How to add bookmarks to PDF: 3 simple hacks
These days, sharing information digitally is second nature for everyone. PDF documents are often used to record and share information for both personal and professional reasons. The bad news: sometimes, we need to deal with very long PDF documents. Oftentimes, it feels extremely overwhelming. This means that PDF documents need to have bookmarks so that it is easy to move around and find the necessary information.
This article details how to add bookmarks to PDF documents using various methods.
Why you might need bookmarks in your document or file
As mentioned before, a PDF document can contain a large number of pages. However, a reader may find it difficult to consume so much content at times. This is especially true when it comes to academic documentation. In such cases, the document’s author should always add bookmarks to the PDF to mark the beginning of a new section as the best practice. This benefits the document’s reader.
Furthermore, when reading a PDF document, it’s likely that the reader will want to create bookmarks in PDF too, to mark some important points in the document. This will let them return and revise these points.
So how to add bookmarks in PDF files on a Mac? We’ll show you our favorite methods so that you can choose what you like the most.
How to bookmark a page on Mac
If you’re working on a long PDF document, like a contract, a manual, or even a tax return, you might want to use the bookmark feature in Preview, a macOS native tool to work with images and PDF files.
Here’s how to add bookmarks to a PDF in Preview:
When you’re on the page you want to bookmark, go to the menu bar and choose Tools > Add Bookmark.
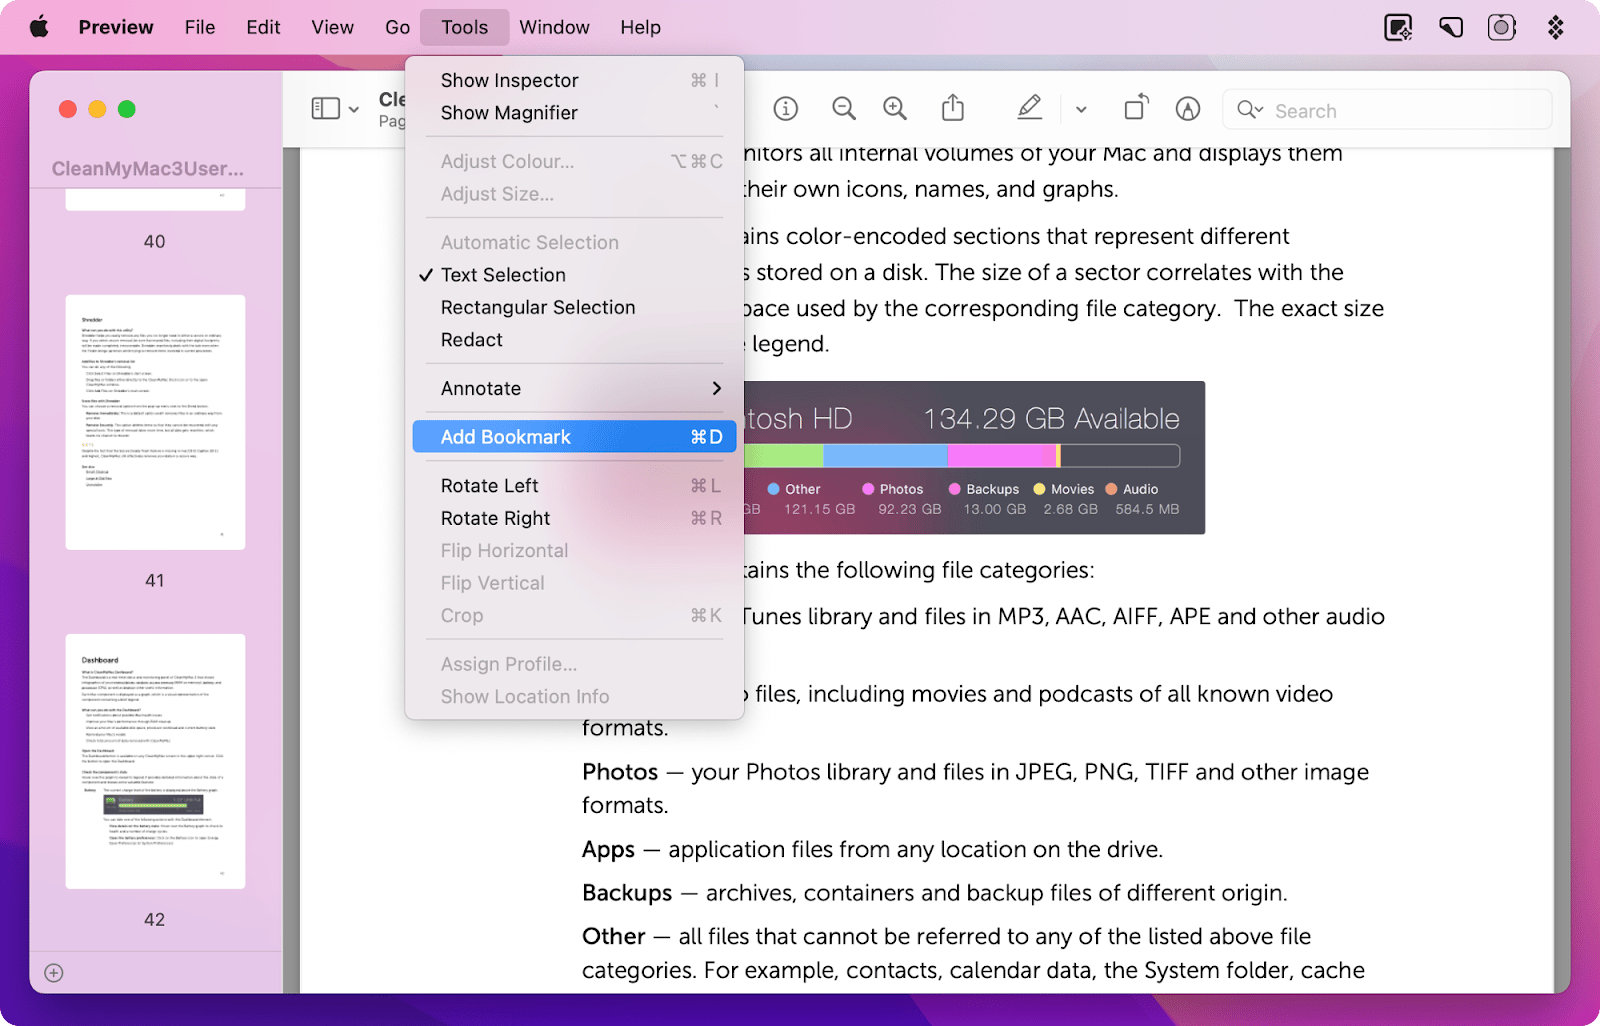
When you add a bookmark, a little red marker will show up on that page. Even if you close Preview and open your document again later, the bookmarks will still be there.
Keep in mind that you can see all of your saved bookmarks and quickly navigate to any of them with a single click. Here’s how:
- In Preview, choose View > Bookmarks from the upper menu to access your bookmarked PDF pages. All of your bookmarks will be displayed in a list on the left
- Then, all you have to do is click, and you will be taken directly to the page you need.
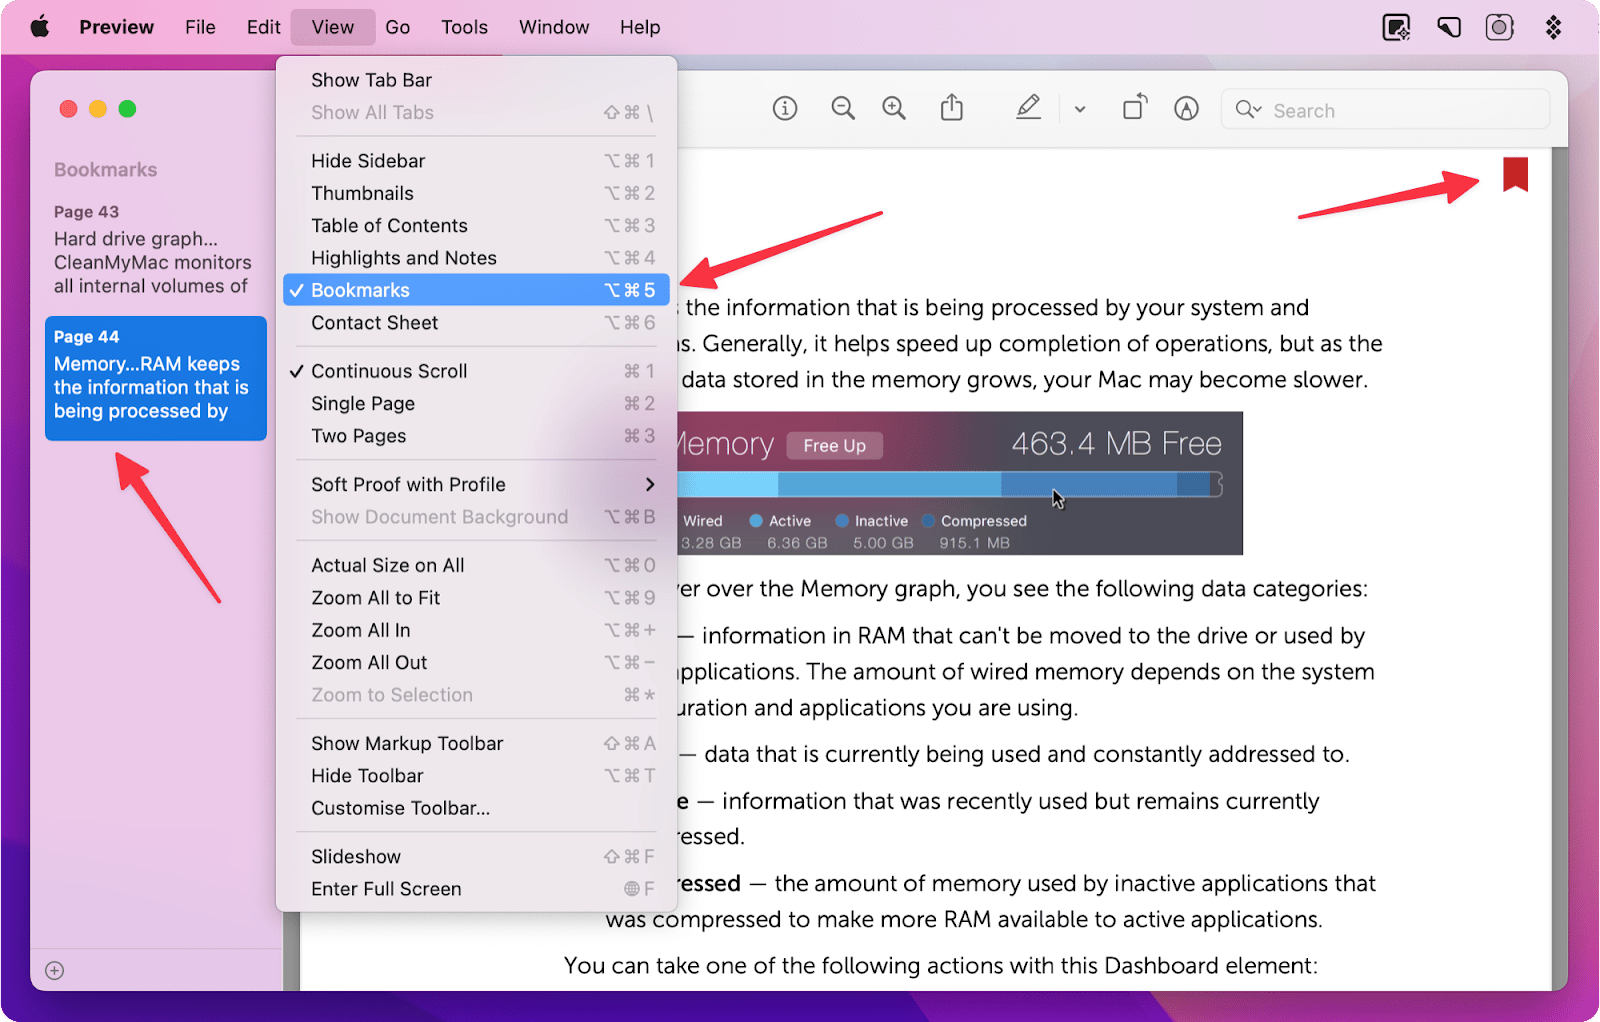
If you want to get rid of a bookmark, right-click on it or hold down the Control key and click it in the sidebar. Choose Delete from the menu.
Overall, we don’t like that in Preview, you can only bookmark the whole page, not individual sentences. So we often use a simple highlight.
How to make bookmarks with a simple highlight
If you want to highlight something in your PDF document, do the following:
- Select the text you want to highlight
- Then go to Tools > Annotate > Highlight Text.
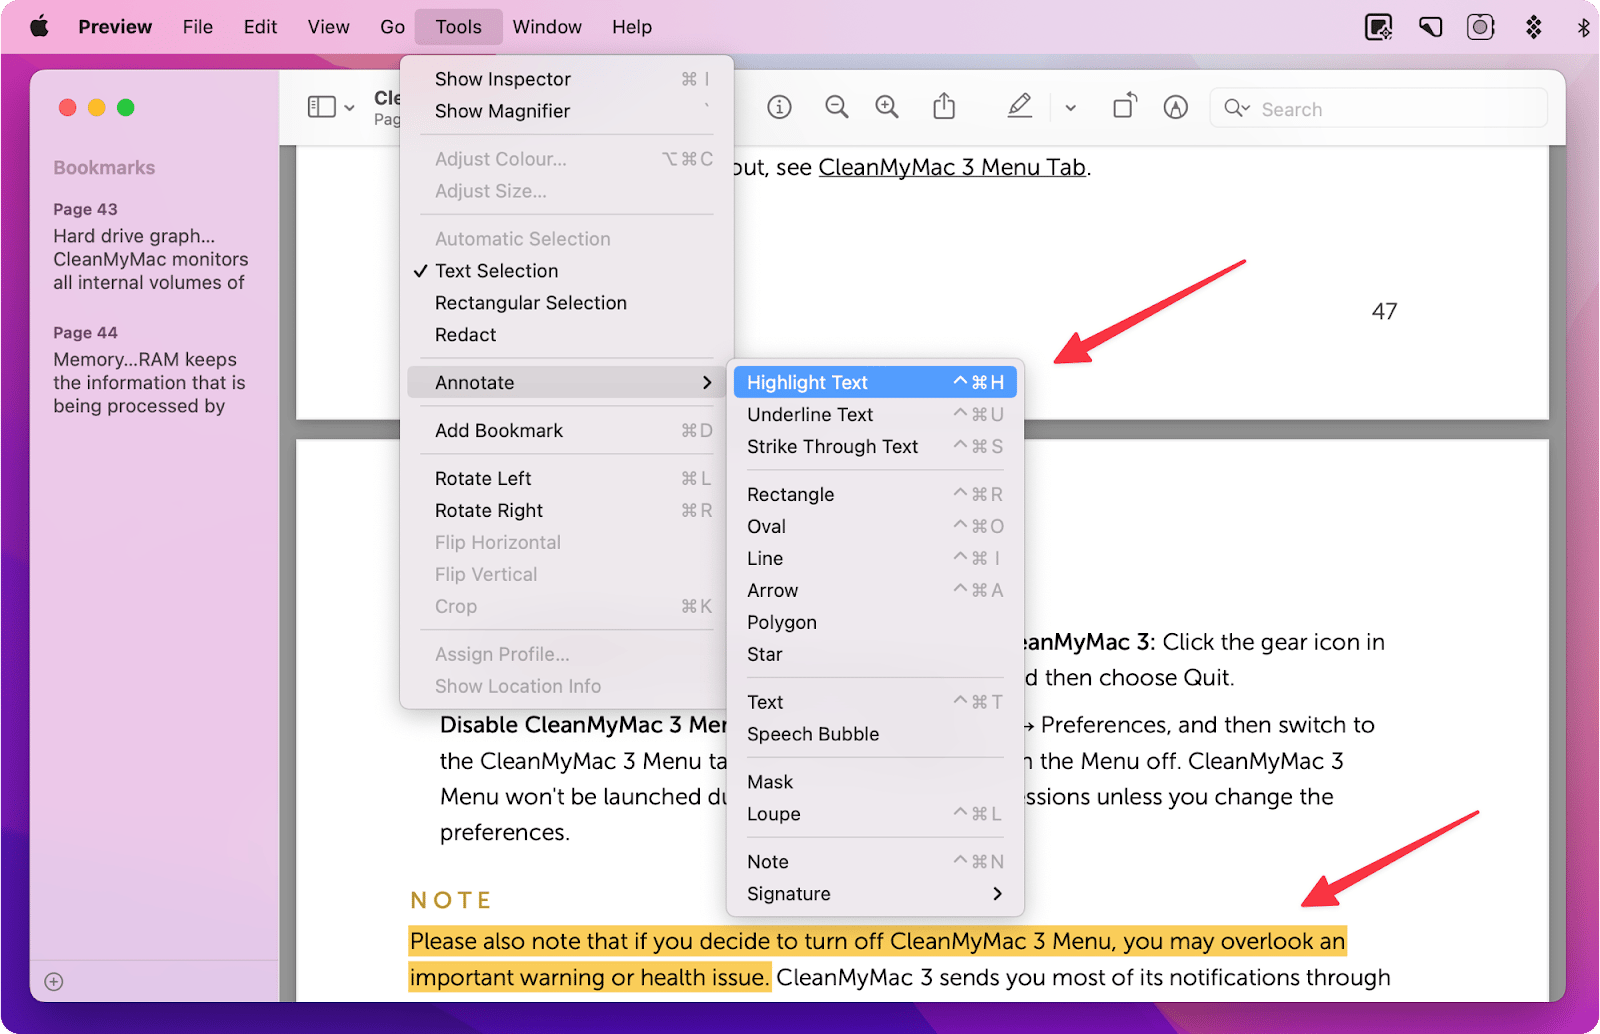
In case you want to remove the highlight, select the text, go to Tools > Annotate > Highlight Text.
However, if you like easy things in this life as we do, you need to try the Nitro PDF Pro app. If you want to highlight text, you can do it as easily as if you were using a regular highlighting marker.
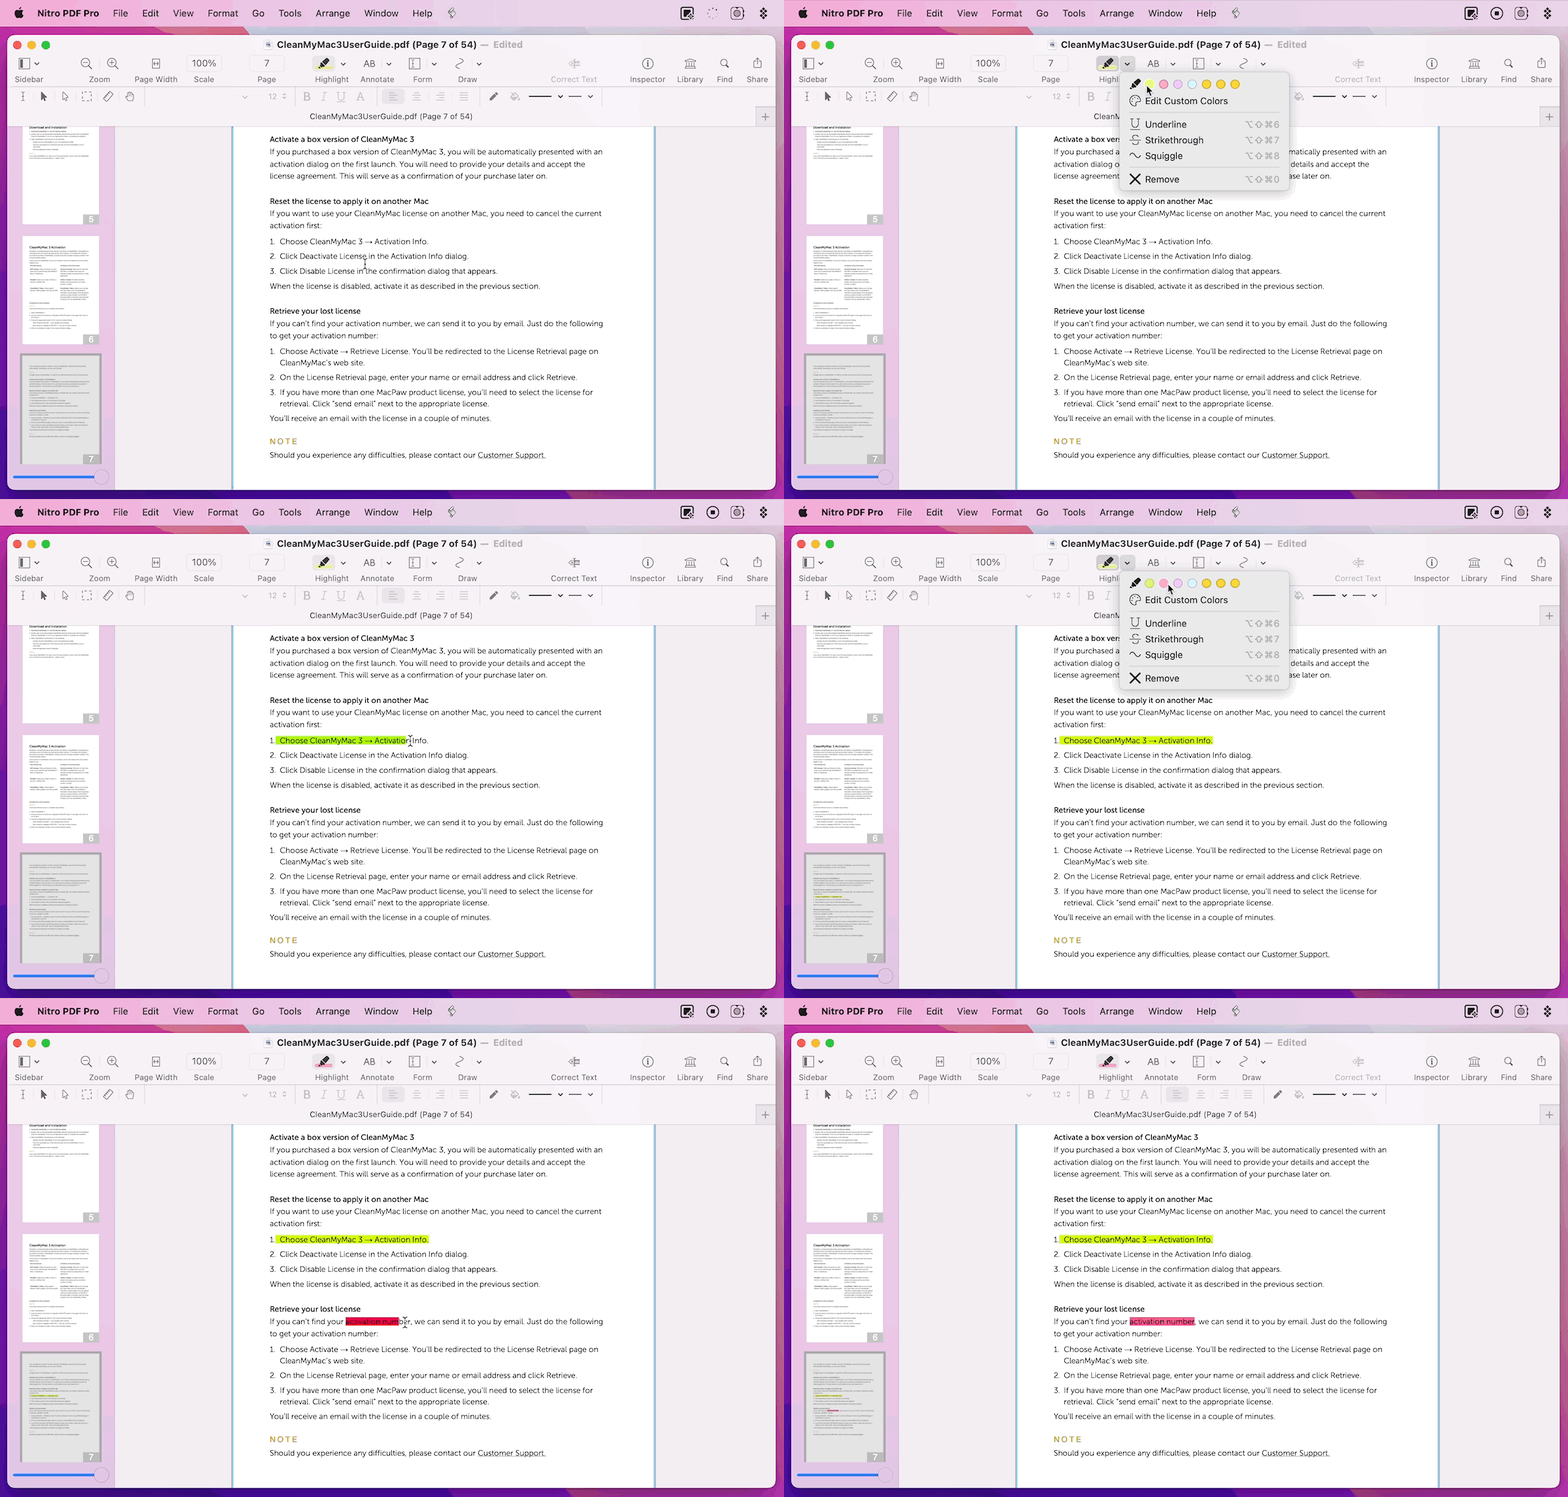
Of course, the highlighter isn’t the main feature that makes us love this app. The Nitro PDF Pro editor can do literally everything you need when working with PDF files. For example, you can just drag and drop files into Nitro if you need to make a PDF. It can read more than 300 different file types and let you turn them into PDFs, quickly and easily. On top of that, you can edit, annotate, merge, sign, and more!
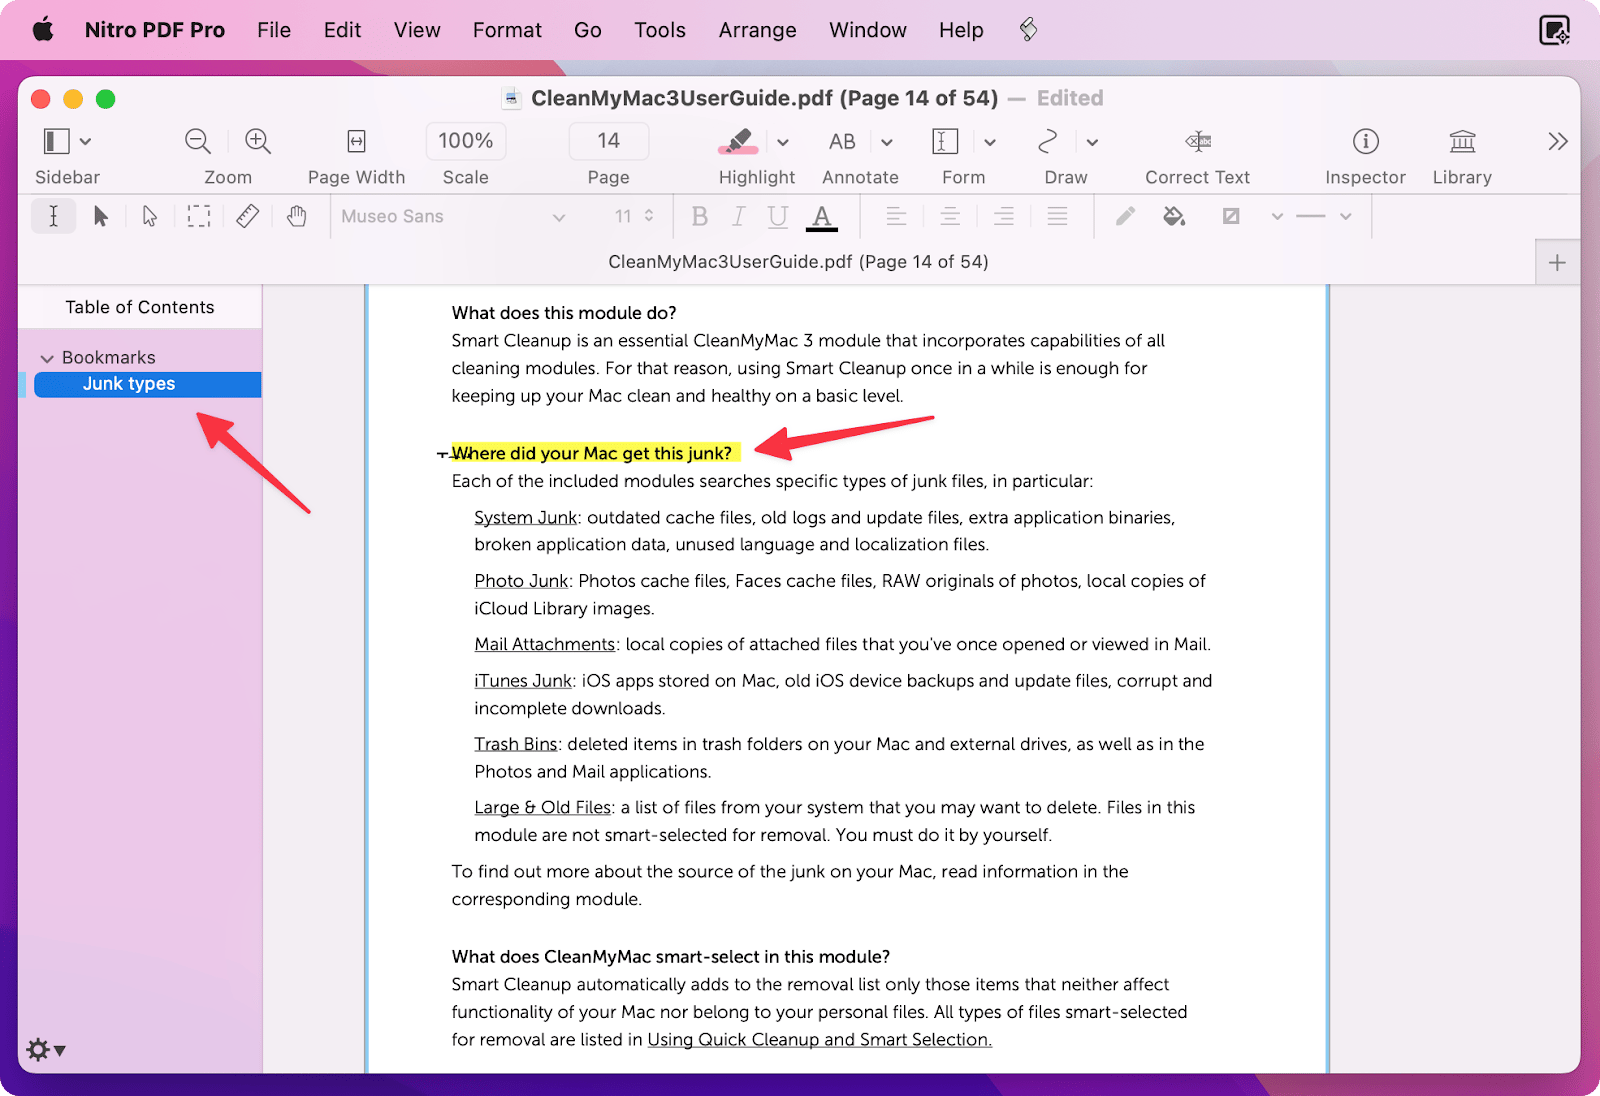
Speaking of bookmarks, with Nitro PDF Pro, you can make a bookmark by picking a piece of text on a page and turning it into a bookmark. To turn a text into a bookmark:
- Open your file in Nitro PDF Pro – you can install it from Setapp
- Highlight the text to use
- Go to Edit > Bookmarks > Add Bookmark
- Your bookmark will appear in the sidebar. Here you can give it another name.
How to add comments to PDF
In addition to highlighting, you can use notes and speech bubbles to comment on text in a PDF. It’s easy to do that in both apps we’ve mentioned – macOS Preview and Nitro PDF Pro.
Here’s how to add a speech bubble In Preview:
- Choose Tools > Annotate > Speech Bubble
- Then simply type your text
- To resize the speech bubble, drag a blue handle.
The flow for adding a note is almost the same as for the speech bubble (Tools > Annotate > Note).
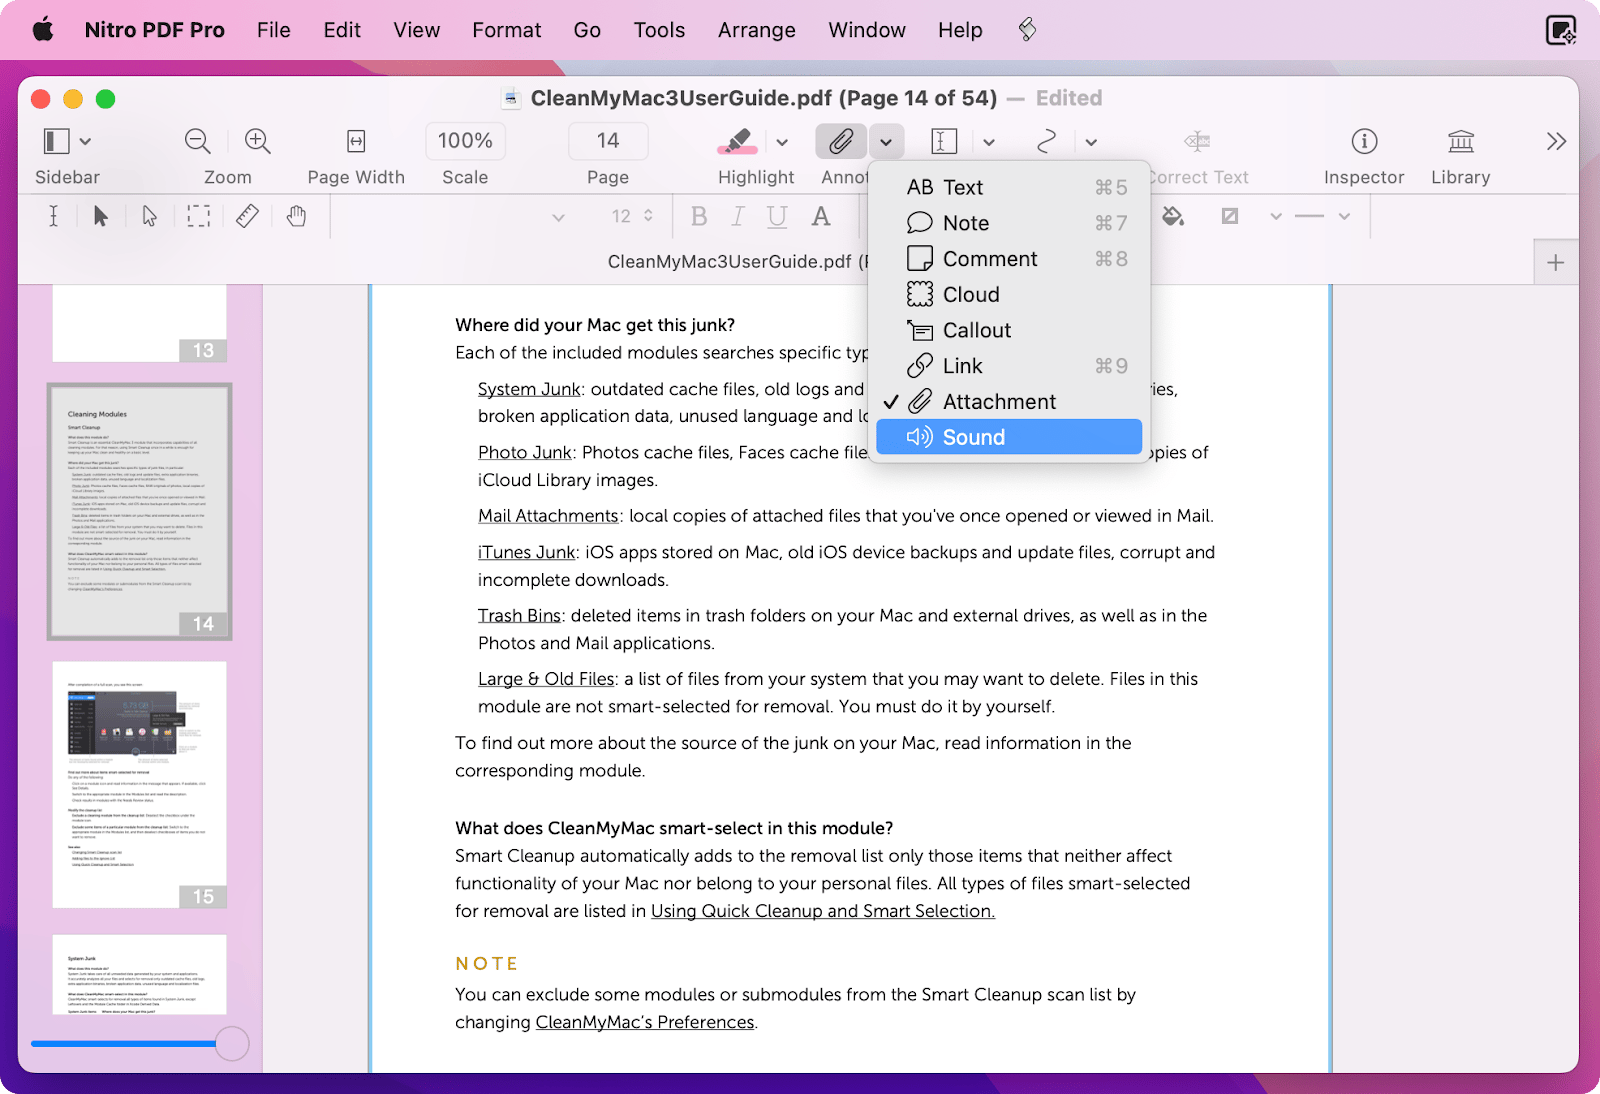
In Nitro PDF Pro, you can even add audio, link, or attachment as an annotation.
Now you know how to bookmark in PDF, highlight text, and make some notes. Probably here we’d finish writing this guide. But no, wait. We have to tell you about one more great app that may be useful to you.
How to use smart apps to add bookmarks
Sometimes, you may need to refer to a specific place in your document from outside of the PDF, such as in your notes, other documents, and emails. With Hookmark, you can do both, link to your PDF document and even to specific locations within PDFs.
So, for example, if you’re a lawyer, and you find an important contradiction in the other side’s testimony, you can add an item to your to-do list to follow up on it. You can click on the link days or weeks later to get back to where you were. You can even send your coworker or client a link to that exact spot in the document.
Here’s how to link to a specific location in a PDF:
- Select the text or image to which you want to create a link
- Bring up Hookmark using a keyboard shortcut (Control + H) or click the Hookmark menu bar icon
- Then click Hookmark’s Copy Link button > Copy Link
- Now you can paste the link wherever you want.
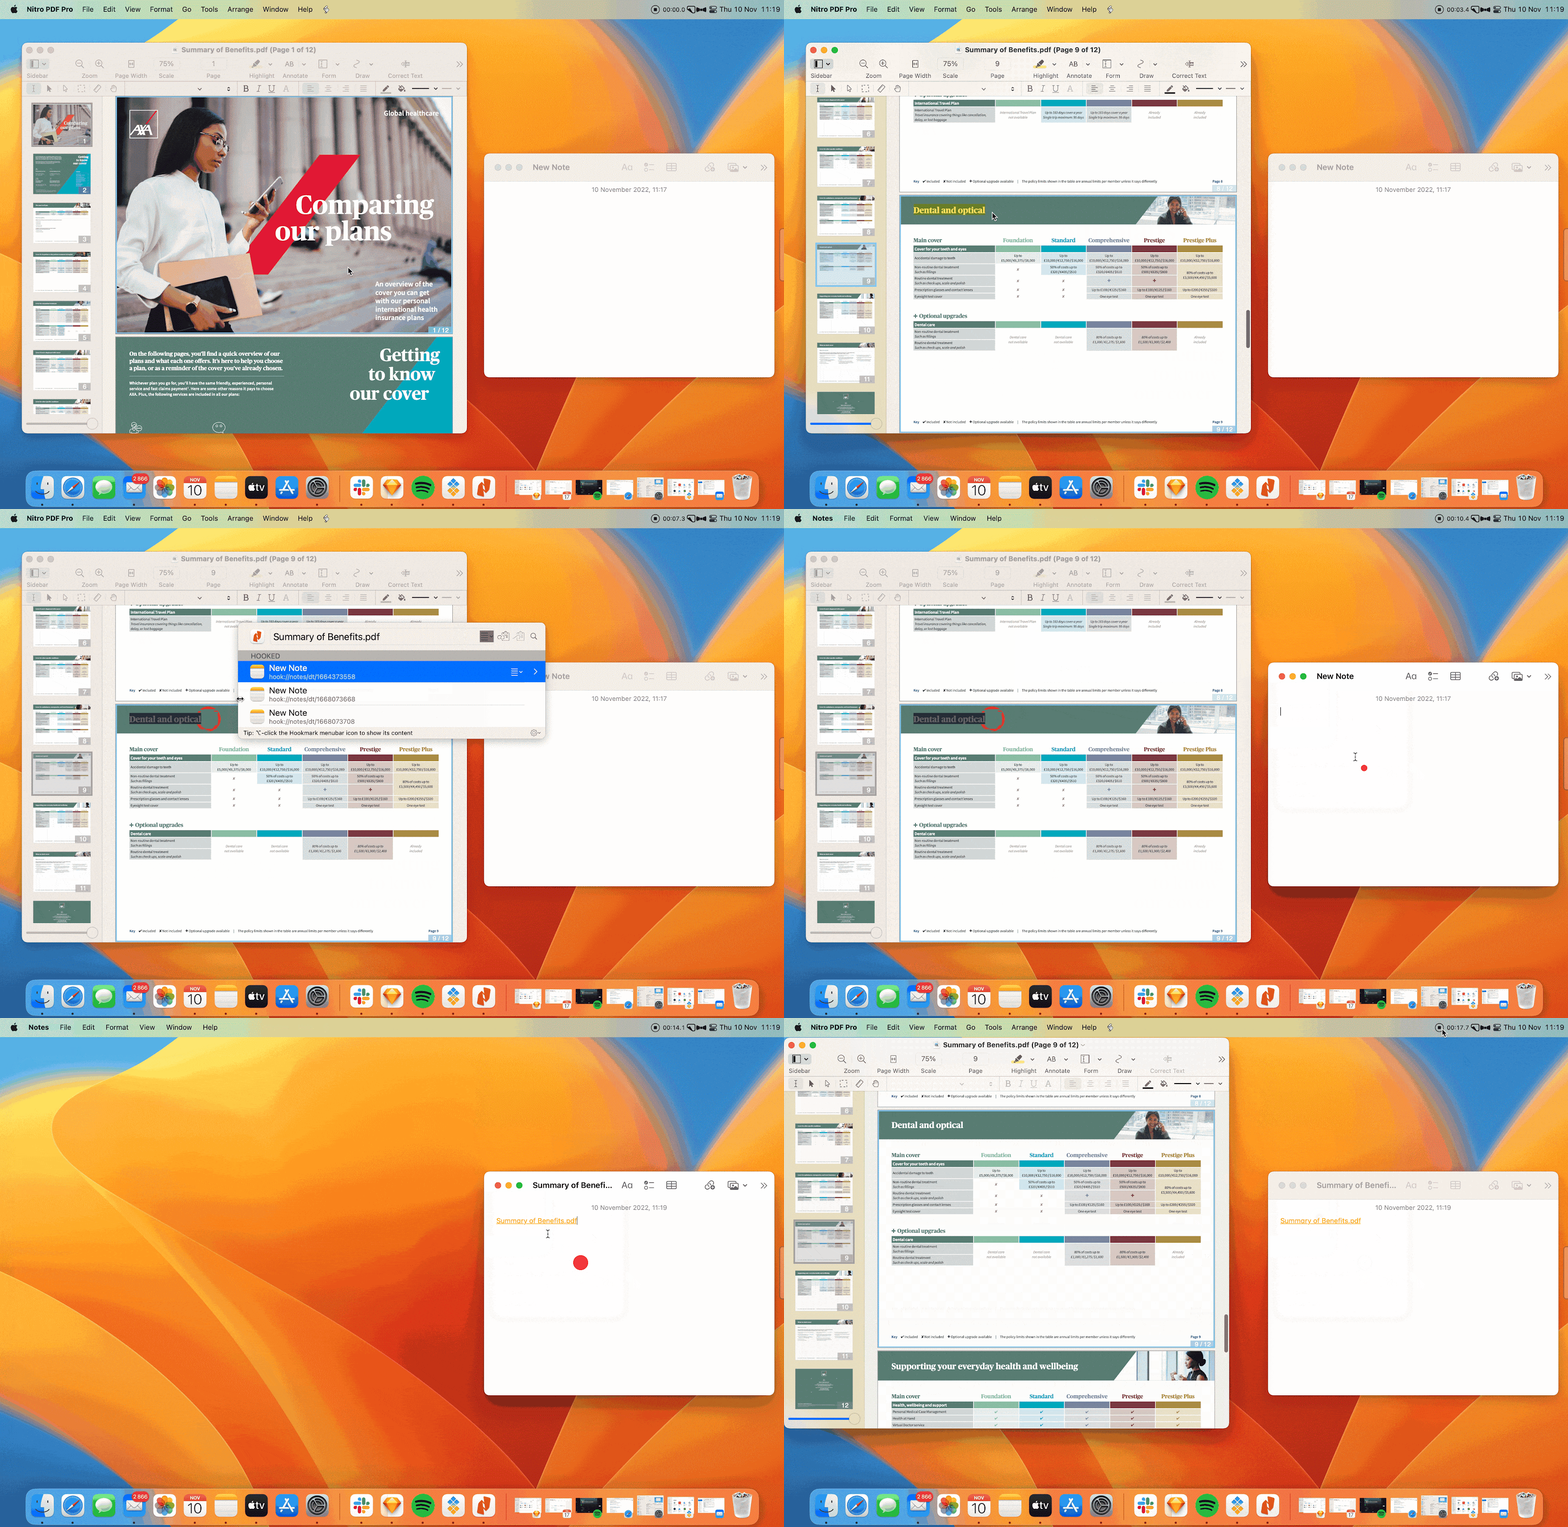
You can even send the link to other people as long as they have access to your original as a shared file.
As you can see, it’s not difficult to add bookmarks to PDFs, especially if you have the right tools such as Nitro PDF and Hookmark. You can try both apps for free on Setapp. This subscription service for Mac and iOS apps is a must-have for anyone who likes to try out new apps and improve their workflow without having to commit to one app for a long time.
With Setapp, you also get great value for your money. A monthly subscription is $9.99, and you can use all of the more than 240 apps in the collection as much as you want!
