My work involves marking text-heavy PDFs, like manuals and contracts. So, I heavily rely on reliable PDF annotation tools that let me make notes, add comments, highlight text, edit documents, and provide graphic feedback — the list is endless. Before I found a couple of my favorite ones, I tried many PDF annotation tools for Mac. I wanted to make things easier for you, so I put together a list of the best solutions you can use every day.
In this blog, I’m going to explain how to annotate a PDF document using Mac’s built-in apps and third-party tools. Let’s begin.
How to annotate a PDF on Mac
To annotate a PDF on Mac, you can use either Preview, which is Mac’s native app, or third-party apps like Adobe Acrobat, Nitro PDF Pro, PDF Search, Skim, or Books on iPad. Moving forward in this blog, you will learn how to annotate a PDF document on a Mac using these apps. Before we dive into the instructions, I want to give you a quick sneak peek at each method:
Searching for the right PDF in secs and basic annotation.
Using Adobe Acrobat Pro
For professional-level annotation.
Using Skim
Basic annotation (free alternative to Preview).
Bonus: Using Books on iPad
Annotating on iOS.
How to annotate a PDF using Preview on Mac
Preview is the built-in PDF annotator on Mac, and it’s pretty handy. You can add notes, comments, and highlight text, plus fill out PDF forms. It lets you open and mark up PDFs and easily save and share them afterward.
Preview is a native app for all Mac users, so I thought I'd dive a bit deeper and cover how to annotate, save, and share PDFs.
How to annotate a PDF in Preview
Follow these steps to annotate and edit a PDF on Mac:
Right-click the PDF on your Mac > Open With > Preview.
Press Shift + Command + A or click View in the menu bar > Show Markup Toolbar.
Use the tools you choose to annotate your PDF: Highlight, Underline, Text, Shapes, Sign, Draw, Arrow, Fill Color, and many more.
How to save the annotated PDF
Depending on what you need, you have two options to save a PDF:
Once you're done annotating, click File > Save to save the changes directly to the original file.
If you want to save a copy with annotations, click File > Duplicate, and then save the duplicate under a different name or location.
How to share the annotated PDF
You can share the annotated PDF directly from Preview via email or other apps.
Click the Share button in the Preview toolbar.
Choose a sharing option from the drop-down: Mail, Messages, AirDrop, Notes, Add to Photos, and more.
If you’re looking to seriously upgrade your PDF editing, try Nitro PDF Pro. It’s a super handy app for all things PDF. With both macOS and iOS versions, Nitro PDF Pro lets you edit, annotate, and sign PDFs on your Mac or iPhone. Not only can you annotate files easily, but you can also edit, create, merge, and even convert PDFs to MS Office formats if you need to do some more advanced editing.
Plus, Nitro PDF Pro lets you manage user permissions, encrypt PDFs, and add passwords for security purposes. You can also sign and validate signatures digitally to save turnaround time without risking security.
Here is how to use Nitro PDF Pro to annotate a PDF:
Install and open the Nitro PDF Pro app on your Mac.
Click Open File > Choose PDF file and click Open.
In the toolbar, you’ll see Annotate. Click the arrow pointing down, located right above the Annotate section.
Select the desired option.
How to annotate a PDF using PDF Search
PDF Search is a handy app that lets you look for anything in your PDF files. It comes with a bunch of cool tools for marking things up, like highlighting and underlining, so you can easily keep track of what you find. Plus, it lets you search through hundreds of pages really fast
Here are the steps to use PDF Search for annotating:
Install and open the PDF Search app on your Mac.
Click Add folder > Choose a folder where you store your PDF. It’ll automatically locate all PDf files that you can find in the left pane.
Open the PDF file or use keywords to search for and locate the document.
Click the pen icon to use annotation tools.
How to annotate a PDF using Adobe Acrobat for professional-level annotation
If you’re looking for more in-depth and professional-grade functionality, try Adobe Acrobat. Its features are tailored for professionals in various industries, such as engineering, design, and law. The platform can handle large, complex PDFs that require extensive annotations.
Compared to Preview, which is ideal for casual annotations, Adobe Acrobat offers advanced tools and collaboration capabilities required for professional-level tasks. These typically include audio/video comments, sticky notes with tags, share reviews, customizable shapes, integration to Adobe Document Cloud, stamp library, find and replace in comments, annotation report generation, cross-platform compatibility, and many more.
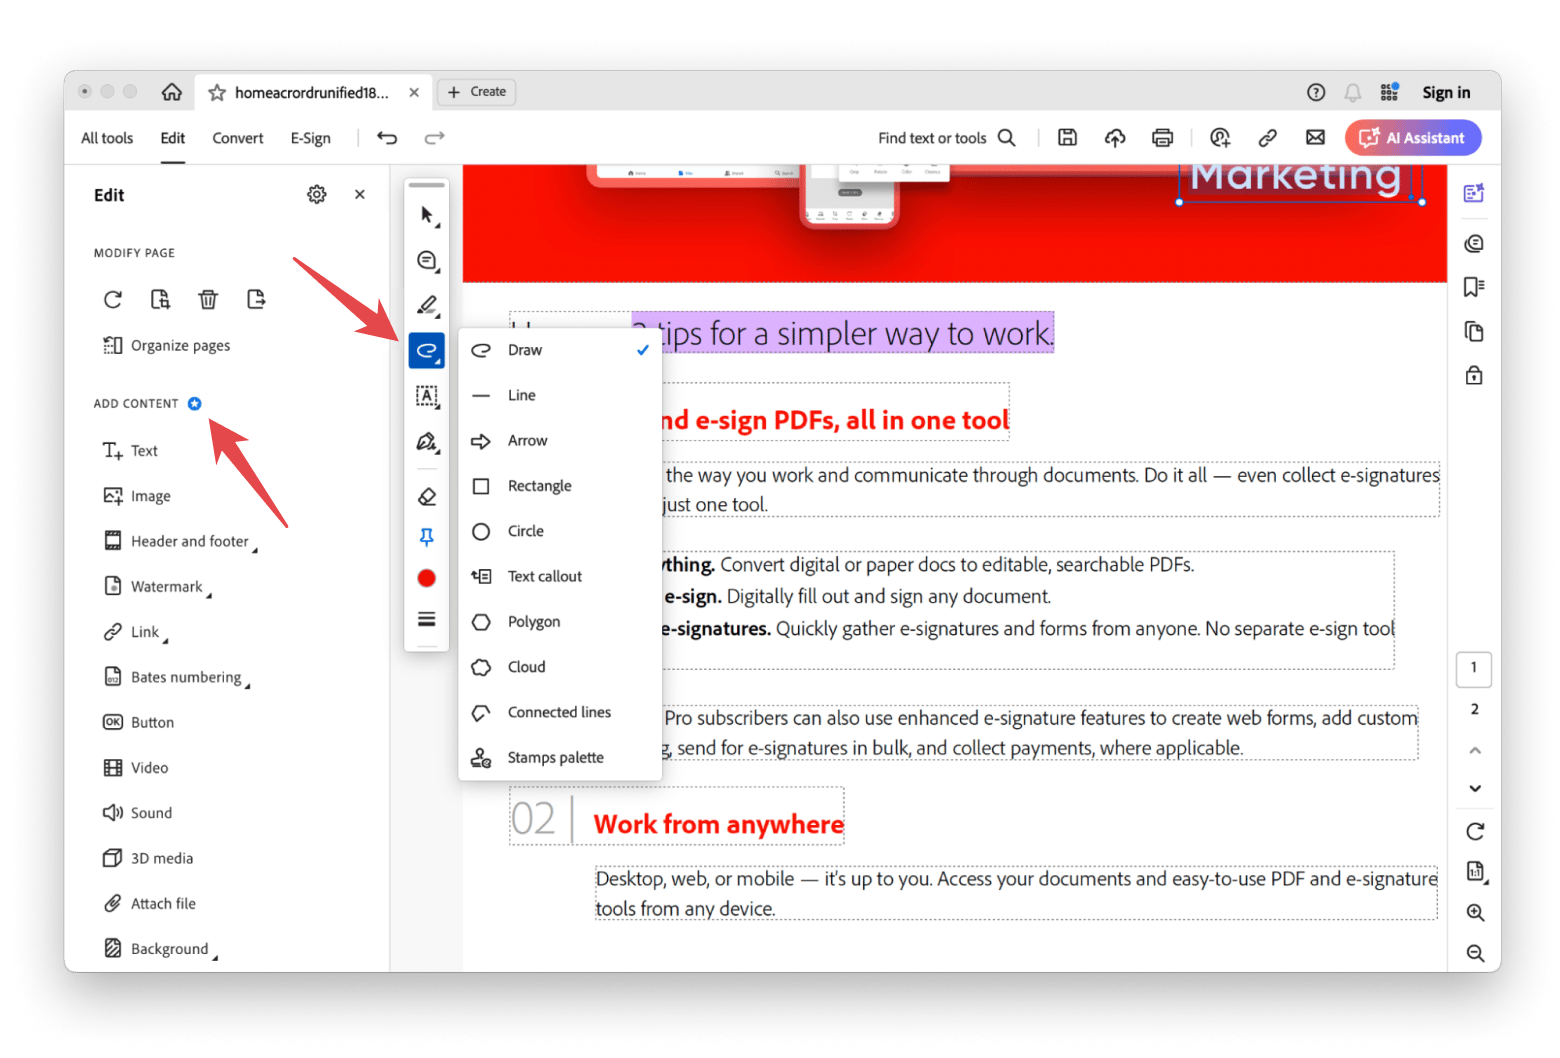
Follow these steps to add annotations using Adobe Acrobat:
Install and open Adobe Acrobat Reader on your Mac.
Choose the PDF you want to annotate > Click Edit to annotate PDF.
Click on the desired option to add annotations to your file.
Save the document when ready.
As you can see, Adobe Acrobat works similarly to other PDF viewers and annotators. However, Adobe is very RAM-heavy and can slow down your system’s performance. Besides, you have to buy the Pro version for live editing.
How to annotate a PDF using Skim
Skim is another popular tool to annotate a PDF on Mac. This is also one of the free PDF editors for Mac. Designed originally for viewing and notating scientific papers, it enhances the capabilities of Preview. You can add and edit notes, highlight important text, read on the full screen, and add snapshots for easy reference.
The tool also provides a magnification tool, smart cropping tool, bookmarks, handy preview of internal links, and many more features (the list is too exhaustive to cover here).
Now, let me tell you how to annotate a PDF document using Skim:
Install and open Skim.
Go to File in the menu bar > Open.
Select the PDF you want to annotate.
Go to View > Show Toolbar.
Click the Annotations icon in the toolbar to see the annotation tools.
Click on any tool to use it.
To customize annotations, select the annotation and right-click on Edit Properties. You can change the color, line thickness, opacity, and font of the annotation.
Bonus: How to annotate a PDF on iPad using Books
Books is a default app for PDFs on iPad. All PDFs on the iPad are opened in the Books app. So, learning how to annotate a PDF document on an iPad is essential. Here’s how you can do it:
Open the Books app on your iPad.
Open the PDF file > Tap the page.
Next, tap the Markup button located at the top of the screen of your iPad > Use the drawing and annotation tools.
If you want to annotate on your iPhone or can’t open the PDF file in Books, just check it out in the Files app instead. You can save it to the Books app from there and then start annotating it.
Streamlining your PDF annotation workflow
Now, I’d like to share some great productivity tips that will surely help you streamline your PDF annotation workflow:
Group annotations into layers to segregate corrections, notes, and feedback.
Use different colors for different annotations types, like red for errors, green for approval, blue for revisions, etc.
Determine your annotation needs. You don’t need to invest in expensive tools for basic work; Tools like Preview, Skim, and PDF Pro should be helpful. Even advanced functionality is available at affordable cost with PDF annotation tools like Nitro PDF Pro.
To streamline working with PDFs even more, use PDF Pals, an app that lets you interact with your documents. Put simply, you type in some questions, and the app’s OCR engine the text, and AI analyzes it locally to give you answers quickly. In PDF Pals, you can chat with multiple PDFs simultaneously, all while PDFS stays locally on your Mac.
Mastering PDF annotation on Mac for better productivity
So, you’ve multiple options to annotate a PDF! Experiment with these tools and find the one that best covers your needs. Tools like Preview, Skim, and PDF Search offer basic annotation functionality, while you can consider using Adobe Acrobat, Nitro PDF Pro, and Hookmark, if you’re looking for advanced PDF annotation tools. Use Books to view, edit, and annotate PDFs on an iPad.
Also, don’t forget the tips and recommendations I’ve added to this blog; these are truly a lifesaver. For example, PDF Pals lets you chat with your PDFs, making search easier and quicker. PDF Squeezer is a must-have tool because it compresses large PDF files without compromising the quality of its content.
What's even better is that you can test many of these apps (and dozens more) with a seven-day trial on Setapp, a popular platform for high-performance, best-in-class iOS and macOS apps.
FAQ
Can I write on a PDF on my Mac?
Yes, you can write on a PDF on your Mac using Mac’s native app Preview, which offers basic editing. Other than this basic tool, you can use PDF annotation tools like Nitro PDF Pro, which is great for advanced annotations.
Click the Annotate drop-down menu > Choose Note to start writing notes.
How do I mark up a PDF on Apple?
To mark up a PDF on Apple devices, you can use Preview on Mac and Books on iPad. For Macs, you can also use other powerful tools like Adobe Acrobat, Nitro PDF Pro, and PDF Search.