Mac running slow? Check your menu bar — not Activity Monitor
iStat Menus shows CPU, GPU, memory, network, and disk usage in real time without opening any app — just click its icon to see a full breakdown instantly. Available on Setapp.
Clear cache, optimize storage, and manage startup items to speed up your Mac.
Regular maintenance like clearing system caches, removing unnecessary files, and controlling which apps launch at startup can significantly improve your Mac's performance without requiring hardware upgrades.
Monitor Activity Monitor to identify resource-heavy processes.
Use Activity Monitor to see which apps and processes consume the most CPU, memory, and energy. This helps you pinpoint what's slowing down your Mac and decide which apps to quit or uninstall.
Update macOS and apps to ensure optimal performance.
Running outdated software can cause slowdowns and compatibility issues.
Manage browser extensions and tabs to reduce memory usage.
Too many browser tabs and extensions can consume significant RAM and slow down your entire system. Regularly close unused tabs and remove unnecessary browser extensions to free up resources.
Get the best Mac optimization tools in one place.
Whether you need to clean up storage, monitor performance, or manage startup items, the right tools make Mac maintenance effortless. Get CleanMyMac, iStat Menus, and 250+ Mac apps with a 7-day free Setapp trial.
Over time, all Macs inevitably slow down due to various factors, such as cluttered startup menus, background apps, overloaded disk drives, and aging hardware, impacting productivity. However, you don't need to invest in a new device immediately. There are several strategies to make your Mac run faster without significant expense. Let's explore them.
Tip: Fix today’s slowdown with one toolkit, not a pile of separate downloads. Start now with a 7-day Setapp trial and use CleanMyMac, App Tamer, iStat Menus, and Gemini.
What’s slowing down your Mac?
Try this!
High CPU usage
Close resource-hungry apps via Activity Monitor. Automate this with iStat Menus or App Tamer.
Too many startup items
Manage them in System Settings > General > Login Items.
Numerous open and unused apps
Use Quit All to quit all apps, including background.
iCloud syncing
Disable it in System Settings > Apple ID > iCloud > iCloud Drive.
Outdated macOS or software issues
Update macOS in System Settings > General > Software Update.
Run Apple Diagnostics. For comprehensive testing, use Novabench.
Why is your Mac running slow?
Before you learn how to speed up a Mac, let's quickly take a look at the most common factors that may be the reason for you asking, "Why is my Mac so slow ?". These are:
Insufficient RAM is limiting your Mac's processing power
A full hard drive hampers performance
Cluttered desktop with excessive files
Accumulation of log files and caches from various apps
Too many installed browser extensions
Numerous open browser tabs
The presence of malware slowing down the system
Many startup items that load upon boot
Potential hardware malfunctions
Corrupted hard drive or SSD
Overheating problems affecting efficiency
An outdated Mac struggling with modern software demands.
How to speed up a slow Mac
Now, I'll show you how to address the above and other common issues to improve your Mac's speed easily.
1. Find and close resource-hungry applications
Some apps take up more processing power than others. We expect more and more from our apps, but when Mac computers get older, they have to work much harder. So, you end up with a Mac taking on more tasks with less memory and processing power.
To avoid working on a Mac that feels as though it's running uphill with a heavy backpack, you need to find and close or remove resource-hungry apps, especially if they're running in the background and aren't needed. One way to do so is with Activity Monitor.
Open Activity Monitor (Finder > Applications > Utilities).
Switch to CPU tab.
Sort the processes by CPU usage by clicking on %CPU.
Pay attention to apps that use a lot of processing power and consider closing or uninstalling the ones you don't need. To close an app in Activity Monitor, choose the app and then click the stop button.
A quicker and better way to solve this problem is with iStat Menus, a handy monitoring app that quickly identifies what is absorbing so much CPU power. In addition to regular CPU percentage, iStat Menus will also show you GPU, memory, network data, and disk usage.
To automate your Mac's CPU problem completely, use App Tamer, a smart CPU manager that can slow down power-hungry apps based on the restrictions you specify. For example, you can slow down your browser if it uses more than 10% of your CPU.
With App Tamer always in your menu bar, you can get the overall CPU load at a glance and then click to see the breakdown for all the apps as well as your CPU chart over time.
2. Free up RAM
Your Mac's RAM (Random Access Memory) stores temporary information for quick access. The more you store in your RAM, the greater the risk that your Mac will become slower. A good solution would be to kill background processes, as this can reclaim some speed.
Closing certain apps can immediately liberate memory and minimize lags. Use the Activity Monitor to close any background processes that are still running (see the instructions above).
You can also perform Terminal operation if your system urgently needs a fresh memory. The native macOS tool, Terminal, has a special command to release your available RAM. Here's how to use it:
Open Termonal (Finder > Applications > Utilities).
Copy and paste the following command into the Terminal window: sudo purge
Enter your user password to confirm.
Note that there are dedicated apps that include a feature specifically for clearing your Mac's RAM, automatically removing unnecessary clutter. My choice is CleanMyMac, which can easily enhance Mac's performance.
Install and open CleanMyMac.
In the left sidebar, click Maintenance.
Choose Free Up RAM to clear memory space.
This action swiftly cleans your Mac's memory, potentially speeding up your apps. Additionally, CleanMyMac offers features to manage Hung Applications and Heavy Memory Consumers within the Optimization section, allowing you to further optimize performance by addressing the most significant memory users. Give it a try and enjoy the improvement in your Mac's functionality.
Get your Mac responsive again with one cleanup pass you control. Clean RAM, junk, and login items in minutes; Cancel before Day 7 = $0 charged. Start CleanMyMac.
3. Manage your startup login items
The startup process can take up more processing power than we imagine since they stay running in the background, quietly slowing down programs you are actually using.
If you follow the tips from the previous section and download CleanMyMac, you can use it to manage startup login items with ease. Try to keep the list to a minimum, removing the ones you don't need and considering that every app requires additional resources.
Install and open CleanMyMac.
In the left sidebar, click Optimization > View All X Items.
Choose Login Items, then choose login items you want to get rid of and click Remove to clear memory space.
You can also do this directly on your Mac. Here's how:
Go to the Apple menu > System Settings.
Then, click General > Login Items.
Choose the items you no longer want to become active at login. Use the minus button to get rid of the login item(s).
4. Close unnecessary apps and delete some of them
Another answer to the "How to increase Mac speed?" question may be quitting and/or deleting unnecessary apps. Any open and running app takes up resources, and if you've got a lot of them running – well, there are simply fewer resources for you to do what you want!
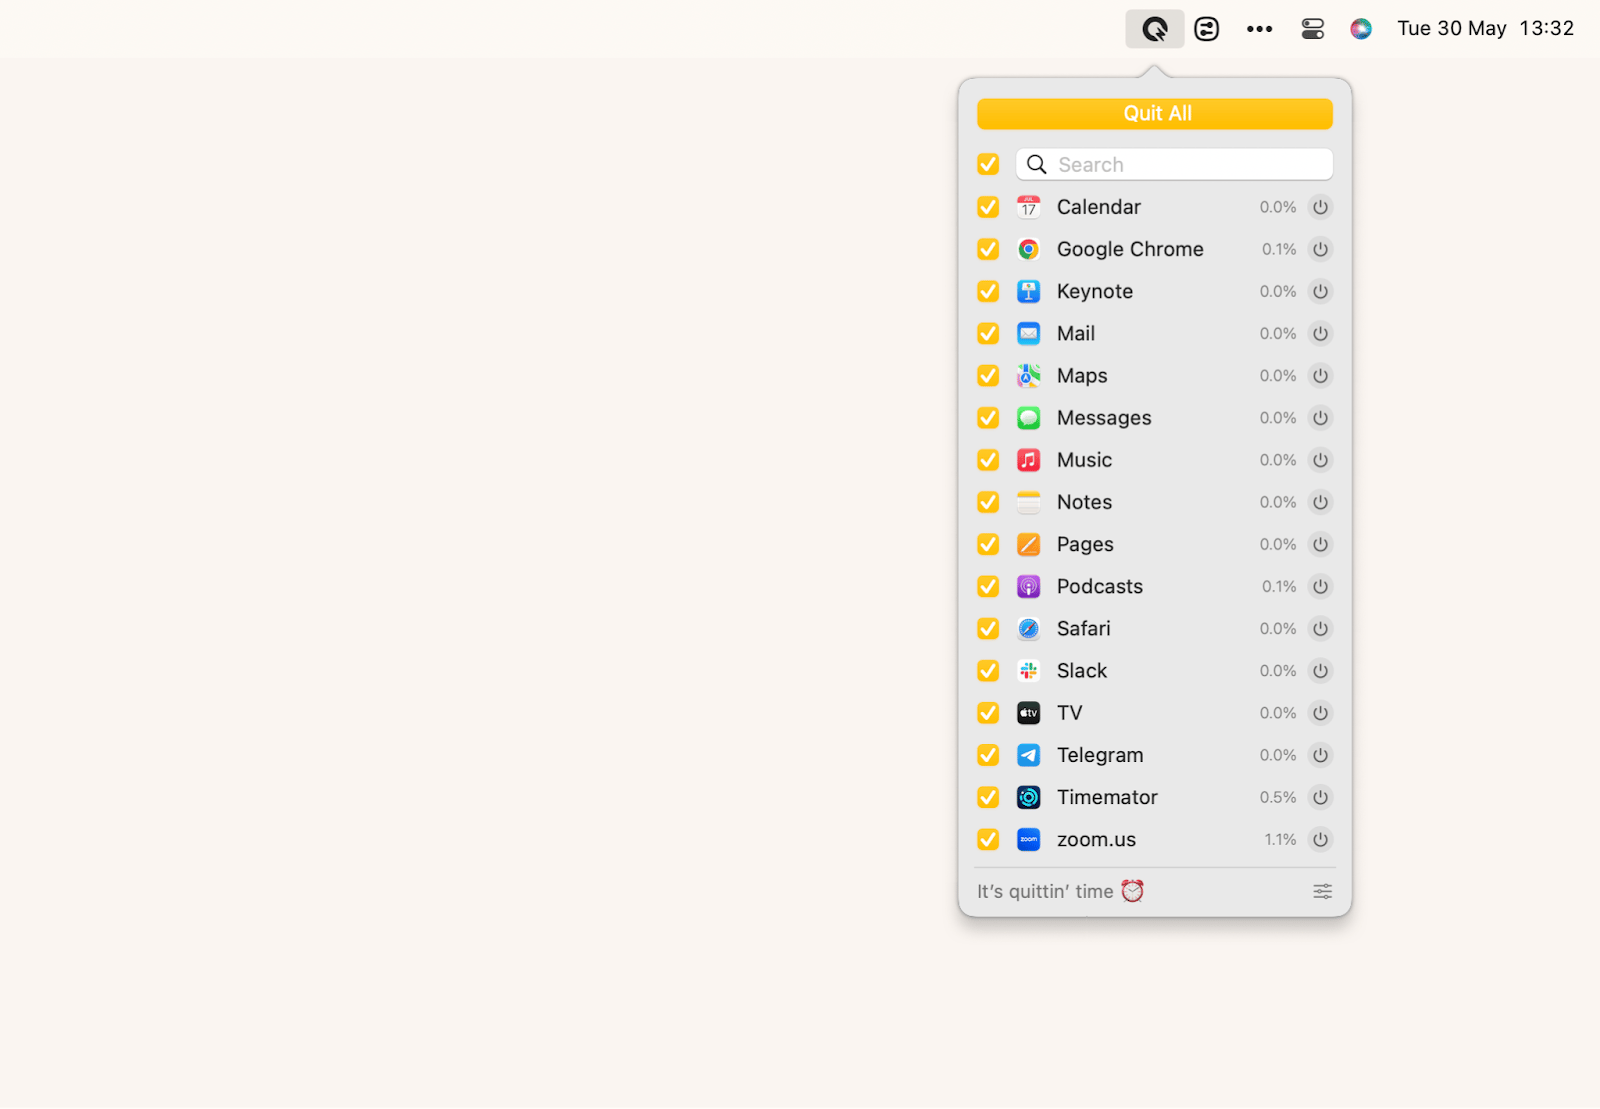
The easiest way to get rid of those behind-the-scenes processes is to click one button in Quit All, the most effortless app-quitting tool for your menu bar. I love that Quit All ensures you save all the changes in your apps and browsers before you close them.
To close background apps with Quit All:
Install Quit All an click its icon in the menu bar.
Go to Preferences and enable View background processes.
Click Quit All.
Quit All is not your thing? Then, you can force quit each app separately. From the menu bar, click the Apple logo on the top left and choose Force Quit. Select an app you want to close down and then Force Quit on the bottom right of the window. Unfortunately, it won't let you close background processes, but it can help reduce the pressure.
To get rid of unnecessary apps for good, I recommend you use CleanMyMac.
Install and open CleanMyMac.
In the left sidebar, click Uninstaller > View All X Applications.
Choose apps you want to get rid of, and click Uninstall.
5. Turn off iCloud syncing
iCloud seamlessly syncs your app data, preferences, desktop layout, multimedia, documents, and messages, which can be extensive for your Mac to handle and may result in slowing it down.
Since iCloud operates silently in the background, its activity might go unnoticed. To deactivate it:
Go to the Apple menu > System Settings.
Click Apple ID > iCloud > iCloud Drive.
Turn off the Synch this Mac option.
6. Reindex Spotlight
If your Mac slows down after an update, reindexing Spotlight might help. Spotlight, a search feature on your Mac, updates its index with every system update. Sometimes, this can cause your Mac to slow down for hours.
The quickest way to reindex Spotlight is by using CleanMyMac.
Install and open CleanMyMac.
In the left sidebar, click Maintenance > View All X Tasks.
Choose Reindex Spotlight and click Run.
Alternatively, you can reindex Spotlight via System Settings.
Here's what you need to do:
Go to the Apple menu > System Settings.
Click Siri & Spotlight in the sidebar.
Scroll down and click Spotlight Privacy.
Add your hard drive (usually named "Macintosh HD") or separate folders to the list.
Remove items from the locations list.
Your Mac will now reindex Spotlight.
7. Check for malware and viruses
Your Mac does a good job of blocking most malware and viruses that are known, but new threats pop up daily. A MacBook running slow may have a few viruses that are causing issues.
One of the best tools for scanning your Mac for malware or viruses is CleanMyMac. It has a ton of tools in its arsenal, but its malware scanning tool is really special.
Here's how to use CleanMyMac:
Install and open CleanMyMac on your Mac.
Click Malware Removal from the side menu.
Click Scan at the bottom of the window.
8. Update your Mac's software
Updating your macOS can fix many problems. Every update from Apple enhances your computer's performance and user experience.
To find a new macOS update:
On the top left, choose Apple menu > System Settings.
Click General on the left sideю
Сlick Software Update on the right side.
9. Declutter a messy desktop
The desktop can seem such a convenient place to store files you are working on. Great for things you need to remember and access quickly. With numerous other apps in the Dock, it soon becomes a go-to place for everything you need.
Unfortunately, when you've got too much going on, it can slow your Mac down. Even a few weeks of allowing documents, files, downloads, and app shortcuts to pile up can leave anyone wondering where they last saw something they needed. It can seriously get in the way of productivity when you have to search all over your desktop or deeper in your Mac, only to find a single file.
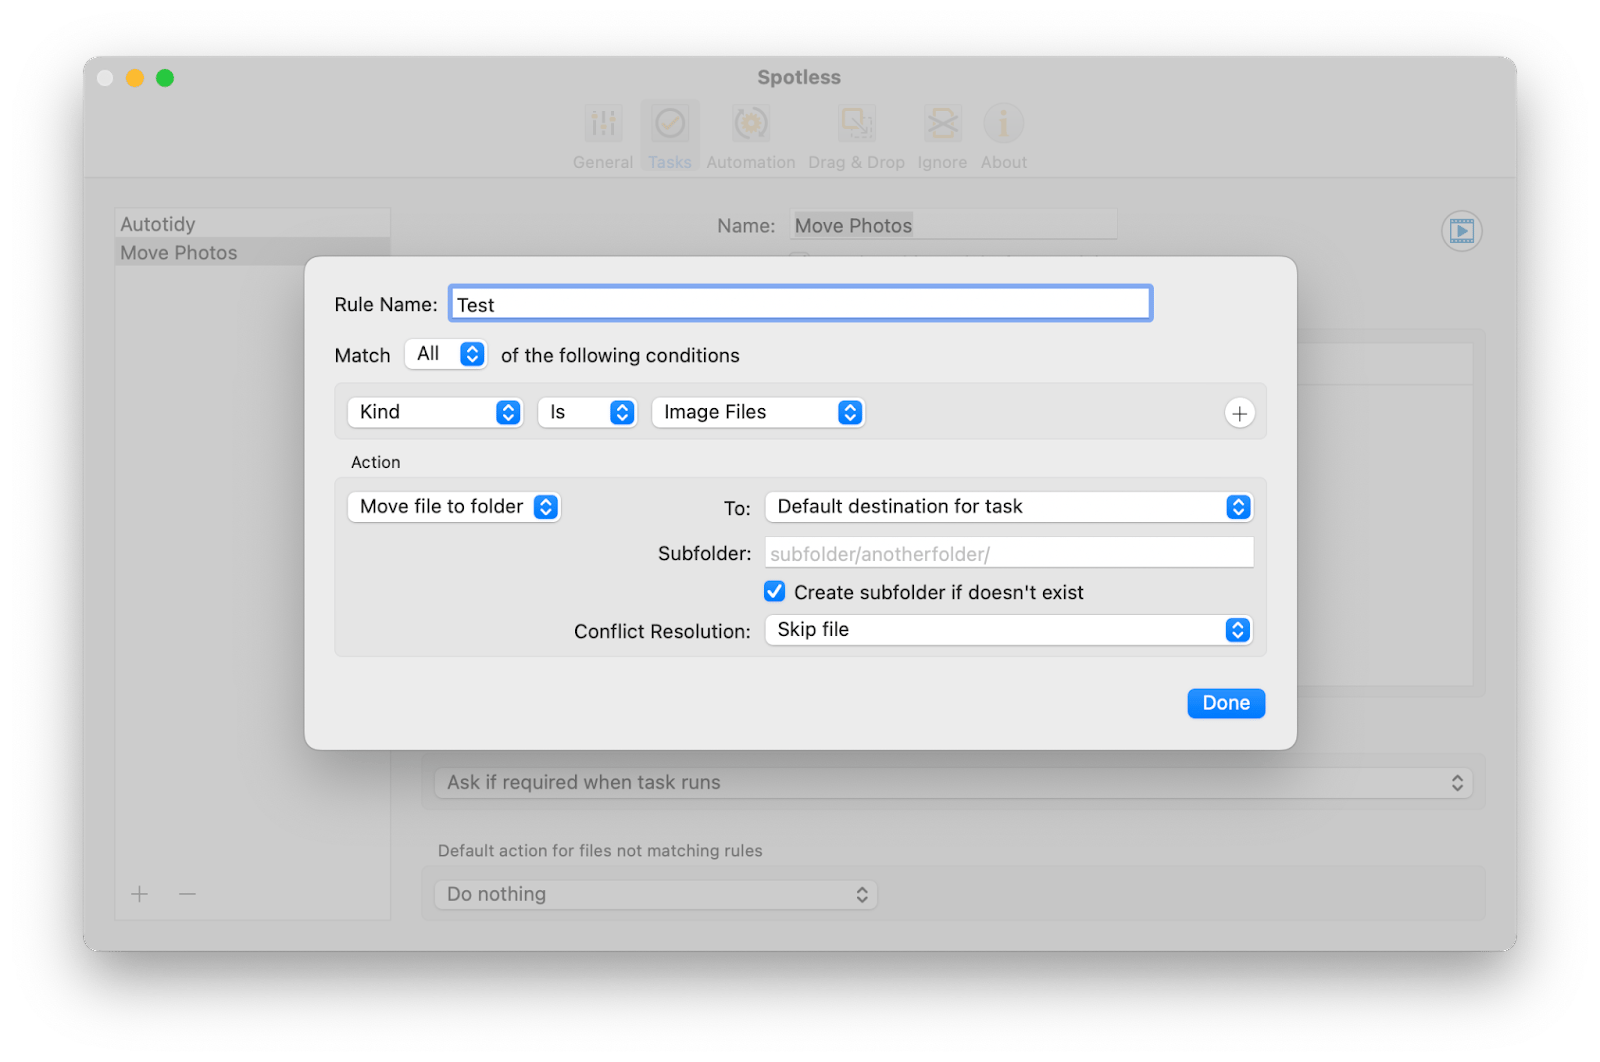
Use Spotless to clean everything up in seconds. All you have to do is show the app where to put different files (e.g. "PDFs in Documents") for it to learn the rules. The app will remember the patterns and continue to learn on its own, quickly sorting all your files.
10. Clear cache files
If you're wondering how to make a Mac run faster, you may want to use this method as well.
Your computer speeds up the app and program launches by creating cache files. Yet, accumulating these files without regular cleanup can slow down your computer.
Cache files come in three varieties: browser caches, system caches, and user caches. Since clearing system caches might disrupt certain app functions, it's best to focus on clearing your user cache. Here's the procedure:
Open Finder and click Go in the top menu bar.
Then, click Go to Folder.
Type in ~/Library/Caches.
Open each folder and remove its contents, but DO NOT delete the folders.
Note that CleanMyMac allows you to clear cache files quickly, easily, and safely.
Have you ever started organizing a garage, only to find it holds far more items than you anticipated? This situation mirrors how computers accumulate data over time. So, shall we start cleaning?
There are two ways to delete large, old, unused files. Here's how to do it from the macOS system menu:
Go to the Apple menu > System Settings.
In the left sidebar, click General. Click Storage.
From there, you can review how much space each app, document, photo, etc. takes.
However, there's a better way! Use CleanMyMac to remove useless data. Follow the steps below:
Install and open CleanMyMac.
Choose Large & Old Files from the left-hand menu.
Click Scan at the bottom of the window.
Choose the files you want to remove. Click Remove at the bottom of the window.
12. Reset your PRAM and SMC
There are times when a Mac performs poorly for no apparent reason. Systems crash, a battery doesn't charge or takes longer than normal, the Mac goes to sleep, or even shuts down unexpectedly. If you've tried other fixes and these issues persist, you might need to reset your SMC (System Management Controller) and PRAM (parameter Random Access Memory).
Both are small cogs in a larger wheel and can be done by resetting your device for 5 to 10 seconds, but it can make a big difference when it comes to speed.
When a battery is removable, switch the Mac off, remove the battery, press the power button for 5 seconds, then put the battery back in and turn the Mac on.
For newer MacBooks, including Air and Pro, resetting the SMC and PRAM involves shutting the Mac down, then pressing Shift + Control + Option on your keyboard along with the power button for 10 seconds. Then, release all keys and press the power button to switch it on.
Other Macs, particularly the iMac, Mac Mini, Mac Pro, involve a slightly different process to reset the PRAM. So here's what to do to fix iMac running slow:
Shut down your computer.
Press the power button, then the Command + Option + P + R keys.
Once your Mac restarts, release the keys.
Although all of these processes aren't straightforward, they can work wonders when trying to speed up a slow Mac. Find more info on how to reset SMC & Pram in our guide.
13. Restart your Mac more often
We hardly take care of our Macs – closing them for the night, then opening them next day to push them even further and handle ever-increasing workloads. We forget that computers also need a break. Instead of simply closing and letting them sleep, we should shut down or restart more often, thereby reducing the strain on processors, software, apps, and hard drives. Here is how to restart a MacBook.
14. Turn off visual effects
Visual effects look pretty, but they won't help you get your work done if your Mac is running slowly. Under Systems Settings > Desktop & Dock, there are two boxes you can turn off to reduce visual effects:
Animate opening applications
Automatically hide and show the Dock
Also, make sure you change Genie Effect to Scale Effect under Minimize windows using.
15. Optimize storage
An overloaded hard drive significantly slows down a Mac. Reducing this load by cleaning up old files and organizing your Desktop can noticeably enhance your Mac's performance. Yet, the challenge lies in comprehensively cleaning your system and deciding which files to delete safely.
Apple has preempted issues with Macs slowing down by providing tips on optimizing your Mac's storage.
To access these recommendations:
Go to the Apple menu and click System Settings.
Click on General, then go to Storage.
In the Storage section, you'll find advice on managing your storage efficiently.
For a thorough and faster cleanup, particularly if your Mac is lagging, CleanMyMac is a highly recommended tool. It's designed to deep clean your Mac, efficiently identifying and removing expendable files such as caches, logs, and language packs, thus speeding up your device.
To make your Mac faster with CleanMyMac:
Install and open CleanMyMac.
Choose System Junk from the left-hand menu.
Click Scan at the bottom of the window.
After the scan, you can either directly clean these files or review the details to see what will be deleted. And you're all set!
It's not a secret that if you stock up photos on your Mac for a long time, they will be occupying a big chunk of your storage and ultimately slowing down your Mac. The worst thing is that a part of that storage is wasted on duplicates and similar photos you don’t even need! Fix this with Gemini:
Install and open Gemini, a duplicate finder app for a Mac.
Run a quick scan of your photo library.
Review the duplicates and similar photos Gemini has found.
Remove them with one click.
Tip: Stop duplicates from quietly eating storage and slowing everything down. Use Setapp Marketplace for just Gemini; reviewed and security-tested; Risk-free 7-day trial. Try Gemini.
17. Run Apple Diagnostics
To check if hardware issues are slowing down your Mac, Apple Diagnostics is a straightforward tool for testing. Depending on your Mac's processor, the steps to initiate Apple Diagnostics vary.
For Apple Silicon Macs:
Turn on your Mac.
Press and hold the power button during startup.
Release the power button once the startup options window shows.
Press Command + D to start Diagnostics, which will run automatically.
For Macs with an Intel Processor:
Turn on your Mac and immediately press and hold the D key.
Release the key when you see a progress bar or are prompted to choose a language.
After completion, Apple Diagnostics will display any issues found along with reference codes, which can be cross-referenced in an Apple Support article for detailed explanations.
For an even more complete picture of your Mac's performance, use Novabench. This app runs a series of tests on your Mac to measure your computer's CPU, GPU, RAM, and disk speed. Then, it gives you a detailed report on how its features compare to the baseline and to other Macs. There, you will definitely find a possible answer to the question, "Why is my Mac slow?".
In my case, the tests take 2-4 minutes at most, and it's like getting the most objective review of your computer.
Speed up your slow Mac and be more efficient with Setapp
The above advice will help you get your slow Mac to speed up so you can enjoy it again! To elevate your Mac's efficiency even further plus make your life easier no matter what you do on your Mac, try Setapp. This platform offers a curated collection of apps tailored to boost your Mac's performance and simplify your daily tasks.
Keep the speed gains, keep the Mac, and skip the upgrade panic. Get 7 days to run the full routine with CleanMyMac, App Tamer, Quit All, and iStat Menus; Free for 7 days. Begin 7-day trial.