-
Set up Apple Pay in the Wallet app on iPhone and iPad, the Watch app for Apple Watch, System Settings on Mac, or the Settings app on Vision Pro — the process takes under three minutes on any device.
-
Security is built into every transaction. Apple Pay never shares your real card number with merchants. A unique Device Account Number handles each payment, so losing your phone doesn't mean losing your card details.
-
Paying in stores is faster than you think. Double-click the side button, glance at your phone for Face ID, and hold it near the reader. The whole exchange takes under three seconds.
-
You can pay without your phone on your wrist. Apple Watch works independently — double-click the side button below the Digital Crown and hold your watch near the reader, no iPhone required.
-
Once you're spending with Apple Pay, tracking it matters.
Chronicle
keeps your bills and due dates organized, and
MoneyWiz 2026
automatically categorizes your transactions. Both are available with a
Setapp Membership
— free for 7 days.
Setting up Apple Pay takes about two minutes per device and works across all your Apple devices — iPhone, iPad, Apple Watch, Mac, and Vision Pro. Here's how to get it running on everything you own, plus how to use it once it's set up.
Firstly, let’s look at a snapshot of the setup process across all the devices. I'll cover detailed steps for each one below:
| Device |
Setup method |
Time needed |
Key requirement |
| iPhone/iPad |
Wallet app > Add Card |
2-3 minutes |
iOS 18 or later |
| Apple Watch |
Watch app on iPhone |
2 minutes |
Paired iPhone |
| Mac |
System Settings > Wallet & Apple Pay |
3 minutes |
macOS Tahoe or Touch ID |
| Vision Pro |
Settings app > Wallet & Apple Pay |
2 minutes |
visionOS 2.0 or later |
What is Apple Pay and how does it work?
Apple Pay is Apple's contactless payment service that stores your credit and debit cards digitally in the Wallet app. You authenticate purchases with Face ID, Touch ID, or your passcode, and the payment is processed via Near Field Communication (NFC) technology.
The system works by creating a unique Device Account Number for each card you add. When you make a purchase, Apple Pay sends this temporary number instead of your actual card details. This tokenization process means merchants never see your real card number, adding an extra layer of security to every transaction.
Apple Pay works at millions of stores, websites, and apps worldwide. Any terminal displaying the contactless payment symbol or the Apple Pay logo accepts it.
Actually, I use Apple Pay every day, and it’s the most convenient way to purchase anything. Next, I’ll show how to set it up quickly and correctly, no matter the device.
Set up Apple Pay on iPhone and iPad
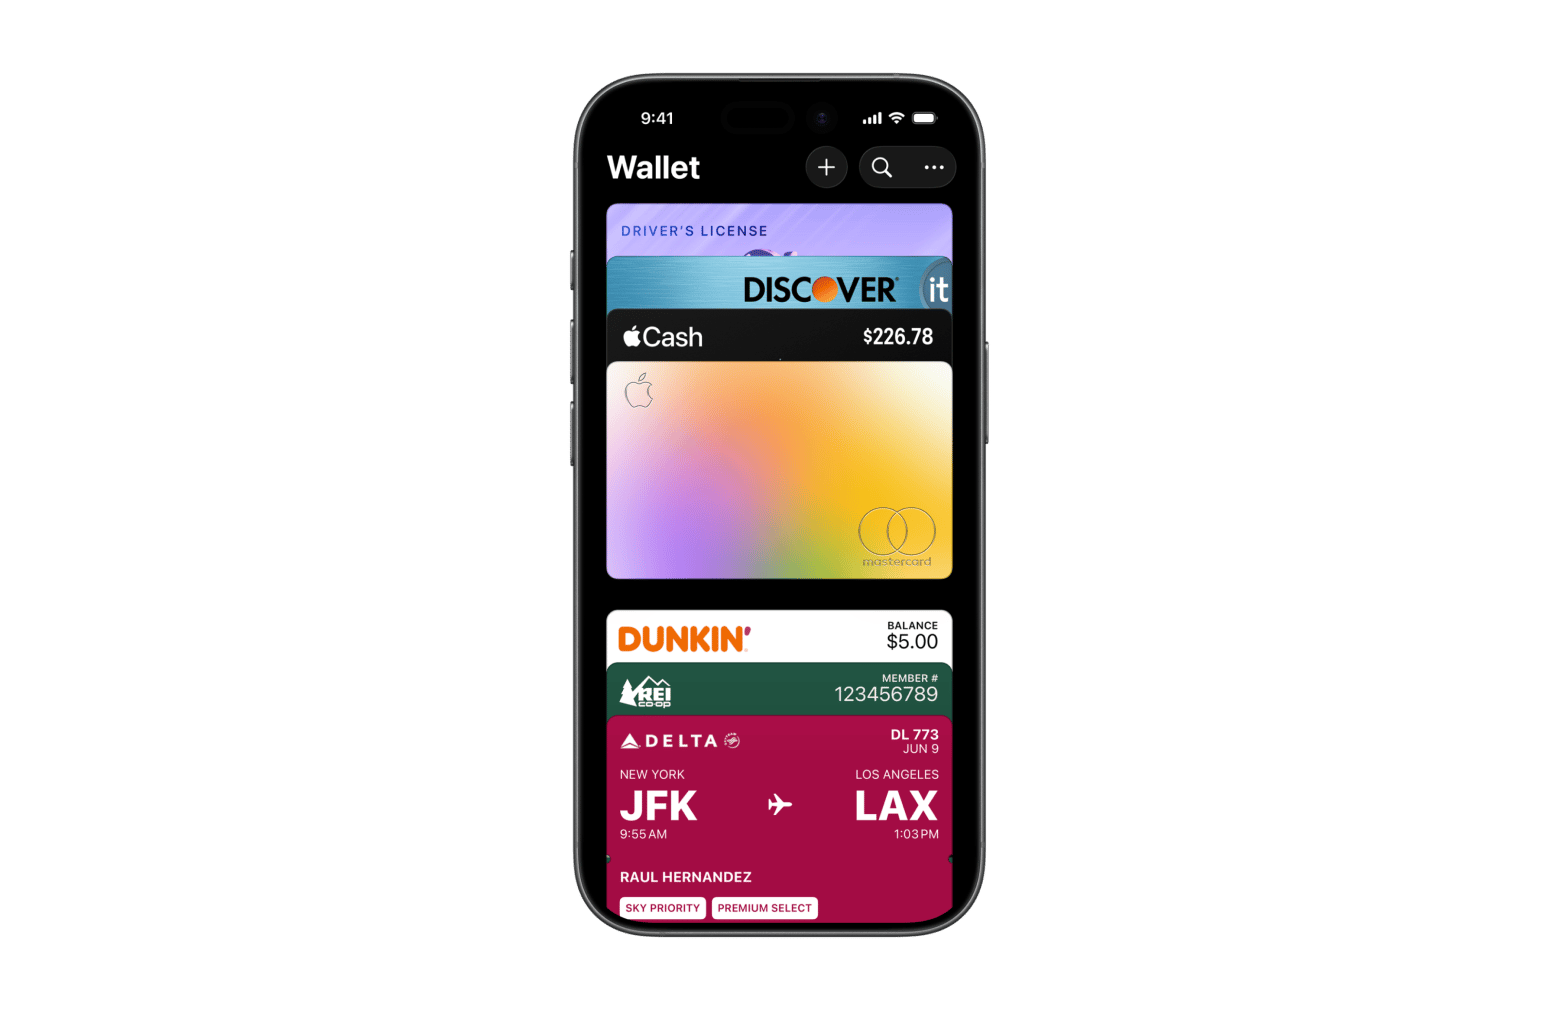
Setting up Apple Pay on your iPhone or iPad takes just a couple of minutes. The process is identical on both devices. Here’s how to do it:
- Open the Wallet app (it’s built-in on iPhone and iPad).
- Tap the plus icon in the top right corner.
- Choose Debit or Credit Card.
- Position your card in the frame to scan it automatically, or tap Enter Card Details Manually.
- Verify your card information and add your name if needed.
- Accept the terms and conditions.
- Complete verification through your bank (usually via SMS or phone call).
Source: https://www.apple.com/wallet/
Your card is now ready to use. To set a default card for payments, go to Settings > Wallet & Apple Pay > Apple Pay Defaults and select your preferred option.
Set up Apple Pay on Apple Watch
To use your Apple Watch as a payment device, you need to pair it with your iPhone. Even when your phone isn't nearby, you can pay with just your watch:
- Open the Apple Watch app on your iPhone.
- Tap My Watch at the bottom.
- Choose Wallet & Apple Pay.
- Tap Add Card next to any card already in your iPhone Wallet, or tap Add Credit or Debit Card for a new one.
- Enter your card's CVV when prompted.
- Wait for your bank to verify the card.
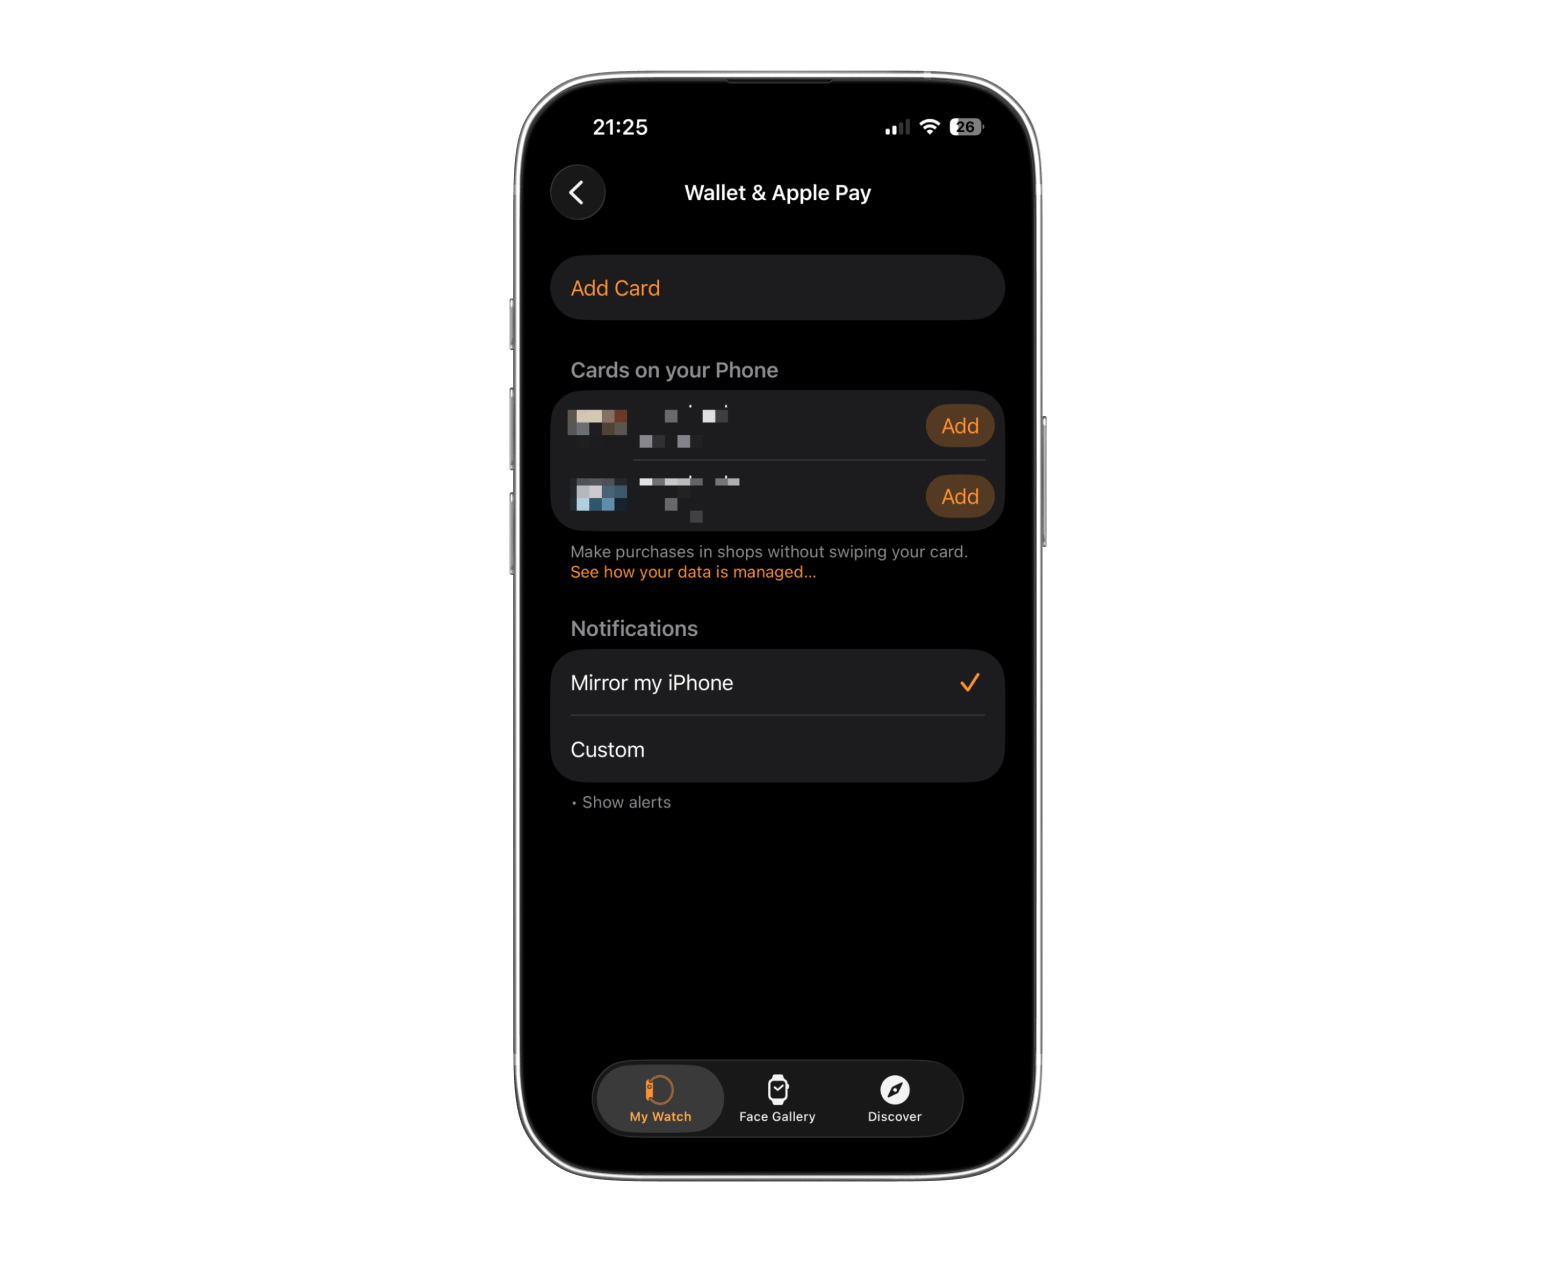
The setup completes automatically, and your default card from iPhone carries over to your watch.
Set up Apple Pay on Mac
Macs with Touch ID or the latest Apple silicon chips support Apple Pay natively. For older Mac, you'll approve payments on your iPhone or Apple Watch.
- Open System Settings.
- Click Wallet & Apple Pay in the sidebar.
- Click Add Card.
- Enter your card details or use the camera to scan.
- Verify your billing address.
- Complete your bank's verification process.
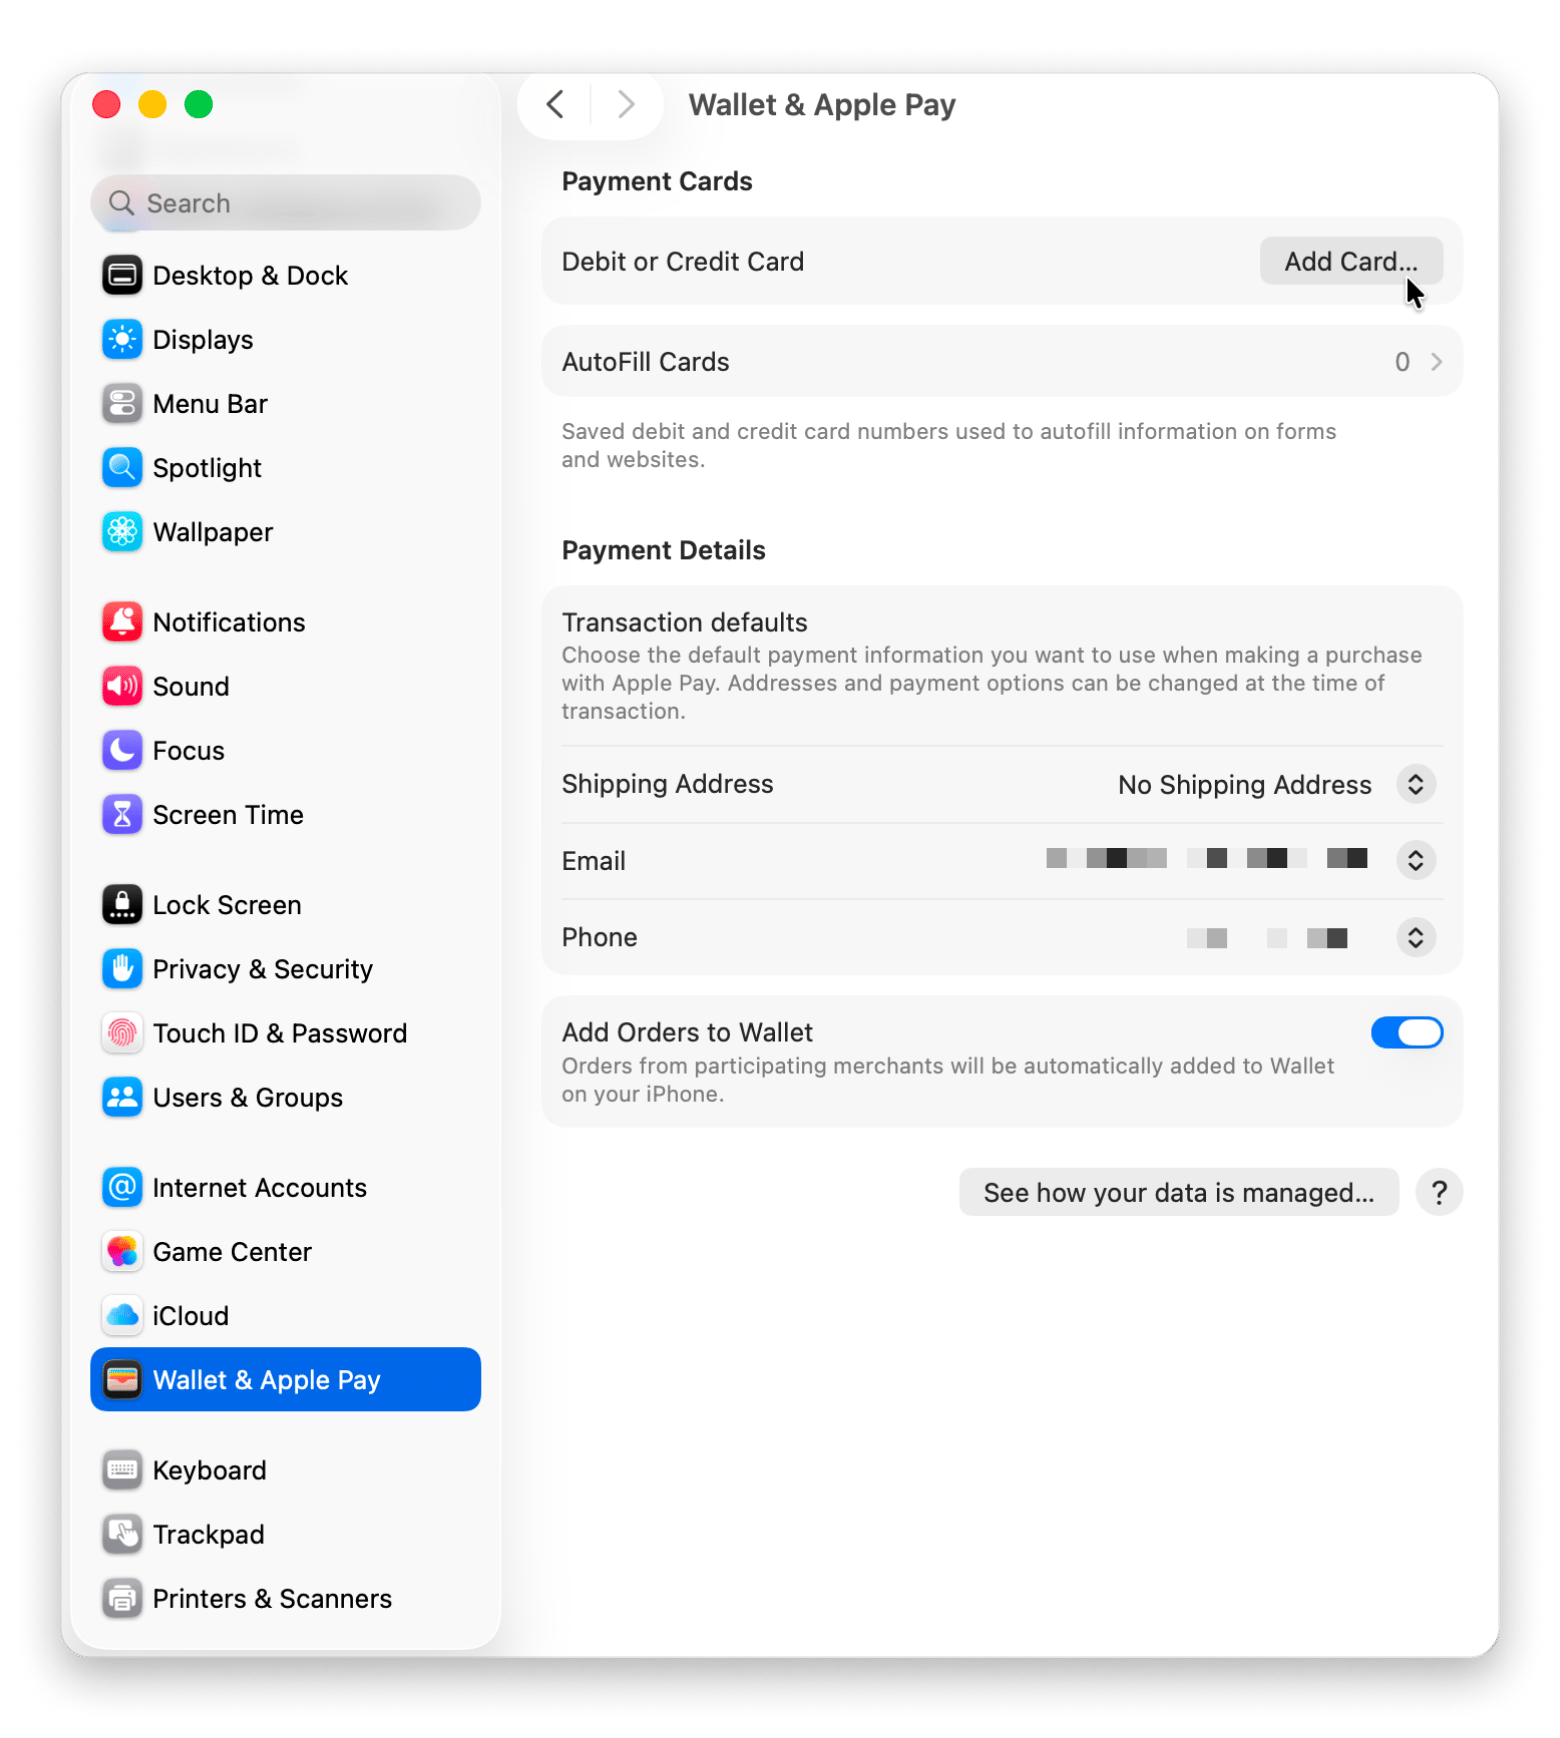
If your Mac doesn't have Touch ID, make sure Allow Payments on Mac is enabled in your iPhone's Settings > Wallet & Apple Pay.
Use Apple Pay on iPhone
Paying with your iPhone varies slightly depending on your authentication method. Here's how each one works.
In stores with Face ID:
- Double-click the side button to activate Apple Pay.
- Glance at your phone to authenticate with Face ID.
- Hold the top of your iPhone near the contactless reader.
- Wait for the checkmark and "Done" to appear on screen.
In stores with Touch ID:
- Hold your iPhone near the reader with your finger on Touch ID.
- Wait for your default card to appear on screen.
- Keep your phone near the reader until you see "Done."
Online and in apps:
- Tap the Apple Pay button at checkout.
- Review your payment information and shipping details.
- Double-click the side button (Face ID) or use Touch ID to confirm.
To switch cards quickly, activate Apple Pay and tap your default card before authenticating. Your other cards appear for selection.
Use Apple Pay on Apple Watch
Apple Watch payments work independently — no iPhone required. The process is even simpler than on iPhone.
To use Apple Pay on Apple Watch:
- Double-click the side button below the Digital Crown.
- Your default card appears automatically.
- Scroll with the Digital Crown to select a different card if needed.
- Hold your watch display near the contactless reader.
- Wait for the gentle tap and beep confirming payment.
The watch face doesn't need to be active. Just double-click and pay.
Use Apple Pay on Mac
Depending on your Mac's capabilities, you can use Apple Pay in different ways — either with Touch ID or using your iPhone.
Using Apple Pay with Touch ID:
- Click the Apple Pay button on supported websites.
- Review your shipping and payment information.
- Place your finger on Touch ID to complete the purchase.
Using Apple Pay without Touch ID:
- Click the Apple Pay button at checkout.
- Review the payment details on your Mac screen.
- Complete the payment on your iPhone by double-clicking the side button.
- Authenticate with Face ID or Touch ID on your phone.
- Your Mac shows "Payment Complete" once the payment is processed.
For third-party browsers or Windows PCs, you can also scan a QR code with your iPhone to complete Apple Pay purchases.
Manage your Apple Pay spending
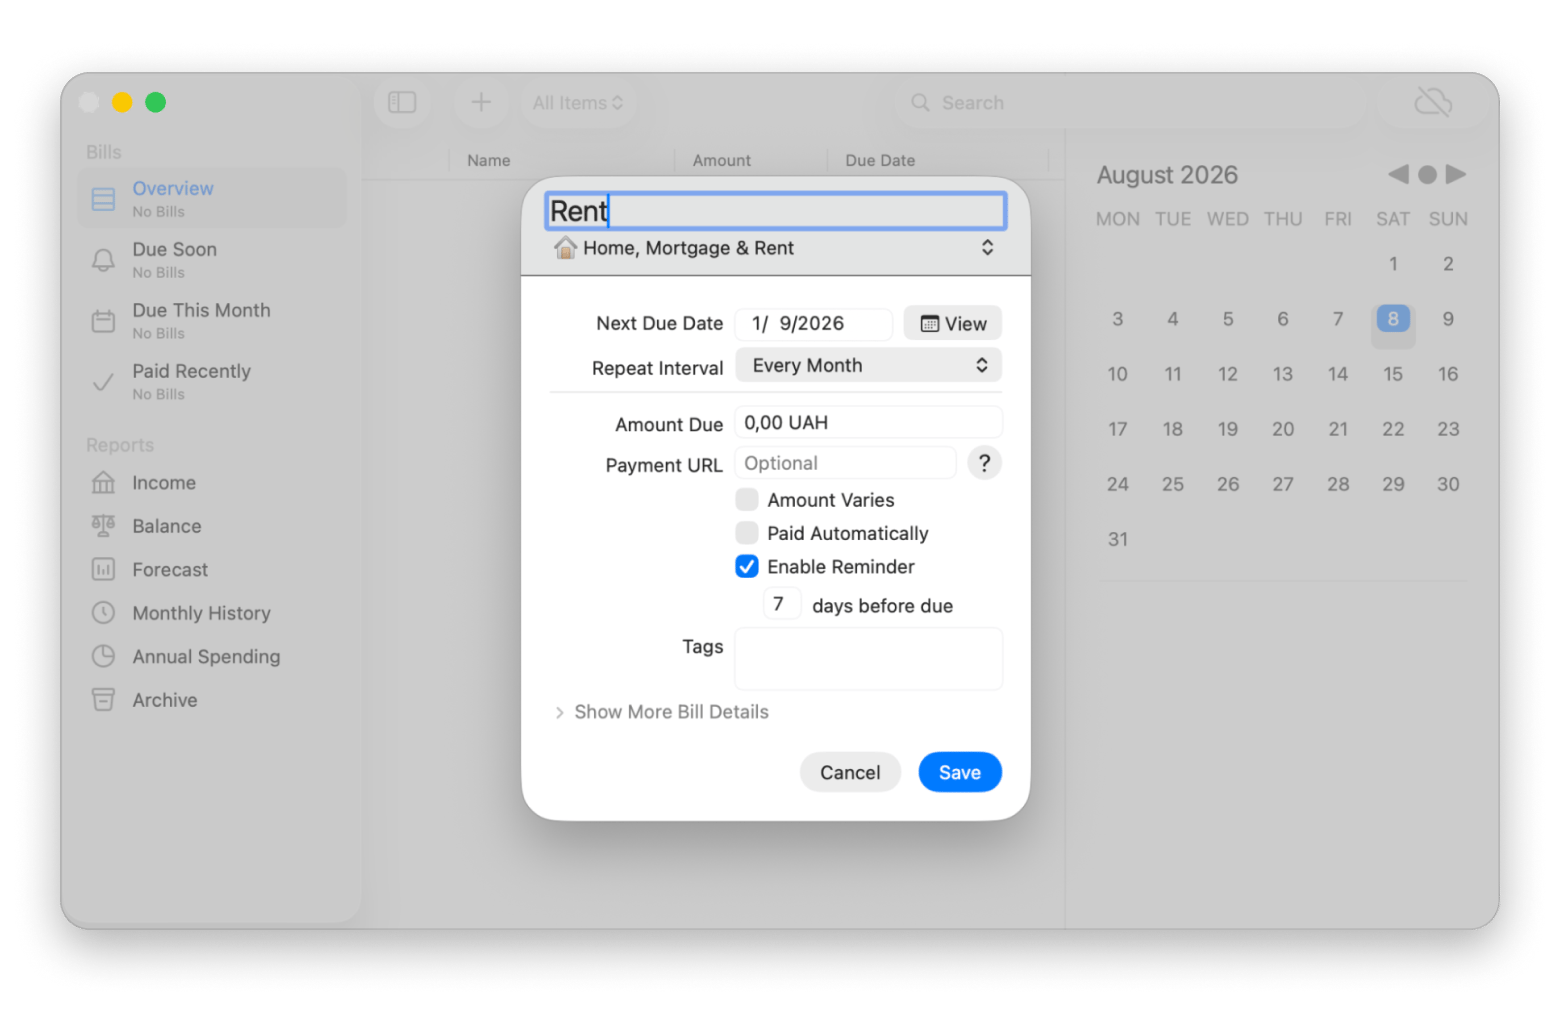
Now that Apple Pay makes spending super easy, I always remind myself how crucial it is to keep track of my finances. Personally, I use Chronicle to manage my bills and recurring payments.
What I like about Chronicle is that it helps me keep track of my subscriptions and schedule upcoming payments so nothing slips through the cracks. I use it to plan my budget and, what’s more, get a clear picture of my spending patterns. It visualizes the payment history with graphs, making it so easy to analyze. The app syncs across all your devices through iCloud, so you won’t have any problems with shopping on multiple devices.
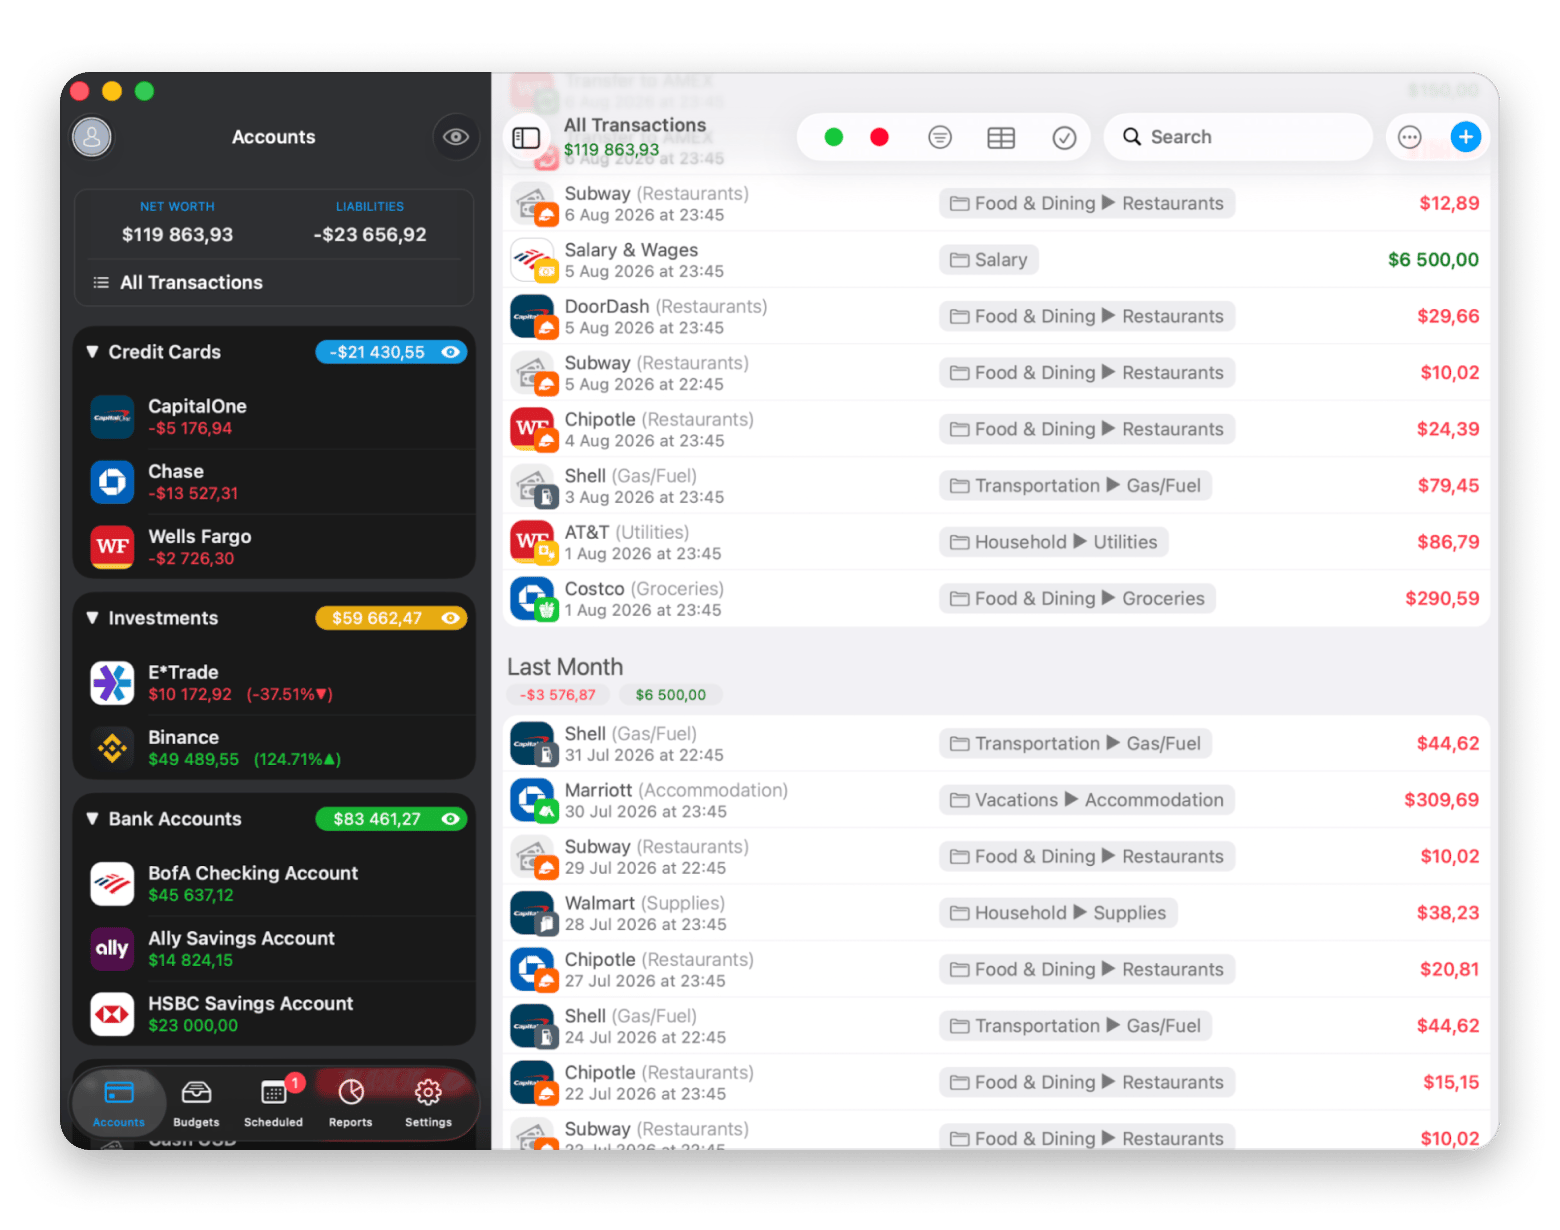
For more detailed financial tracking, I’d definitely recommend MoneyWiz 2026. It offers multiple types of reports to track your accounts and payments, which you can easily export later, say, to discuss them with your financial advisor. Another thing I find really handy about MoneyWiz 2026 is that you can import data from another tool in case you want to switch without losing any information. So I’d say this app will help you see the bigger financial picture beyond daily spending. You can try MoneyWiz 2026 free for 7 days on Setapp.
I consider these two apps perfect solutions for managing my spending, but if you’re looking for something else, check out more finance apps for Mac.
Security features of Apple Pay
Apple Pay incorporates multiple security layers that make it safer than using physical cards. Every transaction requires authentication through biometrics or your passcode.
The Device Account Number system means your actual card number never leaves your device. If you lose your phone, you can instantly suspend Apple Pay through Find My iPhone without canceling your physical cards.
Note: The same biometric-first philosophy applies across Apple's ecosystem — if the security model appeals to you, our guide to Sign in with Apple shows how to extend it to apps and websites too.
Transaction data stays private too. Apple doesn't store purchase details that can be tied back to you, and merchants only receive the information necessary to complete the sale.
Troubleshooting common Apple Pay issues
Even with a smooth setup, you might encounter occasional problems. Here are solutions to the most common ones:
- Card won’t add to Wallet. First, verify that your card issuer is listed on Apple's official list of Apple Pay partners. Update your device to the latest OS version. Contact your bank if the card still won't add, as they may need to enable Apple Pay for your account.
- Payment declined at terminal. Check that NFC is enabled in Settings > Wallet & Apple Pay. Ensure your device has an internet connection for initial card verification. Try removing and re-adding the card if problems persist.
- Apple Pay not working online. Confirm the website supports Apple Pay (look for the Apple Pay button). Clear your browser cache and cookies. For Safari, check that Apple Pay is enabled in Preferences > Privacy.
Making the most of Apple Pay
Apple Pay is one of the simplest ways to handle daily transactions across all your Apple devices — from quick coffee runs with your Apple Watch to secure online shopping on your Mac. Honestly, I can’t imagine my life without it anymore.
Setting up takes minutes, and the enhanced security means you can pay with confidence. Combined with financial tracking apps like Chronicle and MoneyWiz 2026, you'll have complete control over your spending.
Ready to explore these apps and 270+ others? Start your Setapp free trial today and discover tools that make every aspect of your digital life more efficient.
FAQ
How do I pay someone with Apple Pay?
Apple Pay includes person-to-person payments through Apple Cash in Messages. Open a conversation, tap the Apple Pay button, enter an amount, and authenticate with Face ID or Touch ID. Recipients get the money instantly to their Apple Cash card, which they can use for purchases or transfer to their bank account. Both users need to have the latest iOS version and must be 18+ in the US.
Is Apple Pay the same as Apple Wallet?
No, they're different but related. Apple Wallet is the app on your device that stores your cards, tickets, and passes. Apple Pay is the payment service that uses cards stored in Apple Wallet to make purchases. Think of Wallet as the container and Apple Pay as the payment method.
Can I use Apple Pay without internet?
Yes, Apple Pay works offline for in-store purchases. Your device stores payment tokens locally, allowing several transactions without internet. However, you need internet to add new cards, and some terminals may require online verification for high-value purchases.






 Best solution
 Best solution