How to use Magnifier on iPhone, iPad, and Mac
Have you ever noticed how small the print is on medicine bottles? The other day, I helped a relative with low vision to read this tiny print. She usually carries a magnifying glass in her purse. The waiter at her favorite restaurant nicknamed her Sherlock when she was caught using it to read the menu.
She always has her phone but sometimes forgets her magnifying glass. That's why I decided to dig deeper into how to turn on the Magnifier on iPhone and other devices, so I could help my relative make the most of this feature and simplify her daily tasks. Now, I'm gald to share what I've learned to help others do the same.
Benefits of using Magnifier
Thanks to the iOS Magnifier app, your device serves double duty as a magnifying glass. Even with great vision, you may be surprised how often Magnifier comes in handy. For example, if you drop an earring in the grass or plush carpeting, you can easily find it using Magnifier plus your phone’s built-in flashlight. Benefits of using Magnifier include:
- Camera Integration. Take pictures for future reference.
- Flashlight. Illuminate details in low-light conditions, ideal for tasks like finding tiny objects.
- Everyday use. Easily read small print on medicine bottles, receipts, and more.
- Advanced features. Magnify surroundings by pointing the iPhone camera at objects, measure distances, and get descriptions of your environment with LIDAR (a remote sensing method used to examine the surface) available on iPhone Pro.
While most iOS devices can be used as a magnifying tool, the quality varies depending on the phone's camera. Newer iPhone models have better-quality lenses and more advanced software.
How to use Apple Magnifier
Here’s how to get a magnifying glass on your iPhone, iPad, and Mac and ways to use it effectively.
Using Magnifier on your iPhone
If you have an iOS device, you already have Magnifier installed (unless you deleted it). You may find it in the Search field or App Library.
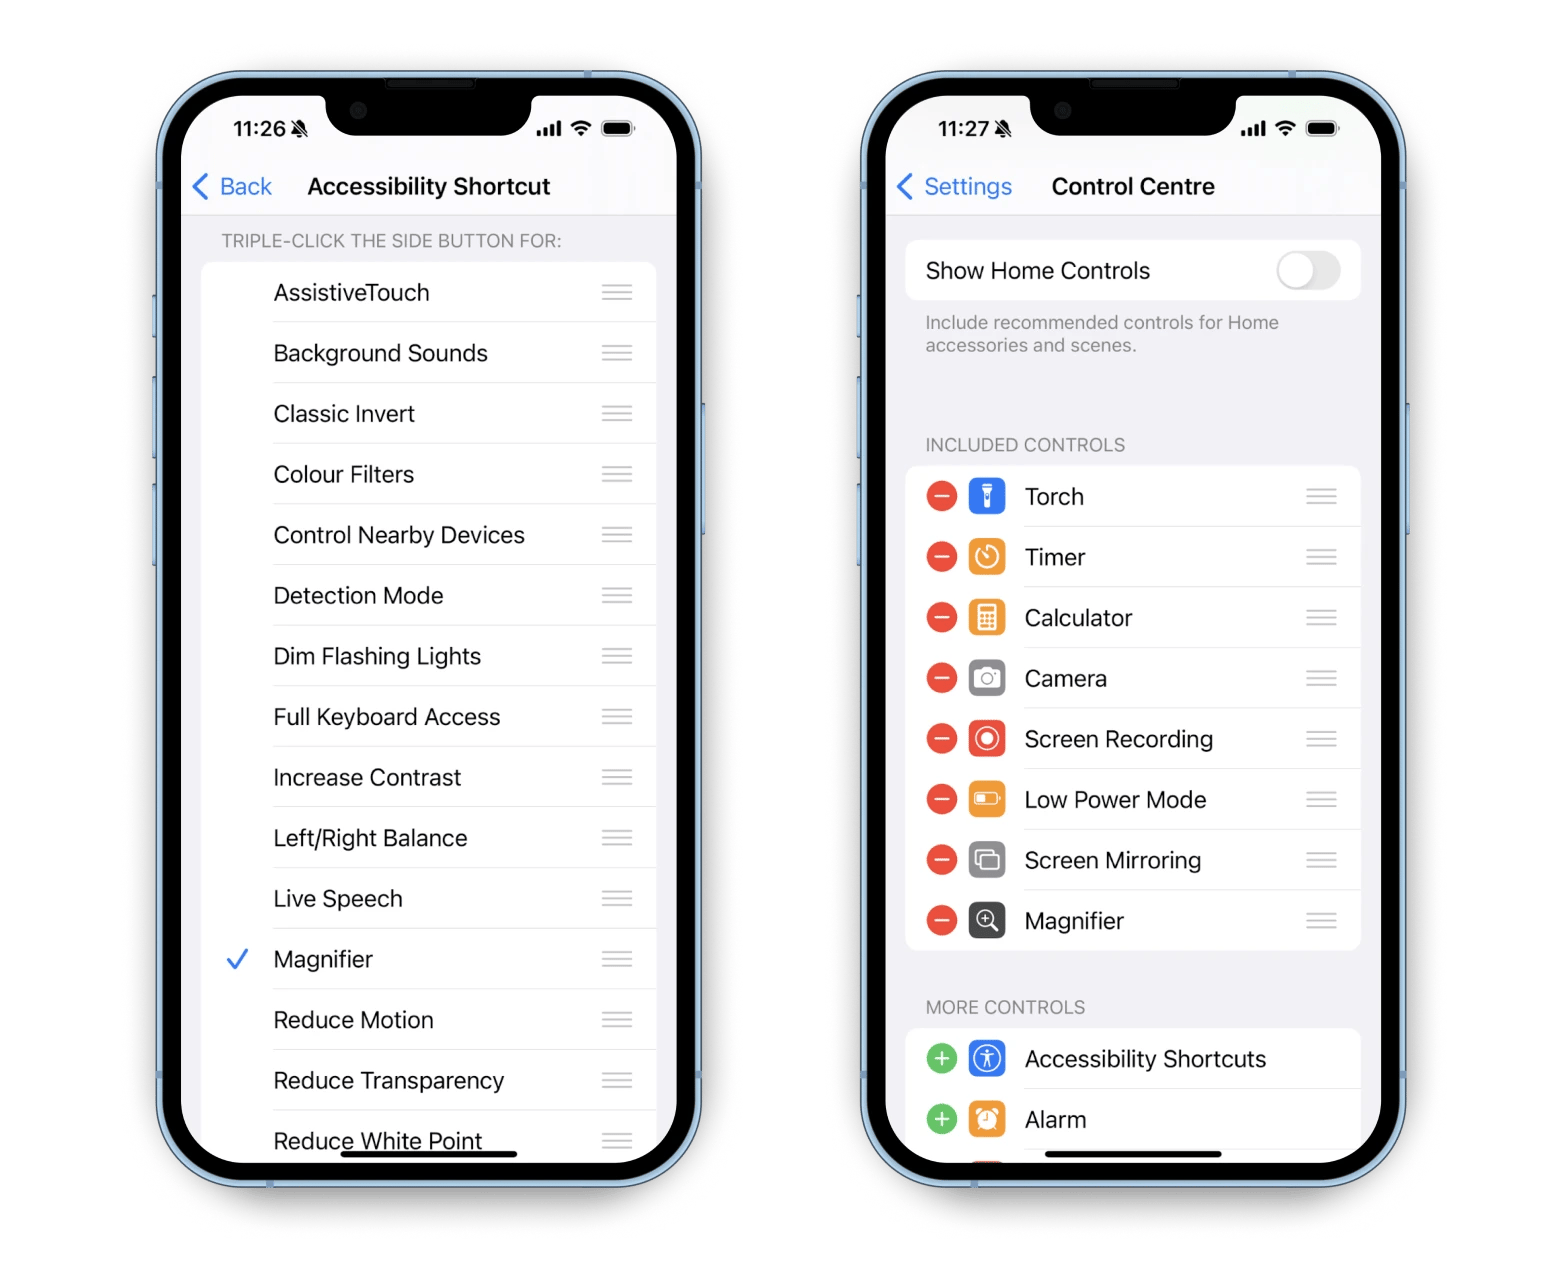
You can also add a shortcut to make it easy to find Magnifier whenever you need it.
Follow these steps:
- Open Settings.
- Click Accessibility > Accessibility Shortcut.
- Tap Magnifier.
The tool will appear as a shortcut in the Control Center, where you can adjust it to your needs.

How to become a Magnifier power user
If you want to master your skills with the Magnifier app, here are a few quick tips to improve your experience:
- Zoom in for an enlarged photo. You can zoom your camera lens in or out using the slider next to the magnifying glass icon.
- Adjust the brightness and contrast. Touch the sun icon for a slider to adjust settings for better qualilty.
- Turn on the flashlight. Touch the flashlight icon to turn it on or off to magnify objects in unlit spaces.
- Magnify a part of a photo: Take a picture in the app and view it. Zoom in or out to a part of the photo if needed.
Using Magnifier on your iPad
Like the iPhone, you can set up Magnifier in the same way on the iPad, as a standalone app and an accessibility shortcut.
Good news is that the iPad magnifier screen is larger, so this version is ideal if you are looking at a newspaper, reference book, or small print brochure. You can take a freeze frame of a larger area, add contrast, and then read it at your leisure.
The Zoom magnifier feature is also available on iPad screens. To activate it, go to Settings > Accessibility > Zoom. You may enlarge text on your iPad screen just like on your iPhone and Mac.
How to magnify your screen on macOS with Zoom
While the Magnifier app is only available for iOS devices, macOS offers its own set of accessibility features.
Fortunately, you can use the Zoom feature to enlarge the screen on Mac to read fine print or enlarge small photos.
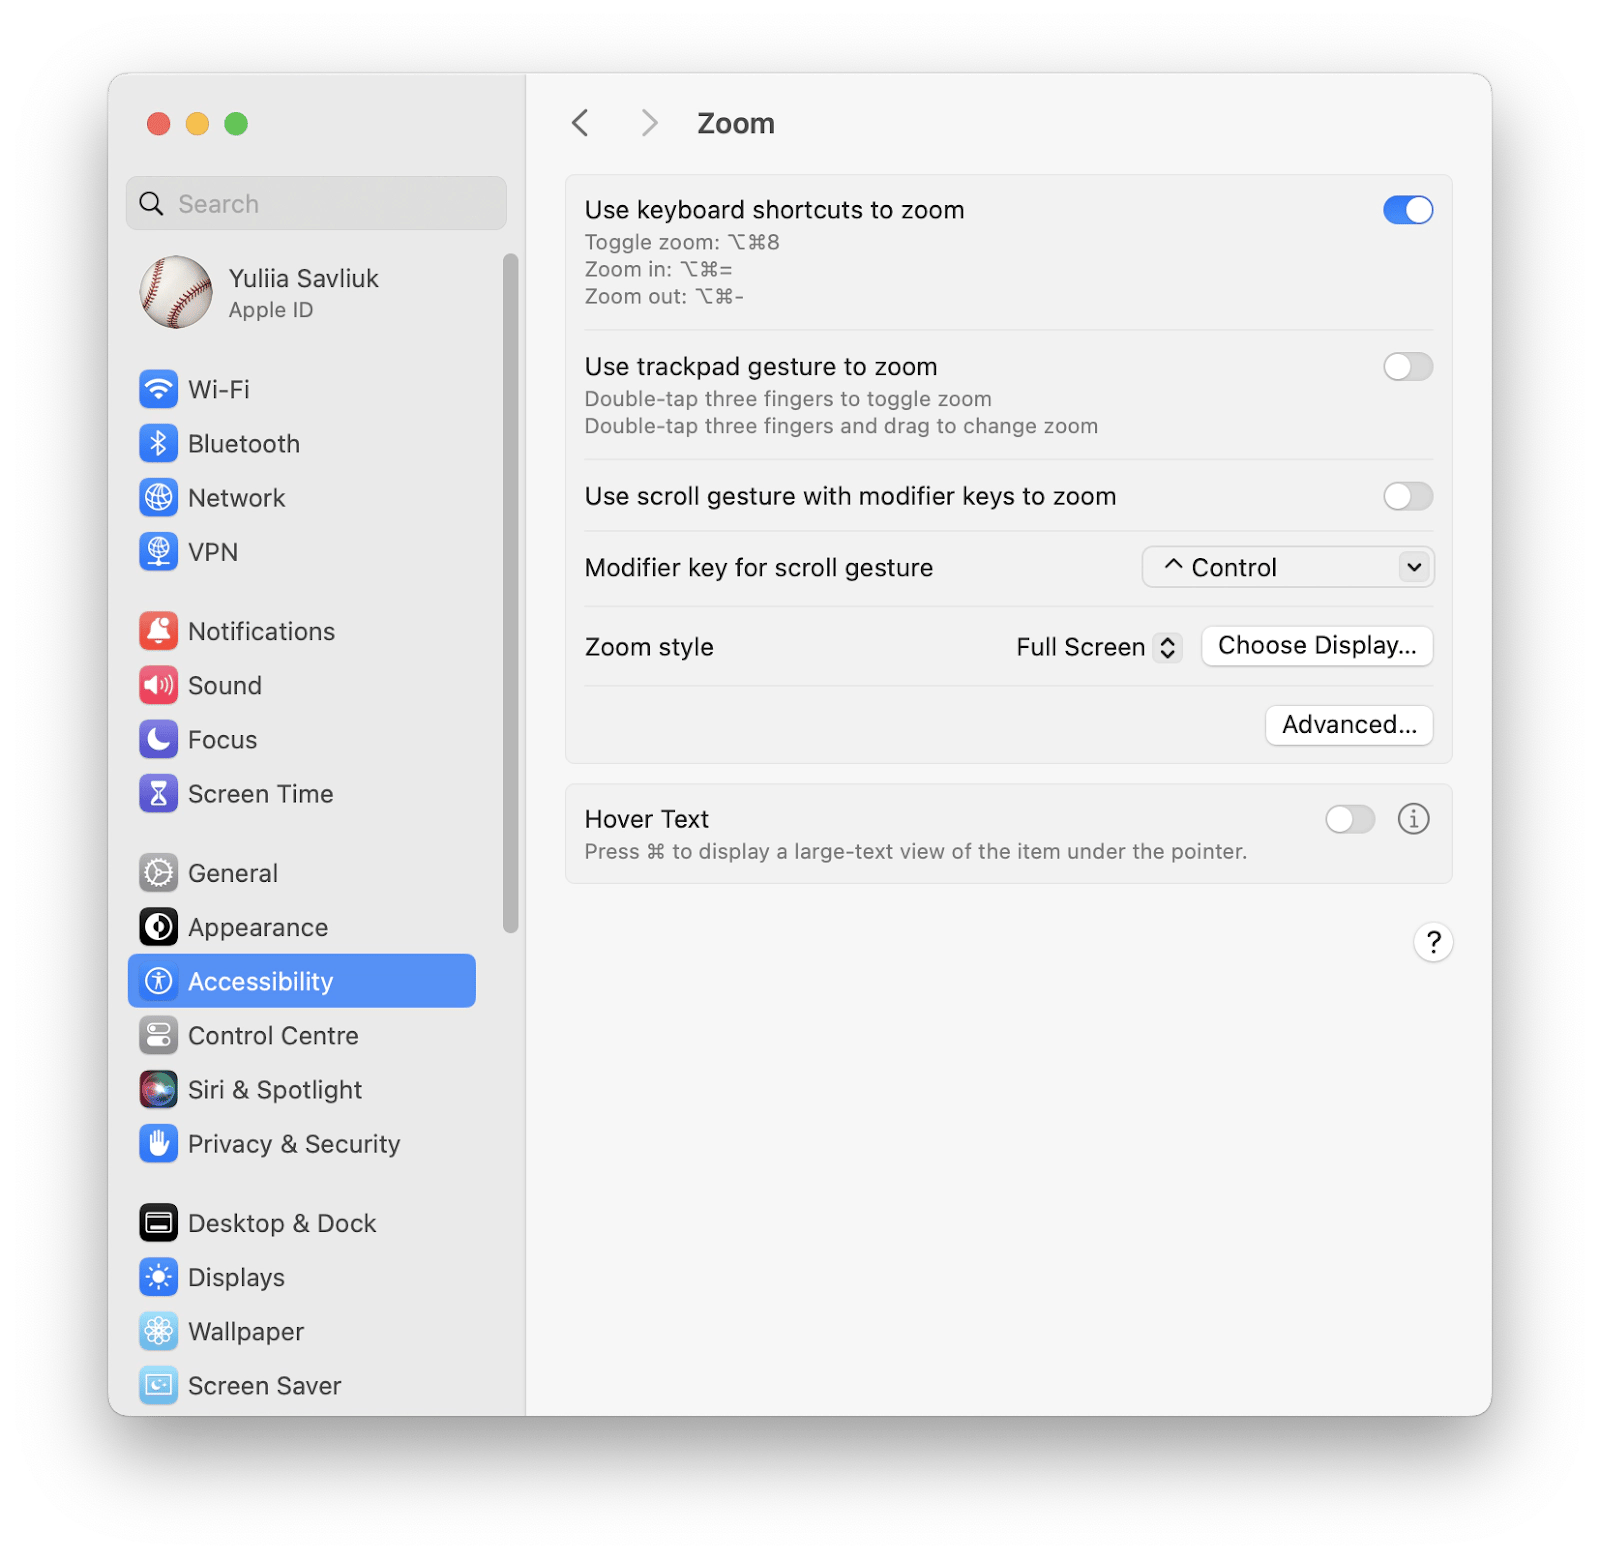
To activate the Zoom Magnifier on MacBook:
- Go to the Apple menu.
- Click System Settings > Accessibility.
- Click Zoom.
You will see a few options for Zoom shortcuts, including Trackpad gestures, menu bar options, and key command shortcuts. You also have the option to set up Hover Text, a feature where the screen magnifier enlarges the specific text you hover your cursor over using a key command.

When text on a screen is hard to read, which can strain your eyes, it’s better to find a more practical solution. That’s why I recommend using TextSniper if you ever come across blurry text or want to avoid the inconvenience of zooming in.
The app offers various features, such as fast text recognition and the ability to listen to selected text. These features make it a game-changer for people with visual difficulties and a helpful productivity tool for everyone.
Use TextSniper to extract text from any website, image, video, or window. The app can copy the text to your clipboard, read it out loud, or read a QR or barcode.

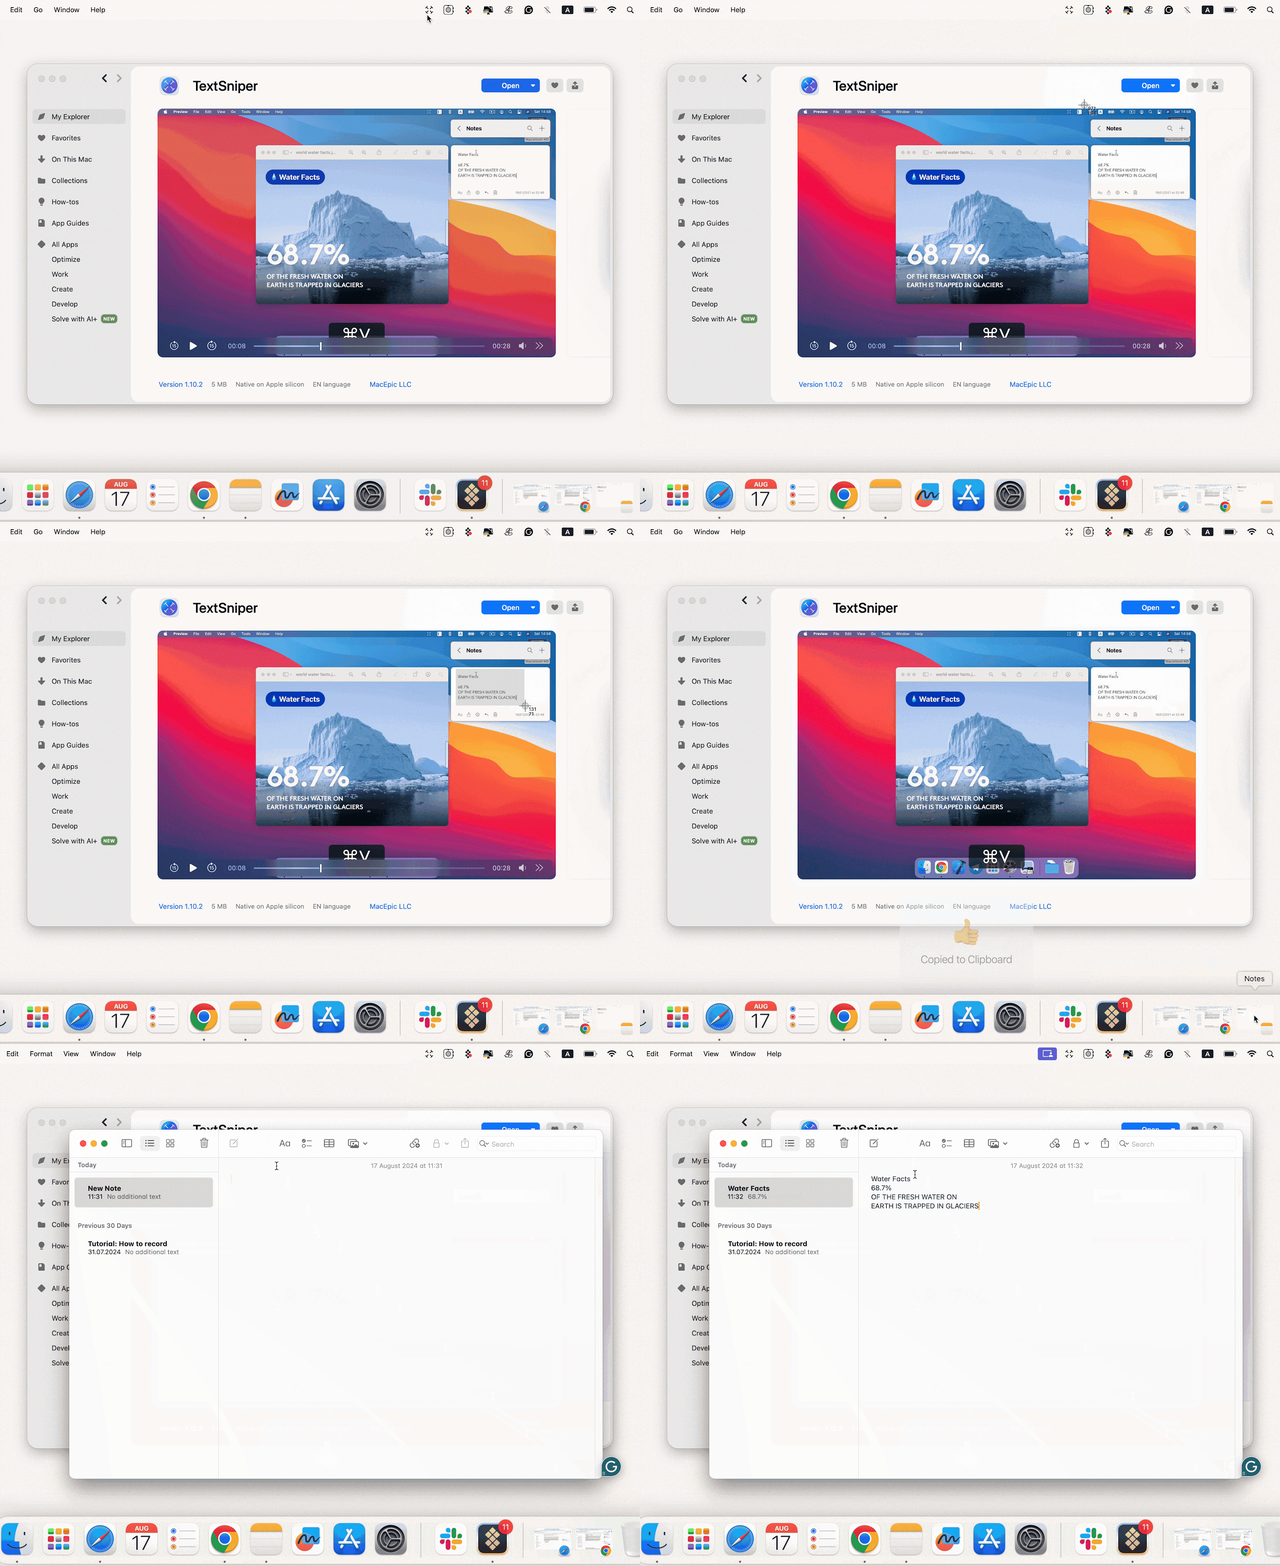
Here’s how to copy any text to enlarge it on your Mac:
- Install and open TextSniper.
- Click the app icon on the top menu bar.
- Choose Capture Text (or press Shift + Command + 2).
- Select the screen area. The text inside the selection will be copied to the clipboard.
- Press Command + V to paste the text to the notes, editor, or other software.

Devices that support the Magnifier app
The Magnifier app is available for iOS devices like iPhones and iPads. It’s supported by the following models:
- iPhone 12 Pro
- iPhone 12 Pro Max
- iPhone 13 Pro
- iPhone 13 Pro Max
- iPhone 14 Pro
- iPhone 14 Pro Max
- iPhone 15 Pro
- iPhone 15 Pro Max
- iPad Pro 12.9-inch (4th generation and newer)
- iPad Pro 11-inch (2nd generation and newer)
If your device is compatible with Magnifier, you’re all set.
Get more done with iOS Magnifier and other accessibility apps
The iOS Magnifier app is versatile as a vision and a productivity aid for iPhone and iPad, while Zoom is a separate feature that can magnify text on your screen and is available for all Apple devices.
Some of the tools require digging into the settings to activate them, so it’s better to use Launcher With Multiple Widgets. It lets you set up your own convenient widget menu, making it easier to open all your favorite tools in one tap.
If you want to extract hard-to-read text from visuals to copy to your clipboard or read it aloud, use TexSniper.
Try these and other tools on a seven-day free trial on Setapp. The platform offers dozens of productivity apps in one subscription. So, why hesitate to try?
FAQ
How to magnify screen on Mac?
Your Mac’s accessibility features include a built-in app called Zoom, which magnifies selected areas of your screen. To activate Zoom, go to the Apple menu > System Settings > Accessibility > Zoom.
Where is the Magnifier on Mac?
Mac donesn’t support Magnifier, instead you can use Zoom, a built-in screen magnifier for macOS. You can find it under the Accessibility menu in Settings.
Alternatively, you can use TextSniper to extract text from any visual on your Mac screen.
How to adjust the magnification?
You can adjust Zoom’s magnification on a Mac using the trackpad gesture or shortcuts.
For trackpad gestures:
- Double-tap three fingers to toggle zoom.
- Double-tap three fingers and drag to change zoom.
For shortcuts:
- Press Option + Command + 8 to toggle zoom.
- Press Option + Command + = to zoom in.
- Press Option + Command + - to zoom out.
For iPhone and iPad:
- Double-tap three fingers to zoom in and out.
- Drag three fingers to move around your screen.
- Double-tap three fingers and drag to change zoom.
Where is the Magnifier on iPhone and iPad?
You can find the Magnifier app in the App Library or via Search field. Also, you can use Launcher With Multiple Widgets, a tool that allows you quick access to your most used apps.


