How to quickly resize images on Mac: Check out my quick solutions
If you’re looking for an image resizer on a Mac, the good news is that the built-in Preview app can get the job done. For occasional resizing tasks, you won’t need any third-party software.
However, if you have more advanced needs, like batch resizing multiple images, you might want to explore other tools. So, in this post, I’ll share several image resizing options (both built-in and third-party) that I trust.
| I want to | What to do |
| Resize a single image | Open Preview > Markup > Adjust Size. |
| Batch resize multiple images | Select all images > Open in Preview > Tools > Adjust Size. |
| Automate image resizing | Use the Automator app to create a quick action with Scale Images. |
| Resize + rename + watermark multiple images | Use PhotoBulk. |
| Convert to another format | Install Permute > Drag image > Select format. |
| Resize with AI-enhanced editing | Install Luminar Neo > Edit image > File > Export > Set Resize dimensions. |
| Resize directly in text documents | Use Pages to drag edges or adjust dimensions manually. |
How to resize images on Mac
Let’s start with the basics. As I said, Macs actually have built-in image editing software that can resize images on your Mac. If you go to Finder > Applications and scroll through the apps, you’ll find Preview, an image viewing and editing app that comes with your Mac. And yes, Preview can resize your image.
Here’s how to resize an image with Preview:
- Open an image in Preview (simply double-click on the file to open it and Preview is the default option in most cases).
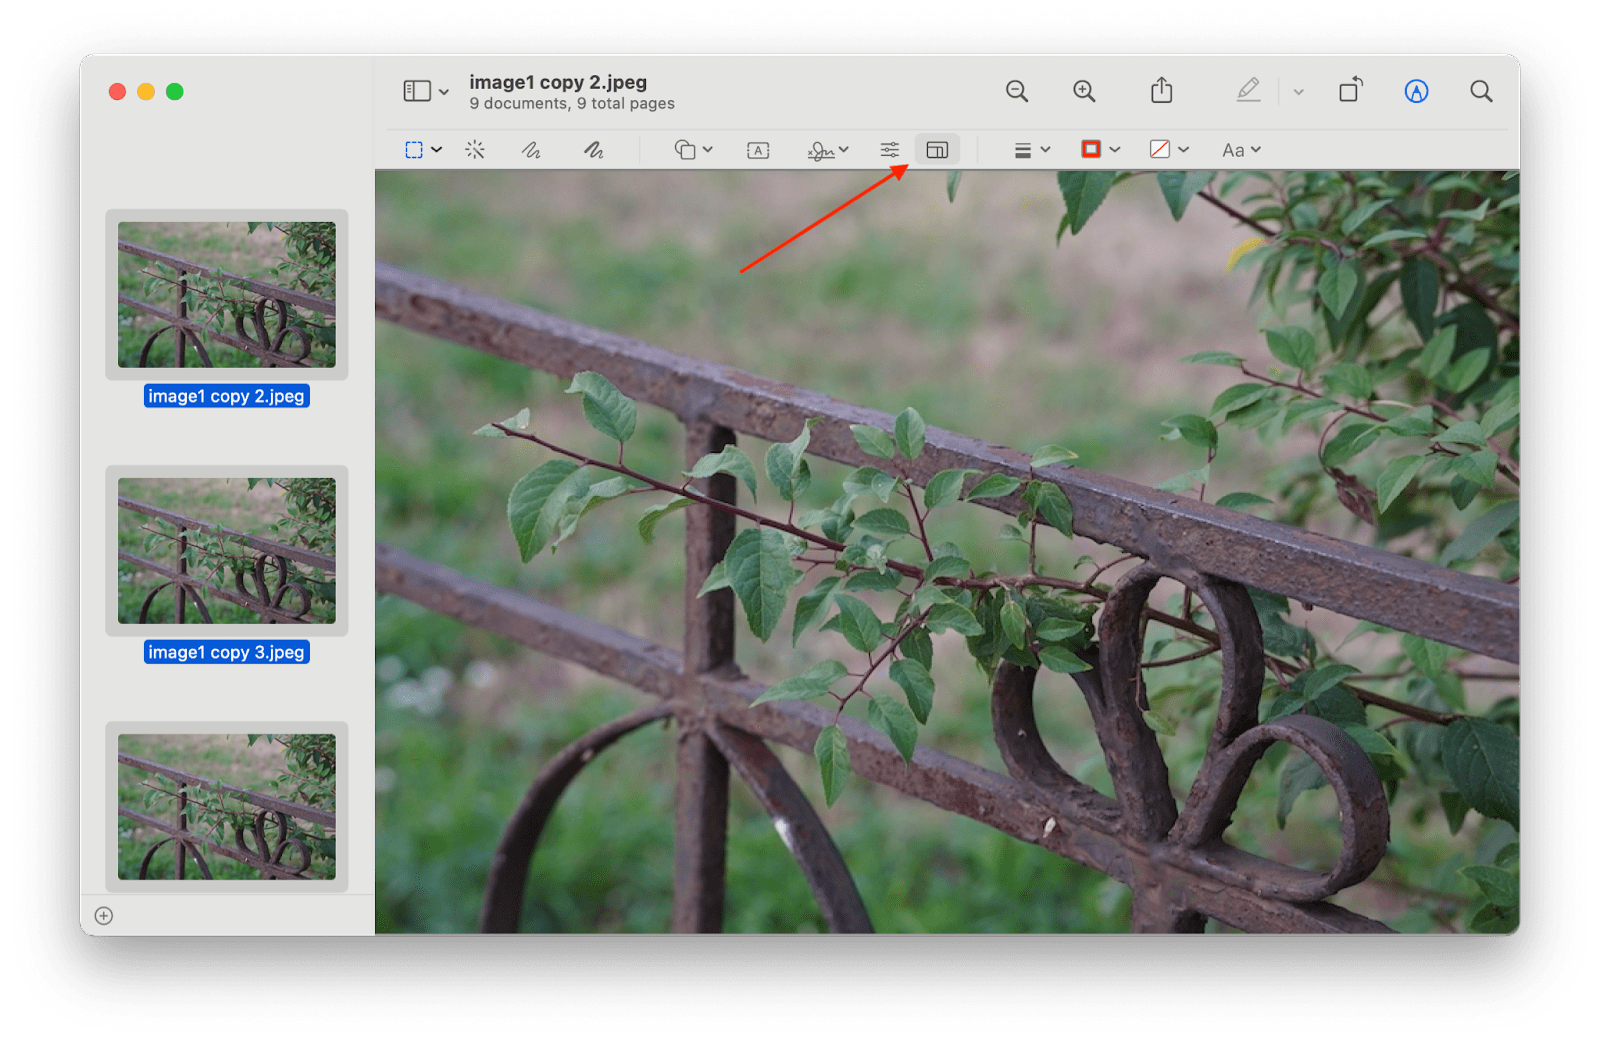
- Find Markup icon in the top menu bar of the Preview window (for narrow images, the icon often hides behind the >> .
- In the Markup mode, click the Adjust Size icon:
In the pop-up window, set your desired image dimensions and click OK:
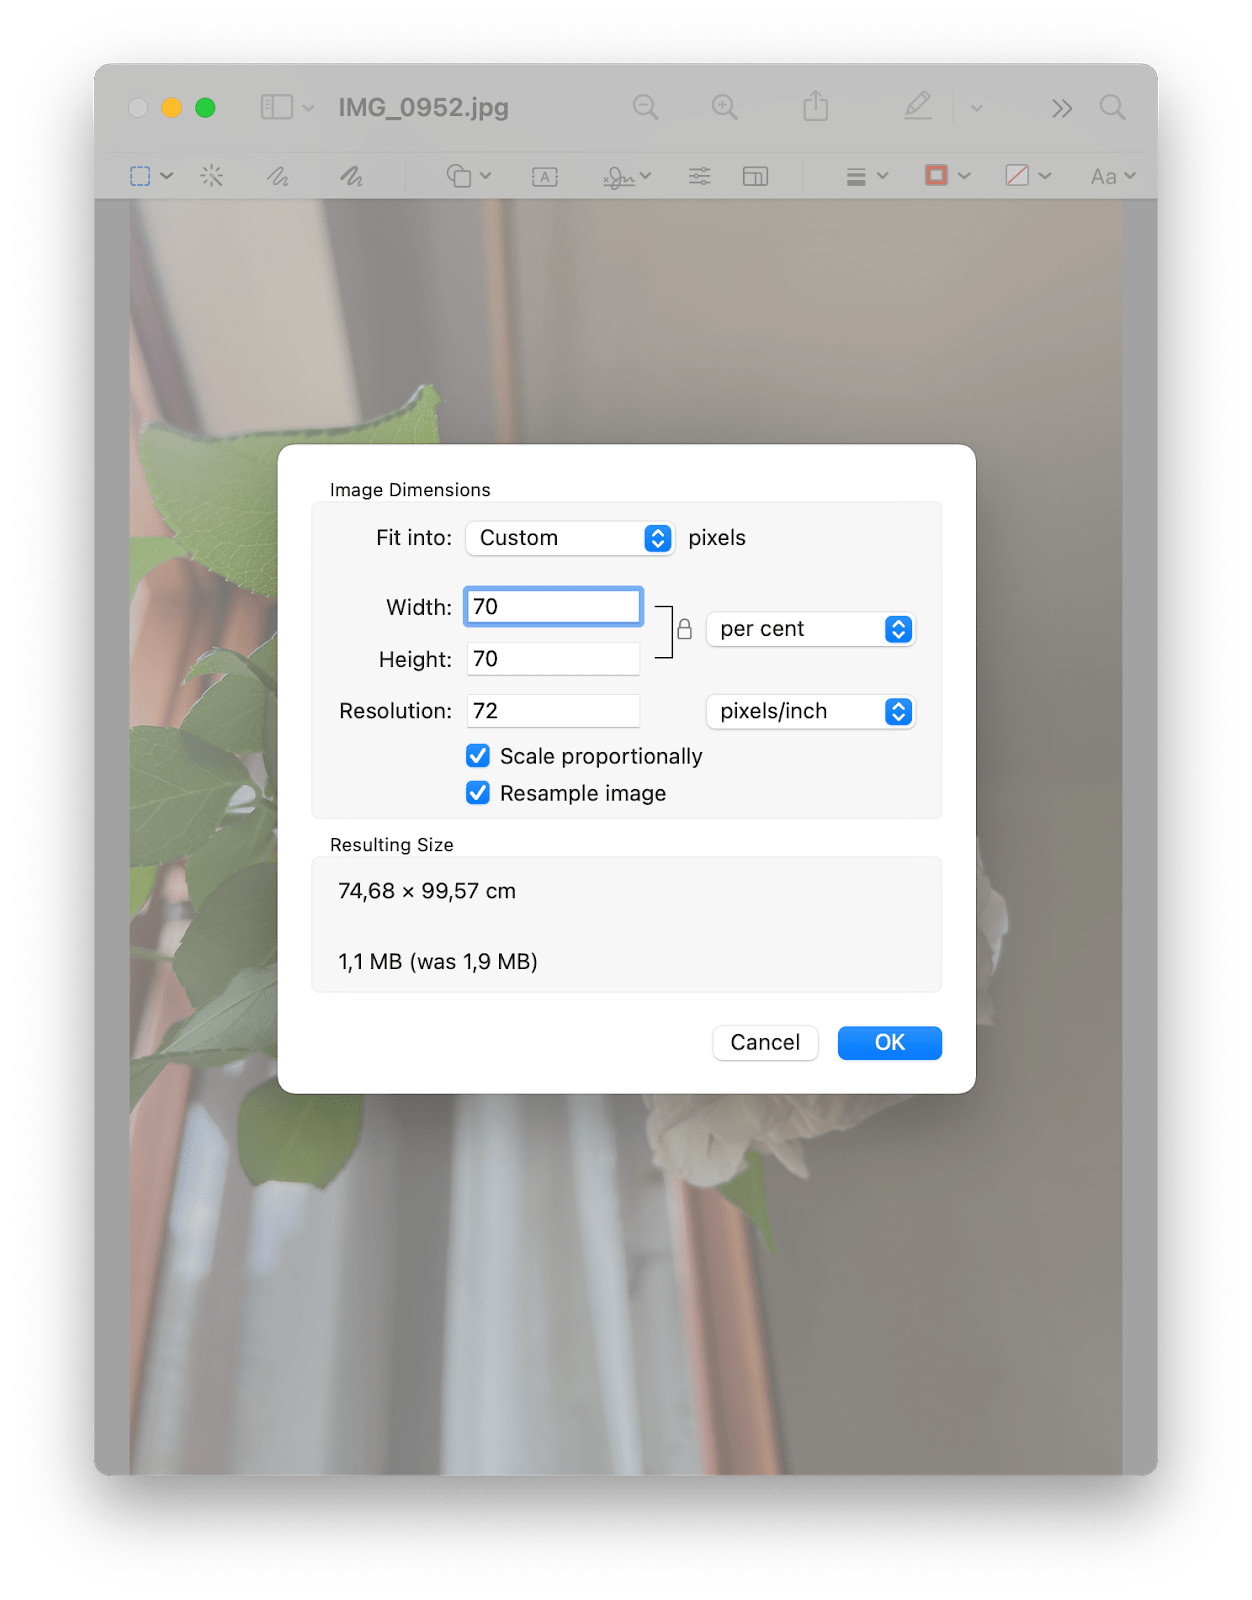
Note that by default, Preview saves all edits in the existing file. To keep both your original image and the resized (or otherwise edited) one, go to File > Export… and save your changes as a new file.
One-click resizing with Automator
If you resize photos often, maybe for a hobby or job, the process can get tedious. Luckily, Macs have a fantastic built-in tool called Automator to automate tasks like these. It’s an app that lets you create your very own workflows, without all the technical jargon and programming knowledge needed. For example, I could string together a bunch of actions that resize my image, rename it, save it to my desktop, and simply run that workflow in one click to get that all done.
Here’s how to use Automator:
- Open Automator by going to Finder > Applications > Automator or by using Spotlight search.
- Click Quick Action.
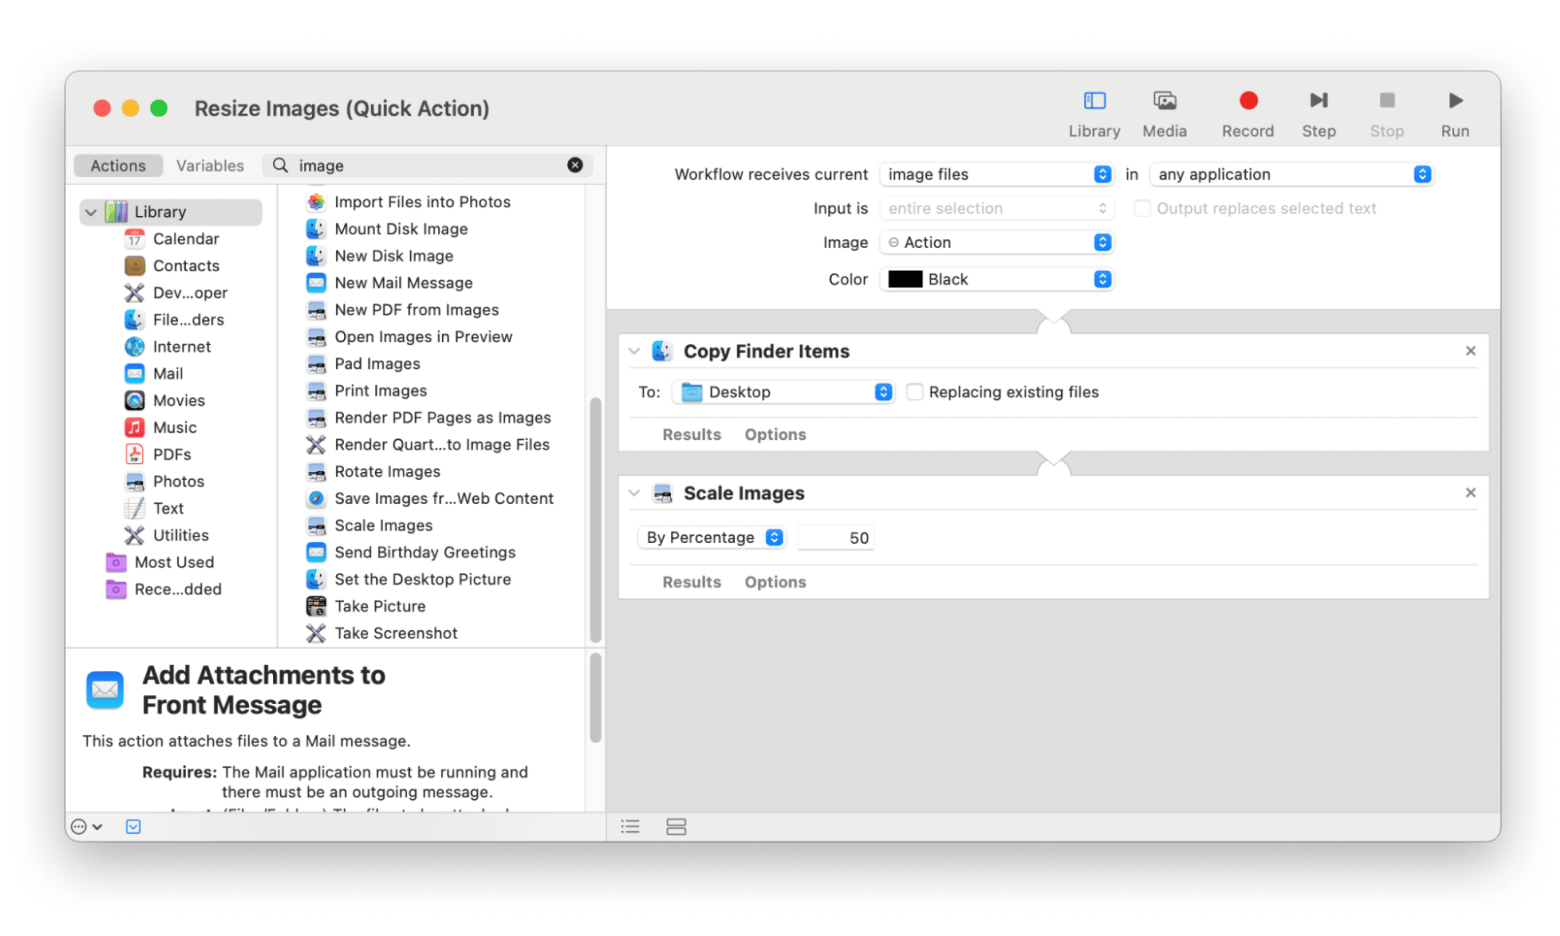
- Next to Workflow receives current, select “image file” from the drop-down menu.
- Drag and drop Scale Images onto the dashboard.
- Click Add.
- Pick the Scale Images option either To Size (pixels) or By Percentage.
- Save the workflow.
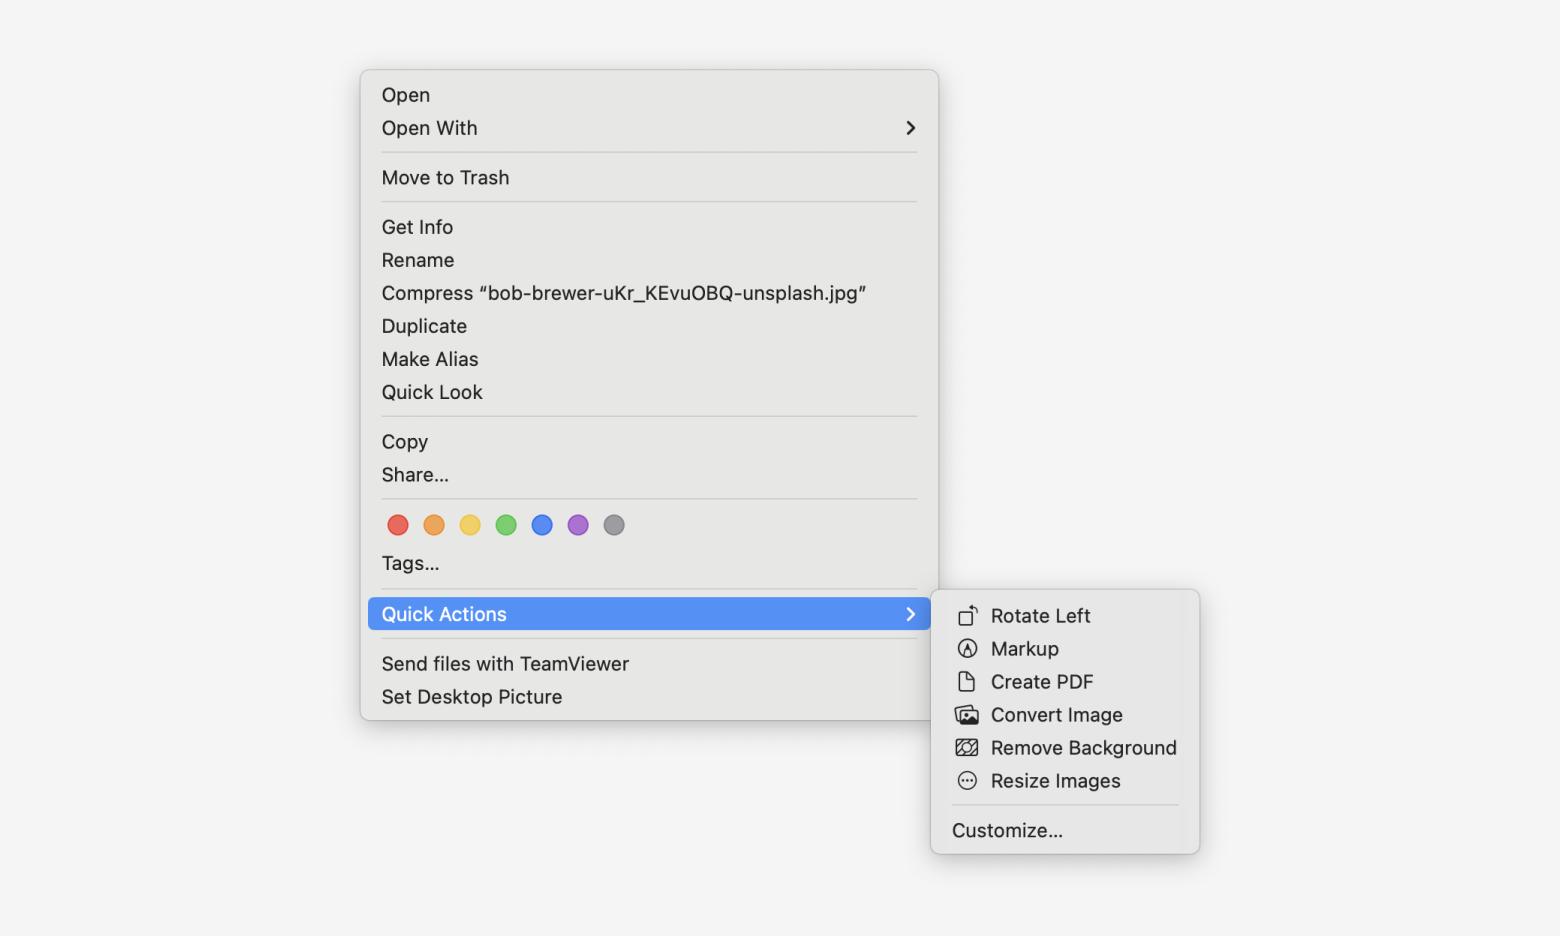
Now, you can easily deploy that quick action by searching anywhere on your computer for an image, right-clicking it, and hovering over Quick Actions > Resize Images (or whatever you named your Quick Action) in step six.
Resize multiple images at once
If you need to resize multiple images, Preview can do that, too.
Here’s a step-by-step instruction on how to batch resize images with Preview:
- Select all images you want to resize in a Finder folder and right-click on them.
- Select Open With… and click on Preview.
- As you get your images open in Preview, you’ll see one selected image in the center and the rest as thumbnails on the side. Select all thumbnails with Command + A.
- Click Tools in the Preview menu bar at the top and pick Adjust Size… option.
- Set your resize settings in the pop-up window and click OK:
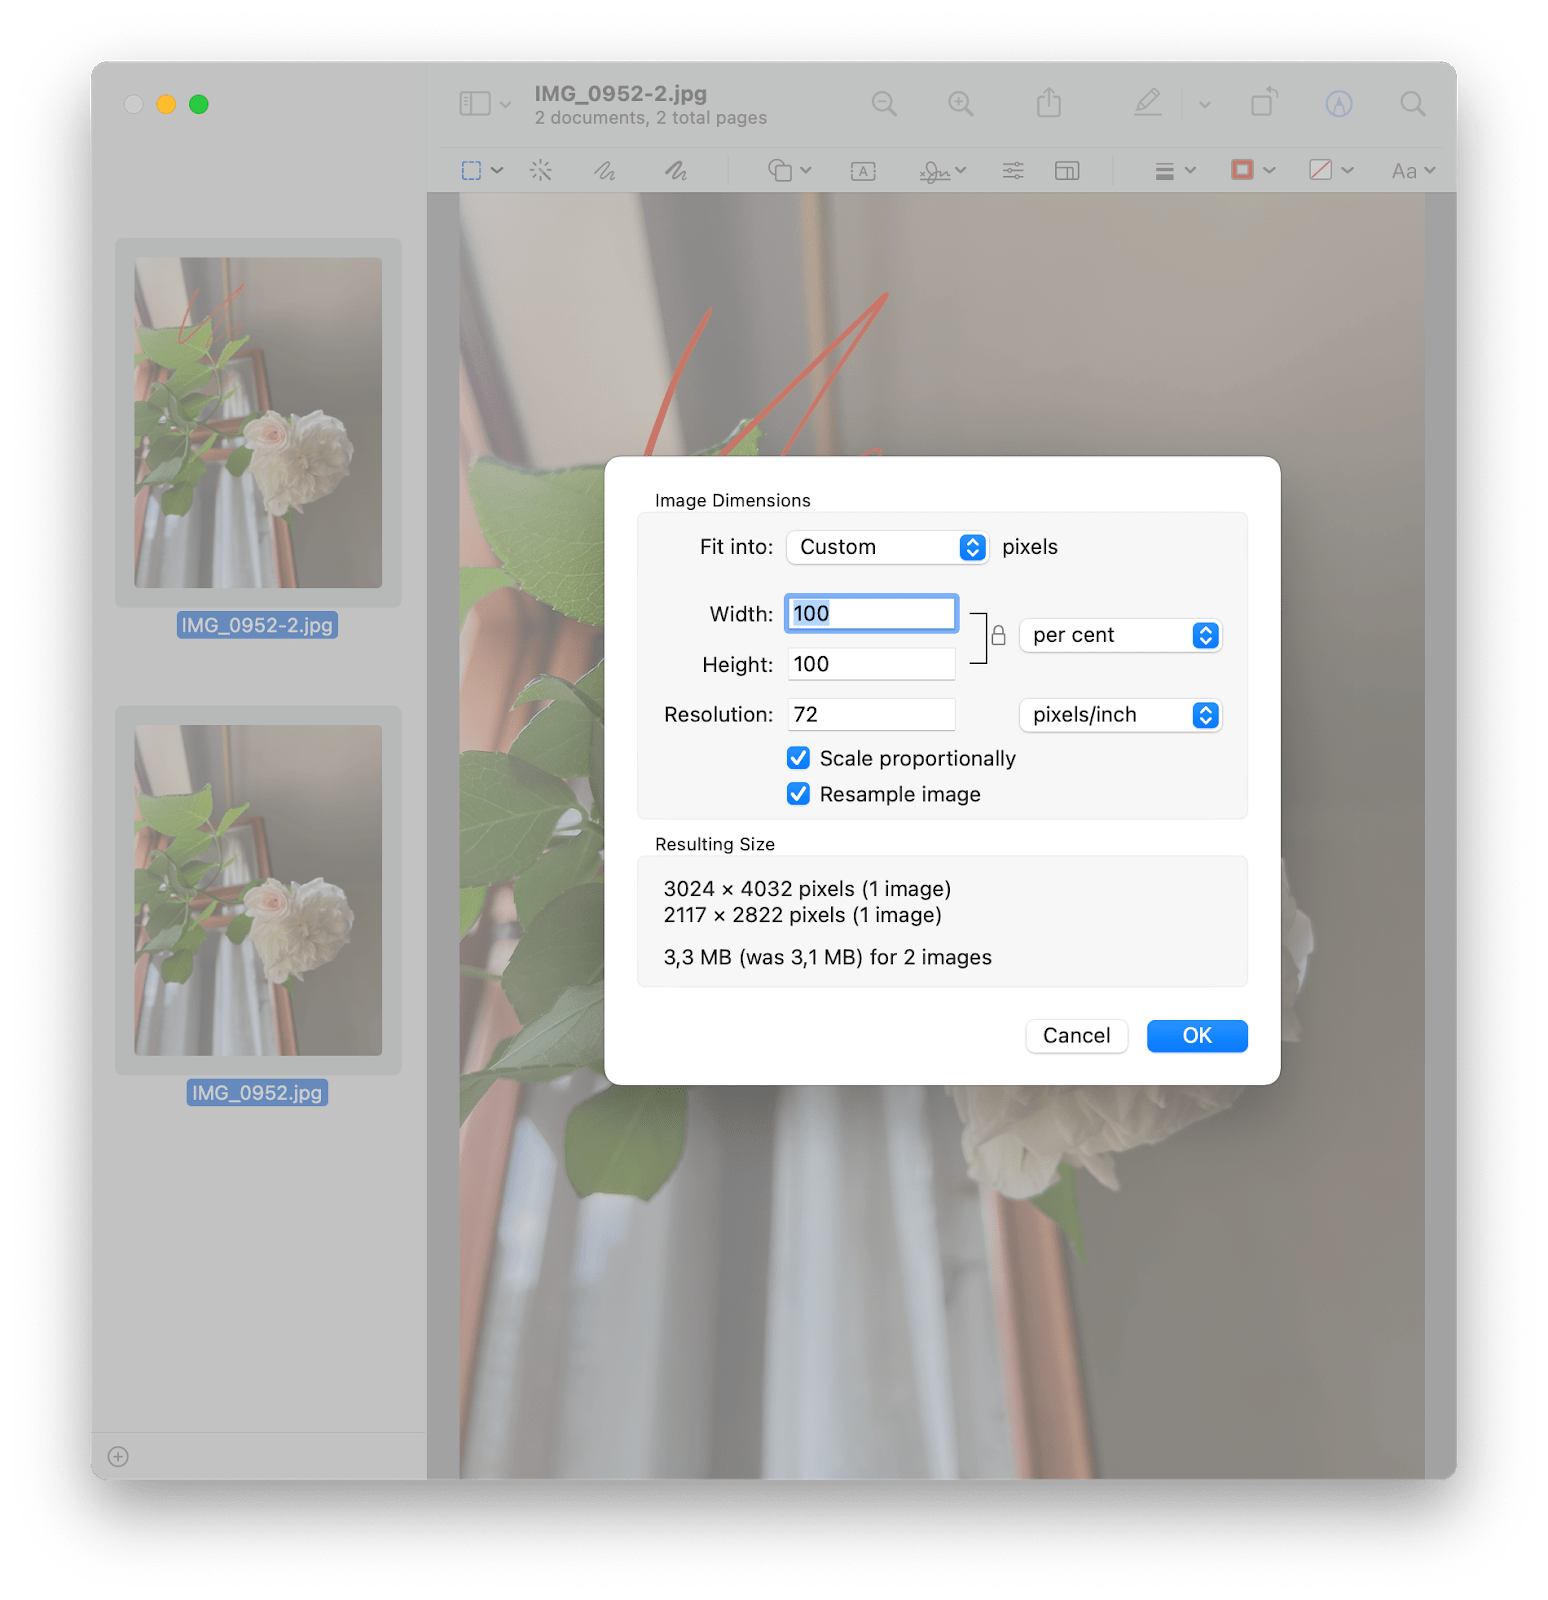
Note that all images will be saved on top of your existing files, so if you want to only create resized copies, make sure you create copies first.
How to resize an image on a Mac without losing quality
Downsizing your image can lead to a poorer quality result. So how can you resize and keep the quality? Well, all you have to do is figure out your end use — what exact size you need for your project or use purposes?
If your file will be a tiny image displayed as part of a webpage or a presentation, just resize it to fit your dimensions. Also, don’t convert a smaller image into a larger size, as that will definitely result in a pixelated mess.
Finally, along with the image size settings, you will often get an image quality slider which is vital when adjusting the quality of your final image:

The same slider is available in PhotoBulk (under Format).
Change the size of an image using Pages on Mac
If you’re an active user of Apple’s native text editor, Pages, you should know that it can resize images, too! Note that your image size might change how your paragraphs and tables look, so it’s important to keep the entire picture in mind. Here’s how to change image size in Pages:
If you have the “Constrain proportion” option selected, you can change just one — either width or height — and the dimensions will adjust automatically. Or, you can manually resize your image by dragging its edges.
Crop an image in Preview
And since we’ve already got one foot in image editing, let’s also see how to crop an image on your Mac. After all, one answer to how to reduce image file size on Mac is simply cropping out the extra space in your pic — a space that, in many cases, can be very well done without.
Open your image in Preview and follow these steps to crop your photo or other visual:
- Find and click the Markup icon in the window menu bar (may be hidden under the >> icon in narrow images).
- Select the area you want to keep (click, drag, and release to make the selection).
- Click the Crop to Selection icon that appears when you’ve made the selection:
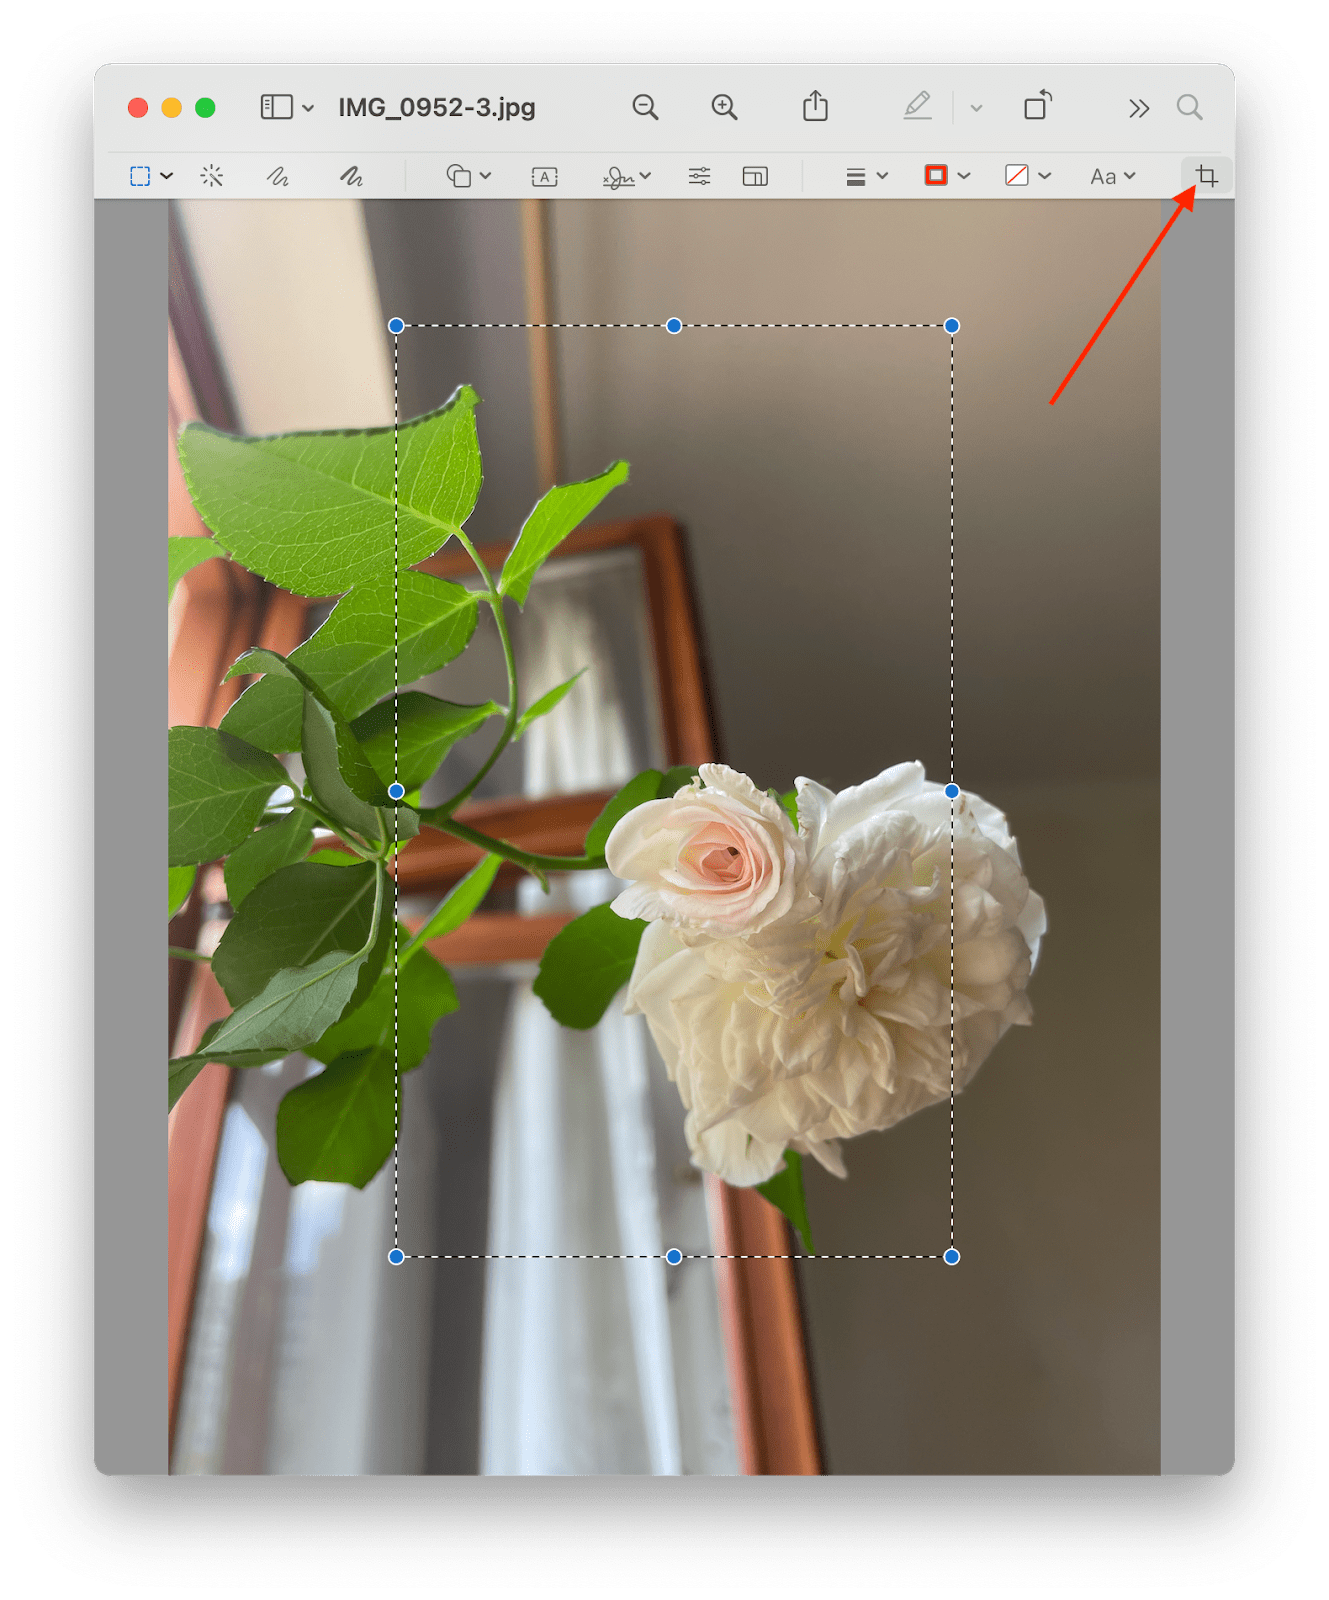
That’s it, your image gets cropped to your selected area! Note that the edited photo gets saved instead of your original, so crop only the version you are ready to part with.
Bonus tips: Convert to any format & enhance your photo
If you need to resize an image, chances are you might also need some additional photo editing tools. Let me suggest a few tips and tools that can be useful when working with any type of image.
Easily convert images or other media
Whenever I need to convert anything — be it videos, documents, or other files — my first choice is always Permute.
Permute is a universal media converter that can help you convert images, video, and audio to a number of formats. Just drag and drop your images to the app window and select the format you want to convert them to — PDF, JPEG, PNG, HEIF, etc.
If the file format you want isn’t in the converter's drop-down menu, you can click Add Preset… > Add New Preset…, select Image, and add more formats, including BMP, GIF, and TIFF.
And by the way, since we are talking about how to resize an image on Mac, Permute knows how to do that too — simply click the wheel icon in the top right corner and check the Resize option:
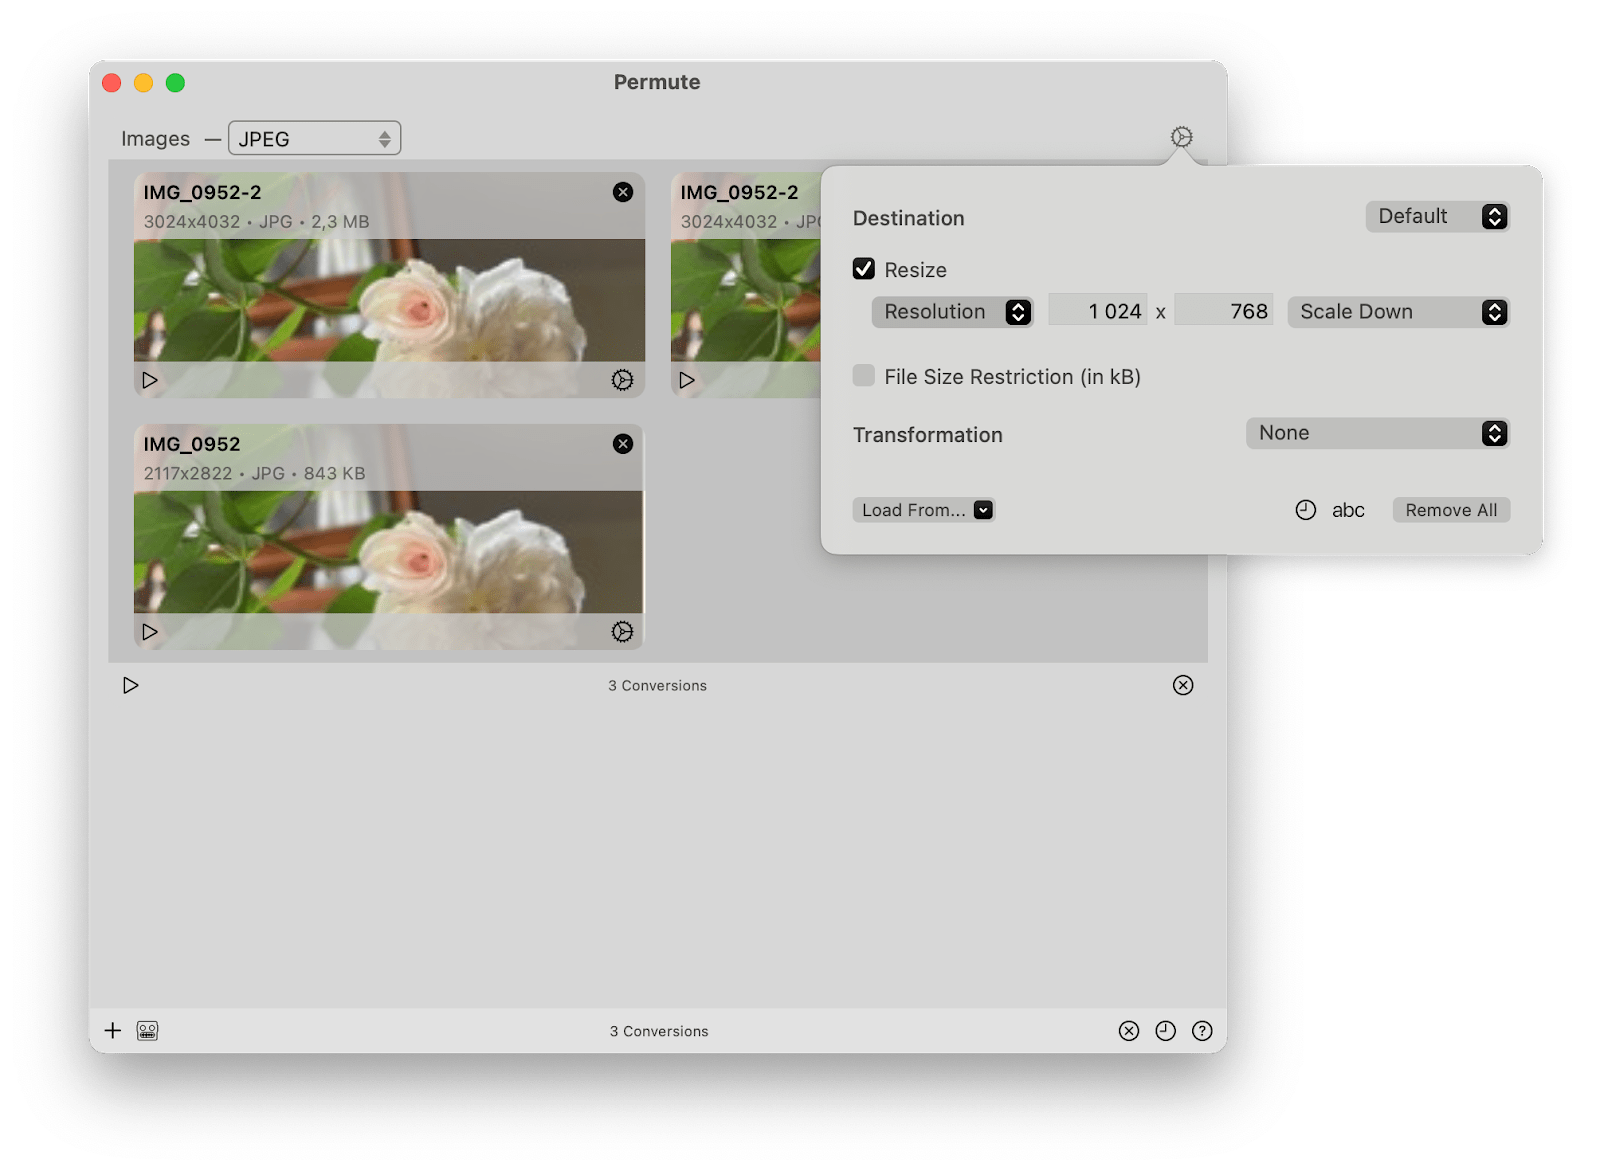
Edit photos with AI
Luminar Neo is another app you might find handy when working with photos. Just like Permute, I refrained from including this solution in our guide on how to resize a photo on Mac, as the key function of this app is AI-enhanced image editing that can help turn your takes into something breathtaking. That said, since you are looking for a tool to reduce photo size on Mac, I’ll start with this feature of the app.
The resize works through export once you are done editing your shot. Find File > Export… in the app’s menu bar at the very top of your Mac’s screen (as opposed to the top of the app window). And set your Resize settings in the respective field that pops up:
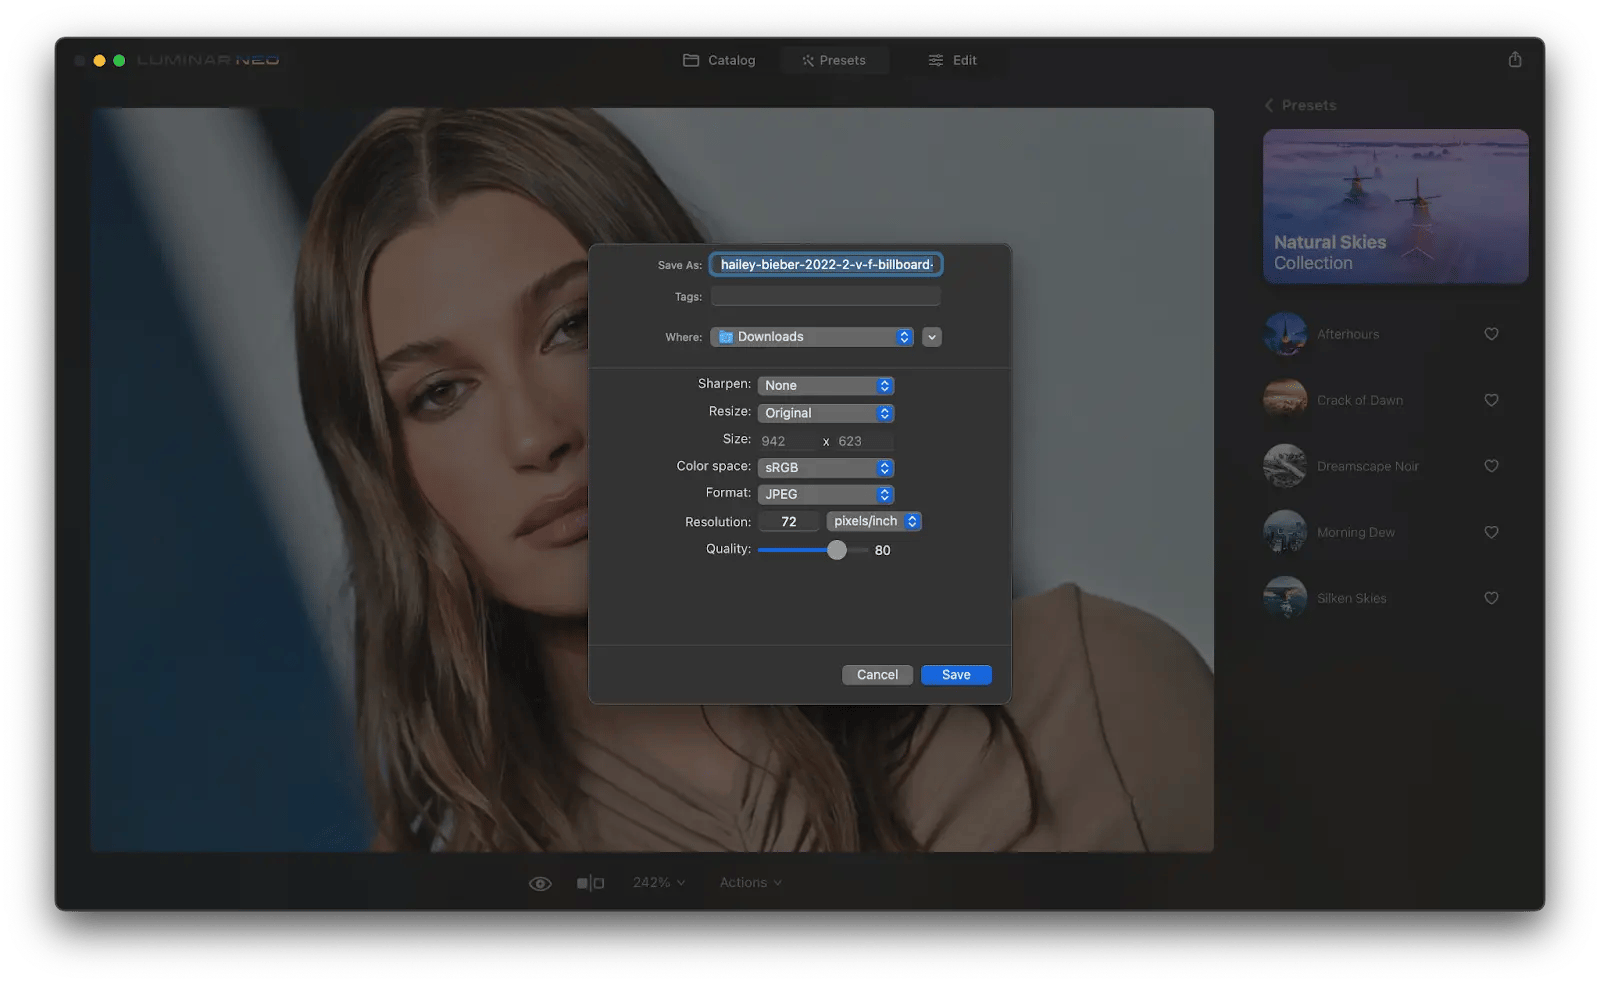
Luminar Neo resize tool lets you set the pixel length of each side of the pic individually, as well as by long or short edge. Make the changes you want and click Save to export your edited visual.
Speaking of editing, I just have to talk about the best part about this photo editor — Luminar Neo offers sets of AI-enhanced looks that can take your photos from good to breathtaking. These versatile presets can be used as is or adjusted to your individual image. You can also save your own settings to edit a bunch of images in the same (or similar) way.
Luminar Neo boasts a collection of really handy tools to turn your photo creations into impeccable masterpieces. Some of the amazing things in the toolkit include noise removal for zoomed-in or poorly lit shots, AI skin, and portrait enhancement tools, smart contrast that enhances your image without making it unnatural or noisy, and much more.
What resizing a photo is and why it is important
Resizing a photo is about making a photo smaller or larger, but beyond this surface description, it’s also about adjusting the width and height and considering the aspect ratio.
Other than for preference reasons, you might want to resize a photo because:
- It can help them load faster on a webpage
- It fits better in certain circumstances
- It improves its appearance and clarity
- It reduces its file size
Differences between file size and image dimensions
Speaking of file size, what’s the actual difference between file size and image dimensions? Aren’t they both related to size?
While that’s true, they refer to very different kinds of sizes.
File size = The amount of KB, MB, or GB a file on your computer takes up.
Image dimensions = The size in mm, cm, or in of the width and height of the image.
When you resize an image, you’re toying with the image dimensions, which will naturally affect file size because you’re adjusting the number of pixels in the image. However, note that resizing dimensions won’t always reduce the file size. If you explicitly wanted to minimize file size, you’ll need to compress the image.
Edit images like a pro with Setapp
Resizing images on your Mac does not have to be an ordeal. You can simply use the tools at your disposal that can take care of image resizing as well as image editing and much more. One such tool that you now know how to use is the built-in Preview app. This Mac app is easy to use, and you already have it on your machine. If you're looking for more advanced features, try these tools:
- To bulk edit and watermark images — PhotoBulk
- To mass convert and resize images and convert other media — Permute
- To add a few finishing touches to your photo works with AI — Luminar Neo.
Explore these and 250+ apps for almost any task with your Setapp subscription and decide for yourself which works best for you (or just use them all!). Start with the Setapp seven-day free trial now and see for yourself!
FAQ
How to resize an image on Mac iPhoto?
To resize an image in Apple’s iPhoto, or its newer substitute, Photos, open the app and select your photo. Then, click File > Export. In the new window that pops up on the screen, change Width and Height, or apply your custom preset. Export the photo.
How to resize an image on Mac for wallpaper?
If you want to use a specific image as your Mac wallpaper but the size doesn’t seem right, here’s how you can change it: Open System Settings > Wallpaper. Click Picture and select your image. Choose Fit to Screen, Fill Screen, or Stretch to Fit (you’ll see a live preview, which will help you pick the right option).
How can I resize multiple images at once on Mac?
The easiest ways to resize multiple images at the same time is to select all the images in Finder, right-click and open with Preview, and select all the photos in the window. Then, use the Adjust Size tool in the menu bar. You could also use a third-party tool like Permute for a smoother workflow.
Can I resize an image to a specific file size (e.g., under 1MB)?
Resizing an image to a specific file size won’t necessarily change its size, as that typically requires compression. If you’re looking to reduce file size, it’s better to use a compression tool that can do so while maintaining good quality.
What is the difference between resizing and cropping?
Cropping and resizing lead to drastically different outcomes. While resizing changes the entire proportions of the image, cropping will cut out portions of the image.
How do I resize images in macOS Finder without opening Preview?
To resize images in macOS Finder without opening Preview, set up a Quick Action in Automator that will let you do so in a few clicks rather than having to open up an image each time.
To do so:
- Open Automator and choose Quick Action.
- Then choose image files for the first drop-down menu.
- Search for Scale Images in the Actions library and drag it to the dashboard.
- Click add in the box, then choose whether you want to resize by percentage or pixels.


