How to reduce JPEG file size on Mac: The best 2026 methods
In our digital era, social media dictates the trends, and more apps are turning to image-heavy formats. This has made most of us very visual, creating a standard of taking limitless photos on a daily basis.
As our phone cameras are becoming more capable of producing high-quality photography, the file size of those photos increases as well. And whether you want to send those images to someone or simply wish to clear that precious storage space on your device, one of the most convenient solutions would be to simply compress photos to reduce their size.
I’ll show you the details of how you can quickly and easily shrink JPEG file size on Mac.
Want to… | What to do |
Reduce JPEG file size without losing quality | Use Preview’s Export feature to adjust format and compression settings. |
Shrink JPEG without losing quality | Use Preview to export as TIFF and choose JPEG in the Compression drop-down. |
Retain file quality | Use Permute to convert to less heavy but high-quality formats |
Compress multiple images | Compress your file folder with the right-click menu. Alternatively, use PhotoBulk or Squash to reduce file size in bulk. |
Compres files online | Use web compressing tools like ShortPixel, JPEG Optimizer, or TinyPNG. |
Reduce photo size by reducing resolution using Preview
Every macOS has a version of Preview, an image and PDF viewing app which lets you look over and print images or PDF files, as well as edit all kinds of image formats.
Before you begin to compress a JPEG, note that there are two types of image compression: lossless and lossy. Lossless compression means that the image quality will be retained, while as a result of a lossy compression, some photo data will be lost, impacting its quality.
Here is how to reduce JPEG file size in Preview:
- Go to Applications and launch the Preview app
- Click on File ➙ Open
- Navigate to the photo you want to compress and select Open
- Click Tools on the menu bar, then choose Adjust Size
- Choose Percent or Size as adjustment value
- Adjust the Width, Height, and Resolution, then click OK
- Check Resulting Size section to make sure new image size is right for your needs
- Select File ➙ Save As to create a new copy of your JPEG
- Enter a filename for your image and click Save
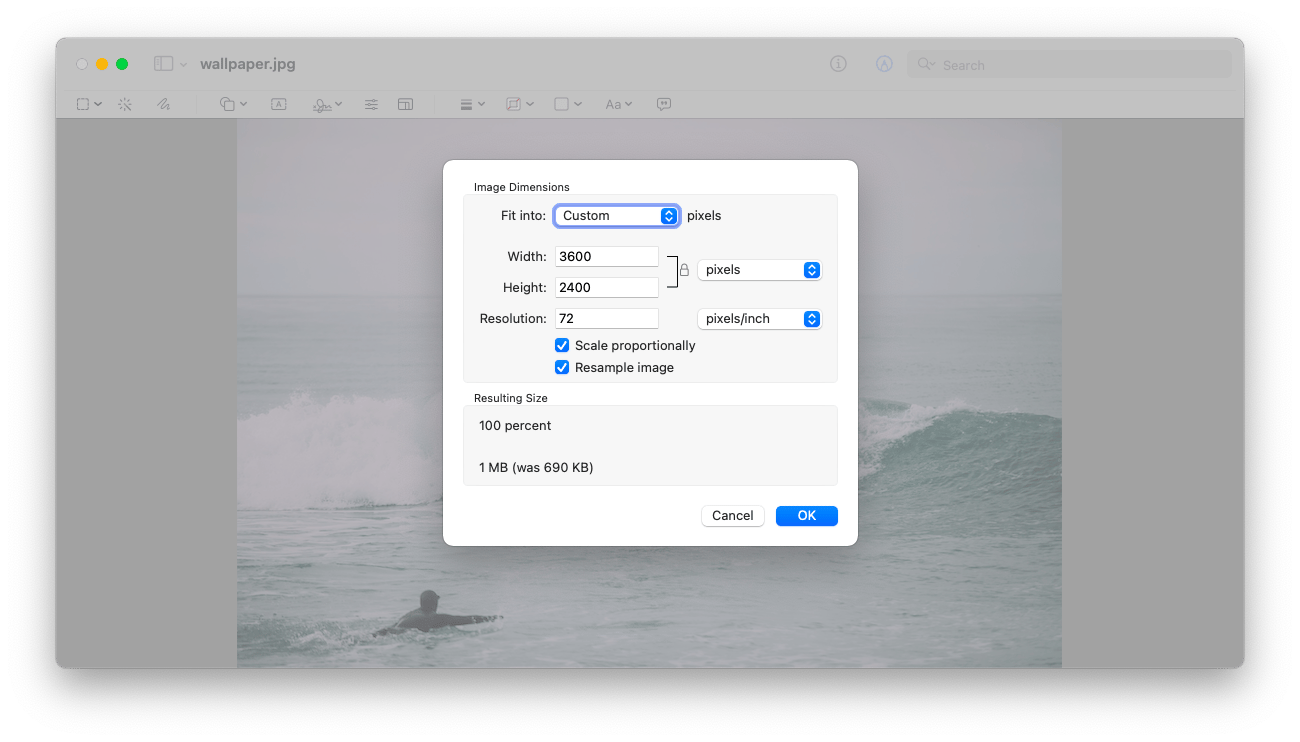
This way to reduce photo size by reducing quality is probably the easiest. However, if you wish to print a photo, or enlarge it later, you’ll need to compress it in a different way that won’t affect the image’s resolution.
Ways to shrink JPEG file size on Mac without losing quality
The simplest way to compress a JPEG is by changing its dimensions and resolution. However, if you do this, your image will become a lot less clear, which is not what we want most of the time.
To compress photos without losing their quality by using the Preview app on your Mac, follow these steps:
- Locate the image you want to resize, then double click to open it in Preview
- Click File ➙ Export
- Export as TIFF by opening the format dropdown menu and selecting TIFF
- Open the Compression menu and select JPEG
- Click Save
- Open the new TIFF file in Preview, then go to File ➙ Export
- Export as a JPEG, and don’t play with the Quality option unless you want to decrease the quality
- Click Save and rename the image if you want
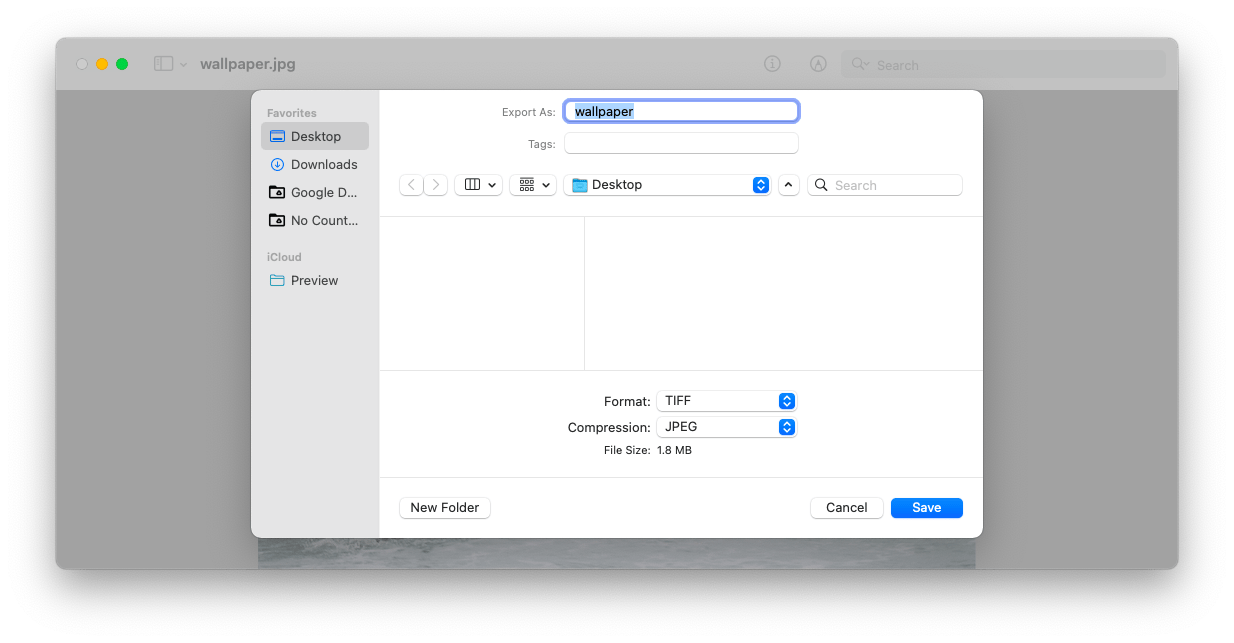
This way, you will create a new JPEG, which will be reduced in size, but its quality will be retained, as much as possible.
Convert files to retain quality
Different file formats are used for different types of visual content depending on how they sustain compression. JPEGs easily lose their quality and are best suited for photos and realistic images, while PNGs retain their quality under compression and thus are great for line-art and images with more text and fewer colors.
Permute is a quick image, audio and video converter, which handles all file formats and can turn one into another in a matter of a few clicks. Not mentioning the trivial image or video file format conversions, Permute is an app that can turn video into audio (and vice versa), and help you prepare your files for going onto a virtual drive, by quickly converting them to ISO.
It takes three easy steps to convert your files using Permute:
- Launch the app
- Drag your file into the main window or onto the dock icon
- Choose the target device or format and click Start
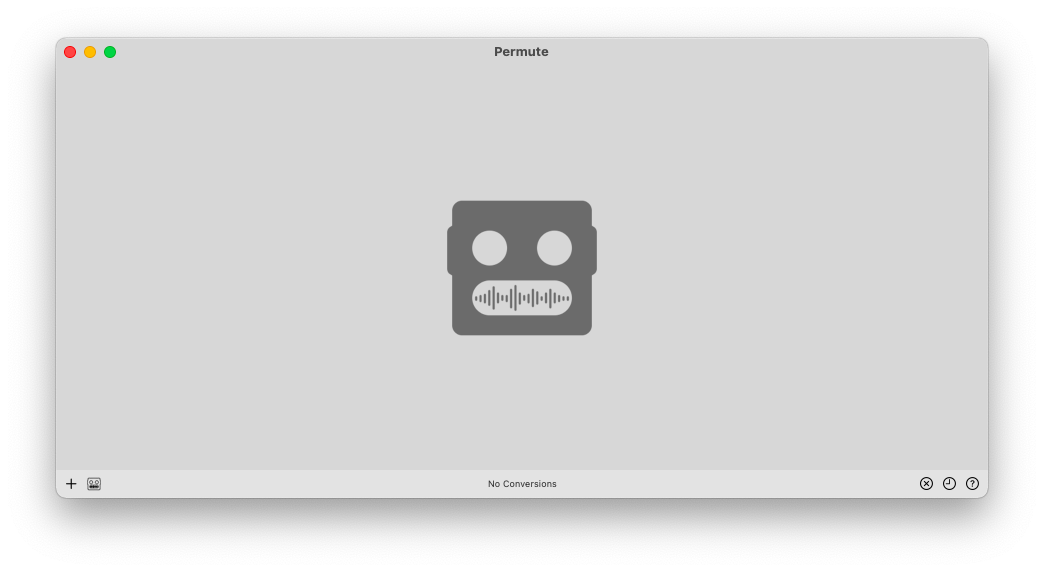
You are all set — your files will be converted into your desired format in seconds.
How to compress photos in bulk
Since most of us have hundreds of photos saved on our devices, it’s rare that we’d want to reduce the file size of just one image. A more likely scenario would be wanting to shrink the size of the whole folder.
If you haven’t been organizing your folders before, now is a good time to start, since you’ll need to arrange the photos you want to compress into a single folder. That might be the hardest step of the process.
From there, you’ll be able to compress photos using no other devices, but your Mac:
- Right-click on the folder of images you want to compress
- Click on Compress “Folder Name”
- Wait for the new “.zip” folder to be created
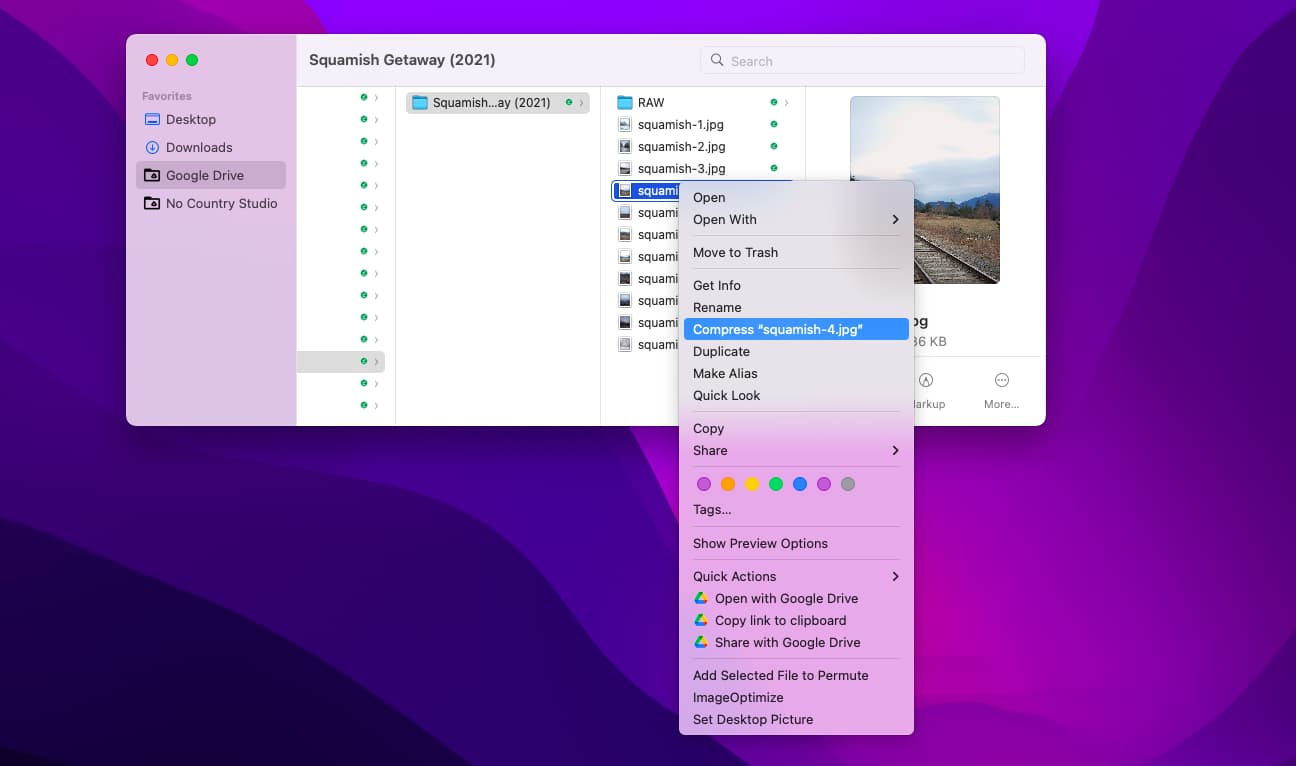
That new “.zip” file is your folder of compressed images. When you want to use those photos again, you simply have to double click that “.zip” folder to unzip it and extract your images.
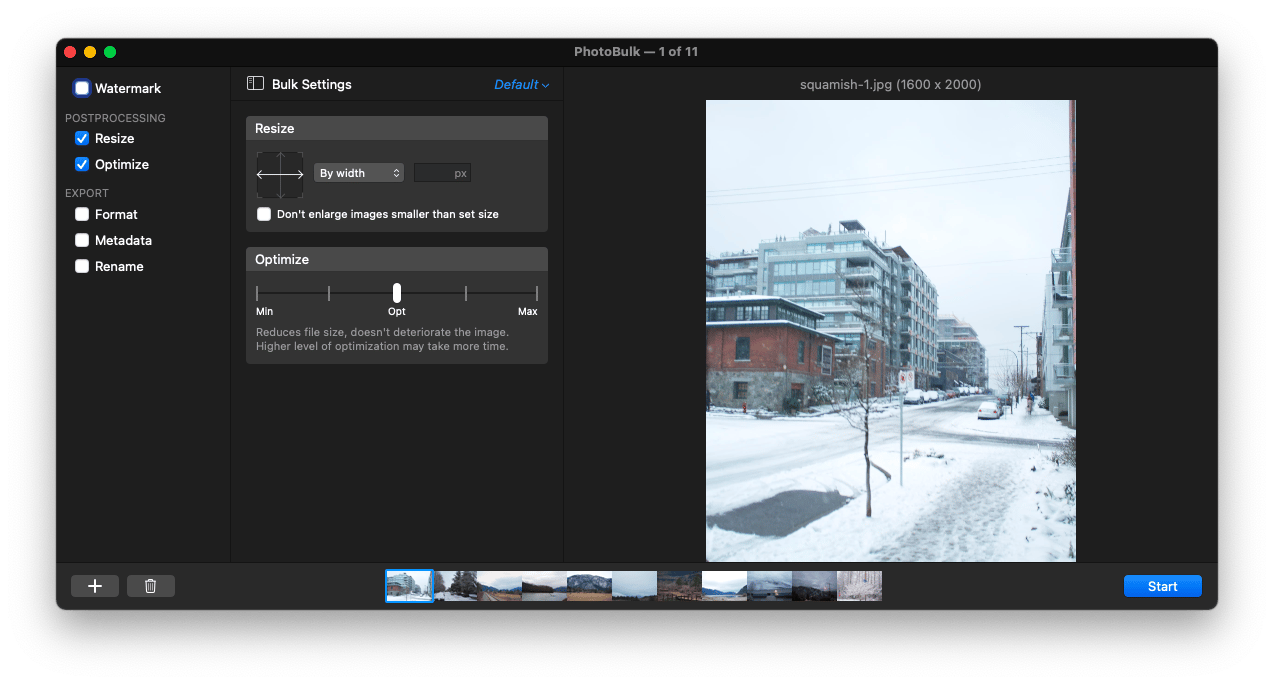
Compress quickly with PhotoBulk
If you find the above methods a hassle, you can always turn to a secure third-party app to do the JPEG file compression for you. PhotoBulk is an image editor designed precisely for handling groups of photos at once. Time is the most precious commodity, so why waste it on compressing, renaming, and formatting multiple images by hand, when a software has been designed to do it all for you! The app has a user-friendly interface and is intuitive in navigation.
To get started, simply:
- Launch PhotoBulk
- Drag and drop all the images that require optimization into the editing window
- Click Optimize and select desired optimization settings
- Click Start and choose the way you want optimized images to be saved
- Hit Save and wait for the app to process your images
Compress and resize with Squash
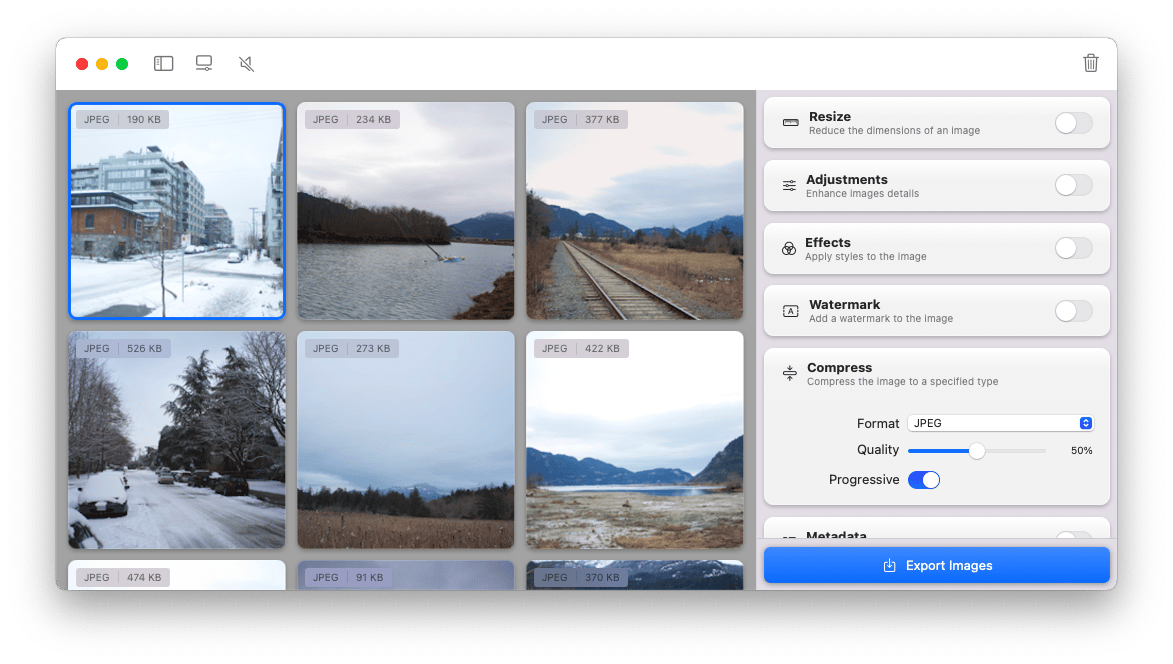
Another efficient way to shrink JPEG file size on Mac is by using Squash — an app created specifically for working on multiple files at the same time. Squash lets you enhance images, add watermarks, convert, rename, and resize — all in bulk. It’s fast and straightforward, making it a go-to instrument in image processing.
To resize or compress photos with Squash, simply:
- Launch the app
- Drag and drop the images you want resized
- Wait for the app to work its magic
Alternative web compression tools
If you’re going ahead with one-time image compression and aren’t bothered to download an app or program for it, there are countless web-based tools that can help reduce file size while maintaining quality.
ShortPixel: ShortPixel essentially does it all, allowing you to resize, compress, enjoy lossy and lossless image compression, optimize images in bulk, and more. The tool is designed for all but targets those who want to improve image quality and loading time for their websites.
JPEG Optimizer: This no-nonsense tool is ideal if you’re looking to reduce image size and convert them into other formats. All you have to do is enter the output format, size dimensions, and quality percentage and hit the compress button.
TinyPNG: TinyPNG is also made to compress images for faster website loading. It boasts a range of tailored solutions for developers, designers, and website owners, such as the Tinify CDN for advanced optimization and the WordPress Plugin for automated compression.
Whether you’re using these tools to save space on your devices or make image sharing easier (no more having to use large-size image-sharing sites), each one has unique features that could sway you one way or the other.
Revert image changes after saving
We’ve all been there: altering an image and then wanting to go back to the old version. Modern technology gives us that opportunity, so if you want to revert image changes to the previous version after you save it on your Mac, you can:
- Click File ➙ Revert To
- Select Browse All Versions
- Choose an older version of the image you want to revert to
Most image processing apps will also have the option to go back to a stage in the editing process, so don’t worry if you’ve made a mistake in the image size or format you’ve changed it to — there is a way to go back.
How to reduce JPEG file size on Mac: Final words
Now you know several simple ways to compress a JPEG on your Mac. Every method has its advantages, and depending on your workflow, you can choose the one that works best for you. And if you want to put your time towards other tasks, while delegating image processing to a trusted and efficient app — you can do that by using Squash, PhotoBulk, or Permute.
Best of all, all three apps — Squash, PhotoBulk, and Permute are available to you absolutely free through the seven-day trial of Setapp, a platform with more than 230 best-in-class macOS and iOS apps that can become your effortless solution to any tech problem and beyond. Don’t take our word for it — give Setapp a try now and see for yourself!
FAQ
How do I reduce the MB of a JPEG on a Mac?
If you want to shrink a JPEG file, you can use a compression tool like Squash or PhotoBulk to reduce the size without losing quality. There are also many free online tools for easy, quick reduction.
How do you compress a large file on a Mac?
To compress a large file, right-click the image or file on your Mac and click the Compress option. If you want more control over the process, you could use third-party image compression tools.
Does compressing files on Mac save space?
Compressing files does save space, but the amount depends on the file type and the tool or method you’re using. For instance, text-based files are the most easy to shrink, while videos and large photos might be harder to shrink significantly.
How do I send files on a Mac that is too large?
For overly large files, ditch the email services and explore other methods like AirDrop (for recipients at your location), cloud storage, large-file transfer services like WeTransfer, or simply compress the file using the Mac feature or third-party tools.


