Use Preview for quick single-page conversions
Preview is the fastest built-in way to change PDF to JPG on Mac — no extra apps needed. Open the PDF, go to File > Export, choose JPEG, and save. Best for one page at a time; set resolution to 200–300 DPI for sharper output.
Use Permute when quality and batch conversion matter Permute converts entire PDFs to JPG in one drag — all pages at once, no quality loss. It also supports PNG, TIFF, BMP, and 50+ other formats. The fastest way to convert PDF to JPG on Mac without repeating steps.
Use Automator for bulk PDF workflows without any app
Automator is a free macOS tool that can convert multiple PDFs to JPG in one automated workflow. Set it up once as a Quick Action, then right-click any PDF in Finder to run it instantly — ideal for repetitive batch conversions.
Use Prizmo to turn JPGs back into searchable PDFs Prizmo converts JPG images into clean, searchable PDFs using OCR — no retyping needed. It also corrects perspective, removes shadows, and enhances image quality before export, making it far more powerful than Preview for scanned files.
Get Permute, Prizmo, and PDF Squeezer on Setapp
All three apps are included in a Setapp Membership — 250+ Mac apps free for 7 days. Prefer to buy just one? PDF Squeezer is also available as a one-time $19.99 purchase via the Setapp Marketplace. Cancel before day 7, and you won't be charged a thing.
I needed to share a page from a PDF on my LinkedIn the other day, so I had to convert it to JPG. I could've just taken a screenshot and called it a day, but I didn't want to lose the quality.
I’m a kind of a perfectionist, so I dug and found a few ways to switch between these two formats with native Apple tools and third-party apps.
If you're in the same boat, I'll show you how to convert PDF to JPG on Mac, whether you need just one image or several.
How to convert a PDF to JPG on Mac: All working methods explained
There are several methods to try, but you can actually try all of them to choose your top converting way to do things quickly. And, of course, your choice may depend on what you really want to achieve.
Before we dive into the details, here's a handy guide for quick fixes:
You want to…
Here's what you could do
Convert a single page quickly
Use Preview: Open the PDF > File > Export > Select JPEG > Save.
Convert an entire PDF to JPG
Use Permute: Drag the PDF in > Choose JPEG > Click Start.
Convert multiple PDFs without an app
Use Automator to set up a Quick Action.
Convert without any Mac tool or app
Use an online converter (but be mindful of privacy risks).
Grab a quick image from a PDF
Take a screenshot (Command + Shift + 4), then export it as JPG in Preview.
Convert JPG to PDF
Use Prizmo: New Document > Open Image File Select the JPG > File > Export As PDF.
Convert via Terminal
Use the sips command, but note that it only works for the first page.
Not sure which Mac app fits your workflow best? I used theProductivity Tools GPT assistantto narrow down my options — it asks a few quick questions and points you to the right tool for the job.
Convert PDF to JPG on Mac with Permute for fast, high-quality results
Let's start with the best method for quality and convenience.
Permute makes it super easy to convert your PDFs into JPGs, and you can even choose other formats like BMP, GIF, and TIFF. There are two main reasons why Permute is my go-to method for converting PDFs to JPGs:
First, it keeps the quality intact, which can't be said for some alternative methods.
Second, it can convert multiple pages at a time, so you won't have to go page by page. Plus, the process is as simple as a drag and drop.
Here's how to convert PDF to JPG on Mac without losing quality:
Install and open Permute.
Click Permute in the menu bar > Settings.
In the Presets tab, select JPEG (the same as JPG format) and PDF.
Close the Settings window.
Drag and drop your PDF into the Permute window. This will lead you to the Permute’s Workshop.
Click PDF to Images and select JPEG next to Preset.
Drag your PDF into the app, and it will execute immediately.
Besides converting PDFs to JPGs, it's also great at converting media files to pretty much any format you'd like.
Mac's Preview is also capable of converting PDFs to JPGs, and the process is quite simple. The only catch? It only converts a single page at a time, so you'll need to go through each page and repeat the process.
Here's how to turn a PDF into a JPG on a Mac using Preview:
Click on the PDF to open it in Preview. Choose a corresponding page.
Go to File > Export.
Choose JPEG in the Format drop-down.
Adjust the quality and resolution if needed.
Click Save.
Tip: For clearer images or print-ready output, set the resolution to 200–300 DPI in the Export dialog. The default is 72 DPI, which looks fine on screen but can appear blurry when printed or zoomed in.
If you only need to convert a single page, this method is quick and effective. But if you need several images, consider Permute or Automator (our next method).
Use Automator to turn PDF into JPG on Mac in bulk
Fan of built-in Mac tools? Then, you can convert multiple PDF pages to JPGs with Automator (a good option, though). It's part of macOS, and it allows users to automate processes they often perform.
In this case, you can create a workflow or Quick Action that converts PDFs in bulk. Setting it up is quite a process, but the conversion process is straightforward.
Here's how to turn a PDF into a JPG on a Mac using Automator:
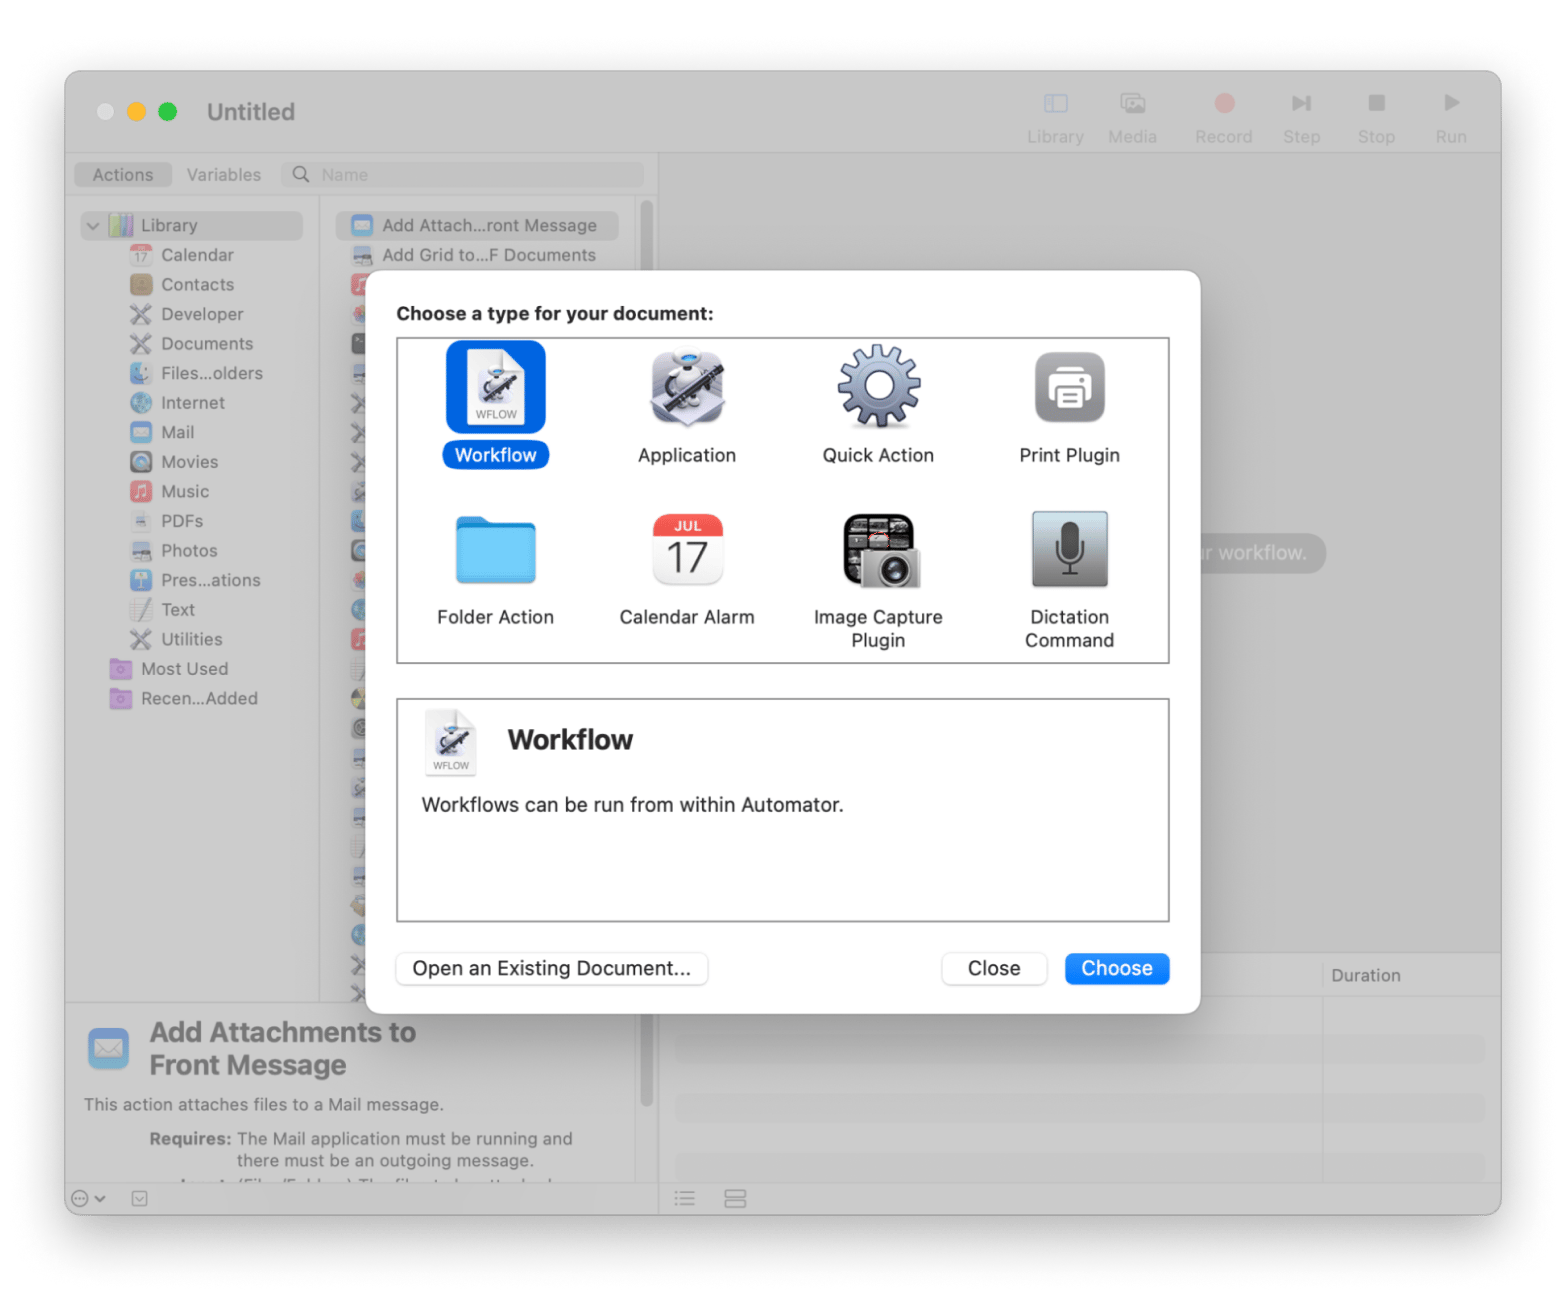
Open Automator (Applications > Automator).
Click Workflow > Choose.
Go to Files & Folders under Library.
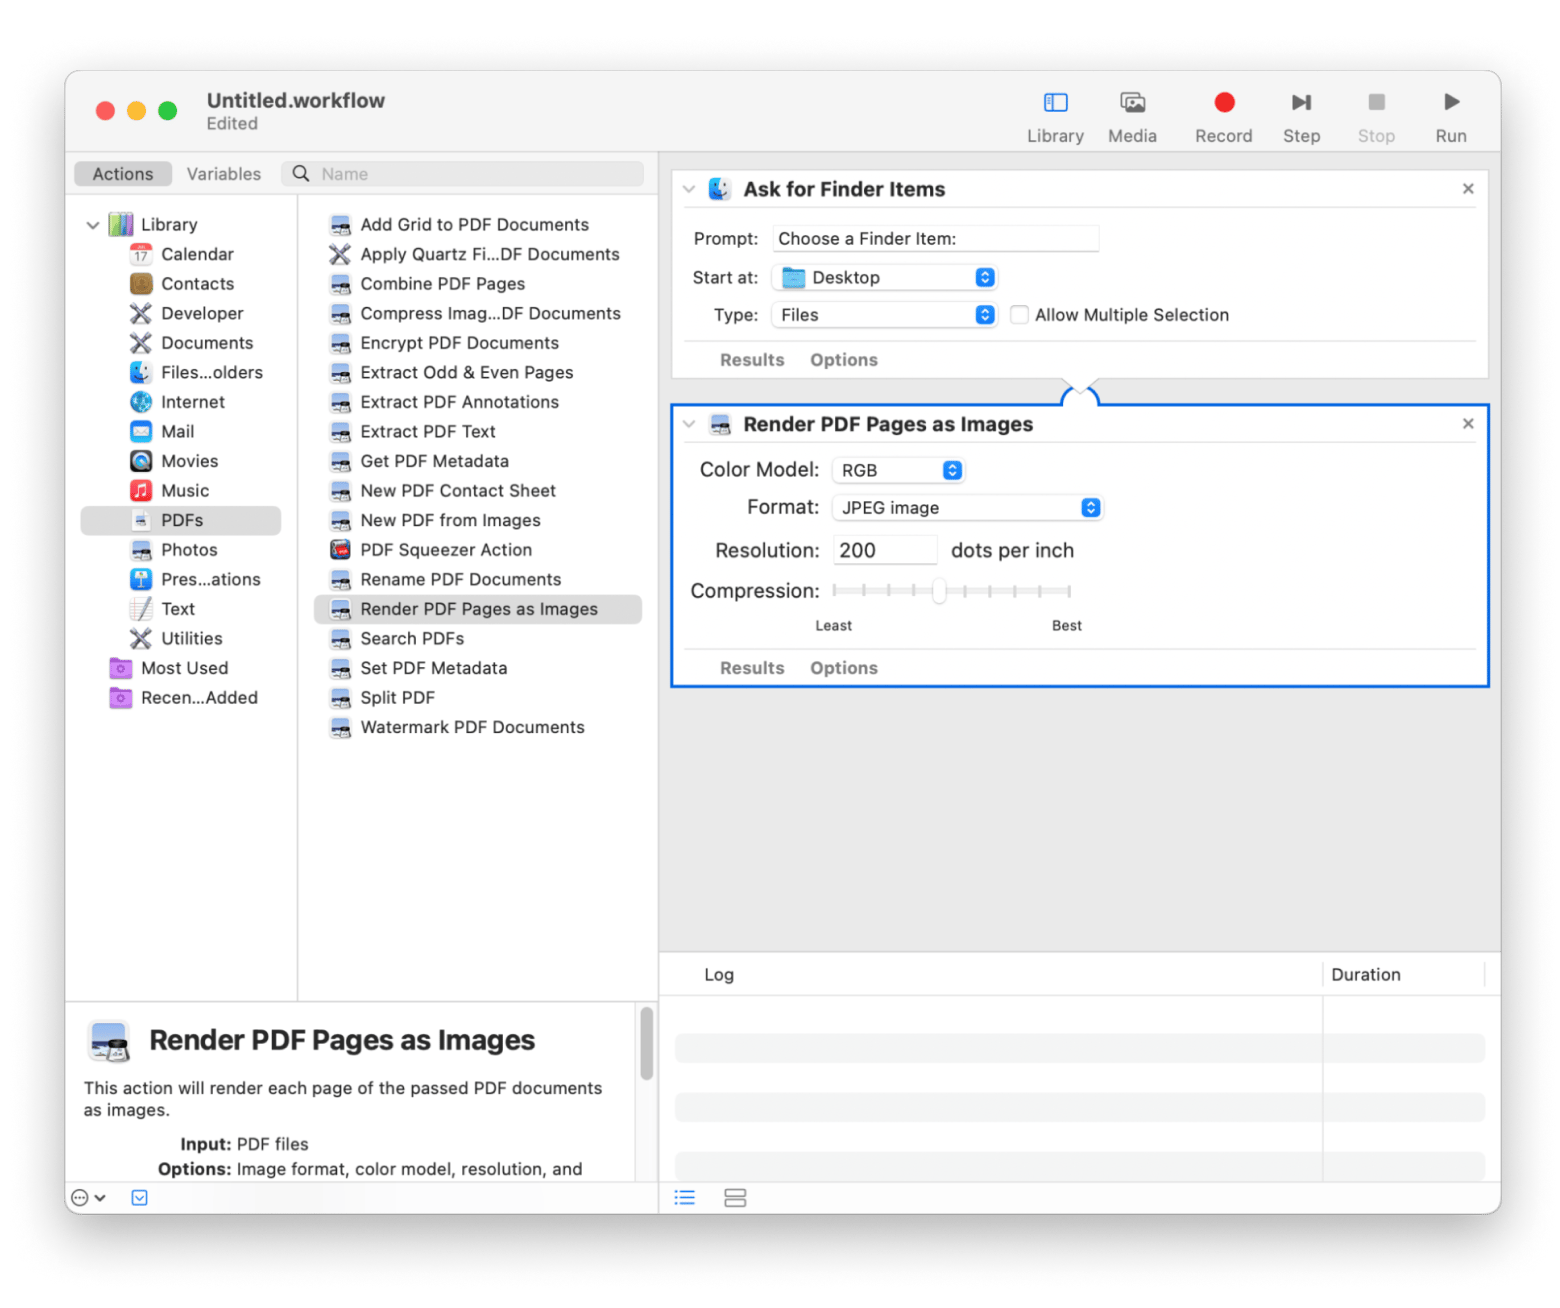
Double-click Ask for Finder Items, then customize the Start at folder.
Go to PDFs under Library.
Double-click Render PDF Pages as Images, then customize resolution and compression.
Go back to Files & Folders under Library.
Double-click Move Finder Items, then select the destination.
Go to File > Save.
Name the workflow, then click Save.
From now on, you'll only need to open the workflow and select your document.
Alternatively, you can set the process as a Quick Action item so that you don't have to open the workflow whenever you need to save a PDF as a JPEG on Mac.
Here's how to do it:
Open Automator (Applications > Automator).
Click New document > Quick Action > Choose.
Go to PDFs under Library.
Double-click Render PDF Pages as Images, then customize the resolution and compression.
Go to Files & Folders under Library.
Double-click Move Finder Items, then select the destination.
Go to File > Save.
Name the workflow, then click Save.
Now, whenever you want to change any PDF document to JPG, you just need to right-click it > Quick items > your Quick Action. It will create the images in the background.
Turn PDF files into JPGs on Mac online without installing apps
If you don't want to install anything or use Automator, you can still get the job done through various online tools.
When online tools make sense:
You're on a borrowed Mac with no installed apps
It's a one-time conversion of a non-sensitive file
You need a result in under a minute
Key limitations to know before uploading:
Privacy risk:Your file is uploaded to a third-party server and may be stored for days.
File size and page caps:Most free tools limit file size or number of pages.
Watermarks:Some services add watermarks unless you pay or create an account.
Inconsistent output quality:Results vary widely between tools.
If you decide to use one, stick to well-known options likeSmallpdf,iLovePDF, or Adobe Acrobat Online
Privacy note:For anything confidential, like work documents or legal files, use an offline method like Preview, Automator, or Permute. Your files never leave your Mac.
Take a screenshot to quickly turn PDF content into an image
If you don't care about quality and only need to share a PDF page as an image, you can simply take a screenshot, and your Mac will save it in PNG format by default. You can then open the image with Preview and convert it to JPG.
Before you capture: Zoom into the PDF as much as possible. The larger the on-screen content, the sharper your screenshot will be.
Here's the step-by-step process:
Open the PDF and zoom in on the section you want.
Press Command + Shift + 4 and select the area you want.
Open the screenshot in Preview.
Go to File > Export.
Choose JPEG and click Save.
This method is a bit slower than simply using Preview, and you can't be sure of the quality you'll get. It depends on the zooming and your screen resolution. Consider using Permute, Preview, or Automator for clearer images.
Transform PDF files into JPGs using Terminal on Mac
Terminal is a no-app method for technical users who prefer the command line. It's fast to type but limited in what it can do. Use this whenyou need a quick thumbnail of a PDF's first page, and you're already working in Terminal.
Here's the convert PDF to JPG Mac command line step-by-step process:
Open Terminal (Applications > Utilities).
Navigate to the location of your PDF. For example, type cd ~/Desktop > Press Return.
Type sips -s format jpeg input.pdf --out output.jpg. Replace input.pdf with the actual name of your PDF and output.jpg with the desired output name > Press Return.
Your image will be saved. However, it's important to note that this will only give you the first page, so it only makes sense when you want a thumbnail for your PDF. The quality is also poor, so I tend to rely on the alternatives that give me control over the resolution.
How to convert JPG back to PDF on Mac easily
Sometimes, you might need to turn a JPG into a PDF, whether it's to make it easy to share, print it, or merge different images into a single file.
The quickest way is Preview, which is already on your Mac. Here's how:
Open the JPG in Preview.
Go to File > Export as PDF.
Name the file and choose where to save it.
Click Save.
The downside is that the tool doesn't give you control over the resolution, and you can only do it for a single page.
Use Prizmo to convert and enhance JPG to PDF on Mac
The other methods I've discussed also work in reverse, but if you want more control over the images and PDF, I recommend using Prizmo. It's my favorite whenever I want to convert and edit PDFs created from images, as it's powerful and easy to use. Best of all? It has OCR, which I use to recognize the text and copy it instead of having to go through the annoying process of retyping.
To convert back to PDF:
Install and open Prizmo.
Click New Document > Open Image File. Select the desired JPG.
Click File in the menu bar > Export As PDF.
Click Export to File.
Turn any scanned JPG into a clean, searchable, editable PDF without retyping a word. Prizmo fixes perspective, removes shadows, and runs OCR. Free for 7 days. Try Prizmo Free.
Final thoughts on how to convert PDF to JPG on Mac
You don't have to struggle with how to turn a PDF into a JPG on a Mac, as there's no shortage of options. Mac's Preview makes it super easy, although you'll have to repeat the process page by page if it's more than one page. Automator is the other built-in alternative, and it works great, but it may take a bit of patience to set it up.
If you want a do-it-all solution that's easy to use, install Permute. It's a master of conversion, whether you want to change a PDF to a JPG or convert an MP4 video to MP3. Then, if you want to reverse the process, you can use Prizmo, as it easily changes any JPG to a PDF, which you can then compress with PDF Squeezer for easier sharing.
The best way to convert PDF to PNG on Mac is to use Permute. This app retains the highest quality and can also create multiple images based on the size of a PDF. To convert:
Install and open Permute.
Drag and drop your PDF into the Permute window. This will lead you to the Permute’s Workshop.
Click PDF to Images and select PNG next to Preset.
Drag your PDF into the app, and it will execute immediately.
How to create a JPG file on a Mac?
You can create a JPG file on a Mac by exporting it from Preview in the JPG format. If you're on the web, right-click it and choose Save As > JPEG. Otherwise, simply taking a screenshot will give you your image, and you can then convert it from PNG to JPG using Preview.
How to compress a PDF on Mac?
To compress a PDF on a Mac, you can use an app like PDF Squeezer. It automatically reduces the size of the file while still maintaining its quality. You need to:
Install and open PDF Squeezer.
Drop in your PDF.
Choose the compression setting.
Click Save.
How to convert a document to JPG on Mac?
To convert a document to a JPG on Mac, you can save it as a JPG by first converting it to a PDF. You can then open the PDF and export it as a JPG file using Preview or Permute.
Get a universal media converter
Permute quickly converts files in a required format.