If you've lost a file and it's not in the Trash or your backup, your only option is to use a file recovery tool. Your chances are pretty good if the loss was due to file deletion, formatting issues, firmware corruption, partition, or file system errors. Physical failures are trickier, especially severe ones, but there's still hope for recovery. Let me share with you a guide with proven methods for recovering files from a USB drive, even if it's damaged.
How to recover files from a USB flash drive: Quick solutions
To save you time, I've organized the key solution from this article into this table. If you need more instructions, feel free to scroll down for more details and my personal recovery tips.
Try these to save your file
Steps
Recover permanently deleted files with iBoysoft Data Recovery
Install and run iBoysoft Data Recovery, select the USB drive, click Search, locate your lost file, and click Restore.
Recover files from .Trashes folder
Open the USB in Finder, press Command + Shift + ., navigate to.Trashes, and recover files. Works if the files are still in your Mac’s Trash.
Repair USB with Disk Utility
Open Disk Utility, select the drive, run First Aid, and follow the prompts to fix errors.
If the USB is not recognized, consult a technician to repair hardware or recover files via memory chip.
Prevent future data loss
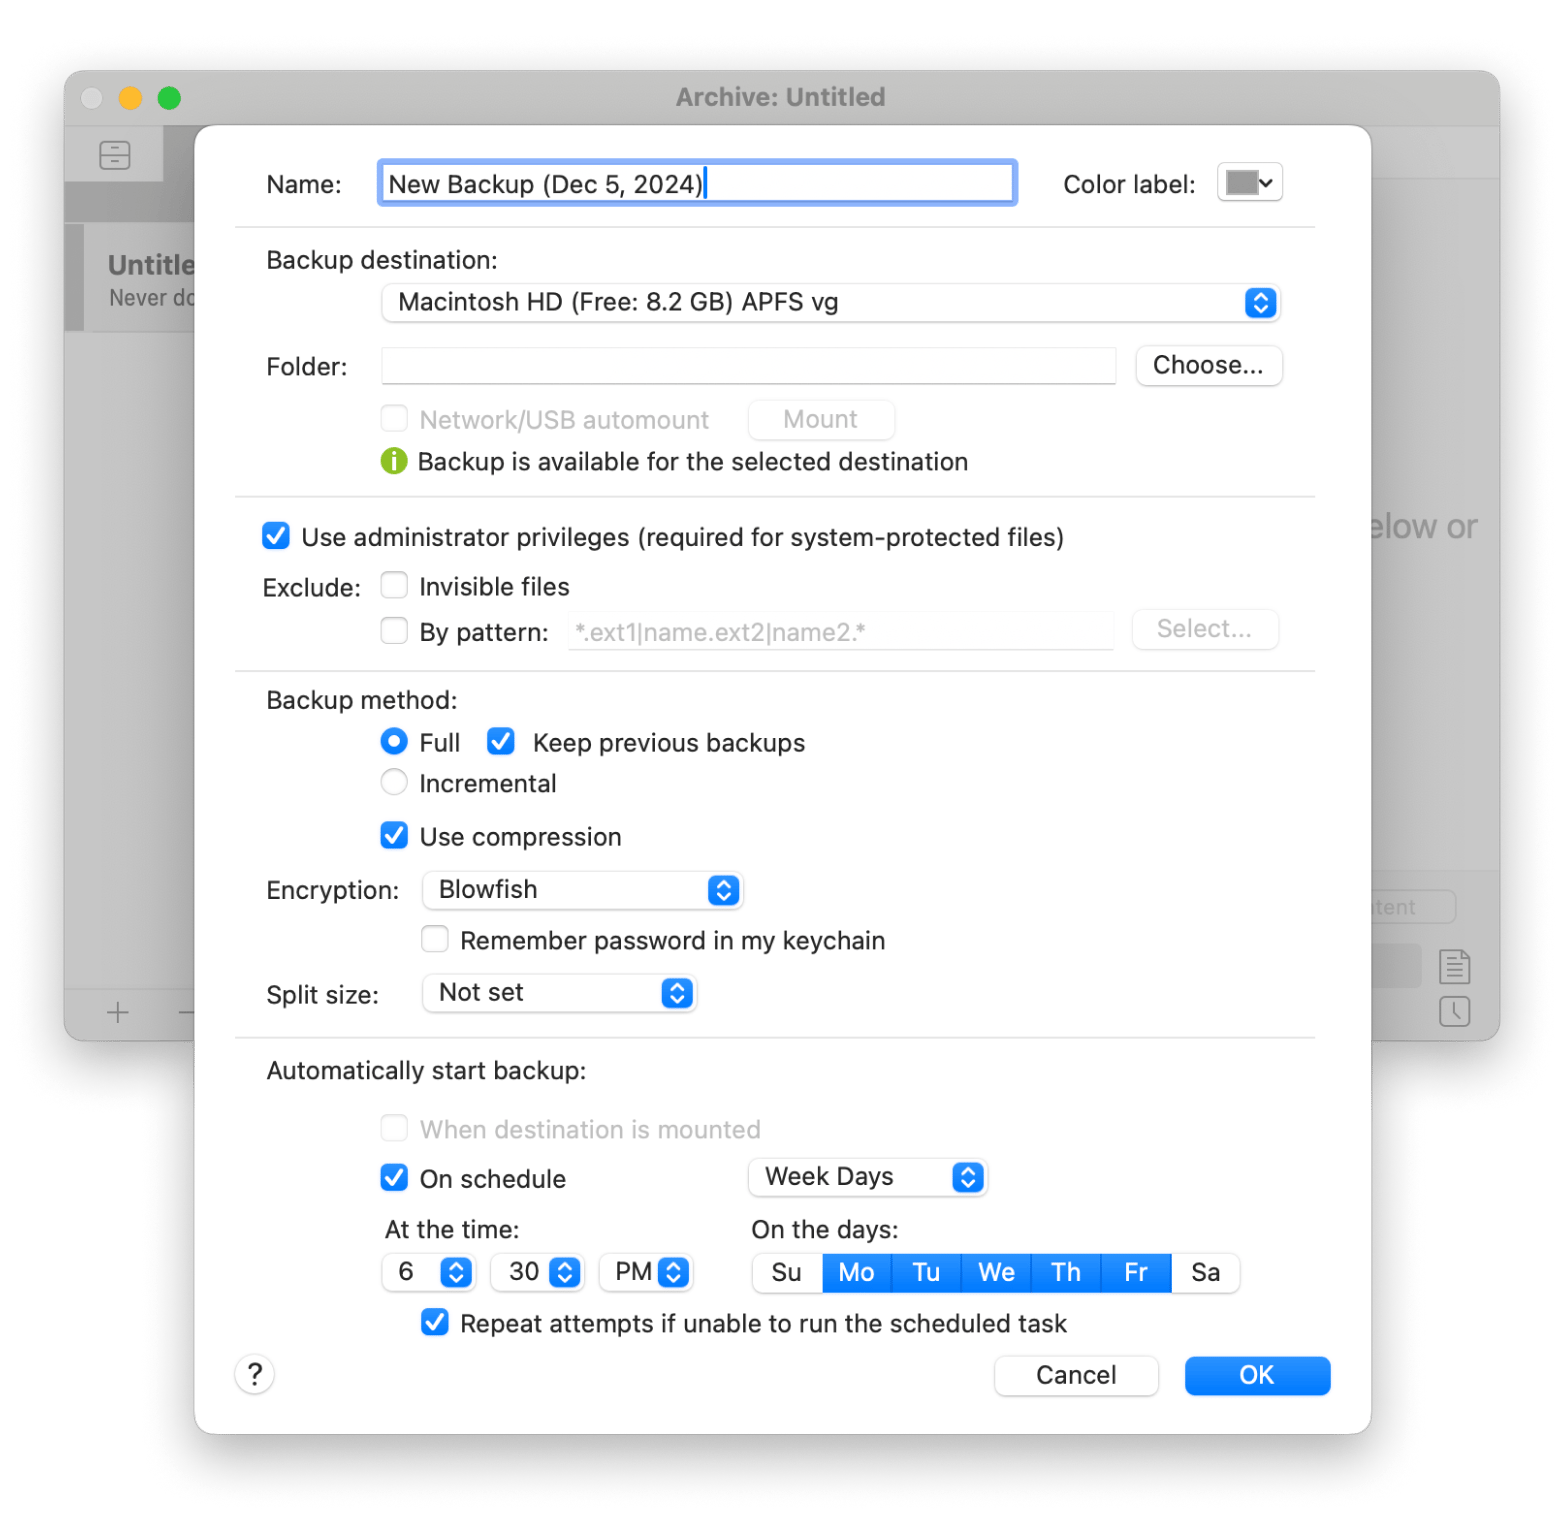
Eject USB safely, avoid malware, and back up data regularly with tools like Get Backup Pro.
How to restore deleted files from USB in a click
As soon as you realize you've lost data, stop using the USB drive. Here's why: deleted files are not completely destroyed. The space they used to occupy is now marked as free. As long as you haven't written over that space with new files, there's a good chance you can recover the lost USB drive data.
Here’s how to recover files from a USB drive on a Mac with data recovery software:
Install and run iBoySoft Data Recovery.
Select your USB drive in the start menu and click the Search button. The scan will take some time, depending on its size and the number of files on it. For example, my 32GB flash drive took about 10 minutes to scan.
Choose the file you want to restore and click Restore. Since you’ll likely see hundreds of files, it’s best to filter them, e.g., by file type. For example, I was searching for a PDF that had been added to the drive today, and this is what the app found:
All you have to do is click Recover. The recovery process takes seconds, and that’s it — your file is back.
The app works with various types of connected drives: iPads, SD cards, and more. I highly recommend iBoySoft Data Recovery for all data loss situations, including recovering deleted photos on iPhone. Just connect your device to your Mac, and the app will take care of your lost data.
We once conducted an extensive test of data recovery tools, and in terms of supported files and storage media, ease of use, and price, iBoysoft Data Recovery turned out to be the best for us.
How to restore files from internal USB .Trashes folder
Your USB drive has a hidden .Trashes folder where deleted files end up. But there's a caveat: they remain there only until the files are deleted from the Trash on your MacBook. So if your Trash is filled to the brim and you're having trouble finding deleted files in it, .Trashes can be a quick way to recover them.
To view hidden files and folders on the USB drive, press Command + Shift + . (full stop).
Can I recover lost files from a broken USB drive?
The short answer is: no guarantees, but it's worth a try. If the file system is damaged, you should first try to fix the errors on the drive before proceeding with file recovery.
Here's how to recover files from a damaged USB drive:
If your USB drive is not recognized by the computer, it might be physically damaged. You'll usually need to open the USB drive's case to diagnose and repair it, and I wouldn't recommend doing this yourself unless you have decent electronics skills.
Leave this to a technician who will check the current flow, look for faults, check the quality of the soldering, etc. As a last resort, they may suggest removing the memory chip and inserting it into the special reader for further data recovery services.
Why files disappear from flash drives: How to avoid future data loss
The more you use a flash drive, the more likely it is that one day something bad will happen — especially if you share your USB device between multiple computers.
Failure due to physical damage is easy to spot, but more often than not, the problem is something on the inside of the device.
Here are some of the common issues that affect files on the USB flash drives:
Unsafe USB ejection
Connecting the drive to a malware-infected system
Downloading an infected file onto the device
Damaged file structure
Accidental file deletion
Therefore, file storage rule #1 is to avoid risky actions whenever possible. Rule #2 (but not in order of importance) is to make backups. I know it's time-consuming sometimes, and you might not want to bother with backups. But I promise, once you make them a routine, they’ll feel as essential as brushing your teeth or taking a shower.
Whether you use Time Machine or another tool, just back up your data. Personally, I've been using Get Backup Pro for several years now. It's great when you need to back up an individual disk, folder, or important file. Plus, its archives are more compact than Time Machine's.
Note: I get the apps I mentioned above, including iBoysoft Data Recovery, along with 250+ apps for macOS and iOS from Setapp. Give Setapp a try — you'll find tools you didn't even know you needed. Start 7 days free if you're a new user.
FAQ
Why can’t some files be recovered?
A file can only be recovered if the space it occupied hasn't been overwritten by new data — that is, no other files have taken its place. When this happens, the original file is considered lost.
Can I recover data from a physically damaged USB drive on a Mac?
You have a chance to recover data from a corrupted USB drive, but it all depends on the severity of the damage.
If your MacBook shows the drive, try recovering data with iBoysoft Data Recovery — it works in such cases.
If the pen drive is not visible, try another USB port. If it doesn’t help, it may need to be repaired. Broken contacts or bad soldering don't affect the storage of data on the memory chip. In fact, the chip simply cannot communicate with your computer, and the technician will need to re-establish this connection. As a last resort, they can remove the chip and use a special reader to plug it into the computer and retrieve files.
For severe physical damage, recovery may not be possible.
Can I recover files from the formatted USB drive?
Yes, formatting doesn’t typically erase files permanently, so they can often be recovered, at least partially. Use iBoysoft Data Recovery to recover files from a formatted drive.
Powerful apps live on Setapp
Ditch defaults and discover new gems on one app platform.