The fastest way to get a still image is a screenshot.
On Mac, iPhone, or iPad, screenshots are the quickest option when you just need a visual reference. They are usually sharp on Retina displays, but frame-level precision is limited, and motion blur can happen.
For precise, high-quality frames, dedicated apps work best.
Tools like SnapMotion let you pause down to the millisecond and export full-resolution images in formats such as PNG, JPEG, or TIFF. This is ideal for YouTube thumbnails, social posts, or any case where accuracy matters.
Batch frame extraction is easiest with automation tools.
If you need an image sequence or hundreds of frames, Permute can automatically convert videos into images at a chosen frame rate, saving time and avoiding manual work.
Built-in Mac tools offer a simple alternative for single frames.
The Photos app on macOS can export a single frame as a TIFF file. It is less flexible than third-party apps but useful if you prefer native solutions.
Setapp gives you an all-in-one solution for video-to-image workflows.
With one subscription, you can access SnapMotion for precise stills and Permute for image sequences, plus many other Mac and iOS tools. You can try everything free with a 7-day trial.
Want to grab a still from your video for a YouTube thumbnail or a social media post? There are plenty of converters, but MP4 to JPEG or PNG (image sequence) conversion might seem tricky when it comes to perfect snaps.
Turns out, there are a variety of cool methods to help you out, from grabbing screenshots and using default apps to getting precise results with third-party apps.
I’ll show you how to take a picture from a video or even create image sequences in a few ways, and you can choose the one you like best.
Capture high-quality stills from videos using native Mac and iPhone tools
The fastest way to grab a still image from a video on a Mac, iPhone, or iPad is simply to take a screenshot. This is the method I use most when a frame quickly catches my eye, and I just need a visual reference.
Screenshots from Retina displays are usually sharp and high-quality, especially in full-screen mode. The main limitation is precision: videos play at 24–30 frames per second, so pausing at the exact moment can be tricky, and motion often results in a slightly blurry image. Still, for speed and convenience, screenshots are hard to beat.
Take a video to photo capture on a Mac
To capture still on a Mac:
Open the video file.
Play the video up to your chosen still and pause it, or use the playback slider to scroll to the right moment.
Click and drag across the area from which you want to take a screenshot.
Release to capture an image.
Your snap will be saved in your Downloads folder.
Extract an image from a video on iPhone or iPad
To capture still on an iPhone or iPad:
Open the video.
Play the video and choose a moment you want to snap.
Press the volume up and side buttons simultaneously to take a screenshot.
Tap on the small screenshot image in the left corner.
Tap and drag the corners of the screenshot to crop anything you don’t need.
Tap Done.
The image will be saved in your Photos app.
The screenshot tool lets you spontaneously convert video to image sequences at your fingertips. However, if you need precise snaps, it’s better to turn to third-party tools that’ll do the job.
If the video you need is hosted online, tools like All Video Downloader let you download videos from 1,000+ websites first. Having the file saved locally makes it much easier to extract sharp, full-resolution frames with desktop apps, instead of dealing with compressed streams or screen captures.
Extract frames from video using SnapMotion for precision
Anyone who needs to transfer video to frames and cares about precision should use a specialized app or tool. I tested different options, and SnapMotion proved to be the most efficient.
SnapMotion is a simple tool designed to do one thing well — instantly get top-quality images out of videos. The app integrates with videos up to 8K quality from your Apple devices or web links. To save even more time, you can rotate and flip videos within the built-in feature before getting stills. The app works with various video formats and exports frames as images from PNG and JPEG to TIFF and even GIF (in case you want to make your pictures lively.)
To extract frames from video using SnapMotion on Mac, follow these steps:
Install and open SnapMotion.
Click Choose Videos In the Finder and open your video.
Play the video or use the slider to get to the right moment.
Click the photo icon to save your image to Downloads.
The cool thing is that the app allows you to choose videos directly from the Photos app or use a link to the video. For example, you can get a still from your YouTube video by pasting the link to the app.
Here’s how to turn a video into a photo on iPhone without screenshots with SnapMotion:
Install and open SnapMotion. It will display all the videos on your device inside the app.
Choose a particular video.
Play the video or use the slider to get to the right moment.
Click the photo icon to capture the photo.
You will see how serious SnapMotion is about getting precise results when you notice that its timer breaks things down to milliseconds! A nice bonus that saved me lots of time.
Convert video to image sequence automatically with Permute
If you’ve ever tried capturing frames manually, you know how quickly it turns into a patience test. Pulling every fifth frame from a video could mean handling up to 30 images per second, and making sure you don’t miss or duplicate a single shot. A much easier solution is to use an automated converter like Permute.
Permute is a powerful way to make image sequences in batches with a few clicks. You won’t even finish your coffee before it’s done. In addition to high-quality PNGs, it can also convert files in different formats, from images to audio and video.
To convert video to images with Permute:
Install and open Permute on your Mac.
Go to Settings > Workshop.
Scroll down and select the Videos to Images box.
Go back to the home screen and click the Permute’s Workshop button at the bottom bar.
Select the format and the frame rate.
Drop a video onto the Permute window to extract images.
Using Permute, you can turn a video into hundreds or even thousands of images in seconds. And the Workshop module is truly one of the app’s superpowers, where you can find a helpful dozen features, such as transcribing text to speech, optimizing videos for the web, replacing color for your snaps or videos, and more.
Export single video frames as photos using the Mac Photos app
Another way to get a still image from a video on a Mac is by using the Photos app. The default Photos app has an obscure command you can use to extract frames from videos.
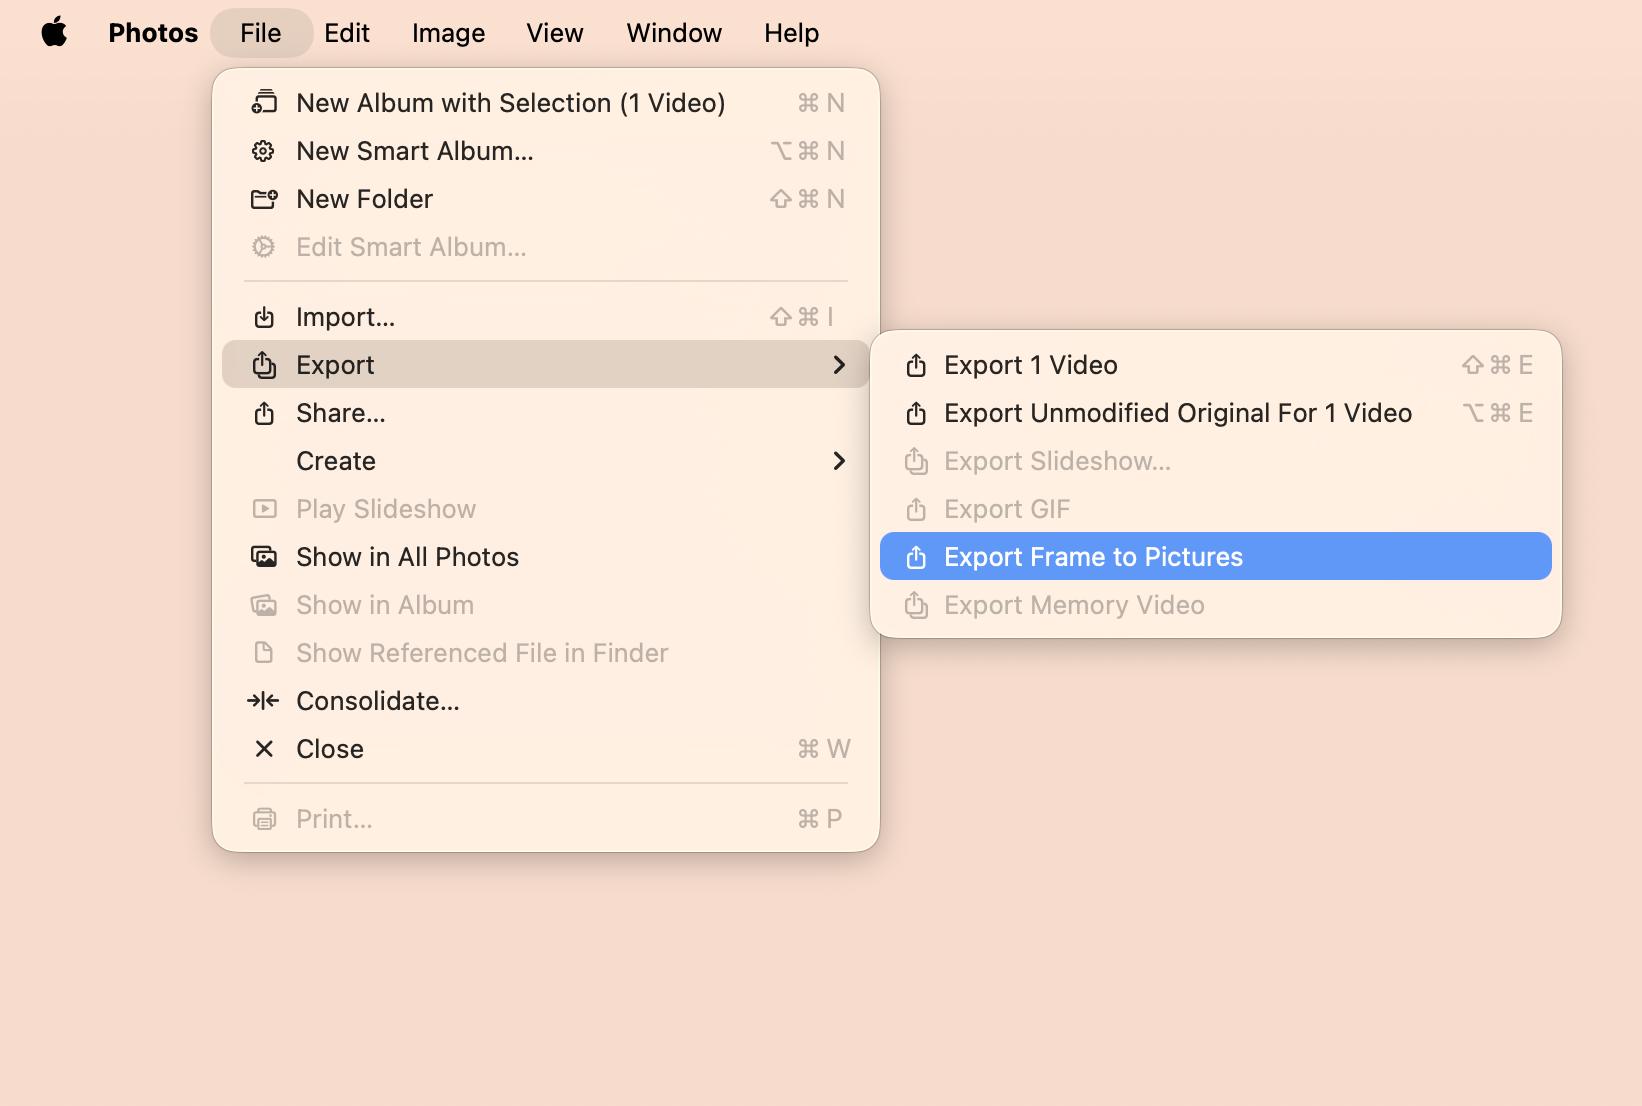
Here’s how to break a video into frames with Photos:
Open Photos on your Mac.
Find and open a video in the library and choose the right moment to snap.
Select File > Export > Export Frame to Pictures in the menu bar.
Your image will be saved as a TIFF in the Pictures folder on your Mac.
Convert video to photo online: Pros and cons
Another way to create a video from an image sequence is by using an online converter. This option can work well if you need a quick result and don’t want to install extra software.
Why people choose online converters:
Cross-device access: You can convert video to image or video to photo from any device, including an iPhone, an iPad, or a shared computer.
No installation required: Most tools run directly in the browser and are often free.
Quick for small tasks: Handy when you only need a few frames or a short clip converted.
What to be careful about:
Privacy risks: Your video must be uploaded to external servers, and it’s not always clear how long files are stored or who can access them.
Malware concerns: Downloaded ZIP files or images may contain unwanted or malicious software.
Lower quality: Online tools often compress images, so the final video-to-image sequence may lack sharpness.
Time costs: Uploading long videos and downloading large archives can be slow, especially on unstable connections.
Tip: If you do go this route, stick to well-known tools like CloudConvert or Kapwing, and avoid uploading sensitive or client-related videos.
Online converters are convenient, but for frequent or high-quality video-to-photo workflows, a dedicated Mac app usually offers better control, speed, and peace of mind.
Tips for fast and accurate video to image extraction
If you’re looking to convert MP4 to frames efficiently, a few smart moves can help you get quicker and accurate results. These tips help you with easy conversion of video to frames, MP4 to image sequence, or taking stills for editing.
Here are the actionable tips that work:
Use a high-resolution source video: Start with the best video quality possible—clear input ensures sharp and detailed image outputs.
Verify output quality regularly: Before copying or analyzing the complete image, check the first few files extracted to validate the quality of recovered elements.
Automate with Permute on Setapp: this app supports batch extraction and control over the output format, so it is well-suited to an automated workflow.
Fine-tune frame selection: Select particular frame intervals (every 5th or 10th frame) for a balance between accuracy and resource usage when converting MP4 to an image sequence.
Use reliable desktop tools: For sensitive or high-resolution projects, choose offline apps like SnapMotion on Setapp instead of online converters.
Protect your privacy: Don’t risk having private content uploaded online to free solutions—local software ensures your data stays private.
Key takeaways from how to get a photo from a video on iPhone and Mac
I’ve covered a variety of ways on how to capture a picture from a video on iPhone and Mac, from taking simple screenshots to using the Photos app.
Another way is to use third-party apps like SnapMotion, which provide quick, high-quality stills. If you need to convert everything in batches, Permute is your choice. You can try these cool apps for seven days absolutely free with a trial of Setapp, a platform with over 260 handpicked Mac and iOS apps covering all categories, from creativity to productivity to web development. Why wait? Explore the whole collection today.
FAQs
How to capture a high-quality image from a video?
Use an accurate frame extraction app like SnapMotion (Mac) or VLC Media Player (Windows).
Pause the video at the frame you want, then export it as a TIFF or PNG to preserve the best detail.
How to take a high-quality still image from a video on Android?
Use apps like Video to Photo Frame Grabber or InShot. Open your clip, pause at the exact moment you want,
and export the frame. Choosing PNG will give you better clarity.
How do I extract high-quality images from a video on my iPhone?
Install SnapMotion or Frame Grabber. These apps let you capture the exact frame,
export it in full resolution, and even work with 8K videos while retaining detail.
What is the best software to extract images from a video?
On Mac, SnapMotion is highly regarded for its accuracy and 8K support.
Permute works well for converting videos into image sequences,
while VLC and FFmpeg are solid free options on Windows and Linux.
Superpowers for your Mac
Tackle your tasks with dozens of helpful apps on Setapp.