How to screenshot on Mac in 2026
- Press Shift + Command + 3 to take a full-screen screenshot.
Shift + Command + 4 — capture a portion of the screen.
Shift + Command + 4 then Space — capture a specific window.
Shift + Command + 5 — for full options, including screen recording. - Edit and annotate like a pro using third-party tools.
While Preview only lets you crop and annotate, apps like CleanShot X and Xnapper offer powerful extras like hiding desktop clutter, adding highlights, redacting sensitive info, and capturing scrolling pages. - Try special tricks.
Hold Option or Shift to resize or lock capture direction, use the timer delay option (via Shift + Command + 5 > Options), or copy screenshots directly to your clipboard by holding Control during capture. - Boost your screenshot game with Setapp tools like CleanShot X, Dropshare, Capto, and Xnapper
These apps (available on Setapp, as well as 250+ others) offer scrolling capture, instant cloud sharing, video annotation, custom backgrounds, and file renaming — all in one subscription. Start your 7-day free Setapp trial to turn basic screenshots into clean, shareable visuals.
Need quick help? Learn how to screenshot on Mac in seconds with our free interactive ChatGPT assistant.
Even though Mac computers have almost everything you need to take a screenshot, the process is more complex than it sounds. Plus, there are a lot of advanced options for taking screenshots on a Mac that you should know about.
- Mac screenshot shortcuts: all shortcut keys and their functions
- Access screenshot menu on Mac: the command for the Screenshot utility
- Best Mac apps to take a screenshot: top tools to capture your screen
- Screenshotting tips&tricks: capture scrolling pages screenshots and capture a specific window
- Mastering Mac screenshots: view, edit, delete, and recover screenshots
- Screenshots troubleshooting: resolve all issues
- How to take screenshots others will love: add annotations, rename, and crop them
- Screenshot FAQs
By the end of this guide, you'll have a solid understanding of how to take screenshots on MacBook Pro or any other Mac.
Mac screenshot shortcuts
Unfortunately, Mac computers don't have a screenshot button, but you can still capture anything on your screen using the standard Mac screenshot keyboard shortcuts. They work for both MacBook Air and MacBook Pro.
| Screenshot shortcut |
Press and hold | |
|---|---|---|
| To take a screenshot of your entire Mac screen | Shift + Command + 3 | |
| To capture a portion of your screen | Shift + Command + 4 | |
| To snap a screenshot of a specific Mac window | Shift + Command + 4 then press Space |
|
| To open the Screenshot app for screenshot options | Shift + Command + 5 | |
| To capture the Touch Bar | Shift + Command + 6 | |
Shift + Command + 3: Take a screenshot of the entire Mac screen
When you press Shift + Command + 3, your Mac instantly takes a screenshot of the entire screen and saves it as a file on your desktop. The file is usually named Screenshot, along with the date and time it was taken.
When you take a screenshot, you'll see a small thumbnail preview in the bottom right corner of your screen that you can click to edit the screenshot.
Shift + Command + 4: Capture a portion of your screen
When you press Shift + Command + 4, your cursor turns into a crosshair. You can then click and drag the crosshair to select the area of your screen that you want to capture. As you drag, the selected area is highlighted with a transparent rectangle.
Shift + Command + 4, then Space: Snap a screenshot of a specific Mac window
To snap a screenshot of a specific Mac window, press and hold Shift + Command + 4, and then press Space. The crosshair on your cursor should change to a camera icon. To take a screenshot, click after highlighting the window with your cursor.
Shift + Command + 5: Open the Screenshot app
All operating systems since Mojave (macOS Catalina, Big Sur, Monterey, Ventura, Sonoma, and Sequoia) come with a Screenshot app. You need to press Shift + Command + 5 to open it. A small menu will appear at the bottom of your screen. The three icons on the left allow you to take a screenshot of the entire screen, a specific window, or a highlighted area. The next two icons to the right allow you to capture a video of the entire screen or just a highlighted area. Click one of the options on the left to choose how you want to capture your screen.
Shift + Command + 6: Capture the Touch Bar
If there's something on your Touch Bar that you want to show others, you can take a screenshot by pressing Shift + Command + 6. This will instantly capture everything on your Touch Bar (if your MacBook has it).
Also, check out where screenshots go on Mac.
How to access the screenshot menu on Mac
As mentioned, on macOS Mojave and later, you can open the screenshot menu and then choose your way of capturing the screen, such as capturing a window or a selected area. macOS versions released before Mojave don't have the screen capturing menu but have the commands to capture part of the screen or the whole screen.
If you're a Mojave, Catalina, Big Sur, Monterey, Ventura, or Sonoma user, you can use Command + Shift + 5 to bring up a screen capture menu that will allow you to:
- Capture Entire Screen.
- Capture Selected Window(s).
- Capture Selected Portion.
- Record Entire Screen.
- Record Selected Portion.

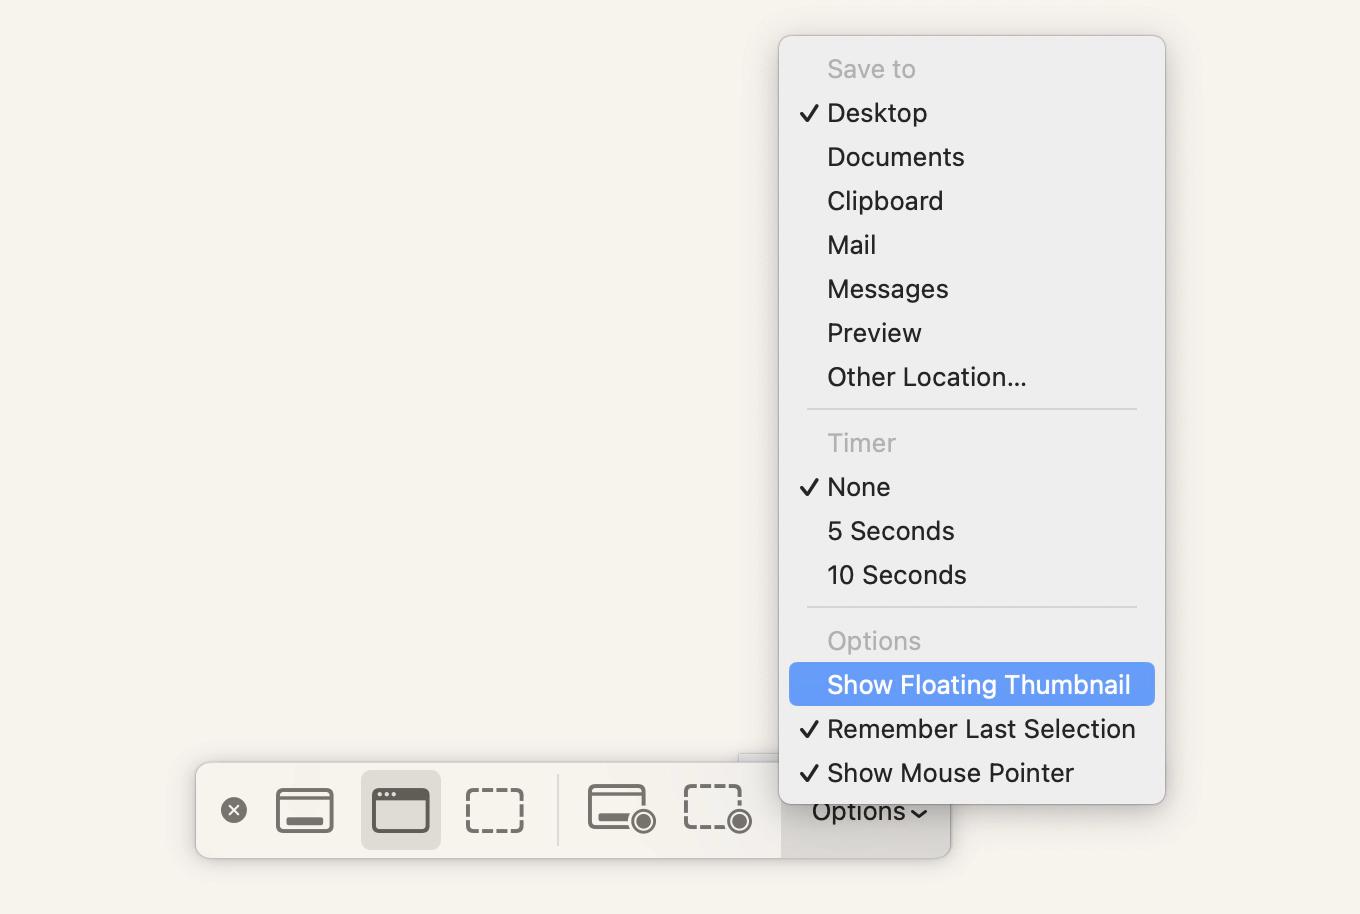
On the right-hand side of this menu, there's the Options button that lets you (among other things) select where your MacBook screenshot and video output are saved.
3 tips to get more precise screenshots on Mac
Dragging your mouse pointer or capturing a window is fine for most cases, but when you need precision, these shortcuts can help. Use them after you’ve already run the screenshotting tool.
- Hold Shift to move the selected capture area in one direction (horizontal or vertical).
- Hold Option to resize the area from the center out.
- Hold Space to quickly switch between capture options — like capturing a selected portion vs. a specific window.
Best Mac apps to take a screenshot
Want to do more with your screenshots? Perhaps you want to share them instantly or add annotations? Below are some of the best tools for taking great screenshots on your Mac.
Use these apps to capture, edit, and share screenshots and screen recordings on your Mac, tailored to various needs:
| App | Its superpowers | |
|---|---|---|
| CleanShot X | Advanced screenshots and screen recording with annotation and cloud upload | |
| Dropshare | Easy sharing of screenshots and recordings with voiceover and URL shortening | |
| Capto | Screen recording with advanced editing features and face camera recording | |
| Xnapper | Creating beautiful, customizable screenshots with text recognition and background customization | |
CleanShot X — advanced screenshot and screen recording functionality in one tool
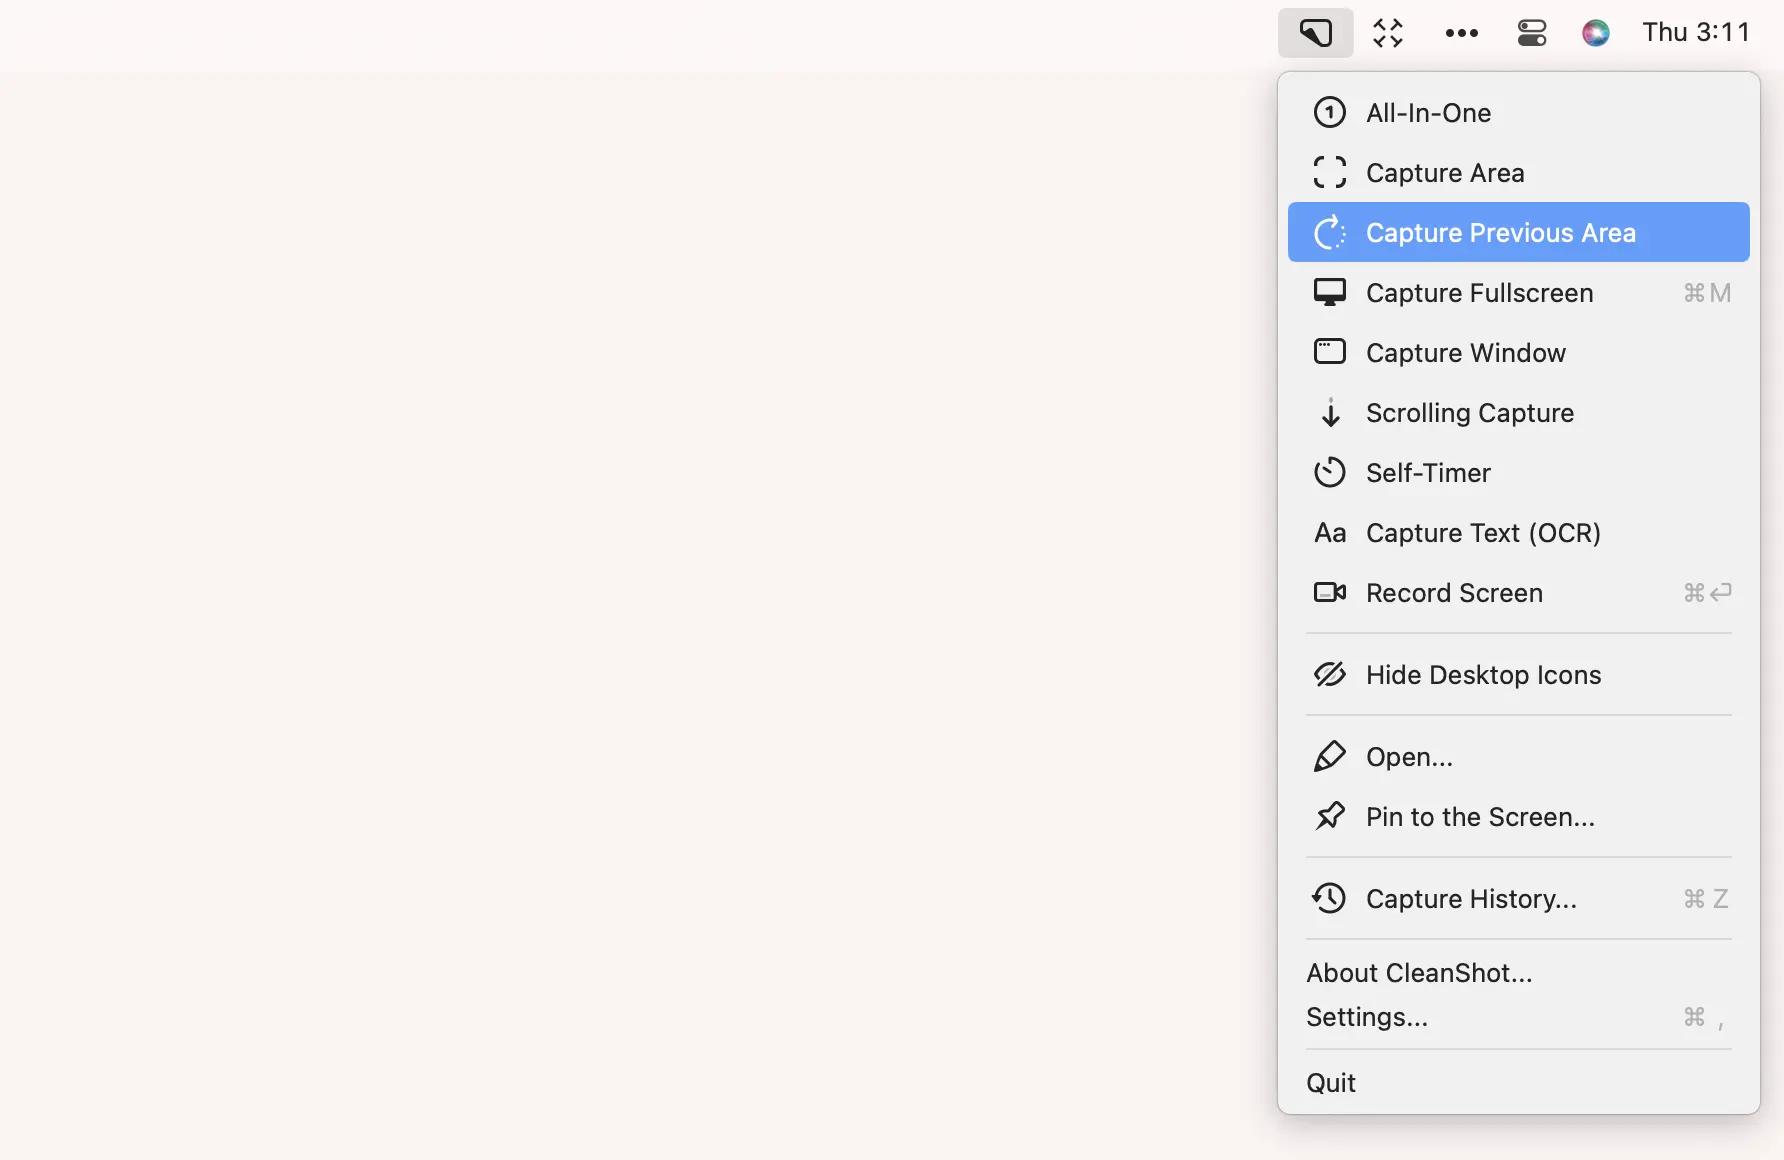
- The best features: Clean desktop, scrolling captures, text recognition, self-timer, and 10GB of storage.
- Price: $9.99/month + tax, along with 250+ apps for almost any task.
Explore no-clutter screen capturing with CleanShot X.
Dropshare — the easiest way to grab and share screenshots and screen recordings
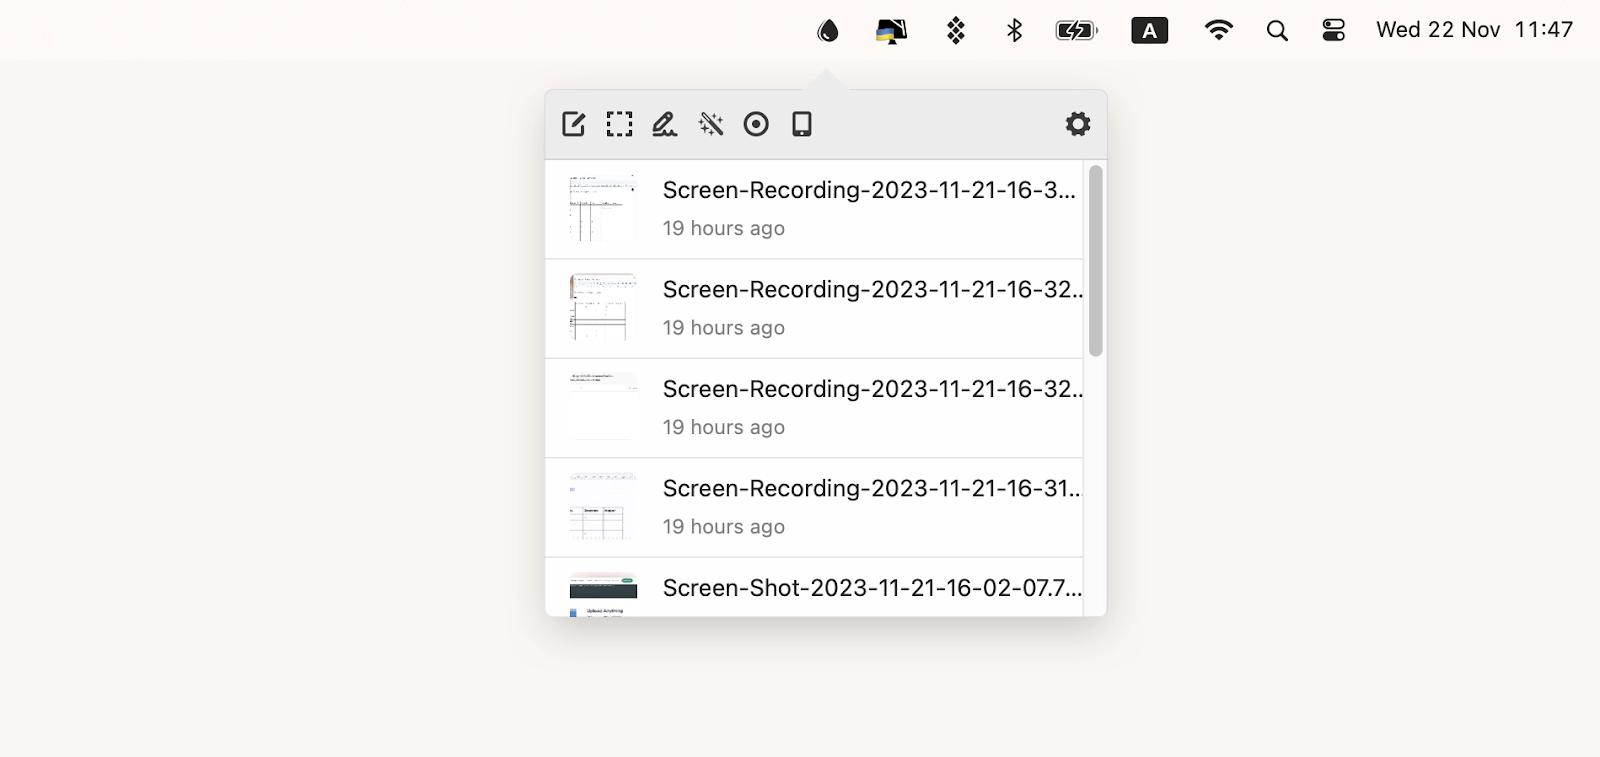
- The best features: Annotation of screenshots and screen recordings, the ability to add voiceover, 10GB of free cloud storage, protected sharing options, and URL shortening.
- Price: $9.99/month + tax, along with 250+ apps for almost any task.
Explore how to grab and share screenshots using Dropshare.
Capto — the best screen recorder
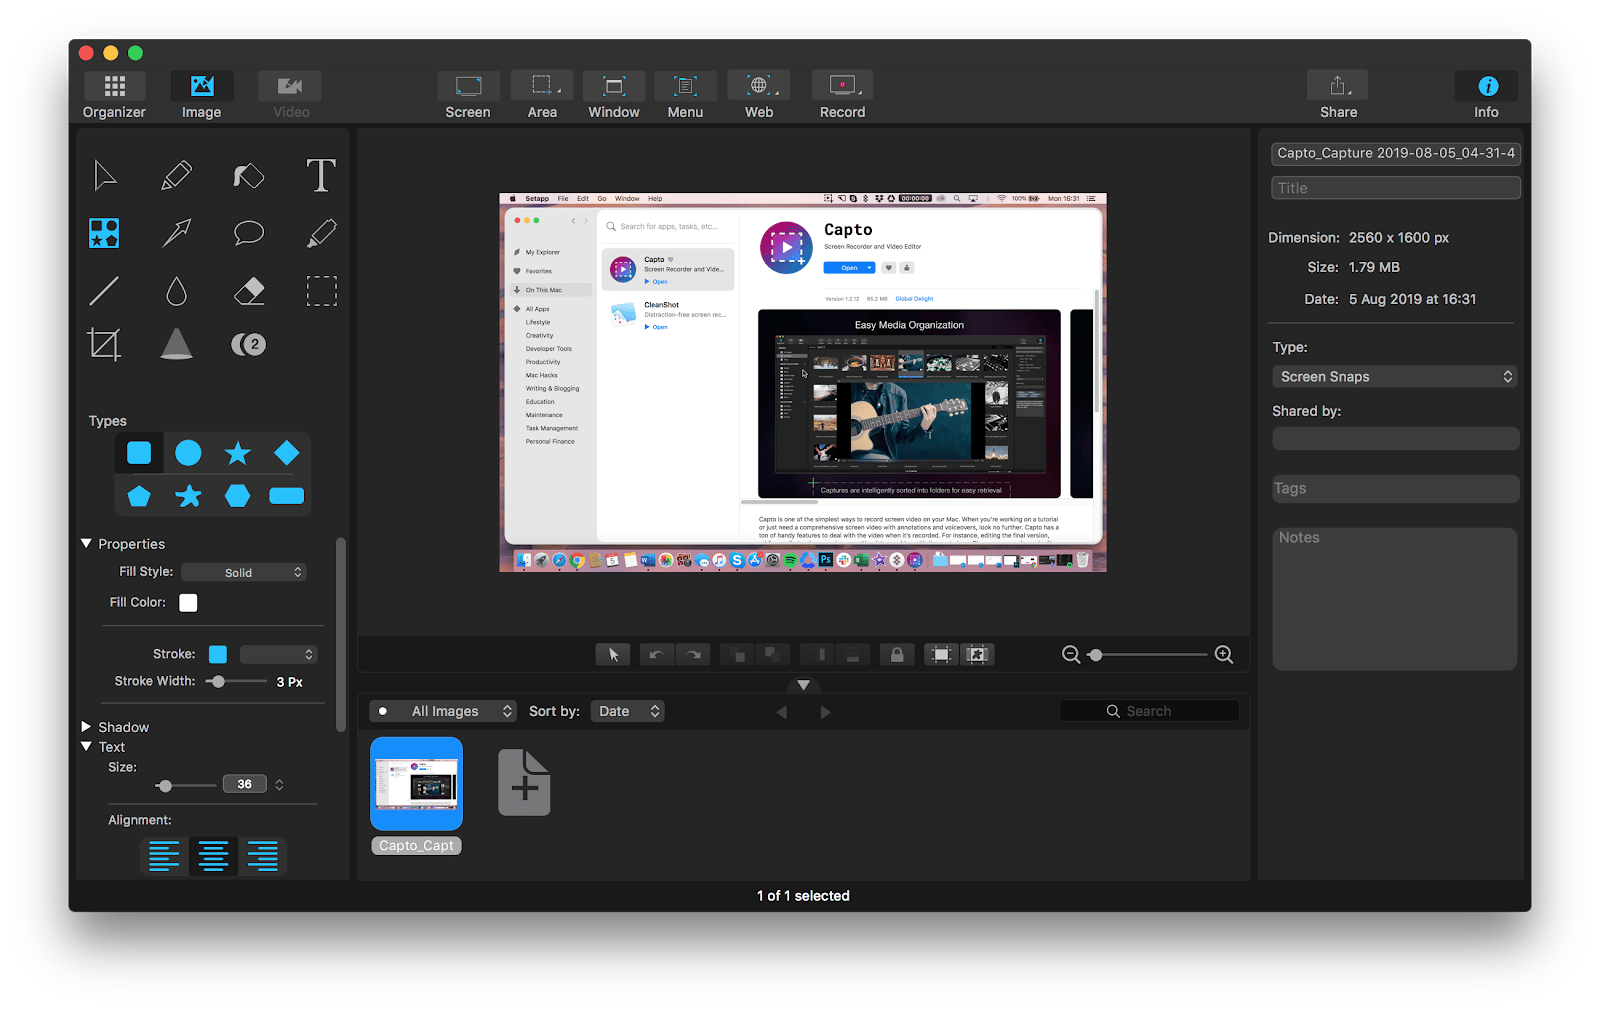
- The best features: Voiceovers and face camera recording, clean desktop.
- Price: $9.99/month + tax, along with 250+ apps for almost any task.
Explore how to record a Mac screen using Captoin detail.
Xnapper — the best app for creating beautiful screenshots without a dedicated design tool
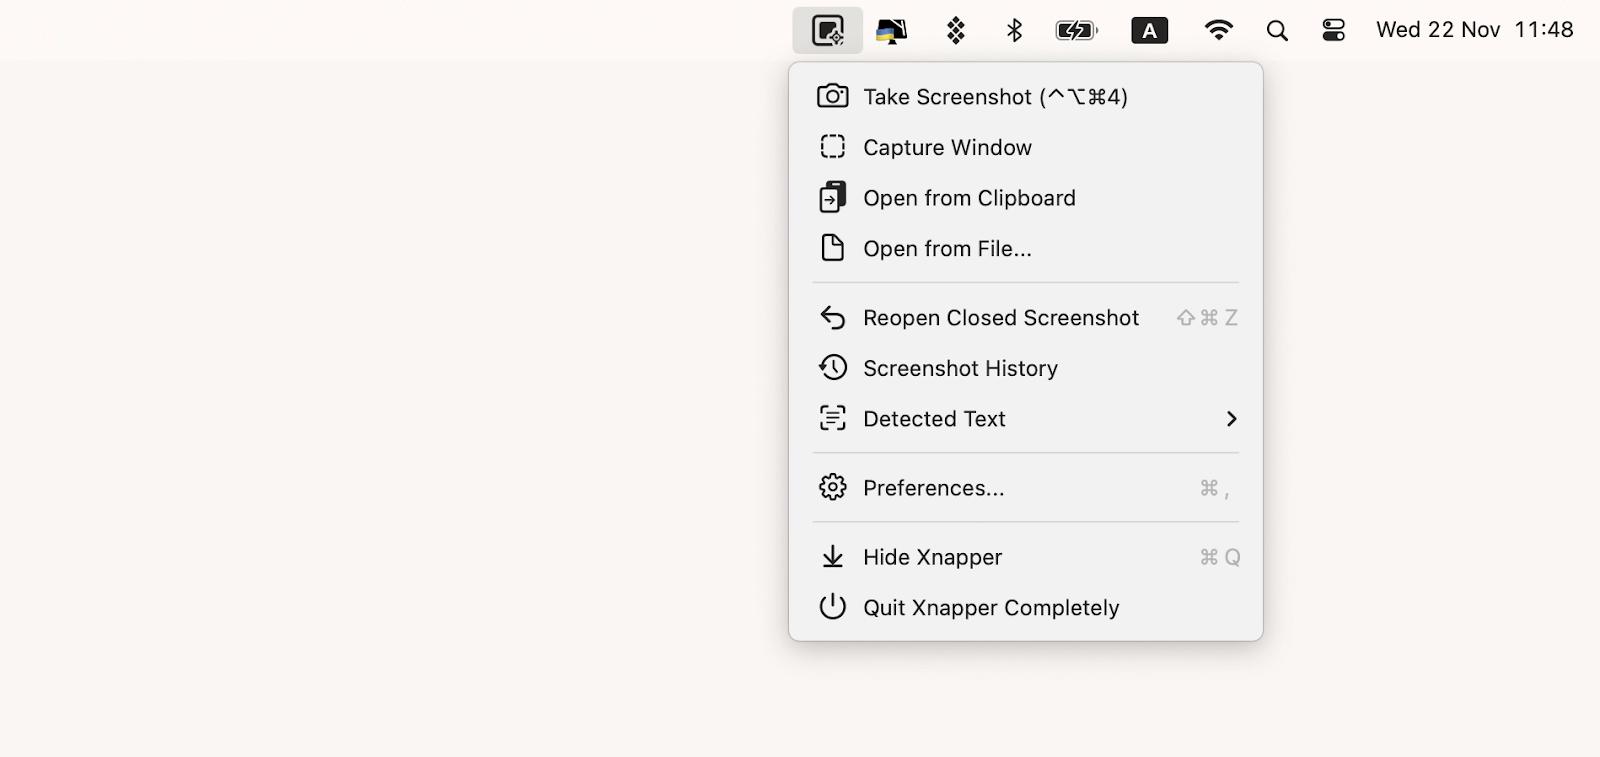
- The best features: Customizable screenshot background, the ability to redact sensitive information, and text recognition.
- Price: $9.99/month + tax, along with 250+ apps for almost any task.
Comparison of the top screenshot apps for Mac
As you know, macOS has a useful built-in Screenshot tool. It works well and usually gets the job done. However, sometimes, you may need a little more advanced functionality to get terrific screenshots. When you choose a third-party screenshot app, make sure it's easy to use and doesn't overwhelm you with excessive features. Below, I'll cover the most important features to look for and compare the five best screenshot tools.
| Let’s compare! | macOS Screenshot | Dropshare | Capto | Xnapper | CleanShot X | |
| Screenshot annotation | ✓ | ✓ | ✓ | ✓ | ✓ | |
| Screen recording | ✓ | ✓ | ✓ | ⛌ | ✓ | |
| Scrolling capture | ⛌ | ⛌ | ✓ | ⛌ | ✓ | |
| Direct cloud sharing | ⛌ | ✓ | ⛌ | ⛌ | ✓ | |
| Video editing | ⛌ | ✓ | ✓ | ⛌ | ✓ | |
| Text recognition | ⛌ | ⛌ | ⛌ | ✓ | ✓ | |
| Distraction-free mode | ⛌ | ⛌ | ✓ | ⛌ | ✓ | |
How to screenshot on Mac like a pro: Tips and tricks
Screenshots are more than just pictures of your screen — they capture your current workspace info. That's why it's important not to just take random screenshots. Here's how to capture quality screenshots with ease:
How to take a scrolling screenshot of the entire webpage
When capturing full web pages or any type of scrolling content, your captures are limited to what is visible on the screen. What if you need to capture more? You can take full-page (scrolling) screenshots with the help of CleanShot X and Capto.
Check our user guide for detailed instructions on how to take a full-page screen capture on a Mac.
How to print screen of a selected area
If you want to capture a portion of your screen:
- Press and hold Shift + Command + 4.
- To select the portion of the screen to capture, drag the crosshair. Press and hold the Space bar while dragging to move the selection. Pressing the Esc (Escape) key will stop the screenshot from being taken.
- Release the mouse or trackpad button to take a screenshot.
- To edit a screenshot, click the thumbnail if it appears in the corner of your screen. You might also wait for the screenshot to save to your desktop.
Note: If you're having trouble with your trackpad, check out our guide on how to fix a MacBook trackpad that’s not working.
How to capture a screenshot of the entire screen
How do you take a screenshot of your entire screen? It's easy! Simply Press and hold Shift + Command + 3 simultaneously, and you're done.
TipWant to copy the screenshot to your clipboard instead of saving it to your desktop? Add Control to any of the above shortcuts. For example, Control + Command + Shift + 3 will copy a full-screen screenshot. |
How to screenshot a specific window on Mac
If you want to capture a specific app window:
- Open the window that you would like to capture.
- Then press and hold Shift + Command + 4, and Space bar. The pointer will change to a camera icon. If you want to cancel taking the screenshot, hit the Esc (Escape) key.
If you find yourself needing to take a screenshot of something that requires a few seconds to set up, you can utilize the timer delay feature. Follow these steps to take a screenshot with a timer delay:
- Simultaneously press the Command + Shift + 5 keys on your keyboard. This action will open the Screenshot app.
- In the Screenshot app window, locate and click the Options button.
- From the drop-down menu within the Screenshot app, select a timer delay option that suits your needs, such as 5 or 10 seconds.
- Finally, click the Capture button in the Screenshot app window or use the appropriate keyboard shortcut to take the screenshot.
How to take screenshots using the Touch Bar
If you have a MacBook Pro with a Touch Bar, you won't have to remember keyboard shortcuts each time you take screenshots. Instead, you can add a camera icon to your Touch Bar and save anything as a screenshot with a couple of taps.
To take a screenshot via Touch Bar, first make sure the screenshot button is active in your Touch Bar by visiting System Settings > Keyboard > Customize Control Strip and dragging the screenshot button onto your Touch Bar if it's not already there.
Once it's on your Touch Bar, click the small arrow next to the minimized control strip, select the screenshot button, and your Mac's screen will display the options available, like capturing the entire screen, a portion of the screen, or recording your window.
How to make a screenshot of the Touch Bar
Maybe you've customized your Touch Bar layout and want to share it with someone or use the same layout on another Mac. Or perhaps you have a Touch Bar game installed that you want to take pictures of. Either way, here's how to take a screenshot of your Touch Bar:
Press Command + Shift + 6 to save an image of the current state of the Touch Bar to your desktop.
How to take a screenshot with Preview
Preview is Apple's native image and PDF viewer — probably an essential part of your workflow. Its screenshot tool allows you to grab a part of the screen, window, or entire screen. The benefit of taking screenshots in Preview is that it automatically opens the screenshot you've taken in a new Preview window, so you can edit it — resize, add annotations, etc.
In the app menu, click File > Take Screenshot > choose which part of the screen you want to capture > take a screenshot. From there, you're free to edit and save your screenshot to any location on Mac.
How to use Chrome screenshot tool
Need to take a screenshot in Chrome? This handy hidden command is going to be your new best friend.
- Open Chrome.
- Then, open DevTools by going to View > Developer > Developer Tools (Option + Command + I).
- Go to the ellipses menu > Run command (Shift + Command + P).
- Type screenshot.
- Choose the type of screenshot you want to take: area, full size, node, or regular.
Your Chrome screenshot will be saved in your regular destination folder, which in Google Chrome is Downloads by default.
For detailed information, please refer to our step-by-step guide on taking screenshots in Chrome.
What is an advanced Chrome screenshot option
Another great benefit of using a snipping tool in Chrome is that you can run it through the device emulator to display a mobile screen, for example, without using your phone. You can even specify the exact device you want to display, which is great for creating design mockups.
- Press Command + Option + I and look for the bar at the top of the screen, just below the address bar.
- Click in the area where it says Responsive and choose the type of device you want from the list. This will make the site you're viewing look like it's being viewed on the phone you chose.
- Once you've done that, just pick up where you left off and go to the last two steps above to capture and save your screenshot.
- Voila! The resulting image will be the size and shape of the phone.
How to share screenshots
The most common way to share screenshots on your Mac is to send them by Mail/Messages/AirDrop via the Share button.
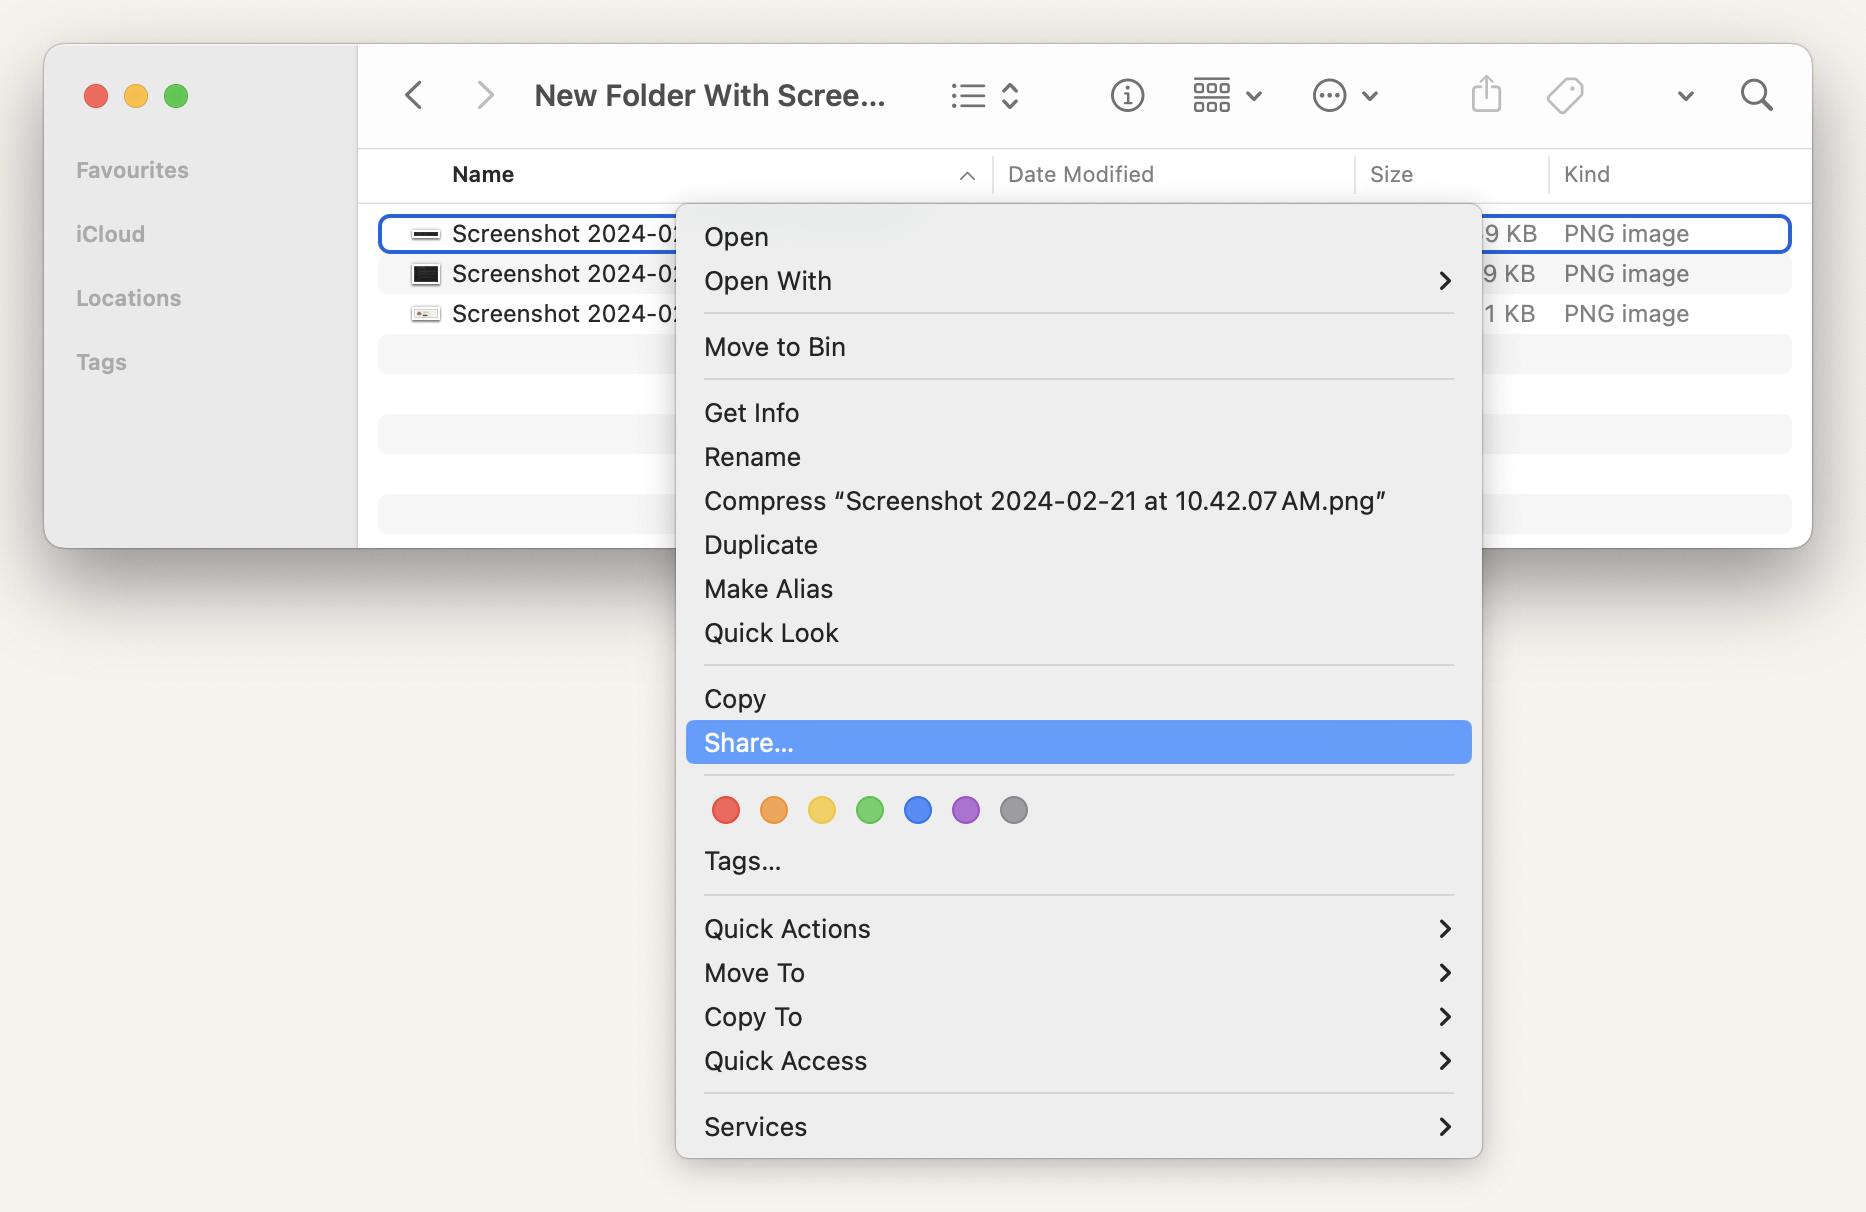
Simply right-click on the screenshot you want to share with someone, then choose Share, and click Mail/Messages/AirDrop/etc. If you choose Mail, the screenshot will be inserted into your email as an image.
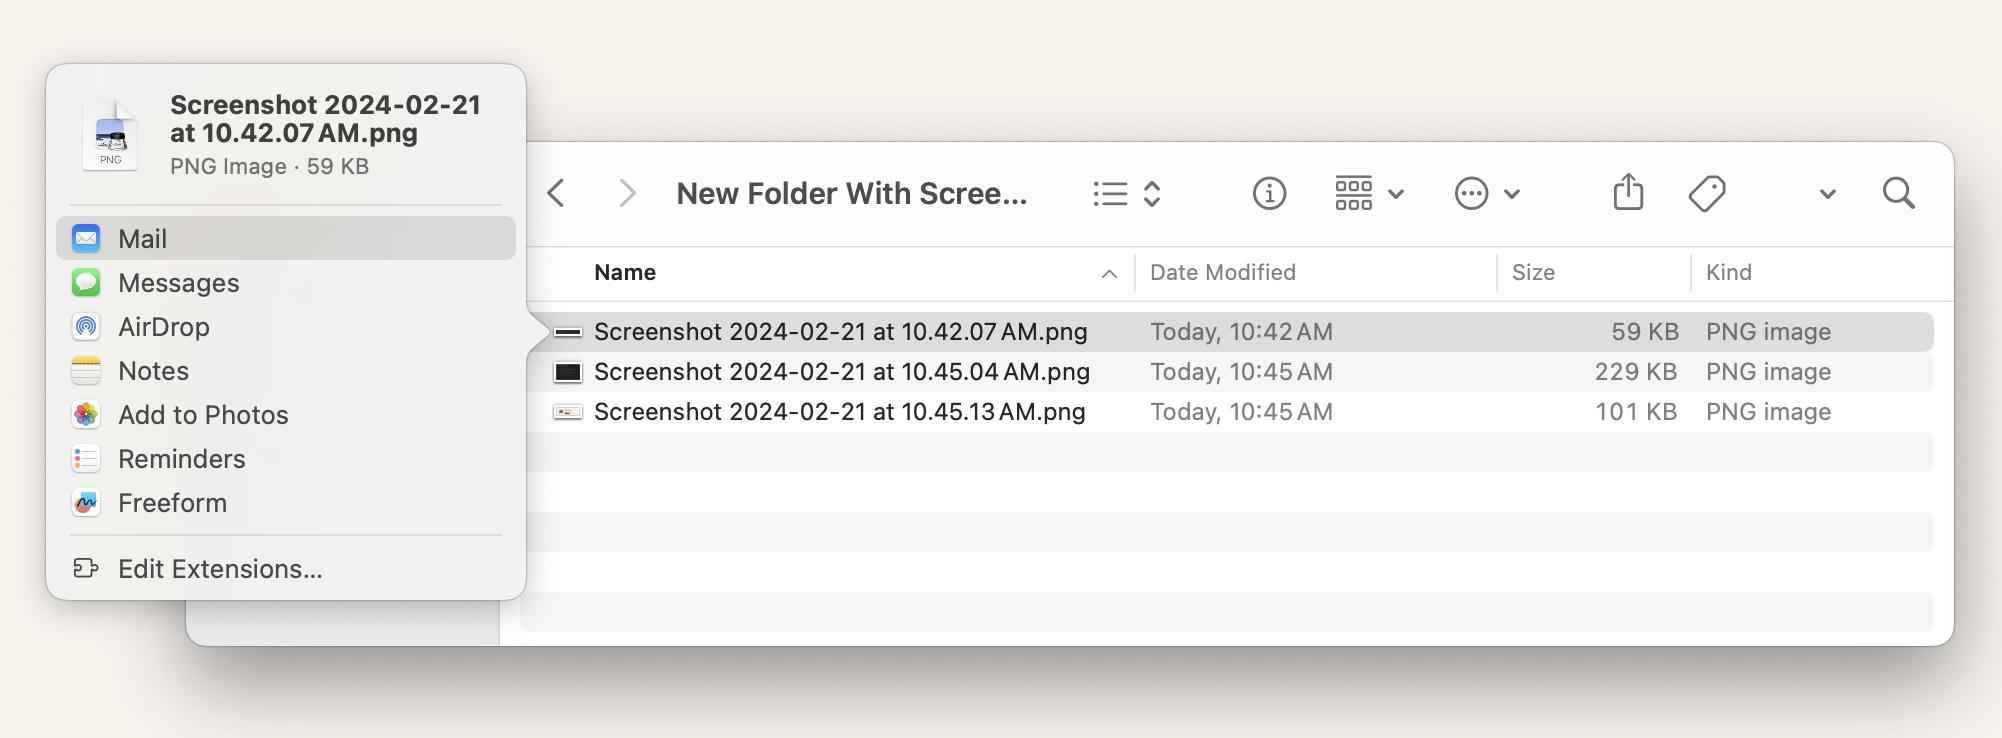
To discover other ways just follow our guide on how to share screenshots.
What info can (and can’t) be seen from your screenshots?
Every file you create contains more data than it seems to at first glance — including screenshots. Let me answer a few common security-related questions about what information can (and can’t) be retrieved from a screenshot.
Can anyone know when the screenshot was taken?
Yes (but…).
Every screenshot — just like any other file or folder — contains metadata. That’s behind-the-scenes information about the file, such as its extension, file size, color model, and more.
One of the key pieces of metadata in screenshots is the date and time they were created or modified. You can view this in Preview > Tools > Show Inspector.
So, if you send someone a screenshot, they can see when it was taken and modified — unless you remove or change that metadata first. I usually use MetaImage to do that.
What info about me can a person get from the screenshot?
Personal information typically isn’t stored in screenshot metadata. Details like your name or location won’t appear — unless you’ve added them manually when editing metadata.
Why is my screenshot black?
In most cases, it’s not a bug — it’s protection.
Some apps and platforms prevent copying or unauthorized sharing of sensitive or copyrighted content. This can happen with:
- Streaming platforms (Netflix, Apple TV, etc.).
- Banking apps
- Video conferencing tools
For regular users, there’s no legal workaround to capture screenshots from these sources.
Mastering Mac screenshots
Now that you know so much about taking good screenshots on Mac, can you think that there is something else? Let's see.
Where are screenshots saved?
By default, the screenshot is saved as a PNG file to your Desktop folder unless you have changed the default setting. Note that if you're running macOS prior to Mojave, your screenshot app is called Grab. The Grab app's default save location is your Documents folder.
Here's how you can change Mac screenshot location:
- Press Command + Shift + 5 to open the Screenshot app.
- Then click Options.
- From the Save to section, choose your preferred location.
- Choose Other Location if you want to set a folder that is not on the list or create a new one.
Finding saved screenshots is not always easy, especially if you’re a new macOS user. If you still can't find your screenshot, our detailed guide on where screenshots go on Mac will show you exactly how to track them down.
How to copy and paste a screenshot on Mac
To copy and paste screenshots, first press and hold the Control key while taking a screenshot (this will copy it to the clipboard), then paste using Command + V or the context menu.
TipWant to paste something you copied a few steps earlier? Then you need a clipboard manager. Paste saves and organizes your clipboard history so you can quickly reuse anything you copied. You can also get Paste for iPhone and iPad to sync clipboard history across devices. Read more about how to view clipboard history on Mac. |
How to edit screenshots on Mac
If you need to crop some portions of the screenshot to remove unnecessary information, it's pretty easy with the Preview, a native macOS application tailored for viewing and basic image editing. For more advanced cropping techniques, explore our guide that offers additional methods to crop your screenshots on a Mac.
If you need more edits, you can use Command + Shift + 4 to take a screenshot and open it in Preview for editing. However, when it comes to advanced features such as highlighting key details, blurring particular areas, changing backgrounds, hiding unnecessary files on your screen when taking screenshots, and more, CleanShot X and Xnapper are far more capable than the macOS native app.
You might also find our instructions on how to take a Mac screenshot without a drop shadow useful for capturing custom screenshots.
How to take a screenshot from a video
Want to grab the perfect still from your travel vlog or action video? Forget blurry screenshots! SnapMotion helps you capture frames from video at the highest possible quality. Simply navigate through the video frame by frame to find the perfect moment, and then click the Capture image button to grab the screenshot.
How to delete a screenshot on a Mac
Want to get rid of an unnecessary screenshot? Press Command + Delete to move the selected screenshot to Trash. Alternatively, you can right-click on the selected screenshot and choose Move to Trash.
You can also press Option + Command + Delete to delete the selected screenshot without moving to Trash.
It's also possible to automatically delete screenshots. This is especially useful if you have many of them, and they eat up your storage space.
How to recover deleted screenshots on Mac
Lost an important screenshot? Where do you find it? This might be an obvious tip, but just to be sure you didn't miss anything, open the Bin in your Dock and go through the files there. If you spot the screenshot you need, just right-click on it and choose Put Back from the menu to restore your file. If you can't see your screenshot in the Bin, try a third-party app for recovering deleted files.
Screenshots troubleshooting
It's frustrating when you need to take a quick screenshot, and your Mac refuses to cooperate. What problems might you face?
Screenshots not appearing on desktop
If you're using built-in macOS Screenshot tool, then your screenshots should be saved to your desktop unless you've chosen to save them elsewhere. Press Command + Shift + 5 to open the Screenshot app. Then click Options. From the Save to section, choose your preferred location.
It can be so that your screenshots are probably on your desktop, but Finder is not refreshing the desktop for some reason. Relaunch Finder or restart your MacBook.
Screenshot functionality doesn't work
If you have issues with screenshots not working on Mac, it's a good idea to start by confirming that the keyboard is responsive. One way to do that is to open a text document or any app that requires keyboard input. Type a few characters and see if they appear on the screen. If you notice any delays or inconsistencies, there might be a problem with your Mac keyboard.
If the keyboard isn't the problem, you may need to shut down the Mac and turn it on again. Check out more tips to fix screenshots not working on Mac.
How to take screenshots others will love
There are times when you want to explain or show something that's happening on your computer screen. Knowing how to take a picture of your screen can come in handy in this situation. However, not all screenshots are created equal. Some are simply useless and confusing. Here are a few tips on how to make your screenshots better:
#1. Avoid capturing the entire screen
Trying to point out a bug in an app? Taking a screenshot of the entire screen makes it difficult to read the text. Don't share a full-screen screenshot. Instead, crop the screenshot or capture a specific window to show just the app.
#2. Add image annotations to show where clicks occur
Annotating screenshots makes it easier for the reader to see what needs to be done. You can add arrows, highlights, or sequence annotations to indicate the order of clicks.
#3. Frame and crop screenshots
Another way to improve the quality of your screenshot is to take the exact frame you need or crop it. This allows you to remove menus and other unnecessary items to make your capture look cleaner.
#4. Remove distractions and irrelevant content
If cropping is not enough to remove unwanted objects, try apps like CleanShot X. One of its handy features is the ability to hide all the desktop clutter in one click!
#5. Rename screenshots
Rename screenshots with descriptive file names that make them easier to find later. Instead of sticking with generic names like "Screenshot 2025-01-01 at 16.59.36," you can take a more intuitive approach. Consider renaming the files to reflect the context, subject, or purpose of the screenshot.
#6. Never share private information
Finally, one safety advice. Our devices are full of private information, from phone numbers and email addresses to more sensitive data like ID and credit card numbers. They're usually safe on your device, but if you take a screenshot and share it, anyone can see what was on your device when you took the screenshot. Make sure the app you're capturing doesn't show private information — and if it does, either crop or blur it out with apps like CleanShot X and Xnapper.
Screenshot FAQs
If you still have questions about the options to take a screenshot on Mac, here you go. I’ve got answers for some common questions:
How to view screenshot on Mac?
A screenshot that you capture on a Mac is instantly saved to your Desktop. You may access them by going to the Desktop screen on your computer or by using Finder to access the Desktop folder and view your saved pictures within. If you have a lot of screenshots that you need to filter through on your Desktop screen, using Finder can be the simpler option since it typically shows the date and time the screenshot was taken.
How to take a snippet on Mac?
To take a snippet on a Mac:
- Press Command + Shift + 5.
- Click on Capture Selected Portion.
- Drag to select the portion you want to capture.
- Release the mouse to capture the snippet.
- Save or edit the snippet as needed.
That's it! You've taken a snippet on your Mac.
Where do screenshots go on Mac?
By default, the screenshot is saved to your Desktop folder unless you have changed the default setting. Note that if you're running macOS prior to Mojave, your screenshot app is called Grab. The Grab app's default save location is your Documents folder.
How to change where screenshots are saved on Mac?
Here's how you can change Mac screenshot location:
- Press Command + Shift + 5 to open the Screenshot app.
- Then click Options.
- From the Save to section, choose your preferred location.
- Choose Other Location if you want to set a folder that is not on the list or create a new one.
How to send a screenshot on Mac?
The most common way to share screenshots on your Mac is to send them by Mail/Messages/AirDrop via the Share button. Simply right-click on the screenshot you want to share with someone, then choose Share, and click Mail/Messages/AirDrop/etc.
How to see screenshots on Mac (select all screenshots to view)?
By default, screenshots are saved to your desktop or Documents folder on your Mac. If you still can't find your screenshots, press Command + Space at the same time on your Mac keyboard to open Spotlight Search. Then, type Screenshot in the search bar, and you'll see a list of matching screenshot files in the results below.
How to screenshot on Mac with keyboard?
Press and hold Shift+Command+3 to take a screenshot of your entire Mac screen.
Press and hold Shift+Command+4 if you only need to capture a portion of your screen.
To snap a screenshot of a specific Mac window, press and hold Shift+Command+4, and then press Space.
How to screenshot on Mac without a keyboard?
If you need to take a screenshot on your Mac but don't have a working keyboard or just want to use a mouse, follow these steps:
- Click the Finder icon in your Dock.
- In the Finder menu bar at the top of the screen, click Go and choose Applications from the list.
- When the Applications folder opens, double-click the Utilities folder.
- In the Utilities folder, double-click the Screenshot app icon to open it. From there, you can take a screenshot using the macOS app.
How to screenshot a full page on Mac?
Press and hold Shift + Command + 3 to take a screenshot of your entire Mac screen.
Why can't I screenshot on my Mac?
By default, screenshot hotkeys are enabled. However, you may have configured them and don't remember. In this case, all you need to do is check if the screenshot shortcut is enabled on your Mac. Here are simple steps on how to do that:
- First, go to the toolbar and click Apple menu > System Settings.
- Click Keyboard, and then click Keyboard Shortcuts.
- Next, click the Screenshots option on the left side of the window.
- Finally, make sure all the options here are checked or active.
How to paste a screenshot on a Mac?
You have the option to copy screenshots directly to the Mac clipboard rather than saving them all to the Desktop or another location, enabling you to paste them into a document or online form you’re working on.
This is especially helpful if you simply need to utilize the screenshot straight away and don’t want to keep it.
Press Control while taking a screenshot on a MacBook to copy it to the clipboard. Then press Command + V in any other app to paste the screenshot.
How to disable screenshot previews?
To stop screenshot previews from floating on your screen, simply deselect the "Show Floating Thumbnail" option in the Screenshot utility's settings, or use a command in the Terminal app:
defaults write com.apple.screencapture show-thumbnail -bool false
How to disable apps from screenshotting on Mac?
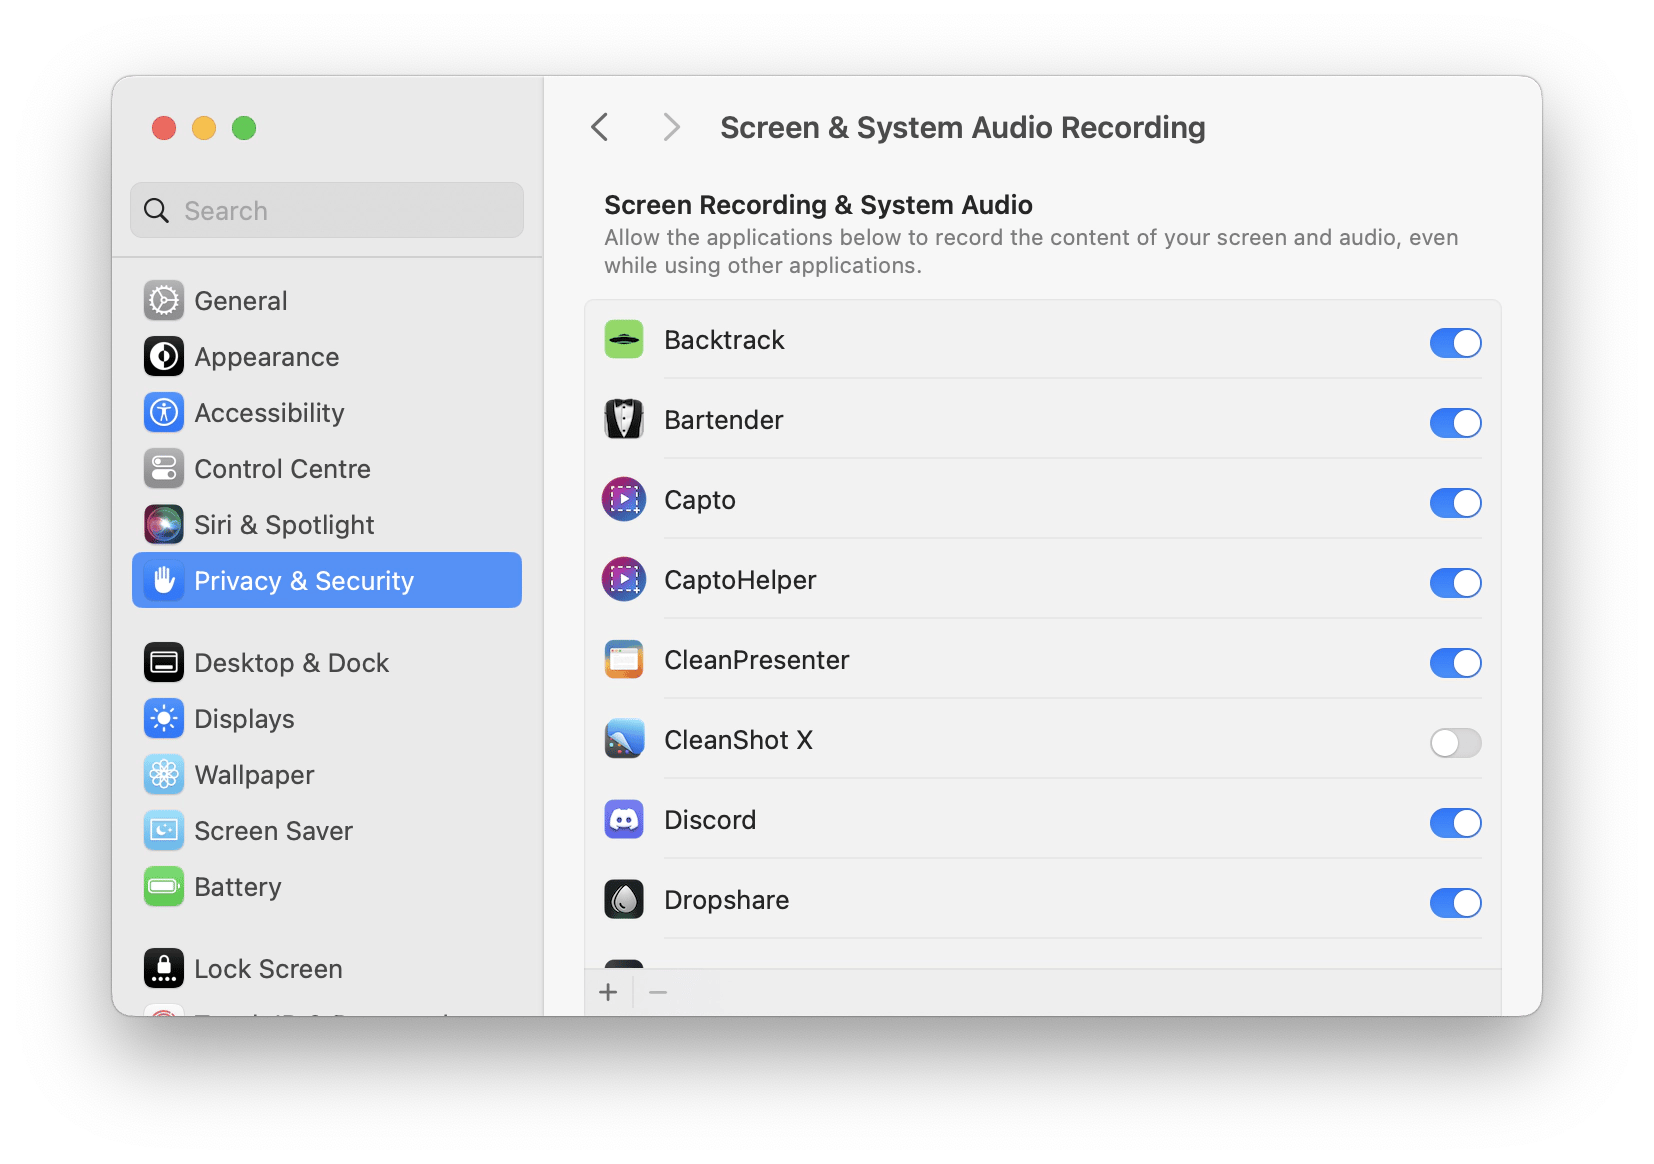
Go to System Settings > Privacy & Security > Screen & System Audio Recording to disable apps to record your Mac screen. Unlock the padlock with your password. You may view a list of the applications that are currently recording your screen here. You can select and unselect the apps from here.
How to selectively screenshot on Mac?
Press and hold Cmd + Shift + 4. Your cursor will change into a tiny reticule to the lower left that contains pixel coordinates. To select a rectangle area for a screenshot, click and hold the mouse button or trackpad button while dragging the pointer. If you want to start over without capturing the picture, press the Esc key. Release the click to take the picture.


