The ultimate guide to the MacBook Touch Bar: Features, customization, and best apps
▼ Key Takeaways
- The MacBook Touch Bar is all about faster, more visual control.
It replaces traditional function keys with a dynamic touch strip that adapts to the app you are using, giving you quick access to system controls, shortcuts, and app-specific tools with a tap or swipe.
- You can customize the Touch Bar to match your workflow.
Through System Settings, you can choose which controls appear in the Control Strip, bring back classic function keys, or add shortcuts for screenshots, emojis, and system actions you use daily.
- Third-party apps unlock the Touch Bar’s real potential.
Tools like BetterTouchTool let you create custom buttons, automations, scripts, and app-specific layouts, turning the Touch Bar into a personalized productivity panel rather than a fixed set of controls.
- The Touch Bar shines most in native and professional apps.
Apple apps like Finder, Safari, Mail, Messages, Logic Pro, and Final Cut Pro use the Touch Bar for context-aware actions such as file navigation, tab previews, emoji selection, playback controls, and creative editing tools.
- Setapp brings the best Touch Bar tools together in one place.
Apps like BetterTouchTool, CleanMyMac, and iStat Menus are all available on Setapp, making it easy to customize your Touch Bar, keep your Mac running smoothly, and monitor performance from one subscription. You can try it free for seven days.
The MacBook Touch Bar is great for anyone who likes quick shortcuts, visual controls, and a more personalized way to get things done, especially if you're used to the touchscreen feel of an iPhone or iPad.
In this guide, I’ll walk you through everything I’ve learned about the MacBook Touch Bar, how it works, how to make it your own, and which apps make it even better.
Personal advice before we start: If your MacBook won’t start, crashes, or shows weird errors, you can use the Fix My Mac | Beyond basic fixes ChatGPT tool to describe your problem and get AI-guided troubleshooting steps to resolve it beyond the usual basic fixes
How to customize the MacBook Touch Bar
If you want your MacBook Touch Bar to offer shortcuts that cater to your specific needs, here’s how you can customize the Control Strip:
- Click the Apple menu in the top-left corner.
- Choose System Settings > Keyboard.
- Click Touch Bar Settings.
- Make your preferred changes by choosing your preferred options from the available menus and toggles.
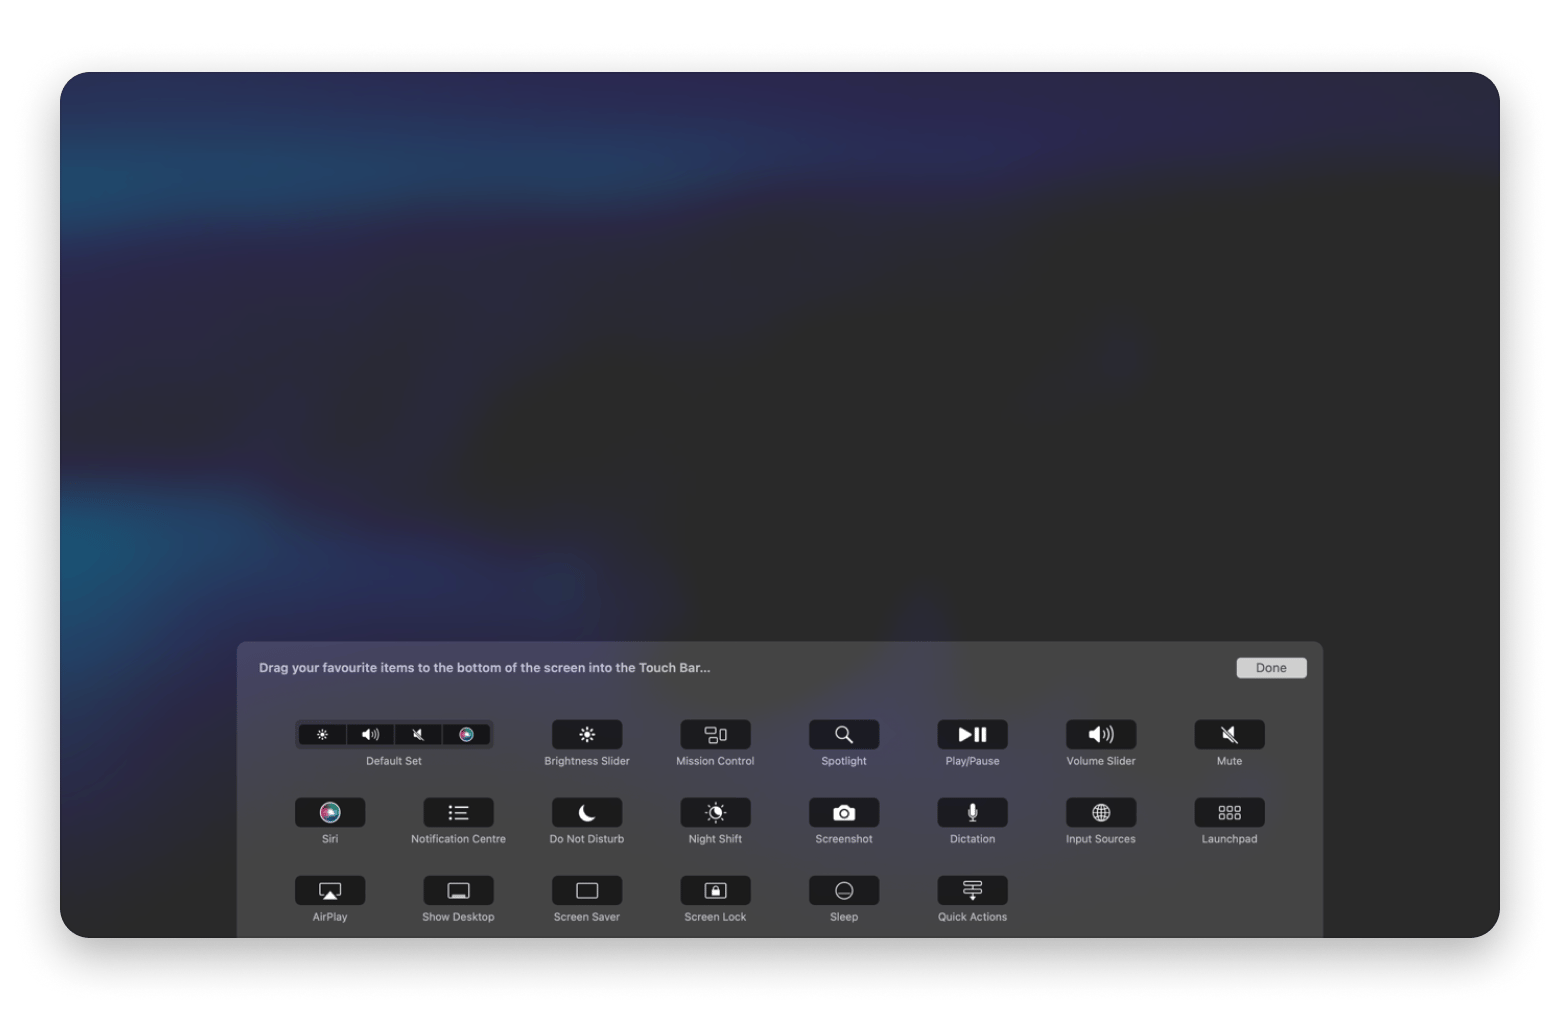
- Click Customize Control Strip, drag your preferred shortcuts to the bottom of the screen, and click Done on your screen or tap it on the Touch Bar.

I've already covered some of the most impressive things the Touch Bar can do, but there are more ways it can enhance your workflow. Personally, I enjoy using the Touch Bar to control the Preview tool. It allows me to perform both basic and intricate tasks like quickly flipping through PDF pages, trimming videos, editing pictures, and listening to portions of audio files. You don't even have to open the respective app, whether it's a media player, photo or video editor, or PDF reader.
Quick access to function keys
If you like the conventional function key approach, you can still access them via the Touch Bar by following these steps:
- Click the Apple menu in the top-left corner.
- Select System Settings > Keyboard.
- Click Touch Bar Settings.
- Open the Touch Bar shows dropdown menu.
- Choose the F1, F2, etc. Keys from the list.
If you want to keep your Mac clean and running smoothly, you can configure the Touch Bar to allow you to quickly access cleaning actions from apps like CleanMyMac. With CleanMyMac, you can run system cleanups, remove clutter, and improve performance in seconds.
Using the Touch Bar for screenshots and emojis
If you often chat using macOS apps like Messages and other social media apps, you can customize your Control Strip by adding the screenshot shortcut. This will enable you to quickly pull up different screenshot options that are usually housed under the tedious combination of Shift + Command + 4 or 5. Once you're typing a message, you can tap the emoji symbol on the Touch Bar to bring out a wide range of emojis.

Is the MacBook Touch Bar worth it?
The MacBook Pro Touch Bar was received with mixed reviews. Let me walk you through the positives and challenges that users have reported and give you my opinion.
The benefits of the Touch Bar
Here’s what makes the Touch Bar handy:
- You can swipe, slide, or tap for quick, touch-based commands.
- It packs basic system controls and switches to app-specific tools without crowding the keyboard.
- You decide which shortcuts live there, so your go-to actions are always one tap away.
- It handles more controls than a row of keys could, so you avoid memorizing multi-key combos.
- The icons are bigger and brighter, so you spot them at a glance.
Overall, a MacBook with Touch Bar features elevates your Mac experience, especially if you like to bring the touch feel from phones into the laptop world.
Limitations and criticisms
Here are a few drawbacks:
- If an app has many options, you might swipe more and expand menus to find what you need.
- Some tasks still require a Return key press or trackpad click after choosing on the Touch Bar.
- It draws a bit of power whenever it’s on, which can slightly affect battery life.
- Not all third-party apps support it fully, so you’ll get the richest controls in Apple’s own apps.
- Because it’s visual, you may look down more instead of relying on muscle memory.
Personally, I like how the Touch Bar looks, and I find it quite useful, especially for system controls and a few other app-specific shortcuts. And since it still accommodates the conventional function key approach, I feel it doesn't get in the way or force you to work differently. The only issue is that sometimes the Mac Touch Bar is not showing up or working properly, which can interrupt your workflow.
What is the MacBook Touch Bar and how does it work?
The MacBook Touch Bar is a touch-sensitive OLED display strip above the keyboard on some MacBook Pro models that typically replaces the function keys. This strip lets you control essential system features like screen brightness, keyboard backlight, media file playback, and audio volume.
It can tuck these controls away in a smaller, expandable patch, leaving plenty of room for app-specific controls. These controls change depending on the app in focus. For example, if you're in Microsoft Word, there'll be shortcuts to common editing functions like bolding, highlighting, text color changes, bullets and numbering, and more.
The Control Strip and its functions
The Control Strip has an ingenious approach to providing basic system controls. Located on the right, it can display a condensed version with one symbol for each function, including Siri, volume, muting, and brightness. If you're only interested in opening or adjusting one of these, tap its symbol and access its slider.
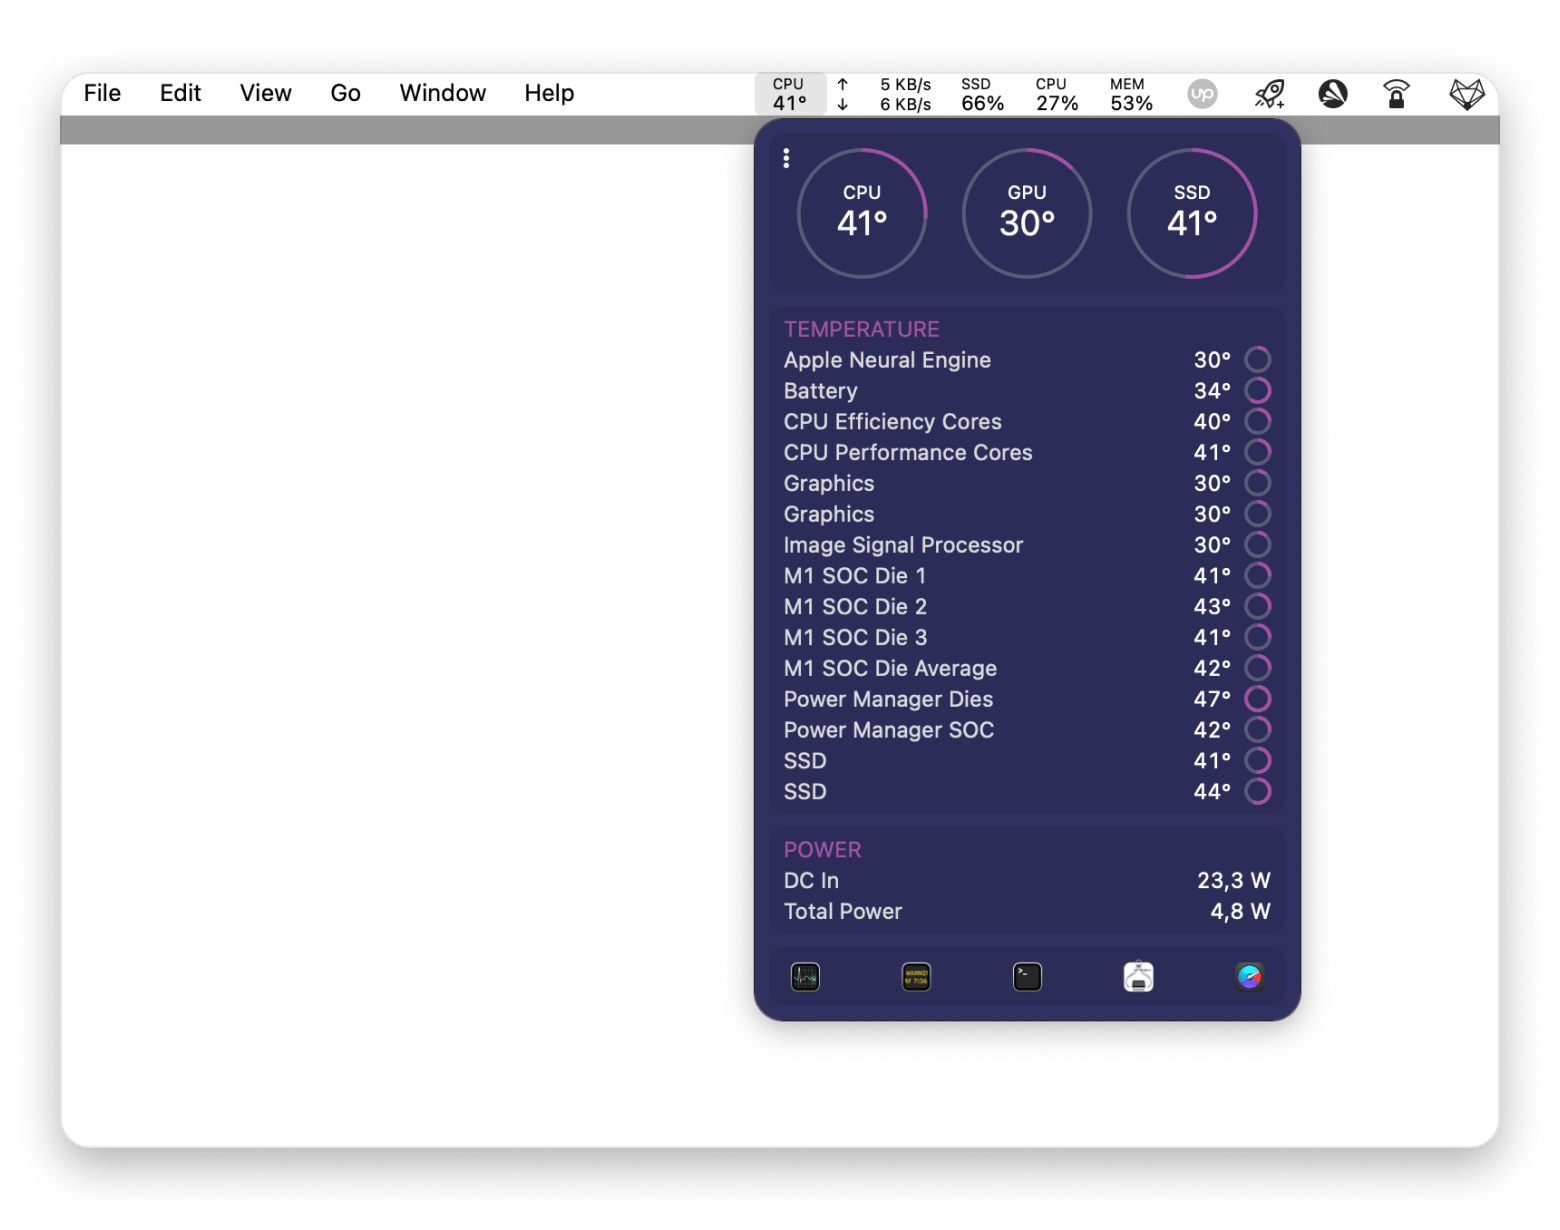
Besides controlling apps, you can view critical information by integrating the Touch Bar with tools like iStat Menus to display system performance metrics.

The Touch Bar has a touch-sensitive button at the extreme right that uses biometrics to provide additional security features. This part can scan your fingerprint to unlock your Mac, alter settings, sign into online accounts, and approve purchases with apps like Apple Pay. I like using Touch ID when permitting new app installations or connecting other apps to my email accounts because I don’t have to type my long password each time. If you’re having trouble with it, read this article on how to fix Touch ID not working on Mac.
How the Touch Bar enhances macOS and app workflows
Now that you have an idea of how the Touch Bar works, let me dive deeper into how it enhances the native macOS app experience and works with third-party software.
macOS system apps
- Finder has some handy shortcuts. My favorites are the ones that switch between view styles (column, gallery, list, and icons) and let me sort files and folders. It might seem like it's not shorter since it's two clicks with the trackpad and two taps with the Touch Bar. Once shortcuts appear on the Touch Bar, switching takes one tap, while the trackpad requires moving the cursor and clicking twice. I frequently change project names, move files, and save edits as I work with audio and video.
- With Safari, I like that the Touch Bar maintains a condensed preview of the tab contents so you can easily identify them when swiping to switch. It has my favorites laid out for me and ready to open with just one tap.

- While the Touch Bar offers plenty of shortcuts for the Mail app, I'm a big fan of the "Move to" shortcut. It makes it easier to send any selected email to a preferred folder. I use it often for emails with offers or important info I can't read right away but want to come back to later.

- As shallow as this may seem, my favorite part of using the Touch Bar with Messages is the emojis. I can easily switch between my frequently used ones and other categories. More importantly, they're larger than phone emojis, so I never tap the wrong one.

Professional apps and workflow improvements
As someone who produces music in my free time, I often find myself in Logic Pro trying to bring out my creativity, and the Touch Bar is always there to help. It provides transport controls for playback and a seeker to navigate through tracks in the arranger.
I can even play the piano on my Touch Bar and tweak device and plugin parameters like decay and release. This in-depth shortcut list also extends to other Apple apps like Final Cut Pro, which makes video editing easier by cutting down on clicks and button presses.
Final thoughts on the MacBook Touch Bar
MacBook Pros with a Touch Bar were definitely an innovative technology that created some buzz in the tech world. It's a great feature if you want to work more efficiently and tackle everyday tasks with a tap. You can do anything from controlling your favorite apps to tweaking system settings.
If you want to dive deeper, you can use a third-party tool like BetterTouchTool that lets you set up custom gestures, script triggers, and app-specific button layouts. You can also keep an eye on performance with iStat Menus or clear out clutter using CleanMyMac, all from the Touch Bar.
Every one of these tools lives on Setapp, home to over 260 Mac and iOS apps, and you can try them free for seven days before you subscribe.
FAQs
Can I customize the MacBook Touch Bar to show only the functions I need?
Yes, you can tailor the Touch Bar to feature only what you use most. Open System Settings and go to Keyboard > Touch Bar. Drag the buttons you use most into the Control Strip and toss anything you don’t need. If you want to take it further, get BetterTouchTool to create your own app-specific buttons, set up custom gestures, or even trigger AppleScripts and Automator actions.
How do I get the function keys back on a MacBook with a Touch Bar?
To bring back the function keys on a MacBook with a Touch Bar:
- Open System Settings from the Apple menu.
- Go to Keyboard and open Touch Bar Settings.
- Select F1, F2, etc. Keys from the “Touch Bar shows” menu.
What are the best apps to improve the MacBook Touch Bar experience?
One of the best apps to improve your MacBook Touch Bar is System Settings for basic tweaks. If you want to get creative, BetterTouchTool lets you set up your own shortcuts, gestures, or tiny automations. And for a quick health check, iStat Menus can show your Mac’s CPU, memory, and network stats right on the Touch Bar.
Does Apple still support the MacBook Pro Touch Bar?
No. Apple discontinued the Touch Bar when the M3 MacBook Pro models were released in 2023. Older MacBook Pro models that include the Touch Bar will continue to work, but the feature is no longer available on new MacBook Pro models.


