Best snipping tools for Mac I use as a content creator in 2026
▼ TL;DR:
- The built-in Mac screenshot feature lacks more advanced functionality. That's why bloggers, researchers, and content creators create their own toolkits with the best snipping tools for Mac.
- CleanShot X is the most popular Mac snipping tool among creators. It combines cloud hosting, annotation, screen recording, and clean captures without desktop clutter.
- If you need to convert on-screen text into editable content with a single keyboard shortcut, try TextSniper. And with Xnapper, you can make your screenshots more attractive, placing them on a nice background, rounding the corners, or adding a watermark.
- With a Setapp subscription, you get access to CleanShot X, TextSniper, Xnapper, Capto, ScreenFloat, and over 250 other apps for content creators. Try the 7-day trial now and build your workflow without paying for multiple pricey subscriptions.
I used Mac's built-in snipping tool for quite a long time and was fine with it. However, my workflow with screenshots required the use of additional tools for text extraction from videos and images, as well as for editing. So I started looking for the best snipping tools for Mac.
After testing and analyzing reviews from bloggers, designers, and researchers, I realized that it is possible to find a snipping tool on Mac that combines several apps in one. In this article, I have compiled the best choices and use cases.
Comparison of the best snipping tools for Mac
Mac comes with a built-in snipping tool that’s great for everyday use. It lets you take full-screen shots, capture windows or selected areas, and even record your screen. But if you need more advanced features, like editing, freehand selection, or instant cloud sharing, you might want to try a third-party app.
Let's look at some of the options in greater detail below.
App | Best for | Key feature | Price |
Power Mac users | Screen recording | Included in Setapp | |
Text extraction | Lightning-fast OCR | Included in Setapp | |
Sharing pretty screenshots | Screenshot customization | Included in Setapp | |
Built-in tool | Basic captures | Free and fast | Free |
Tutorial creators | Video + screenshots | Included in Setapp | |
Designers | Precise measurements | Included in Setapp | |
Monosnap | Simple needs | Easy cloud sharing | Free or from 2.50/mo |
Lightshot | Quick annotations | Fast and lightweight | Free |
Reference while working | Floating screenshots | Included in Setapp | |
Movavi | Screen recording | Video editing included | Free or from $19.95/mo |
Now let's explore what makes each of these Mac snipping tools worth using.
CleanShot X: The best all-in-one snipping tool for Mac
Previously, I needed several applications to take a screenshot, record a screen video, make annotations, edit, and upload to cloud storage, but now all of this can be done in CleanShot X.
One more cool thing for me, as someone who's always dealing with a mess of icons, is that CleanShot X can instantly hide desktop icons and files. This is super handy for recording tutorials or creative content.
Here’s what a Reddit user says about CleanShot X:
“If you're really serious about screenshots, or you happen to have a Setapp subscription, you should get Cleanshot X. I use it, though I'd probably not actually pay for it if it weren't included in Setapp, but Cleanshot X is excellent. It records nicely, will hide desktop icons for screenshots, has a slick GUI, etc.
My favorite thing about Cleanshot is that after I take a screenshot, I have it just float the screenshot on my screen. From there, I can just drag it into an email or slack thread or whatever and it never actually saves anywhere, so there's nothing to clean up later.”
The Quick Access Overlay provides immediate post-capture options. After taking a screenshot or recording, a compact window appears with annotation tools, cloud upload functionality, and sharing options. This eliminates the typical workflow of saving a file, locating it, opening an editor, and then sharing — everything happens in a single continuous action.
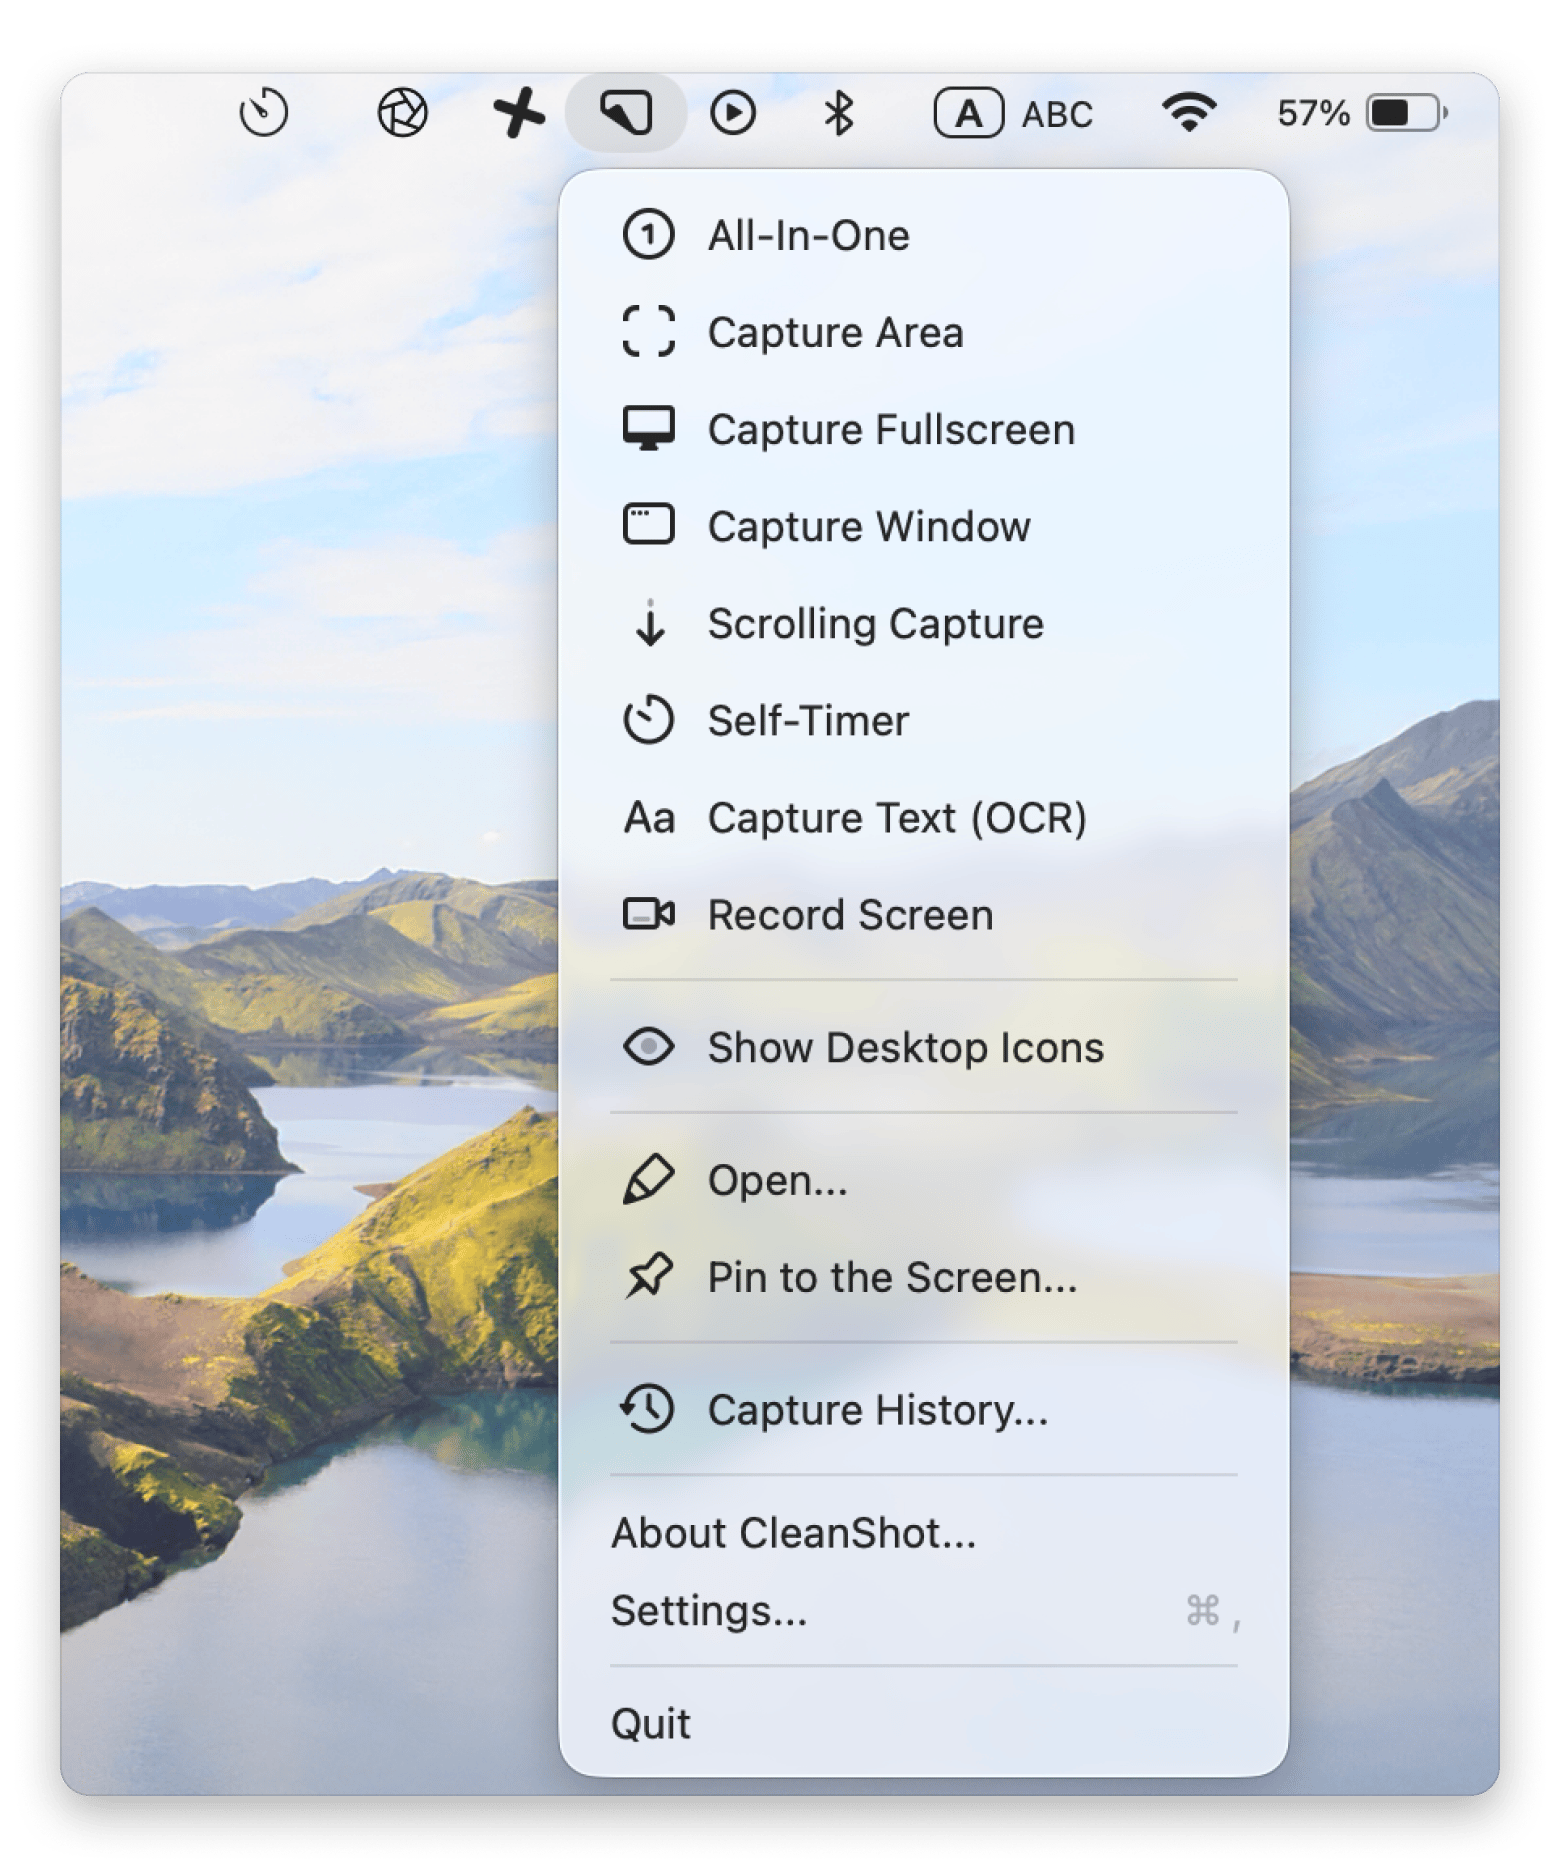
“CleanShot X is my go-to for distraction-free screen recordings. It hides all the clutter and makes my videos look polished every time”, shares Stefan-Radu Gogolan, video editor, digital marketing specialist.
Key features:
- Desktop icon hiding
- CleanShot Cloud with instant shareable links
- Screen recording in multiple quality levels
- Quick Access Overlay with integrated annotation tools
- Notification suppression during recording sessions
Pros:
- Screenshot and recording needs in one app
- Professional results
- Best for tutorials, documentation, social media, and technical content
- Cloud storage eliminates file management concerns
Cons:
It may be excessive for users with basic screenshot needs
Price: Available on Setapp, a subscription platform with 250+ apps. You can try it free for 7 days.
TextSniper: Best Mac snipping tool for extracting text
TextSniper specializes in a single function: converting on-screen text into editable, copyable content.
This snip tool for Mac uses advanced OCR technology to recognize text from virtually any on-screen content, like YouTube videos, images, PDFs, presentations, and even text embedded in graphics.
Using TextSniper couldn't be easier: press Cmd+Shift+2 (customizable), select the screen area, and the recognized text is immediately copied to the clipboard, ready to paste anywhere.
Here’s what a Reddit user says about it:
“I’ve found TextSniper with its screenshot-like keyboard shortcut to have a better workflow. Very happy with it.”

Key features:
- Recognizes text from videos, images, PDFs, and presentations
- Direct clipboard integration — extracted text pastes immediately
- Minimal menu bar presence
- Multi-language text recognition support
Pros:
- Excellent at extracting text
- Works with virtually any on-screen text source
- Keyboard-driven workflow maintains productivity
- Essential tool for research, note-taking, and content creation
Cons:
Requires clear, high-quality on-screen text for optimal accuracy
Price: Available on Setapp, a subscription platform with 250+ apps. You can try it free for 7 days.
Xnapper: Best snipping tool for Mac to create nice-looking screenshots
While most snipping tools focus on capture functionality, Xnapper emphasizes presentation, transforming basic screenshots into professional-looking images. I use it when I need to create a presentation or social media post.
With this tool, you can center content, add a nice background to your screenshot, apply appropriate padding or subtle shadows. No advanced design knowledge or additional software needed — everything works intuitively and simply.
“The best mac snipping tool would be Xnapper”, says a Reddit user.
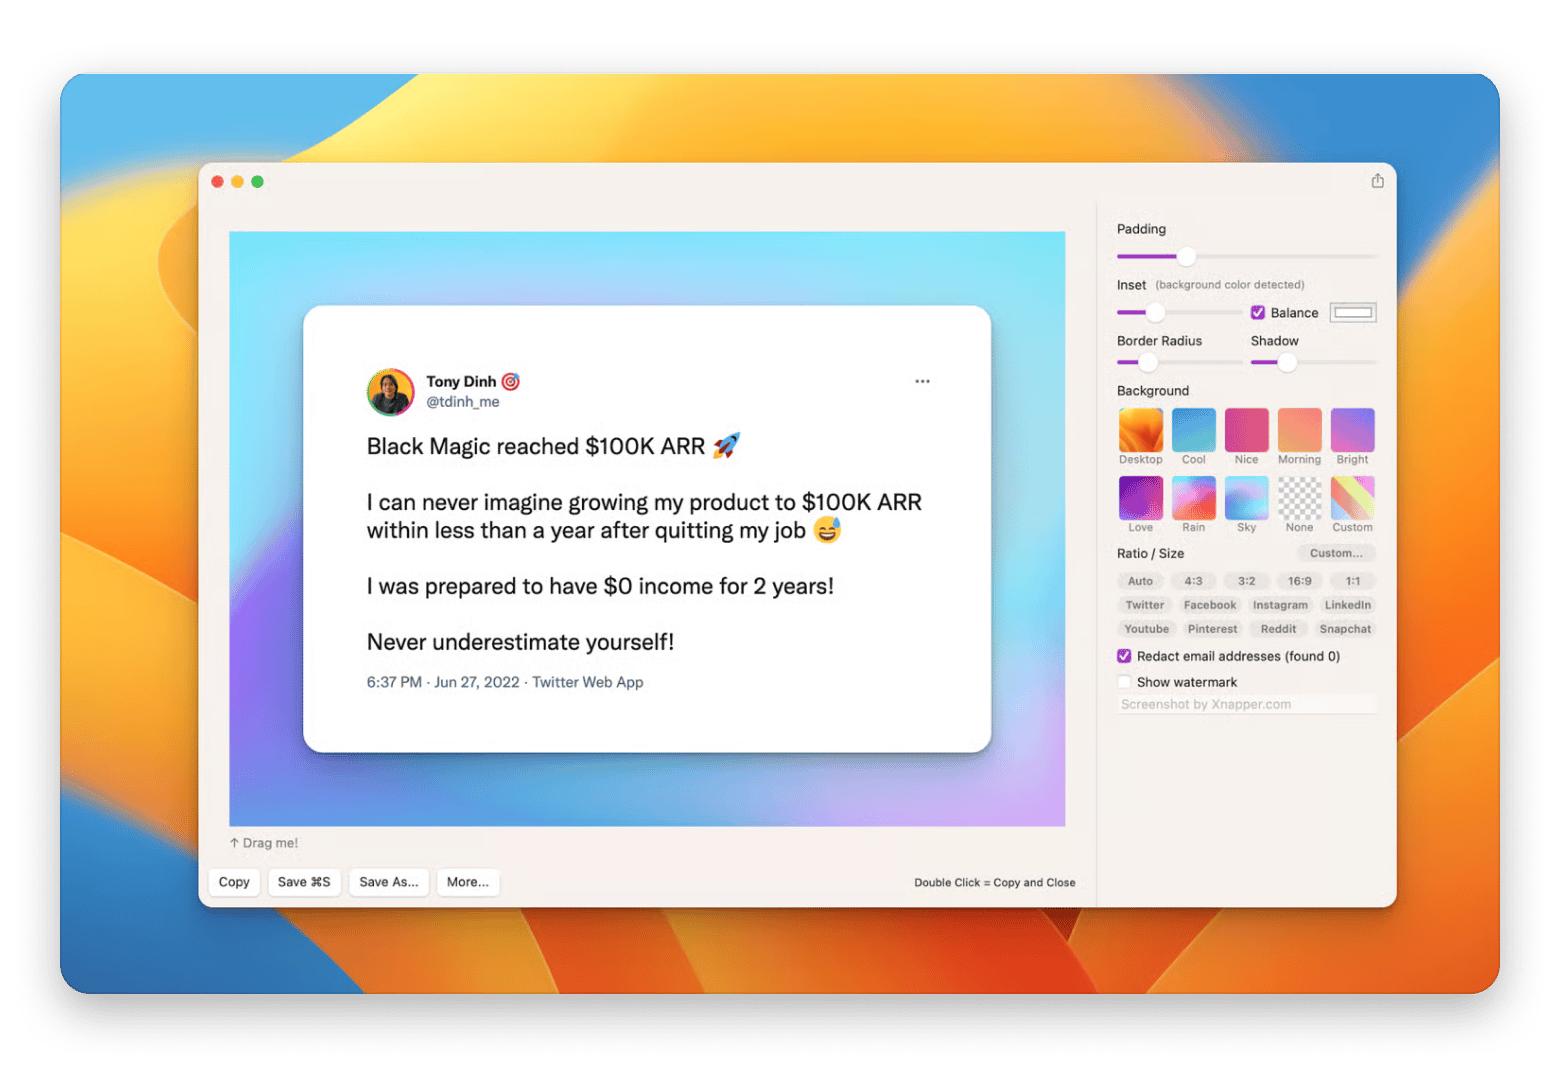
Key features:
- Automatic screenshot beautification
- Sensitive information redaction
- Text selection and copying directly from screenshots
- Customizable borders, padding, and shadow effects
- Background options including blank canvas or custom images
- Watermark support for branding
Pros:
- Transforms basic screenshots into professional-looking images
- Ideal for social media, documentation, and presentation
- Fast workflow from capture to polished output
- Privacy protection through built-in redaction tools
Cons:
Designed for beautification rather than detailed annotation
Price: Available on Setapp, a subscription platform with 250+ apps. You can try it free for 7 days.
Built-in Mac snipping tool: The quick and free option
When I need to take a quick screenshot of a piece of news and send it to my friends in a chat to discuss, I use the built-in Mac snipping tool. I don't care if the image looks good, and I don't need to make annotations. When speed and basic capture needs are key, this is the perfect option.
Accessible via Shift+Command+5, it offers essential features without requiring additional software installation or subscription costs.
Key features:
- Full-screen, window, or custom area capture
- Quick access
- Basic screen recording functionality
Pros:
- No installation, setup, or subscription required
- It’s free
- Sufficient for personal needs
Cons:
- No annotation tools
- Captures include desktop clutter unless manually cleaned up
- No OCR or text extraction capability
Price: Free (built into macOS)
Read also:
- Best screen recorders for Mac
- Remove Mac screenshot shadow
- Screenshot on Mac not working
- Crop a screenshot on Mac
Capto: Best Mac snipping tool for tutorial creators
Creating a tutorial requires more than just a screenshot — you need screen recording with voiceovers, webcam overlays, and annotations. Capto provides these capabilities without requiring professional video editing software.
The is one of the best snipping tools for Mac that handles both screenshot and recording needs in a unified interface. The best part is that all media is stored in the app’s library, and it doesn’t mess with your Mac folders.
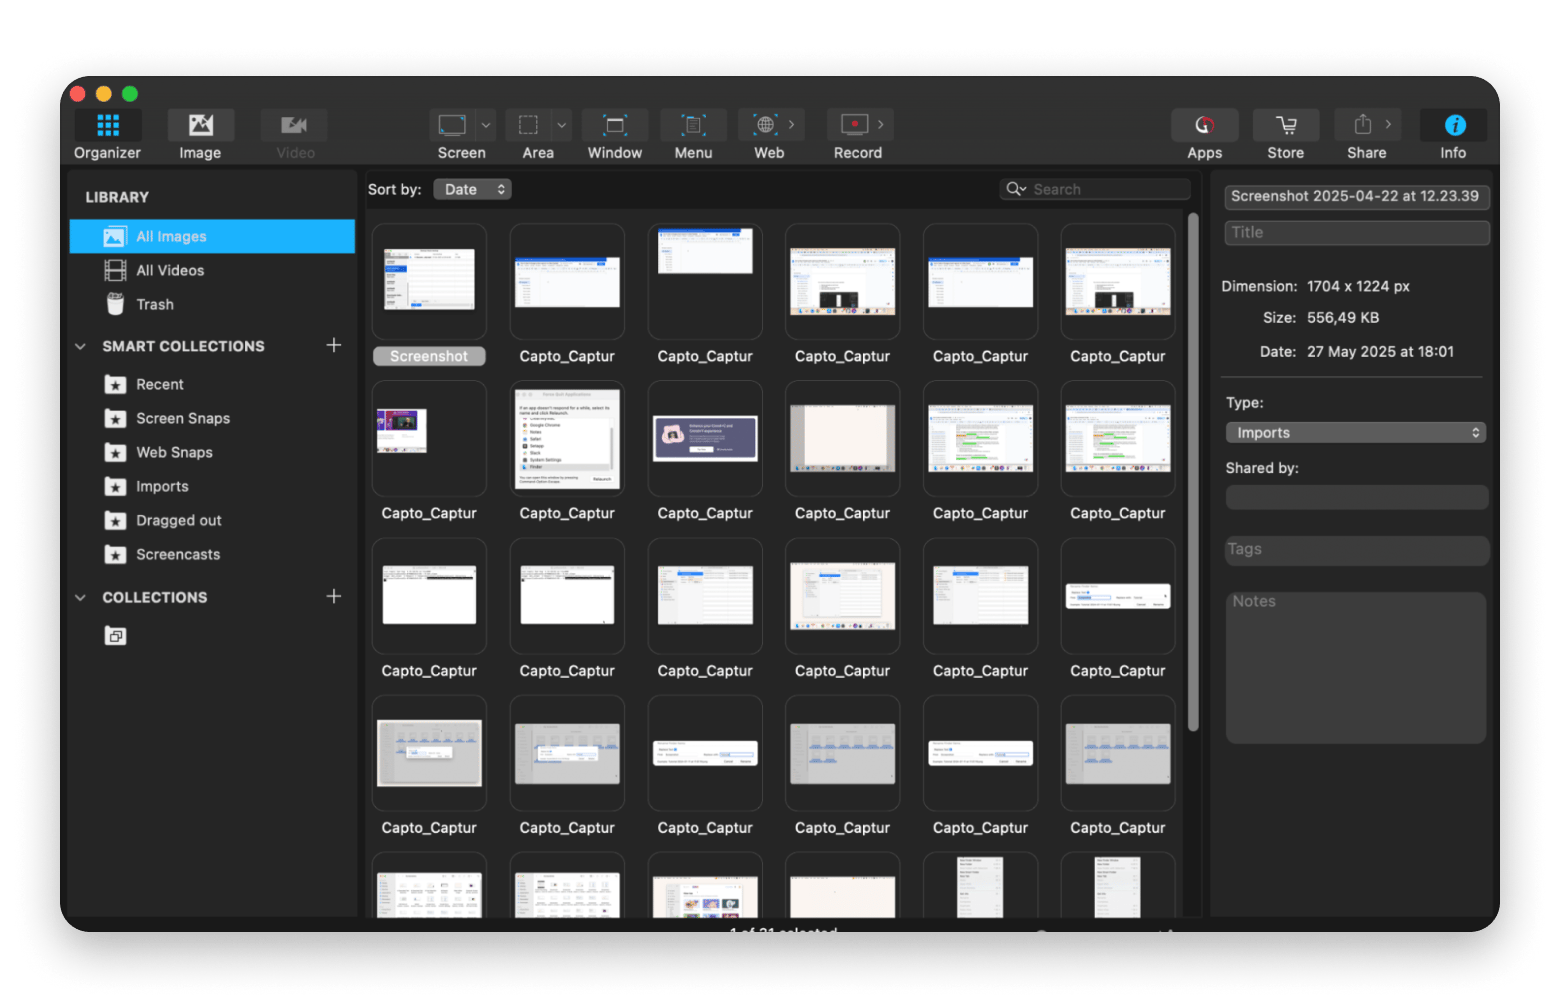
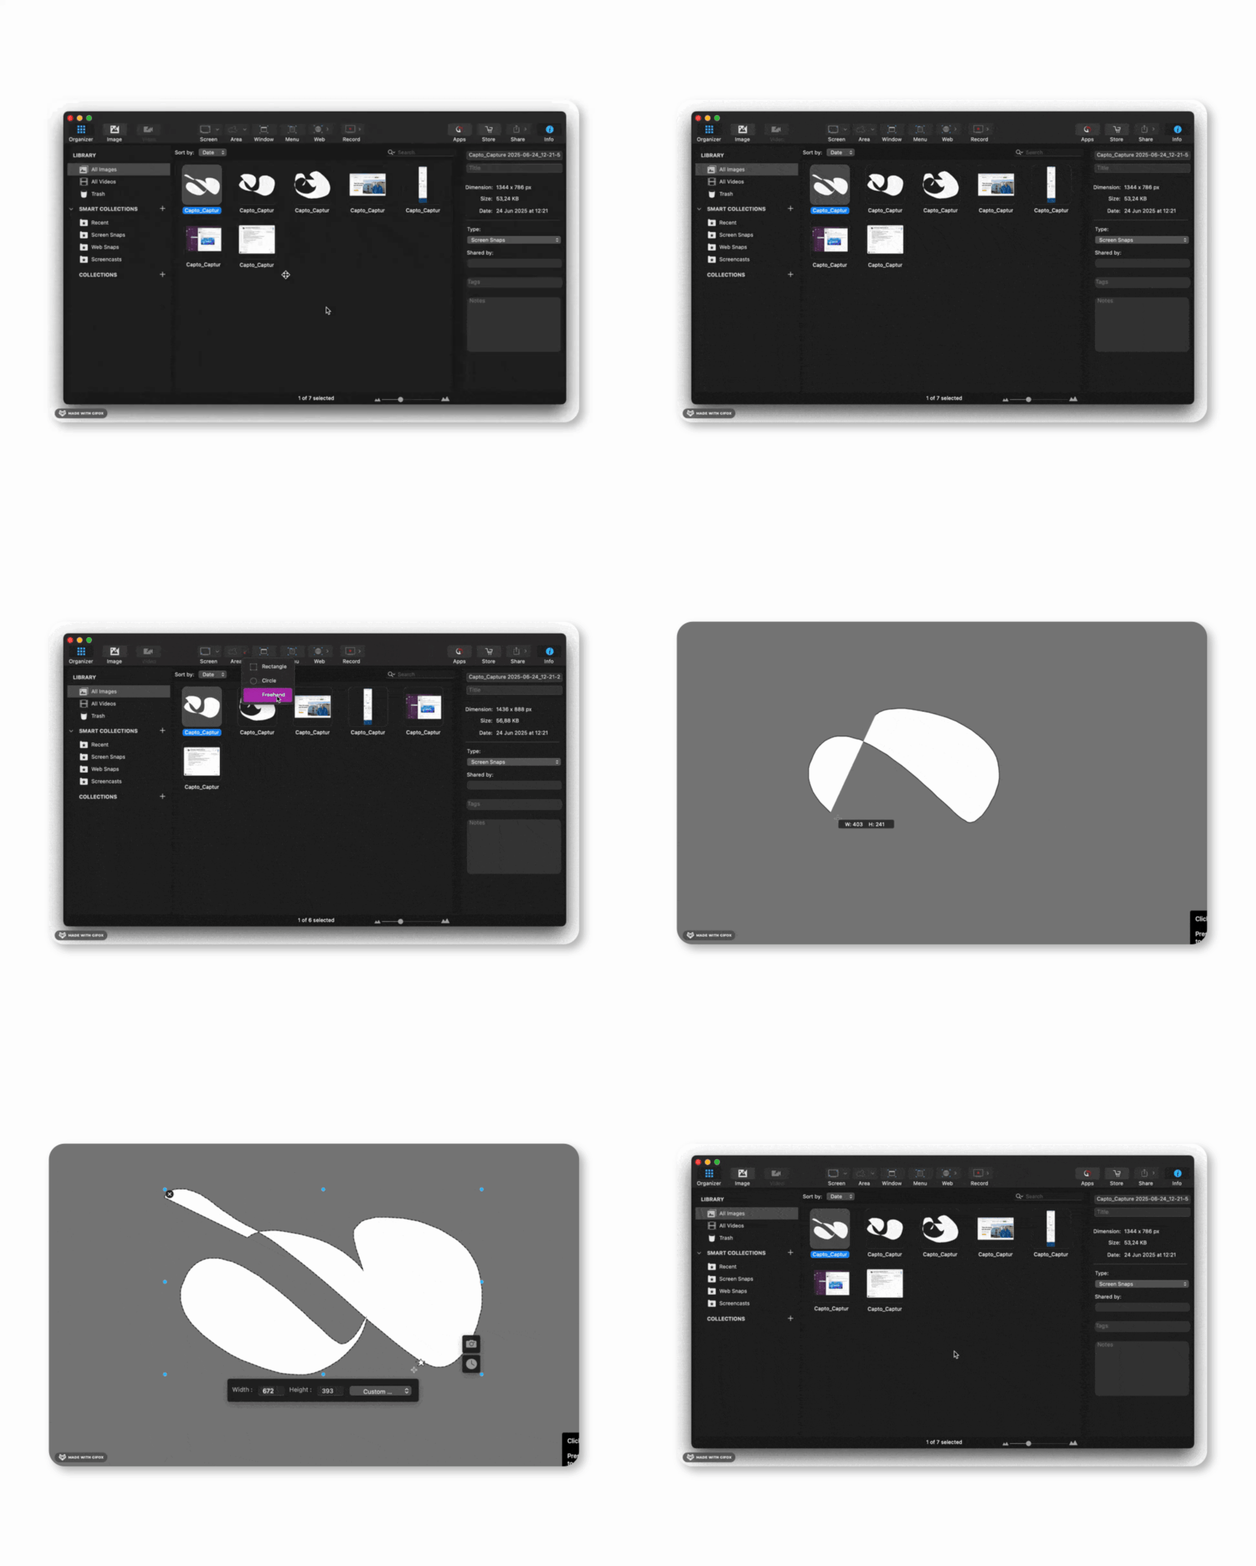
Capto is also a great tool for freehand capture. To create screenshots of any type, open the app, click Area > Freehand, and draw out the shape. Press the Option key to capture a screenshot, and it will appear in the Capto app automatically. You can then edit your screen capture and share it anywhere.
“When I’m recording tutorials or client demos, Capto is my go-to. It captures in great quality and lets me add annotations or edits right in the app — no need to open Final Cut for simple tweaks”, shares Stefan-Radu Gogolan, video editor, digital marketing specialist.
Key features:
- Full-screen or selected area screen recording
- Webcam overlay support for personal presence in videos
- Real-time and post-recording voiceover and annotation
- Screenshot capture of screen, window, selected area, menu, or browser
- Screenshot editing
Pros:
- Single tool for screenshot and screen recording
- Simple editing tools for quick adjustments
- Desktop cleanup prevents unprofessional-looking recordings with visible clutter
Cons:
May overwhelm users with basic screenshot-only needs
Price: Available on Setapp, a subscription platform with 250+ apps. You can try it free for 7 days.
PixelSnap: Best Mac snipping tool for designers who need measurements
Designers and developers who are obsessed with accuracy call PixelSnap a must-have in their collection of the best snipping tools for Mac. It displays the exact dimensions of screen elements, distances between components, and alignment verification.
The app operates in real-time as you drag the cursor, showing measurements instantly.
“This app is extremely handy for checking details that most people overlook!” shares Edyy, a Setapp user.
![]()
Key features:
- Real-time distance measurement between any on-screen elements
- Native CleanShot integration for saving measurements
- Integration with Adobe XD and Sketch
- Multiple-element capture in a single screen view
Pros:
- Accurate measurement capabilities
- Integration with existing design tools
- Faster than manual measurement methods
Cons:
Specialized use case
Price: Available on Setapp, a subscription platform with 250+ apps. You can try it free for 7 days.
Monosnap: Simple Mac snipping tool for content creators
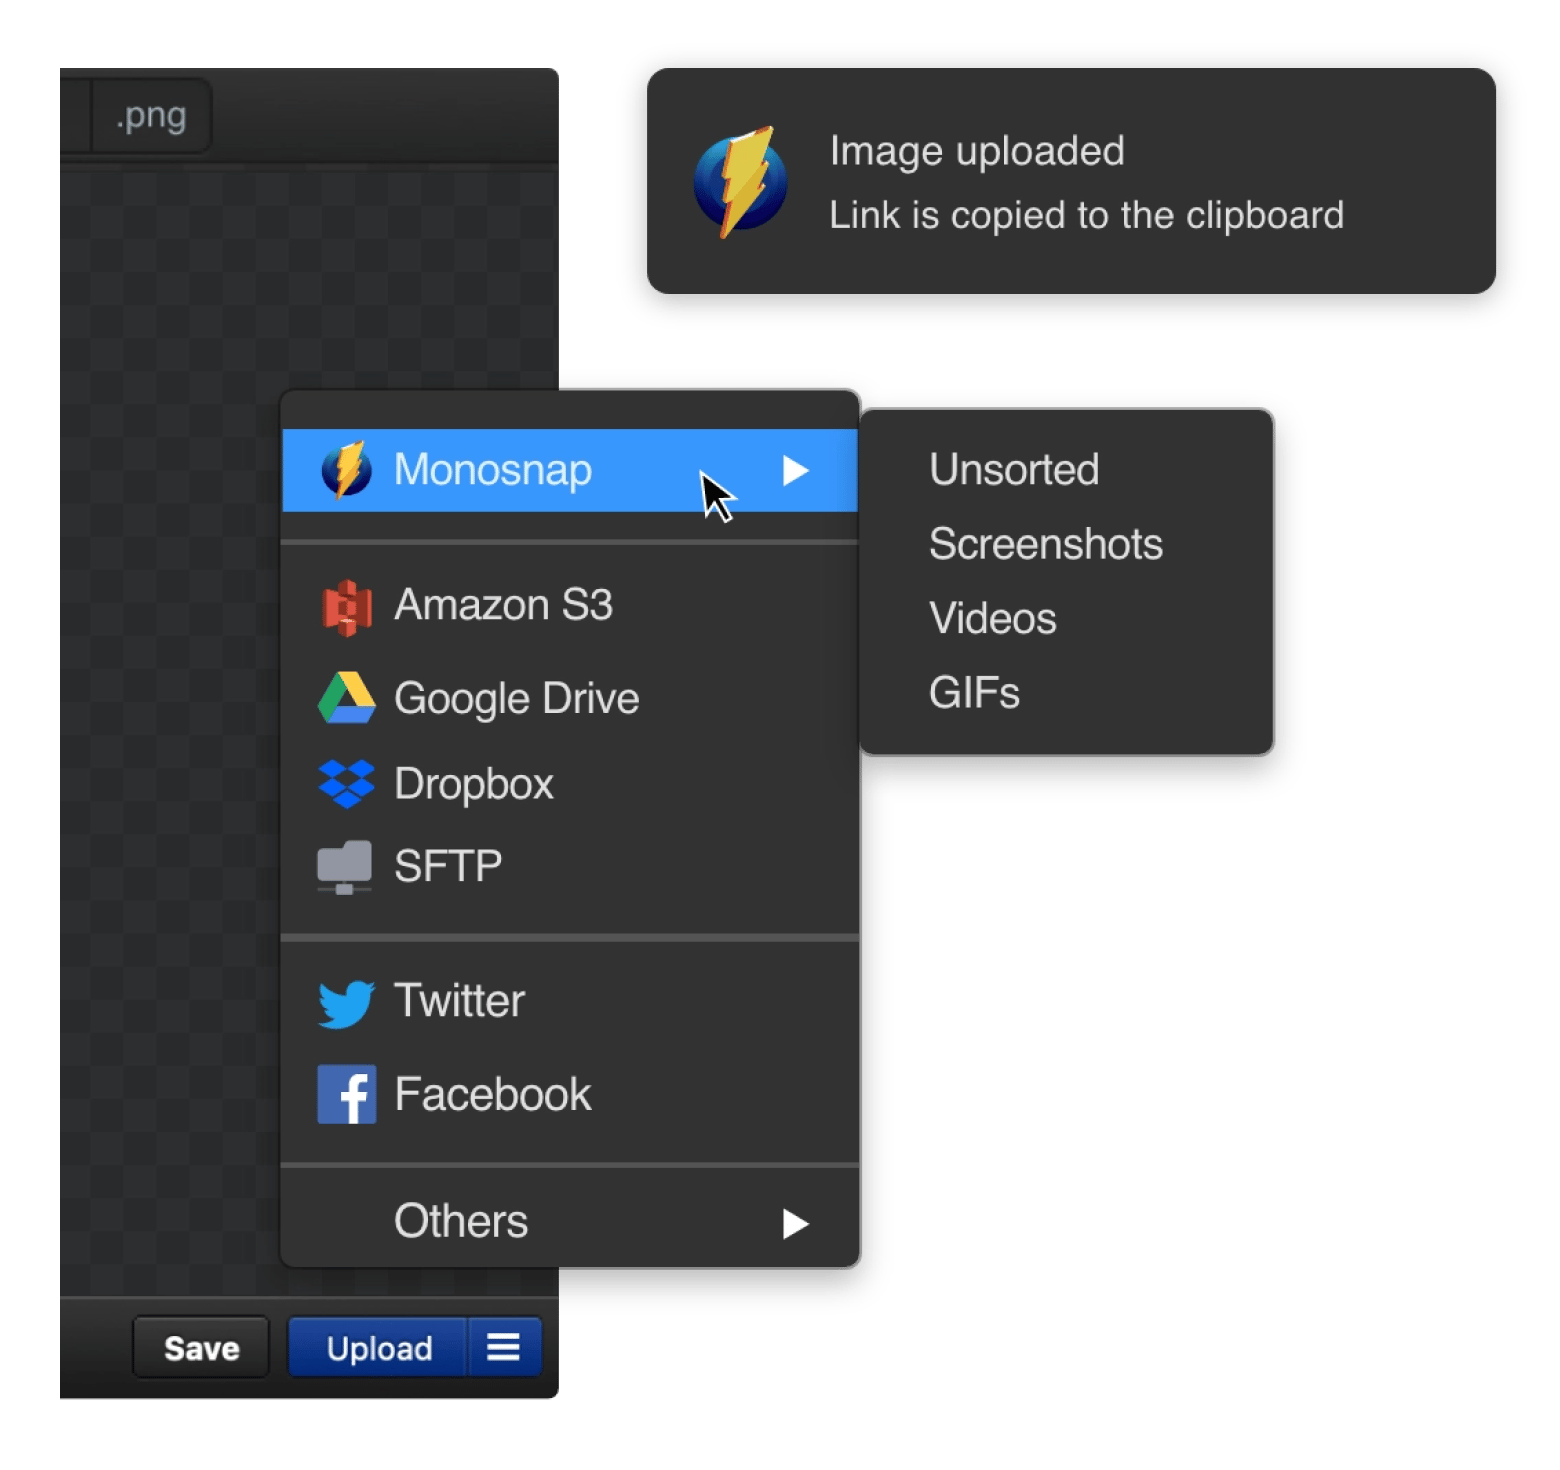
Monosnap is something between a Mac's basic built-in tool and feature-heavy professional alternatives. It provides useful additional functionality, like cloud storage, basic annotations, and screen recording without the complexity or cost of premium solutions.
The app’s core advantage is its accessibility. Users gain cloud storage for quick sharing, basic annotation tools for marking up screenshots, and both capture and recording capabilities.
Key features:
- User-friendly interface
- Cloud storage options
- Screenshot and screen recording
- Basic annotation tools
Pros:
- Free option available
- Clean interface suitable for non-technical users
- Covers the most common screenshot and basic recording needs
Cons:
- Advanced features require paid subscription
- Limited annotation tools
- Not as powerful for professional use
Price: Free or from $2.50/month
Lightshot: Free and lightweight Mac snipping tool
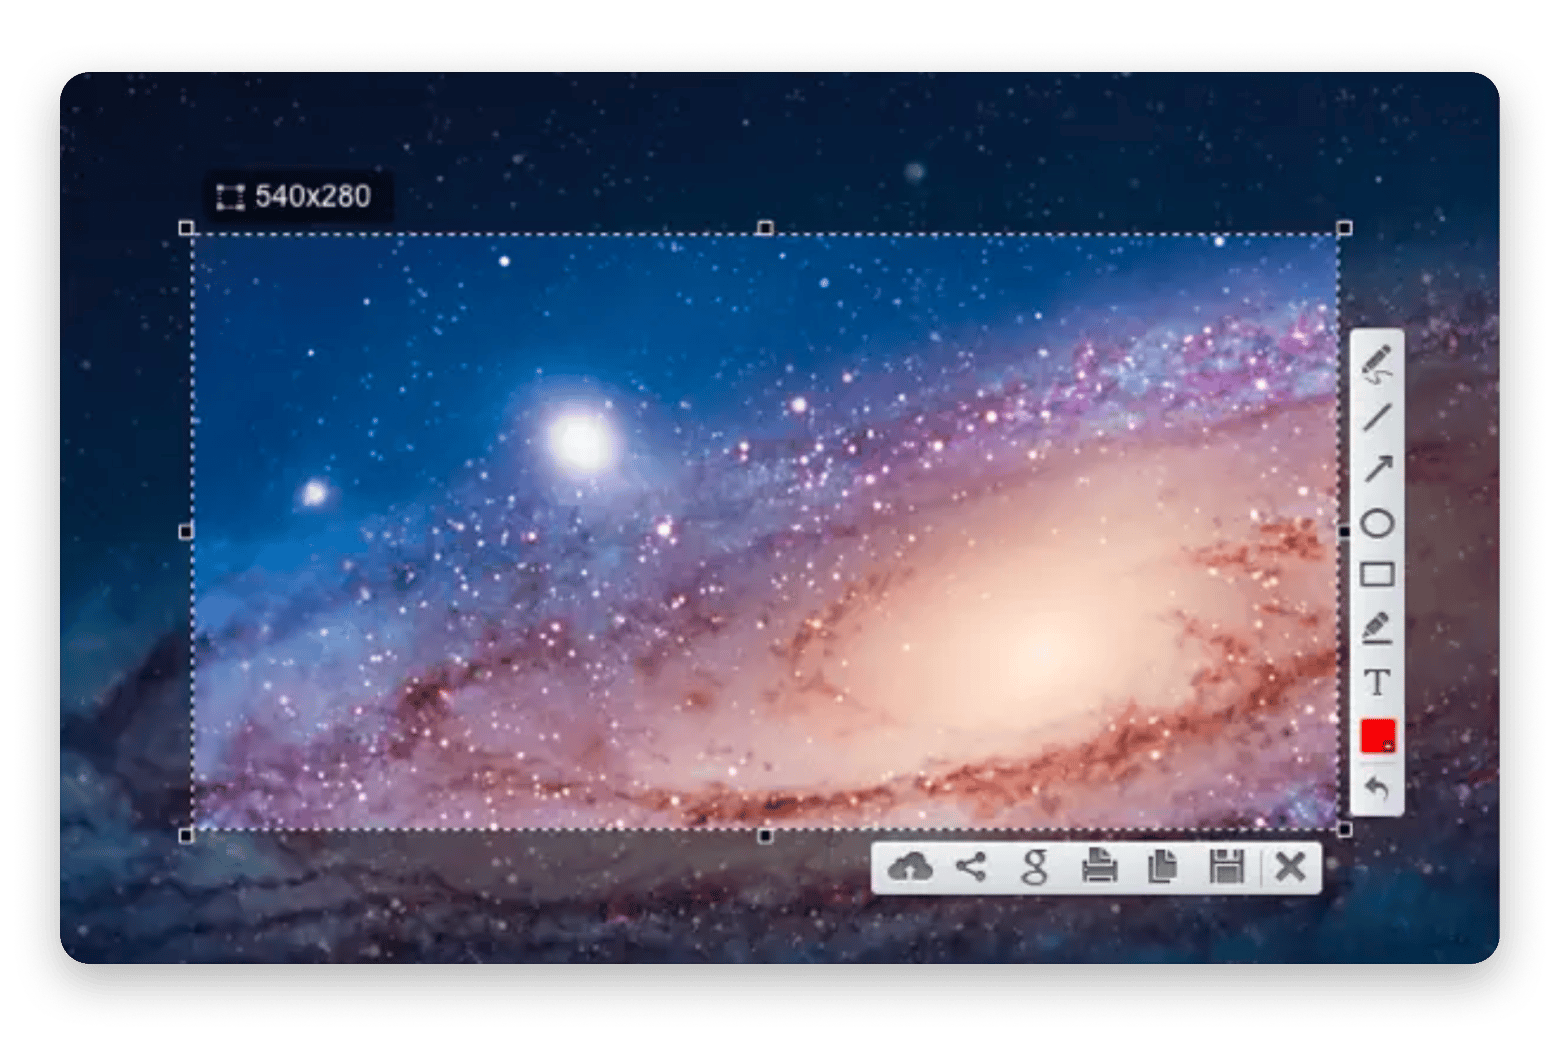
Lightshot is a free, fast, and easy-to-use snipping tool for Mac that lets you capture screen areas, add basic annotations, and upload them to cloud storage or share them directly on social media.
For casual users without professional needs, it's a great free option. Its functionality is slightly greater than the Mac built-in screenshot tool, but it still loses out to more advanced tools.
Key features:
- Quick screen area capture
- Basic annotation tools
- Simple interface suitable for non-technical users
Pros:
- Permanently free
- Fast performance
- Annotation without complexity
- Great for casual, personal use cases
Cons:
- Very limited editing features compared to paid alternatives
- Less polished interface than premium options
Price: Free
ScreenFloat: Best snipping tool to keep screenshots floating while you work
Rather than saving screenshots to files that become buried in folders or hidden behind active windows, ScreenFloat keeps captures floating above all windows for constant accessibility.
This app is especially useful for video editors who constantly reference client notes while editing and need to keep screenshots visible above their timeline. With ScreenFloat, screenshots remain visible and accessible without switching windows or navigating files.
Key features:
- Screenshots float persistently above all active windows
- Instant text and barcode extraction
- Timed screenshot capture
Pros:
- Unique floating capability
- Excellent for research, comparison work, and reference-heavy tasks
- Screen recording with audio
Cons:
• Floating window approach requires adaptation period
Price: Available on Setapp, a subscription platform with 250+ apps. You can try it free for 7 days.
Movavi Screen Recorder: Snipping tool for Mac with recording capabilities
I knew Movavi Screen Recorder as a recording tool, but it also has capable screenshot functionality. With this tool, you can take screenshots, add annotations, and share the results.
Recording features set Movavi apart from ordinary screen capture software. Webcam overlay, keystroke display, mouse cursor highlighting, and instant trimming after recording support the creation of tutorials and presentations that go beyond just screen captures.

Best features:
- Single window, full page, or custom area capture
- Text, arrow, and highlight annotations
- Screen recording with webcam overlay
- Real-time drawing on video during capture
- Keystroke display and mouse cursor highlighting
- Flexible recording options with custom dimensions
Pros:
- Powerful screen recording features
- Well-suited for video-focused workflows
- Multiple export and sharing options
Cons:
Full feature set requires paid version
Price: Free or from $19.95/month.
How to use a snipping tool on Mac
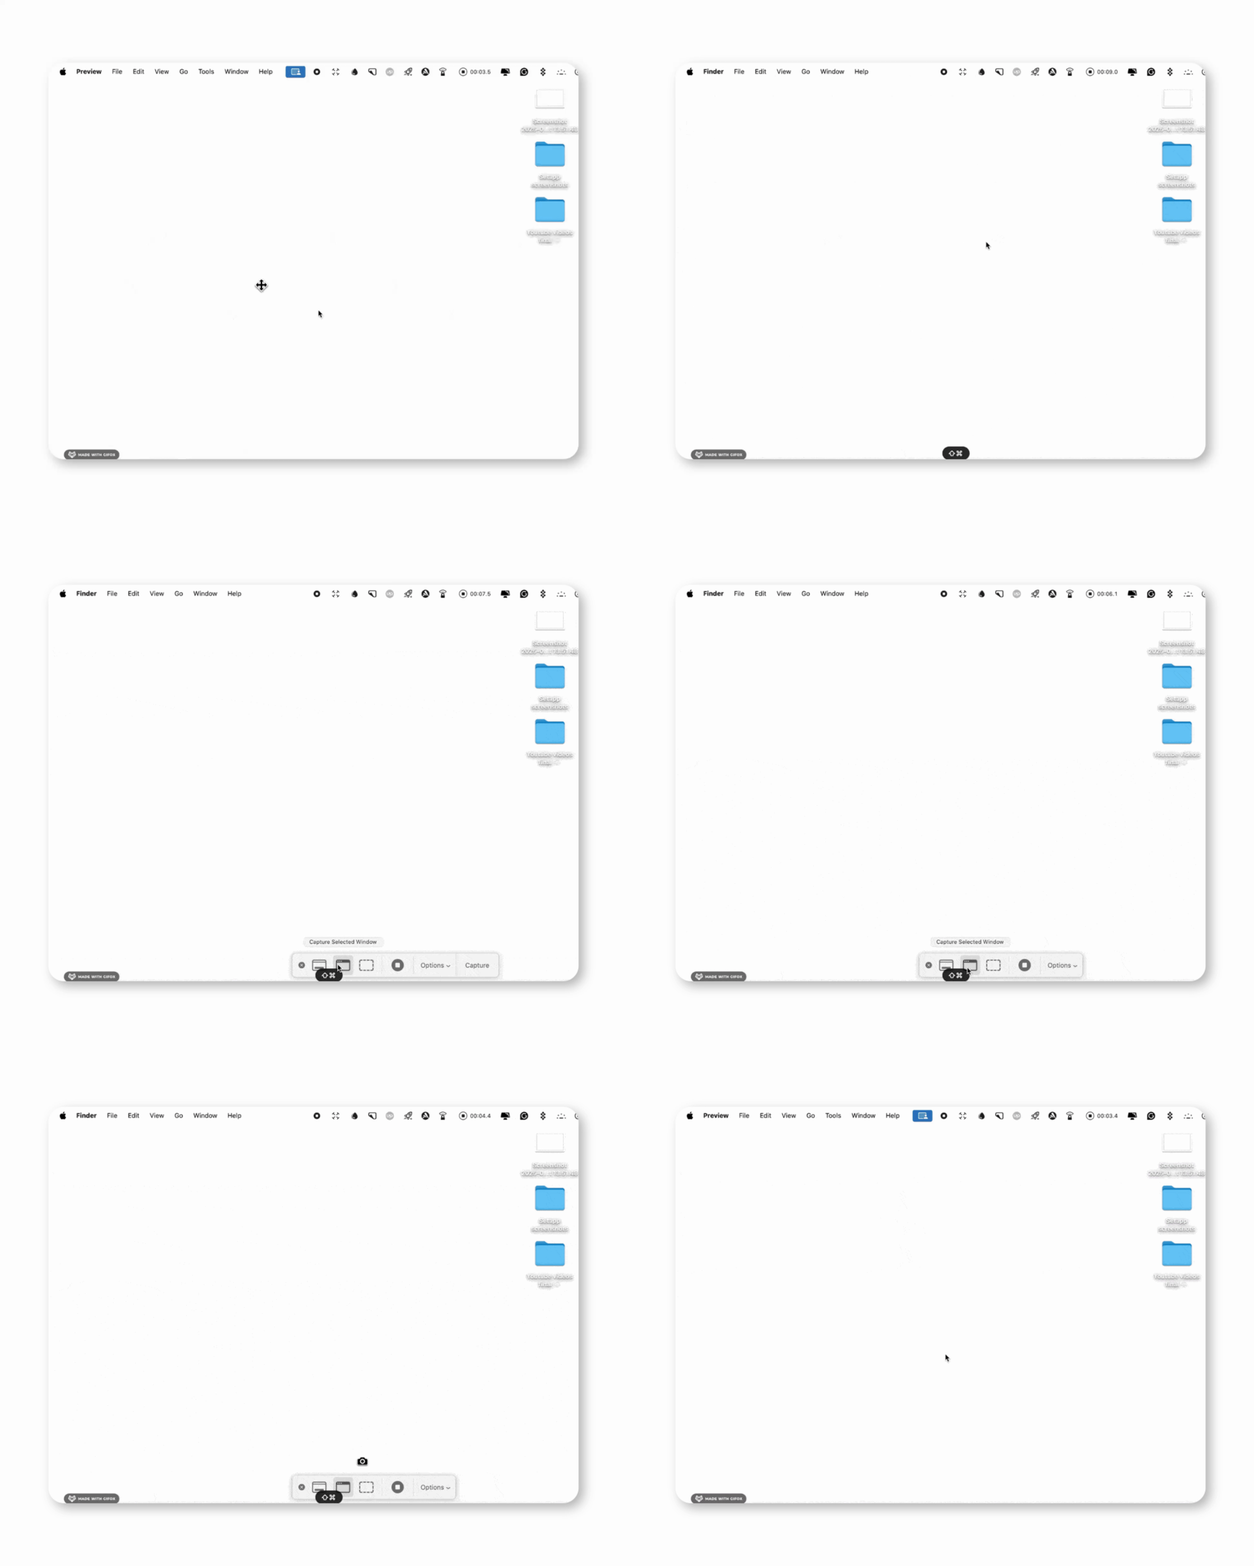
On Mac, you can capture the entire screen, a window, or a selected area using specific key combos, or open the snipping tool menu to choose your preferred option.
To take a screenshot on a Mac using the built-in snipping tool:
- Press and release Shift + Command + 5 simultaneously.
- Click to choose what you want to capture (e.g., full screen, selection, window).
- Take the screenshot by clicking Capture.
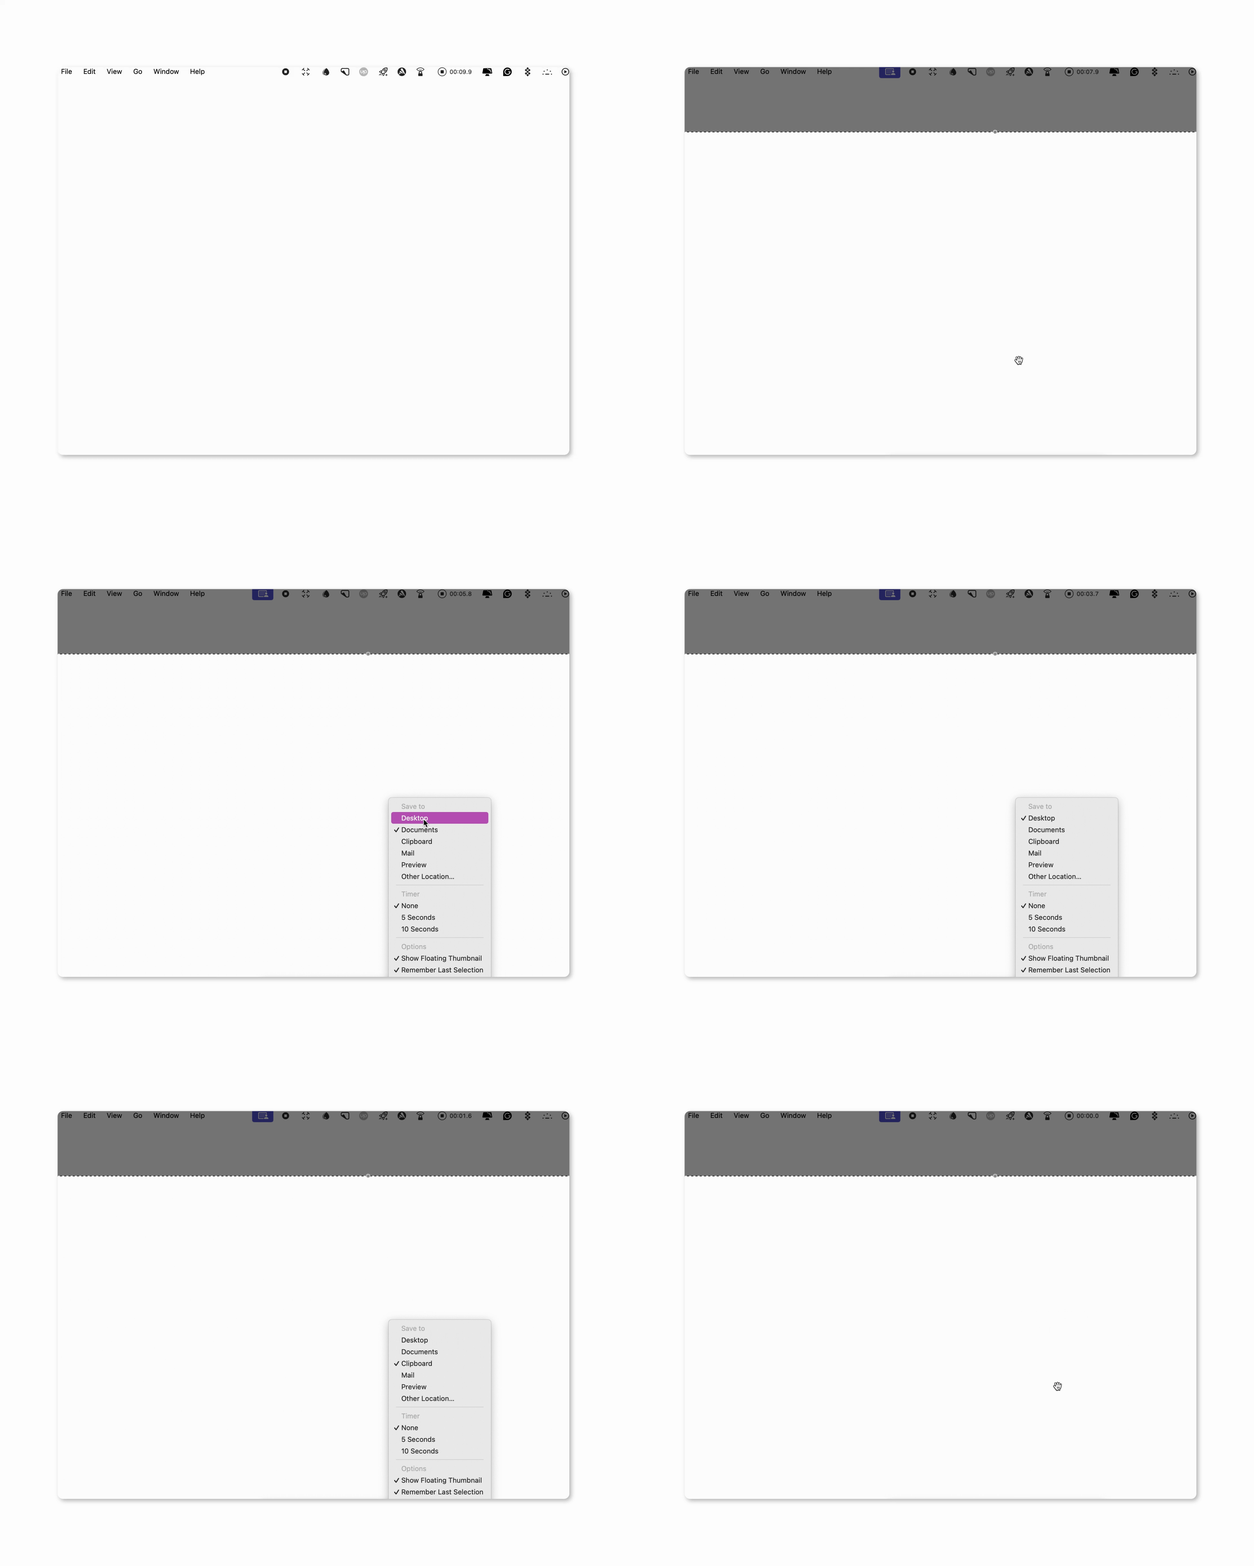
Where do your screen snips go? By default, every screenshot you create is saved to the Desktop. To change the location:
- Press Shift + Command + 5 to open the screenshot menu.
- Click Options.
- Choose a new location under Save to, such as Documents or another folder.
A shortcut for the snipping tool
Here are the main screenshot shortcuts on Mac:
- Shift + Command + 3 — Capture the entire screen
- Shift + Command + 4 — Capture a selected area
- Shift + Command + 4, then Spacebar — Capture a specific window
- Shift + Command + 5 — Open the screenshot/snipping tool menu with full options
- Shift + Command + 6 — Capture the Touch Bar (on supported Macs)
- Control + Shift + Command + 6 — Copy the Touch Bar capture to your clipboard
From the menu, you can also choose where to save your screenshots, set a timer, and show or hide the mouse pointer in the capture.
Wrap-up: Which Mac snipping tool matches your workflow?
For basic screenshot needs without advanced requirements, Mac's built-in tool remains perfectly adequate and costs nothing.
For content creators and researchers requiring comprehensive functionality, CleanShot X provides the most complete solution. When text extraction is the primary requirement, TextSniper's focused OCR capability becomes essential. Designers benefit significantly from PixelSnap’s precise measurement tools. Tutorial creators should evaluate Capto for its integrated recording and annotation capabilities.
All these snipping tools and over 250 other applications are available in Setapp for the price of a single subscription. A 7-day free trial allows evaluation of which tools best fit specific workflow requirements.
FAQ
How to use the snipping tool on a Mac?
To use the snipping tool on a Mac:
- Press and release Shift + Command + 5 simultaneously.
- Click to choose what you want to capture (e.g., full screen, selection, window).
- Take the screenshot by clicking Capture.
How to snip a clip on Mac?
If you want to snip a clip on a Mac, just press and release the Shift + Command + 5 keys simultaneously, then choose what you want to capture. To trim a video clip, use QuickTime Player. Open the video, go to the Trim feature, highlight the section you want to keep, and confirm the cut.
Is there a tool on Mac like snipping tools?
Mac has a built-in Screenshot tool that works just like the Snipping Tool on Windows. You can access it by pressing Shift + Command + 5. This opens a screenshot menu where you can capture the entire screen, a window, a selected area, or even record your screen. If you need more advanced snipping tools with annotation, editing, and quick sharing capabilities, try CleanShot X, TextSniper, or Xnapper from theSetapp collection.
Why can't I snip on my Mac?
If your Mac stops taking screenshots, open System Settings > Keyboard > Shortcuts > Screenshots and double-check that your shortcuts are turned on. Flipping them off and on again usually gets everything snapping back to normal.


