How to change Mac's Hosts file – 5 step guide
▼ TL;DR: Change Mac’s hosts file
- How to find and edit the Mac hosts file: It’s located at
/private/etc/hosts. Use Finder > Go > Go to Folder > type/private/etc/hosts. Then open Terminal and typesudo nano /etc/hoststo edit. - Steps to update your hosts file: First back it up. Then use Terminal to edit entries in the format
IP_address domainname. Save your changes and reset DNS cache withsudo killall -HUP mDNSResponder. - How to fix or recover a broken hosts file: Check file permissions and formatting. If it’s missing, restore it from a backup or use recovery software like iBoysoft Data Recovery.
- Make it easier with trusted apps: Setapp tools like Core Shell, Get Backup Pro, SSH Config Editor, and CleanMyMac simplify the process. All are available on Setapp with a 7-day free trial
If you're migrating your website to a new server or want to protect your system from cyber threats, you might need to edit your hosts file.
The good news is that editing your hosts file on a Mac is easier than you think. In this guide, I'll show you how to identify the host file location and make the required adjustments in minutes.
How to locate and edit the hosts file on macOS
So, where is the hosts file? The hosts file is located in the /etc/hosts folder on your Mac.
Despite sounding daunting, identifying the hosts file location and making modifications is a swift and uncomplicated process. I'll guide you through it in five simple steps.
To locate the Hosts file on Mac:
- Select Go > Go to Folder… from the Mac menu bar
- Type in /private/etc/hosts
- Click Go
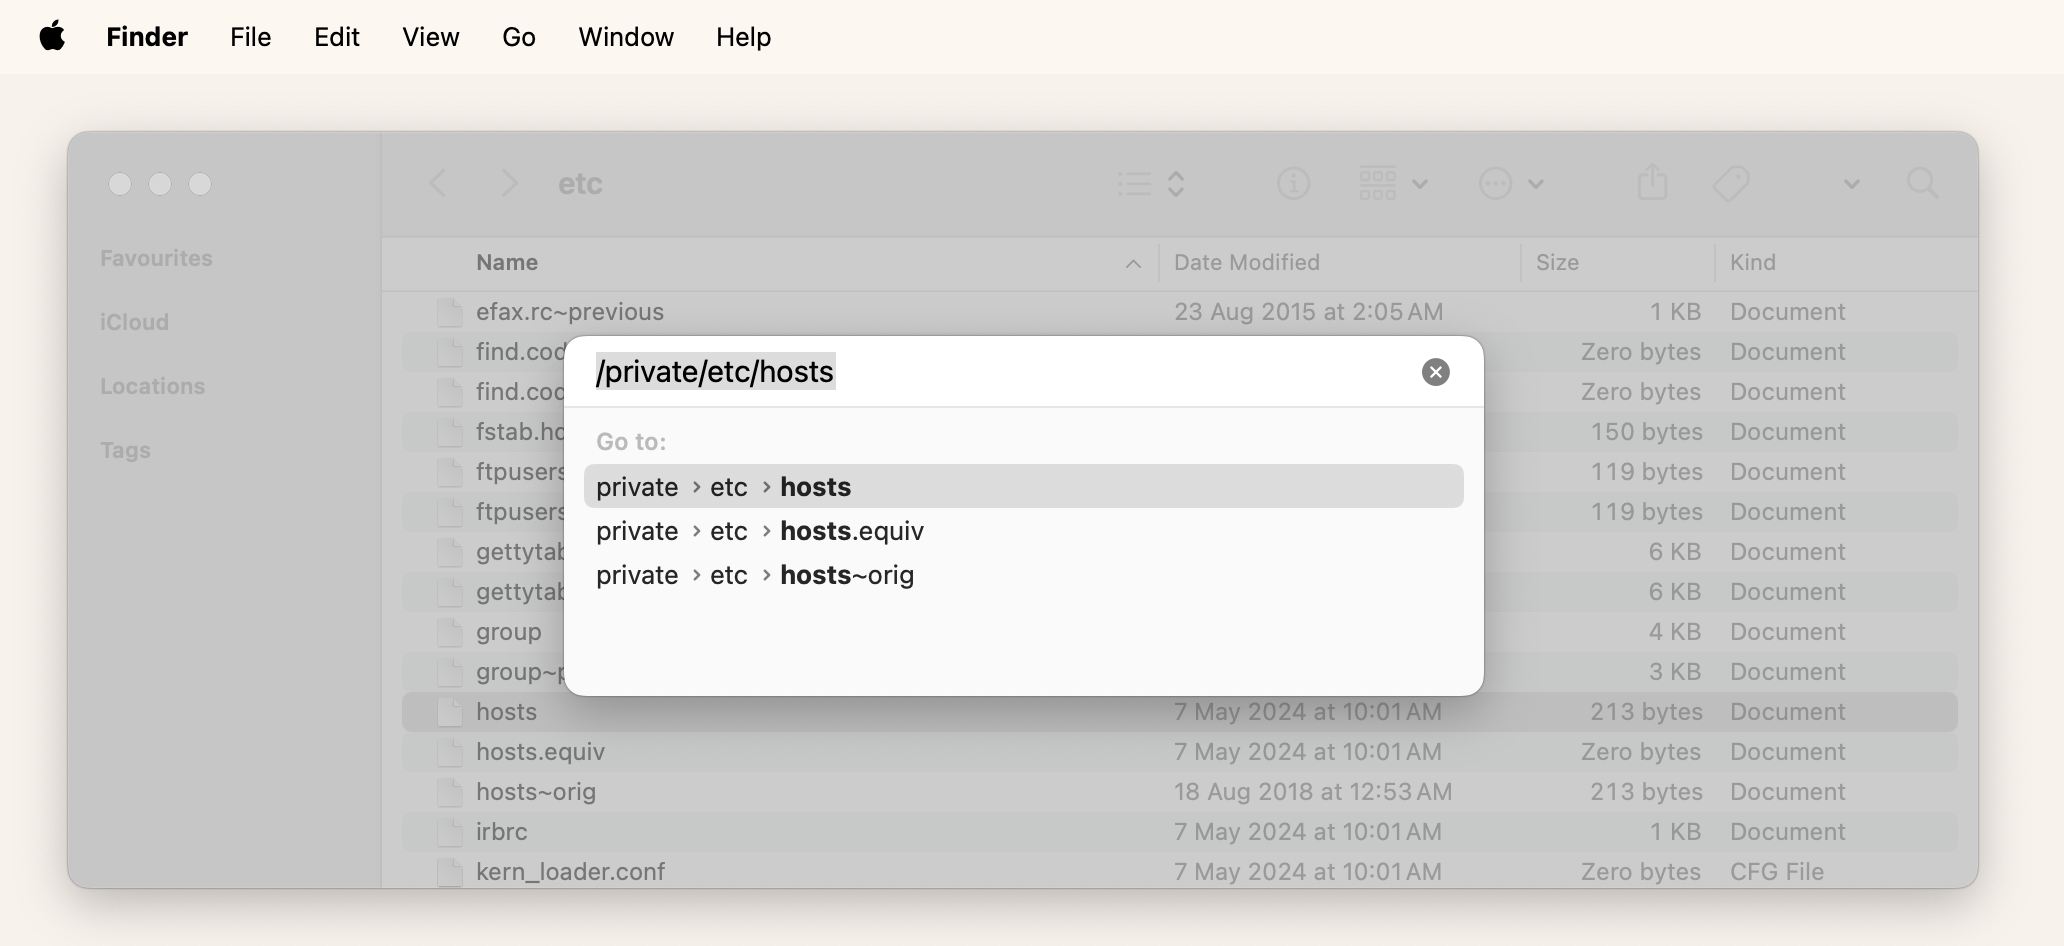
You should end up within the "etc" folder and have the Mac Hosts file highlighted.
Step 1: Prepare to edit the hosts
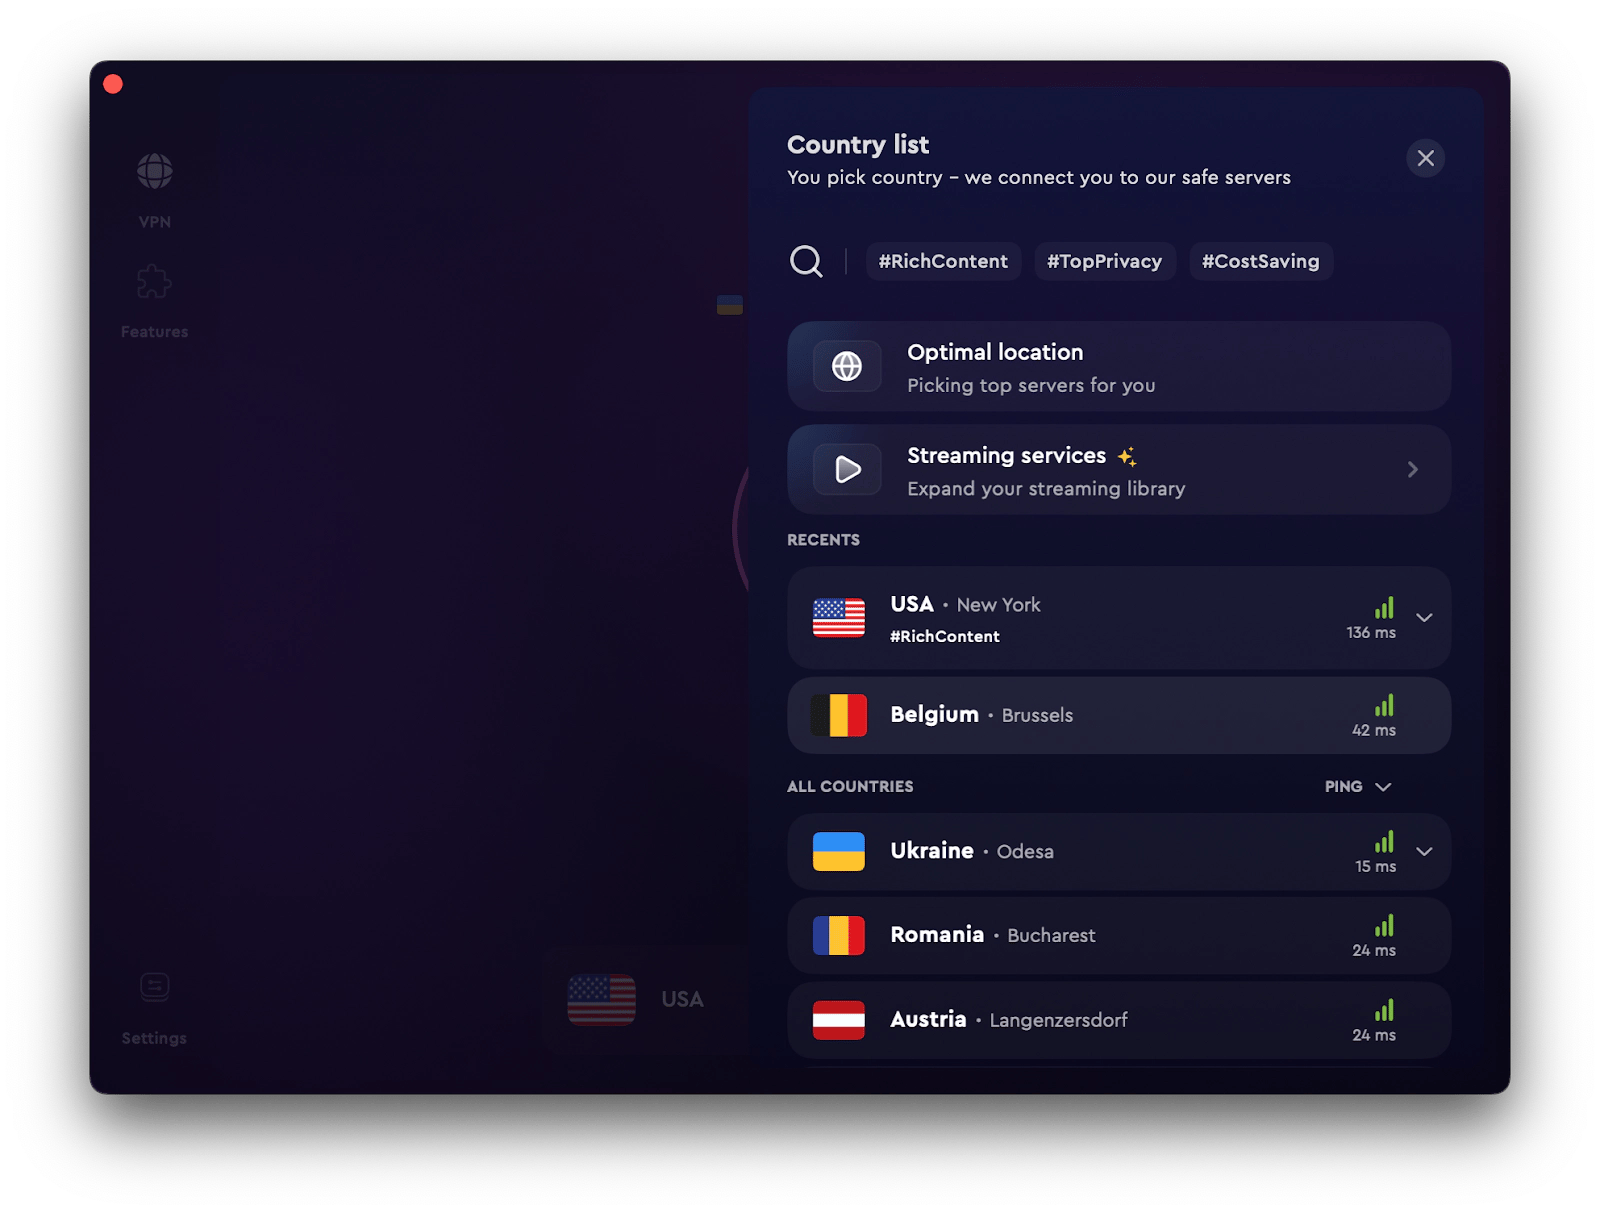
First, set up a VPN to improve your security measures. My personal recommendation is to download ClearVPN and establish a connection to a VPN in your preferred location. Simply choose a location or let the app pick one for you, then click the activate button to connect to a new server automatically.
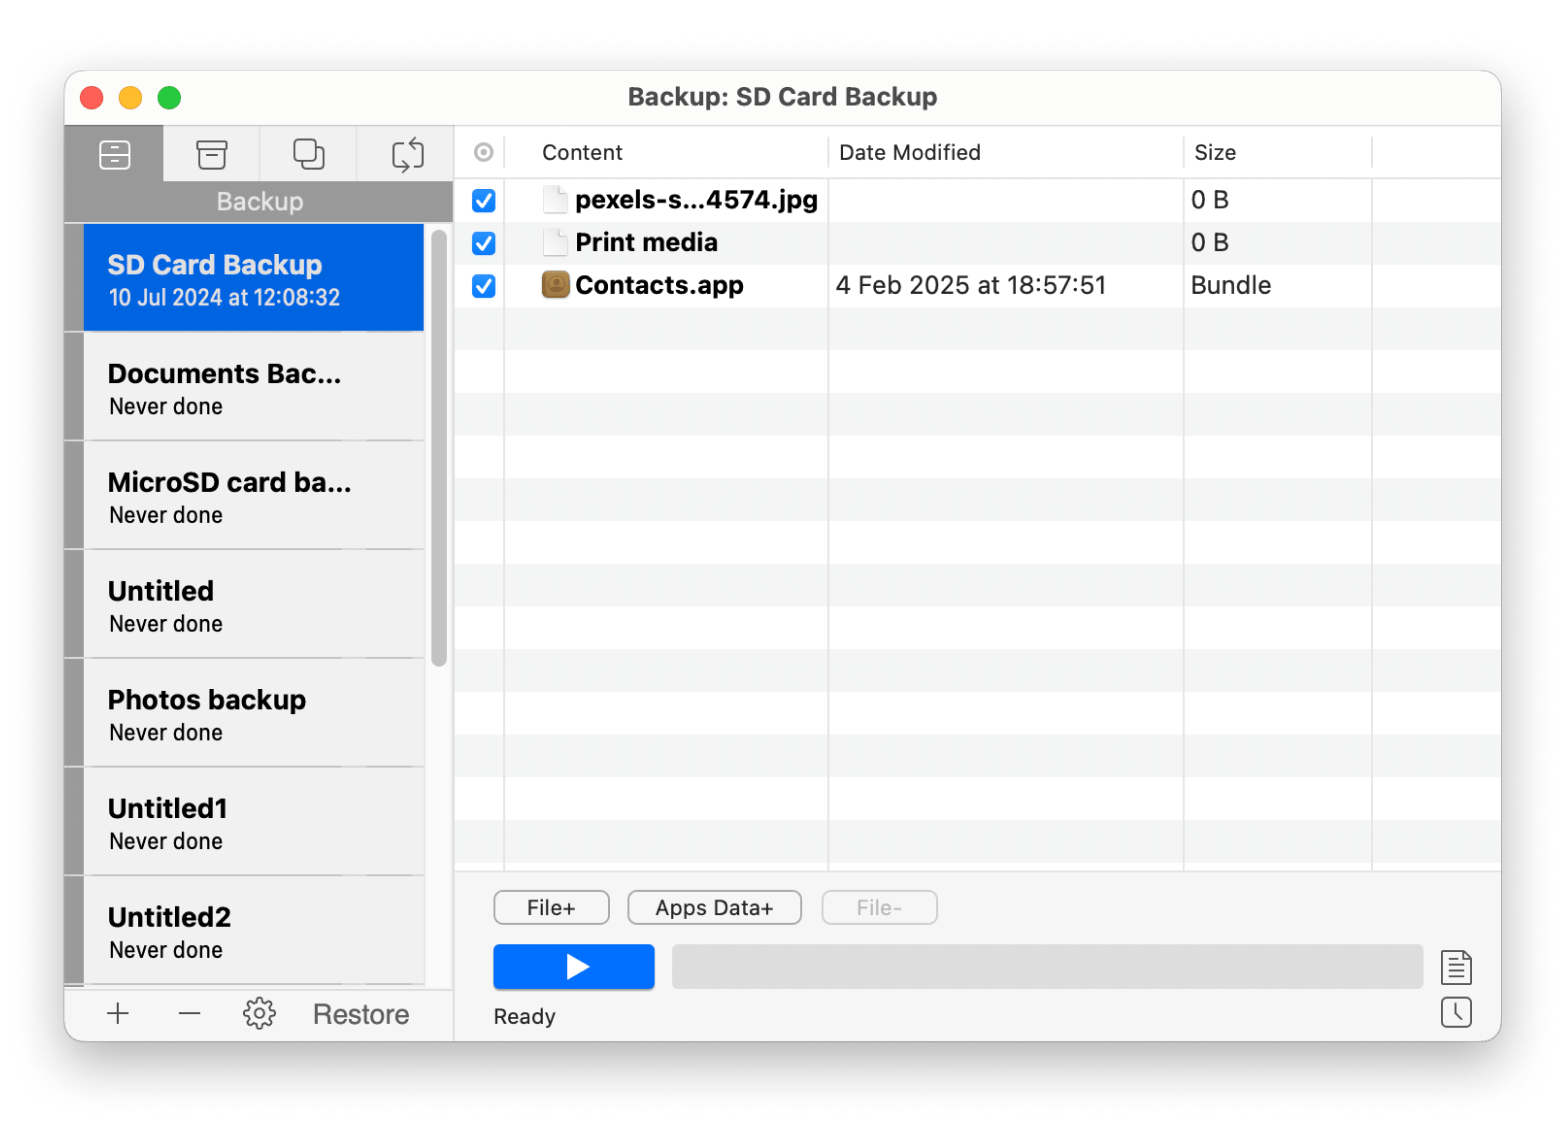
Also, make backups of the Mac hosts file before editing, in case an error occurs. That way, you can safely revert to the previous version and undo any mistakes. Just copy the document onto an external hard drive or make a local backup, and then you can experiment with the hosts file without the fear of breaking anything.
I prefer to use Get Backup Pro for this purpose because it’s easy to create encrypted backups of all your sensitive data or just a few selected files that you need at the moment. And even if something happens to your device, you can still recover your files on any Mac that has the software installed.
Step 2: Access your Mac terminal
Once you have a secure connection, you’ll want to identify your host file location by accessing Terminal on your Mac.
You can use a built-in one, but for constant work, I recommend using Core Shell. This app comes with built-in Secure File Transfer Protocol (SFTP) capabilities so you can manage all your hosts remotely from within the app.
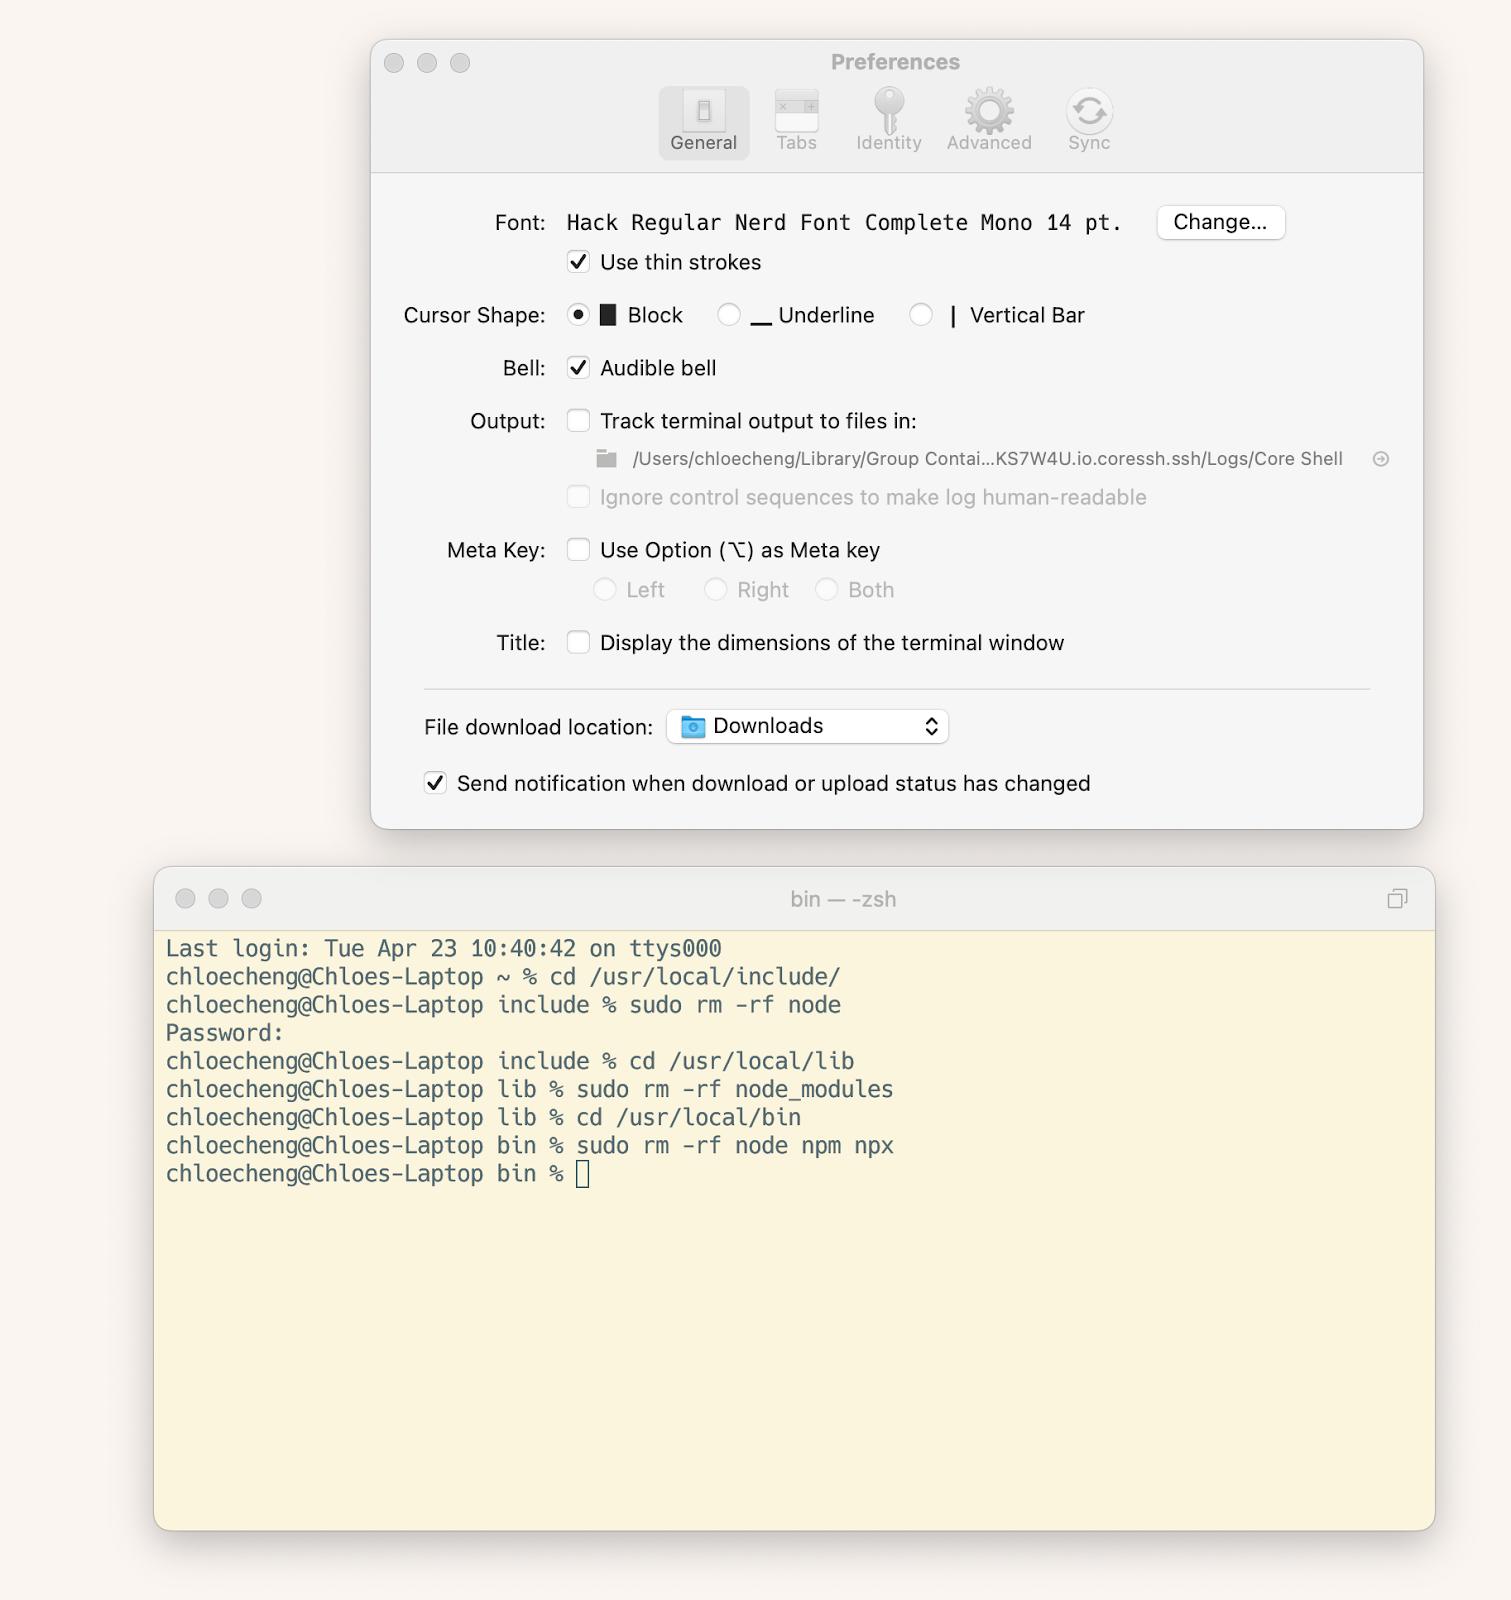
You can also restore your session if your connection fails, so you don’t lose all your work. In Core Shell, all your saved host files are right at your fingertips. Just select the one you want to edit.
Check out the comparison of 11 Terminal alternatives for Mac in 2025.
Step 3: Add the host entry
Here is how to add the host entry in Mac:
- Open Terminal.
- Type sudo nano /etc/hosts and press the Return key.
- Enter your admin password.
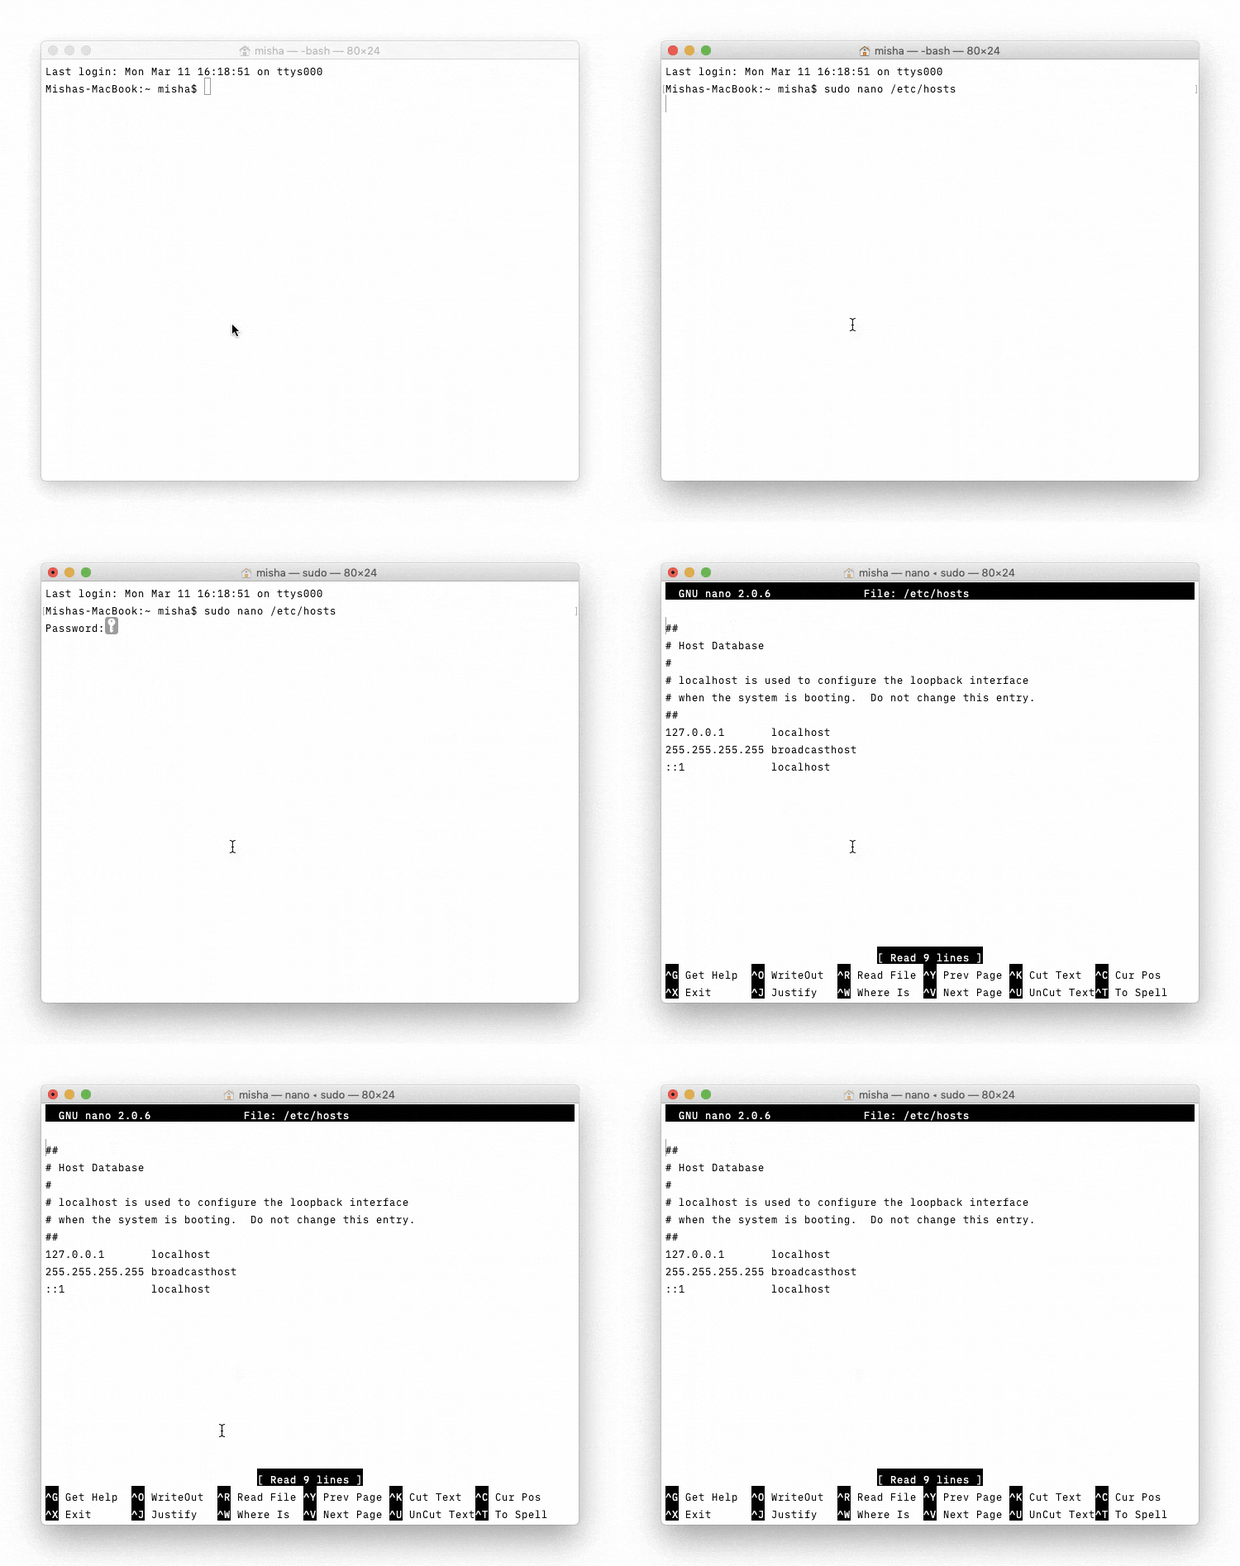
You'll now be taken to the text editor, where you can edit your Mac's hosts file.
Step 4: Edit the host file
The next steps will depend on what exactly you're trying to do with the Mac hosts file. But for now, I'll assume you want to add a new domain.
To do so:
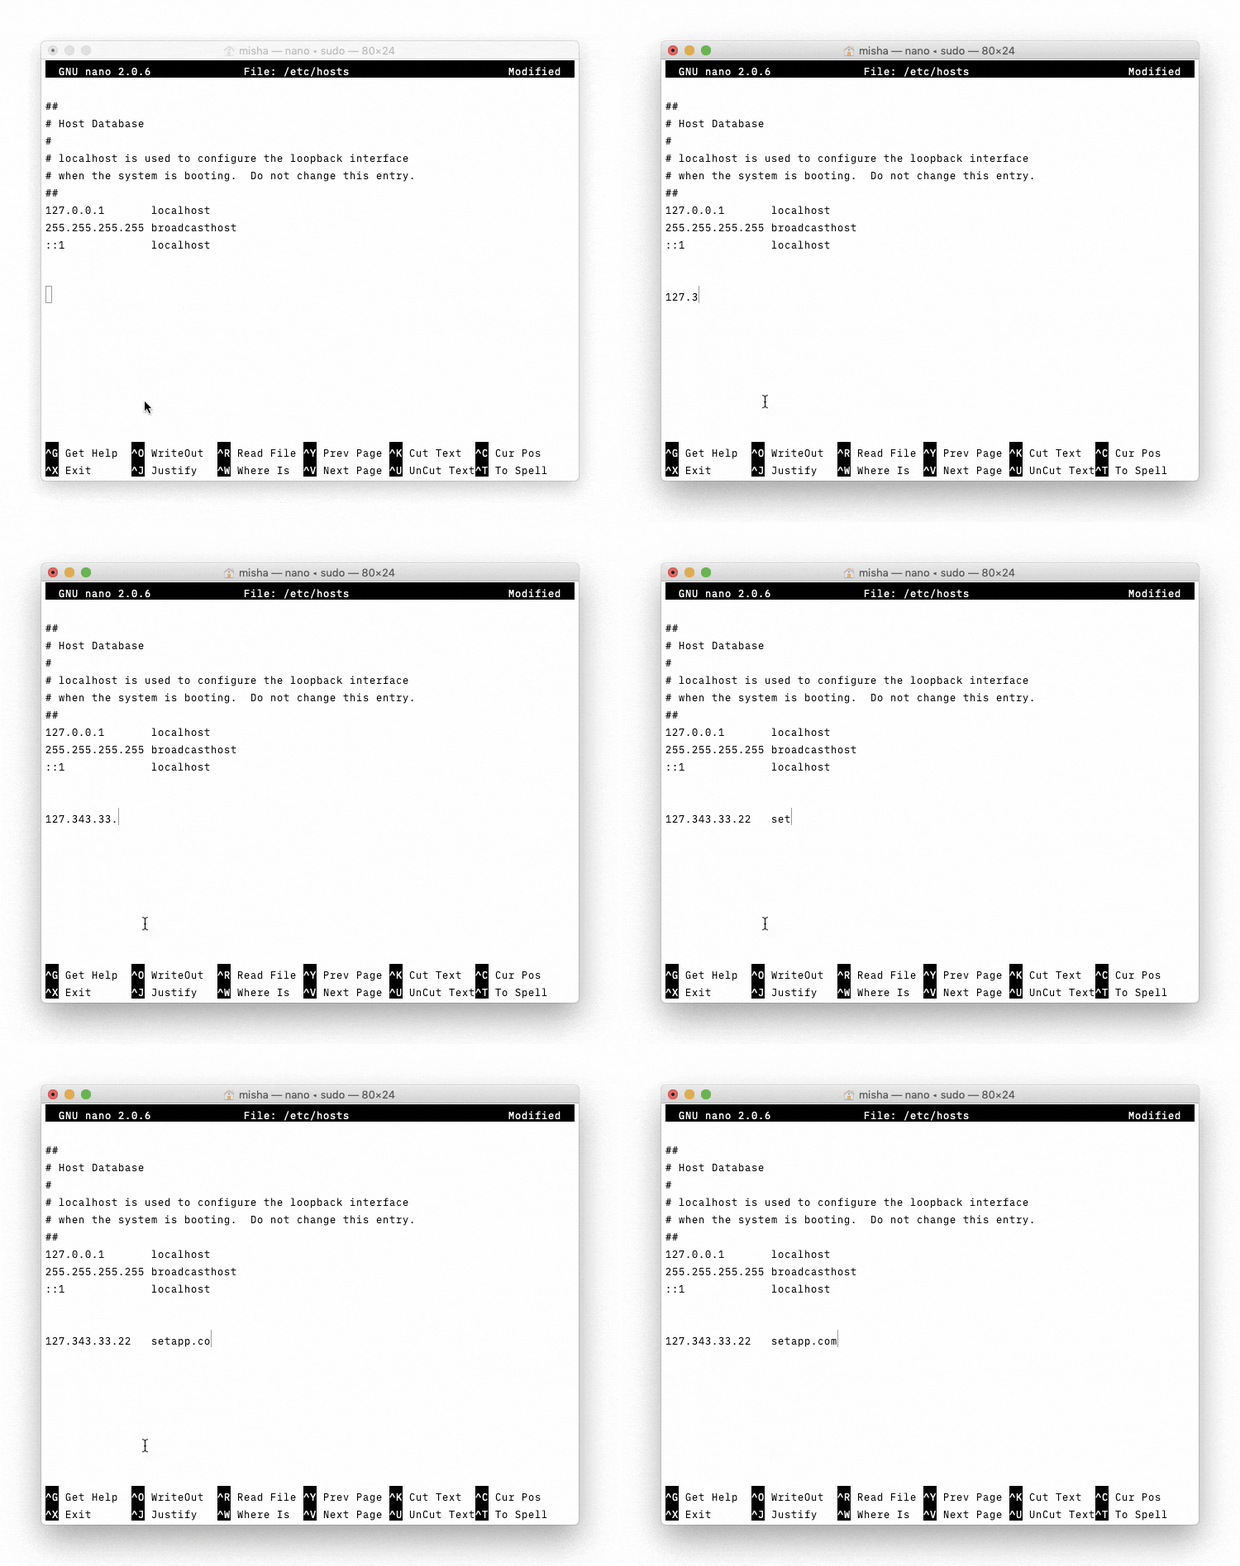
- Use the Return key to create some space below the existing records.
- Type in the TCP/IP address.
- Press the Tab key.
- Enter the domain name.
- Save the file by pressing Control + O.
- Exit with Control + X.
You've successfully altered your Mac's hosts file. But just to make sure your edits are being saved properly, I want to add one final step to this process: clearing your DNS cache.
Step 5: Clear your DNS cache
Changes won’t always go live even after they’ve been saved. I recommend clearing your DNS cache to remove saved IP records after you’ve finished editing the host file.
To do so:
- Enter the following command into the Terminal or within Core Shell before exiting: sudo killall -HUP mDNSResponder.
- Press the Return key to clear your Mac's DNS cache and prevent any clashes between DNS and the Hosts file.
The changes should take effect immediately. Using the Mac hosts file this way, you can literally input any TCP/IP you need, from other websites to your own development server to your Mac (just type in 127.0.0.1), which can be useful when you want to avoid using social media or other distractions. You could also outright block malicious websites with a 0.0.0.0 address.
How to fix a malfunctioning Mac hosts file
As I mentioned, you may find that your Mac hosts file is malfunctioning. There are lots of reasons why this can happen but the important part is that you can fix it, so don’t dwell on the reasons why for too long.
Sometimes when you add too many entries to your Hosts file Mac might not process them correctly. It could be that some of the TCP/IP addresses are responding to the same domain name or you've deleted some other essential information.
Let’s focus on the fixes:
- Check the file permissions to ensure that the hosts file has the correct read and write permissions.
- Check syntax and formatting to ensure each entry follows the correct format: IP_address hostname.
- Clear the DNS cache to ensure that the system recognizes the updates.
- Check the network configuration to ensure that your network settings are correctly configured and that there are no conflicts that might override the hosts file.
- Ensure that your router or firewall settings are not blocking access to specific domains or IP addresses.
- Reset hosts file to default by opening it in a text editor and restore it to its default configuration:
##
# Host Database
#
#
# localhost is used to configure the lookback interface
# when the system is booting. Do not change this entry.
##
127.0.0.1   localhost
255.255.255.255   broadcasthost
::1    localhost
Recover lost hosts file or data on Mac with iBoysoft Data Recovery
Your Mac’s hosts file is small, but it has a critical function: mapping addresses to their respective host names. If you edit and accidentally delete or overwrite it, you can experience unexpected connectivity issues.
This is where iBoysoft Data Recovery steps in. It's one of the best file recovery software for Mac that can restore important files like the hosts file from internal or external drives. It’s not a tech-geeky, command-line recovery tool, but a user-friendly recovery program that anyone can use to recover their lost files.
Here's how to recover your files using iBoysoft Data Recovery:
- Install and open the app.
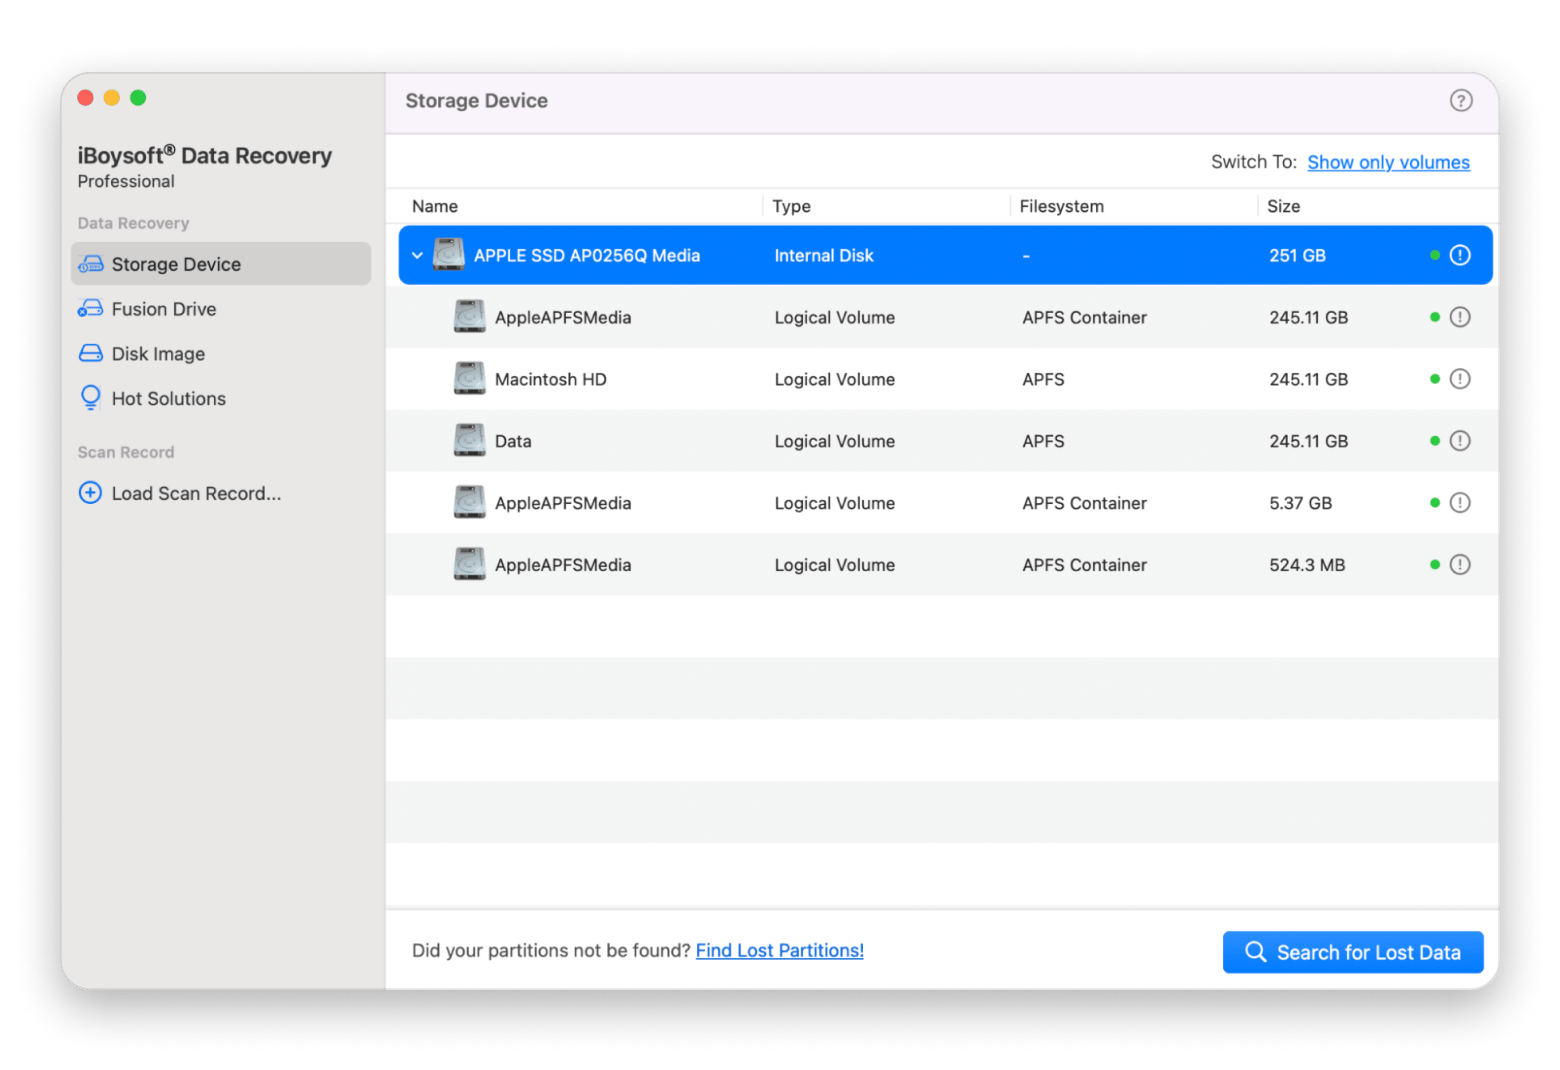
- Choose the drive where your hosts file or other data was stored.
- Click Search for Lost Data.
- Select the file and click Preview in the right pane.
- Click Recover.
Tips to protect your hosts file on Mac
You always want to protect your Mac's hosts file from unauthorized changes. This helps to reduce the risk of phishing attacks or malware infections.
As an extra precaution, you should use antivirus and anti-malware software to monitor changes to the hosts file. For schedule regular system scans you can use CleanMyMac to detect and remove any malicious software that could alter the hosts file.
Just run a Protection scan from the sidebar, and the app will detect and remove any threats on your machine. 
FAQs
Where can I find the host file?
You can find the host file in the /etc/hosts folder on your Mac. Simply open Open Finder > Click Go in the menu bar > Go to Folder > Type /private/etc/hosts > Go.
Is it dangerous to edit your hosts file?
It's not dangerous to edit your hosts file. Any changes made can be easily reversed by restoring the file to its last functional state. However, even in this case, there are some risks involved. For example, you might mistakenly run your test scripts against production on a new Mac. Or, you could use someone else's Mac for testing, not knowing that they don't have their hosts file modified or vice versa. So make sure you're very careful.
Do you need to reboot after changing the hosts file?
You don't need to reboot after editing the hosts file. Once you save the changes and clear your DNS cache, the updates take effect immediately.
How do I clear the cache in the host file?
To clear the cache in the host's file, open Terminal and type sudo killall -HUP mDNSResponder. Then, press the Return key to clear your Mac’s DNS cache.
What should I do if I accidentally delete my Mac's hosts file?
If you accidentally delete your Mac's hosts file, you can still recover deleted files on Mac
with iBoysoft Data Recovery. Install the tool, select the drive where the file was stored, and search for the lost data.
Does iBoysoft work with encrypted Macs?
Yes, iBoysoft Data Recovery can recover directly from a FileVault-encrypted drive as long as you can supply the proper password (or corresponding recovery key) to unlock the disk.
Will iBoysoft work if my Mac won’t start?
iBoysoft Data Recovery can work in macOS recovery mode. If your Mac is not booting up properly, you can launch the tool in recovery mode to access your drive and recover your data.
Is iBoysoft safe to use for system files?
Yes, it’s completely safe to use iBoysoft Data Recovery for system files. The tool works in read-only mode, so it recovers system files, including the hosts file, without changing any existing data.


