How to create folders in Gmail
Email is how most of us communicate daily, and with so many messages coming in, it’s easy to feel overwhelmed. Gmail, the go-to service for 1.5 billion users, makes it easier to stay organized by letting you create folders (or labels) to keep things tidy. Just a heads-up — Gmail calls them labels, but they work just like folders, so I’ll use both terms in this article.
Why you need to create folders
Keeping your inbox organized is key to managing your emails effectively. Here’s why creating folders (or labels) is so important:
- Keep your inbox organized: Group related emails together to reduce clutter.
- Prevent lost messages: Avoid losing important emails among the noise.
- Simplify navigation: Use labels and colors to quickly find what you need.
- Quick access: Easily locate emails, even weeks later, without endless scrolling.
Gmail Labels vs Folders: How does it work?
We all are used to creating good old folders when it comes to organizing some files.
Gmail changed this method of message storing — now it’s all about labels.
To understand how they work, let’s have a look at the standard Gmail’s labels like Inbox, Sent, Spam, and so on.
All the labels have self-explaining names — Inbox contains incoming emails, while Sent includes messages that you send. Yes, that’s just it. When you click on the standard label or the one that you created, Gmail performs a search, filters all the matching emails, and shows a set of results.
It’s important to remember that the system doesn’t make any copies of the labeled email, so if you decide to delete one — it will disappear from your Inbox at all.
You can create folders to group some similar emails. Labeling is like putting colored stickers in a big worksheet — you just mark the page so it differs from the others. You can put two or more labels on one email to simplify navigation even more.
How to create a folder in Gmail on Mac
There are two ways to create a folder in the browser version of Gmail.
Let’s start with a shorter one. You can create a folder right in your Inbox, so open a browser, go to Gmail, sign in to your account, and let’s get started. That will take literally 30 seconds:
- Go to the sidebar, the panel that shows your Inbox, Sent, Spam, and so on.
- Click More, and select Create new label.
- Name your label in the pop-up window.
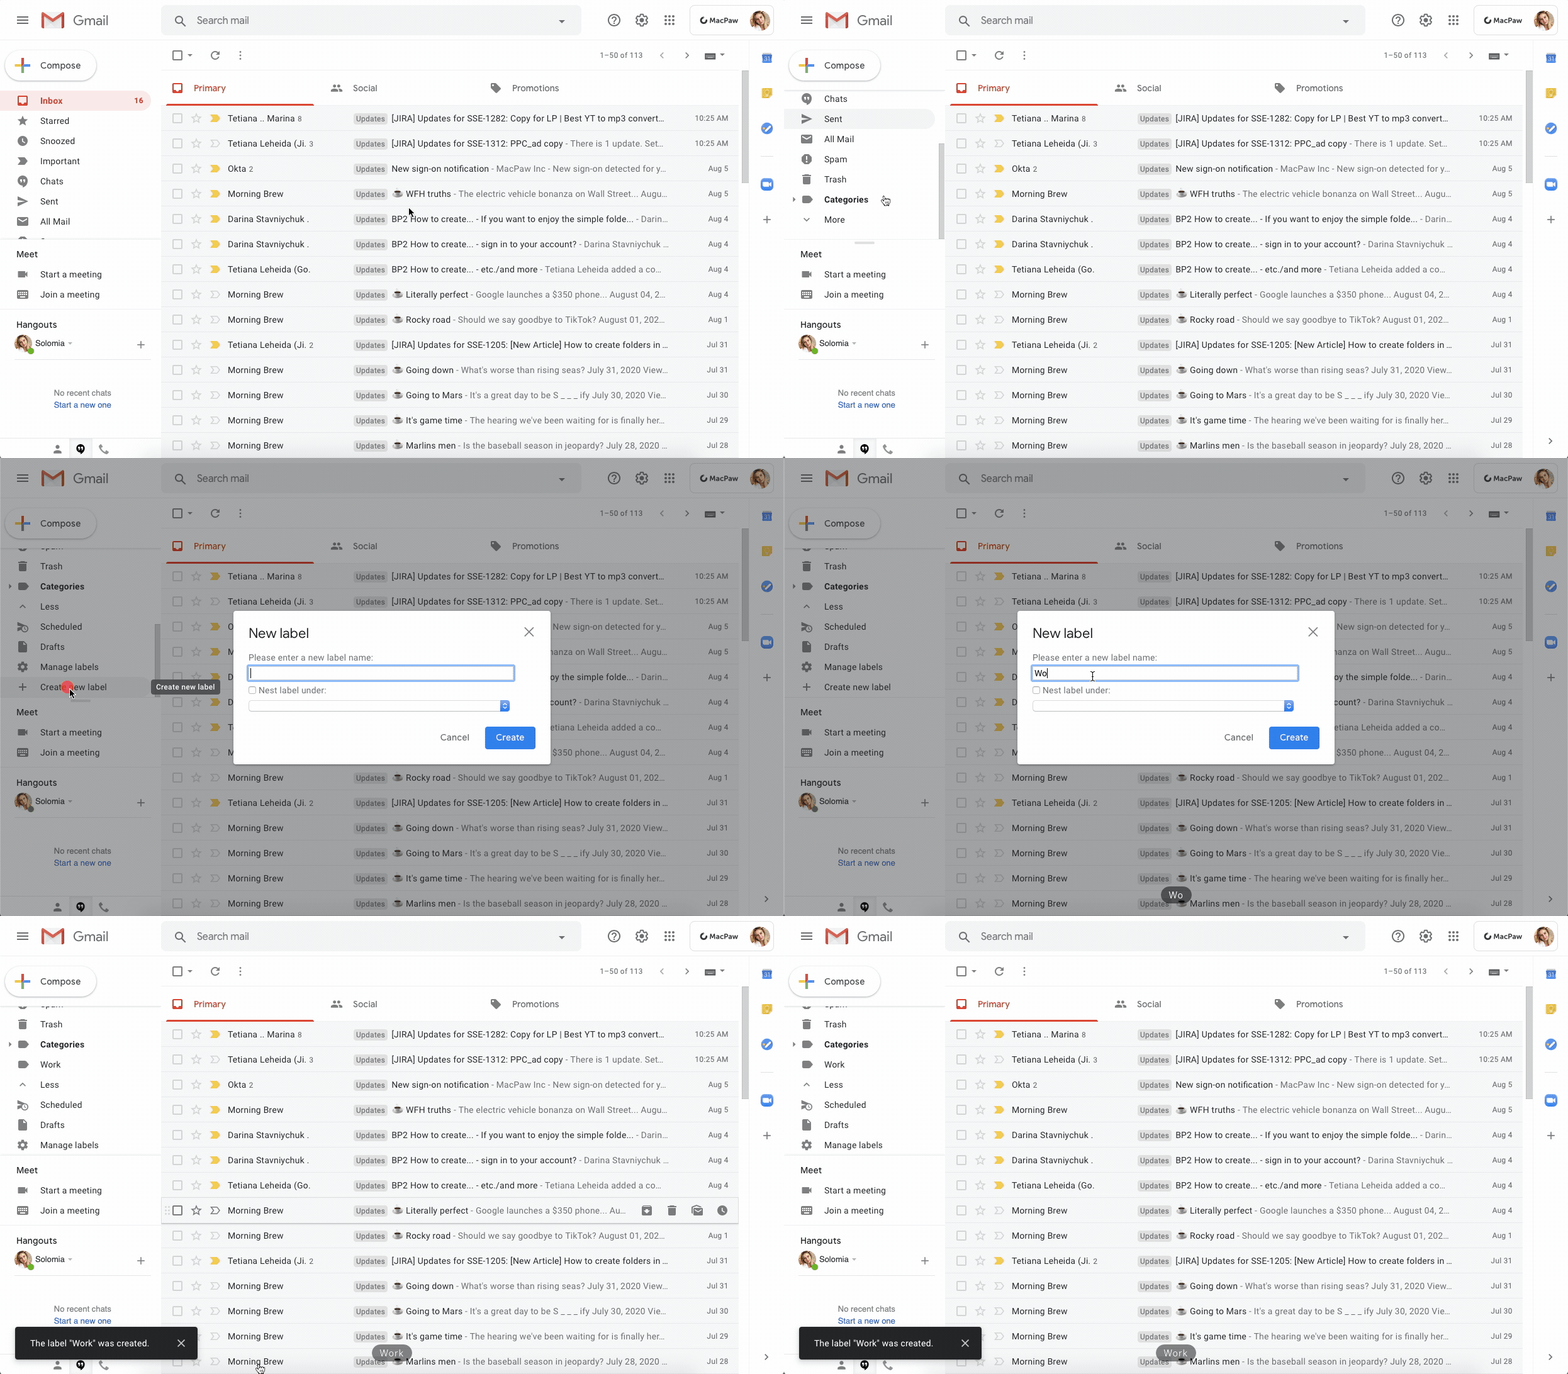
After creating your first label you can add a sublabel. It works like a folder in the folder. For example, you have a label ‘Work’, where you gather all your business emails. To make the label more specific, you can create sublabels ‘Teammates’, ‘Clients’, ‘Partners’.
Let’s move to a more advanced folder creation method in Settings. Here you’ll find detailed instructions to customize labels for yourself.
- Click on Settings icon > See all settings.
- Select Labels.
- Scroll to the bottom, and select ‘Create new label.’ Here you also can create sublabels.
- Hit Save.
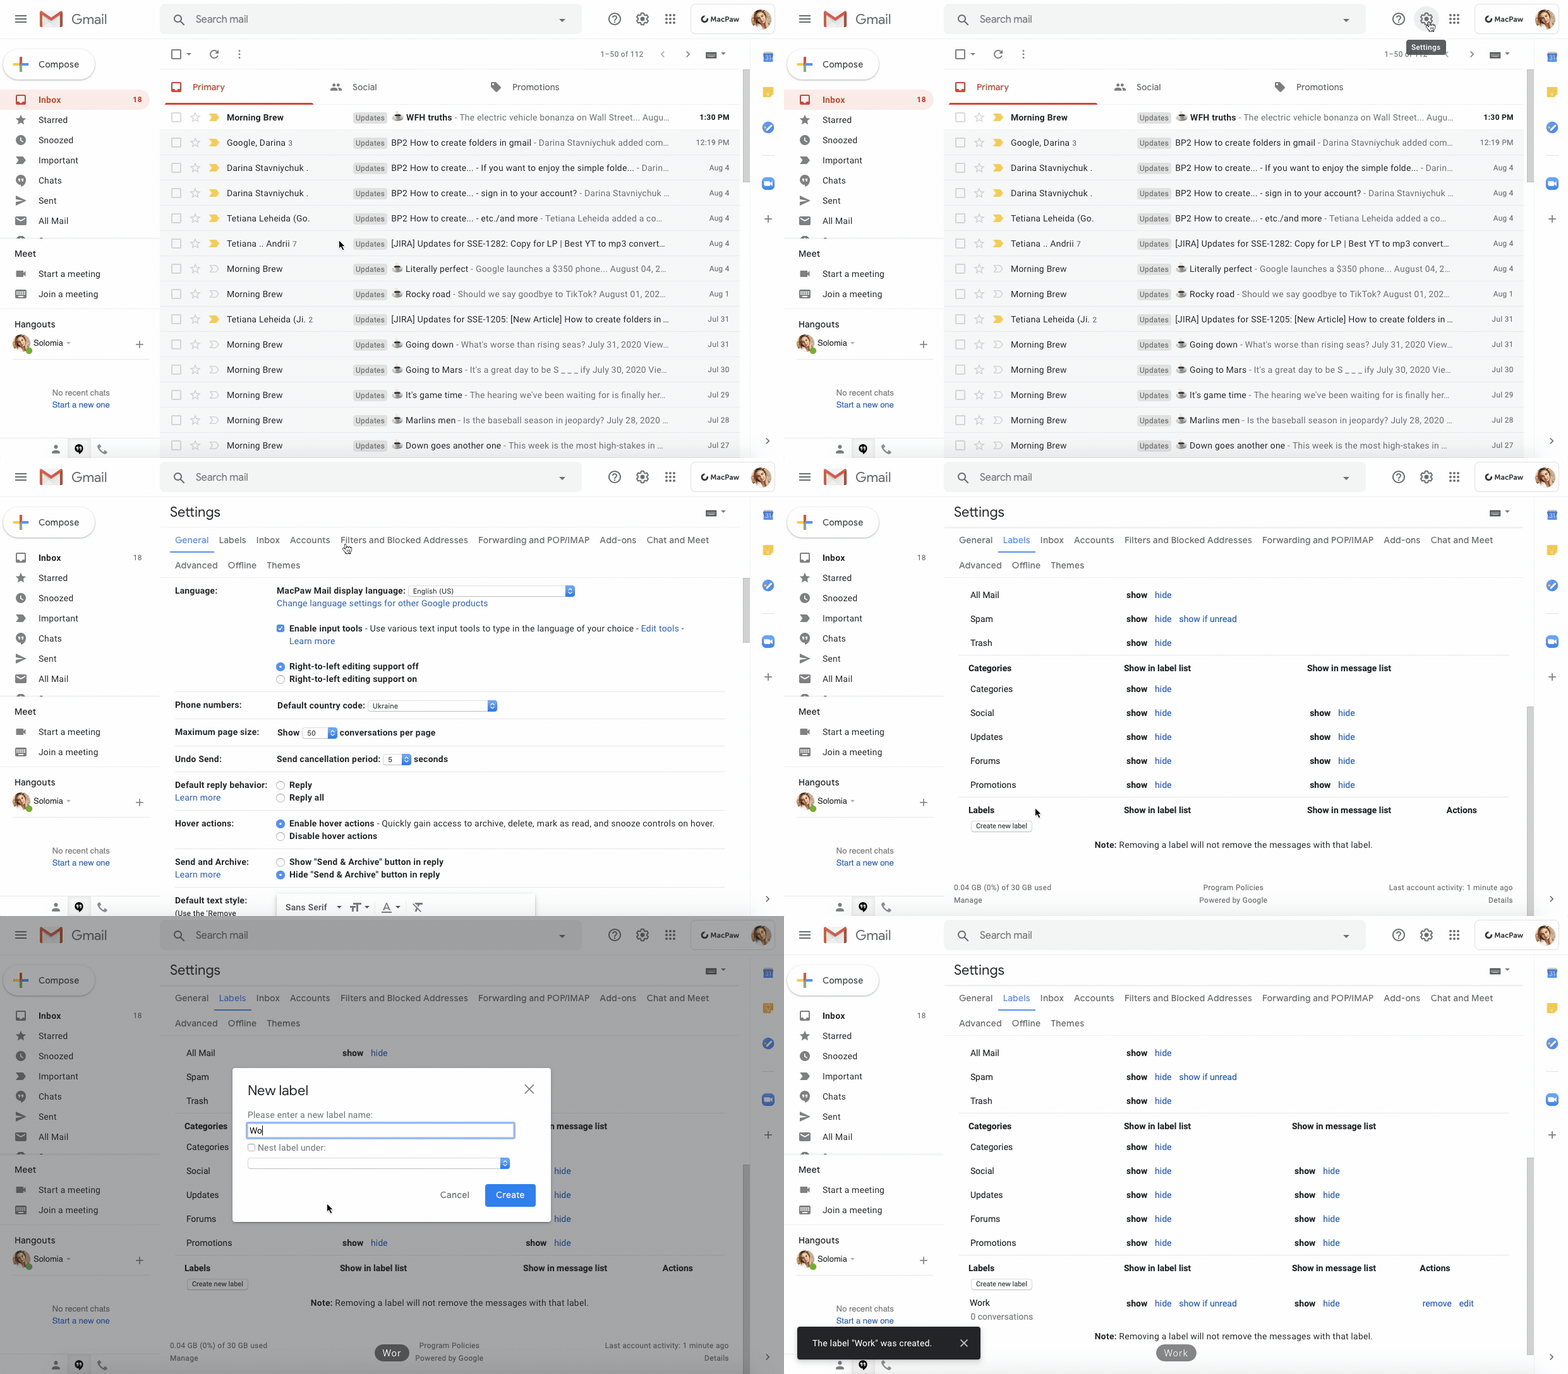
In the settings, you can adjust some preferences, such as Show in label list, Show in message list, and so on.
Voila, you’ve created your first label.
The folders will appear in your sidebar so that you can quickly access sorted emails. Just click on a folder, and get a set of results. Moreover, you can change the color of the label that makes some emails stand out. And that’s not the end — add several labels to your conversations, and navigation will become even easier.
How to organize Gmail into folders on a mobile device
If you prefer a mobile app to the browser version, then good news — it’s also easy to create folders instantly from your iPhone. Pay attention that labels you’ve added are visible only for you.
- Download the Gmail app.
- In the app, select one or multiple emails.
- Tap the Menu icon. You’ll recognize it by 3 horizontal lines in the top-left corner of the screen.
- Tap Create new.
- Name your label, and click Done.
Yeah, that’s pretty similar to creating folders on Mac, and easy as well.
You can also edit and delete labels, rename them, and create sublabels. After such a cleanup, your Inbox will never be cluttered.
How to edit or delete a label
So as you see, you can easily generate as many labels as you like via the Gmail app or Gmail’s web platform. What I should warn you about, though, is that there’s only one method to edit and delete labels — via the web version of Gmail.
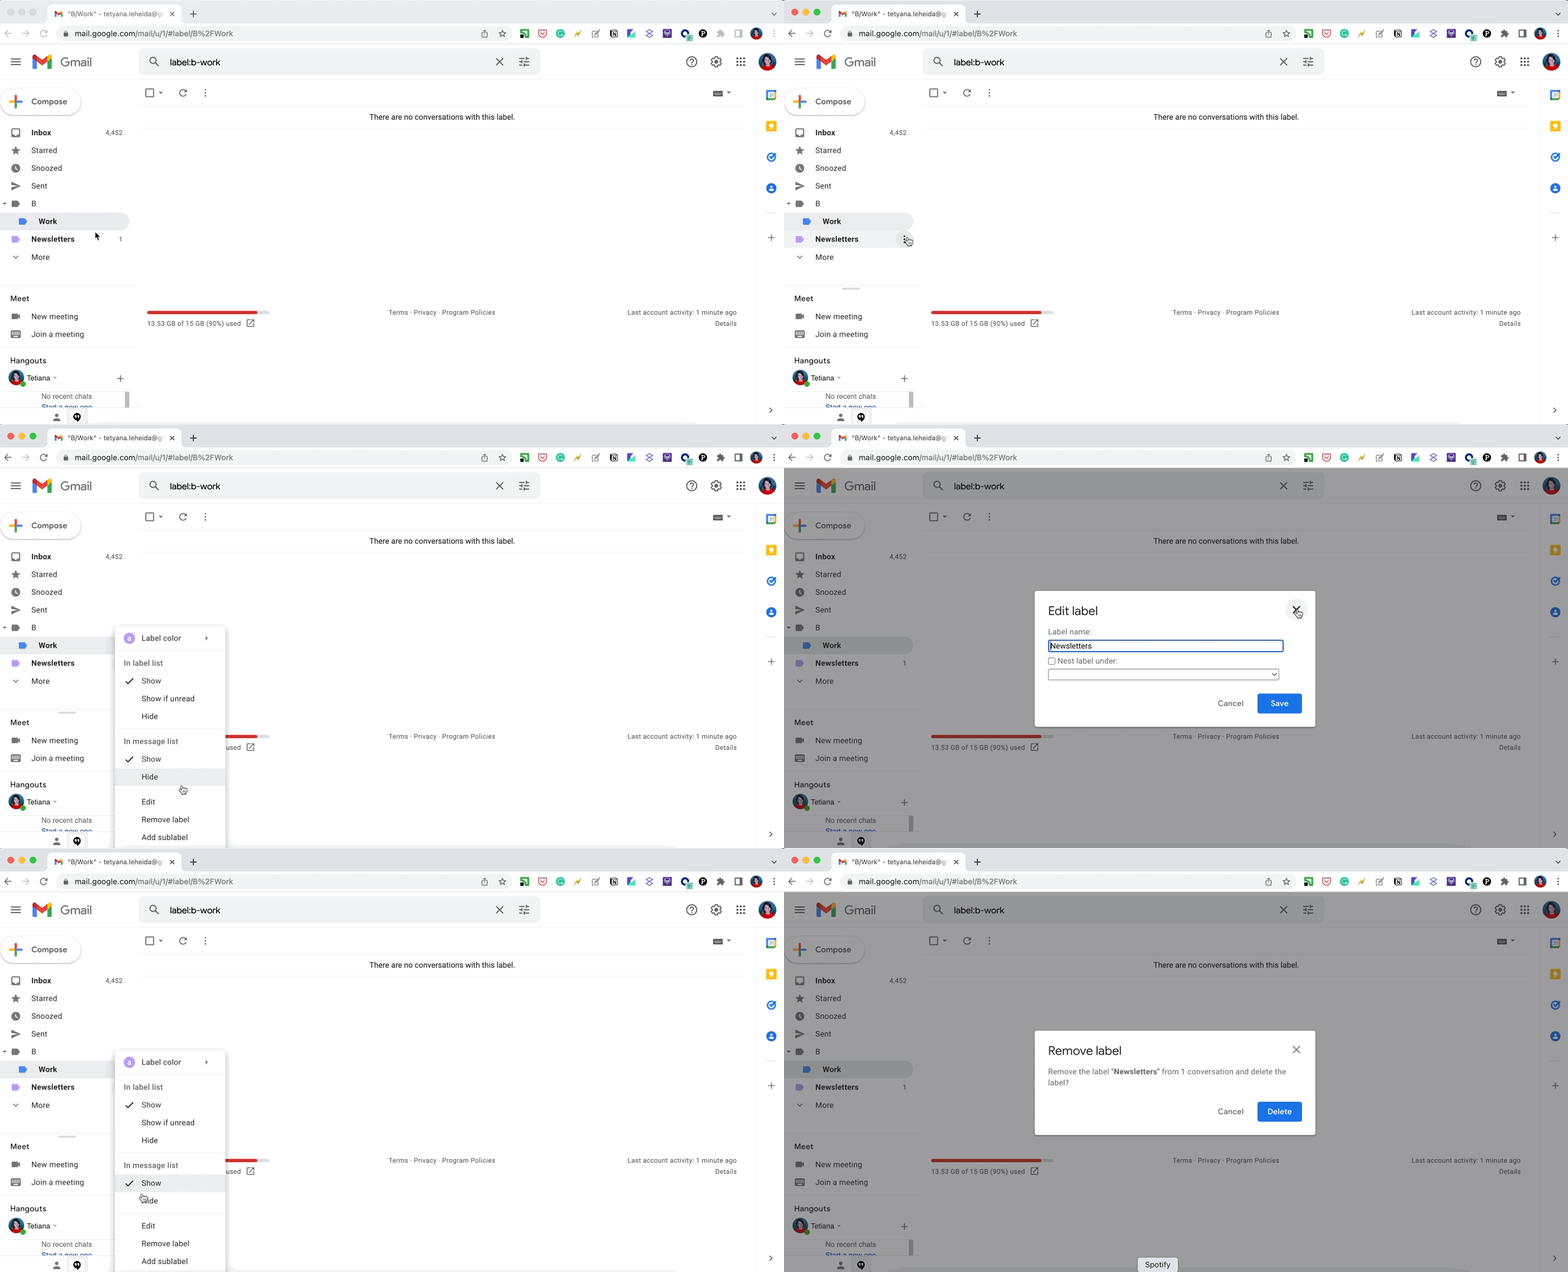
Here’s how to edit a label in Gmail:
- Open Gmail in a browser.
- Go to the sidebar and hover over a label.
- Click the three dots > Edit.
- Change your label and click Save.
Here’s how to delete a label in Gmail:
- Open Gmail in a browser.
- Go to the sidebar and hover over a label.
- Click the three dots > Remove label.
How to manage your Gmail labels
Now when you know how to create, edit, and delete labels, let’s see how to use them.
When you scroll down in the Gmail menu, you’ll see a Manage labels option. Clicking it will take you to the Labels settings. Here, you can customize which labels you want to show in the label/message list, which ones you’d like to hide permanently, and which ones you want to show if unread.
If you use many labels, it might be useful to hide some of them so your Gmail menu doesn’t expand too much.

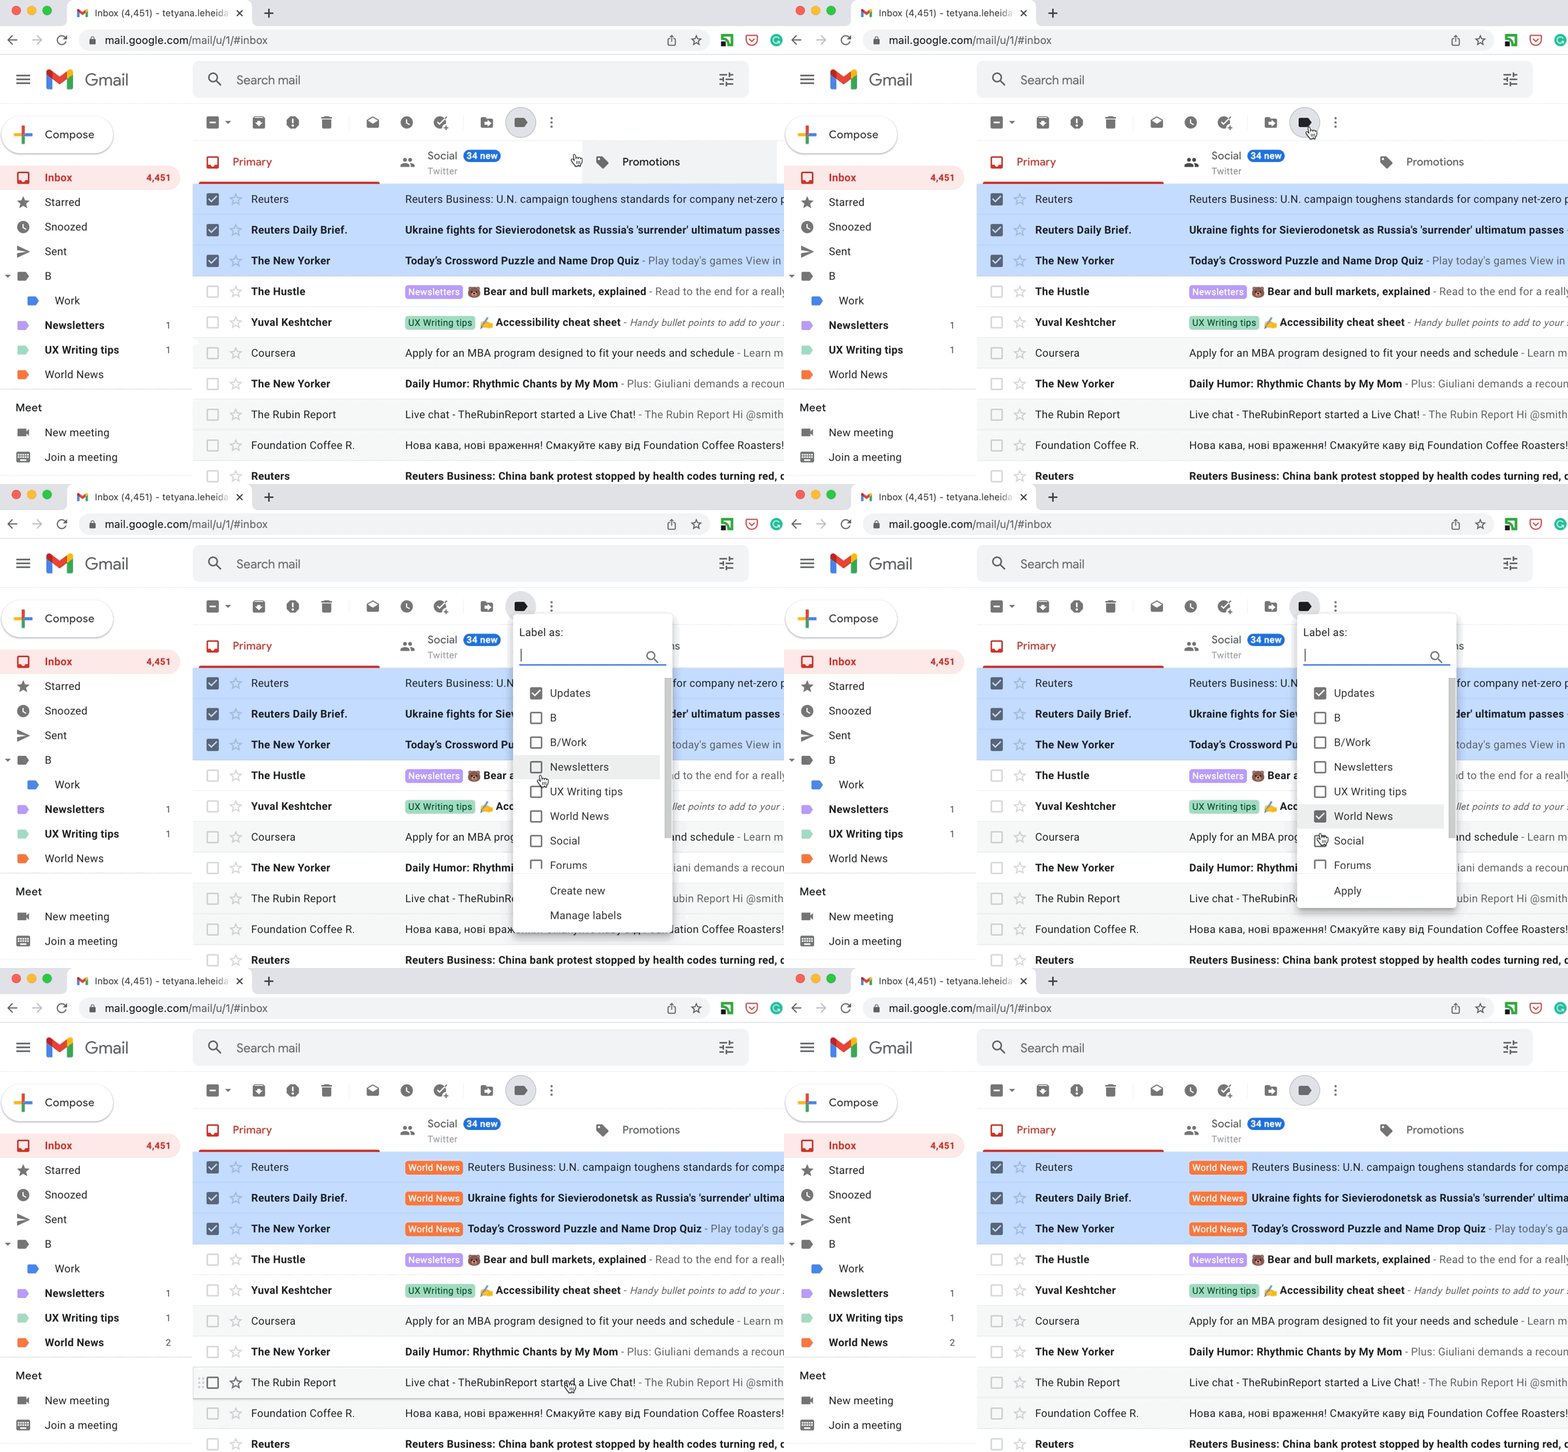
You can easily apply labels to emails — just select the email or a bunch on emails, click the Labels icon in the toolbar and select the appropriate label.
How to move messages into a label in Gmail
Moving emails from one folder to another is just deleting an old label and putting a new one.
Fortunately, in practice, it’s not as hard as it sounds. Follow a step-by-step guide, and you’ll understand why:
- Select a message in the Inbox.
- Click Move to in the toolbar above emails. Or just right-click on the message, and select Move to.
- Choose the label you want to apply.
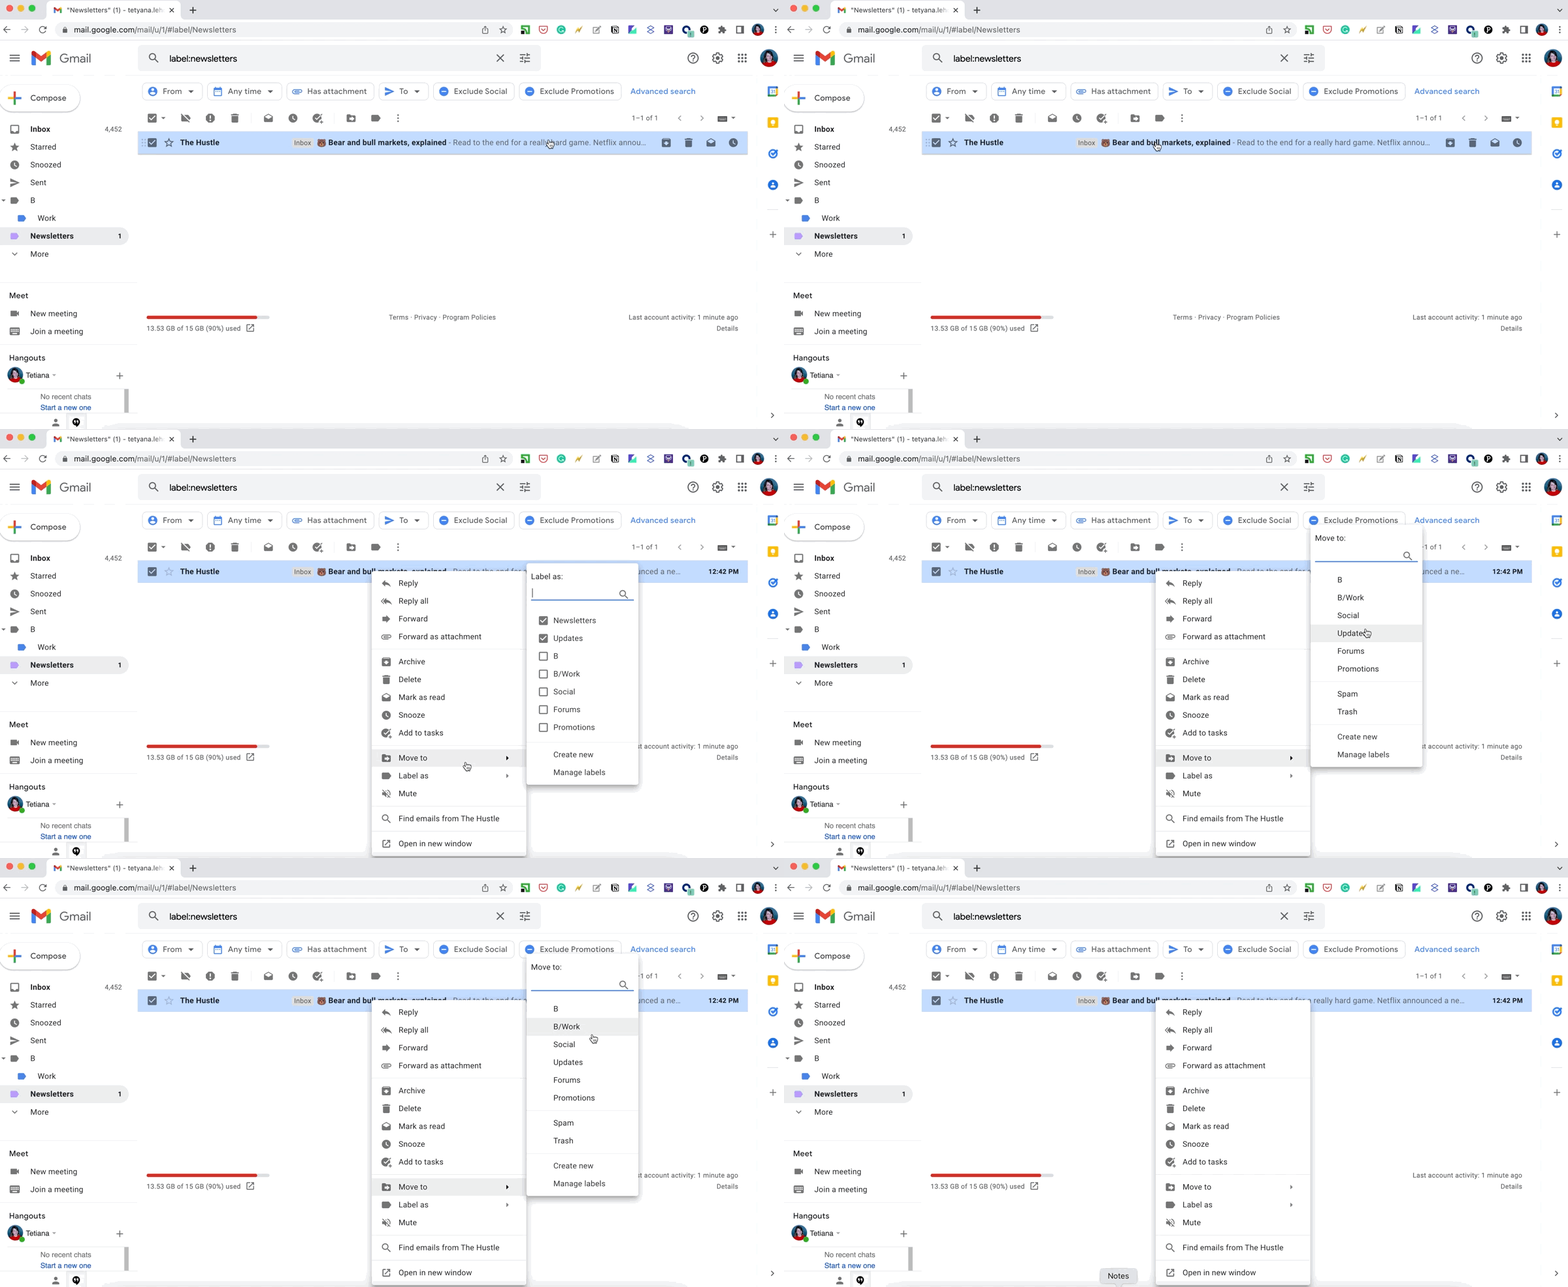
If you want to move an email from a particular label, then select it, and follow the instructions above.
There is a more straightforward way to move your messages — just long-press on an email, and drag it to a needed folder. Well done, now you can find moved messages in the destination label.
Automatically apply labels using filtering
It’s great that you can apply and remove labels manually, but you can only declutter your inbox if the emails will arrive in the right folder from the very start. Luckily, Gmail lets you automate the process by applying labels automatically based on your filters:
- In Gmail’s search bar, click the Show search options (the icon on the right).
- Enter the terms that match a certain group of emails — a sender’s address, words mentioned in the subject, size, etc.
- Click Create filter.
- Select Apply the label > choose the label and click Create filter.
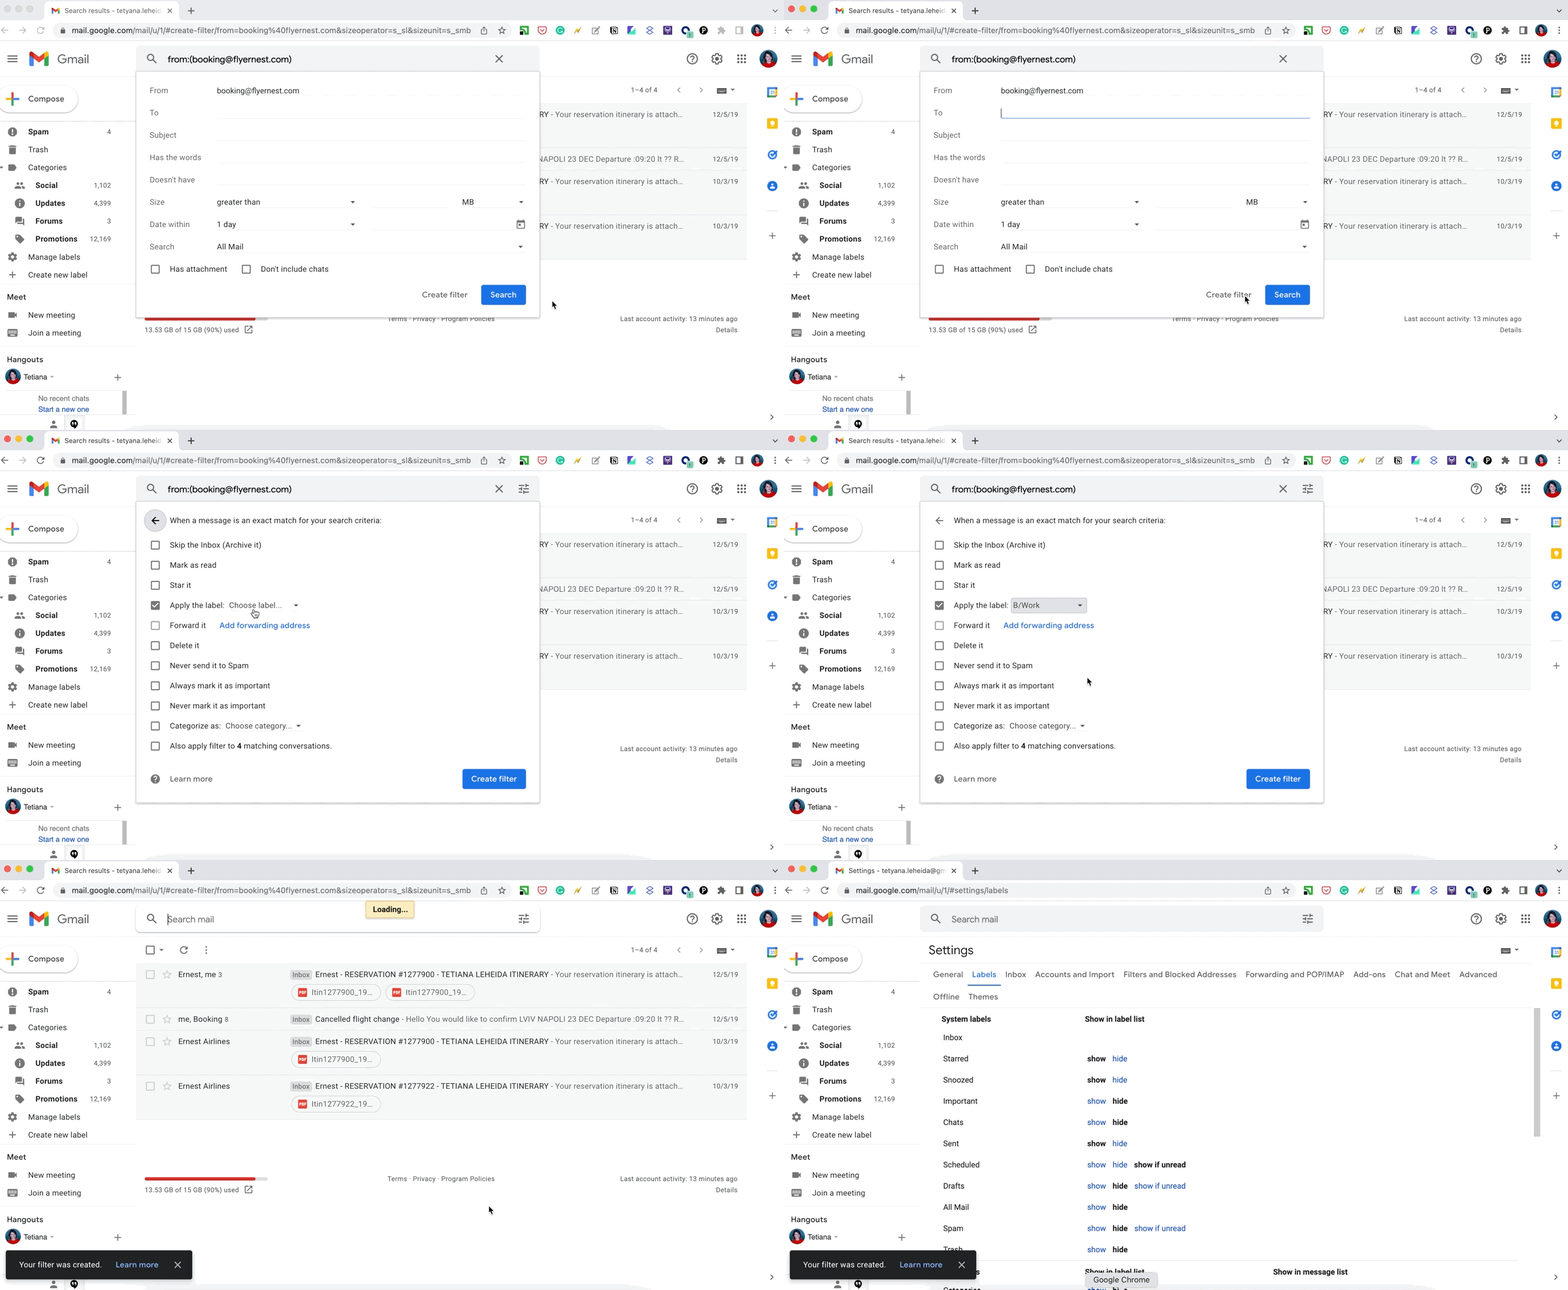
Now, all the messages that match the terms you’ve entered will be labeled respectively.
Final thoughts
A messy inbox is such a headache for most email users. Gmail solves this problem by introducing labels that quickly arrange your emails. Labels are multifunctional — in addition to standard actions like editing and deleting, you can set any color to the label, move messages between labels, and more.
Although labels are similar to folders, there are some minor differences. If you prefer authentic folder-based functionality, enhance your Gmail experience using an inbox management app such as Spark Mail. You can try this tool for seven days free with Setapp, a subscription service for Mac and iPhone.


