Maximize your AirPods battery life with these simple tricks: The best 2026 methods
There’s nothing more frustrating than pulling out my AirPods for some peace and quiet while traveling, only to find them deader than my houseplants in winter.
Over time, it’s totally normal for these little gadgets to lose battery life, especially with all the things that can mess with their performance.
How did I maximize my AirPods’ battery? Well, grab a popcorn because I’ll cover how to make AirPods last longer, boost their battery health, and stretch their lifespan, so you don’t have to replace them anytime soon.
Here’s a quick overview of the best solutions and tips:
| What happened? | What to do |
|---|---|
| AirPods lose battery quickly | Enable Optimized Battery Charging, and turn off Active Noise Cancellation, Spatial Audio, and Automatic Ear Detection in the Bluetooth settings. |
| Listening at high volume drains battery | Lower volume or use Boom 3D to enhance audio without blasting it. |
| Extreme temps affect performance | Store AirPods in cool, dry places and avoid hot/cold exposure. |
| Mic switching drains battery | Set mic to Always Left or Always Right in Bluetooth settings. |
| Managing AirPods on Mac is slow | Use ToothFairy for a one-click connection and battery info. |
Simple tricks to make your AirPods last longer
I get it! You want your AirPods to last through your entire jog or that trip to another city. But they just die on you, and you end up…devastated. On top of that, having to charge them more often is a total hassle.
The good news? With some simple tricks, you can forget that “oh-no-the-battery-is-low” noisy sound.
Enable AirPods Optimized Battery Charging
I find Optimized Battery Charging — the feature that reduces the wear of your device — super helpful, whether for my iPhone or AirPods. It’s a great habit that can improve your AirPods battery and extend its lifespan.
Here's how to enable Optimized Battery Charging for your AirPods:
- Connect your AriPods to your iPhone.
- Go to Settings > Tap Bluetooth.
- Tap the information "i" icon next to your AirPods.
- Turn on Optimized Battery Charging.
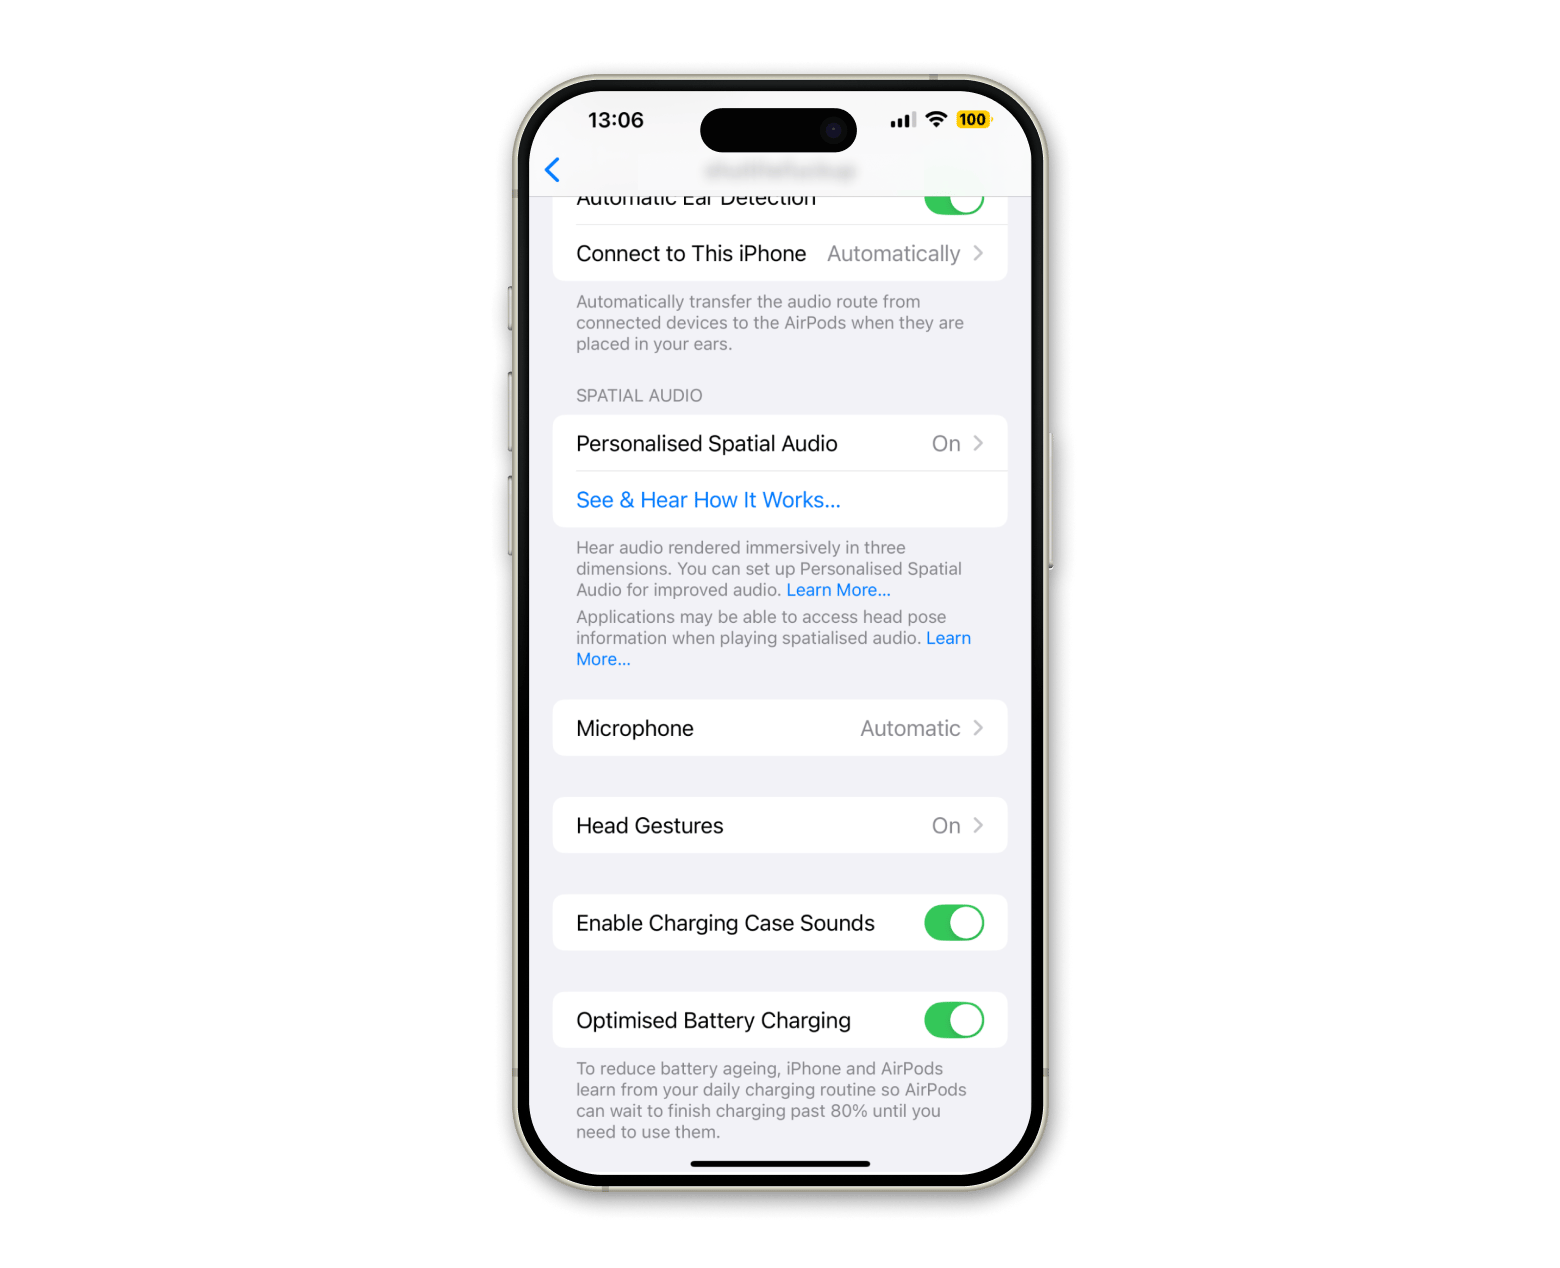
How it works is that it learns to recognize your daily charging habits and delays charging past 80% until you need to use it. If you have iOS 15 and newer, the feature is turned on automatically.
Having trouble staying connected? Check out this guide on how to fix AirPods disconnecting from iPhone.
Turn off unnecessary features
Some provide great listening experience, but they can be your AirpPod’s battery Achilles' heel.
Disable Active Noise Cancellation
I love Active Noise Cancellation and it’s made a big difference to my life, especially when I need to get work done in a noisy environment. The downside is that this feature can impact your AirPod battery health. If it's turned on, you'll get roughly four hours from one charge, and if it's off, you'll get five.
Here's how to manage Active Noise Cancellation from your iPhone/iPad:
- Connect your AirPods to your iPhone.
- Go to the Settings app > Tap Bluetooth.
- Tap the information "i" icon next to your AirPods.
- If the Noise Cancellation is active, tap Transparency or Off.
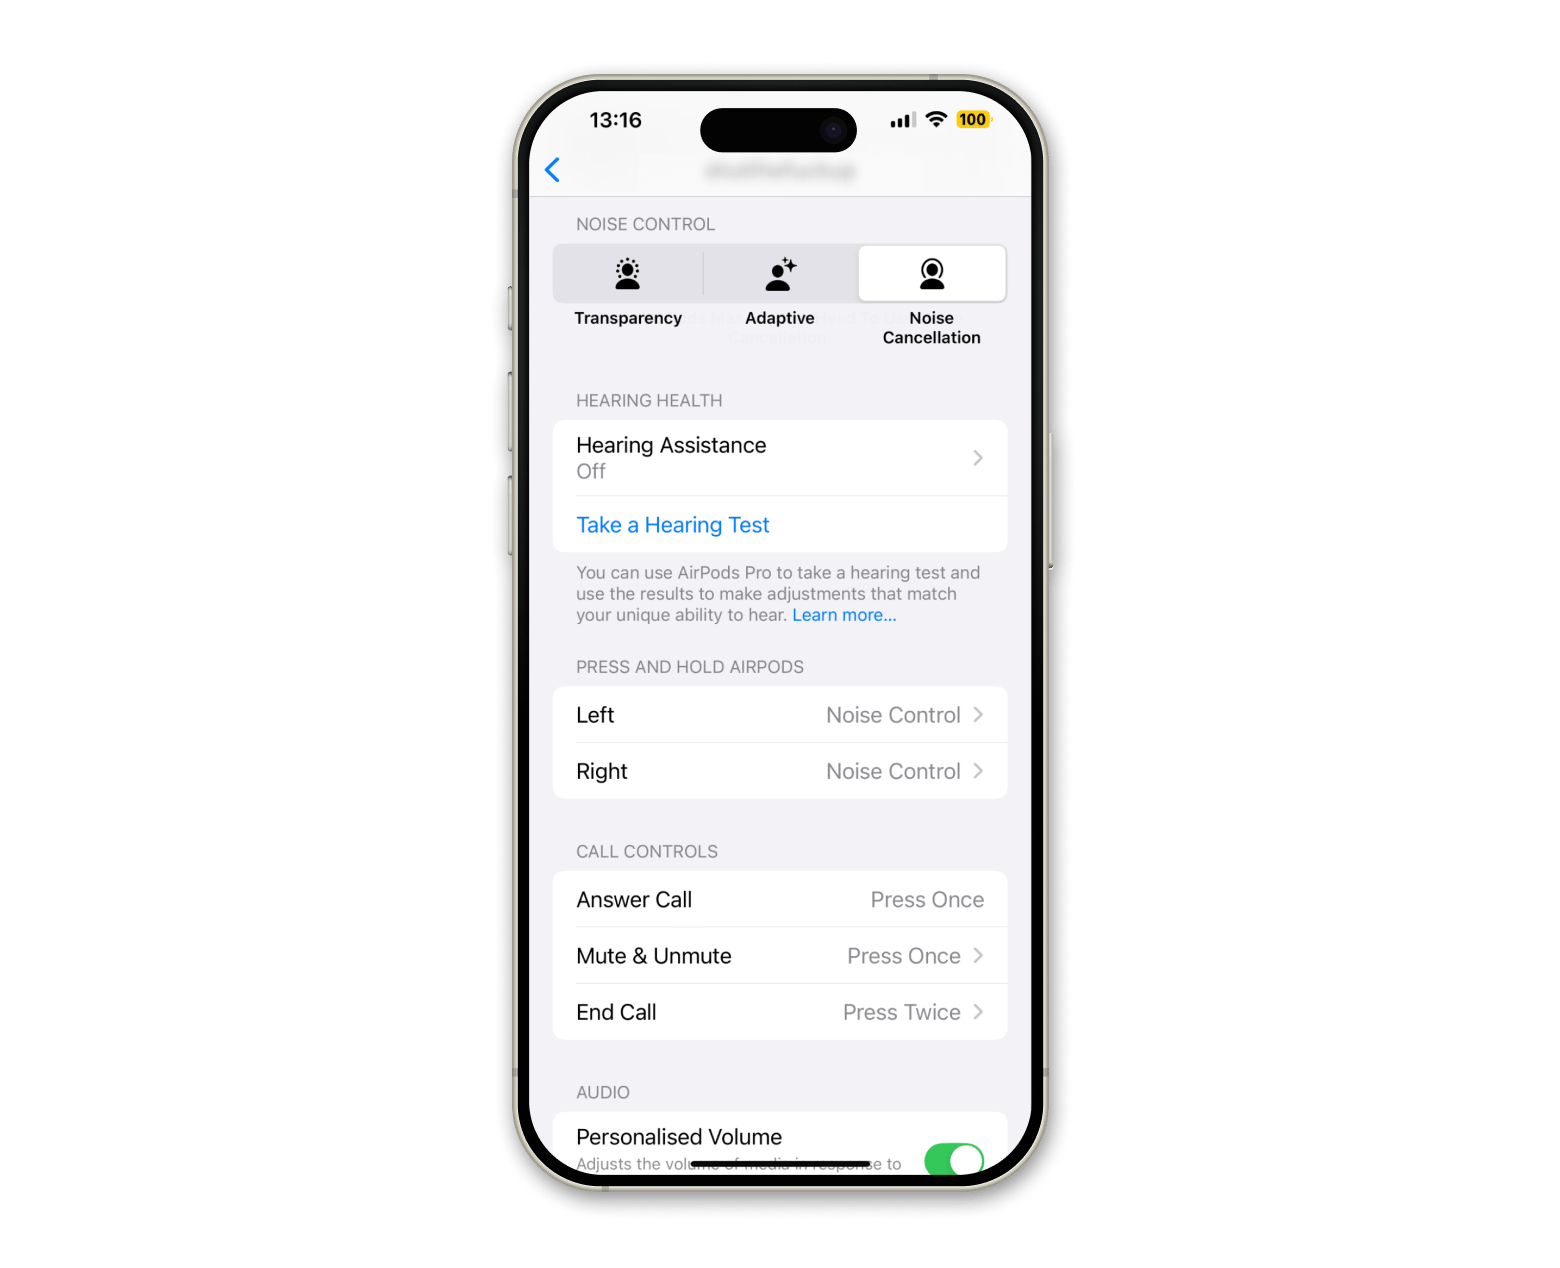
And here's how to manage Active Noise Cancellation from your AirPods:
- Put your AirPods in each ear.
- Press and hold the force sensor on the stem of either AirPod.
- Listen for the chime.
- Cycle through Active Noise Cancellation, Transparency mode, and Off.
Disable Spatial Audio
It’s the same with the Spatial Audio feature. If enabled on your AirPods, it can provide up to 5.5 hours of listening time. Switched off, you’ll get six hours. Those 30 minutes can really count!
To manage Spatial Audio from your iPhone:
- Connect your AirPods to your iPhone.
- Go to Settings > Bluetooth.
- Tap the information "i" icon next to your AirPods.
- Tap Personalized Spatial Audio.
- Tap to access it and turn it off.
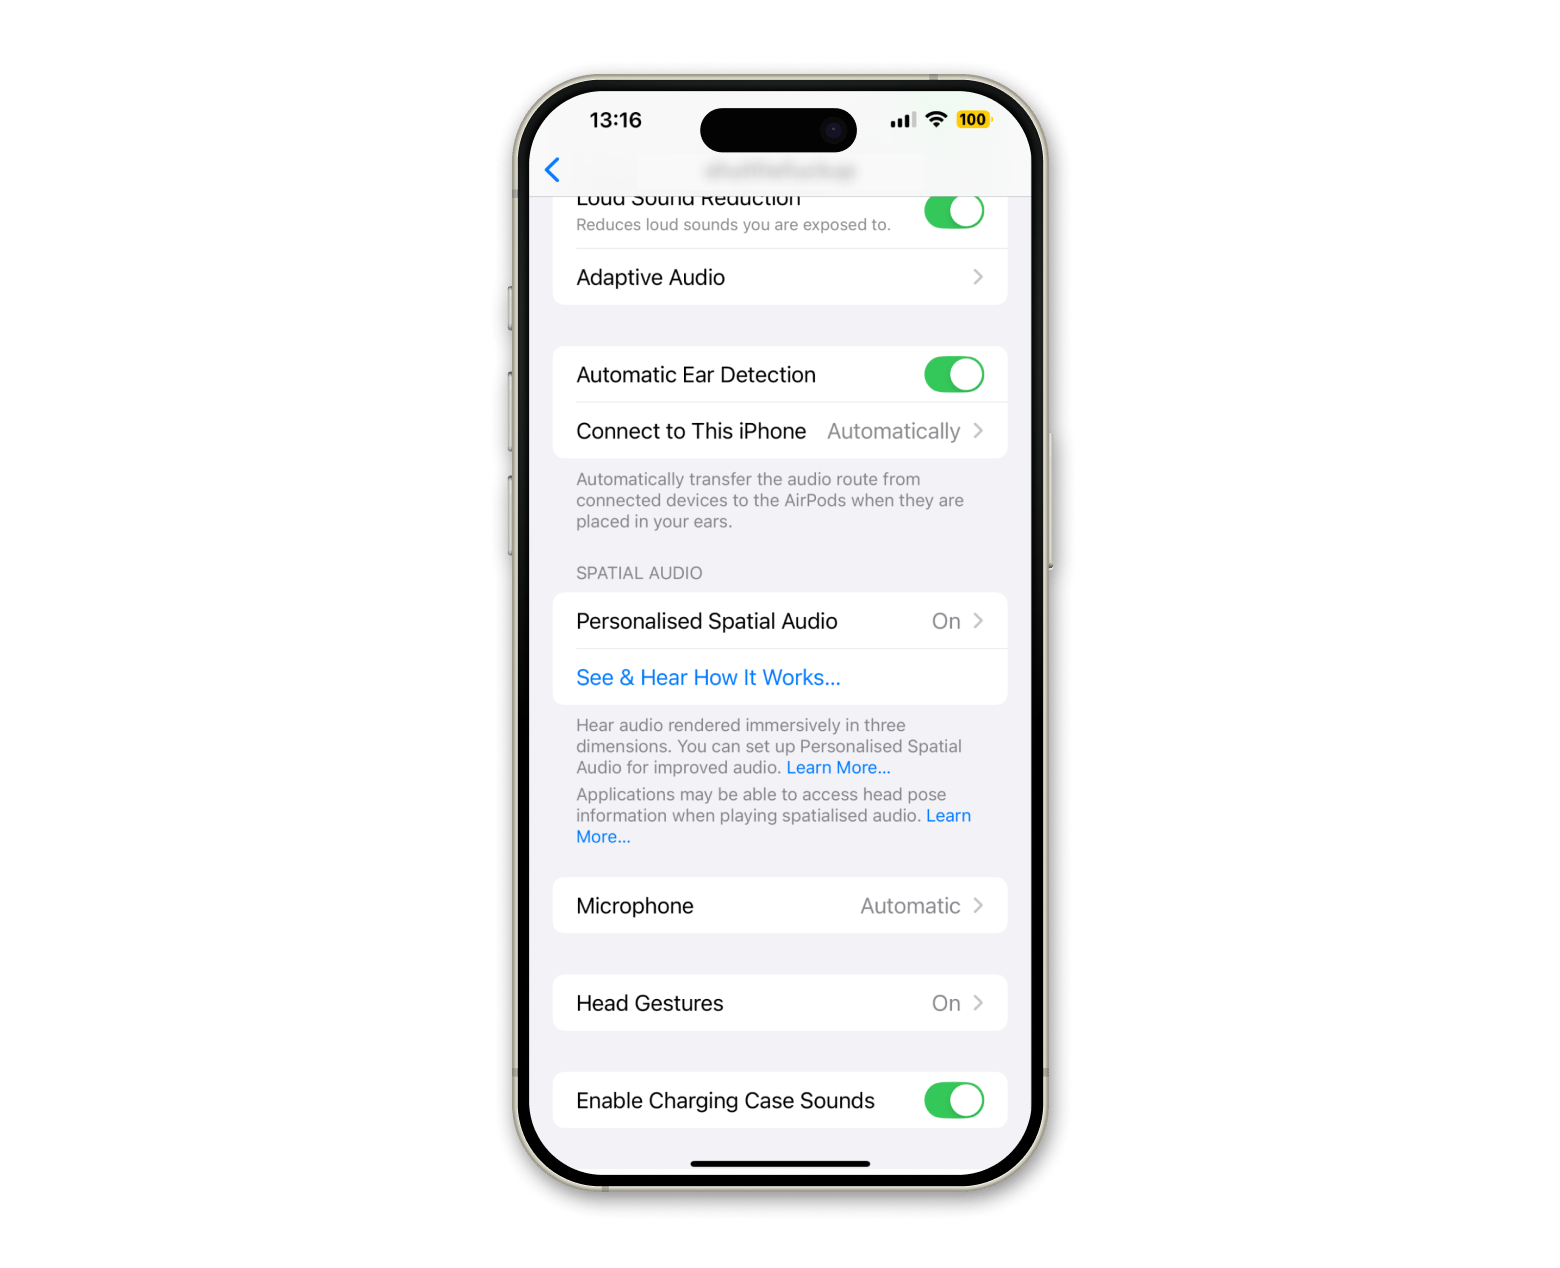
To manage Spatial Audio from your AirPods:
- Wear your AirPods.
- Connect them to your device and go to Control Center.
- Tap and hold the volume button.
- Choose Spatial Audio below.
- Choose Off to turn off Spatial Audio and head tracking.
Disable Automatic Ear Detection
Automatic Ear Detection is another feature that can drain your AirPods' battery health. Be sure to turn it off when you're using your headphones.
Here's how to do it on iPhone and Mac:
- Connect your AirPods to your iPhone.
- Go to Settings > Bluetooth.
- Tap the information "i" icon next to your AirPods.
- Turn off Automatic Ear Detection.
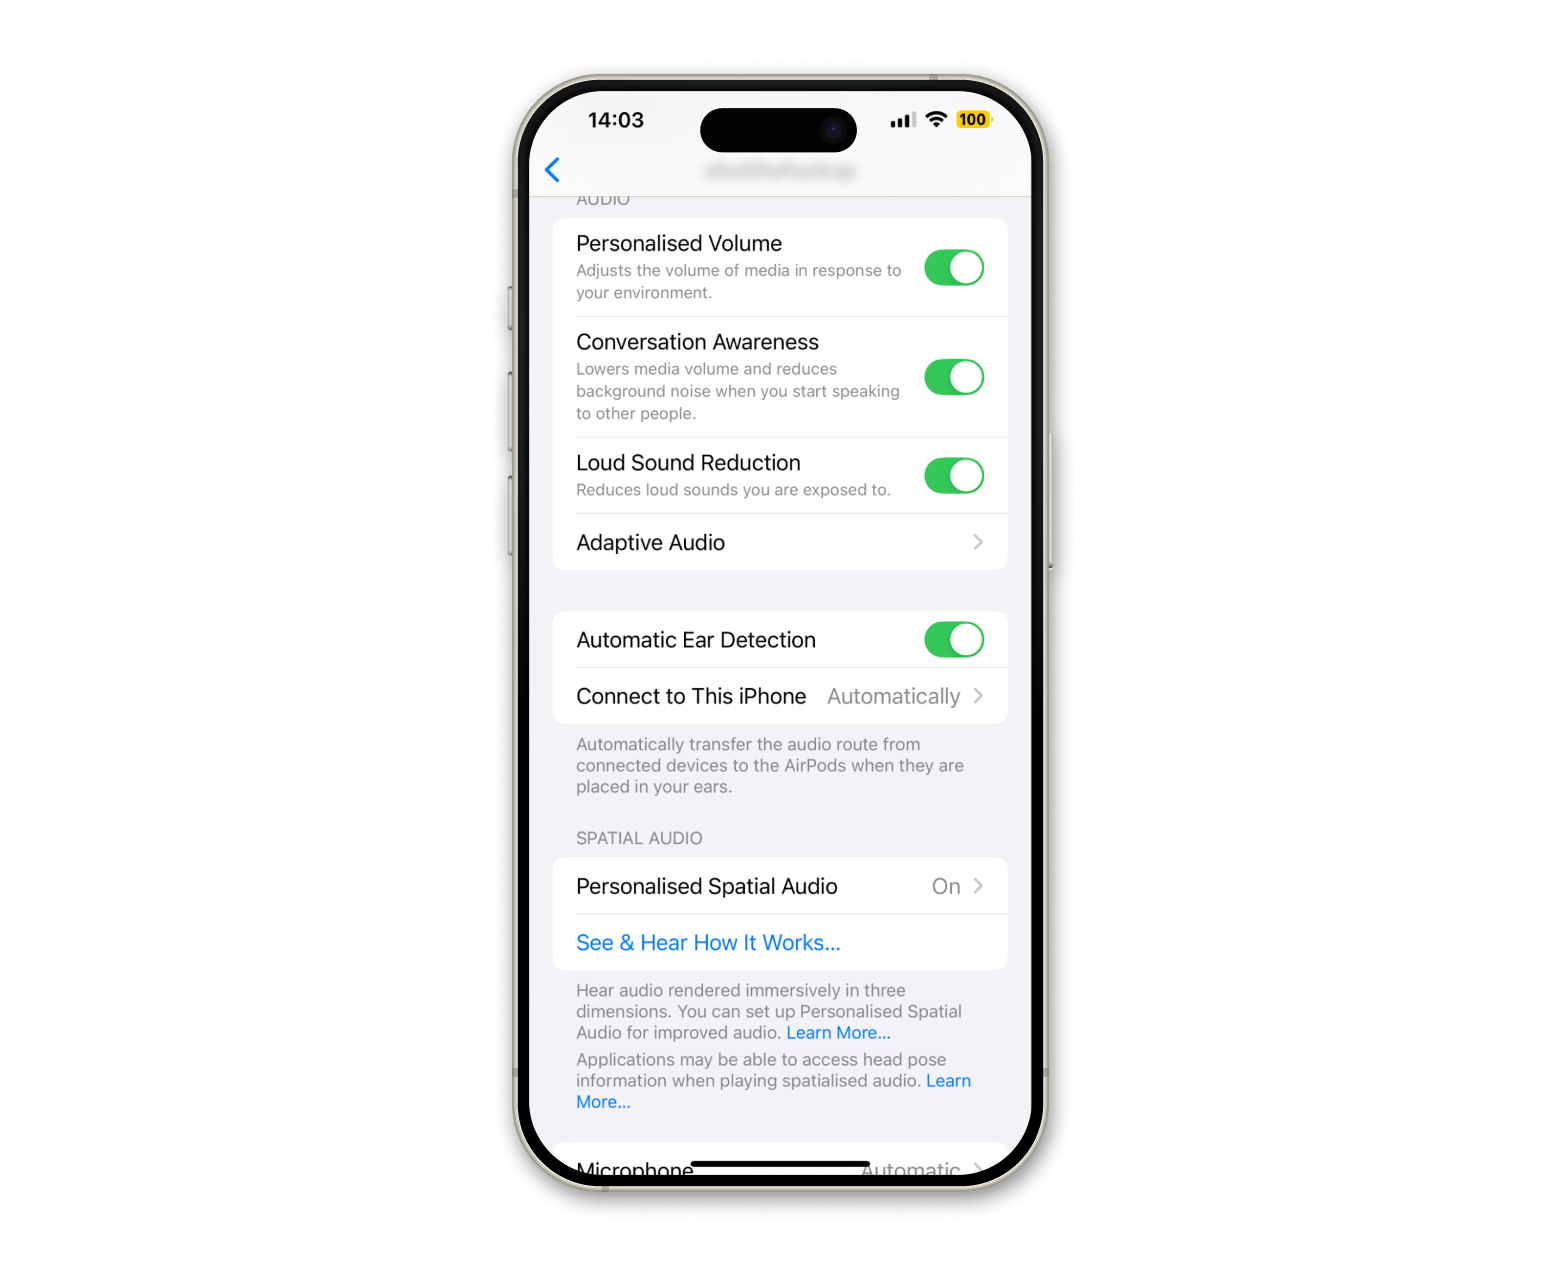
To turn off Automatic Ear Detection on your AirPods, go to Settings and tap your AirPods name. Turn off Automatic Ear Detection.
Use and charge only one AirPod at a time
You can do just fine using one AirPod for calls or listening to podcasts. The good thing about doing so is that it can work wonders to conserve your battery.
You don’t need a tech degree to pull this off. Just wear one AirPod and leave the other in the case. Voilà, double the battery life.
Lower the volume
I know, I know — lowering the volume is preposterous! Especially when you want to blast your favorite tunes at full volume. But turning it down a bit can actually improve your AirPods' battery life. So, keep your volume level at around 60-70 decibels (dB). That’s 60% of the maximum volume for a maximum of 60 minutes.
Here's how to turn down the volume on AirPods:
- Use the Touch Control.
- Place your thumb on the stem of either AirPod and use your index finger to swipe down on the Touch Control to lower the volume.
- Swipe down the Touch Control to decrease the volume.
- Swipe up to increase it.
To turn down the volume on your AirPods using your iPhone, just drag the volume slider in your app or directly from the Lock Screen.
Avoid extreme temperatures
Temperature extremes aren’t great for living things or tech gadgets. Let’s be honest. No one handles extremes well. And when it comes to AirPod battery health, very high or low temperatures can mess with how long they hold a charge.
If you think iPhones are not temperature-friendly, you’ll be surprised to learn that AirPods are the same. Apple informs us that AirPods are better stored at temperatures between -10°C (14°F) and 45°C (113°F) and used at temperatures between 0°C (32°F) and 35°C (95°F).
If you decide to play with those limits, your AirPods will definitely try to self-regulate their temperature. The result? Slow charging or low performance.
Here are a few tips I use (and recommend you) to keep your AirPods safe and sound:
- Don’t use them? Then, keep AirPods in the charging case.
- Keep them in a cool, dry place, away from any direct sunlight.
- Keep them out of extreme cold and heat.
- Don’t store them anywhere, humid or damp.
- Always turn off Bluetooth when they’re not in use.
Keeping them in these conditions will ensure they perform optimally and are always ready to go when you are.
Turn off the designated mic
I honestly think muting mics should be a legal requirement on meeting calls, but that might just be my low tolerance for background noise. That said, turning off your AirPods’ mic can also help reduce a bit of battery drain, so it’s worth knowing how to do it.
If you want to switch off the designated mic on your iPhone, you should:
- Connect your AirPods to your iPhone.
- Go to Settings > Bluetooth.
- Tap the information "i" icon next to your AirPods.
- Tap Microphone.
- Choose either Always Left or Always Right to designate a specific mic.
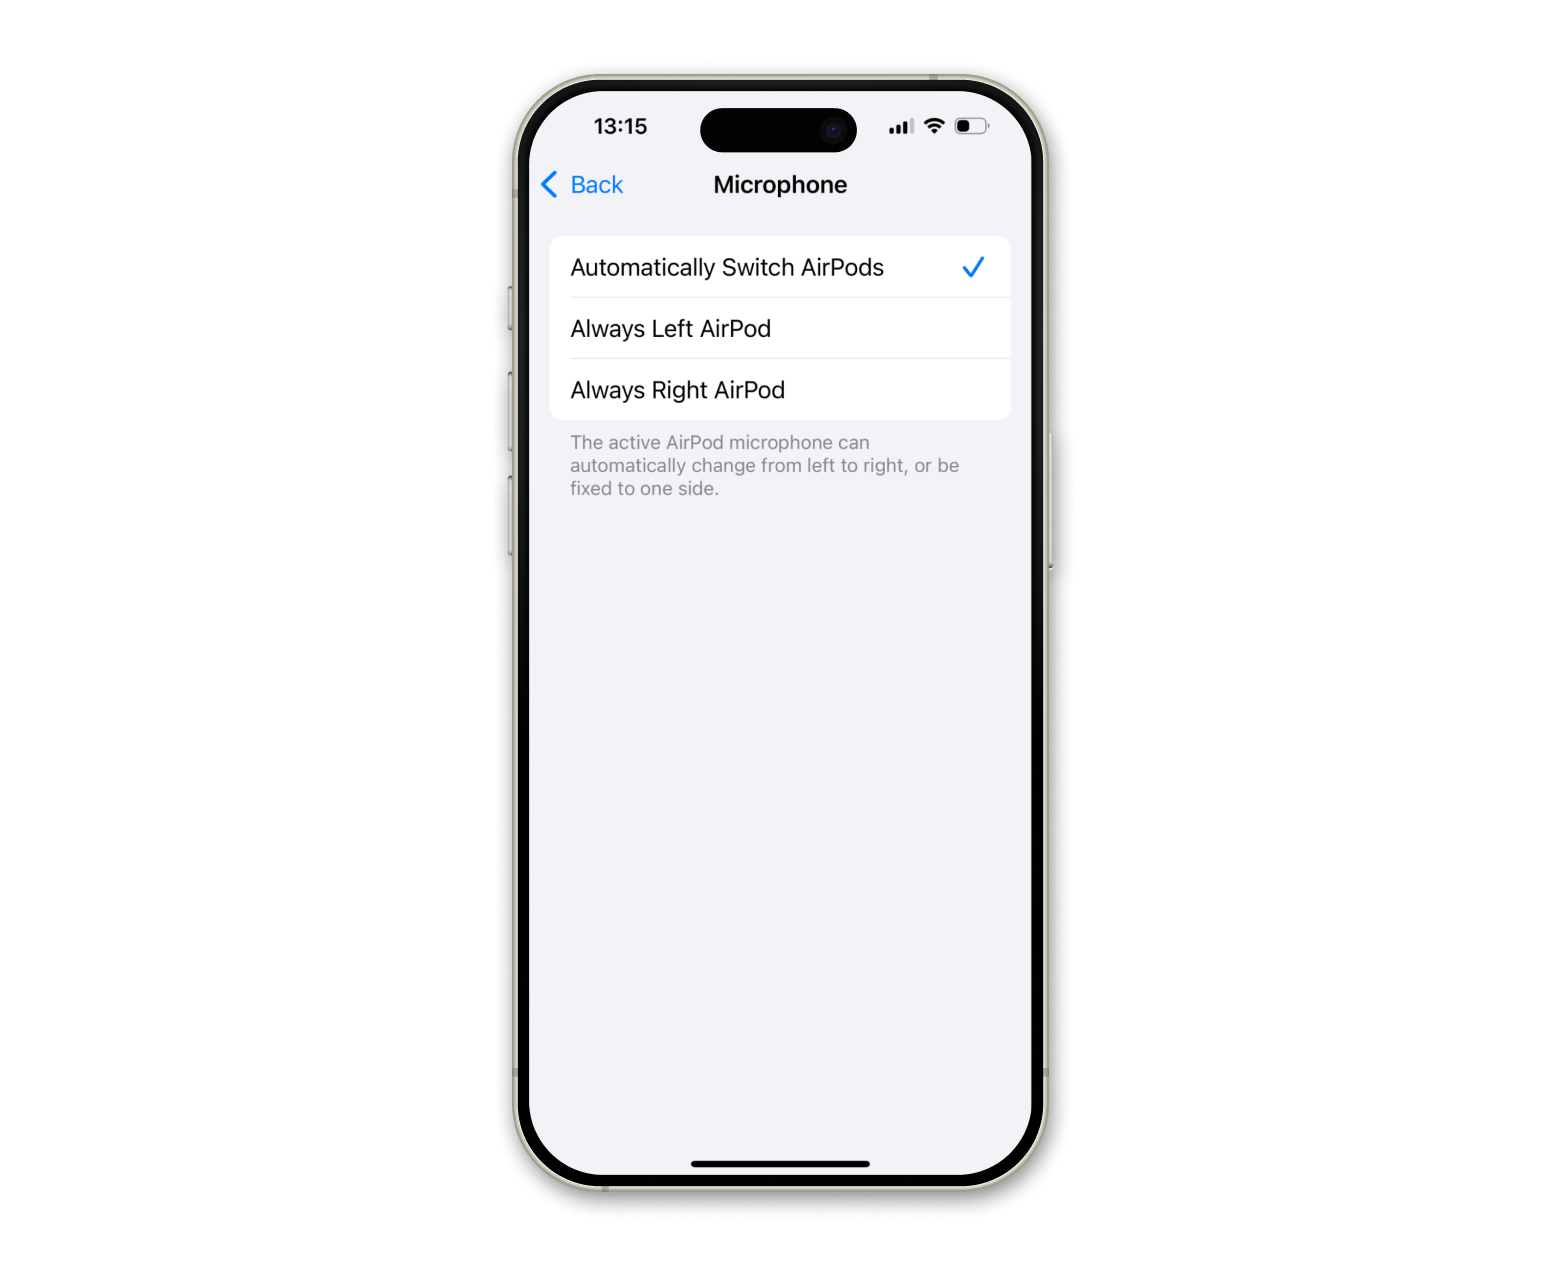
Note that there’s no “Off” feature. One of the sides must be always active.
Connect your AirPods to your MacBook
Connecting your AirPods to your MacBook lets you easily manage settings, track battery life, and switch between devices without hassle. This is perfect for work, calls, or just zoning out with your favorite playlist.
Here’s how to connect them:
- Open the lid of your AirPods case.
- Click the Bluetooth icon in the menu bar on your Mac.
- Select your AirPods from the list of available devices and connect.
Now you’re all set to control everything from volume to battery status right from your Mac.
Contact Apple Support if battery life continues to decline
No success after all solutions, and the battery still draining? Well, I guess it might be time to consider an AirPods battery replacement as your last resort. Apple Support can usually replace the batteries for you or advise on whether the AirPods are at the end of their useful life.
Still, running into issues? Here’s a helpful article on how to fix common AirPods Pro problems, from weird glitches to audio dropouts.
How AirPods battery life works and how to check it
All good things must come to an end. In other words, your AirPods (like any other battery-powered device) have a limited lifespan. So, if it’s a couple of months or years, it really depends on how you use and care for them.
The good news is, with the right habits, you can make them last longer. Taking good care of your AirPods helps extend both their overall lifespan and how long they last between charges.
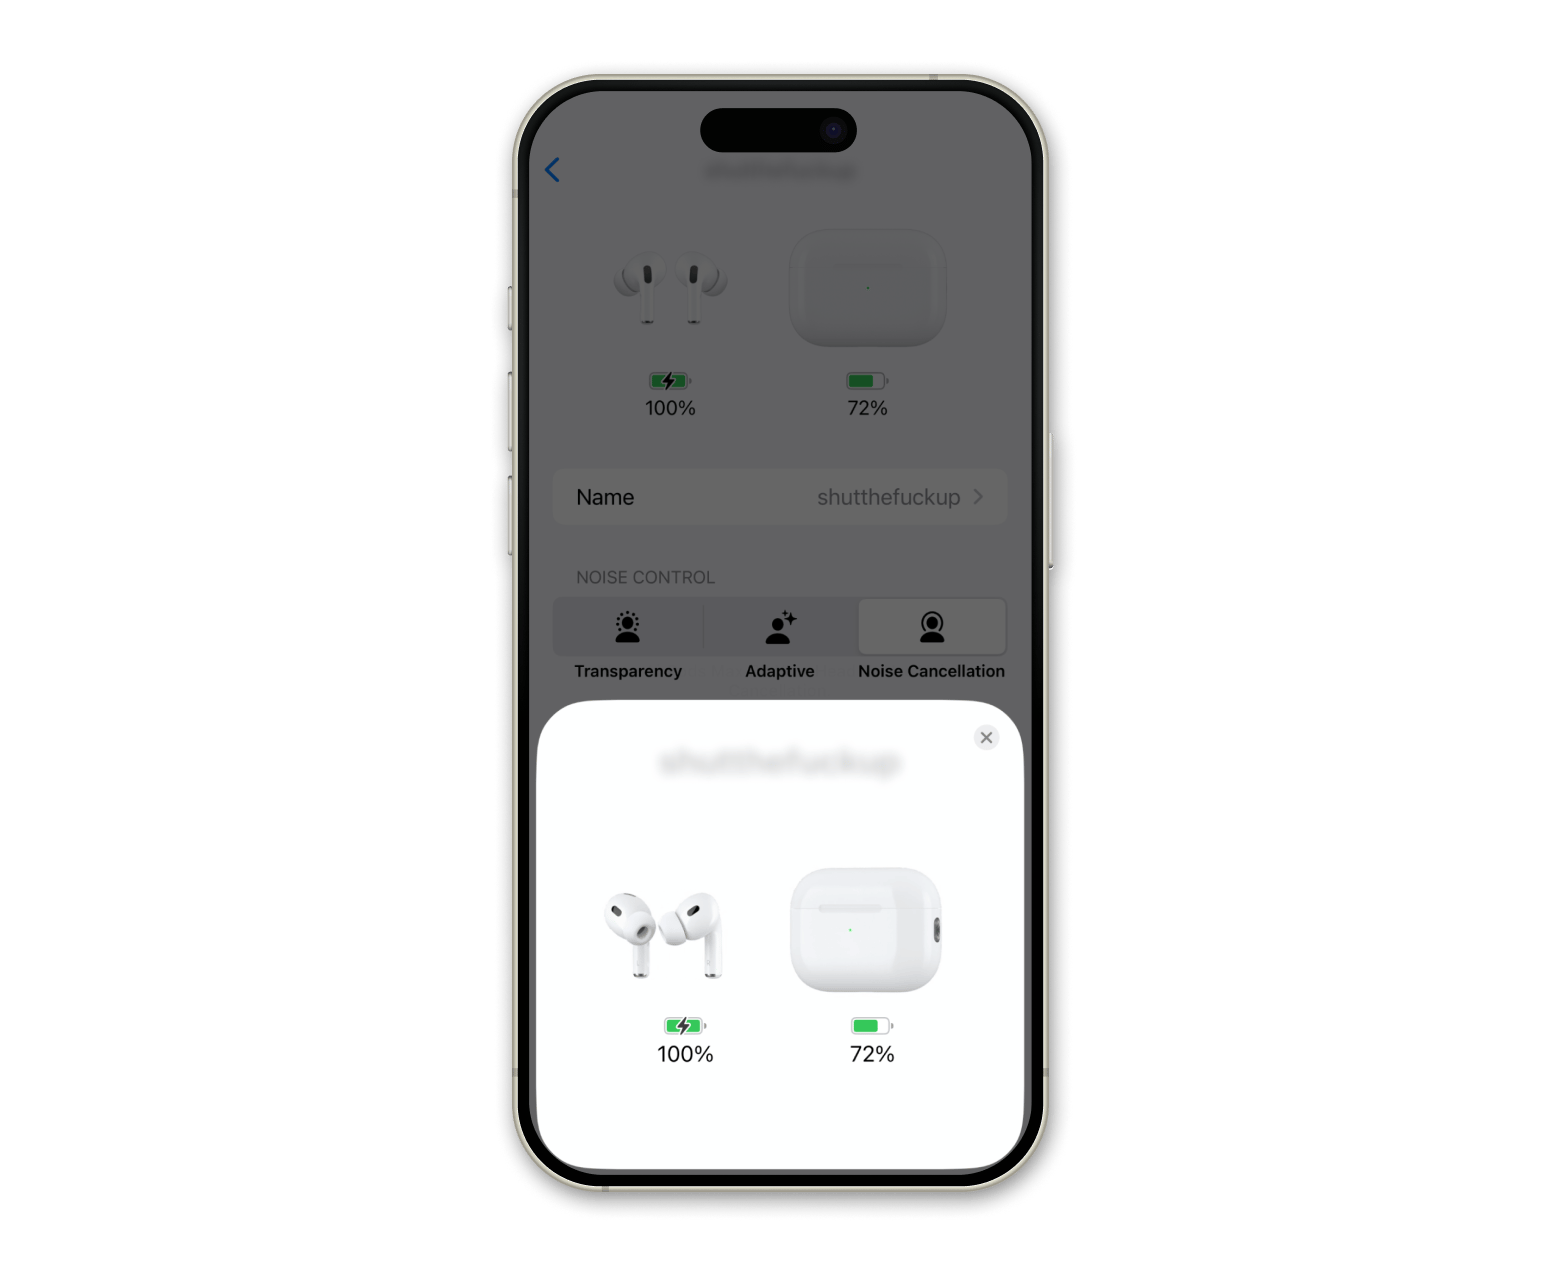
If you want to check the battery level on your AirPods check the battery level on your AirPods or your AirPods Pro battery life, here's what to do:
- Have your iPhone nearby.
- Open the case lid of your AirPods.
- Wait for the pop-up on your screen to show the battery levels of both the AirPods and the case.
How long should you charge your AirPods?
1-2 hours is more than enough for a full charge of my AirPods. After that, I can go to the gym for another workout session and have that “trying to find the right song to start the first set” moment.
Also, don’t forget about the “overcharge” rule, which works for all Apple devices. Avoid leaving your AirPods connected to chargers for long periods of time when they’re fully charged.
The newer the AirPods, the less time to charge, too. In fact, just 15 minutes plugged in can often be enough to get them going and give you a solid few hours of listening time.
Final thoughts on AirPods battery life
Getting into proper charging habits, disabling unnecessary features, and regular maintenance can improve the battery life of your devices, not just AirPods. I think you need to be consistent with your charging for the best results. Look after your AirPods, and they’ll give you the best possible service for the longest time.
Why not take ToothFairy and Boom 3D for a spin to help you with your AirPods battery life and give you the best possible sound quality to playback? They’re all included in Setapp, a platform with 250+ Mac and iOS apps. There's a free trial, so it’s worth checking out.
FAQ
How long does AirPods' battery last on a full charge?
How long do AirPods charge lasts and how long do AirPod Pro batteries last overall really depends on how you're using them. On a full charge, you can get up to 6 hours of listening time or around 4 hours of talk time.
Why do my AirPods drain so quickly, even when not in use?
It’s normal for batteries to drain quickly, even when not in use over time. But if your AirPods stay connected to Bluetooth, they may keep trying to maintain a connection in the background, which can drain the battery faster than you’d expect.
How can I check my AirPods battery health?
To check your AirPods battery health, open the case near your iPhone, and a pop-up will appear on the screen showing the battery levels of both the AirPods and the case. You can also swipe to the Today View and check the Batteries widget. Just make sure it’s enabled.
Does turning off Noise Cancellation help the AirPods battery last longer?
Yes, turning off Noise Cancellation can extend your AirPods’ battery life, sometimes giving you up to an extra hour of listening time. When Noise Cancellation is on, your AirPods use more power to block out external sounds. Switching it off means less energy is used, so your battery lasts longer.
Can AirPods battery be replaced if it degrades over time?
AirPods batteries cannot be replaced on your own. However, Apple does offer a battery service or replacement option, though it comes at a cost. If your AirPods are still under warranty or covered by AppleCare+, you might pay less (or nothing), but otherwise, you’ll have to pay a fee for each AirPod or the case.


