How to password protect a folder on Mac
I live in a neighborhood where not everyone locks their doors, and residents feel safe walking alone at night. But while physical security has never been an issue for me, I’ve become hyper-focused on my virtual safety because of the amount of important information and files I store digitally.
Especially since I own a shared MacBook in addition to my personal computer, I take extra precautions to protect my offline documents on that shared device. I've been doing it successfully for a long time, so now I'd like to share my tips on how to password lock a folder on Mac.
Password protect folder on your Mac using Disk Utility
Anything you want done on your Mac can typically be done using a built-in macOS tool or a third-party tool. macOS has what’s called the Disk Utility, which can help encrypt a folder. To password protect a folder using Disk Utility:
- Open Finder and go to Applications > Utilities to find the Disk Utility app.
- Click File > New Image > Image from Folder.
- Select the folder you want to put a password on and click Choose.
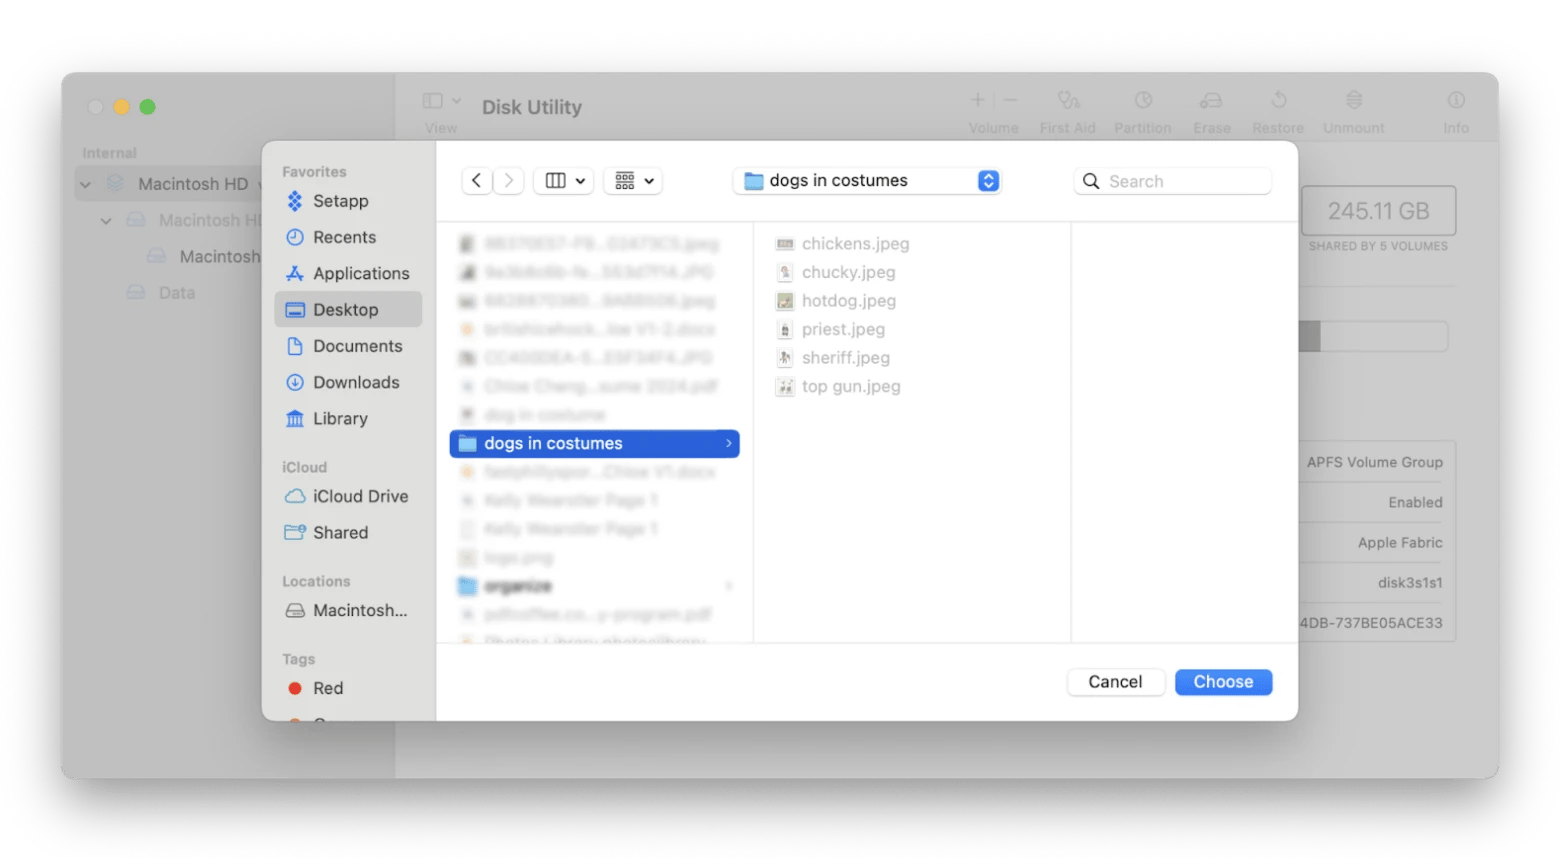
- Choose a name and location and select which Encryption type you want from the dropdown menu, as well as the Image Format of your choosing.
- Click Save and enter your own secure password for that folder, or click the key icon to open up the Password Manager to help you create one.
- Click Done.
- Double-click the .dmg file to open the folder, then enter your password.
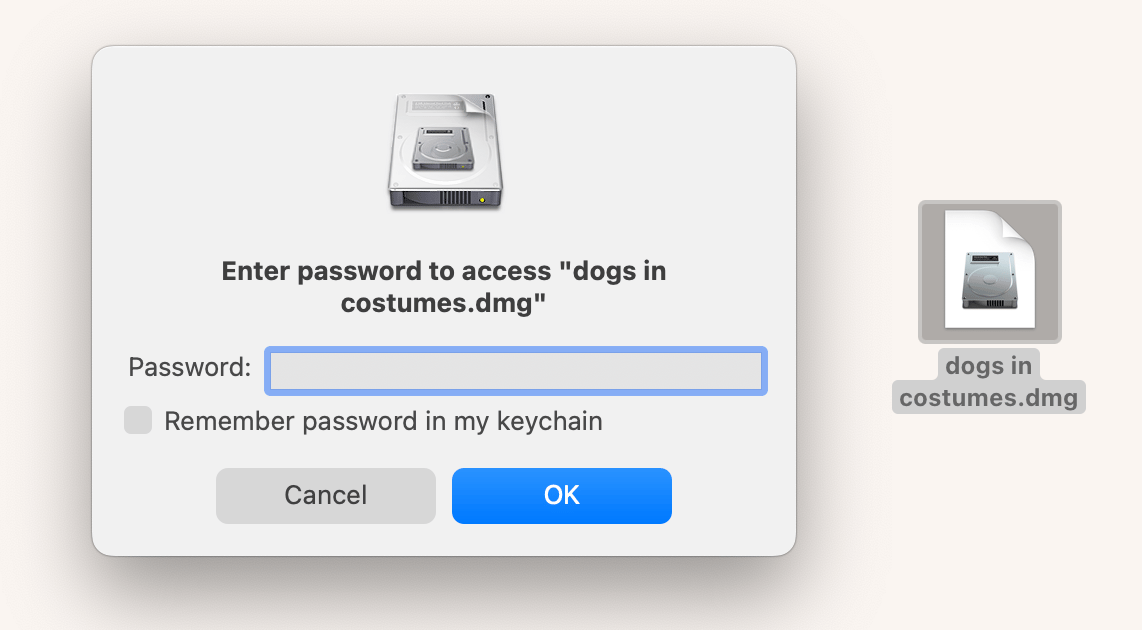
You might spot the option to store the password in your keychain, but I wouldn’t recommend it. This option can bypass the password request when you double click it next time and simply open up the folder.
There’s no going around it – this method is super time-consuming and makes a simple task unnecessarily complicated. In some cases, you might also need more capabilities or more archive format choices – and macOS doesn’t offer much past basic folder locking. If you’re looking for a more efficient way to handle folder protection, BetterZip is a useful app especially if you’re working with numerous files and archives regularly.
- Download and open BetterZip.
- Choose the file or archive you want to protect.
- Press File > Save with Preset > Save as Solid 7z, Ask for Password.
Now, it’s impossible to open the file without a password.
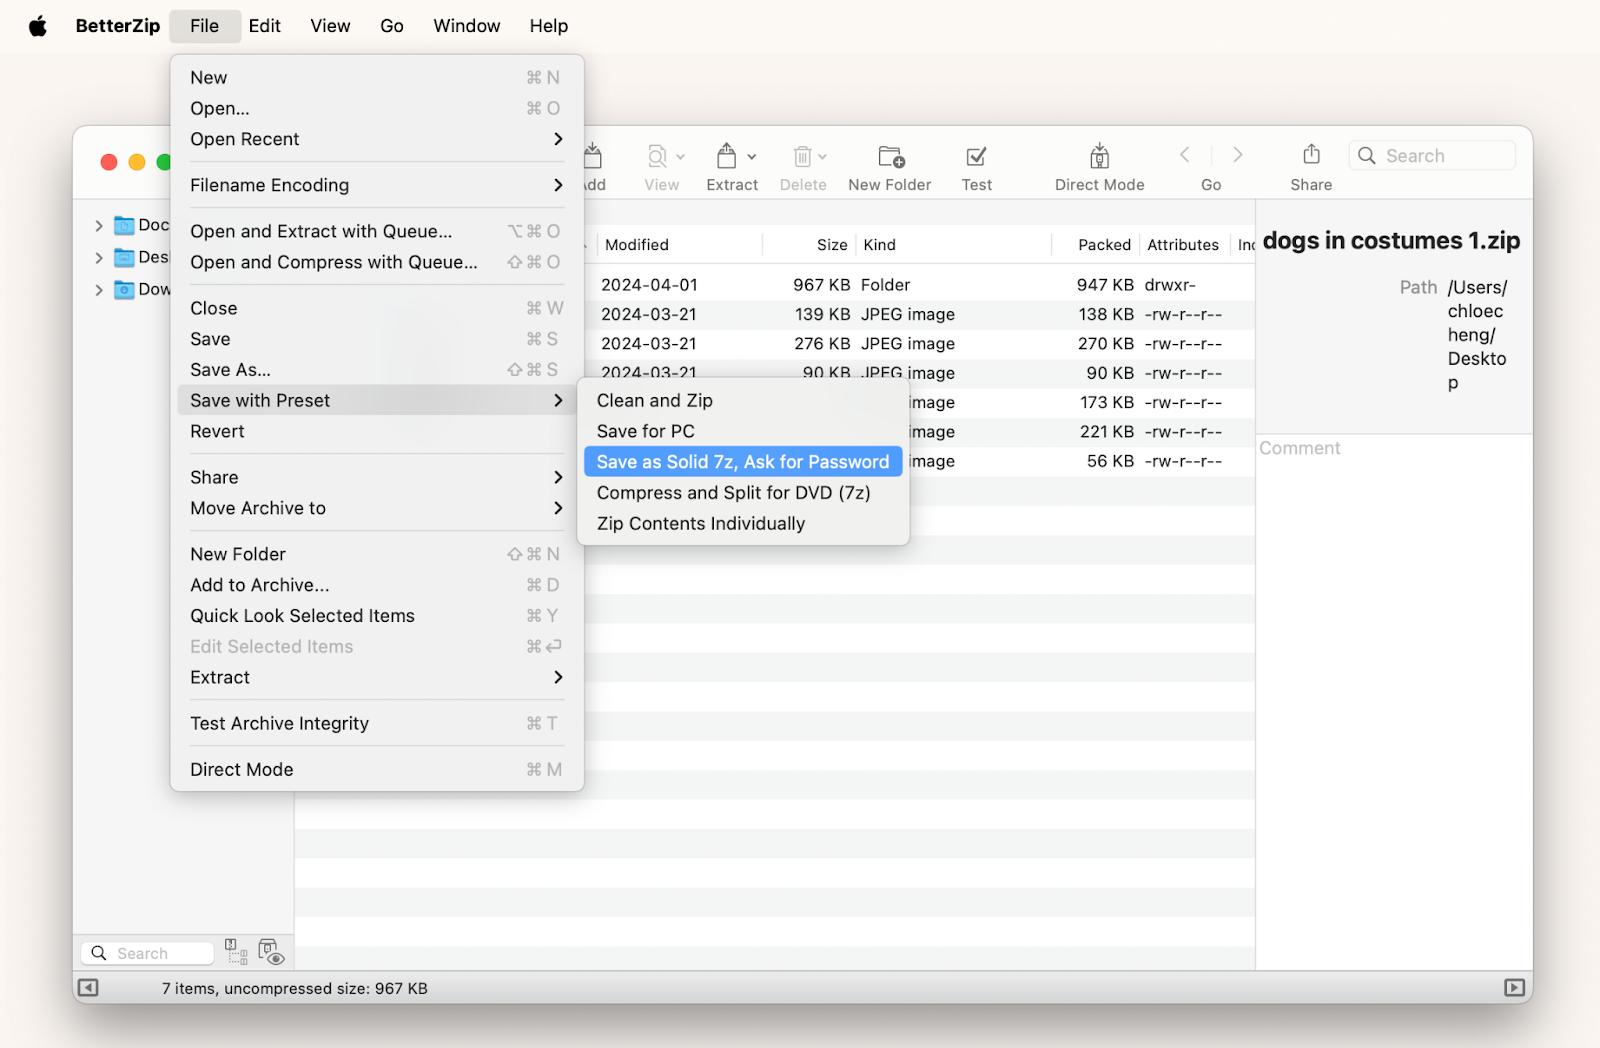
You can modify these encrypted folders, preview items with the Quick Look feature, and perform other useful actions quickly and easily right within the platform itself – all while compressing their contents and keeping them under lock and key.
Lock folder on your Mac using Terminal
The other native macOS option is to use Terminal. Here’s how:
- Open Terminal through Spotlight Search or by going to Applications > Utilities.
- Navigate to the Directory. If your folder is on the desktop, enter cd ~/Desktop.
- Enter the following command: hdiutil create -encryption AES-256 -volname "Encrypted Folder" -srcfolder "YourFolderName" -ov -format UDBZ "EncryptedImageName.dmg". Be sure to replace:
- "YourFolderName" with the actual folder name.
- "EncryptedImageName.dmg" with the name of the future encrypted folder.
Press the Return key.
Enter a password for that folder, re-enter it, and then press Return.
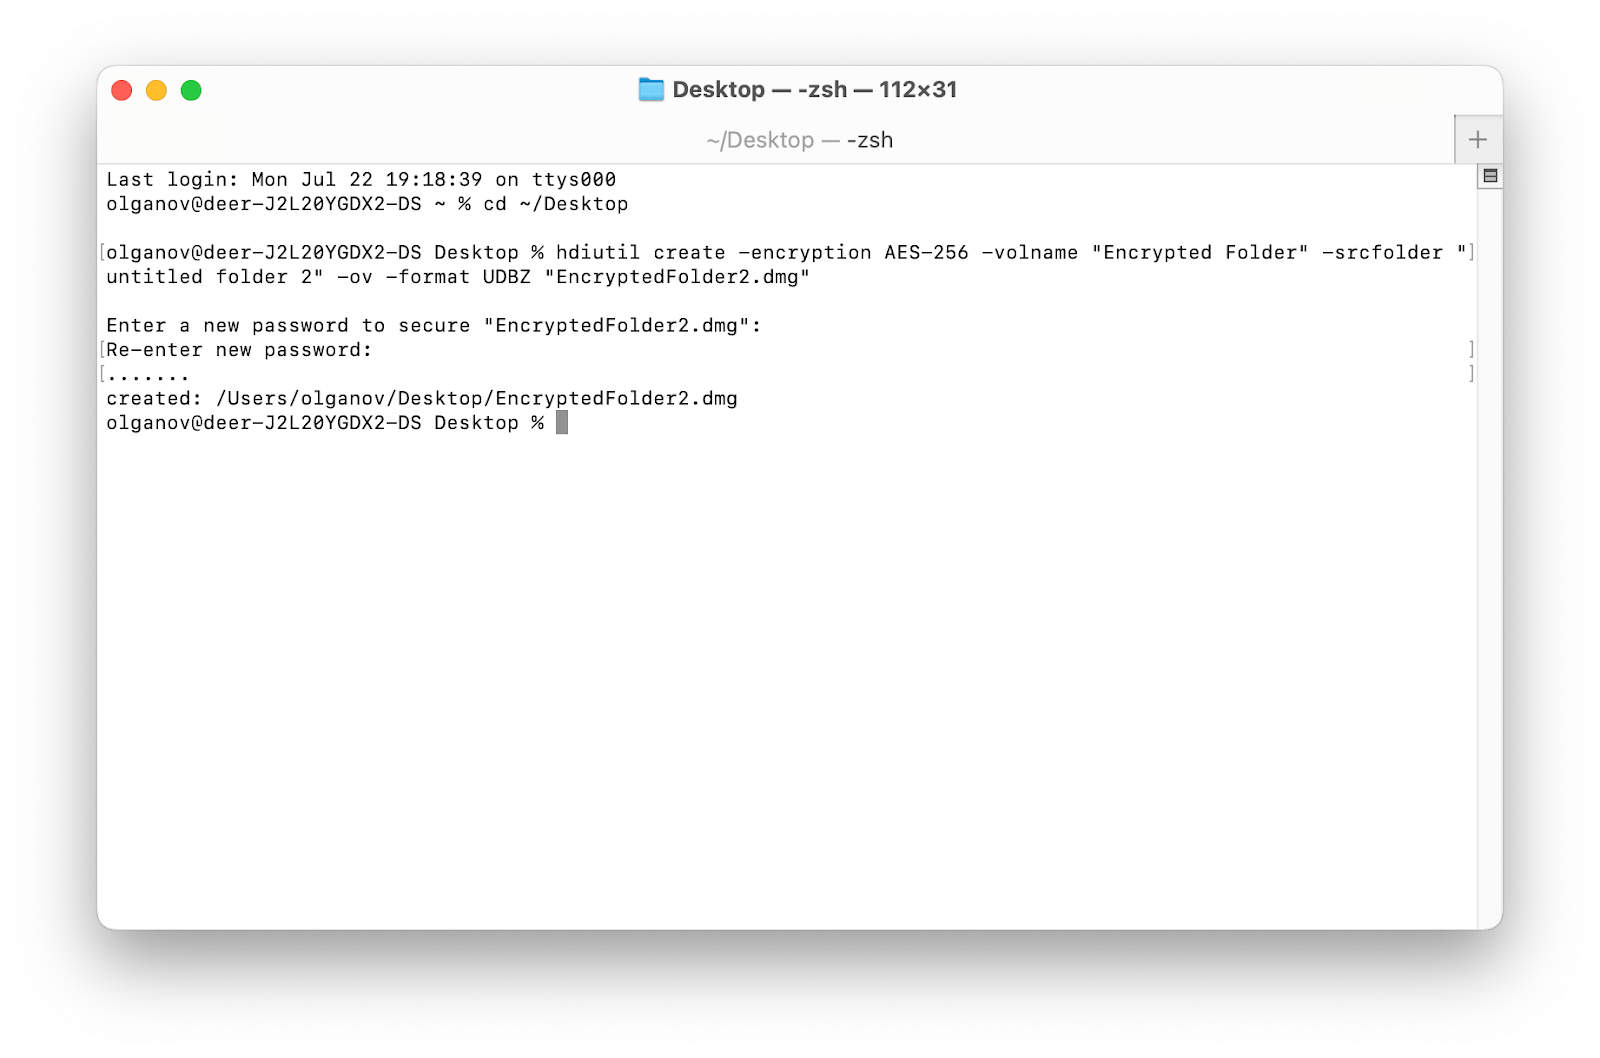
Terminal isn’t always the easiest method to perform Mac tasks, but certainly gets the job done.
Password protecting individual files on Mac
Now you know how to lock a folder on Mac – but what if you’ve got unrelated individual files you want to put a password on? Is that even possible? While you’d typically have to create separate folders for each of those files in order to lock them, certain apps make it possible to password protect single files.
Using password-protection in Notes
Whether you use your Notes app like a diary, or find it an easy spot to note down all your passwords, you’ll definitely want to know how to password-protect your notes. Start by heading over to your Notes app and follow these instructions:
- Click on the note you want to protect.
- Click the padlock icon in the top right-hand corner.
- Select Lock Note and you’ll see a pop-up with the option to use your device password or create a separate password.
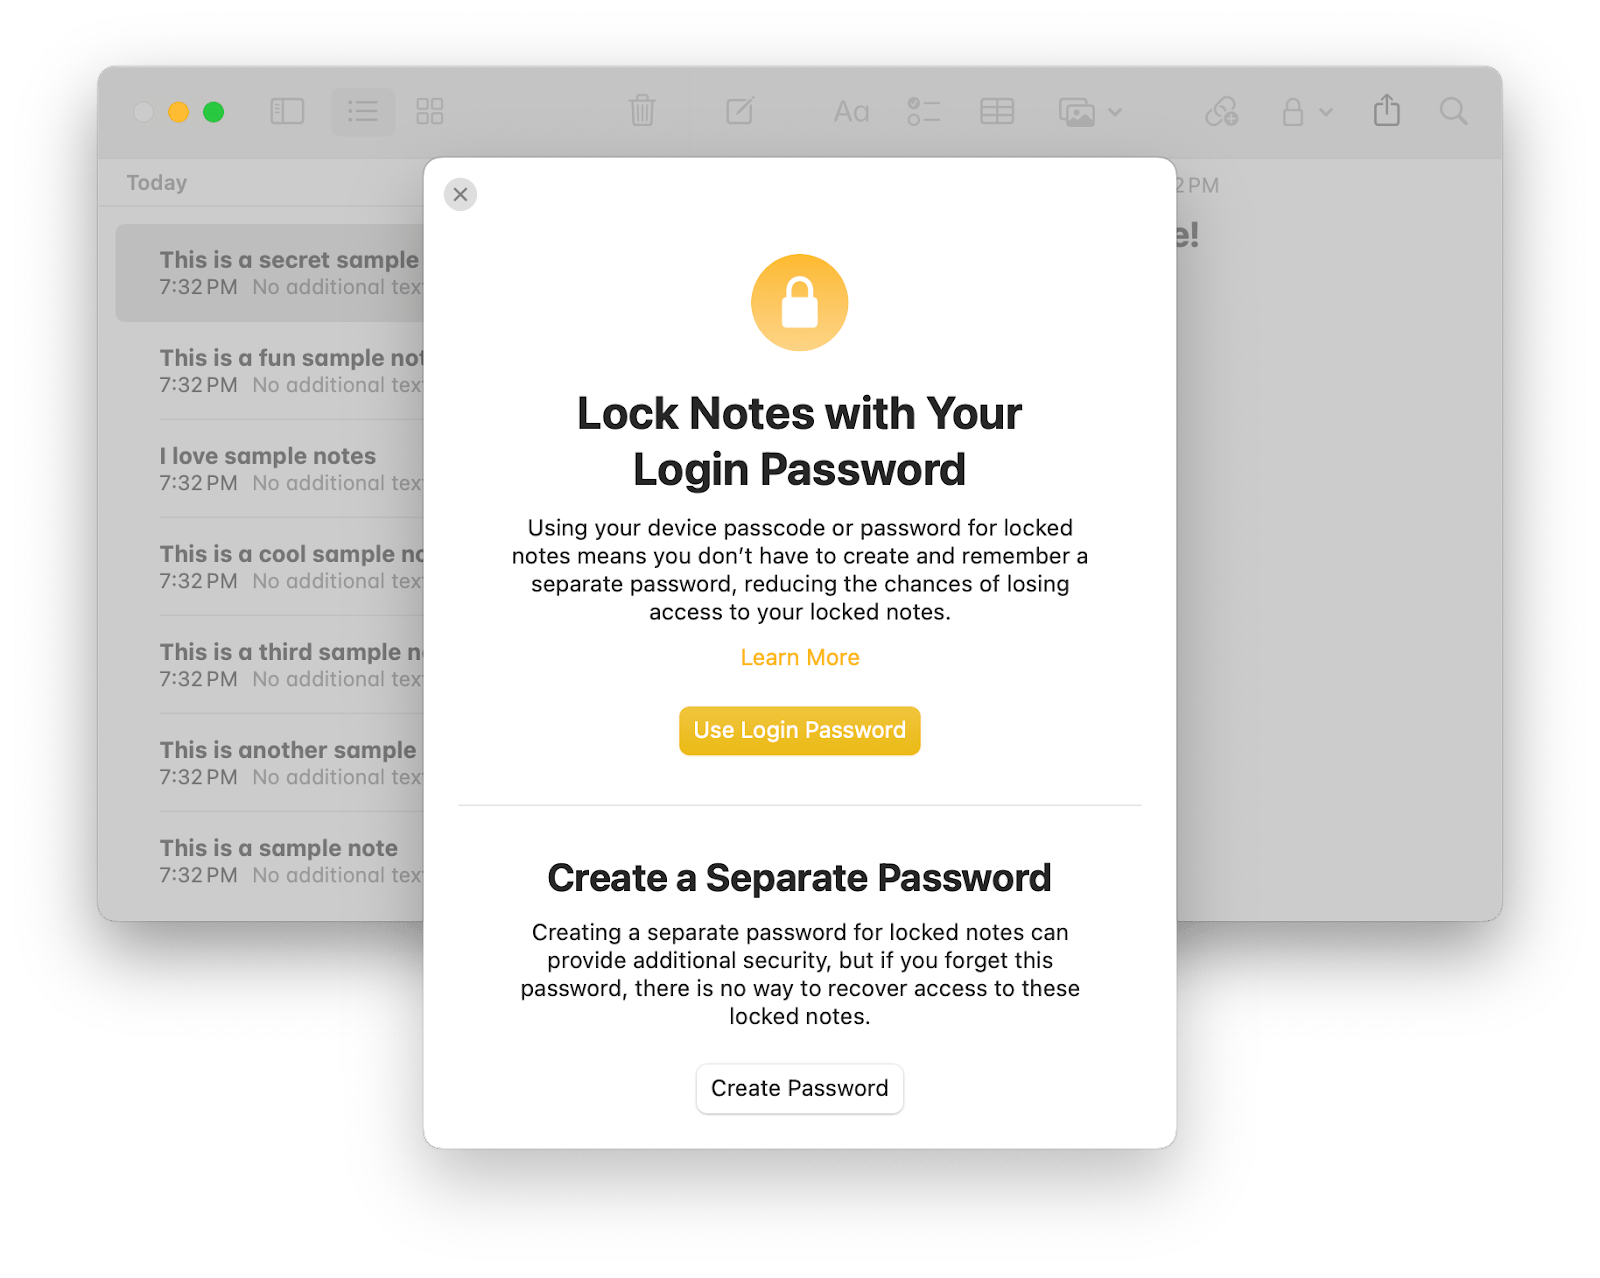
The Notes app is definitely a favorite among Mac users, as it provides an easy place to jot things down. But if you’ve ever wished you could replicate the concept of real-life sticky notes, Notes might not be the most ideal alternative.
SideNotes, on the other hand, lives on the side of your Mac’s screen so you can easily hide and reveal your collection of notes without having to open an app every time you need something. Using one simple shortcut, your list of notes can pop open or slide closed.
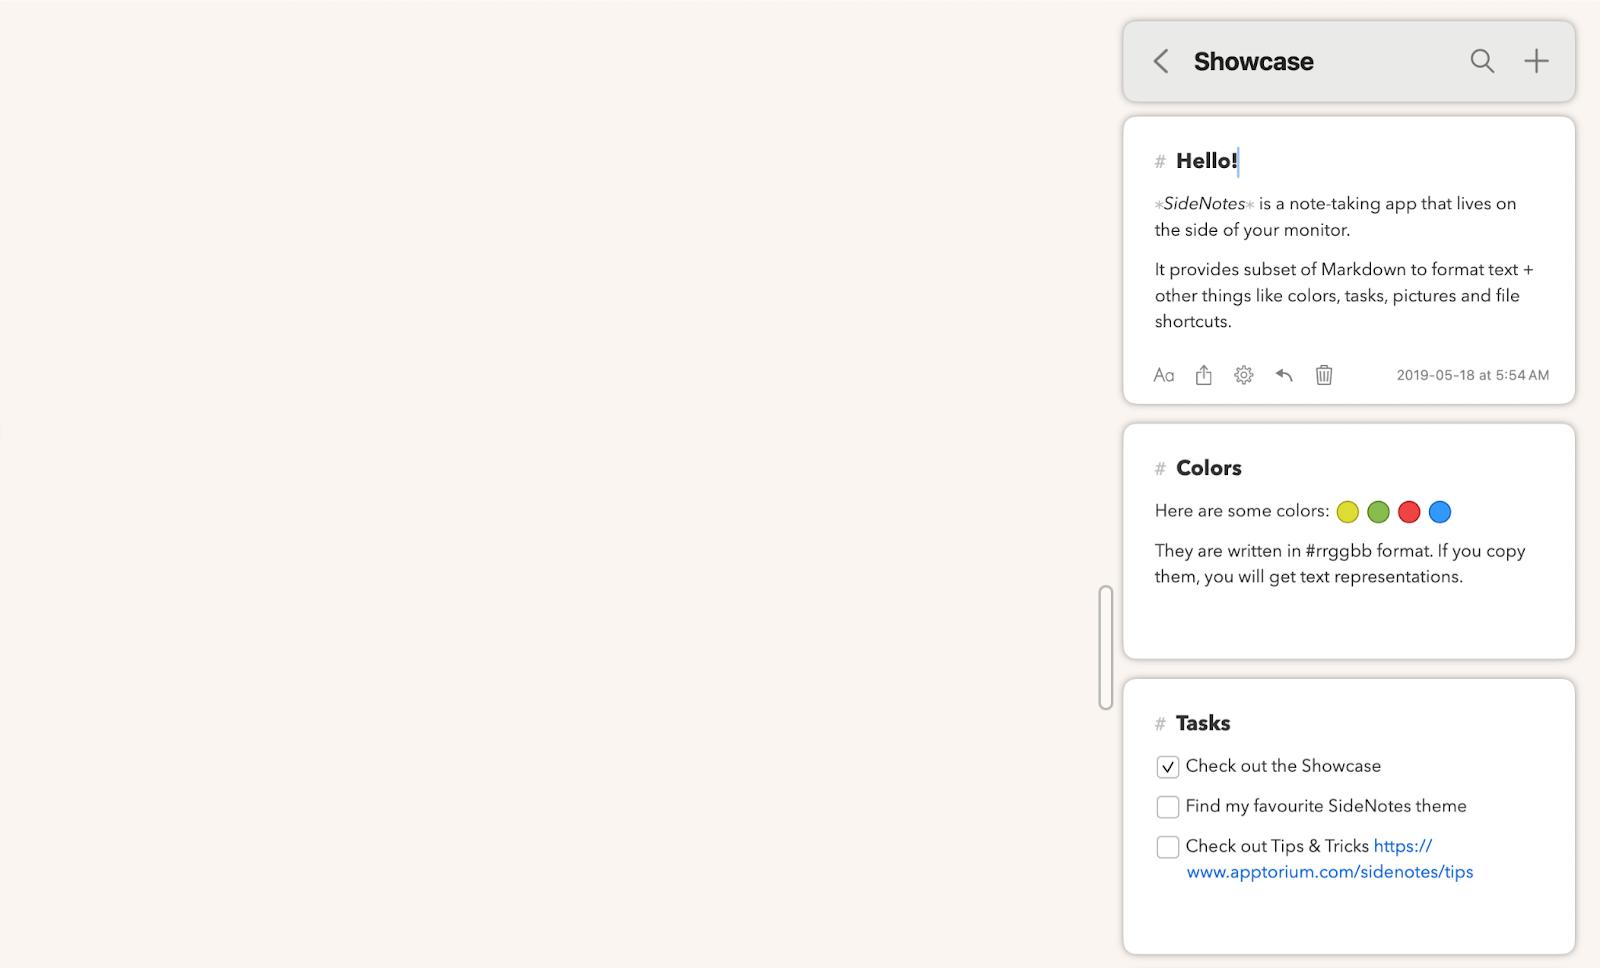
The app icon in the menu bar lets you control its visibility, and it has all the capabilities you need to make specific kinds of notes and customize each one. There’s even a code-friendly interface and markdown formatting support. Where SideNotes has a leg up over the native Notes app is that it supports infinite scrolling, meaning you don’t have to click each individual note to find what you’re looking for.
While it doesn’t support password-protection, you can create as many folders as you like to house your lists and thoughts.
Password protecting a PDF
There’s also the option to protect a PDF file in Preview, which is useful if you’ve got private documents saved onto your Mac. Here’s how to do it:
- Open a PDF using Preview.
- Click File in the menu bar and select Export as PDF.
- Click Show Details > Permissions.
- Select the checkbox next to Require Password To Open Document and enter in a password. Type in the same password in the Verify box.
- Choose your preferred permissions.
- Enter your Mac password twice and click Apply.
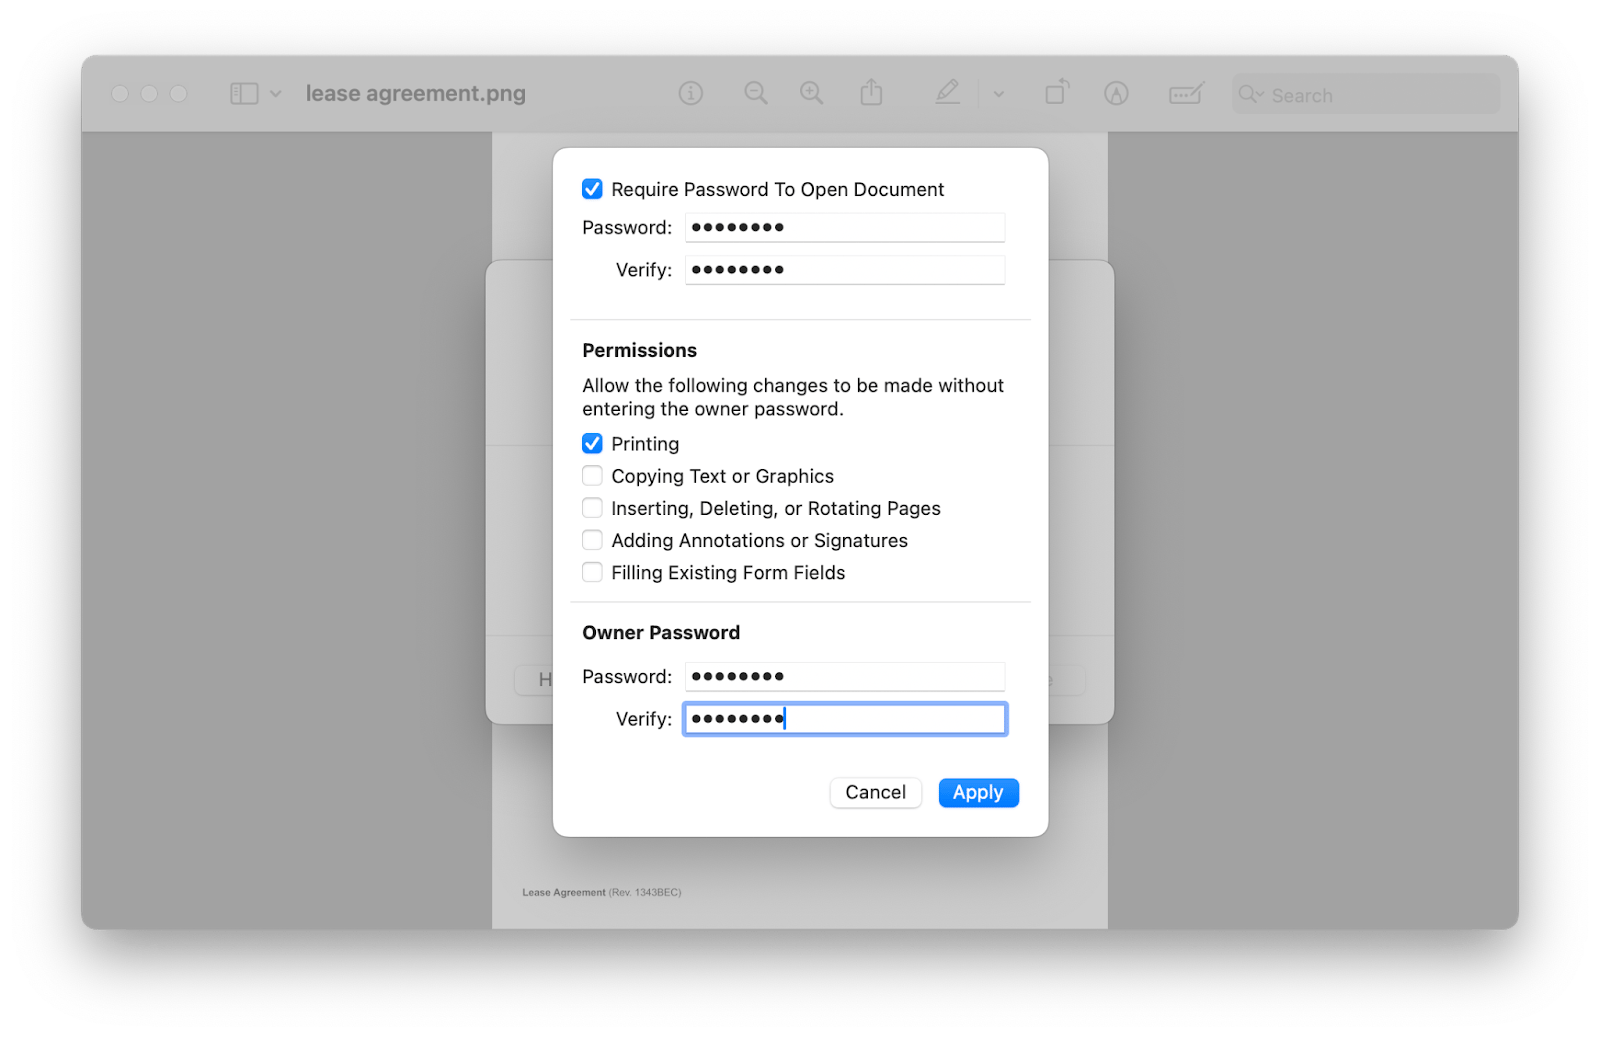
It should then appear as a PDF file with a padlock icon.
The standard for passwords used to be using a mix of uppercase and lowercase letters, then it was adding special characters, and now there are all sorts of recommendations on password length. Regardless of the changing guidelines, we should always use unique, long and complex passwords for each of our accounts and files in case of a security breach.
While it might seem more convenient to use the same password for everything, once that password is compromised, you set yourself up as an easy target for cybercriminals. But it’s wholly unrealistic to expect to remember every single elaborate combination of numbers and letters in your head.
I tend to be one of those people who looks for the Forgot Password button pretty often, so I save myself that hassle by using Secrets 4. It’s a highly useful password and information manager that can do all the remembering for you.
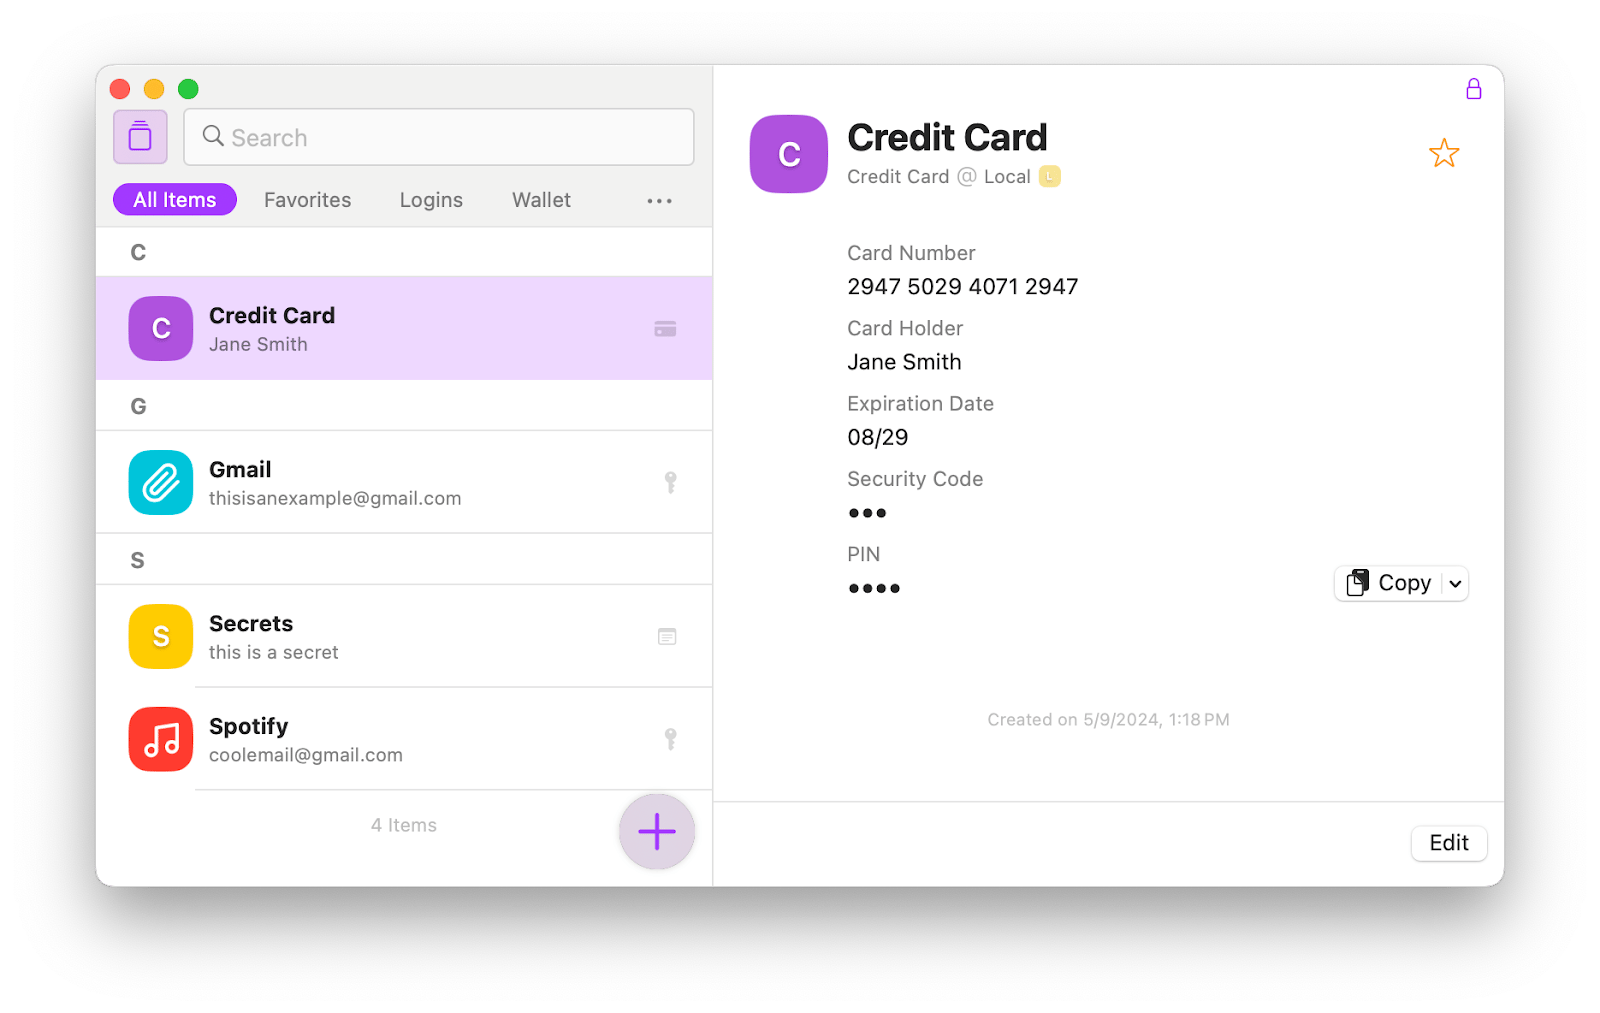
Whether it’s credit card details, your social security number, or passwords for a bunch of different websites, I get to consolidate all that information in one place, and sync that between all my devices. Need to fill something in? Simply click the copy button next to any field and you won’t have to type it out.
Summing up: Why macOS locked folders matter
There are a couple of folder password protection options available, some seamless, some a little more tedious – as well as native apps that have their own built-in security system. For that extra peace of mind, though, I find third-party apps usually offer the best encryption and password-protection features around.
Secrets 4 and BetterZip are both incredibly useful apps that work to up your file security, so you won’t have to stay on your toes all the time. Interested in downloading them? All the apps mentioned above are all available on Setapp, a subscription platform that gives you access to 260+ native macOS apps for all sorts of Mac-related solutions. Start your 7-day free trial and explore all these incredible tools.
FAQ
What does locking a folder do on Mac?
It essentially involves adding a password to that folder to protect the contents inside it. Only those who have the password or authentication code can access those private files.
Why you should password protect folders on your Mac
There are a few reasons why you’d want to password protect folders on Mac.
- Protect your privacy (especially for shared laptops). Storing your confidential files in a password-protected folder will keep it safe from other users.
- Stop data breaches in dire cases where your laptop is stolen or someone hacks into it.
- Avoid accidental changes as any changes will require authentication.
- Give you peace of mind. No need to explain.
How do I hide a folder on my Mac?
To hide the folder, click on it and press Shift + Command + . (period). Note that the same shortcut will reveal the folder.
How do I compress a folder with a password on a Mac?
Macs don’t have a built-in zip file manager of their own, so you can only compress a folder and password protect it through Terminal.
- Open Terminal.
- Navigate to the directory. For example, if your folder is on the desktop, type: cd ~/Desktop and press Enter.
- Type zip -er YourZipFileName.zip YourFolderName. Where YourZipFileName.zip is the name of the folder you want to create. And YourFolderName is the name of the current folder. Press Enter.
- Enter the password when the prompt appears. The characters won’t appear on the screen as you type. It’s okay.
- Confirm the password.
To make things more secure and easier, a third-party tool like BetterZip can handle all sorts of compression and archiving in a flash.
How to password protect a folder on a Mac without Disk Utility?
Without using Disk Utility, there’s only one other native way to password protect a folder on a Mac. Mac users can either use Terminal to create an encrypted disk image or employ a third-party tool. Downloading a third-party tool is usually the easiest method, especially if you aren’t particularly tech savvy. BetterZip can instantly password protect any folder in just a few clicks, thanks to its shortcut capabilities and easy-to-use platform.


