How to password-protect a ZIP file on Mac: My top solutions
- macOS doesn’t offer a simple built-in way to password-protect ZIP files.
You can create ZIP files natively, but adding a password requires either Terminal commands or third-party apps. - Terminal works for occasional use but isn’t ideal for daily workflows.
Type:zip -er YourZipFileName.zip(replace with your desired file name) > Drop files to compress > Enter > Type a password > Enter. This method is free. - Third-party apps are the fastest and most user-friendly option.
Tools like Archiver and BetterZip let you encrypt ZIP files in seconds using drag and drop, without dealing with command-line steps. BetterZip supports strong AES-256 encryption, password presets, password generation, and lets you view or edit files inside archives without fully unzipping them.
- Setapp bundles the best ZIP encryption tools in one place.
With Setapp, you get access to BetterZip, Archiver, and 250+ other productivity tools under one subscription. You can try them free for 7 days.
Once in a while, you’ll need to add a password to a ZIP file to enhance its privacy, make it safe for sharing, or protect it from unauthorized access. Unfortunately, Mac doesn’t provide a built-in option for that. This leaves users with two options:
Terminal, which is free but quite manual.
Third-party apps like Archiver and BetterZip. They are fast and easy to use, but cost some money.
So, how should you go about it, and how do you decide what works best for you?
In this guide, I’ll show you how to password-protect a ZIP file on Mac using various tools and methods.
| Ways to secure ZIP files | How to do it |
|---|---|
| Use Terminal |
Open Terminal on your Mac. Type: zip -er YourZipFileName.zip (replace with your desired file name) Drag and drop files to compress > Press Enter Type a password > Press Enter. |
| Core Shell |
Install Core Shell to manage multiple SSH hosts. Use its full-featured SSH terminal with one-click login to zip and secure files remotely. |
| Archiver |
Install Archiver. Open the app > Drag a file to zip > Click Archive Choose format > Select Encrypt Create a password > Archive. |
| BetterZip |
Install BetterZip to create secure archives. Step 1: Open the app > Set up a Master Password. Step 2: Go to Settings > Presets > Save Click Set next to the Password line > Set password. BetterZip will apply this password to future ZIP files. |
Personal advice: When I needed to password protect a zip file on Mac and ran into errors, I used the Fix My Mac: Beyond Basic Fixes GPT assistant to troubleshoot. It helped me fix Mac issues with Terminal commands and gave me alternative methods when the built-in compression tool wasn't cooperating.
How to create a ZIP file on a Mac
While Finder doesn’t allow you to password-protect a ZIP file, it’s still a valuable option for archiving general files. So, before we look at the more advanced options, let’s see how the built-in functionality works.
Here’s how to create a ZIP file on Mac:
Locate the file or folder in Finder.
Click on the file to select it. If it’s multiple files, hold Command while clicking on the others.
Right-click on one of the selected items.
Click Compress.
Just like that, Finder will create an archive in the same folder. It will just call the file Archive.zip by default, so ensure you rename it to make it easy to identify.
3 best ways to password-protect ZIP files on Mac
Now, let’s look at the details of how to password-protect a ZIP file on Mac. We’ll look at three different methods, so you can choose one depending on your workflow and comfort level. Each has its strengths and possible drawbacks depending on what you are looking for.
Here’s a quick comparison:
Method | Ease of use | Encryption level | Cost |
Terminal | Advanced | Standard ZIP AES (basic) | Free |
Easy | AES-256 | Included with Setapp with 260+ apps for $9.99/month | |
Medium | AES-256 (strong) | Included with Setapp with 260+ apps for $9.99/month |
#1. How to password-protect a ZIP file with Terminal
The only native way to password-protect an archive on a Mac is to use Terminal. These instructions and the command-line interface might seem daunting, but if you follow them step by step and copy the commands carefully, I promise you’ll be fine.
- Open Terminal on your Mac.
- Type in cd and the location of the file or folder you want to compress and protect. In my case, it's the Desktop, but your file could be anywhere else: Downloads, Applications, etc. So, as you can see in the picture below, I typed cd desktop.
- Type this command into Terminal: zip -e -r New File.zip Original File
- New File.zip is the name of the new ZIP file you want to receive. In my case, it is "Setapp_protected.zip".
- Original File is the full name of the ZIP file you want to password-protect. Mine was "Setapp.zip". Note that you should also write the extension (.zip)!
- Type the password for your archive, confirm it, and press Enter. When you type the password, no characters are displayed – this is normal.
- Wait for the process to finish. You'll find the new ZIP in the same folder as the original file.
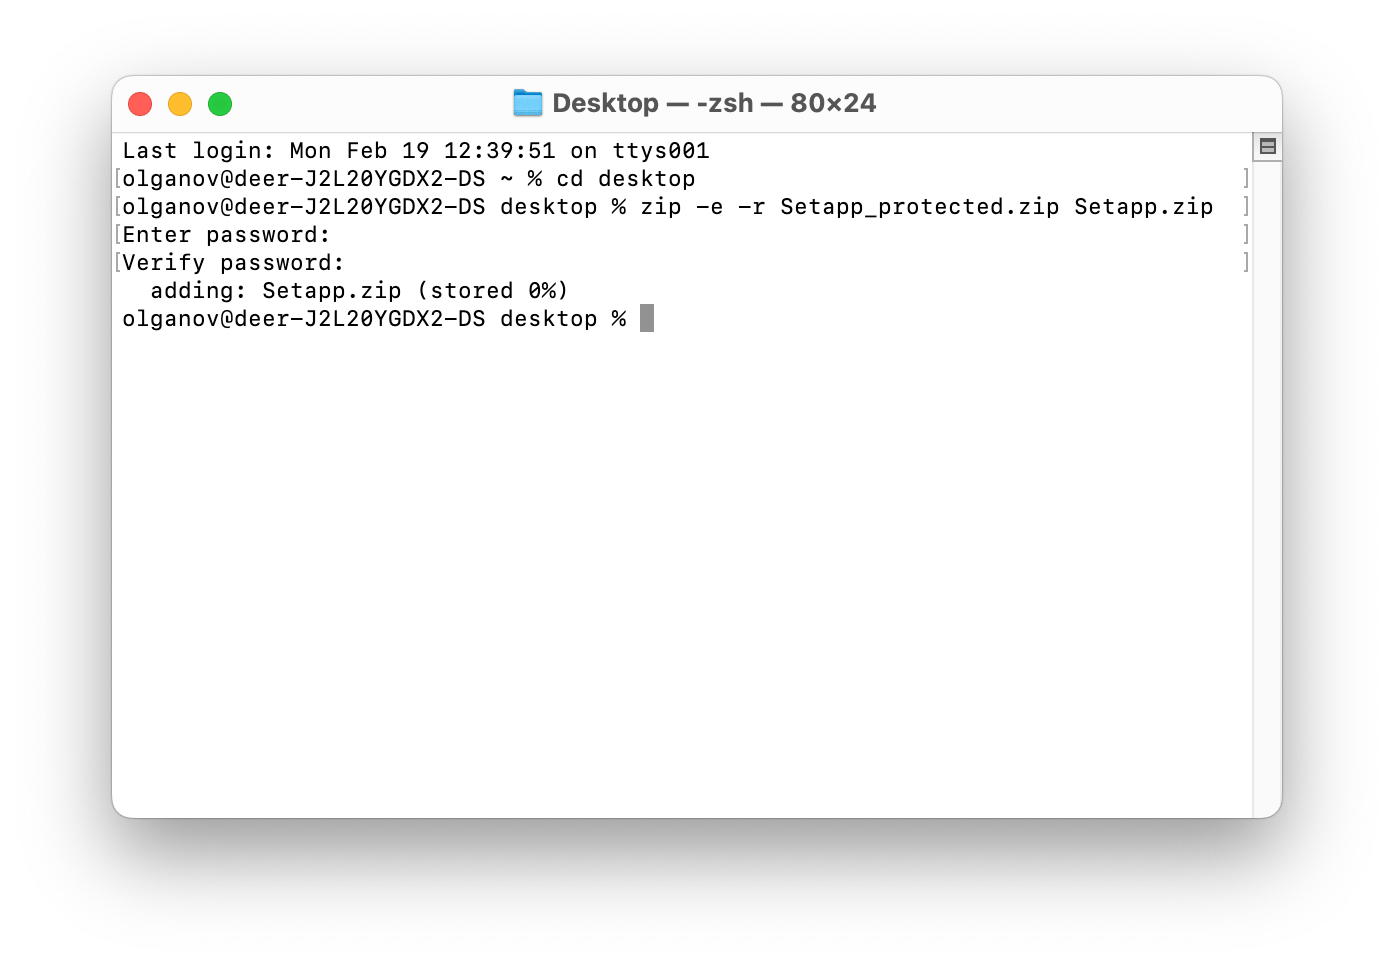
You're done! Remember your password because there's no "forgot password" option here. This method has the right to live if you need to encrypt one or two archives. But if you have a lot of files and protecting them is your routine, there are better ways to go than the Terminal.
#2. How to create encrypted archives on a macOS in seconds with Archiver
When it comes to third-party archive protection tools, Archiver is probably the fastest and the easiest, and definitely one of my favorites.
Here's how to password-protect a ZIP file on a Mac using Archiver:
- Download and open Archiver.
- Drag the folder or file you want to zip into the app window.
- Click Archive.
- Select the compression format and compression level.
- Check the Encrypt box and create and confirm a password.
- Click Archive again.
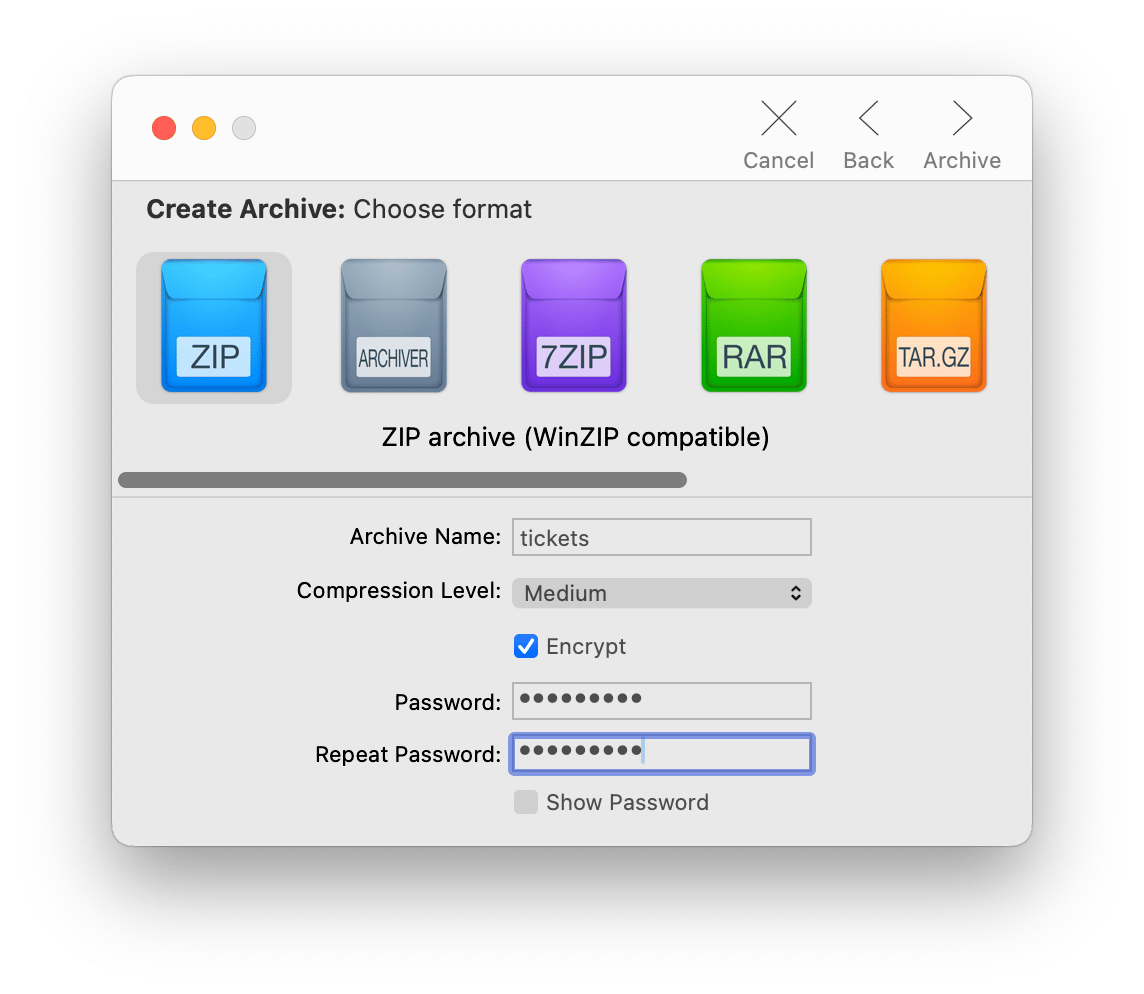
Be sure to memorize your password or store it in a safe place. You'll have to type it each time you open the archive, even if you work on the same computer you used for encryption.
#3. The easiest way to protect ZIP files on your Mac with BetterZip
If you need a more advanced tool for frequent work with archives, I highly recommend BetterZip as the best choice. First, it's easy: drag and drop, and the file is archived and password-protected. Second, it is secure. It automatically protects your files and folders with AES-256 encryption (also called "military-grade protection") and has a password generator for creating and managing strong passwords for files or folders.
I must admit: you'll need to configure a few settings first, and it may take some time. But I promise that after that, zipping, encrypting, and opening archives will always be a breeze.
Step 1. After downloading and opening BetterZip, click BetterZip > Settings > Passwords in the top menu. Set up the Master Password in the lower left corner. This will allow you to customize your passwords further.
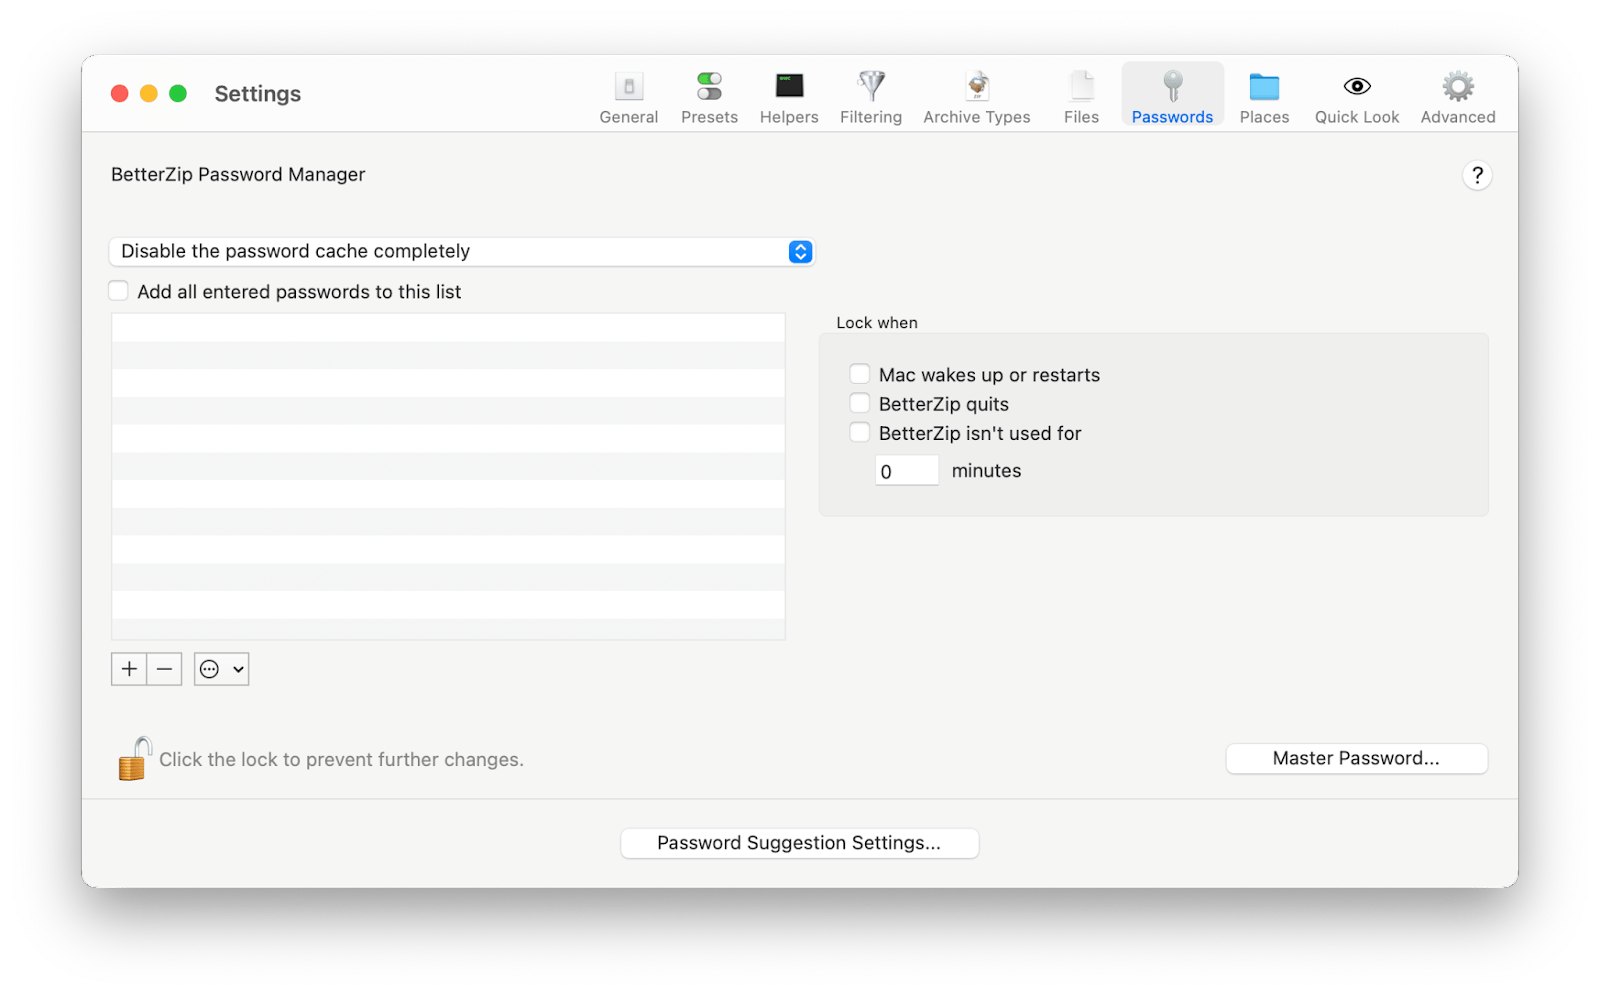
Step 2. Set the password for future archives.
- In the Settings, go to the Presets section.
- Switch to the Save tab and select Clean and Zip.
- Select the encryption Method. I recommend that you choose Strong (AES-256).
- Click the Set button next to the Password line and set a password. You can enter it manually or generate it by clicking the key icon. Remember the password. BetterZip will apply it to all subsequent ZIP files you create until you set a new one.
- Close the Settings.
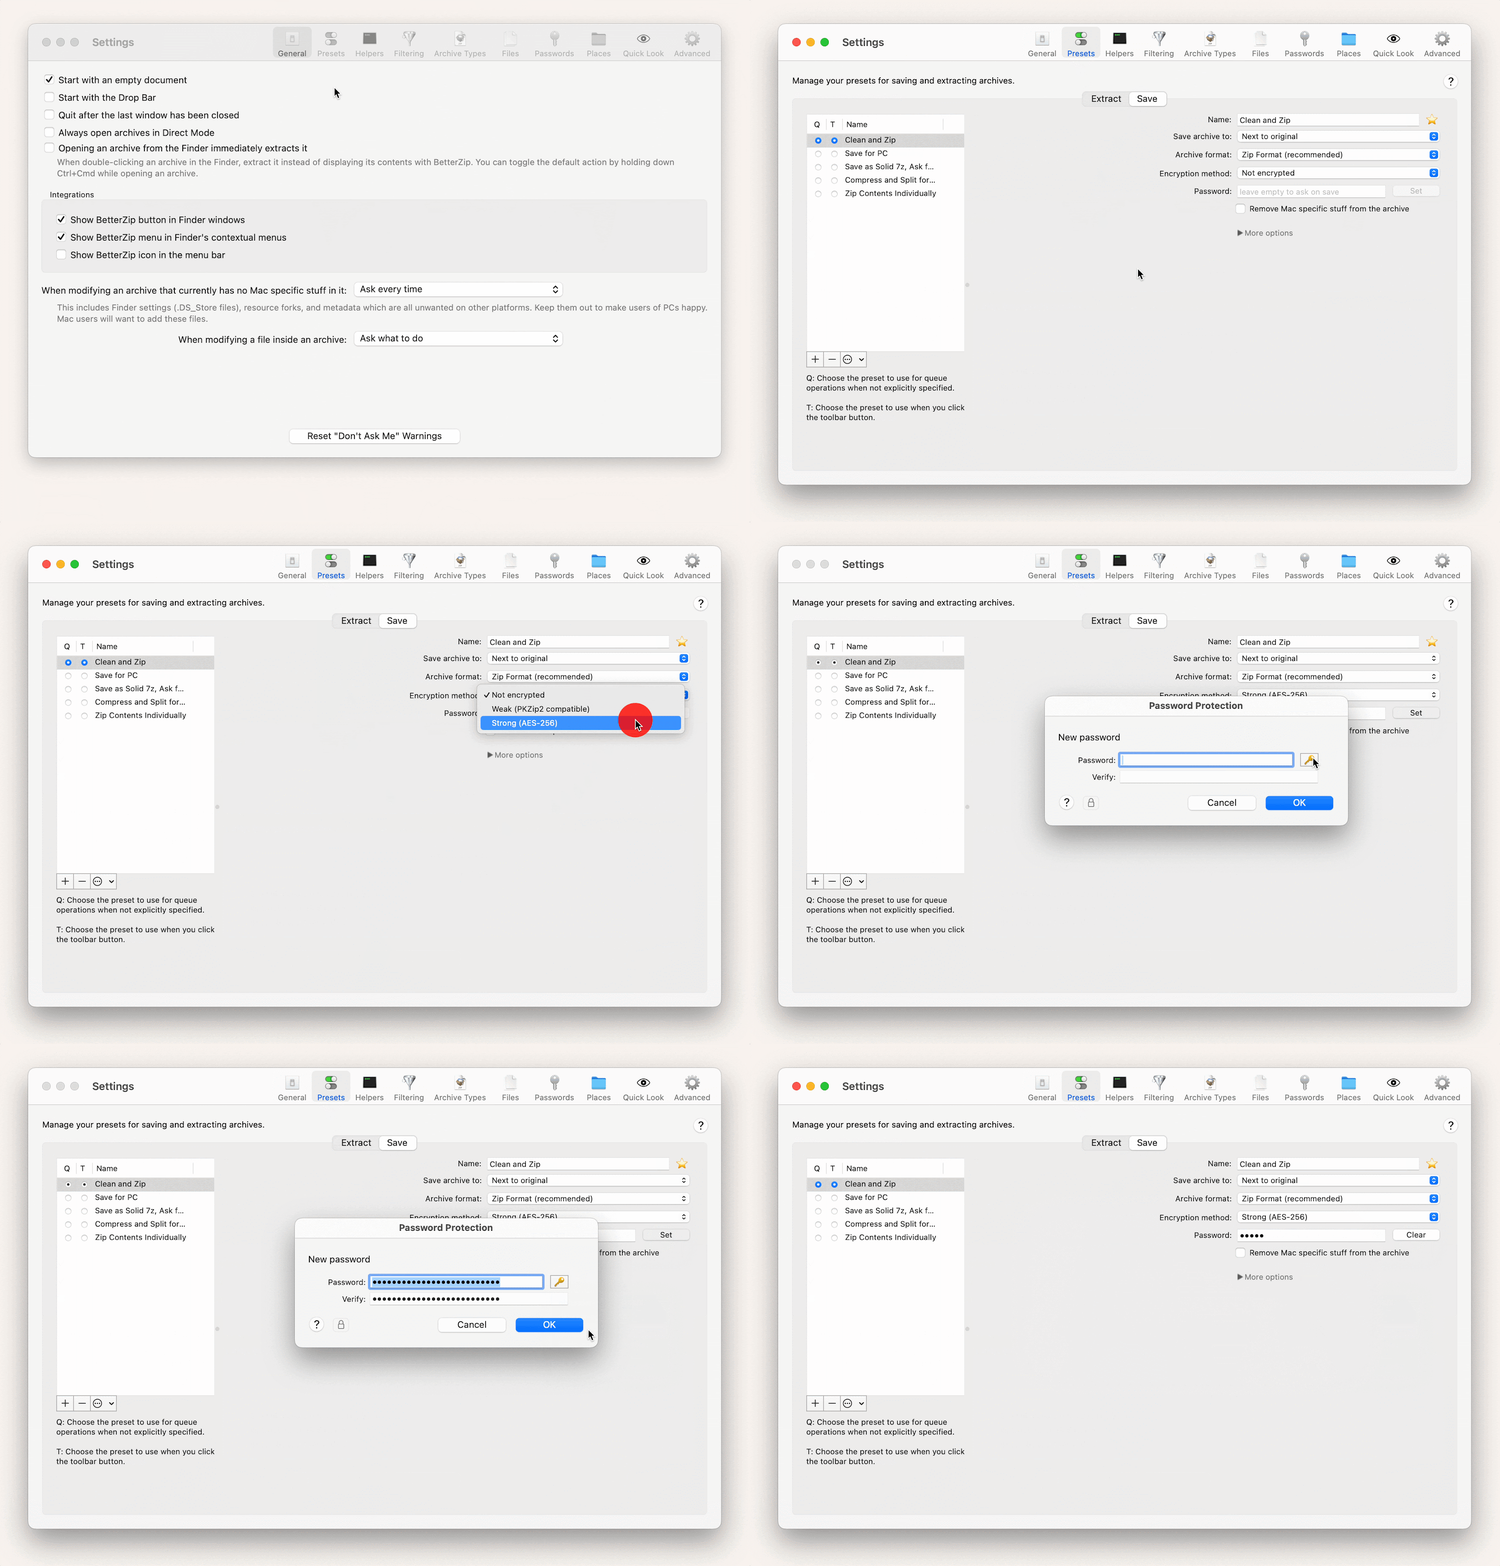
The app is now ready to use. To password-protect ZIP on Mac, drag the file or folder into the BetterZip window and click Save. The new protected archive will appear next to the original file or folder.
Both you and the person you share the encrypted file with must enter a password to open it. But what if you don't want to type passwords every time, and also don't want to keep your ZIP file unprotected? There is a solution.
Return to Settings > Passwords and check the box "Add all entered passwords to this list." From the drop-down menu, choose what the password manager should do. I recommend selecting the "Automatically try passwords except for RAR archives" option.
Now, you don't need to type anything. BetterZip will automatically choose the password from the saved ones when you open the archive. However, unauthorized people will still need to type in the password.
How to open password-protected ZIP files on Mac easily
The easiest way to open an encrypted ZIP is to double-click it and enter the correct password. Archive Utility (a native macOS tool) will open and unpack your file.
The other way is to use the Terminal.
- Open Terminal on your Mac.
- Use the cd command to change directories to where your ZIP file is located. For example, if it's on your Desktop, you would use cd desktop.
- Type the following command, replacing YourFile.zip with the name of your ZIP file: unzip YourFile.zip. In my case, the command is unzip tickets.zip.
- Type in the password for the ZIP file and press Enter. Note that no characters will show on the screen; this is normal for password prompts in Terminal.
- Wait for the process to finish. Your files will be extracted to the current directory.
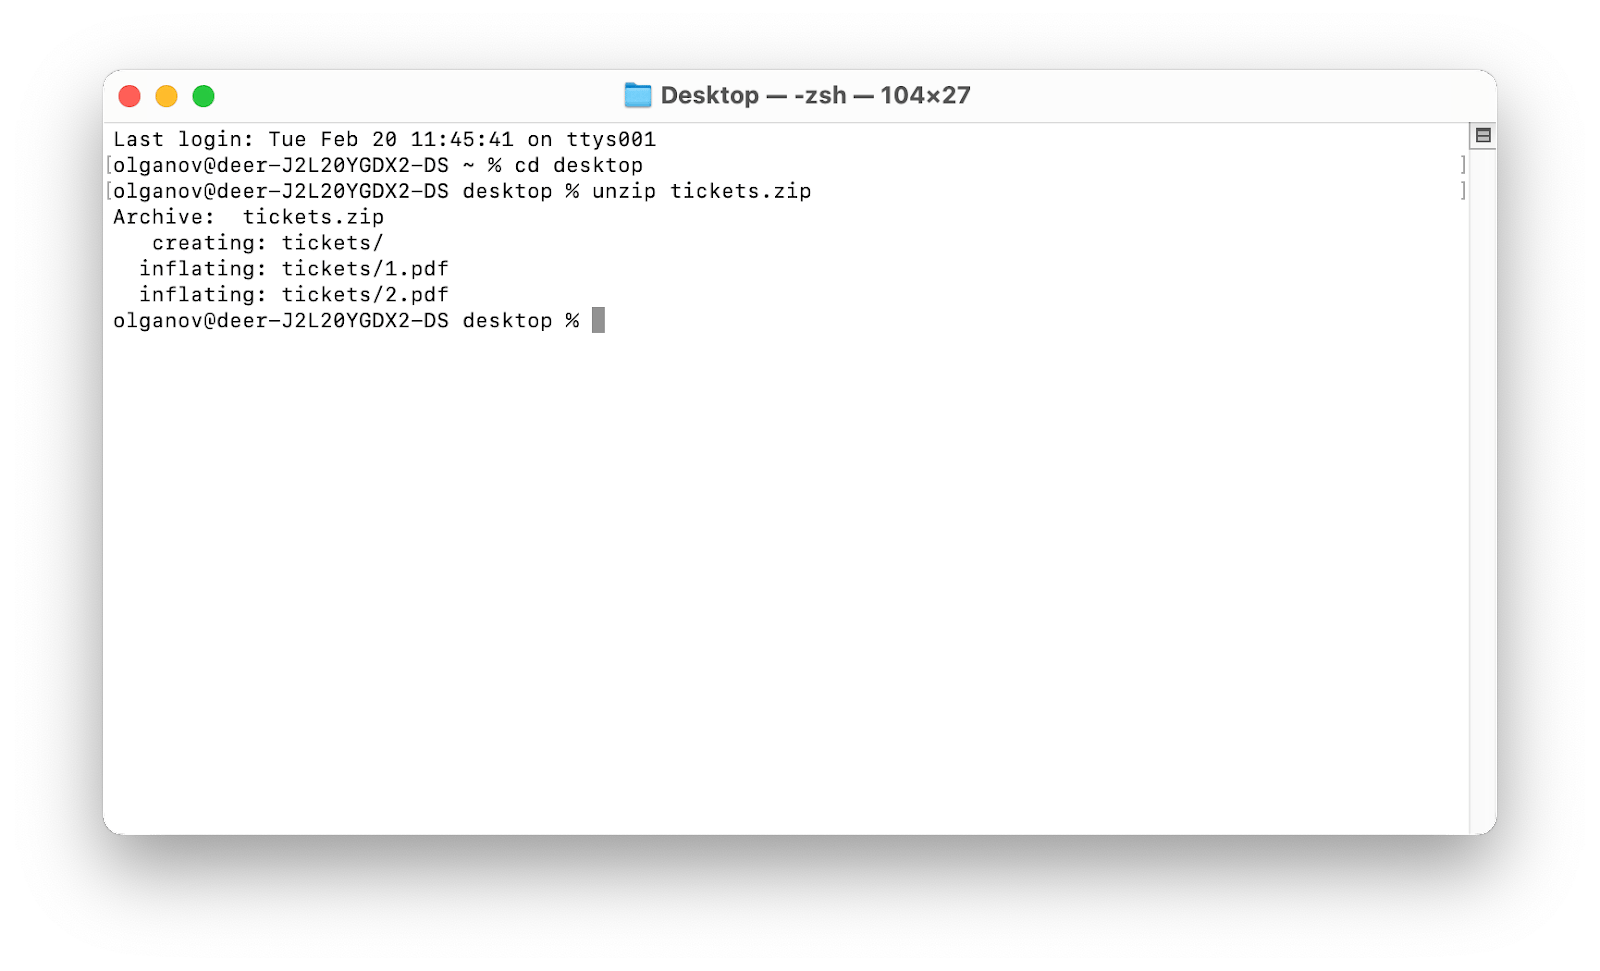
The disadvantage of the Mac's native tools is that opening them equals unpacking them. Once you open the archive, a folder containing the unzipped files is created on your Mac. You won't be able to preview or edit the files inside the ZIP.
If you want to manage the files inside the archive, extract individual files without unzipping them, etc., you'll need third-party apps. I recommend BetterZip to open encrypted ZIP files. Here's how it works:
- Open BetterZip on your MacBook.
- Drag and drop the zipped file you want to view or edit (or find it in the left menu in BetterZip).
- If you're viewing files, double-click the file in the compressed folder to view. If you are making edits, like changing the filename, make any edits you like.
- If edits were made, select "Save" at the top left of the BetterZip window to re-save the compressed file or folder.
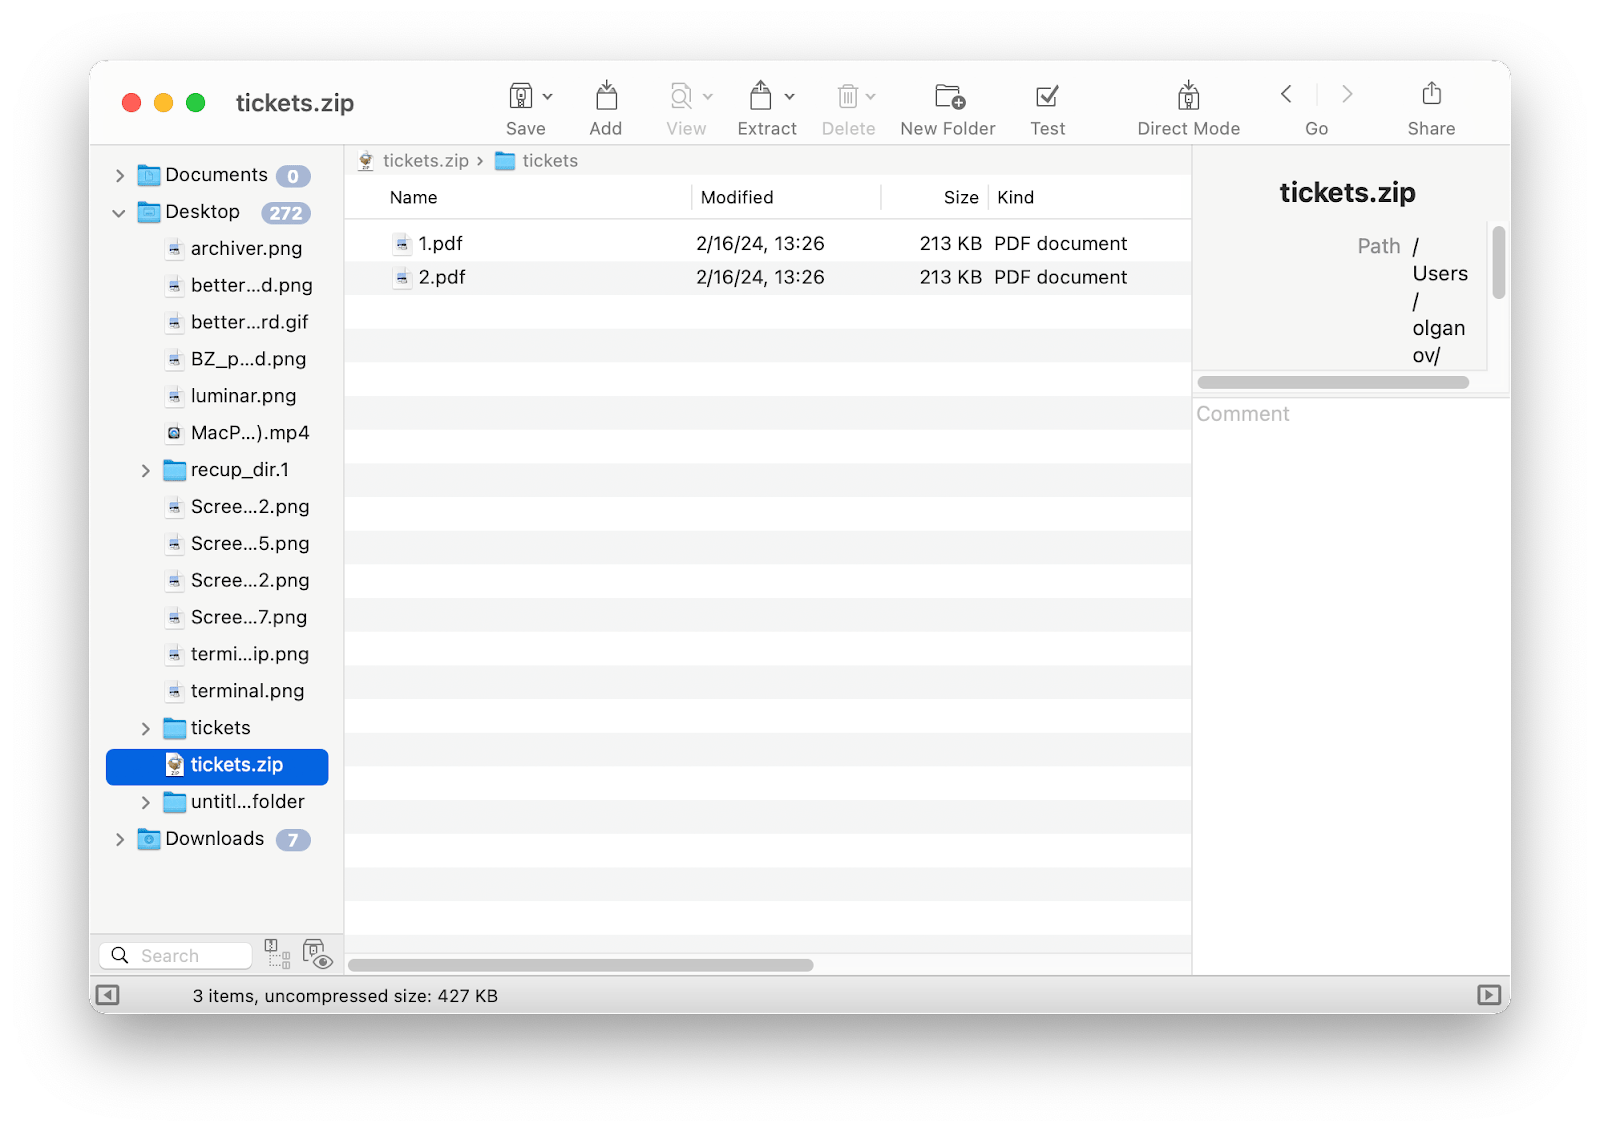
As long as you use BetterZip, you can perform many actions without breaking the compression.
If you suspect the archive is corrupted, you can check out how to recover or extract data from corrupted ZIP files on Mac.
Final thoughts: Best way to password-protect ZIP files on Mac
Knowing how to password-protect a zip file on Mac is one of those skills that will come in handy once in a while, and there are several methods you can use. Essentially, the right tool depends on your workflow and budget.
Terminal is free, but it’s not user-friendly and isn’t suitable for multiple files. Archiver is a better option, especially if you are looking for ease of use. BetterZip then takes the functionality further as you can create presets for quickly compressing and password-protecting your files. And if you want a more advanced Finder alternative that can view and extract all types of archives, there’s Commander One.
All these apps are available under Setapp, a single subscription that’s a gateway to 250+ Mac apps. It offers a 7-day free trial, so you can try out the above apps at no cost!
FAQ
How do I password-protect a ZIP folder?
Why won't my protected ZIP file open?
If your password-protected ZIP file won't open, it might be due to an incorrect password, unsupported encryption by the Archive Utility on Mac, a corrupted ZIP file, outdated or incompatible unzipping software, or insufficient file permissions. Try using a different app like BetterZip or Archiver, check for software updates, or ensure you have the correct file permissions.


