Check permissions: In Finder, select the drive > Command + I > Sharing & Permissions > click the lock > enter password > set to Read & Write.
If the drive is NTFS-formatted: Use iBoysoft NTFS for Mac — connect the drive, mount it in the app, and get full read/write access without reformatting.
Run First Aid for formatting errors: Applications > Utilities > Disk Utility > select the drive > First Aid > Run.
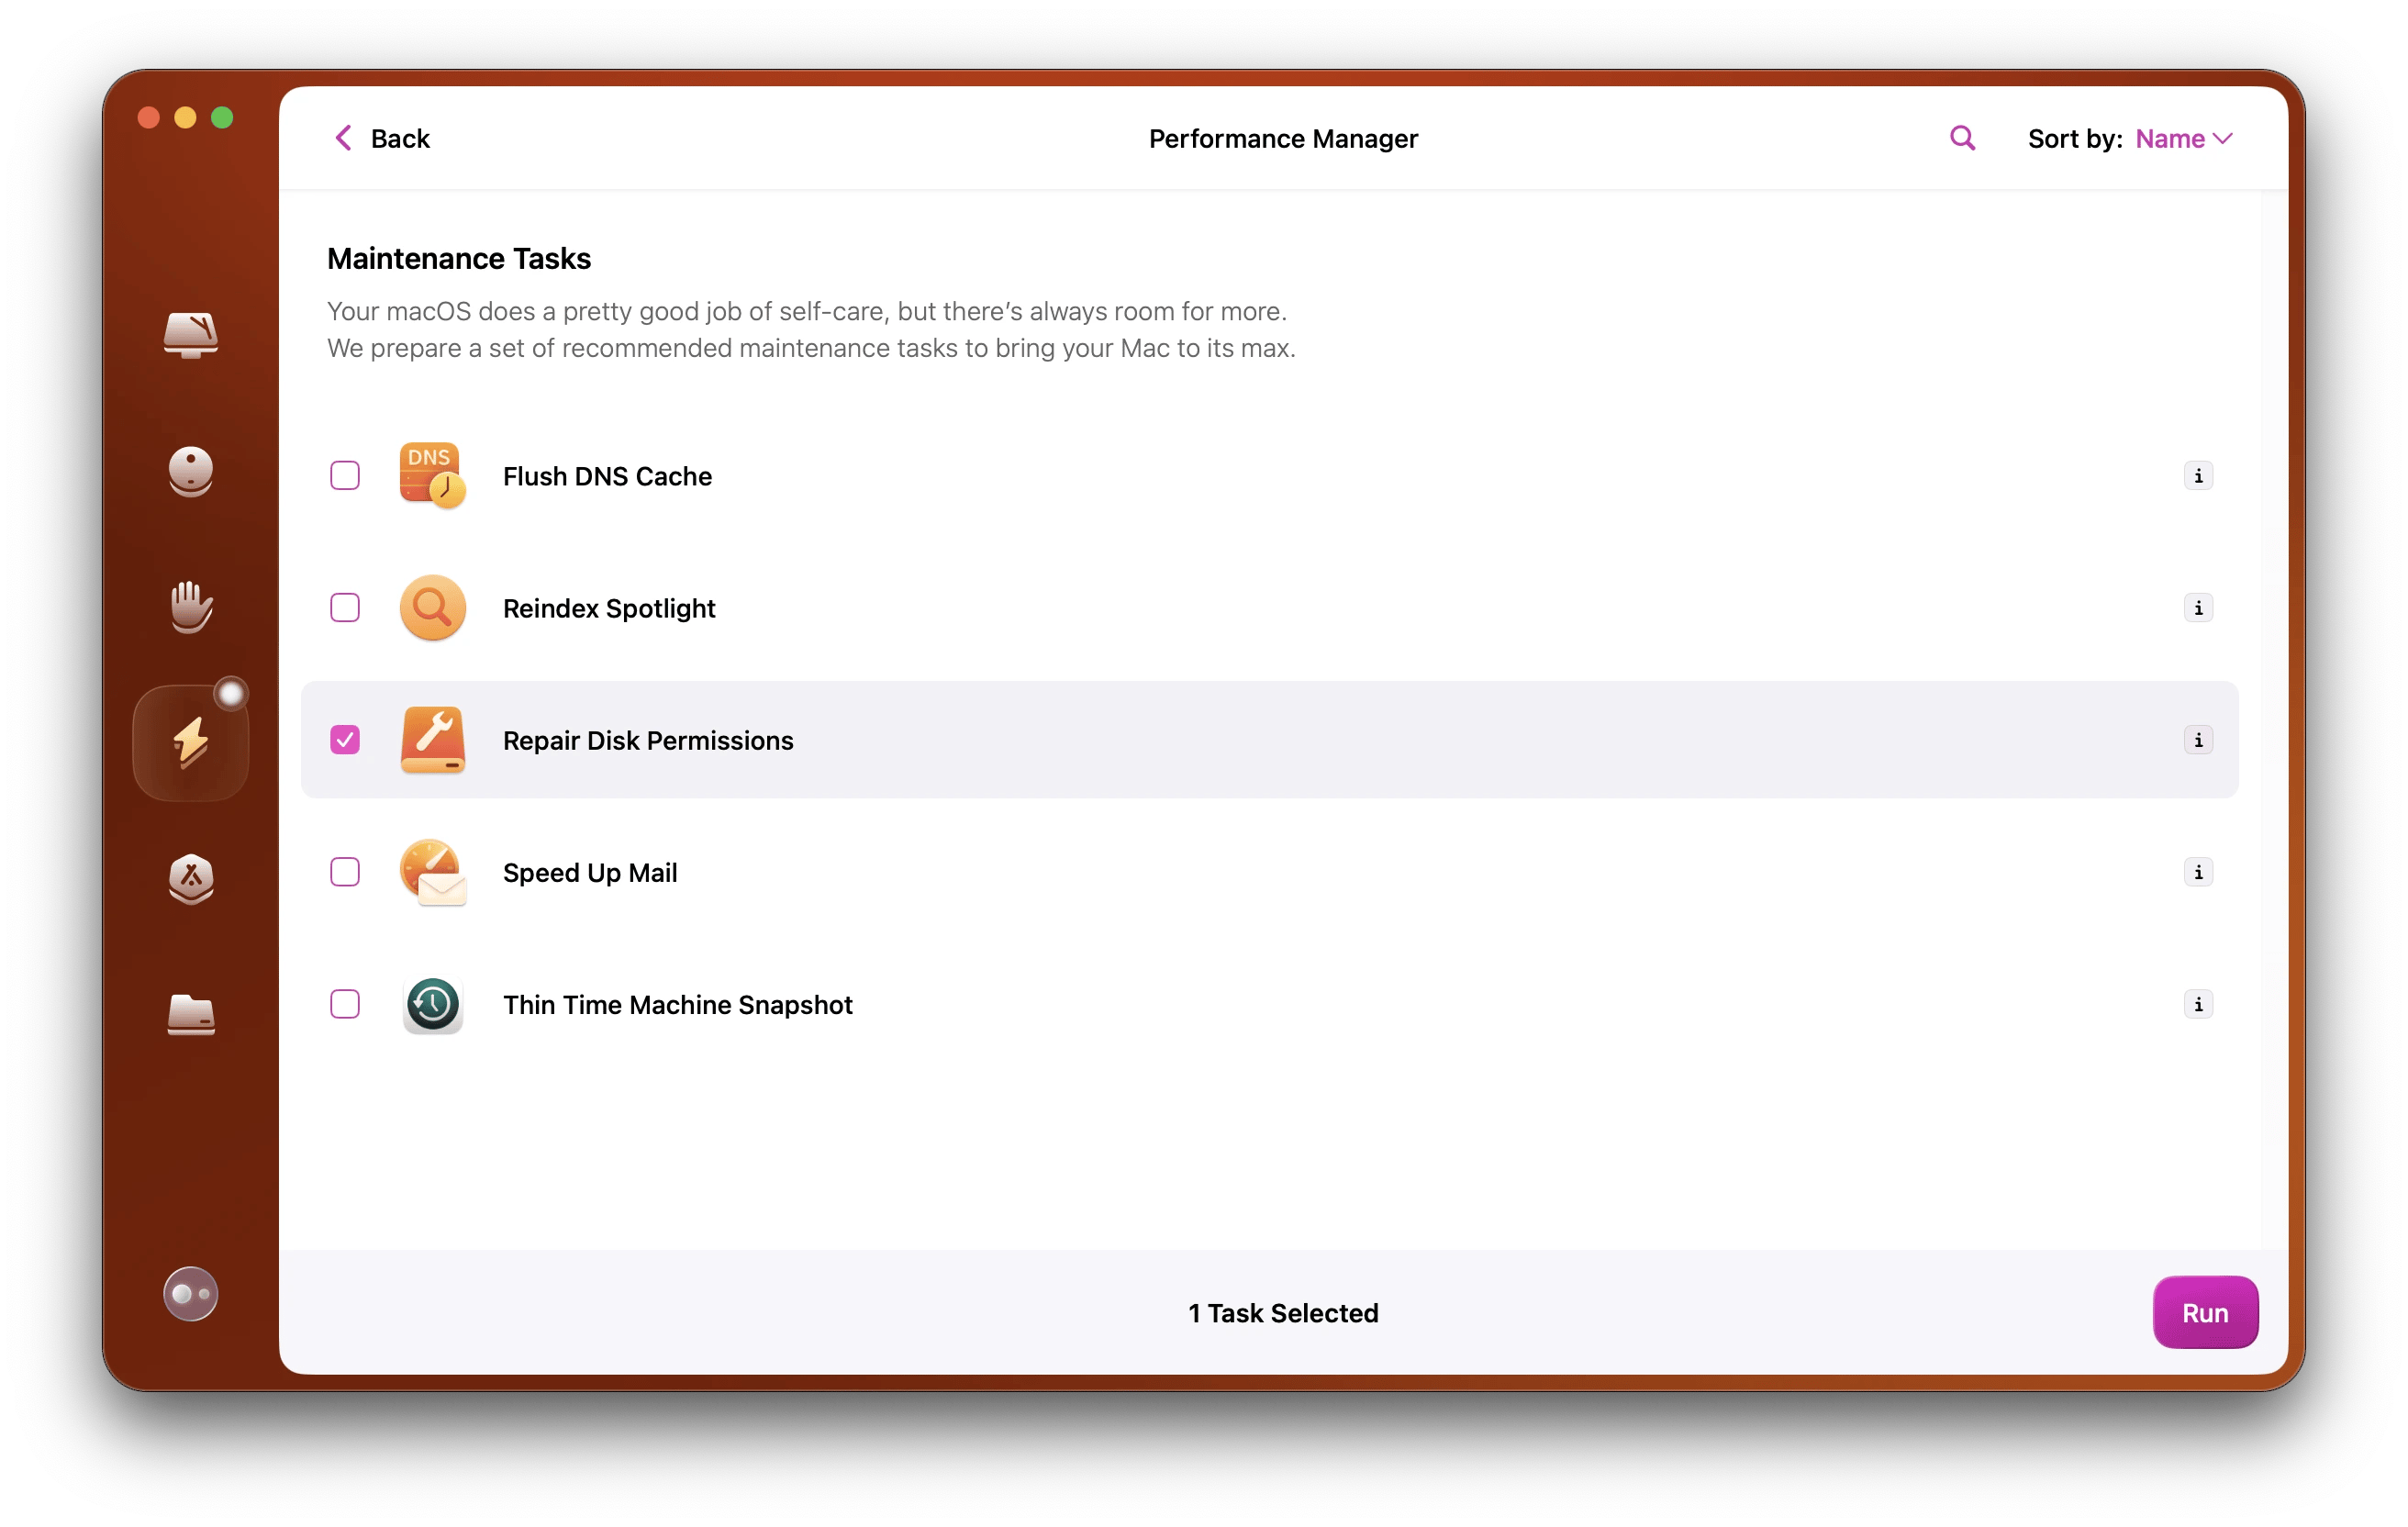
Repair disk permissions: Use CleanMyMac > Performance > Maintenance Tasks > Repair Disk Permissions.
We use external hard drives, SSDs, and USB sticks to store and backup valuable files, or just transfer data. Sometimes, we may find that the disk we are trying to work with shows up as read-only. What does that mean exactly?
Read-only permission means you can open and view the files from the disk, and even copy them to your Mac. What you can’t do, however, is adding or deleting files to and from your storage drive. For that you need a Read & Write permission.
Depending on what causes the problem, there are several ways to fix disk read-only situations and unlock a hard drive. Read on to find out whether you need to be looking to set up access permissions, format read-only drive, or repair drive errors.
Connect external hard drive to Mac > Click on the drive and press Command + I > Click on the arrow next to Sharing & Permissions.
Fix disk read-only issue without reformatting
Install and open iBoysoft NTFS for Mac > Connect external NTFS drive to Mac > Manage your files.
Check whether Mac internal hard drive is read-only
Click on the file > Press Command + I > Sharing & Permissions
Fix internal hard drive permission problems
Go to Utilities > Disk Utility > Choose the hard drive to repair > Select First Aid > Run.
Write to a locked drive using Terminal commands
Open Terminal > Type: nano /etc/fstabAdd line: LABEL=DRIVENAME none ntfs rw,auto,nobrowse. Press Control + O to save, then Control + X to exit. In Finder: Go > Go to Folder > Enter /Volumes > Go > Find your drive in the list.
Recover files from a read-only drive before fixing (using iBoysoft Data Recovery)
Most fixes involve formatting your drive to reset the file system, which is why it’s smart to make sure your data is safe first. Usually, this just means backing up the disk. But if you run into trouble, you can use a tool like iBoysoft Data Recovery.
iBoysoft Data Recovery is one of the lifesaver apps I like having around, as it comes in handy in emergency cases. The tool can pull data from read-only external drives, unbootable Macs, and encrypted APFS drives. It also works with all Apple Silicon and Intel Macs, including those that have the Apple T2 security chip.
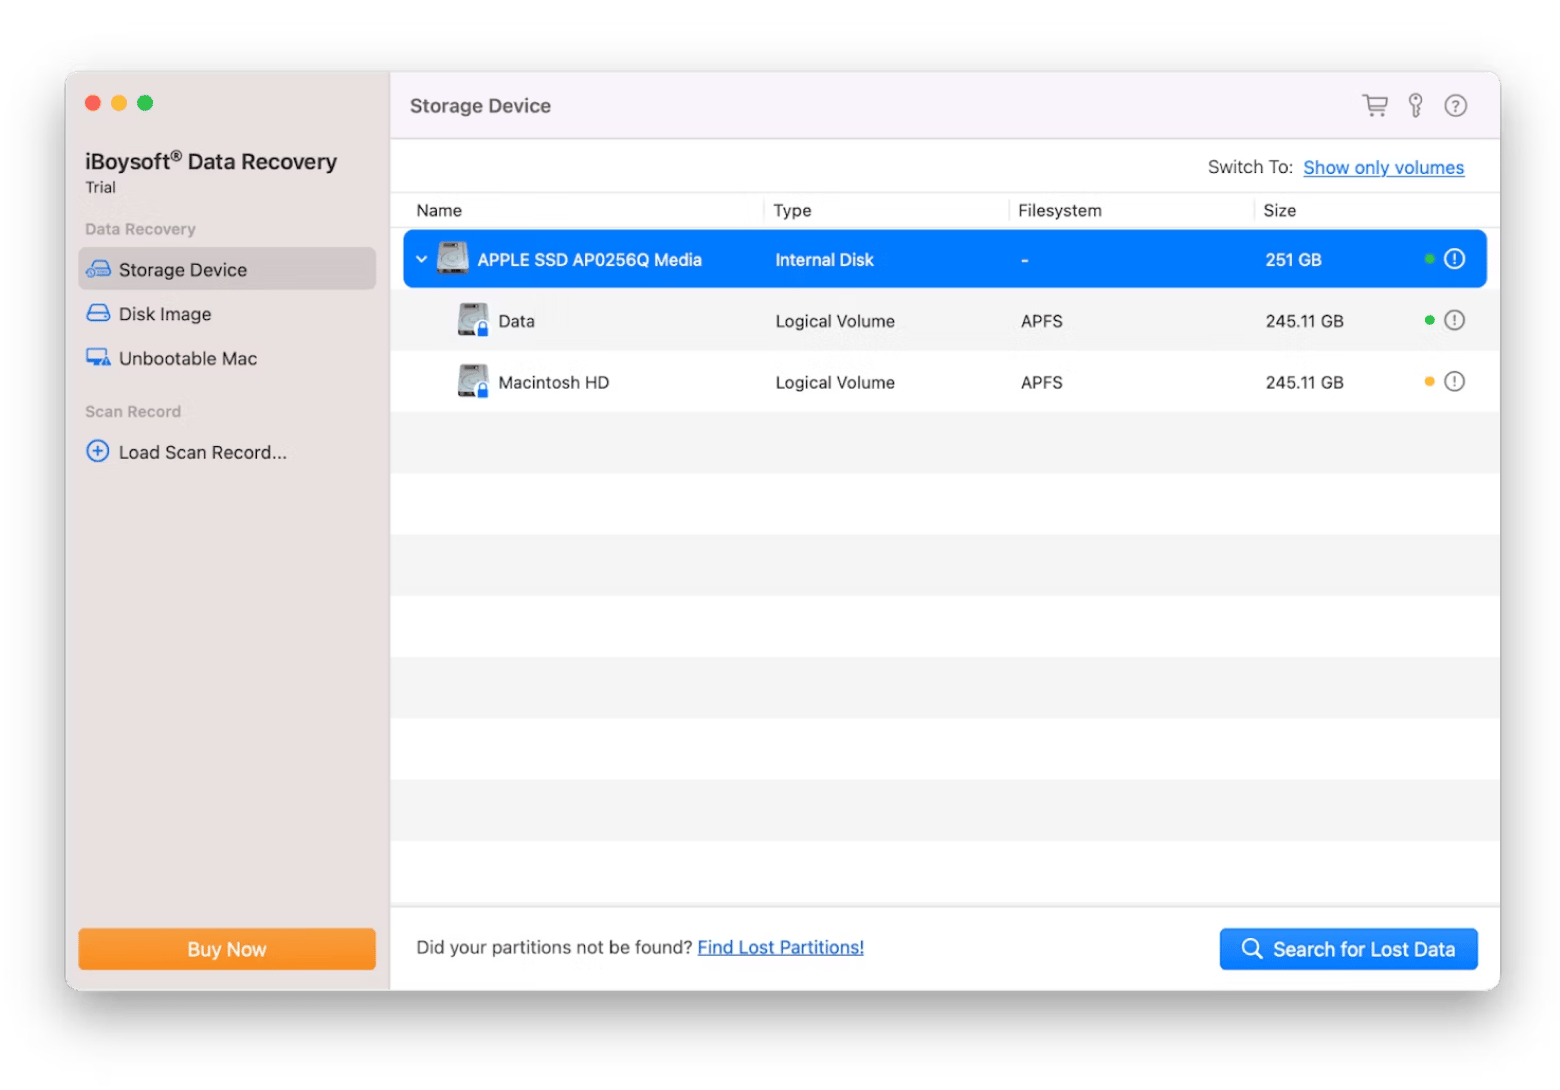
Here's how to restore files using iBoysoft Data Recovery:
Install and open iBoysoft Data Recovery.
Choose the read-only disk drive.
Click Search for Lost Data.
Preview files and click Recover.
Choose the destination and click Select.
How to change hard drive read-only permissions on Mac
When an external hard drive shows up as read-only, you can retrieve and work with the files from it, but you can’t continue to use the disk as storage and data transfer device effectively, since you can’t modify anything on it.
To understand what needs to be done to unlock a hard drive, let’s first have a look at the most common reasons external disks may become read-only:
Permission settings. Settings under Sharing & Permissions on your drive may prevent your Mac or your user account from accessing files on the disk. This happens if you use your device on another computer with a different OS, or access restrictions were added intentionally to protect the data.
NTFS format. NTFS is a proprietary file system developed for Windows and incompatible with Mac. It will allow you to read the files on the hard drive, but not make any changes to it.
Formatting errors. If you see a warning about read-only mode while connecting your external drive to Mac, this means the storage device itself has formatting errors which prevent you from writing files to it.
As you can see, read-only problems may have different origins and require different strategies to solve them. The good news is that there’s a solution for each of the above scenarios. Let’s start with access settings on your drive.
How to check and change external hard drive permissions
Permissions is a security feature that can be set for a file, folder, or entire hard drive to configure access privileges for certain users or user groups. You can easily check the current permissions on your disk. Follow these steps to find out what they are:
Connect the external hard drive to your Mac
Click on the drive icon and press Command + I to display the Info window
Click on the arrow next to Sharing & Permissions at the bottom of the window to see current permission settings
If you want to change a read only hard drive to read and write, make sure you have your Mac administrator password to be able to authorize the change. Otherwise, it’s fairly easy to set up access permissions. Follow these steps to remove read-only:
Click on the golden padlock icon at the bottom right of the Info window to unlock it ➙ enter password ➙ OK
Click on the drop-down menu by the Privilege next to your username ➙ choose Read & Write
Close the Info window
As straightforward as this fix to read-only issue is, it would only work if the problem causing it is indeed hard drive permission settings. So if this method doesn’t unlock a hard drive for you, check the disk format to make sure it’s not NTFS. For this, simply click on the arrow by General to expand this section of the disk Info window.
Since macOS isn't compatible with how NTFS writes data, by definition, it will only let you read the files from the NTFS drive. The most obvious option that comes to mind is to change the drive formatting to a file system supported by macOS. The problem with this solution is that reformatting the disk will erase all its data. So only choose to format read-only drive if:
You’re willing to take the time and create a backup copy of your files on the drive
You’re sure that in the future you’ll only use this hard drive for Mac
Luckily, there are apps that allow you to write to NTFS volumes on Mac. So if you want to fix disk read-only problems without reformatting, definitely look into iBoysoft NTFS.
iBoysoft NTFS comes with a full read/write support for NTFS drives. This saves you from the need to erase and reformat your NTFS storage drives every time you want to use them on Mac. And also helps you interact with Windows users to read, write, copy, delete, and transfer files across devices.
Once you connect your external NTFS drive to Mac, you can manage your files, check for disk errors, view details, as well as format a drive to NTFS or vice versa.
How to check whether Mac internal hard drive is read-only
Permissions can be applied to hard drives as well as to separate files and folders. This way you can determine who can view and alter files on your Mac. If, for some reason, you find yourself with files and folders showing as read-only, be sure to check permissions on them. Otherwise, you won’t be able to make any changes to their content.
Checking permission settings on Mac is easy:
Click on the file or folder you want to check and press Command + I to display the Info window
Click on the arrow next to Sharing & Permissions at the bottom of the window to check and set up access permissions
As long as you have administrator’s rights and password for your Mac, you should be all set.
Now, it’s a little bit different when it comes to internal hard drive permissions on your Mac. Starting with macOS Catalina or later, your Mac’s internal drive contains a read-only system volume, separate from other files for security reasons. There’s also a second “writable” volume with the data you have access to named Macintosh HD-Data.
Both volumes appear as a single Macintosh HD icon on your Desktop, so the Info window will show seemingly conflicting status on permissions: you appear to have Read & Write privileges as system administrator, and yet you see “You can only read” under Sharing & Permissions.
How to fix internal hard drive permission problems on Mac
Since every file and folder on your Mac carries a set of permissions, as those get corrupted over time (due to installing and uninstalling apps, using shared folders, copying files from external volumes, etc.), the whole system may experience problems.
So no wonder that repairing permissions is considered a standard troubleshooting practice, capable of solving many types of system problems on Mac. You can try using Mac’s own Disk Utility to repair read-only problems with disks, folders, or files. To try this method:
Open Utilities from the Applications folder ➙ Disk Utility
Choose the hard drive you want to repair from the left-side panel
Click on the First Aid icon from the top menu ➙ Run
If you understand how critical permissions are for the system performance, you can also try a more powerful specialized CleanMyMac to verify and repair broken permissions.
Get into the habit of launching CleanMyMac whenever you run into issues with apps or files, as well as for regular system scans. To start the repair:
How to write to a locked drive using Terminal commands
If you’ve been unsuccessful in your attempts to unlock a hard drive with other methods, you may choose to try using Terminal. It will allow you to write to a NTFS formatted hard drive on your Mac. Be advised, though, that this should be treated as a one-off solution, since the NTFS support in macOS is experimental and, therefore, isn’t very reliable.
Be sure to follow these steps exactly to avoid any accidental mistakes:
Launch Terminal from Utilities in Finder
Type in nano /etc/fstab
Replace DRIVENAME in LABEL=DRIVENAME none ntfs rw,auto,nobrowse with the actual name of your external hard drive and type the resulting command in the Terminal window
Press Control + O to save the file
Press Control + X to exit
Disconnect and reconnect your external hard drive
After that your drive will be available in /Volumes. To get there:
Choose Go in Finder ➙ Go to Folder
Enter /Volumes ➙ Go
Find you drive in the list
After you remove read-only with the NTFS Terminal command, you’ll be able to copy files to your locked external hard drive.
How to prevent hard drive read-only errors
As you can see, there are a number of ways you can try to fix disk read-only on Mac. But, as always, it’s better to avoid a problem than to invest considerable effort trying to get rid of it. Here’s a couple of tips on what you can do to prevent read-only errors on Mac:
Use external hard drives in formats supported by macOS
Run regular check-ups to diagnose and repair broken disk permissions
If you’re using someone else’s hard drive, make sure to ask them to set up read and write permissions for you
Don’t let read-only stop you from making the edits you need
To change a read only hard drive to read and write may take some time, but it’s worth the effort once you know how to fix the problem. You can try to fix disk read-only by changing permission settings, overriding NTFS restrictions with iBoysoft NTFS for Mac, repairing drive errors with the power of CleanMyMac or recovering corrupted files with iBoysoft Data Recovery.
Select the file or folder and press Command + I to open the Info window. Click the lock icon at the bottom and enter your password. In the Sharing & Permissions section, choose Read & Write from the dropdown menu next to your user account.
How do I turn off read-only on my Mac hard drive?
To turn off read-only on your Mac hard drive, open Finder and choose your hard drive. Then, press Command + I to open the Info window. Click the lock icon and enter your password. In the Sharing & Permissions section, set your user account to Read & Write, and finally, close the Info window.
How do I fix a removable disk read only?
To fix a read-only removable disk, connect it to your Mac, choose the disk in Finder, and press Command + I to open the Info window. Click the lock icon, enter your password, and set your user account to Read & Write in the Sharing & Permissions section. If the option is grayed out, check for a physical write protection switch on the disk.
How do I remove read-only from USB on Mac?
To remove read-only from a USB on Mac, connect the USB drive, select it in Finder, and press Command + I to open the Info window. Click the lock icon, enter your password, and set your user account to Read & Write in the Sharing & Permissions section. Check for a physical write protection switch on the USB drive if it's grayed out.
Why is my external hard drive read-only on Mac but works fine on Windows?
If your external hard drive is read-only on Mac but works fine on Windows, it's probably formatted with NTFS. This is a Windows-only file system, so it's not fully supported on macOS. If you want the disk to work on both platforms, you need to reformat it to exFAT. To prevent losing any data when formatting a drive, use iBoysoft NTFS for Mac. The tool gives you NTFS read and write permissions on macOS, and it doesn't risk your data in any way.
Can I fix a read-only drive on a Mac without losing data?
Whether you can fix a read-only drive on a Mac without losing data depends on what's causing the issue. If it's simple file permissions, you can easily change them using Finder. If the cause is more technical, you can use Disk Utility to run First Aid or repair the disk's file permissions with an app like CleanMyMac. If the drive is formatted as NTFS, it'll be read-only on Mac, but you can use iBoysoft NTFS for Mac to get write permissions without losing any data.
How do I know if my drive is physically write-protected?
To check if your drive is physically write-protected, look for a small slider on the side. Some SD cards and external drives include this switch to lock file permissions. You may also see it labeled as "lock." If there's no switch, the issue is most likely software-related, so check the disk permissions or file format.
What file system format should I use to avoid read-only issues on Mac?
The right file format you should use to avoid read-only issues on Mac depends on where you'll use the disk. If you'll only use it on Macs, APFS is the best standard. If you'll need to use the disk on both Mac and Windows devices, exFAT is the most compatible option. Avoid using NTFS for drives you frequently connect to a Mac, although you can still use iBoysoft NTFS for Mac to get NTFS write permissions.
What's the difference between iBoysoft NTFS for Mac on Setapp vs. buying directly?
The pricing model. With a Setapp Membership, you pay a fixed monthly or annual fee for access to iBoysoft NTFS for Mac, along with 260+ other apps. All updates are included as long as your membership is active. On the developer's website, iBoysoft NTFS for Mac is available as a separate purchase, either as an annual subscription or a lifetime license.
Value. The annual subscription for iBoysoft NTFS for Mac costs less than a Setapp Membership for the same period, so if this is the only app you need, buying directly from the developer may be the more cost-effective option. However, if you use even a few other paid apps from the Setapp Membership catalog, such as iStat Menus, Paste, CleanMyMac, Bartender, and others, Setapp Membership typically provides much better overall value.
Is iBoysoft NTFS for Mac on Setapp safe?
Absolutely. Before iBoysoft NTFS for Mac was added to the Setapp catalog, it was reviewed by the Setapp team to verify that it is safe, functional, and meets Setapp's quality standards.