Your Mac's speakers are hiding what your mix really sounds like
Boom 3D boosts volume beyond Mac's built-in limits and lets you fine-tune every frequency with an equalizer — so you hear your GarageBand tracks exactly as they are. Available on Setapp.
Macs are often praised for being especially good at helping you make music. Just look at what any DJs and production studios are using, and you’ll mainly see MacBooks and iMacs. So if you’ve just bought a Mac to create the music you’ve always dreamed about, good choice! But now, where do you start?
A better way is to start creating music gradually, covering all the foundations first before graduating to pro-level apps. That’s why apps like GarageBand exist to help you bridge the gap. And I’ll show you how to use GarageBand on Mac to become a pro.
Tip: Turn your GarageBand practice into real tracks with a full Mac music toolkit. Start today with 7 days of Setapp access and keep building with Boom 3D and n-Track Studio.
What is GarageBand for Mac?
GarageBand is a digital audio workstation, meaning it lets you record your own music with the possibility of using a library of GarageBand instruments, such as a GarageBand keyboard and a variety of other virtual keyboard pianos (even an online MIDI keyboard).
Alternatively, you can simply record your voice for a podcast or voiceover, and then edit it with all the necessary arrangement right within the app.
How to start a project in GarageBand
When you’re convinced that it’s not yet time to use any of the GarageBand alternatives, you’re ready to start on your learning path. To begin, let’s create your first project:
Open GarageBand from your Applications folder (or download from the App Store).
Let any sounds and add-ons download automatically if asked.
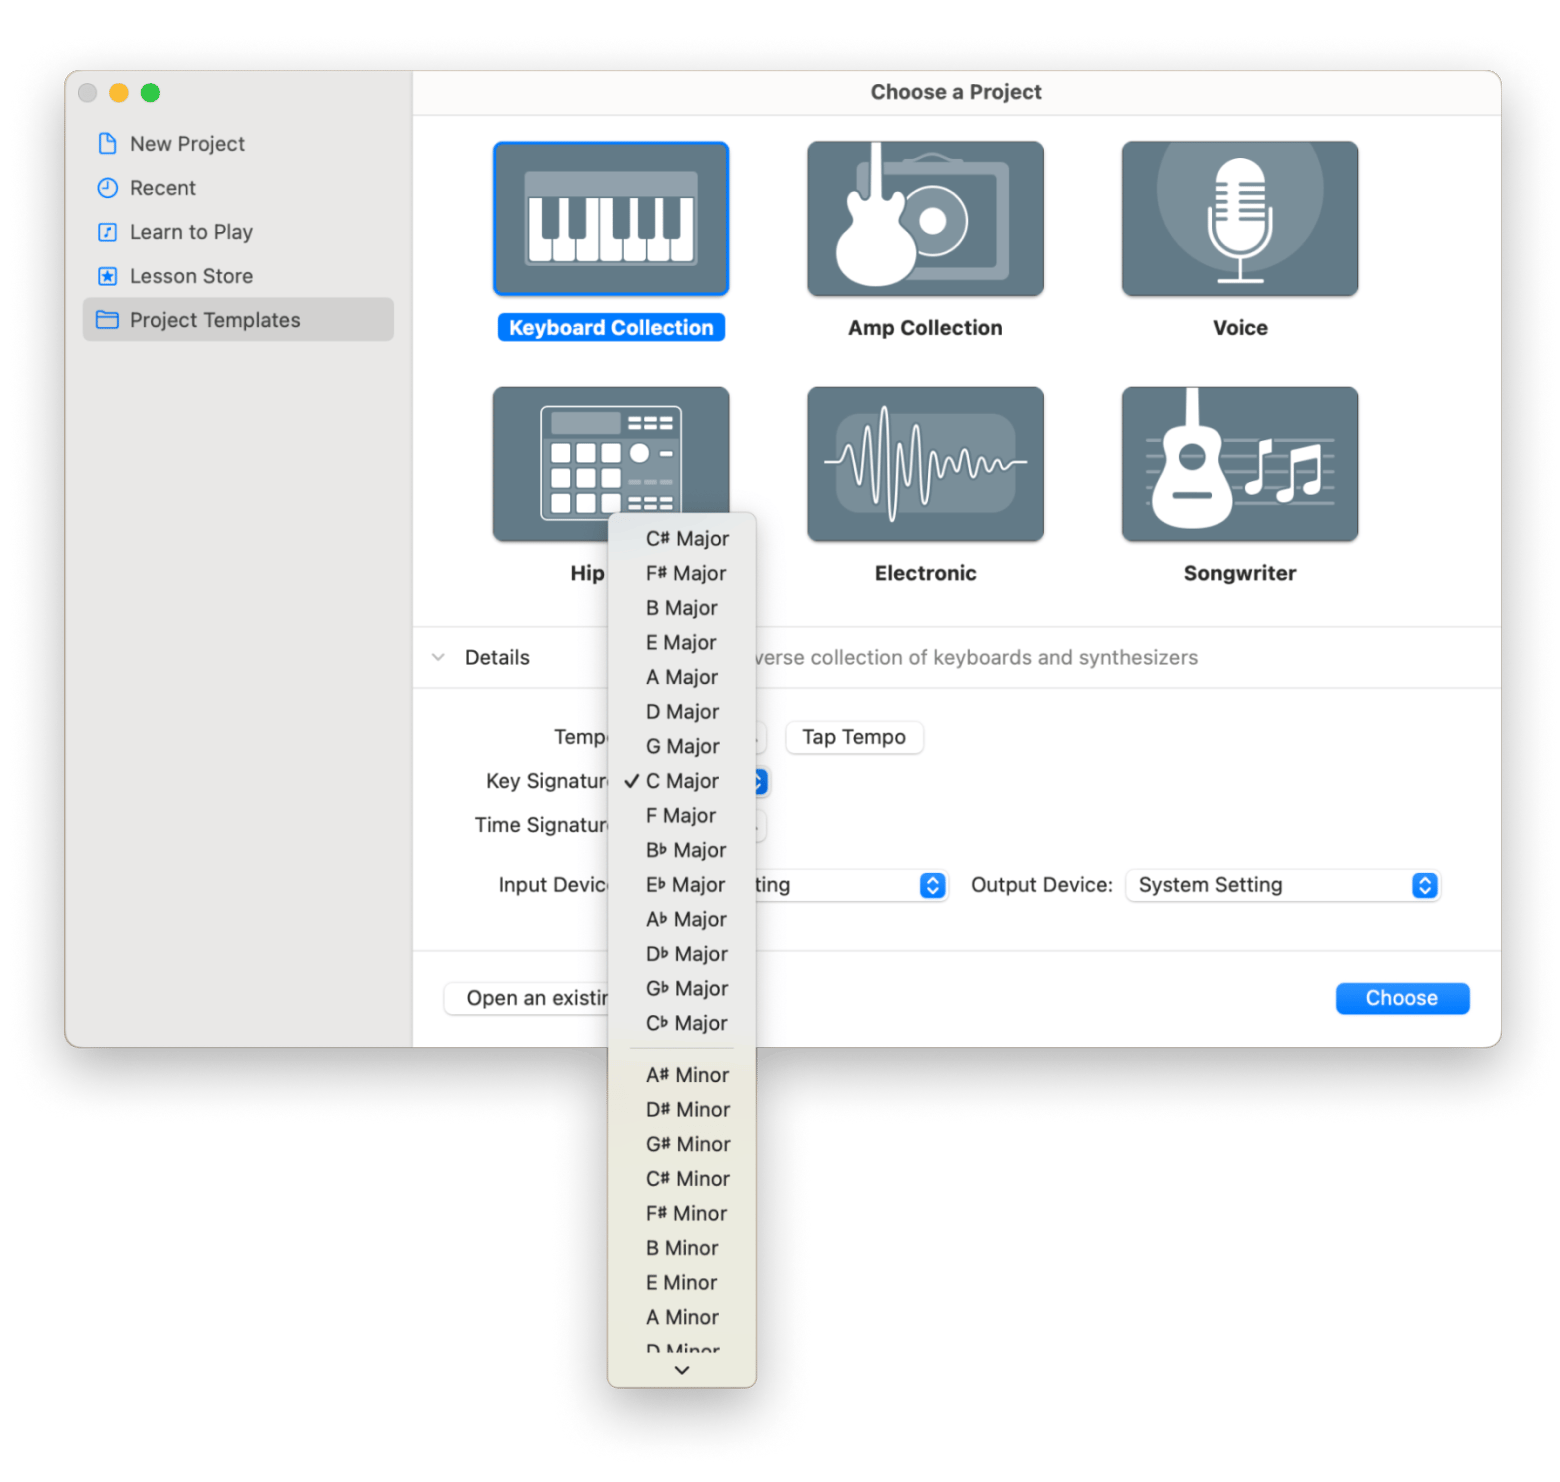
Click Project Templates > Choose one of the templates that resembles what you have in mind the most.
If you already know the tempo and key you want to play in, click Details to open additional options.
Click Choose when ready.
How to fine-tune your workspace
Once you get past the beginner sessions, you may want to tweak the finer details so that they actually work for you. Key among these are adjusting a track's speed, changing the pitch, and adding instruments.
I’ll show you how to do this in a moment, but if you come across a term you aren't familiar with, you can click Help in the menu bar of the app.. It will name and explain different workspace items when you move the pointer to them with your cursor.
Here's how to take control of the basics.
Adjusting the speed of a track
You can slow down a track to get a clear view of how the different items you've added are working together. Look at the top middle part of the app, and you'll see a number with the description TEMPO below it. This is the BPM (beats per minute), and you can move it up or down to change the speed of a track.
Double-click the Tempo number.
Edit the number to your desired BPM. You can also click on it and move the slider up or down.
Be keen to ensure that the tempo you choose actually works with the chosen loops or instrument tracks.
Change pitch
When you want to use a specific key or match the vocals you have, you can change the pitch on GarageBand. The option is right next to Tempo, so the process should be simple.
Click the Key Signature below Tempo. It's denoted in the format Cmin (C Minor) or Dmaj (D Major).
Scroll to the key you want and select it.
If the track is playing, you should hear the pitch switch in real time.
Add instruments
At some point, you'll need more than just a keyboard or a loop. When inspiration strikes, you can add any other instrument, whether software or hardware-based.
Here's how to do that:
Click the plus (+) button in the upper-left corner of the track area. Or press Option + Command + N.
Choose between these four:
MIDI – It gives you a wide variety of software instruments, from pianos to pipe organs.
Drummer – It inserts an automatic drummer that works with your track.
Mic or Line – Let's you record using a microphone or line input. You can also use it to drag and drop audio.
Guitar/Bass input – Allows you to connect a guitar or bass to your Mac and record a track.
Click Create.
If you add the wrong ones, delete them to keep your workspace tidy (right-click on a track > Delete Track).
Once you get the hang of them, you’ll be free to explore the limits of your creativity.
How to add Apple Loops
Another great reason to use GarageBand is its abundant library of Apple Loops, which will quickly teach you how to sample in GarageBand — an essential skill for any music maker.
To use Apple Loops:
Click View in the menu bar > Choose Show Loop Browser.
Filter the database by Instrument, Genre, or Descriptors.
Click on the loop to play in preview.
When you like the tune, drag it over to your main instruments panel.
To increase the loop’s length, just drag it to the right over how many bars you need.
How to record on GarageBand with instruments
While loops can carry you quite far, and you can even compose whole tracks with them, the dream of every musician is to create something original that has never existed before.
To record using GarageBand instruments:
Click Keyboard Collection in Project Templates..
Click Window in the menu bar > Choose Show Musical Typing, or press Command + K to open the online MIDI keyboard.
Click the record icon and use the keys on your Mac keyboard to play your music.
Click the record icon again to stop recording.
While virtual keyboard pianos are quite limited compared to the real ones, you can record real instruments with GarageBand as well:
Click the plus “+” icon to start a new instrument track.
Choose the option that allows you to connect a guitar or bass.
Connect your instrument to GarageBand.
Click the record icon and play as usual for complete control.
Click Record once again to stop.
The combination of Apple Loops, GarageBand instruments, and your own bass or guitar could easily result in thousands of unique tracks and compositions. Possibilities are endless!
When your creation is ready, you naturally want to save and share it with the world. To only save the GarageBand project itself and maybe work on it later:
Click File in the menu bar.
Choose Save As.
Name your project and choose the destination folder.
To export your track into a complete song, click Share in the menu bar > Export Song to Disk, where you’ll be able to choose the format as well as the quality of your audio.
Now you just need really good speakers to get all the complexity you’ve put into your song right.
How to get the best sound possible
What if you don’t have the budget to splurge on expensive audio gear? How do you maximize your Mac’s sound then? The answer is Boom 3D.
Boom 3D is a simple but mighty equalizer and volume booster for your Mac. With a simple slider, it lets you override your Mac’s internal volume limits and really get the maximum out of your speakers.
In addition, Boom 3D is a precise equalizer that allows you to adjust all the frequencies to the kind of song being played, which works both for your music collection and your own tracks too. Just select the closest preset from the dropdown and fine-tune as you see fit.
How to graduate beyond GarageBand tutorials
While you’re learning how to use GarageBand on Mac, it’ll seem like it’s never going to get boring. But with time you’ll get too comfortable and even hit the ceiling in terms of being able to execute on your creative vision. At that point, you might start looking for GarageBand alternatives. Your next best step — n-Track Studio.
n-Track Studio is a fully fledged music studio right in your Mac, while still in many ways as accessible as GarageBand. The professional mixer and sequencer allow you to DJ right within the app, and live input recorder makes it possible to record all the songs live during a concert or session. Finally, the app’s own massive library of effects will considerably extend what you thought was possible in creating new sounds.
How to use GarageBand on Mac: Final words
To sum up, finding out what is GarageBand really is an essential part of becoming a well-rounded musician. And using extra help provided by Boom 3D and n-Track Studio will only accelerate you in your goals.
You learned the steps, now create more often with better sound and pro controls. Setapp gives 7 days with Boom 3D, n-Track Studio, and 250+ vetted apps, risk-free 7-day trial. Get Setapp trial.
FAQ
Does GarageBand work on older Macs?
Yes, GarageBand works on older Macs. The only problem is that some older macOS versions may not be supported. If yours isn’t, you can use n-Track Studio as an alternative to record and edit music.
Is GarageBand still free on Mac?
GarageBand is still free on Mac. Apple doesn’t pre-install it anymore, but you can download it from the App Store for free.
Can I download GarageBand without the App Store?
You can’t download GarageBand without the App Store. Like any other Apple app, the official (and safe) version is only available via the store.
Why can't I install GarageBand?
There are several reasons why you can’t install GarageBand:
The current release doesn't support your macOS version.
You might be low on disk space (the app can take a few GBs).
There could be issues with your App Store account, such as an Apple ID conflict.
You can try updating your macOS, clearing junk with CleanMyMac, and signing out and back into your App Store.
Control sound with Boom 3D
Get a one-stop sound booster and equalizer for Mac.