How to back up iPhone contacts [With or without iCloud]
▼ Key takeaways:
- Back up iPhone contacts with or without iCloud: You can back up your contacts using iCloud, Finder, Gmail, or a dedicated app like AnyTrans for iOS. iCloud allows automatic syncing, while Finder or AnyTrans gives you more control over where your data is stored.
- The quickest way: AnyTrans for iOS: Install AnyTrans for iOS on your Mac, connect your iPhone, and go to Device Manager > More > Contacts > To Mac. This method lets you export only contacts and even schedule automatic wireless backups.
- Cloud backups: iCloud and Gmail: To back up all content, enable iCloud Backup in Settings > Apple Account > iCloud > iCloud Backup > Back Up This iPhone. For contacts only, toggle Contacts under Saved to iCloud. Alternatively, sync contacts to Gmail by adding your Google account in Settings > Mail > Accounts and enabling Contacts.
- Local backup using Finder: Connect your iPhone to your Mac, open Finder, select your device, and click Back Up Now. This saves your entire phone, including contacts, directly to your Mac’s storage.
- Recover missing contacts easily: If any contacts go missing during backup or transfer, use iBoysoft Data Recovery. It scans your iPhone or Mac backups to recover deleted or lost contacts in just a few clicks. Available on Setapp, along with AnyTrans and other tools to keep your iPhone data safe. Try with a 7-day free trial.
Although Apple recommends iCloud for backups, I’ve tried a few other excellent (and, in some cases, more convenient) methods to back up contacts over the years.
Let me share what I believe are the best ways to back up iPhone contacts and safely store not just people's names and numbers but also emails, workplace info, websites, and more.
5 ways to back up iPhone contacts: Quick review
To save you time, I’ve summed up all the solutions from this article in the quick table below. If you’re an advanced user, these instructions should be enough. For more detailed guidance, scroll down to find explanations of the same solutions in greater detail, along with a few personal tips.
My fav ways to back up iPhone contacts | Instructions |
Contact only — directly to Mac | Install AnyTrans for iOS on your Mac and connect your iPhone. Go to Device Manager > More > Contacts > To Mac. |
To iCloud (with all other content) | On your iPhone, go to Settings > Apple Account. Choose iCloud > Select iCloud Backup > Tap Back Up This iPhone. |
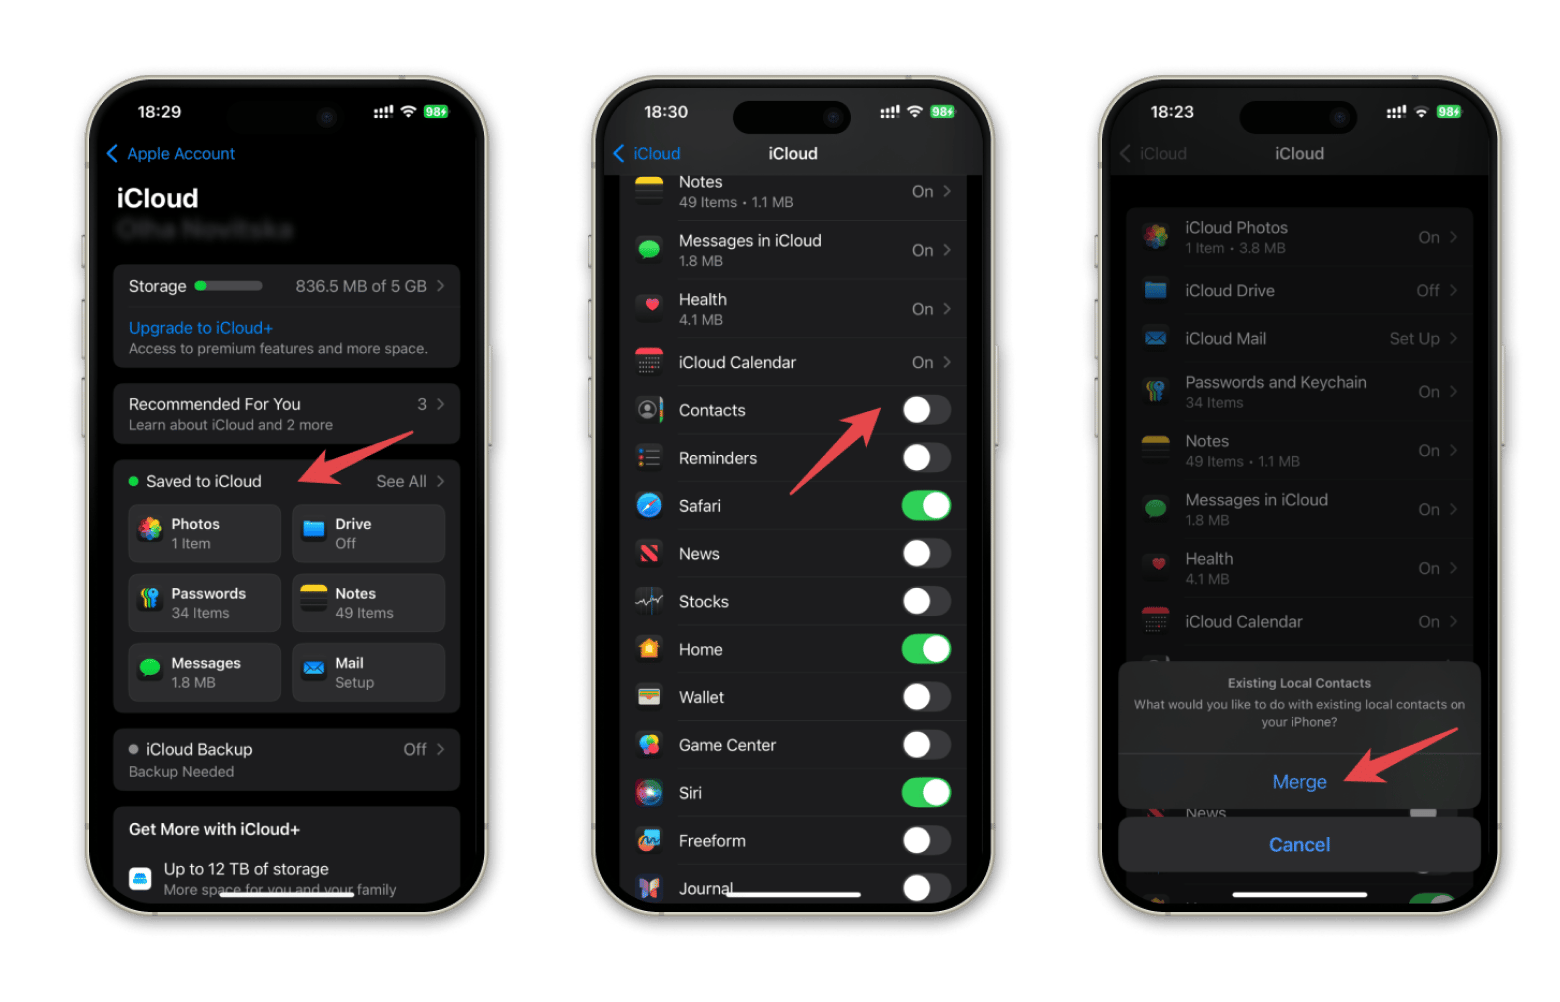
To iCloud (contacts only) | Go to Settings > Apple Account > iCloud > Saved to iCloud. Turn on Contacts and select Merge when prompted. |
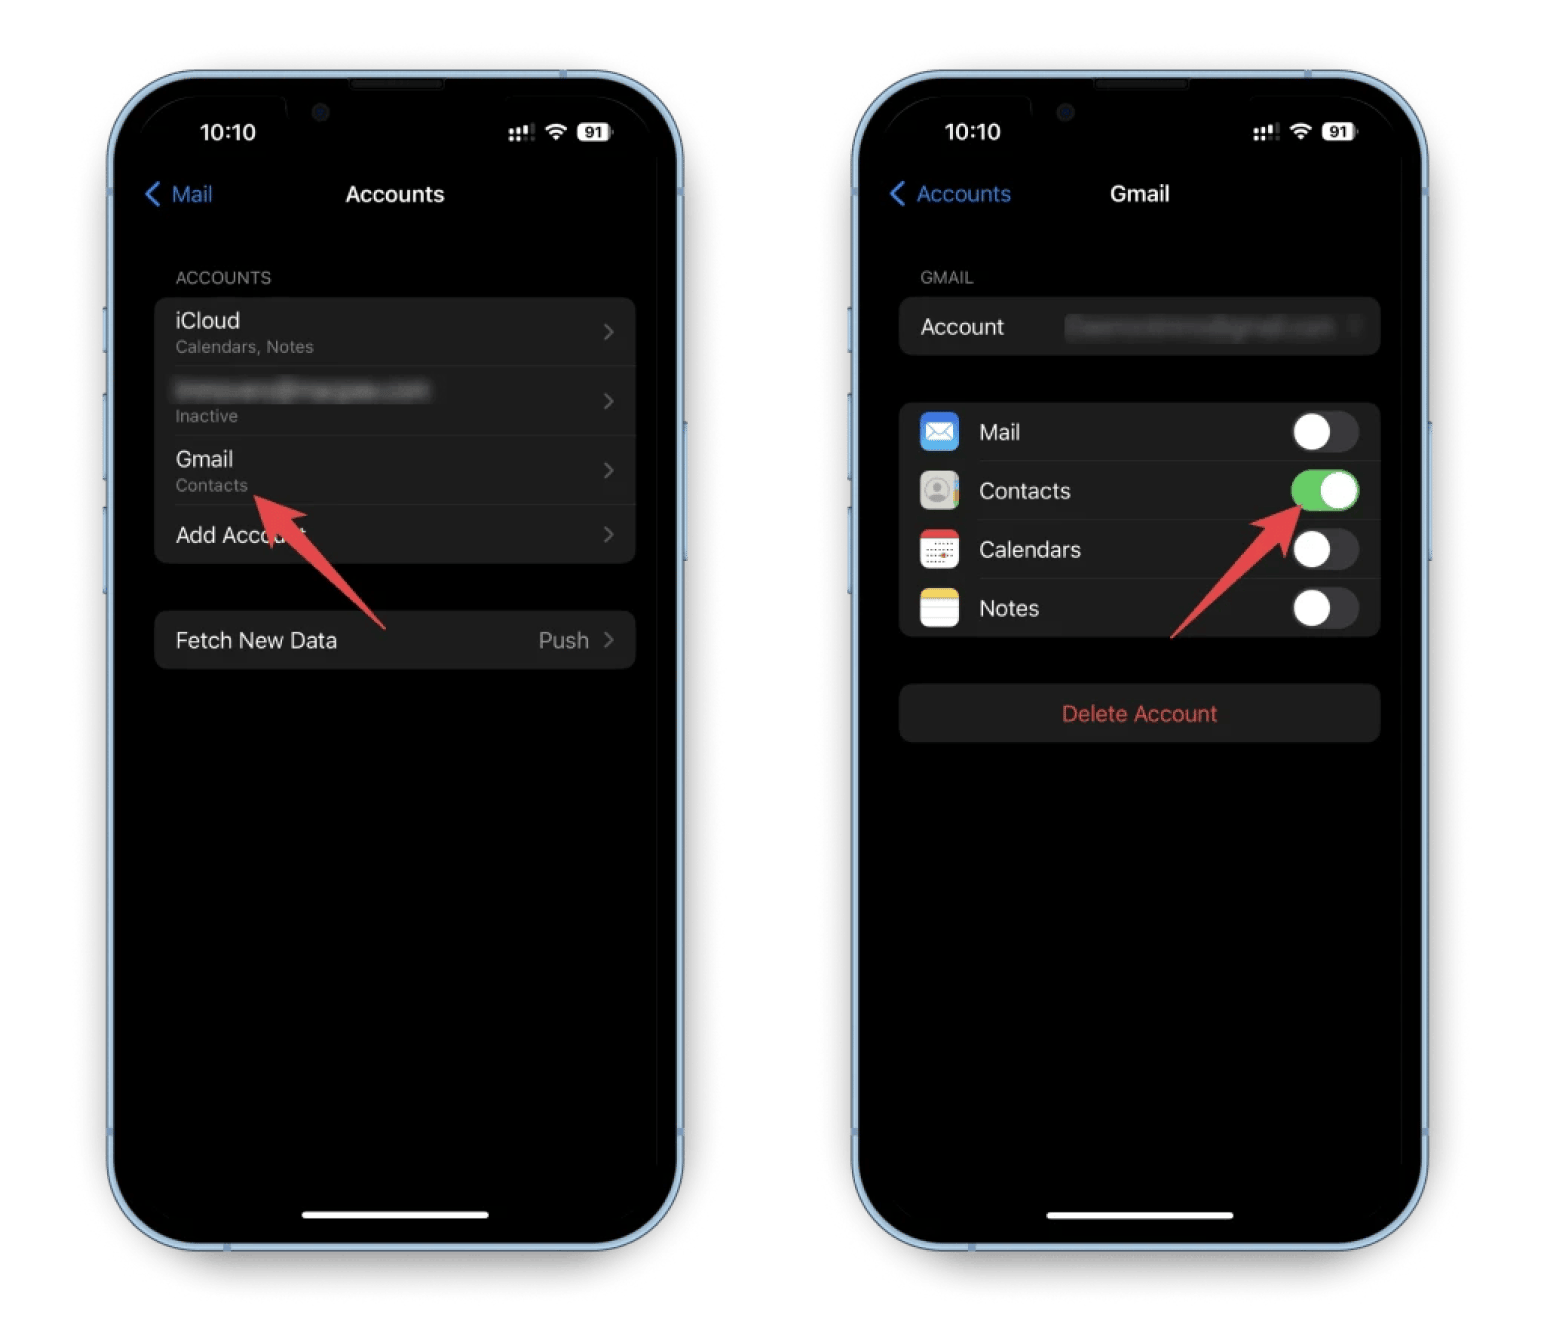
To Gmail | On your iPhone, go to Settings > Apps > Mail > Mail accounts. Tap Add Account or choose the existing one. Turn on Contacts. |
With Finder to Mac | Connect iPhone to Mac, open Finder, select your device, and click Back Up Now. |
Tip: iPhone contact backup corrupted | Use iBoysoft Data Recovery to restore missing contacts. |
Want to learn more troubleshooting tips? Check out the iPhone Help Assistant, a ChatGPT assistant that helps you find quick solutions. Just tell it what happened.
How to back up contacts on iPhone?
There are a few popular methods to back up your iPhone, for example, using standard apps like iCloud or Gmail. One advantage of cloud backups is that they can run automatically when your device is connected to Wi-Fi.
I know some people have privacy concerns about their contacts being stored on Apple or Google servers. If this is you, consider alternative backup methods that allow you to manage and transfer data between your Apple devices and other devices.
Learn also how to back up an iPhone to a Mac.
#1. Back up contacts on iPhone in seconds
If you prefer to keep your data on a hard drive, whether it’s an external drive, your Mac, or another device, I recommend AnyTrans for iOS. The app makes backing up your data quick and hassle-free.
Here's how to do it:
- Install and open AnyTrans for iOS.
- Connect your iPhone to your Mac.
- Go to Device Manager > Choose the More option.
- Scroll down the left panel screen and choose Contacts > Choose the contacts for backup > Click the To Mac button and set up the exporting format of the iPhone contacts.

Within seconds, your files will be transferred to your laptop.
An additional perk is the built-in Air Backup Manager, which lets you schedule regular wireless backups of your iPhone, eliminating worries about forgetting.
#2. Backup contacts using iCloud (+ all other content)
iCloud offers two ways to back up your iPhone: sync either all your content or just your contacts. To back up all content, make sure the phone is charged and connected to a Wi-Fi network. Then:
- Go to Settings on your iPhone > Apple Account.
- Tap iCloud > iCloud Backup > Turn it on.
- Tap Back Up This iPhone.

Within a few minutes, all your phone’s content and settings will be backed up to iCloud.
The issue with this method is that you'll probably need an iCloud+ subscription. You get 5GB for free, but that’s usually not enough when it comes to storing photos, videos, documents, and other large files.
To check the remaining free space in your storage, go to Settings > Apple Account > iCloud. Tap on Storage for a more detailed view of the apps and features using the most space. For tips on freeing up space, see this guide on how to clear iCloud storage space on Mac or iPhone.
#3. Sync contacts to iCloud
The previous method backed up your contacts along with all the other content on your phone. But if you only want to sync your contacts to iCloud, then:
- Go to Settings > Apple Account > iCloud > Saved to iCloud.
- Turn on Contacts.
- Tap Merge when a notification appears asking what to do: Merge or Cancel.

The convenience of iCloud is that your contacts will be synchronized across all devices linked to your Apple Account, including iPhone, iPad, MacBook, and more. If you change a contact on one device, the update will be reflected on all other devices.
#4. Back up iPhone contacts to Gmail
If you use a Google account, another great option is to back up your contacts to Gmail. They’ll be stored securely in the cloud, and you’ll get 15 GB of free storage.
Here's how:
- Go to Settings > Scroll down and tap Apps > Mail > Mail accounts.
- Tap Add Account.
- Choose Google and follow the on-screen instructions to sign in.
- Tap Save once verified.
- Turn on Contacts Sync, then tap Save again.

A Google account allows you to store up to 15 GB for free, which is three times more than iCloud. You can even disable iCloud synchronization and store all your contacts in Gmail.
To do that:
- Open Settings > Apps > Contacts.
- Tap Default Account.
- Choose Gmail.
All new contacts will now be stored in your Google account.
Read also:
- Back up an iPhone to iCloud
- Sign Out Of iCloud on Mac
- Fix iCloud Syncing Paused
- Delete Contacts on iPhone
#5. Back up iPhone contacts with Finder
If you’re wondering whether you can back up your contacts using a built-in tool, the answer is yes: with Finder.
The catch is that you can’t back up just your contacts. You’ll need to back up your entire iPhone. If you’re okay with that, here’s how:
- Open Finder.
- Connect your iPhone to your Mac with a USB cable. It should run macOS Catalina or later.
- Type your device passcode or tap Trust This Computer.
- Choose your device.
- Click Back Up Now.
That’s pretty much it. All the information on your phone, including your contacts, will be backed up.
In a nutshell: Best methods to back up iPhone contacts and never lose them
You can back up your iPhone contacts either to the cloud or to your device. Cloud options like iCloud and Gmail make it easy to sync automatically, while saving them to your Mac or an external drive with Finder gives you more control.
If you want more flexibility, try using AnyTrans for iOS to back up only what you need, or iBoysoft Data Recovery to bring back files that may have gone missing during a transfer. To clear out clutter before creating backups, use CleanMy®Phone.
All these apps are part of Setapp. It’s a single subscription that gives you access to over 260 great Mac and iPhone apps. There's also a 7-day free trial, so take advantage of it to see for yourself how much easier and more organized your digital life can be.
FAQ
How do I back up my contacts on an iPhone without using iCloud?
To back up contacts on an iPhone without iCloud, you can:
- Use Finder to create a full backup to your Mac.
- Sync contacts with your Gmail account (15 GB free storage).
- Use AnyTrans for iOS to back up only contacts and save space.
How can I recover my contacts on my iPhone without using iCloud?
You can get your contacts back on your iPhone without iCloud by restoring them from your Mac, as long as you’ve backed them up with Finder. Or, if they were synced to Gmail, turn on contact sync in your iPhone’s Mail settings to retrieve them.
How do I save my contacts to my iPhone instead of iCloud?
To save your contacts to your iPhone instead of iCloud, go to Settings > Apple Account > iCloud > See All (under Saved to iCloud) > Contacts, then turn on Sync this iPhone. From now on, new contacts will be saved locally on your iPhone instead of iCloud.
How do I back up my iPhone contacts only?
To back up your iPhone contacts only, use an app like AnyTrans for iOS. Here’s how:
- Connect your iPhone to your Mac.
- Open AnyTrans for iOS.
- Go to Device Manager > More > Contacts.
- Select the contacts you want to back up.
- Click To Mac to export and save them.
Can I recover iPhone contacts if I forgot to back them up?
Yes, you can recover iPhone contacts if you forgot to back them up by using data recovery software like iBoysoft Data Recovery. It scans your device for deleted or lost data and helps restore contacts that weren’t saved through iCloud, Gmail, or Finder.
Does iBoysoft work if iCloud backup is incomplete?
Yes, iBoysoft Data Recovery can still work when there’s an incomplete iCloud backup. It scans your device directly, allowing you to recover files and contacts even if your iCloud backup didn’t complete successfully.
Can iBoysoft recover data from encrypted Macs?
Yes, iBoysoft Data Recovery can recover data from encrypted Macs. It supports APFS, T2 chip, and Apple Silicon encryption, FileVault 2, and more, so you can safely recover data from protected drives.


