How to create link for image on a Mac to share online
Posting pictures on social networking sites like Instagram and Facebook is just as much fun as sharing them with friends and family via email or text. And while you can create a link for the image on Instagram and then simply share it with anyone, it may require a person who wants to see it to sign in to the app. On top of that, you might want to share your image not for fun but for business purposes. So, how to make an image a link? Don’t worry! It’s not as complicated as it may sound.
In this guide, I’ll show you how I make links for images and share the tools I use.
But first, let’s quickly overview the best 2025 solutions:
| I want to | What to do |
|---|---|
| Create a sharable image link privately | Use iCloud Shared Albums on Mac or iPhone. |
| Don’t want to use Apple services | Use Dropshare: Drag & drop to create instant, longer-lasting image links. |
| Upload images to blog platforms | Use MarsEdit to publish blog content with images offline and manage posts easily. |
| Share polished, attractive screenshots instead of raw screen captures | Use Xnapper for clean, styled screenshots with backgrounds and rounded corners. |
| Remove duplicates or junk images before sharing | Use Gemini (Mac) or CleanMy®Phone (iPhone/iPad) to detect and delete duplicates quickly. |
How to create a link for an image using iCloud on Mac
Most people automatically jump to posting on social media or an image-sharing site to share them online. But if you’re not looking to have all your followers or the world view your family photos from your cousin’s baby shower, you can simply use iCloud’s Shared Albums feature that has a free, built-in way to generate a link to your photos. And anyone can access the link, even without an iCloud account.
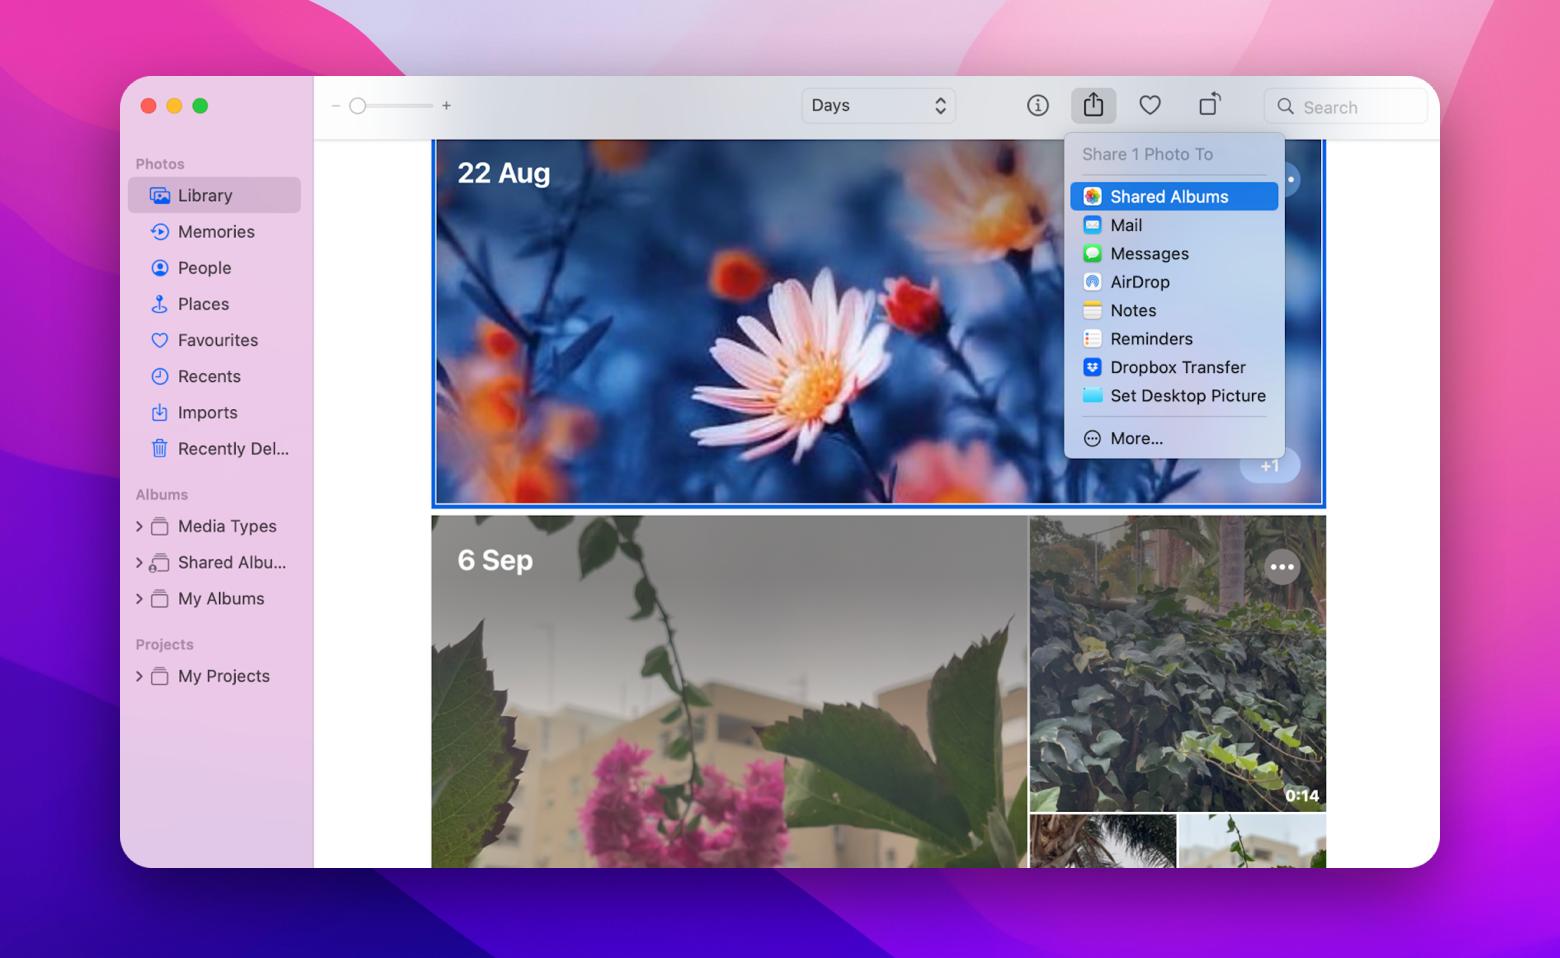
Here’s how to create a sharable link using iCloud and the Photos app on your Mac:
- Open the Photos app on your Mac
- Select a photo(s) you want to share
- Click the Share button in the top right corner and select Shared Albums
- Click the plus (+) button to add a new shared album and give it a name
5. Go to Shared Albums in the menu bar on the left
6. Open the album and click the People icon (next to the Share button)
7. Select Public Website to get a link to your album. You can add a single image or more.
8. Copy the link and send it wherever you want.
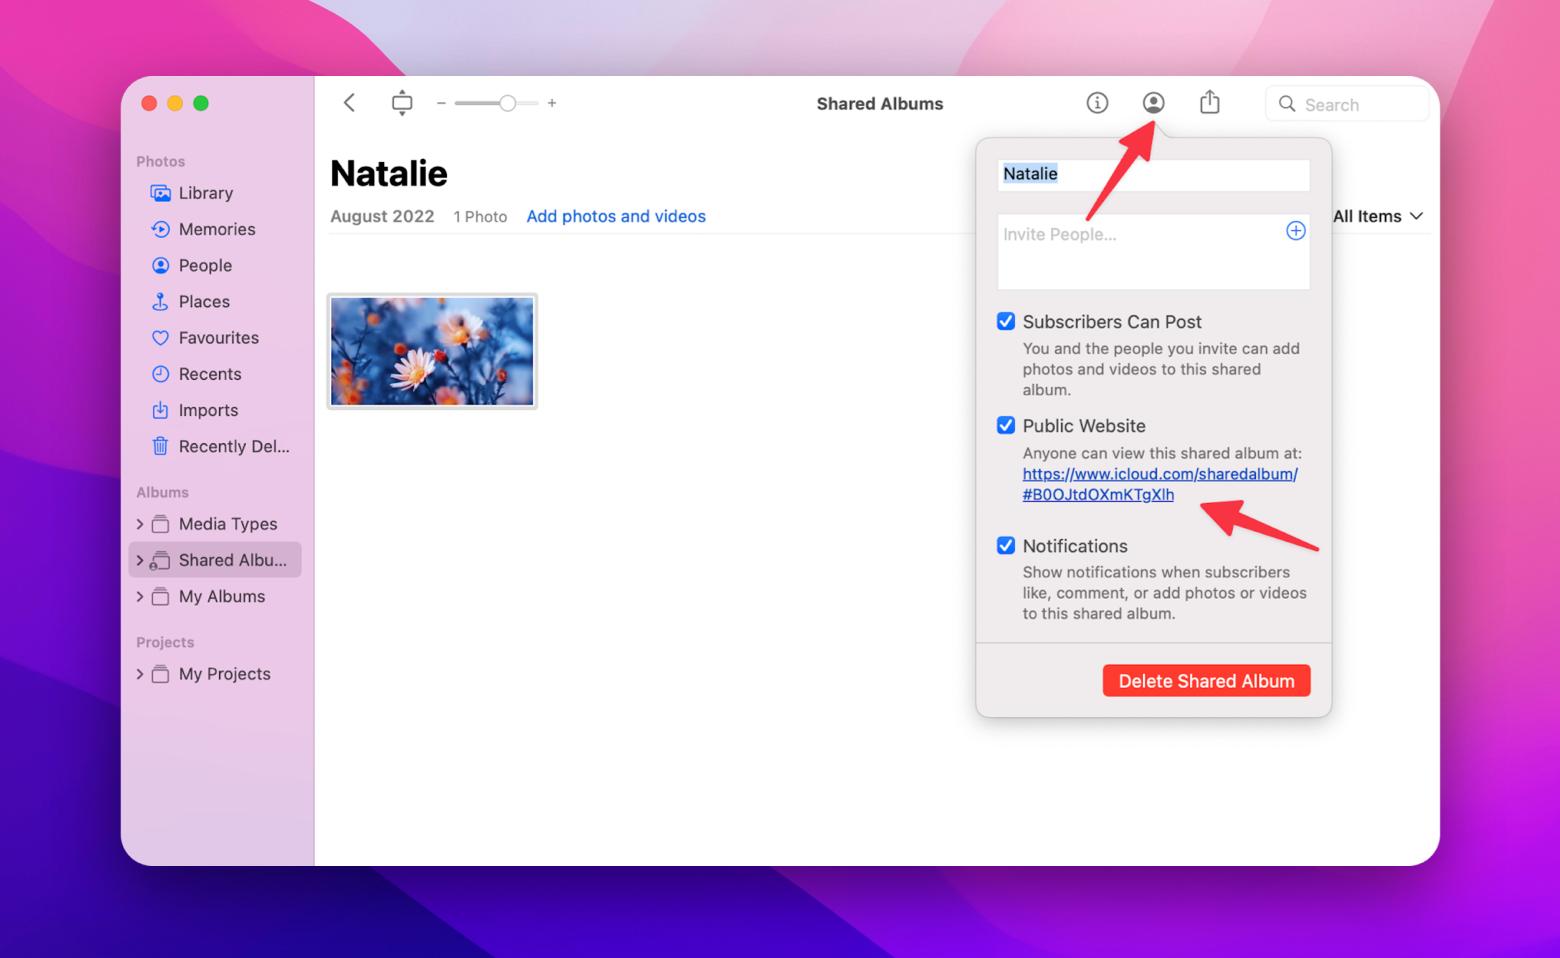
If you can’t seem to find the option to generate a link, make sure public sharing is on. If the pictures you want to create a link for aren’t in your library, simply drag and drop them into your Photos app.
Keep in mind that your default free iCloud storage space is limited to 5GB, so if you need more space on iCloud, you’ll have to pay for iCloud+ ($0.99 per month for 50 GB, $2.99 for 200 GB, and $9.99 for 2 TB).

How to create a link for an image using iCloud on iPhone
So now you know how to turn an image into a link on a Mac, but what do you do if you’re going to use an iPhone, which is pretty common these days?
How to generate an image link on iPhone using iCloud:
- On your iPhone, open the Photos app.
- Select a photo/photos you want to share.
- Now tap the Share button (see the bottom left corner)
- Then choose Copy iCloud Link
- Now, you can share the link with your colleagues and friends. For example, you can paste it into a Messages conversation.
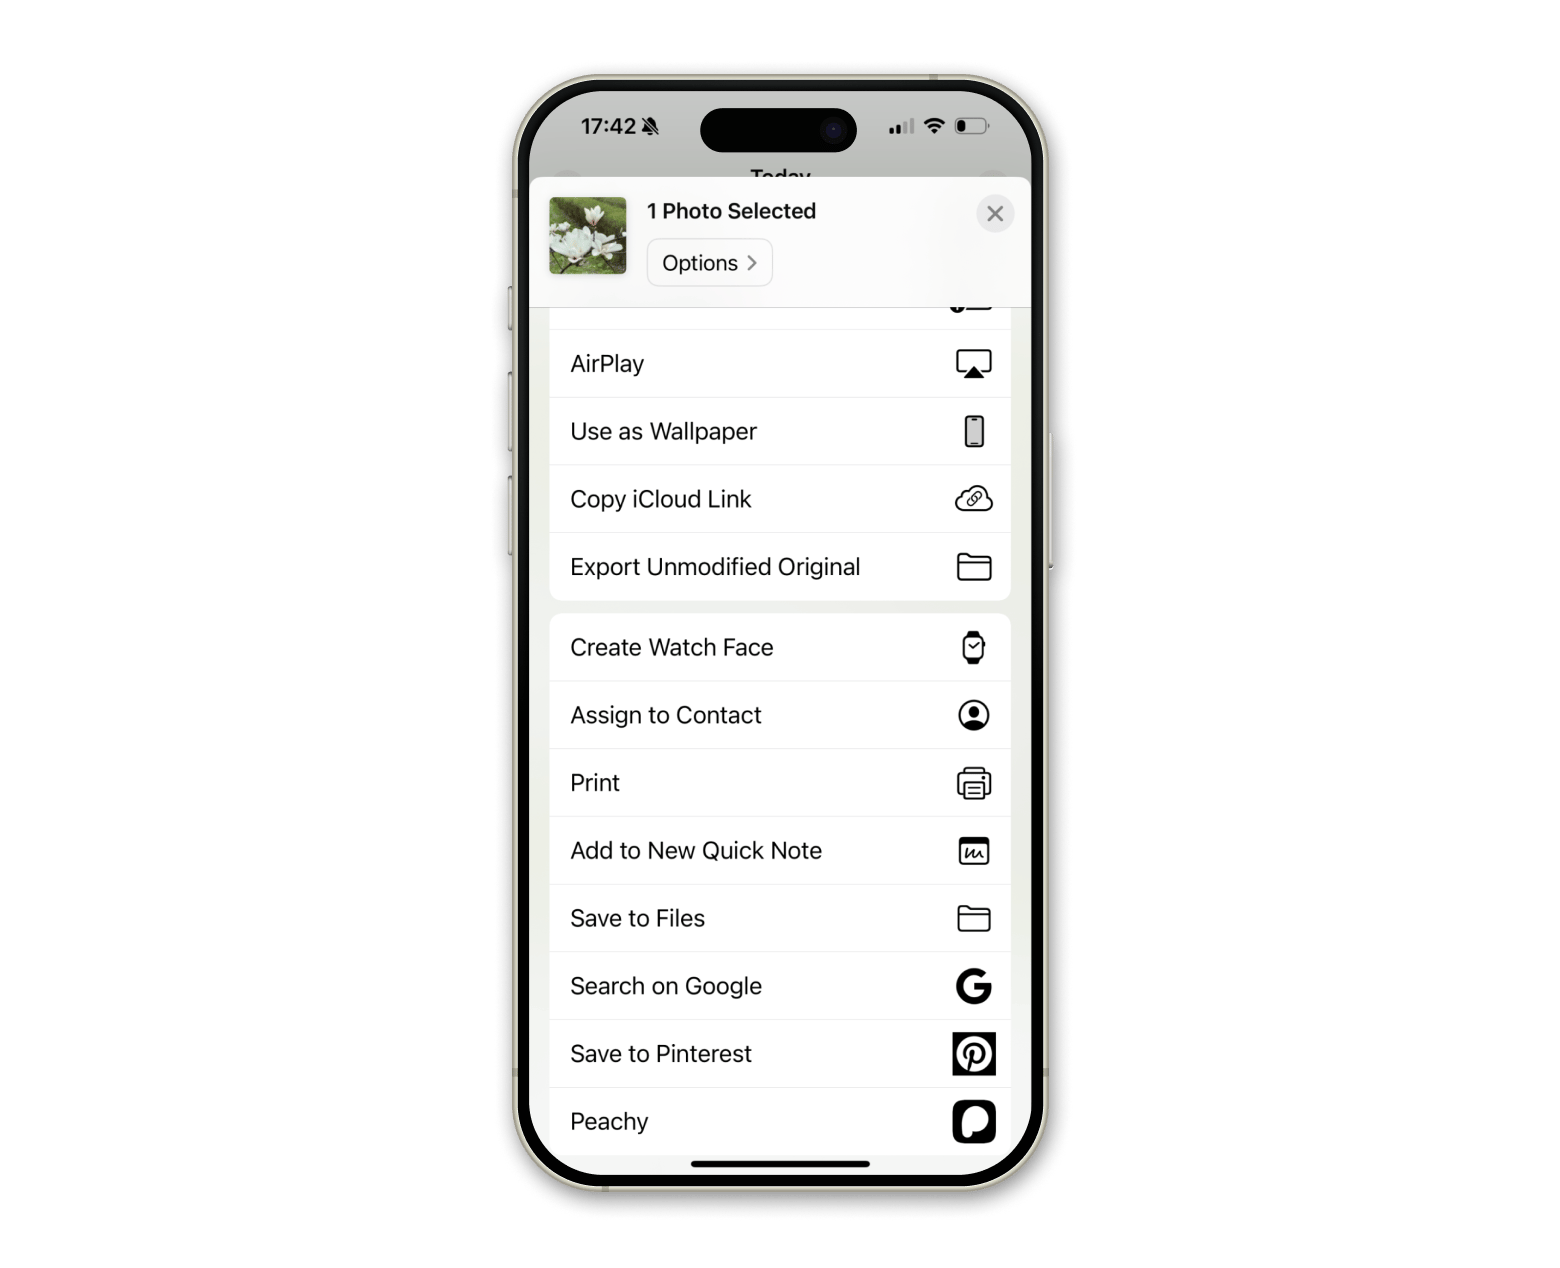
Note that for iPhone, you’ll need to make sure iCloud Photos is enabled on your device. To do so, you can go to your Settings > Your iCloud account > iCloud > Photos to make sure the function is toggled on.
What’s specific to iPhone and iPad only that you’ll also need to remember is that links expire. iCloud links typically expire after 30 days, so don’t forget to monitor your link if you need it to be accessible for a longer period of time.
Publish a picture from Mac
Blogging may have lost some of its luster to social media platforms like Twitter, Facebook, and even Tumblr, but it’s not completely extinct. So you might also want to add images to your blog or website on WordPress or other “blog” engines. In most cases, it isn’t difficult. For example, there is the Image block to insert an image onto your page or post in WordPress.
However, it can be a real hassle if you have to keep track of multiple blogs or if your internet connection is slow. That’s why I highly recommend the MarsEdit tool, which lets you write and publish content offline, see all your posts in one place, add images, videos, and everything else.
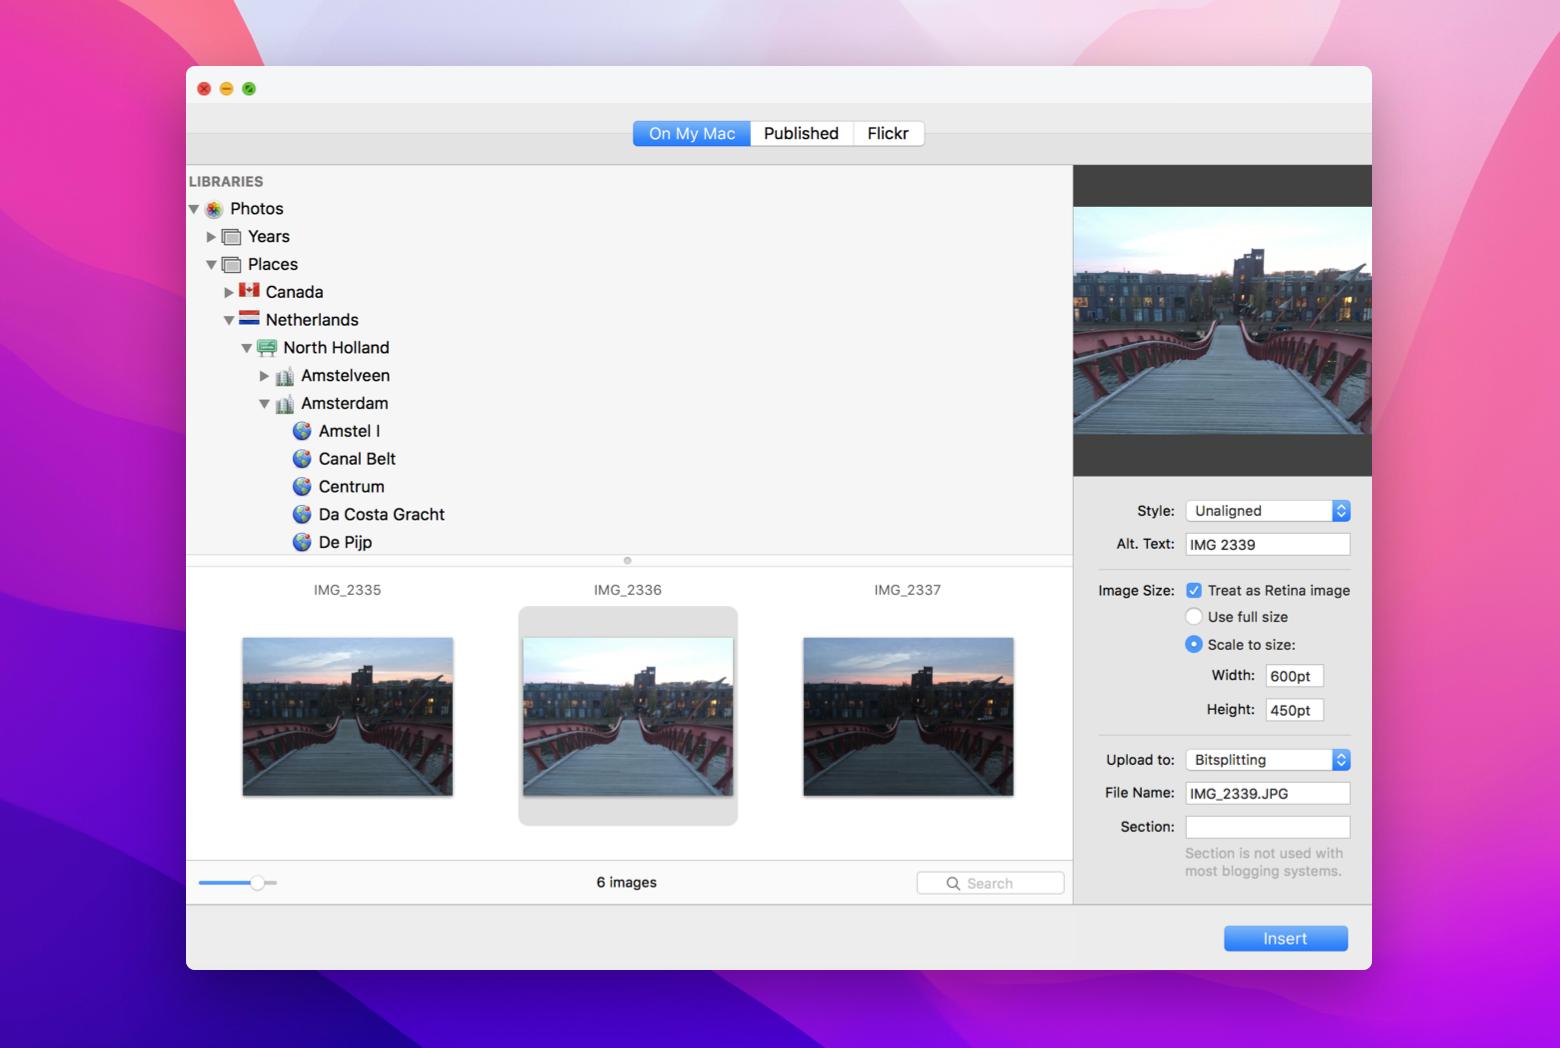
Add files as attachments, and the app will publish them instantly. Simply drag a featured image from the library into your draft, import photos from the Media Manager, test the result, and make as many changes as you like. The app also supports instant scanning and import from Aperture, Lightroom, and Apple Photos.
How to make a picture into a link quickly and effortlessly
One of the most common ways to create a URL for an image on your Mac and iPhone is via the Photos app and iCloud. Alternatively, you can use any other file sharing solution. For example, I prefer Dropshare. All I have to do is to drag and drop the image onto the app icon and copy my link. Just one click, and I’m done!
And if you share screenshots, it’s nice to have Xnapper at hand because it creates better screenshots than a native Mac tool. I also recommend decluttering your gallery from time to time. My best friend here is Gemini on Mac and CleanMy®Phone on iPhone and iPad.
Best apps to manage and share images efficiently
Besides sharing, I think tools for organizing images will be really helpful. Here are the the top picks:
- Xnapper: Photos aren’t the only type of image you’ll likely need to share with people. I personally also share lots of screenshots in my everyday life, be it with friends or with colleagues. If you want to beautify your screenshots, I recommend using Xnapper. I like to take screenshots with its help because it does such a great job compared to the native Mac screenshot-making tool. With the tool, all your screenshots can be neatly centered on a nice background and with rounded corners. Seeing as how clean and attractive your screenshots come out with Xnapper, won’t want to use a native Mac tool anymore!
- Gemini: This tool is ideal for decluttering and cleaning up your photo libraries to save storage on Mac. It automatically scans your library for any duplicates and similar images.
- MarsEdit: As mentioned previously, this powerful blog editor platform lets you write and publish content offline, including those with images. It’s great if you want to upload images and manage content on platforms like WordPress, as you can embed links to your shared photos.
Image link sharing made simple
One of the most common ways to create a URL for an image on your Mac and iPhone is via the Photos app and iCloud. Alternatively, you can use any other file-sharing solution. For example, I prefer Dropshare. All I have to do is drag and drop the image onto the app icon and copy my link. Just one click, and I’m done!
You might be wondering, “Why I need so many apps?” The answer is simple: With Setapp, a platform with hundreds of great tools for your Mac and iPhone, such as Dropshare, CleanMy®Phone, MarsEdit, Xnapper, and Gemini. Plus, you can get access to 260+ tools with a single subscription. This saves you a lot of time and money!
You can get a feel for how Setapp can enhance your workflow by trying it out for free for a week if you’re a Mac or iOS user and experimenting with some of the apps they provide. You have nothing to lose by giving new apps a try, and you never know what you might end up loving!
FAQ
How do I create a link to share photos on Mac?
To create a shareable link, you can upload your photos to Apple iCloud, create a Shared Album, and copy a link for sharing. You can also use the third-party app Dropshare that lives in your menu bar for easy drag-and-drop functionality or a browser-based tool for temporary sharing.
How do I turn a picture into a link on my MacBook?
To turn a picture into a link, you can open it in the Photos app, put it into a Shared Album, and copy a shared link. Alternatively, third-party services can generate links for you as well.
How do I get an image URL on Mac?
To get an image URL, upload your photo to the Photos app and share it through a Shared Album.
How do I make a shareable photo link?
To get a sharable photo link, use a third-party app for photo sharing or the Photos app on your Mac.


