Have you ever needed to share a file with a colleague or a family member who is on the same network? If you own a Mac, you can easily create a Mac shared folder so others have access to your files. This way, you’ll have more control than with a shared cloud drive, and it can be a cost-effective alternative to buying a file server. In this article, we’ll show you how to create a shared folder on your Mac in a few easy steps.
How to turn on file sharing on Mac
If you want to create a shared folder on your Mac and give others access to it, you need to turn on file sharing first.
Here is how to turn on file sharing on Mac:
In the Apple menu, click System Settings.
Then, in the left sidebar, click General.
Next, click Sharing.
Here, you can turn on File Sharing. Type in your password if prompted.
Then click the “i” icon next to the File Sharing toggle, and you’ll see that a folder named [your user name]’s Public Folder has been created. To share another folder, click the “+” below the folder window, browse to the folder, and click Add.
How to create a network shared folder
After enabling file sharing on your computer, you can allow other users to access files by creating a shared folder (see step 5 in the above section). You can also create and share a new folder by following these steps:
Open Finder, right-click, and select “New Folder” to create the folder. It’s generally recommended to avoid using spaces or punctuation symbols in the folder’s name to ensure compatibility with different operating systems and file transfer protocols
Right-click on the folder and select “Get Info.”
Under General, check the Shared folder checkbox.
Next, click the “Sharing & Permissions” section.
Then, click the “+” icon and add the users you want to share the folder with, then set their access permissions.
Click the lock icon to make changes.
Keep in mind that you can add or remove files from the shared folder at any time.
Tip: If you have a Mac shared folder that contains a large number of files, and you need to free up space, it’s best to begin with files that are either very large or that you haven’t accessed in a while. One of the easiest ways to quickly locate these files is by using CleanMyMac X’s Large & Old Files module. This tool scans your Mac and identifies the files that are taking up the most space or that have been inactive for a long time. Once you’ve identified the files you want to remove, you can easily delete them with just one click.
Another option is to share by enabling iCloud Drive and setting the folder to be shared with specific people.
With iCloud Drive, you have the ability to share files and folders with others, making it easy to collaborate on projects together. Those who are invited can access the shared items from any of their devices and view them. Depending on the privileges that you set, they can also collaborate on the items. Any updates made by collaborators will be visible to you the next time you open the files on your Mac.
Here’s how to set up file sharing on Mac via iCloud:
Open Finder and, in the left sidebar, click iCloud Drive.
Then right-click on a folder you want to share and choose Share.
From the drop-down menu, choose if you want to share a copy or let others collaborate.
Next, set the permissions, and choose how you want to share the folder (via the invite link, Mail, etc.).
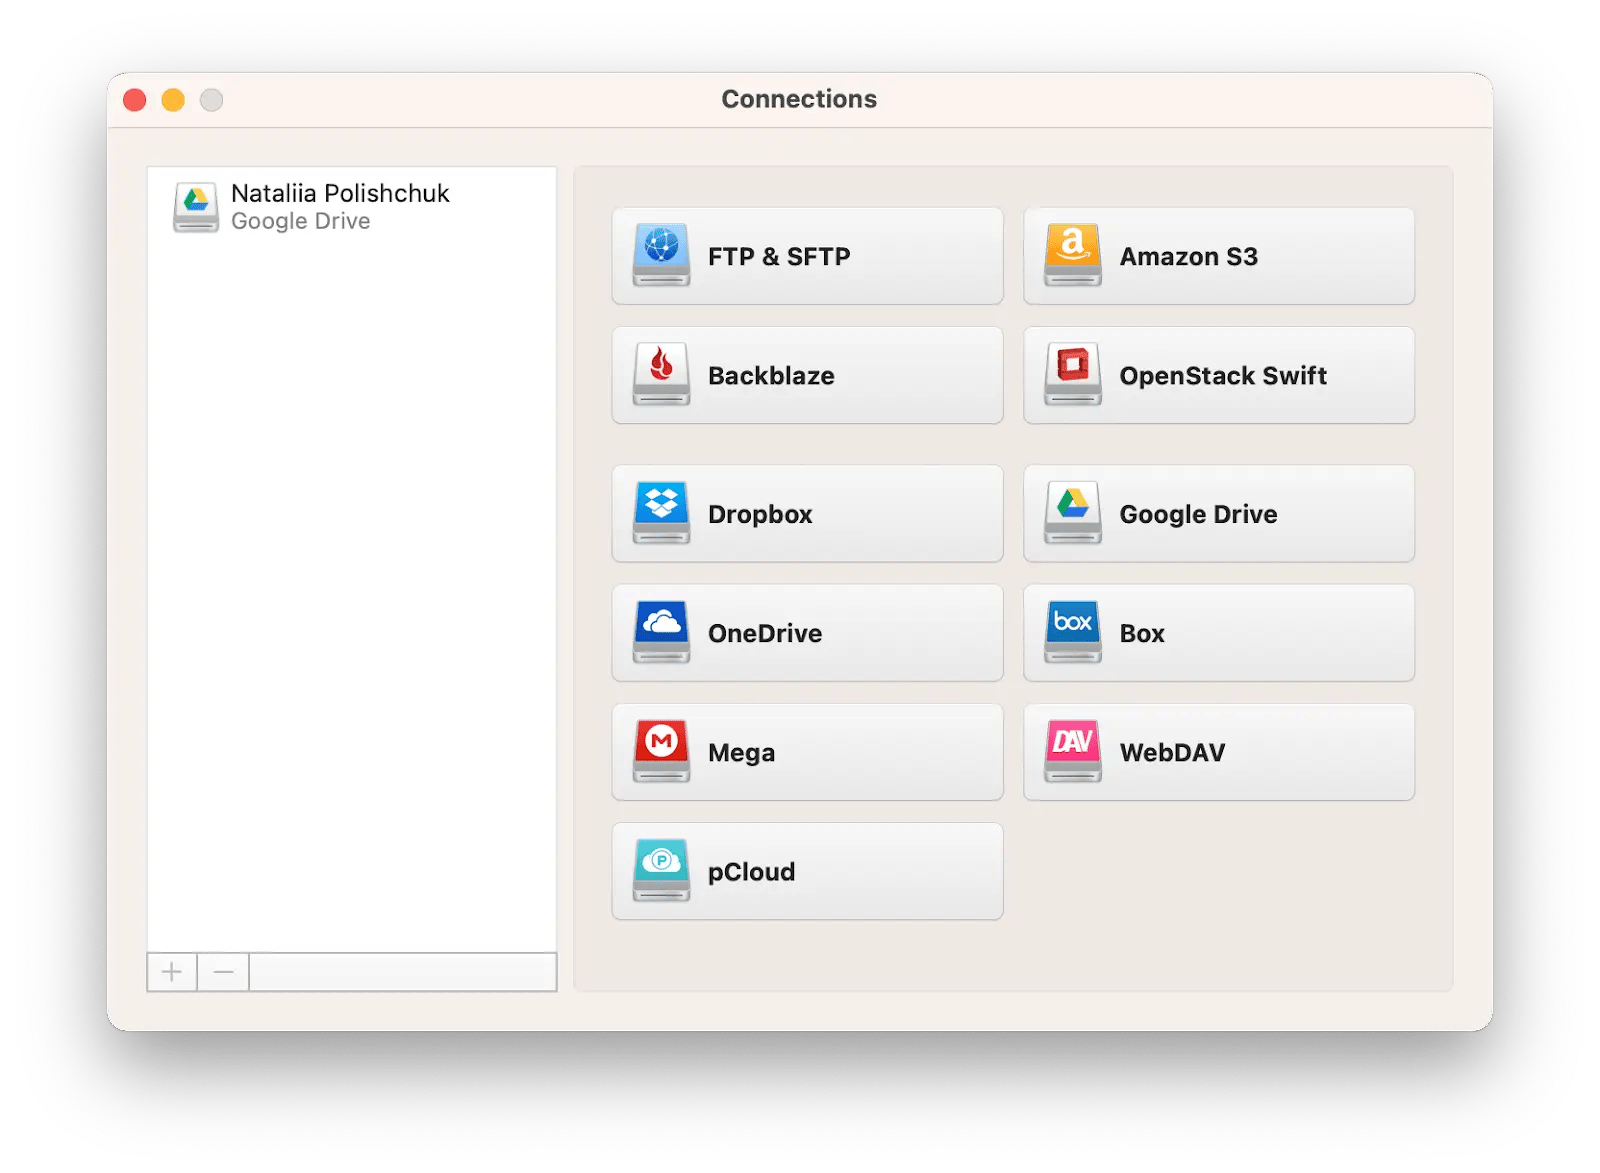
Alternatively, you can try using a tool like CloudMounter to easily connect any cloud storage and share files with others on your network.
CloudMounter is a trustworthy cloud storage manager that enables users to efficiently manage and organize their online-stored files. By consolidating files from various cloud services, including Google Drive, OneDrive, Amazon S3, and more, CloudMounter provides a streamlined approach to accessing and handling documents, photos, videos, and apps. With CloudMounter, you can mount all your cloud drive accounts as local drives on your Mac or Windows computer, simplifying the process of performing any necessary actions on your files. Say goodbye to the hassle of managing multiple cloud storage services and streamline your workflow with CloudMounter.
Where can you configure a shared folder?
After enabling sharing for a folder on your Mac, you might want to determine who can just view the folder, and who can make changes. To configure a Mac shared folder, simply follow these steps:
In the Apple menu, click System Settings.
In the left sidebar, choose General.
Then click Sharing and click the “i” icon next to File Sharing.
Click on the shared folder you want to configure.
You’ll see three settings options: one for your user account, one for Staff, and one for Everyone. Read & Write means the user can see and copy files to and from the folder. Read Only means the user can view the contents of the folder but can’t copy files to it. Write Only (Drop Box) means the user can copy files to the folder but can’t view its contents.
To grant permissions to a specific user listed in your Contacts app, click the “+” button and select them from the window that appears.
Why can’t I share a folder on Mac?
There could be several reasons behind the Mac file sharing not working issue.
Disabled File Sharing
One of the most common reasons is that the File Sharing feature might have been disabled on your system. To enable it, go to the System Settings and click on the Sharing option (as described earlier in this article).
No shared folder in Finder
If you’re sure that File Sharing is turned on but the shared folder doesn’t show up in your Finder, try the following:
Open Finder and go to its preferences (Finder > Settings or press Command + ,)
Click the Sidebar tab
Make sure that both “Connected servers” and “Bonjour computers” are turned on.
Denied access to the Shared Folder
As we said above, a Mac user can set the shared folder to “Read Only,” “Write Only,” or “Read & Write.” But when you move new files into that shared folder, the permission rights don’t automatically apply to all of the files in the folder. Do the following to fix it:
Go to the Apple menu > System Settings.
Then click General > File Sharing.
Choose a Shared folder and user in the right panel.
Click the arrow in the Permission column, right-click on the permission line for the user.
Click Apply Permissions to Enclosed items.
If after following the instructions above File Sharing is not working, you can try other solutions to share your files and folders. We’ll cover other methods later in this article.
Sharing limitations
The main limitation of sharing a folder on your Mac compared to a dedicated file server or cloud sharing is that your Mac must be turned on and connected to the network for others to access it. That’s fine if the Mac on which you’re creating the shared folder is a desktop Mac such as a Mac mini, Mac Studio, or iMac – these machines typically sit on a desk and can be set to wake up when network activity is detected. But if you’re using a MacBook Pro or MacBook Air, it’s likely that you’ll shut down your computer and put it away when you’re done using it, so the shared folder won’t be available.
Which is best for sharing files?
When it comes to sharing files, there are a variety of methods available, each with its advantages and disadvantages. Depending on your needs and use case, some methods may be more suitable than others. Let’s look at some of the best practices for sharing files:
Mac file sharing over internet
One of the most common ways to share large files is to use a file transfer protocol (FTP) program. Forklift can synchronize and transfer files from Mac to Mac on the same network. All you need to do is connect to your Mac via AFP or SMB, log in and add the folder you want to synchronize to your Favorites in Forklift. You can then use Forklift’s sync tool to ensure that the same data is always present in both folders.
Fast sharing
If you want to share files quickly, apps such as Dropshare are a great option. Without the hassle of setting up an FTP connection, Dropshare allows you to quickly and easily share files, screenshots, and even screen recordings with others.
Wrapping up
So now you know how to set up file sharing on Mac. And if you want to adjust your routine to a specific case, try the apps we mentioned in this guide. These are CloudMounter to easily connect any cloud storage and share files with others on your network; Forklift to synchronize and transfer large files from Mac to Mac on the same network; Dropshare to share files quickly without the hassle of setting up an FTP connection; and CleanMyMac to identify the files that are taking up much space on your device and speeding up your Mac.
Luckily, all these apps are available for free as part of a seven-day trial of Setapp, a platform with over 260 Mac, iPhone, iPad, and web apps for any job.
Superpowers for your Mac
Tackle your tasks with dozens of helpful apps on Setapp.