Floating recording: How to record a specific window on Mac
Apple Screenshot tool can record the whole screen or a selected portion by simply pressing Command + Shift + 5, but it won’t cover you when you want to capture a specific app window because it just can’t. You need a more advanced tool to get the job done.
No worries. There are a bunch of different methods to focus on an app screen you want to capture. I’ll show you how to record only one window on a Mac like a pro.
How to screen capture just one window
I tested different methods and can confidently say that the feature to capture a single window effortlessly is a real game-changer for any content you work with. Focusing on a selected window avoiding a cluttered desktop in the background, helps create professional images and videos that stand out. So it’s the perfect moment to upgrade to a professional tool and get to know how to record a specific window on a Mac stress-free.
A good screen recording app contains enhanced floating recording features that allow you to capture just one window and customize your materials just the way you want (and they don't mess up your content, obviously).
If this is what you're looking for, here’s a quick glance at screen recording apps:
| Let’s compare! | Gifox | Cleanshot X | Dropshare |
| Records a specific window | ✓ | ✓ | ✓ |
| Perfect for | Quick recording with a shortcut | Advanced editing | Sharing files via URL quickly |
| Top feature | Transforms videos into GIFs | Sets timer before recording | Secures links for safe sharing |
| Hidden gem | Video speed multiplier | Screen notifications off while recording | Custom shortcuts for recording |
| Price per month | Included in Setapp* | Included in Setapp* | Included in Setapp* |
*Setapp is a platform with 250+ apps for macOS, iOS, and web. Try it free for 7 days, then continue from $9.99 + tax per month.
Too many options? Just describe your use case to our free custom GPT: How to screen record on Mac, and it will suggest the right tool for your needs in seconds.
Gifox: GIF maker for capturing animated GIFs
When I need to record a specific app window on a Mac and turn it into GIF for a tutorial or presentation, I use Gifox. Here's a quick guide on how it works:
- Download Gifox and install it on your Mac.
- Click on the fox icon in the menu bar.
- Choose the window mode.
- Pick a window and click Record.
- Click on the fox icon in the menu or press Command + Esc to stop recording.
- Click three dots next to the recorded video.
- Choose the desired format.
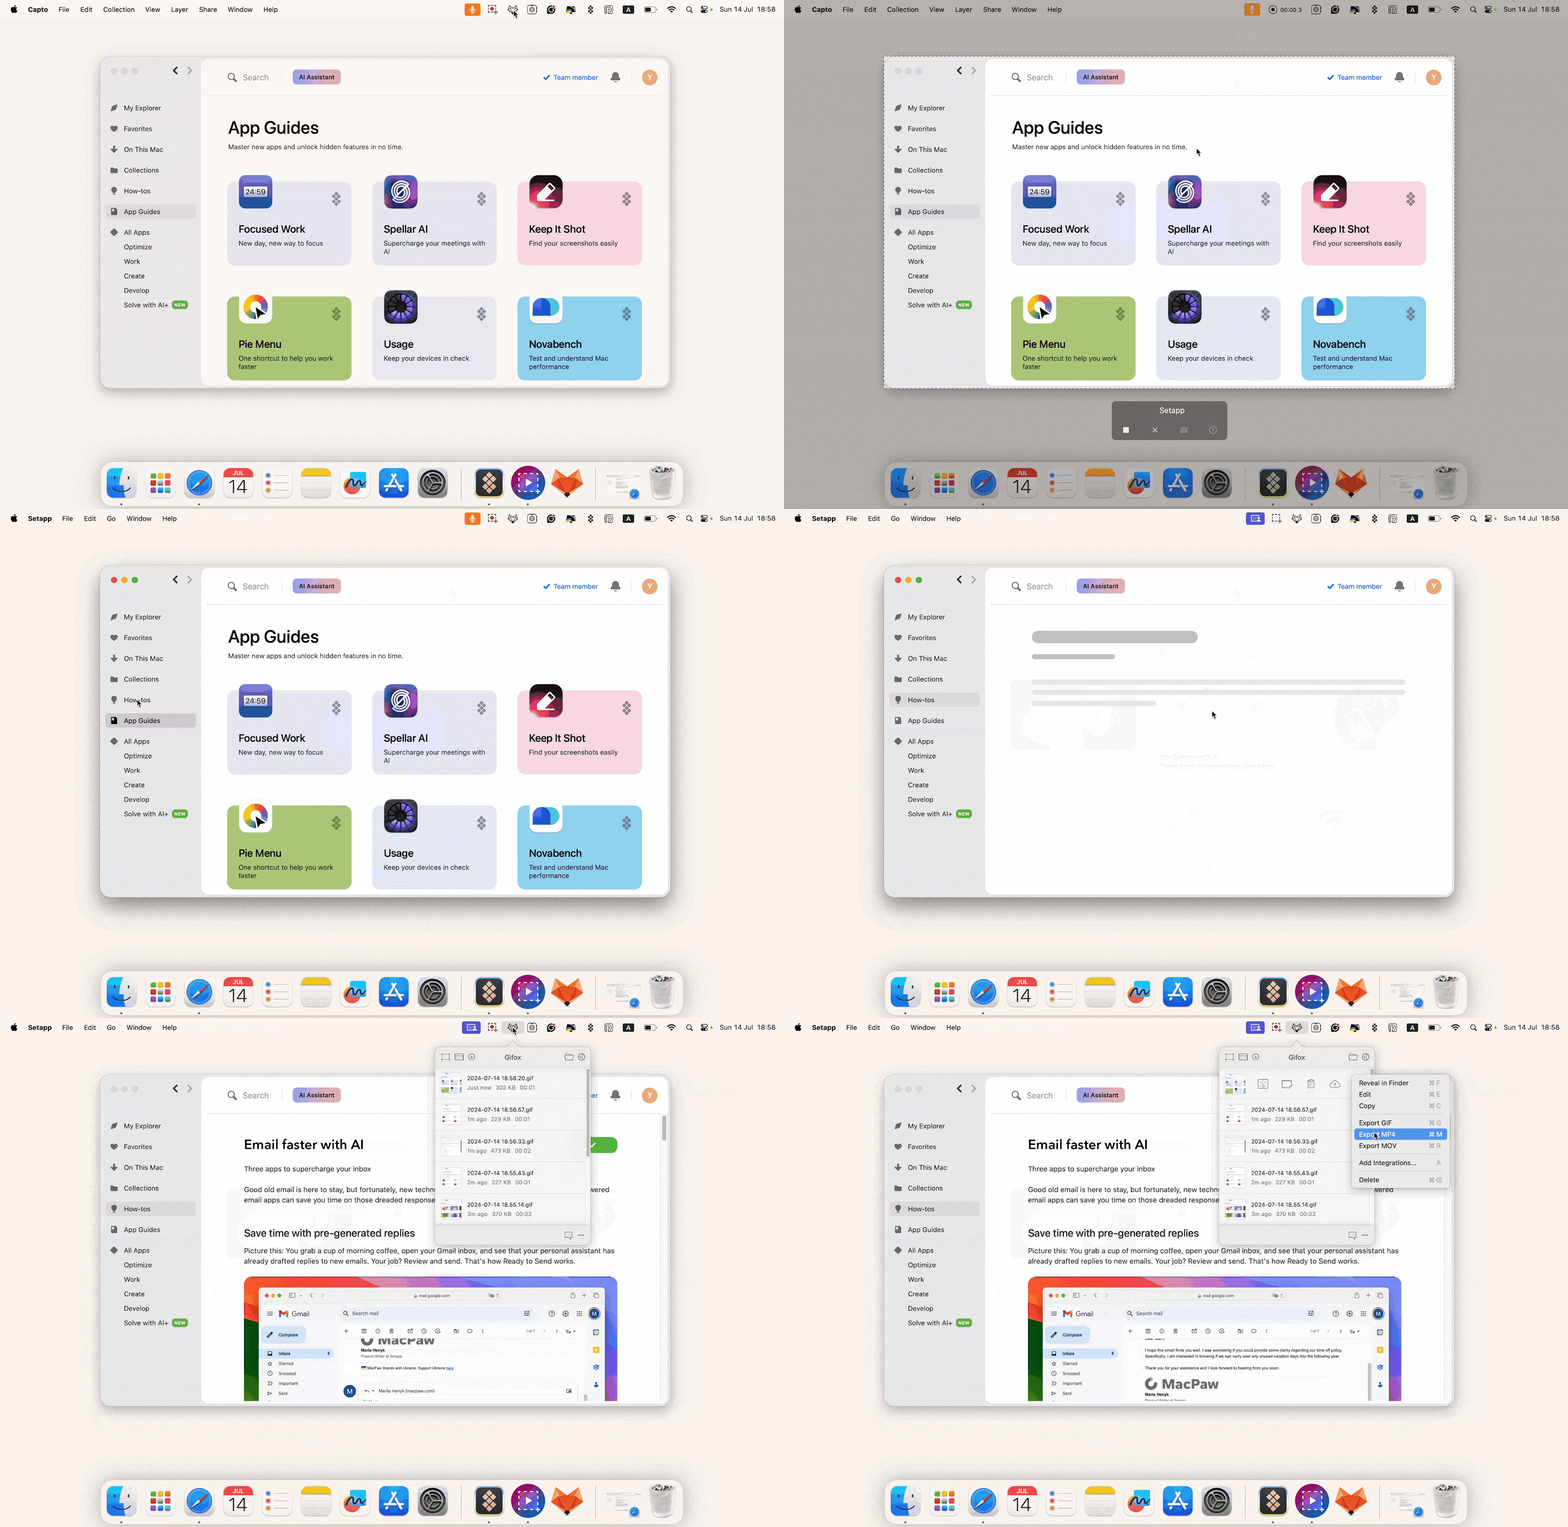
Besides, Gifox is highly flexible and offers quite a few customization options. You can adjust cursor appearance, window shadows, recording and playback fps, pause duration, and many more. All these options are available in the Gifox menu bar (click the gear icon on the right-hand side of the interface).
CleanShot X: More than just window recording
CleanShot X is a powerful screen recording tool designed for a Mac. When I say powerful, I mean it. While you record a window, you can pause the recording process (just in case you need a break). It’s super handy for sharing long instructions, giving feedback, or just clarifying information. Among other features, you can also set a timer, save your content to a CleanShot Cloud, and capture a screen without desktop icons so that you won’t waste your time on cleanup.
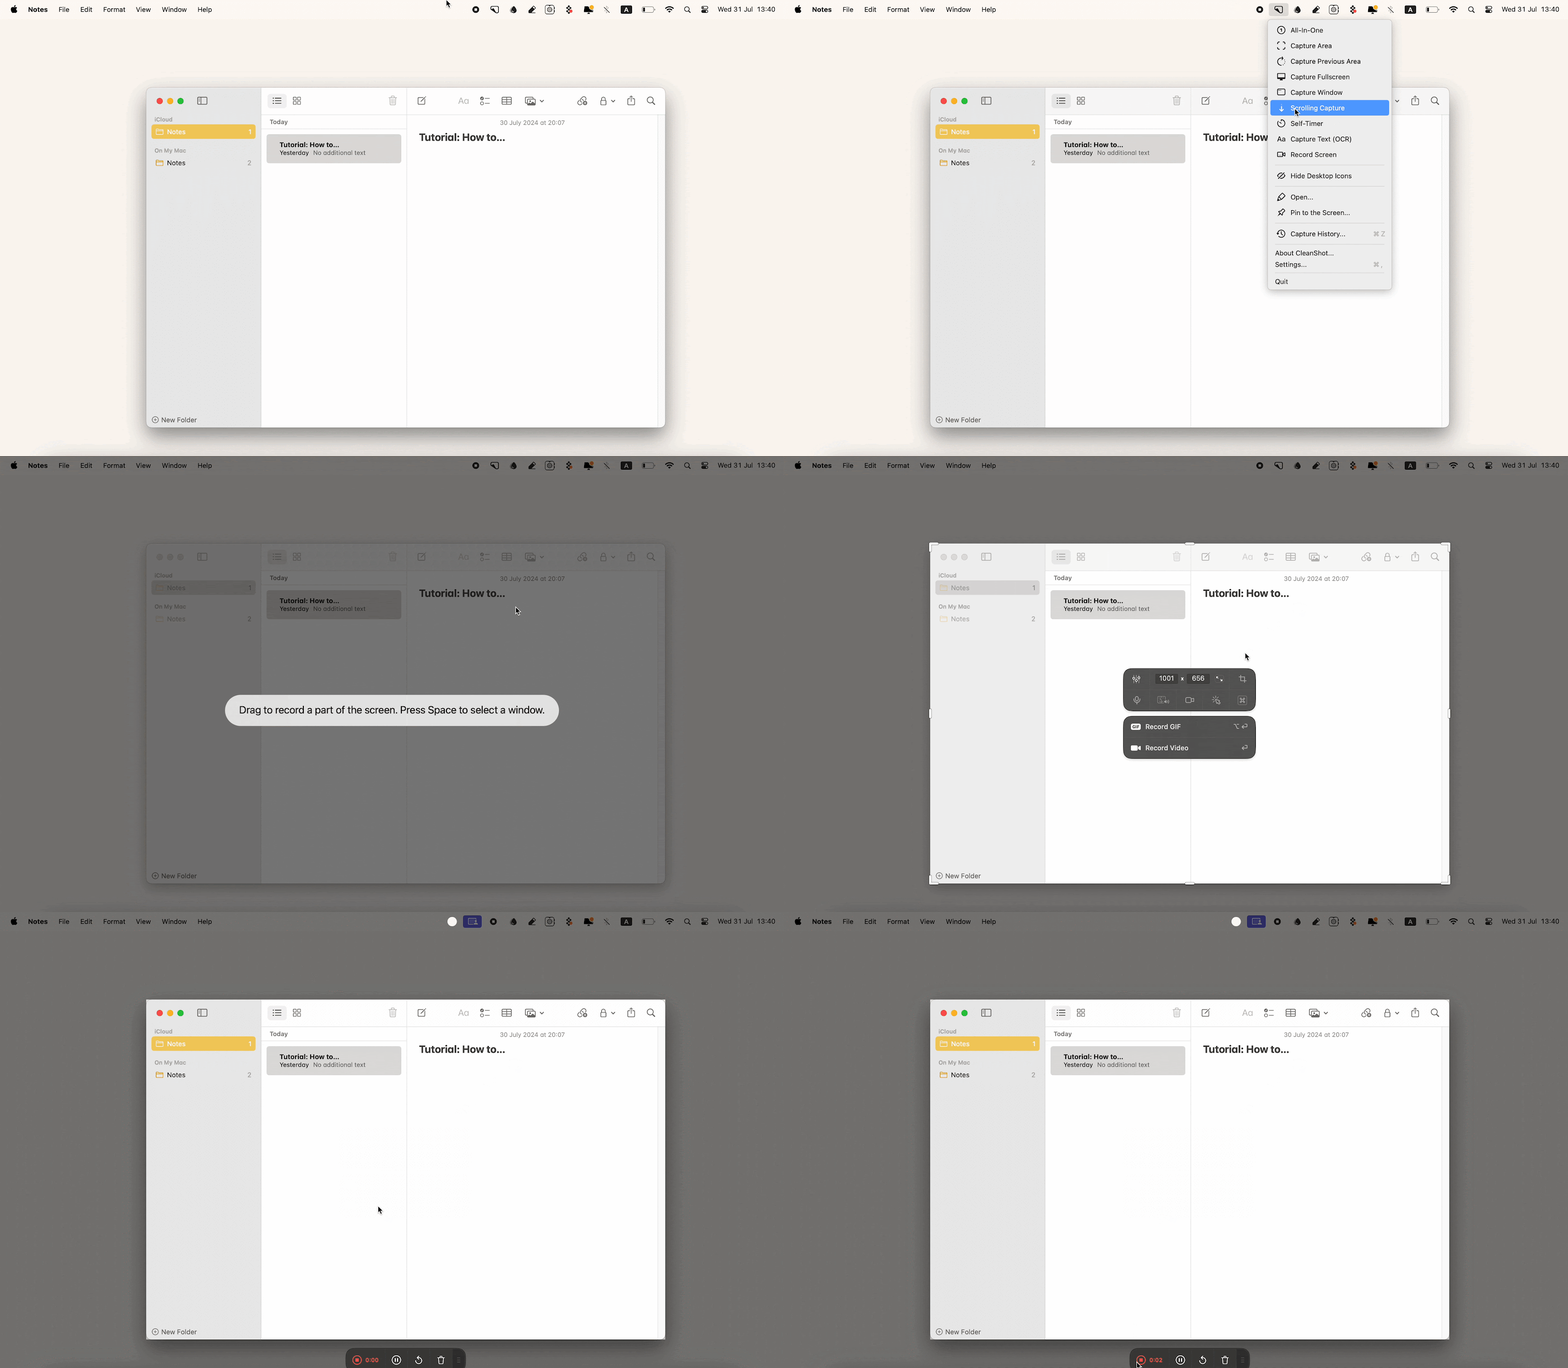
So, let me show you how to record a specific window with the app:
- Install and open CleanShotX.
- Click on the top menu bar and choose Record Screen.
- Press Space to select a window.
- Click Record Video.
- Click Stop to finish recording.
Dropshare: Your files are in safe hands
With Dropshare, you can record a specific window and share a link, which you can preview instantly in the browser. But it’s not the best part. The cool thing about Dropshare is that you can keep your data safe when sharing online. It generates encrypted links with optional password protection and expiration dates, making the process a breeze. Here’s how to screen record a floating window safely:
- Install and open Dropshare.
- Click the Dropshare icon in the menu bar.
- Click Capture Screen Recording (a round button).
- Press Space and choose the window you want to record in the drop-down menu.
- Click Record (big round red button).
- Click the same button to stop the recording.
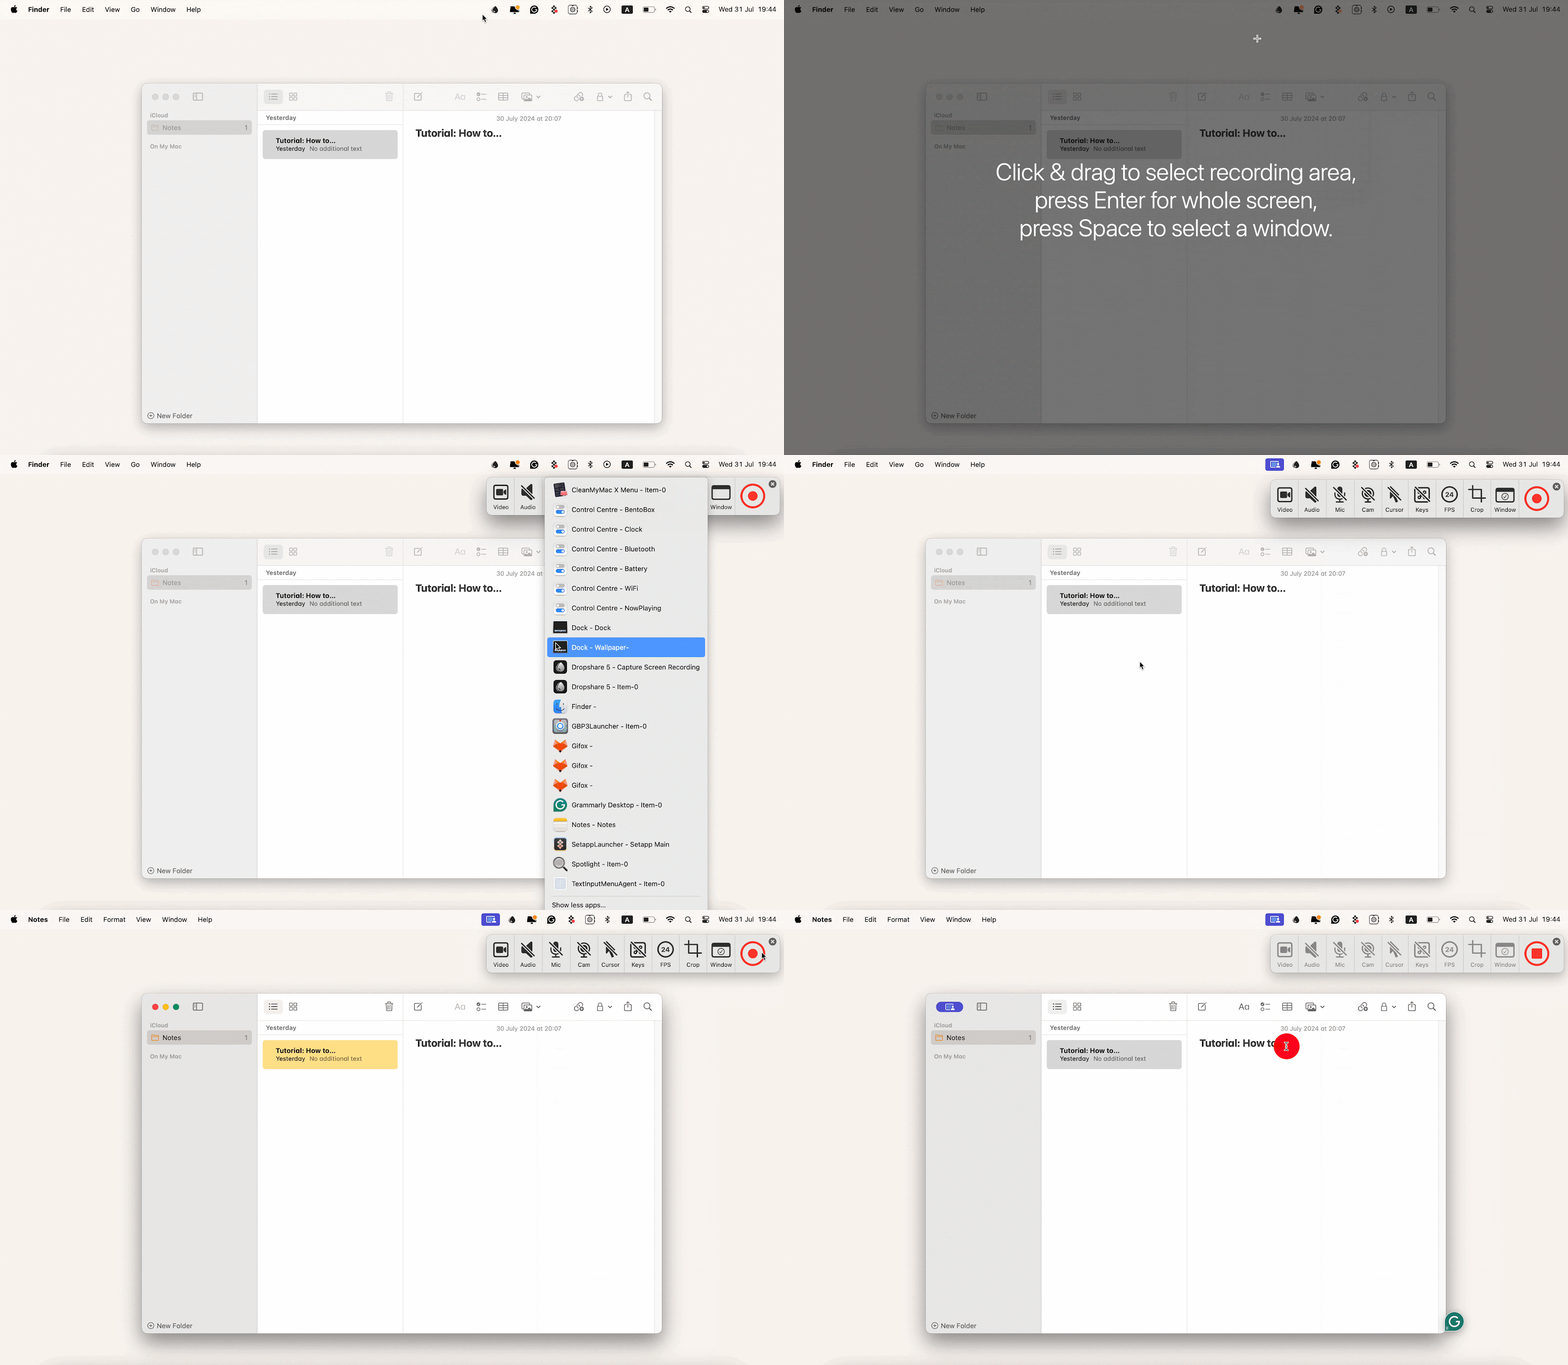
After you finish recording, click on the three dots next to the file and choose Create access-restricted URL. You can encrypt your link with a password, adjust the expiration date, and even track downloads. Here you have it.
Record a part of the screen
In case you need to focus on a certain part of the screen to visualize your point, or you just don’t want to show off the chaos around the recording area, you should know how to record a partial screen in a few clicks because it’s not that much work. I’m sure you’ll take minimal effort to create a focused video that highlights key elements for a viewer, and I’ll show you how to do it quickly.
Apple Screenshot: Built-in tool for quick recordings
Imagine you want to capture important content and need it ASAP. So, how do you quickly record a part of the screen on Mac? It’s simple.
Here’s how to record a portion of your screen using the native macOS Screenshot tool:
- Press Command + Shift + 5 on your keyboard and launch the Screenshot toolbar.
- Click Record Selected Portion.
- Drag to select the window and click Record.
- Click Stop to end recording.
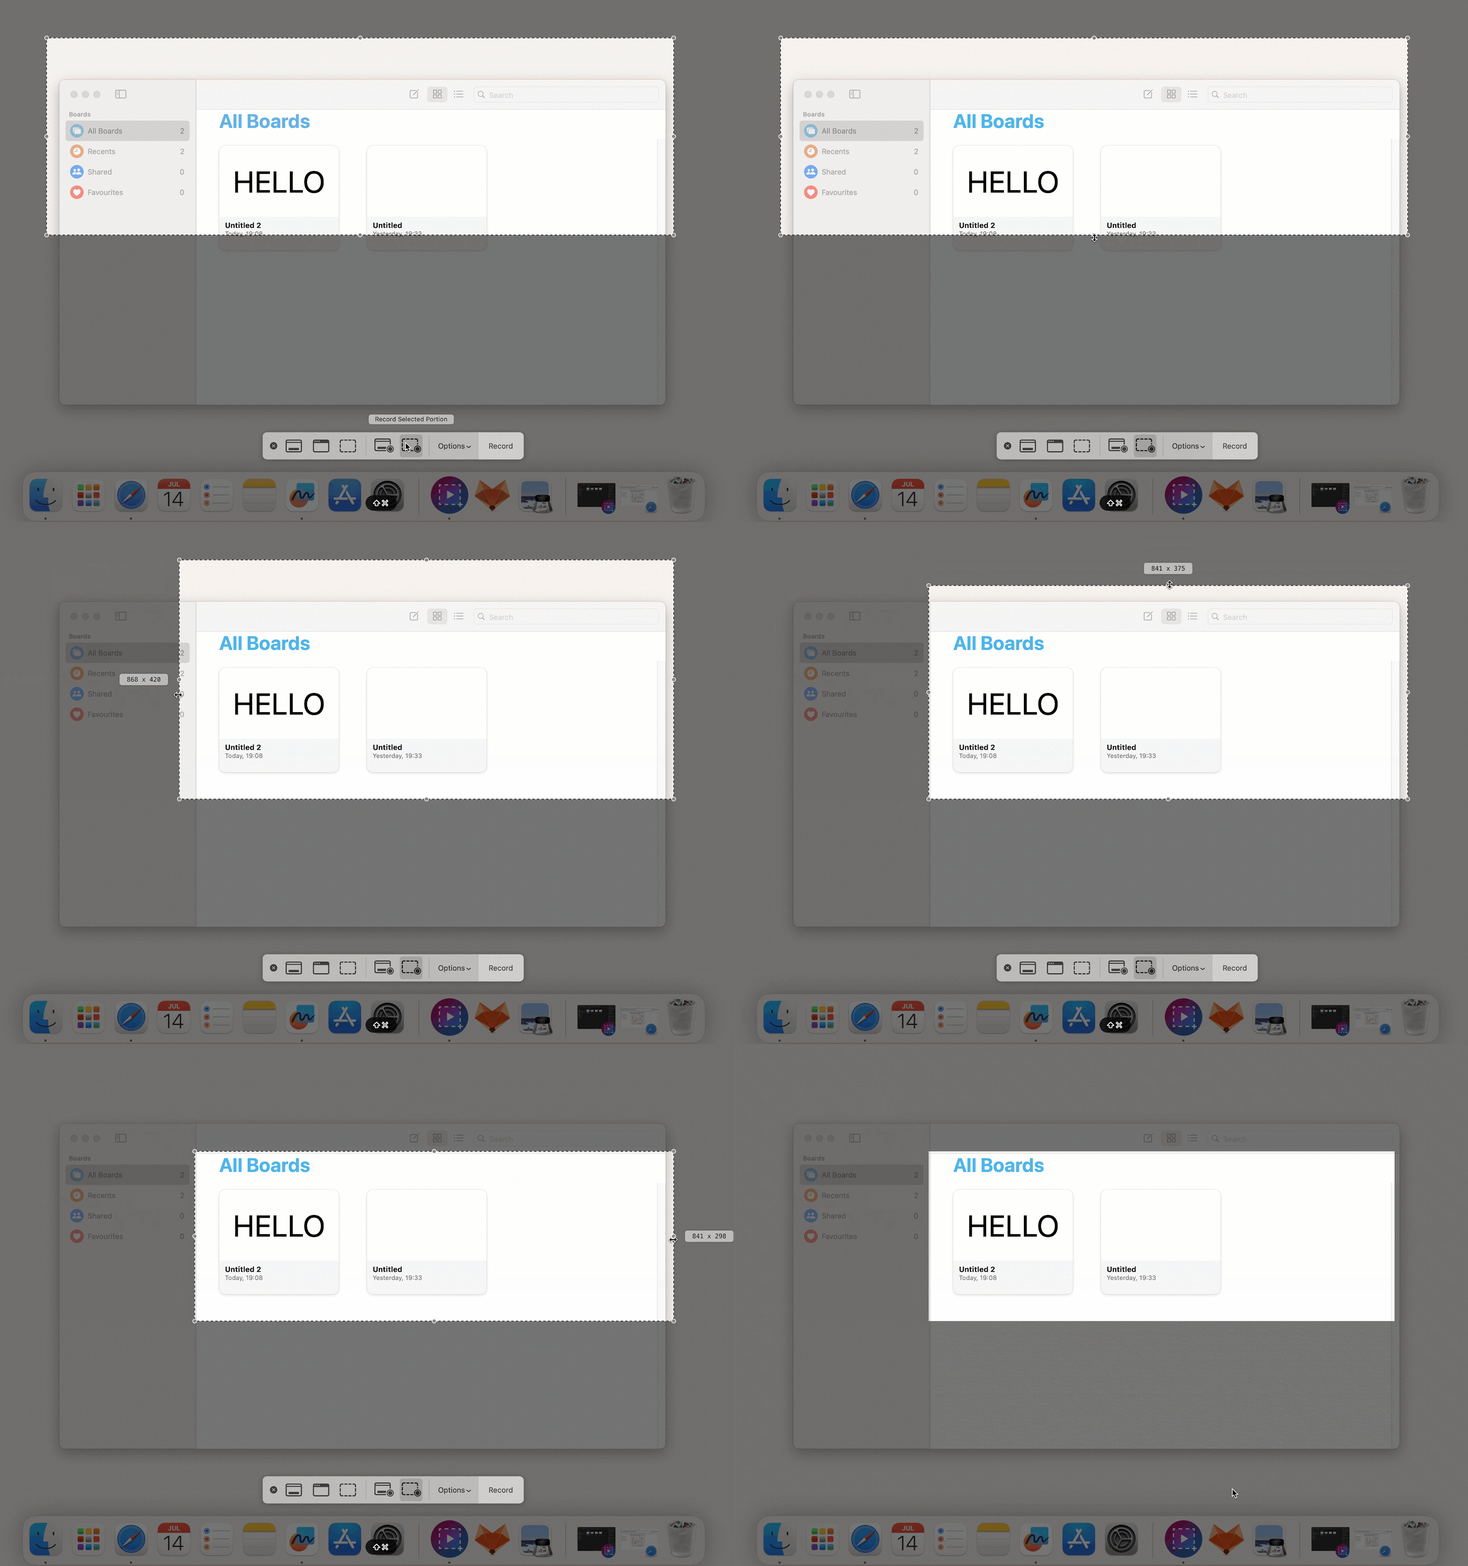
Now you know how to record a portion of your screen. The built-in macOS tool is straightforward and completely free. But it's not a space-efficient option because files can come out too large, and as I mentioned earlier, you can’t record a specific window with the native tool, so you need a professional app for this.
QuickTime Player: Plan B screen recording for Mac
Alternatively, you can try a pre-installed QuickTime Player to record a partial screen. It works similarly to the Apple Screenshot, and I just wanted to highlight it as an option in case you're looking for a different approach.
Open QuickTime Player from Launchpad > Click File > Choose New Screen Recording > Click Record Selected Portion, and drag to adjust the recording area > Click Record.
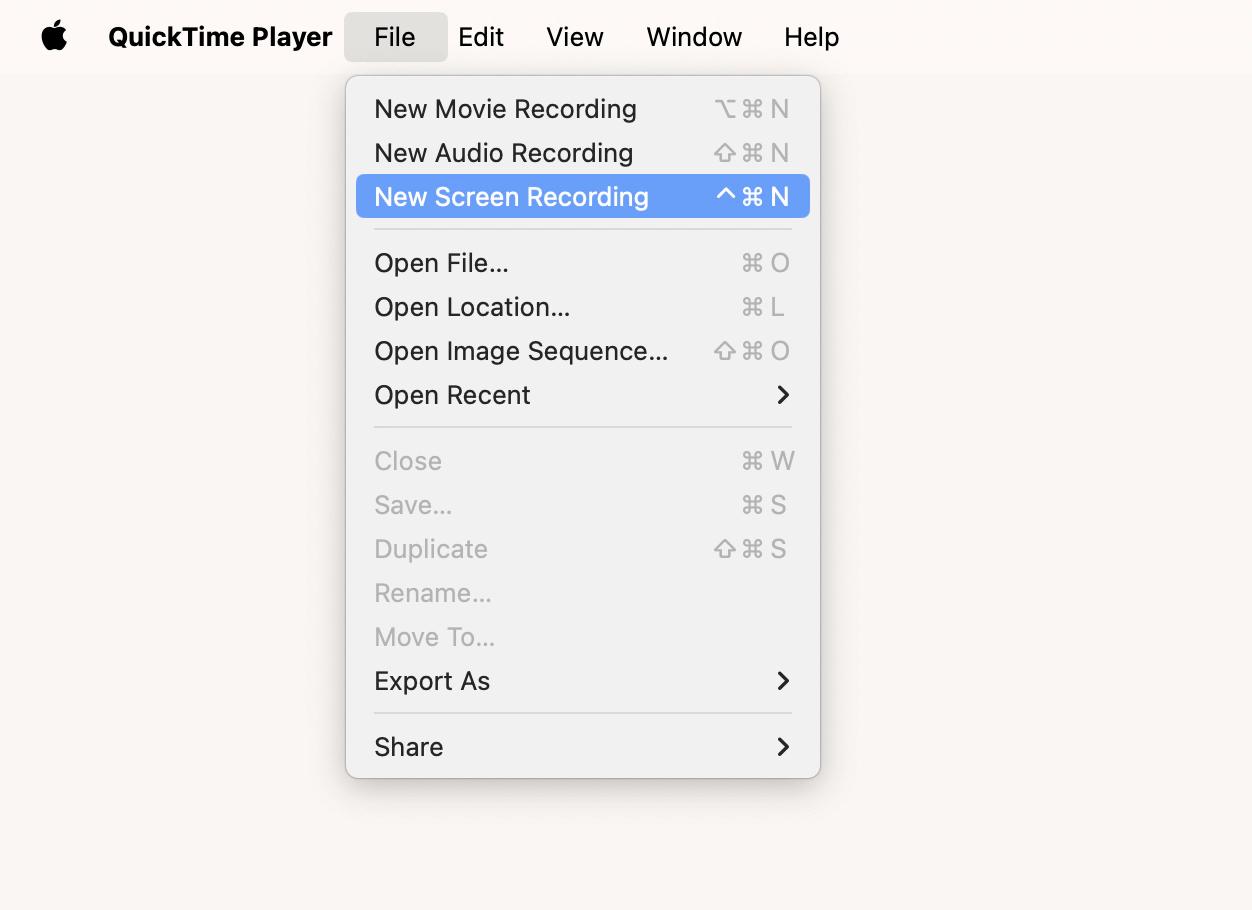
Note that you can’t record a selected window in QuickTime Player, so you need the help of third-party apps anyway.
Capto: Screen recording with voiceover
The native tools are good, but if you're looking for a more advanced way to capture a part of the screen on Mac, I'd recommend Capto. Capto is great if you need to record a tutorial by giving instructions aloud or if you need to record a screen and webcam video at the same time.
To record a part of the screen on Mac using Capto, follow the steps:
- Click on the Capto icon in the menu bar.
- Click Record Area.
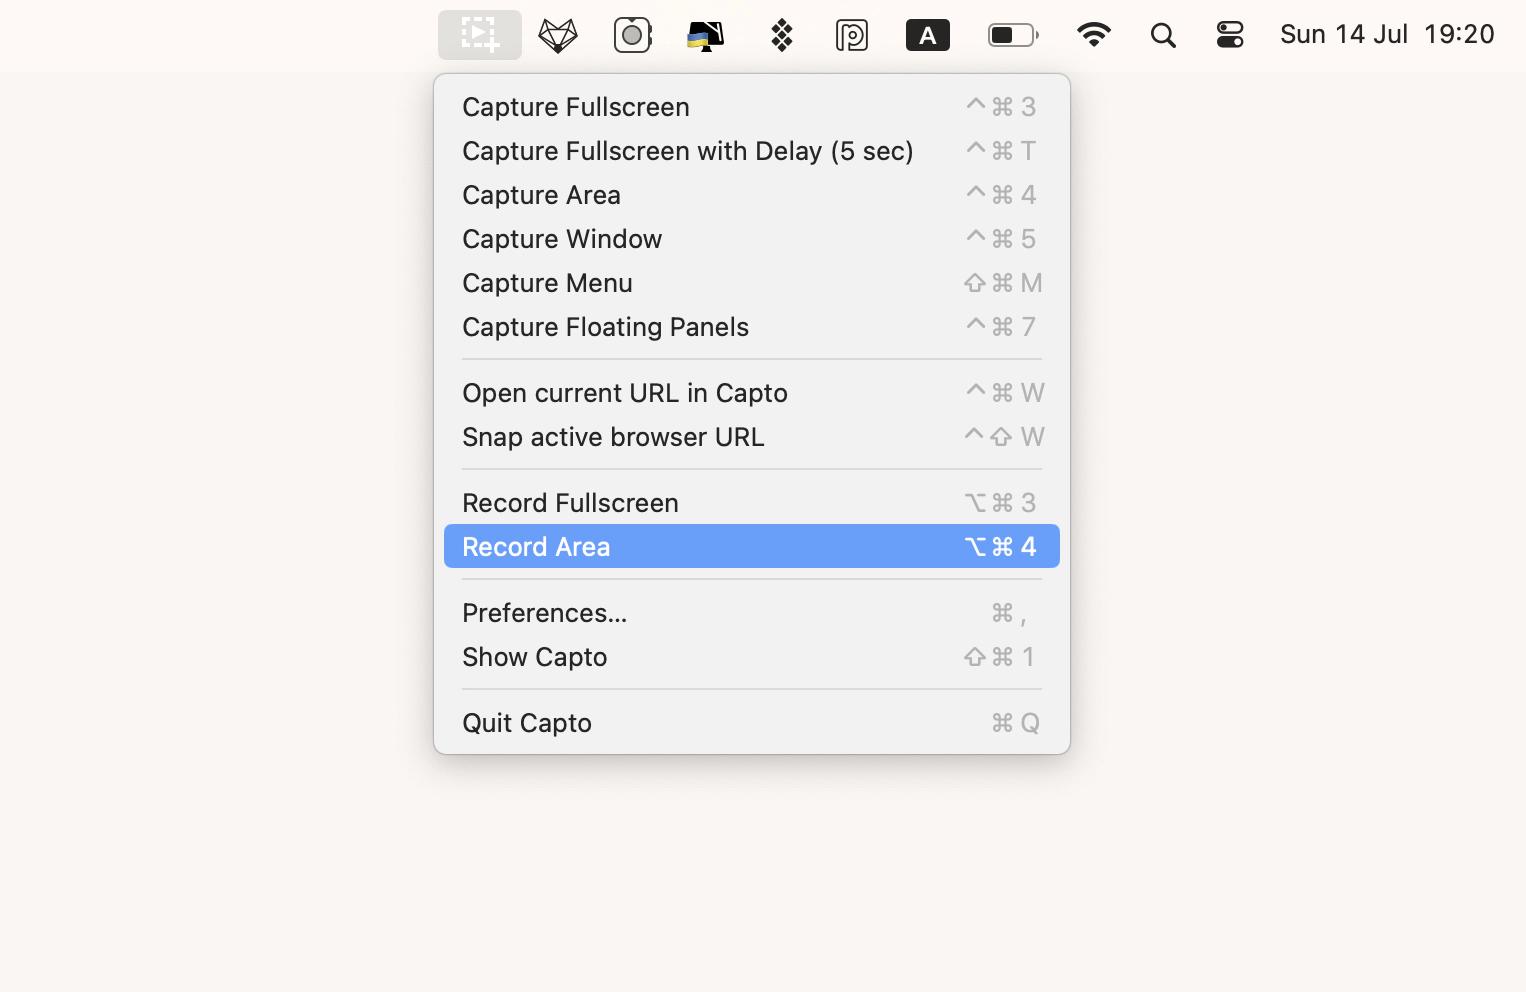
- Drag to select the area you want to record.
- Click Record.
- Press Shift + Command + Esc to stop recording.
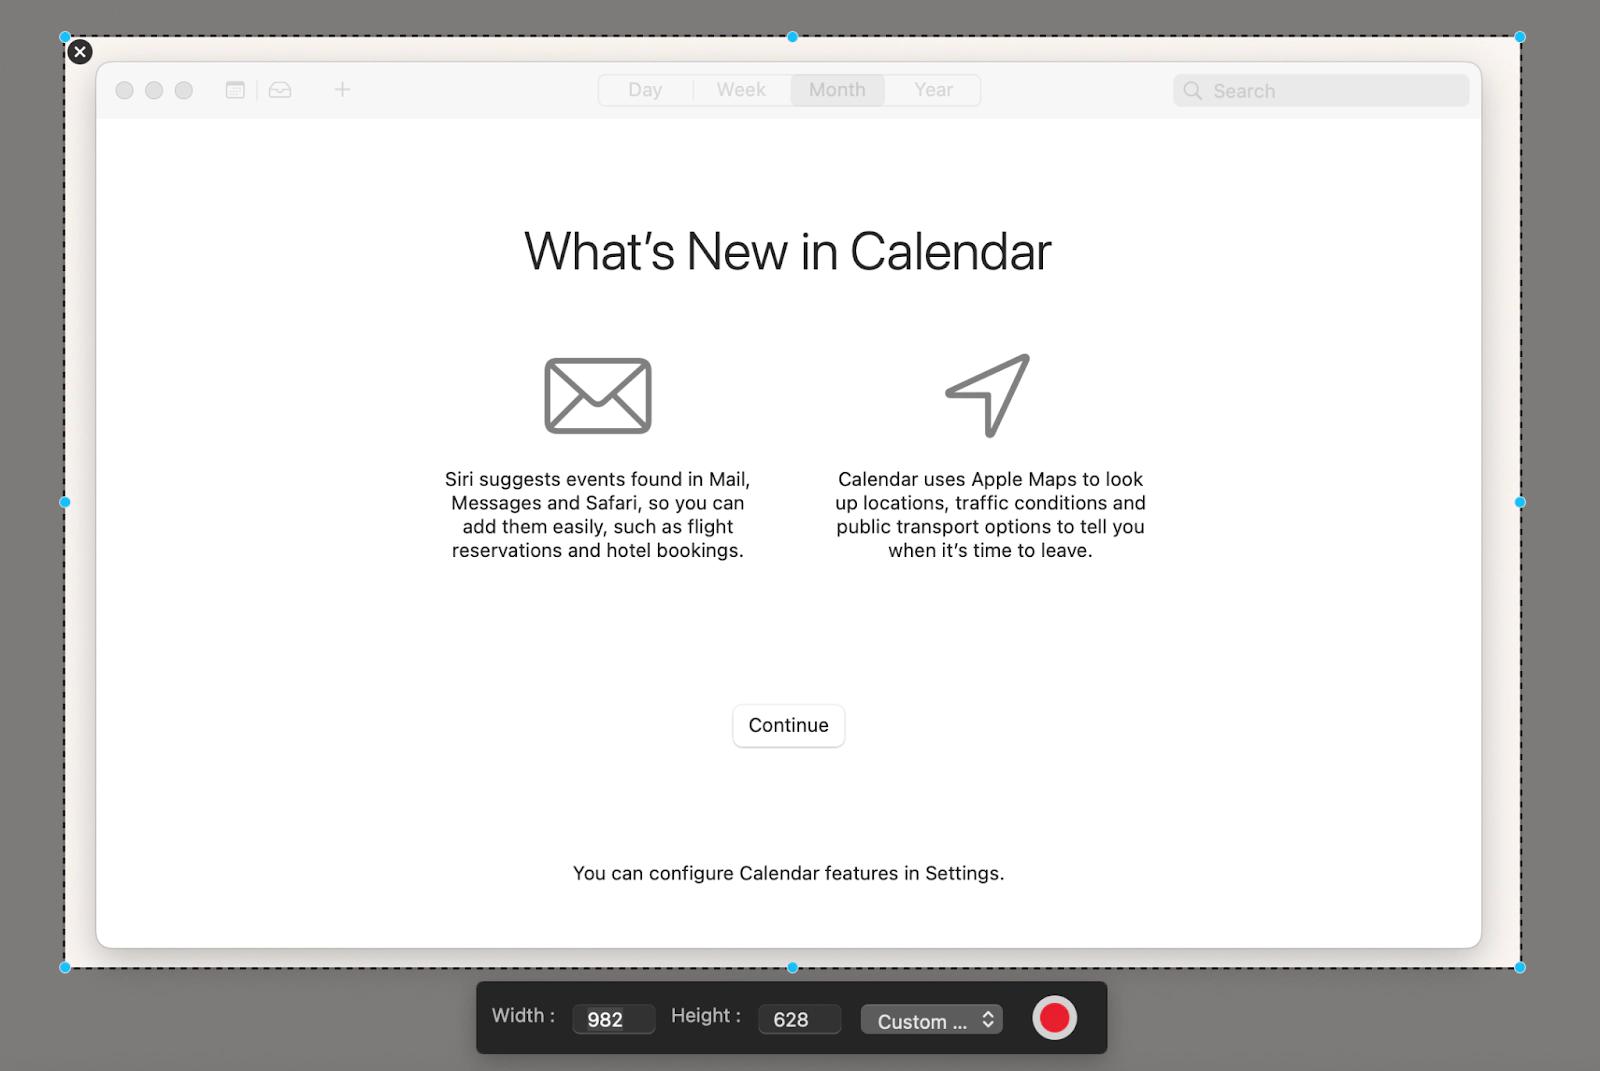
Capto's advanced features and ease of use make it an excellent choice for more complex recording needs. P.S. Don’t forget to speak when the rec is on!
How to capture drop-down menu
Taking a screenshot or video of a drop-down menu can be tricky, as it often vanishes at the most crucial moment. To record a partial screen for showing drop-down menu with the Screenshot toolbar, follow these steps:
- Open the menu you need to capture.
- Press Shift + Command + 5 and click Record Selected Portion.
- Move your cursor over the selected menu and click Record to capture it.
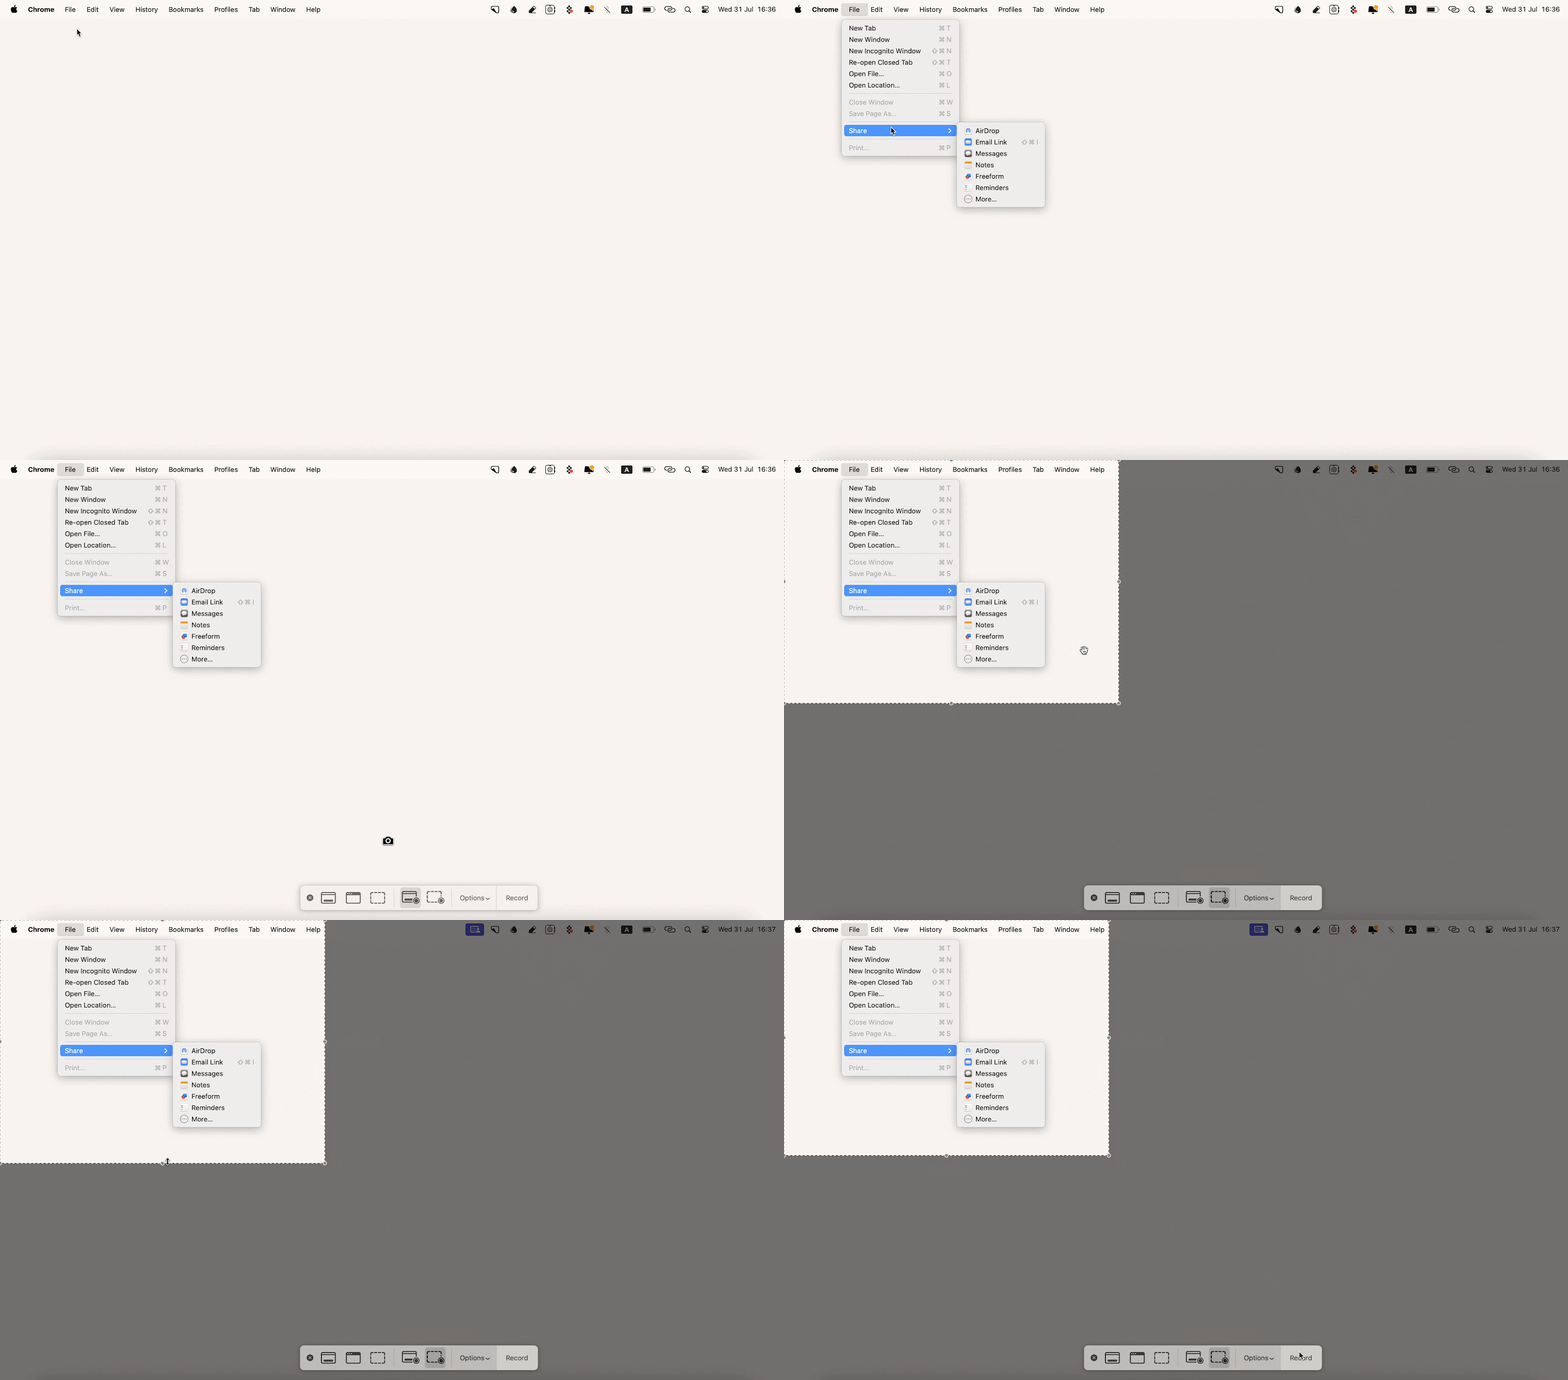
An easy and simple way to record part of the screen on a Mac, including tabs and menus.
Record a specific window or a part of your screen
It doesn't matter if you want to screen record a floating window, capture an entire screen, or record a specific tab. There are dozens of options to make it, from built-in tools by macOS to third-party apps.
Each tool has its benefits, and it's up to you to select the one that best meets your requirements. While Apple Screenshot and QuickTime Player do basic recordings and lack the ability to capture selected windows, apps like Gifox and Cleanshot X can do this, and they also offer other professional editing features. For safe window recordings, you can use Dropshare, which encrypts links for sharing materials privately. And if you need to record a designated area on a screen with voiceover, Capto is your choice.
The key benefit is that these tools are available via a single Setapp subscription. If you're not sure which tool you need, a seven-day free trial can help you choose, and you can discover other useful apps for daily tasks.


