How to forget a Wi-Fi network on Mac
Your Mac saves all Wi-Fi networks (public or private) you’ve ever signed into. Wherever it detects one of these networks, it will connect automatically. So cool and convenient, no?
Yes, but not always.
Convenience may become an inconvenience for many reasons, such as troubleshooting, security reasons, or the desire to switch between networks (more on this below).
The solution? Delete Wi-Fi network on Mac.
Here, I will show you exactly how to forget the Wi-Fi network on Mac devices. I’ll show you an easy step-by-step process to get rid of any unwanted or unsafe networks from your Mac.
Why you might want to forget a Wi-Fi network on Mac
Being a part-time event planner (out of my passion), I must travel a lot and stay connected to the web. So, to keep things running smoothly, I must keep switching my Wi-Fi network. So, I have to remove Wi-Fi network on Mac for security reasons or network cleanup.
Besides, there may be other reasons why you may want to delete Wi-Fi network on Mac devices. Let’s figure them out.
Remove old or unnecessary Wi-Fi networks
This is called network clean-up!
Remove all unnecessary, unsafe, and old Wi-Fi networks you may no longer connect with. So, there is no confusion or feeling lost in a long list of networks with similar names, and you can quickly connect to the desired network.
Troubleshoot connection problems
Not able to connect to a W-iFi network? It may be because the network’s settings have changed. Try this: forget the network and then reconnect. It should allow your Mac to reconnect to the new configuration.
Switch between networks
You may frequently switch networks, for example, between your home and office network. This may be problematic if both networks are available. So, you have to forget the office’s network if you want to use your home’s Wi-Fi, and vice-versa.
Improve security by removing unwanted public networks
Did you know storing details of an unsafe network could allow someone to access your Mac and track your movements? It's scary!
Public networks are often unsafe. So, in case you've no other option but to sign in to an open Wi-Fi network, make sure you forget it on your Mac asap. Otherwise, your Mac will connect to it automatically whenever it’s within range. This may expose your data to cybercriminals lurking all over public networks looking for an opportunity.
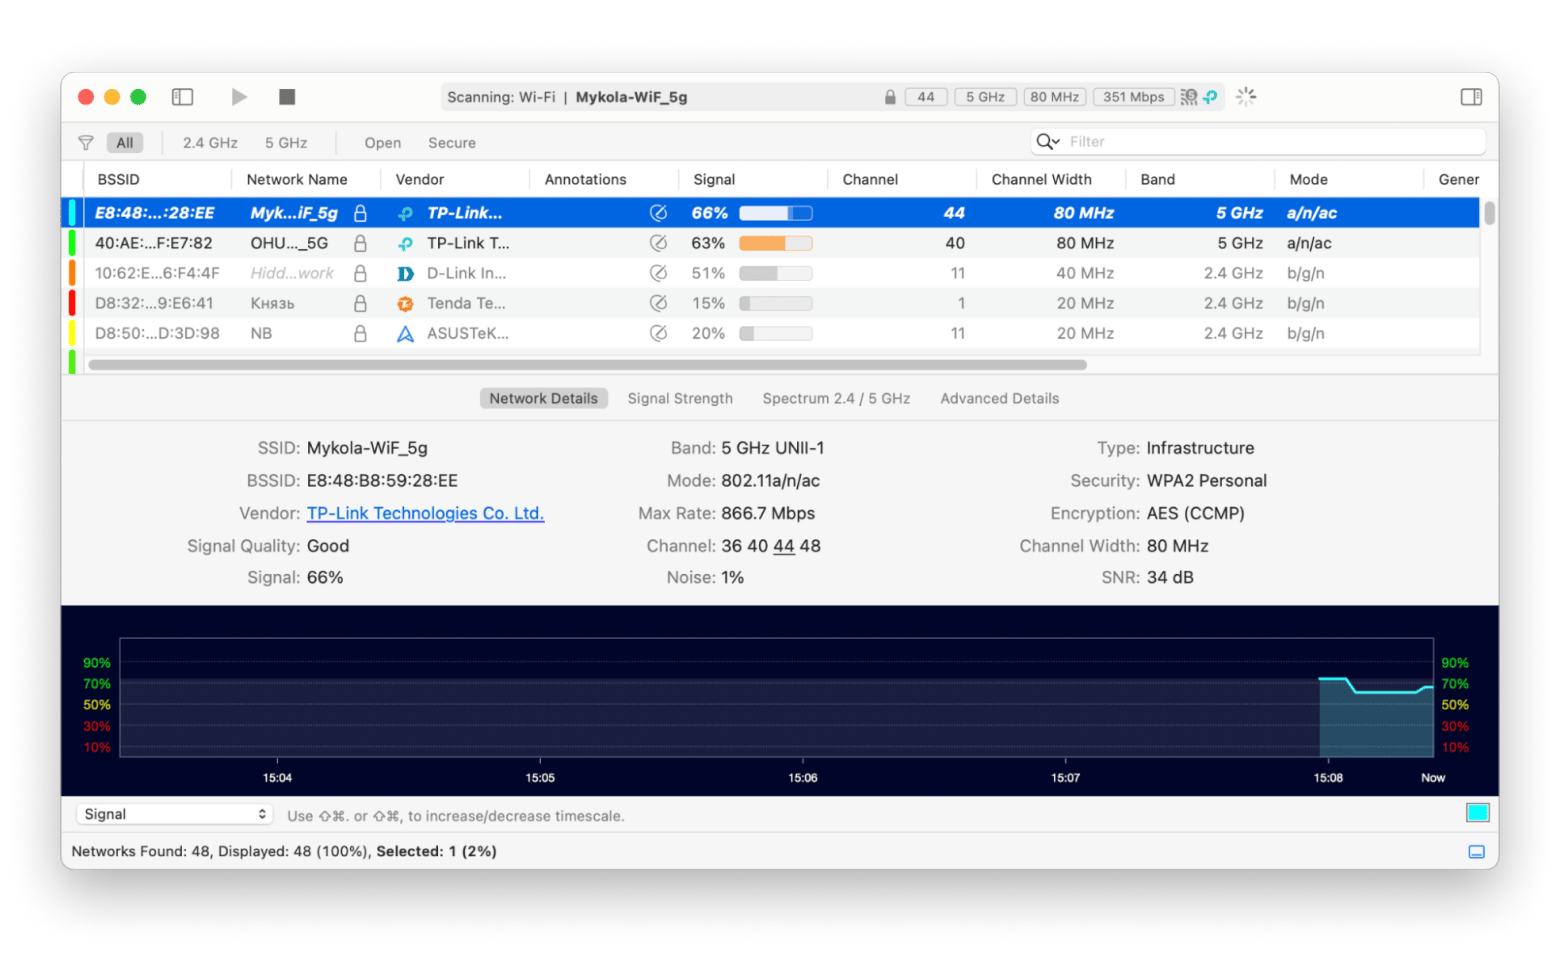
Tip: I can handle my network manually, but there's a much easier and quicker way that has made my life simpler when dealing with Wi-Fi — you should check out WiFi Explorer on your Mac.
WiFi Explorer scans your network and shows important details like the band, range, security status, signal quality, country code, channel, and much more. I can troubleshoot network issues quickly without needing professional help. No system admin skills required — just open the app and start fixing problems on your own.

How to forget a Wi-Fi network on Mac
Now, coming to the main topic — how to forget WiFi on MacBook. Let me walk you through clear and actionable steps of the process:
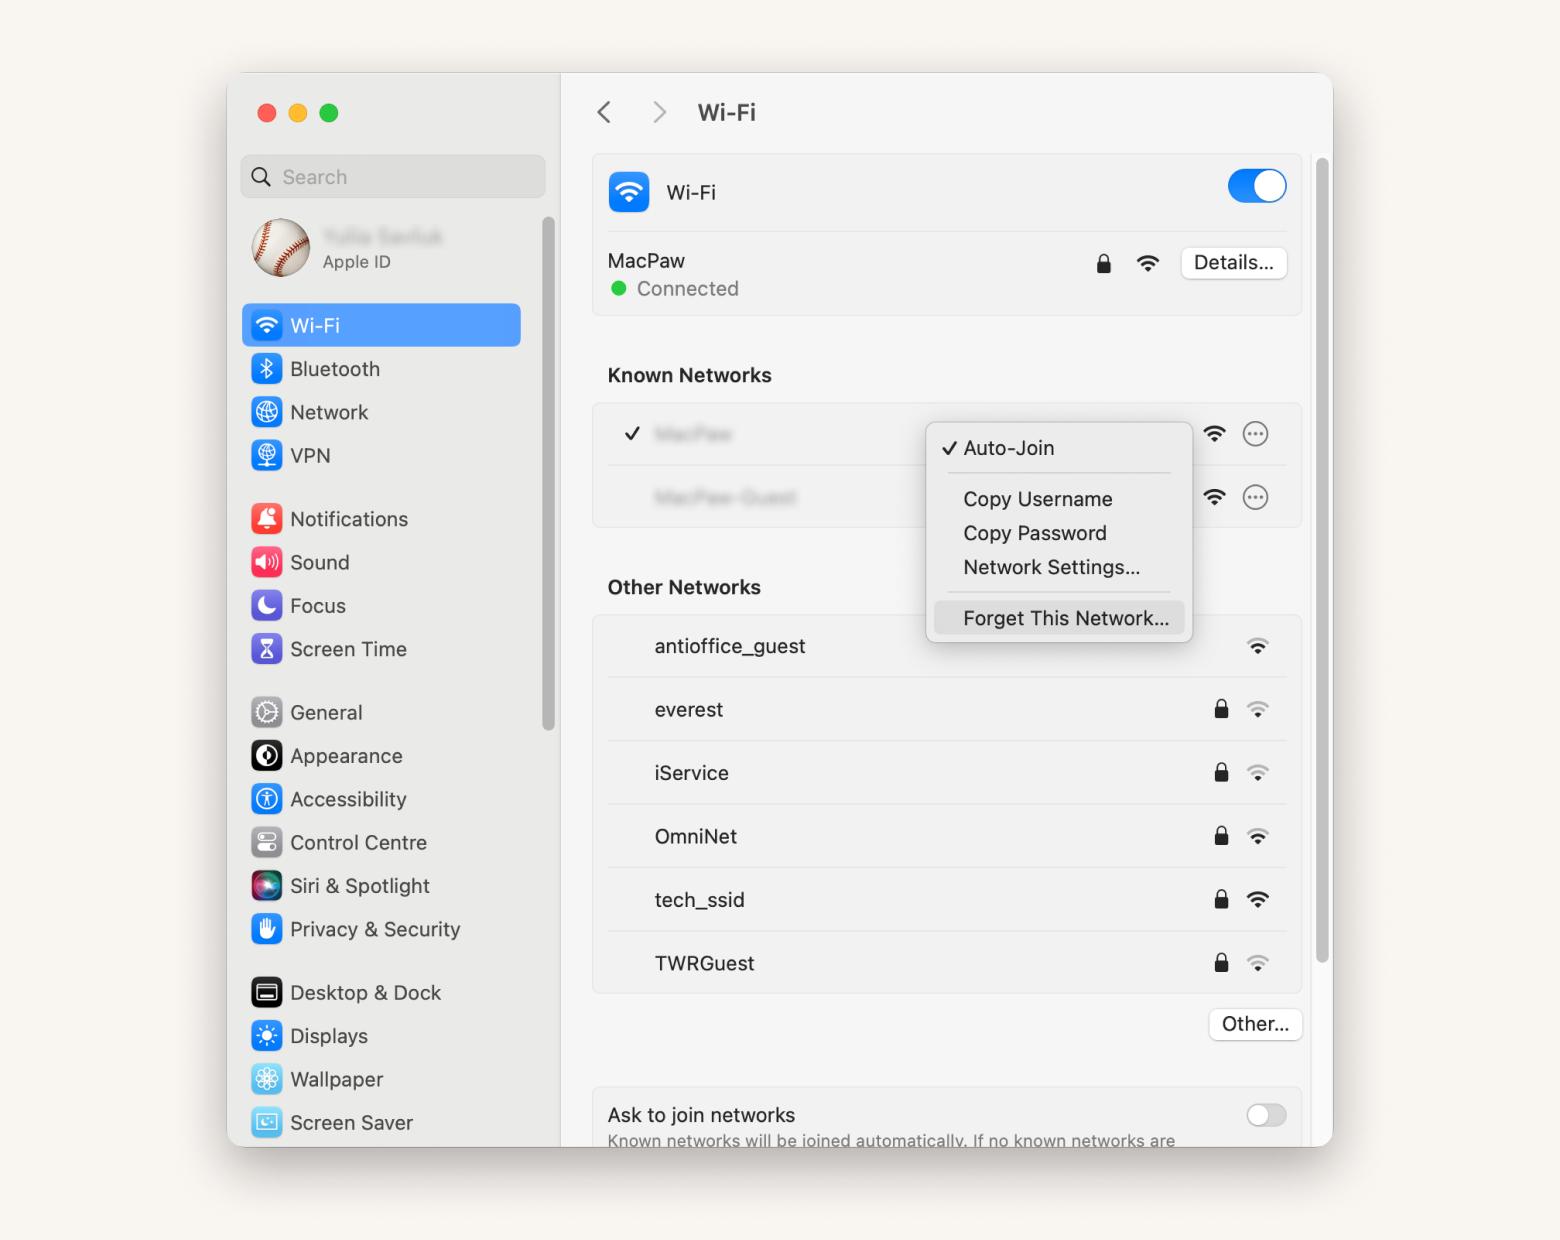
Click the Wi-Fi icon at the top-right menu bar.
Click Wi-Fi Settings, or click the Apple icon > System Settings.
Choose Wi-Fi network > Right click > Forget This Network.
Click Remove.
![]()

Use the same process to forget any Wi-Fi networks on your Mac.
Reconnecting to the forgotten Wi-Fi network
You can always reconnect to the forgotten or removed Wi-Fi network. Again, this is easy! Just ensure the Wi-Fi is on and your device is within the range first:
- On your Mac, click the Wi-Fi icon in the menu bar.
- Select the network you want to reconnect to from the list.
- Re-enter the password (or the updated password) and click Join.
If you don’t see the network, click Other Networks at the bottom of the list to display nearby available networks.
Additional tips for managing Wi-Fi networks on Mac
Here are a few tricks I’ve picked up to optimize my connection and keep Wi-FI running smoothly.
Set network preferences on Mac
Prioritizing networks on your Mac ensures that your device connects to preferred networks automatically.
Here’s how to set them on your Mac:
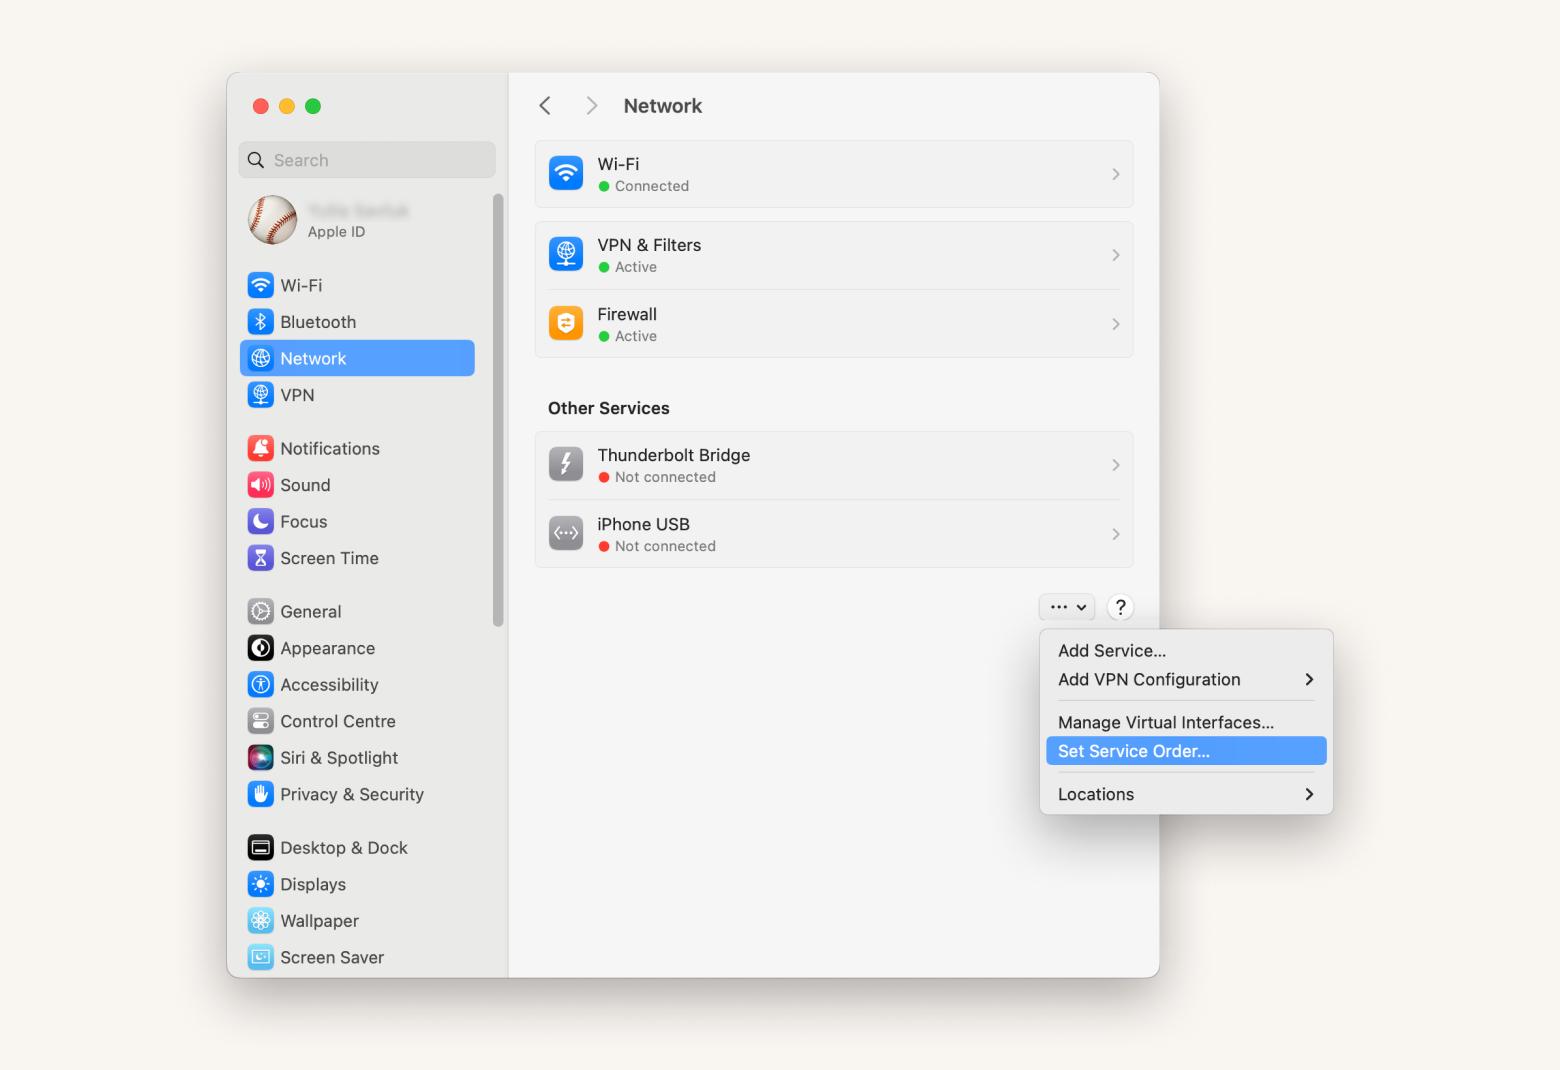
- Click the Apple icon in the menu bar > System Settings.
- Click Network.
- Click the three-dot menu at the bottom of the network services column.
- Click Set Service Order.

- Drag your most preferred network type on the top.
- Press OK to save changes.
Now, your Mac will automatically connect to networks based on the priority you’ve set. If Wi-Fi isn’t available, it will attempt to connect via Thunderbolt Bridge, and if that’s unavailable, it will try iPhone USB.
Turn on Firewall to avoid connecting to unsecured networks
Imagine if you could set up your Mac to never connect to an unprotected, public, or less secure network. Pretty convenient, right? You can make this happen by using a firewall. It restricts automatic connections to unsafe public networks.
Follow these steps to enable a firewall on your Mac:
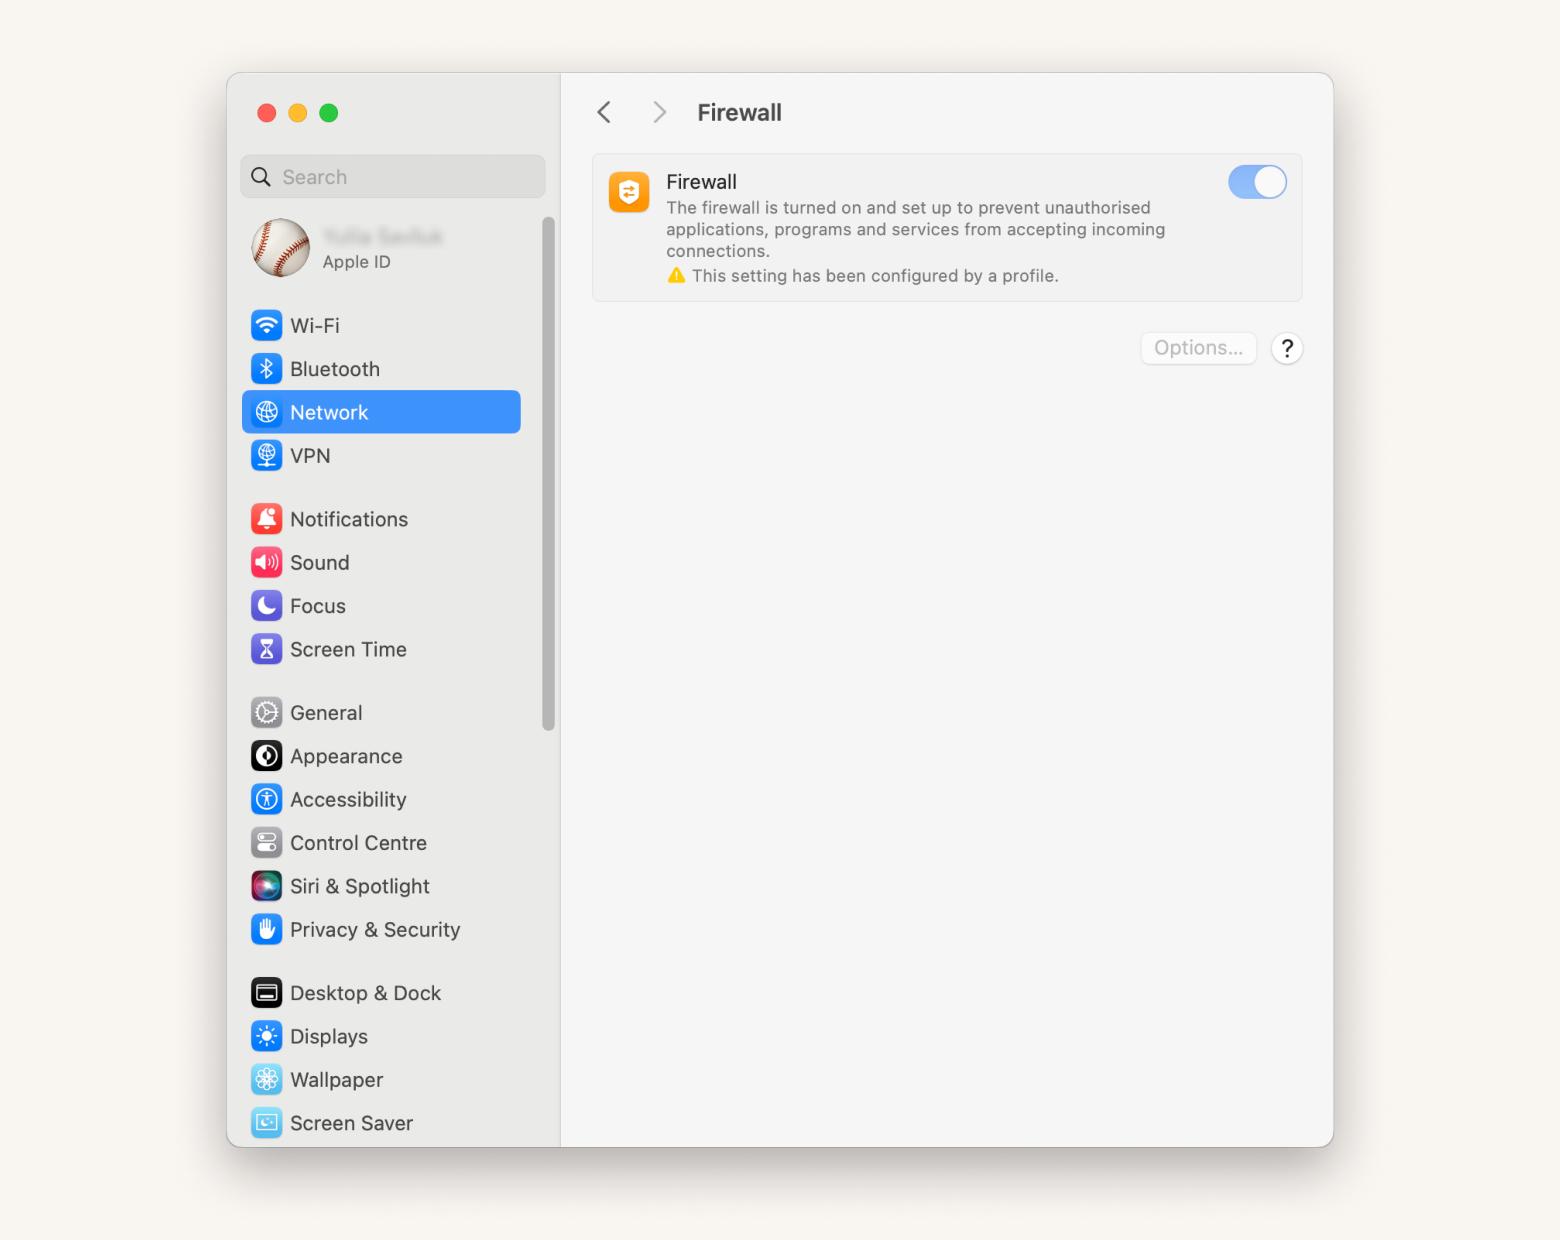
- Click the Apple icon in the menu bar > System Settings.
- Click Network > Firewall.
- Turn on Firewall.

- Click Options.
- Turn on Block all incoming connections.
You can also enable Stealth Mode to make your Mac less visible on networks if you wish to.
Summing up: Best methods to forget Wi-Fi network on Mac
Now you know how to forget WiFi on your MacBook. I use an entire toolkit of WiFi tools to manage my WiFi and keep it secure. For this, NetSpot is a wonderful network analyzer that helps manage, deploy, and fix any wireless network quickly and smoothly, while WiFi Explorer helps me detect and fix any issue with my network.
You can try these apps with a 7-day free trial on Setapp, a platform offering 250+ top-performing iOS and macOS apps. Whether you need tools for writing, managing databases, or anything in between, Setapp has you covered.


