How to create a timeline
If you need to present complex information in an interesting, digestible, and easy-to-follow way, this article is for you. We’re going to talk about timelines.
Timelines are excellent for organizing concepts, events, and information. They are often used in case studies, product design, customer service, and education. How to make a timeline? You only need a suitable timeline maker on hand to draw a timeline. We’ll look at various options in this guide. Furthermore, we’ll walk you through the process of building a timeline, step by step. Keep reading!
What is a timeline?
In order to help viewers quickly understand temporal linkages, a timeline presents a chronological list of events along a drawn line. Timelines are increasingly depicted in infographics that combine text and graphic pictures for better presentation.
How to do a timeline
If you want to illustrate a series of events graphically, such as the major milestones in a project or significant events in a person’s life, you can easily do that with the help of timeline generators. However, before we cover the best options, we’d like to share a few useful tips on how to make a timeline.
- 1. Gather the data you require
- 2. Make the timeline’s outline
- 3. Pick a layout for your timeline
4. Make your timeline more appealing
You must first have a concept of the details you will convey with your timeline, whether it be for a project timeline, an agenda, or an outline of a historical event for a college project.
The timeline often shows dates, times, locations, etc. Depending on your goal, you can add more information (such as a description of the event).
To help you through the process, start by drafting a preliminary outline. This stage will assist you in selecting and cataloging the essential information from the materials you collected. Your timeline should have the following basic elements: dates, the name of the event, its details, etc. Describe the essential events, including significant dates, times, locations, names of people, etc. Choose a start and finish date, then list the events that occurred between those dates in chronological sequence.
You can choose between the most popular timeline layouts: vertical, horizontal, and snake.
Vertical layout: When you have too many things to showcase, use a vertical layout. With each new point added, you can expand the vertical chronology because it’s always simpler to scroll down than to the side.
Horizontal layout: When your timeline contains fewer points, you can utilize a horizontal layout. It’s the layout style that works best for presentation slides.
Snake layout: The snake layout is ideal for a lot of points and little text. Use the snake layout rather than the vertical timeline if you’d rather confine your timeline to one page. Additionally, there is space to add photos.
Use colors, shapes, and fonts to make the timeline of events stand out, provide a uniform appearance, and, most importantly, bring attention to key elements. For instance, you can use different shapes to group related events into easily recognizable categories or color codes to indicate the significance or amount of risk associated with each milestone. To further explain an event or task on the timeline, use images. This can improve the timeline’s clarity and aesthetic look.
What is the best timeline software for a Mac?
A project timeline can be easily created using basic spreadsheets or other manual techniques. However, employing a reliable timeline tool to create it will make it more efficient and professional.
Many users are familiar with Timeline Maker Pro as it’s one of the best timeline creators on the market. Unfortunately, the app is not available for macOS. But don’t worry. Mac users have some similar-functioning alternatives to work with. Keep reading to learn more about them.
Make a timeline with native macOS tools
After you have decided on a layout, it’s time to finally answer the question, “how to make a timeline?” We’re going to walk you through the process. Let’s start with the native macOS tool Pages.
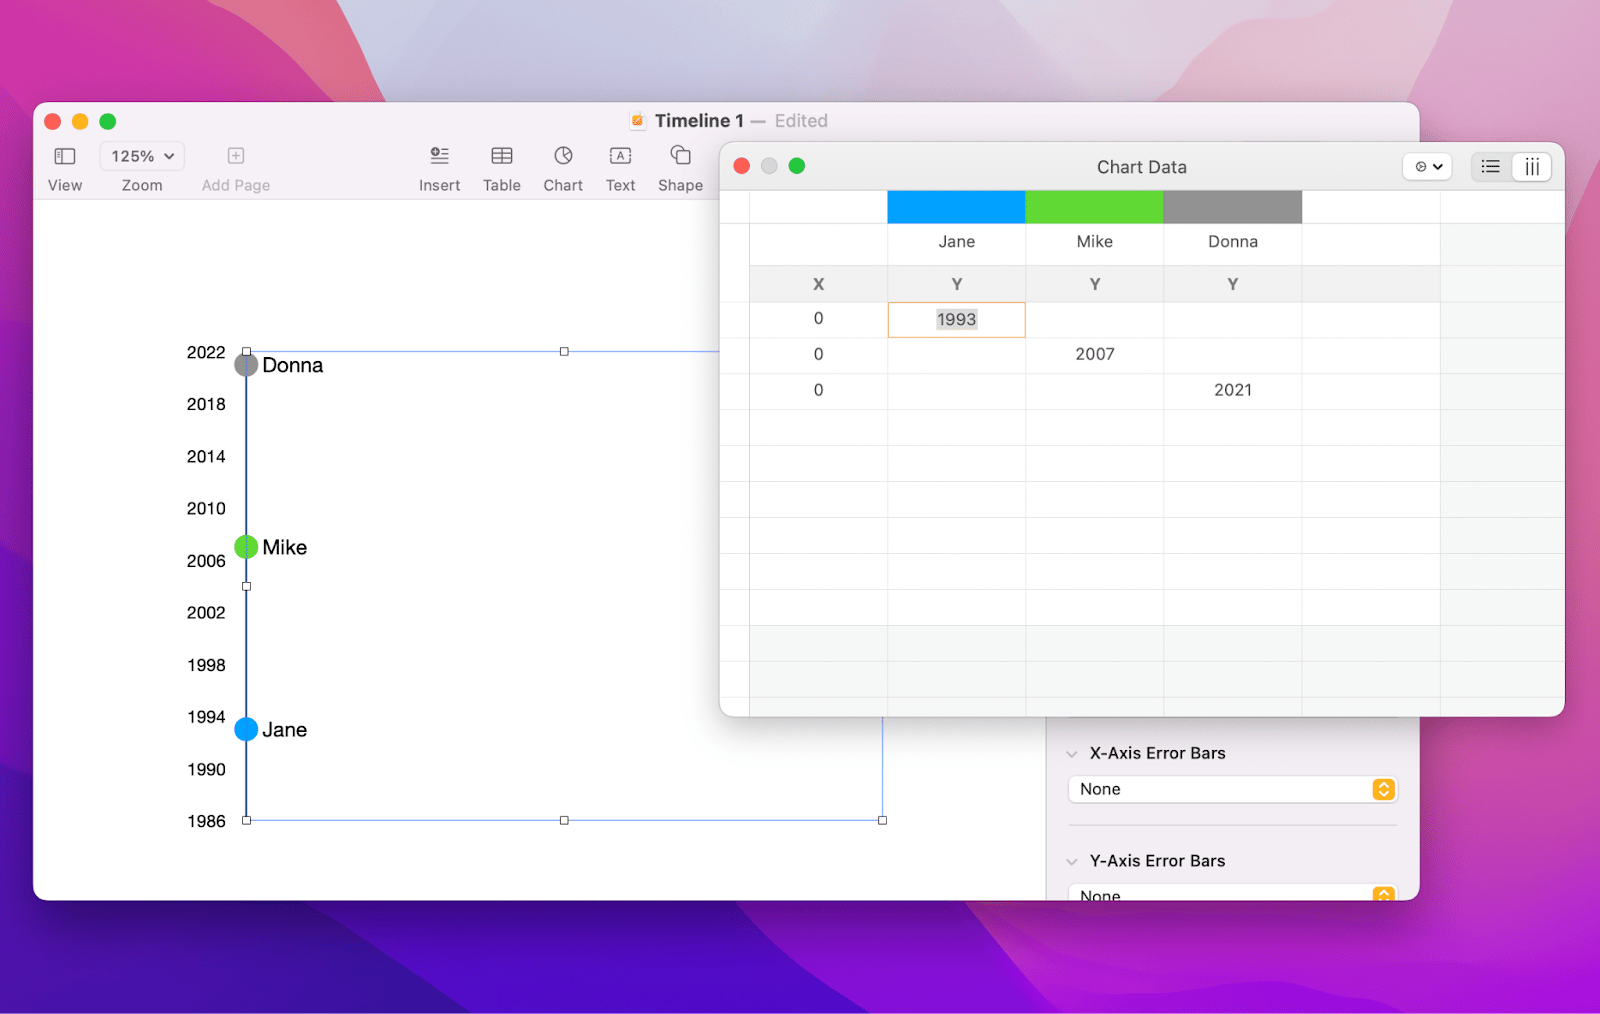
While there’s no timeline function in Pages, you can still make charts. By using the right kind of chart you can create a timeline chart. Here’s how:
- Open Pages
- Create a new document and just choose a regular blank document
- Click on Chart and then use the 2D scatter chart (the left option at the bottom of the page)
- Then click the Edit Chart Data button to convert this to a timeline
- Clear out everything you see in the chart (click cell 1, then hold Shift and click cell 18, then press Delete)
- Name the columns for each item
- Set every X value to zero
- Then set Y values diagonally
- You can further adjust this chart by clicking Format in the top right corner of the screen.
How to create project timeline
A project timeline: what is it? Project managers can view the whole project plan in one location by using a project timeline, which is a visual list of tasks or activities arranged chronologically. A project timeline usually looks like a horizontal bar chart with each task represented by a name and a start and finish date.
A project timeline offers a thorough perspective of the entire project from beginning to end. You may view a task’s start and due dates as well as its dependency on other tasks, which is crucial information.
As you can see, a project timeline can be invaluable for a project team, but creating one by hand or even using Excel can be difficult. Fortunately, the software mentioned before can quickly help you make an interactive timeline. On top of that, you can take advantage of apps like SheetPlanner, Timemator, Taskheat, and Diagrams. These are great tools to manage tasks in a timeline.
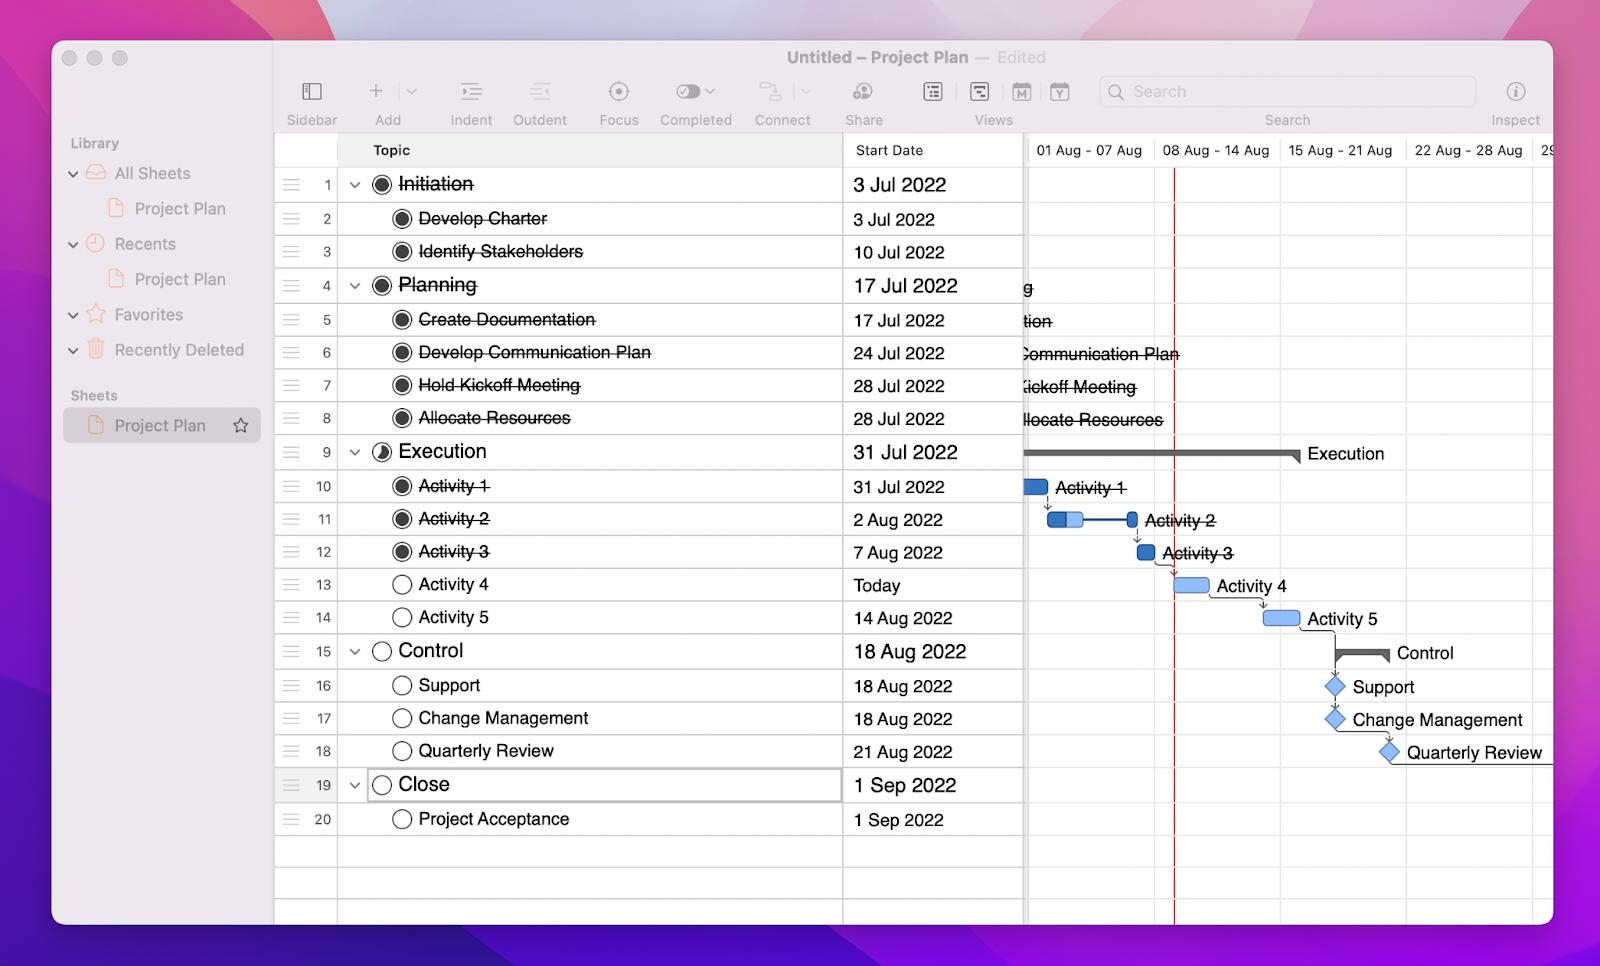
Anyone may arrange activities, carry out long-term planning, manage projects, and more with the help of SheetPlanner. Users can focus on their most urgent tasks in the calendar while also planning and visualizing goals in a simple timeline format by days, weeks, months, quarters, and years.
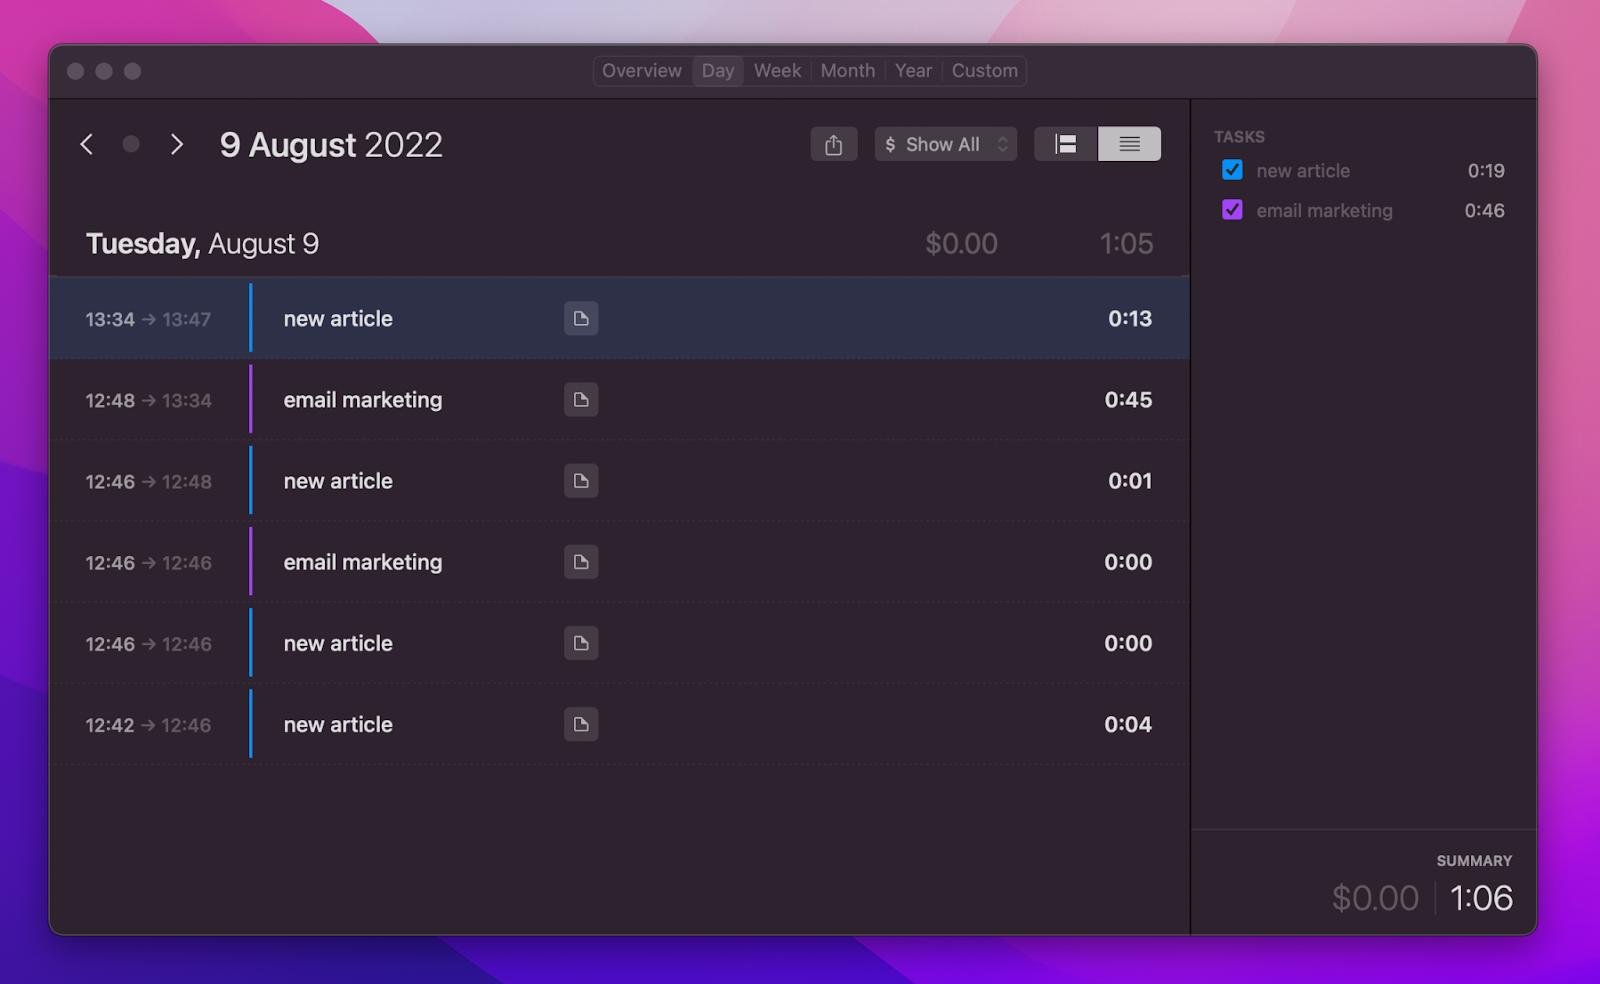
You may also like Timemator, a time management app that can keep track of how you or your team are spending time on projects. You may only want to track one project or dozens. Without you having to do a thing, Timemator combines everything into a single activity timeline. Simply look at the timeline whenever you want to see how your time is spent. The best thing: with just a few mouse clicks, you can assign the time to your projects.
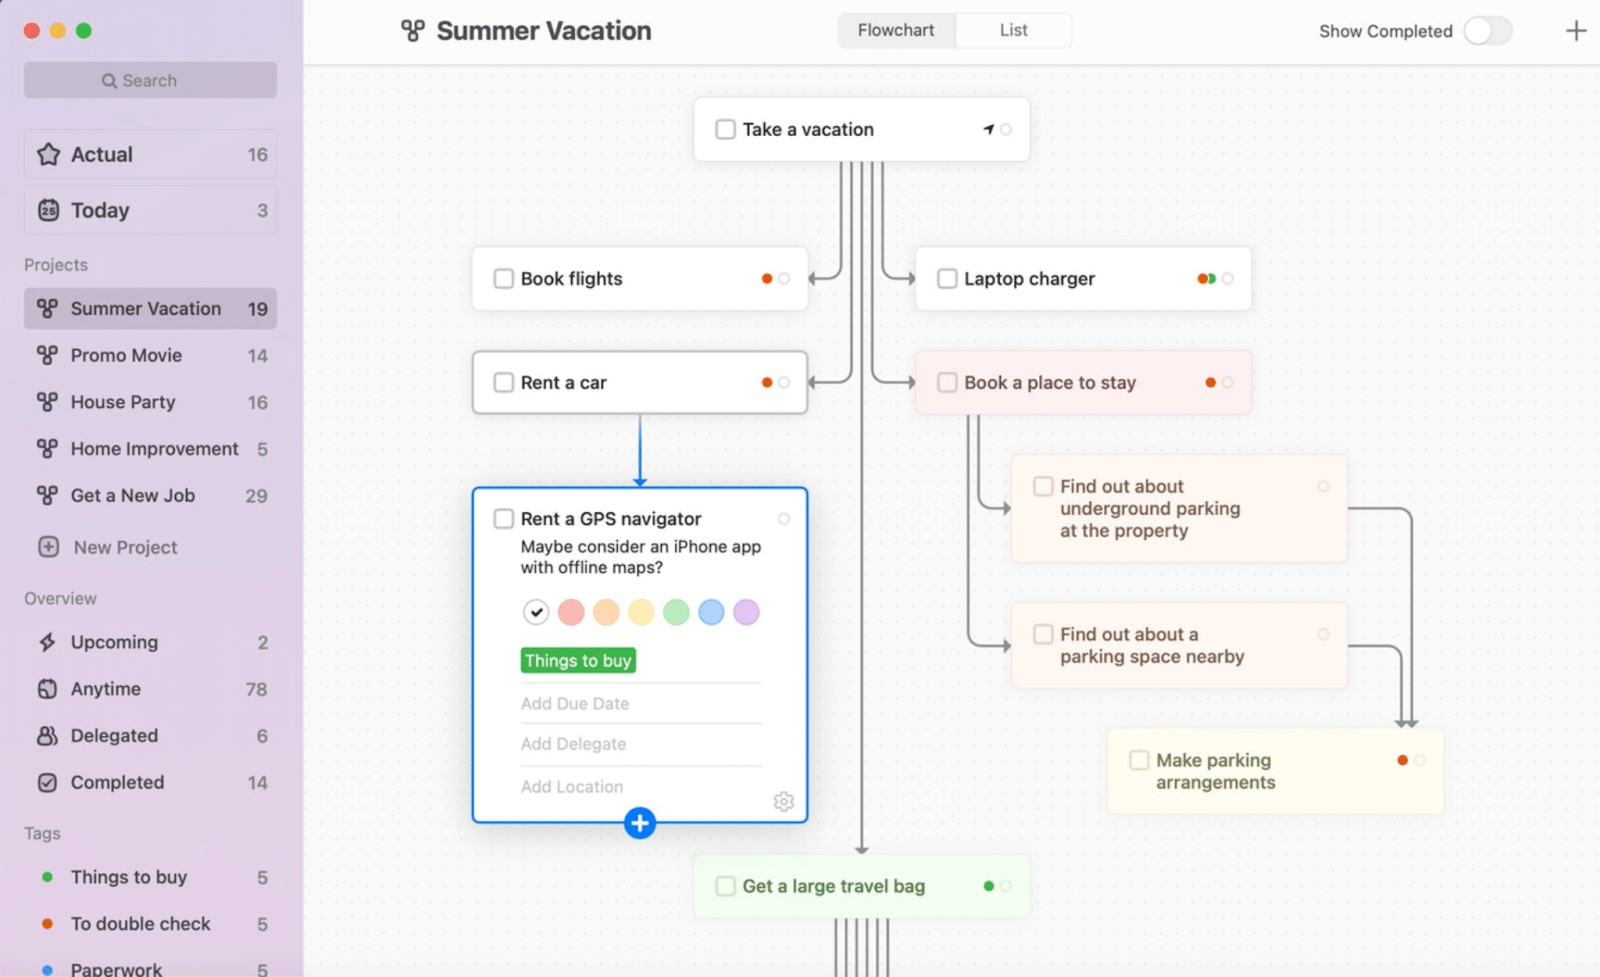
Another great app is Taskheat. It guides you in how to approach tasks properly utilizing a visual flow structure. Identify what needs to be done and link tasks together in Flowchart or List views.
To help you remember to follow up with someone when you’re leaving the workplace at the end of the day, Taskheat allows you to create location-based notifications, add tags, and share your flows with other people.
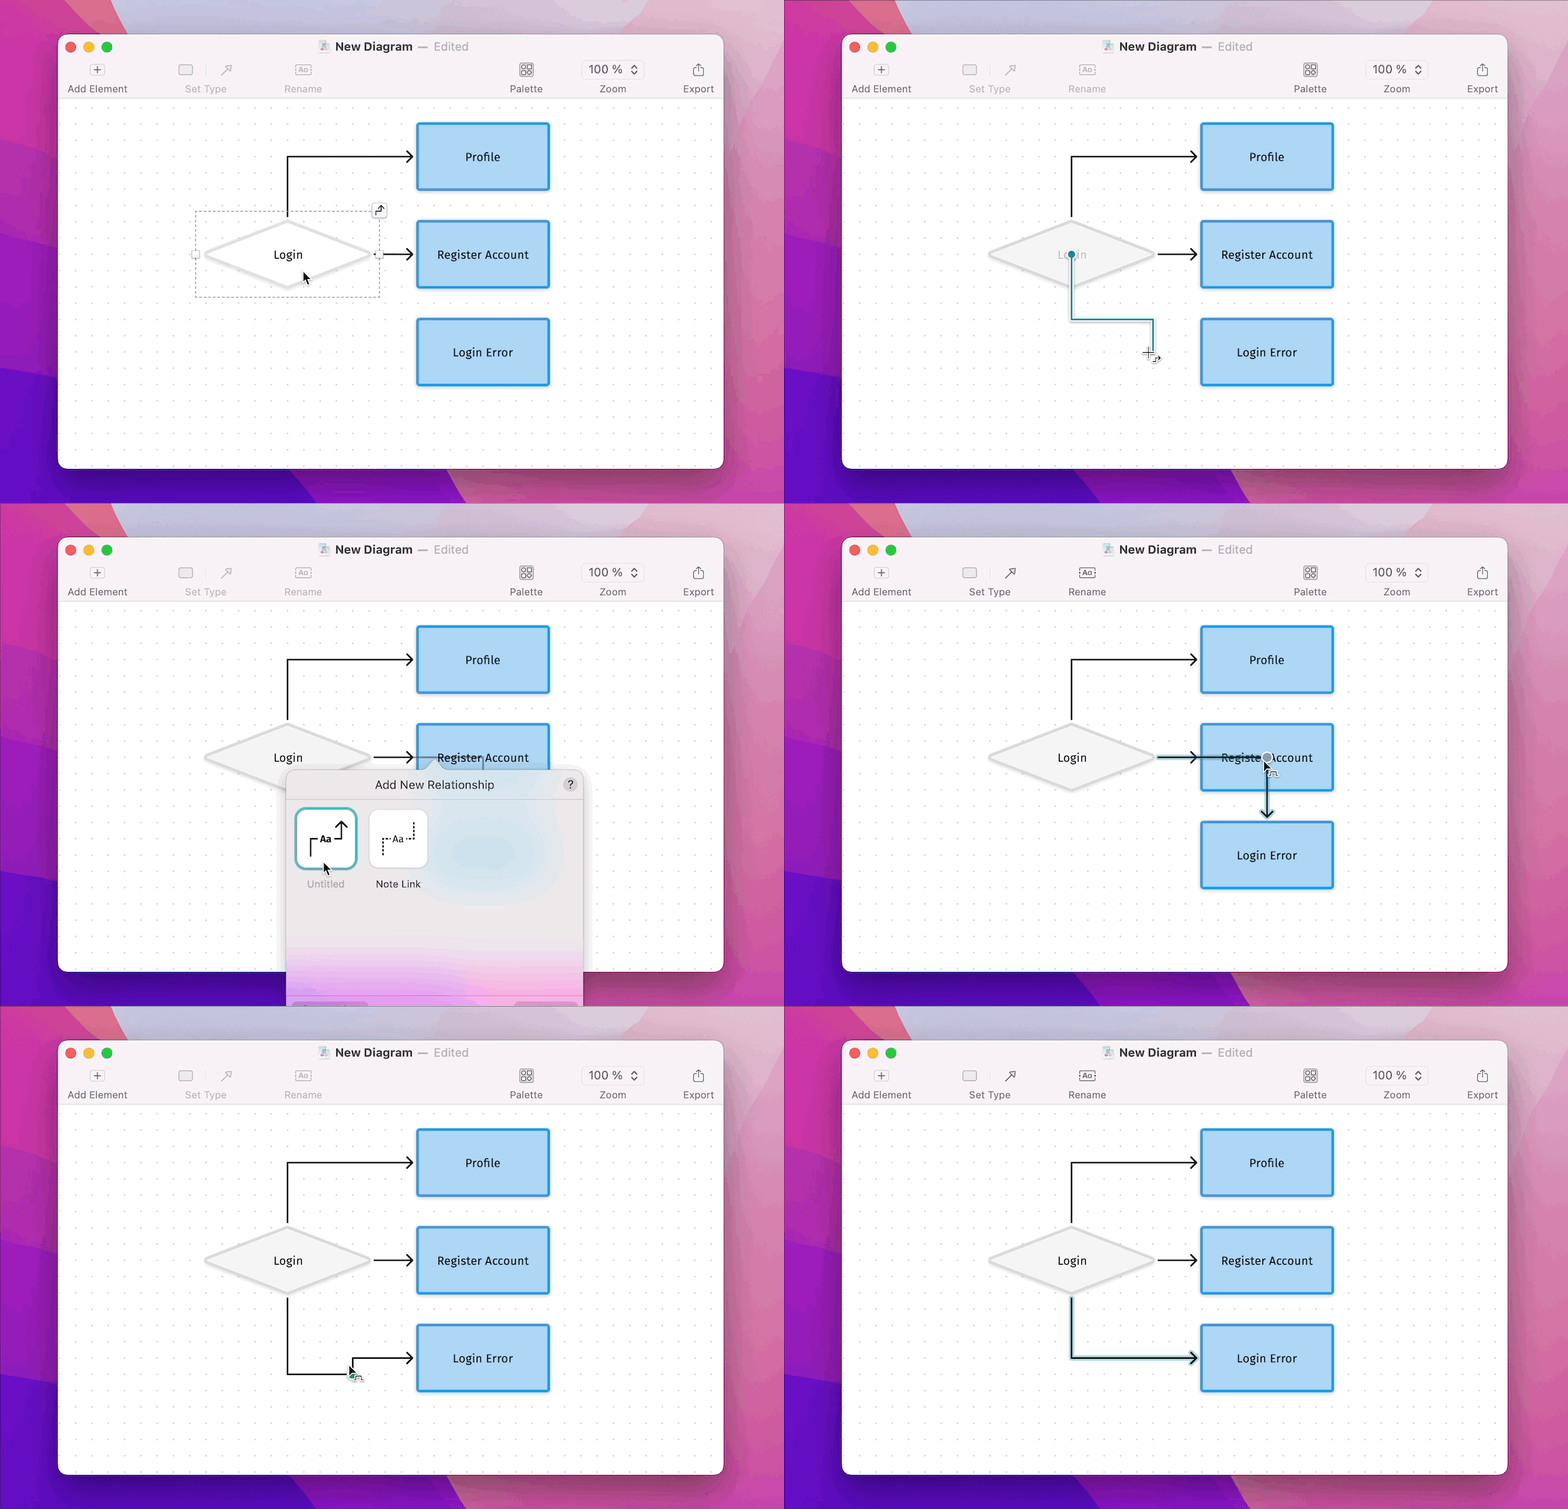
You can also visualize information with Diagrams. The app makes it simple to create diagrams by using objects to frame them. Once your objects are built, all it takes to establish a relationship between them is a simple drag and drop.
Create a timeline online
As you already know, any event or project, including significant milestones, due dates, and related tasks, can be easily visualized using timelines. You may need to create a timeline online so that everyone on your team can quickly access it during the course of the project in order to keep everyone on the same page. Good news: you can create a timeline in Google Docs using the Lucidchart add-on or Google Drawings.
The Lucidchart editor will let you easily create your timeline using drag-and-drop shapes and templates.
Alternatively, you can use Google Drawings to design your timeline. Just bear in mind that creating your timeline could be more challenging or time-consuming because there are no templates and only a few shapes available.
To create a timeline in Google Docs, take these actions:
- Open a Google Doc
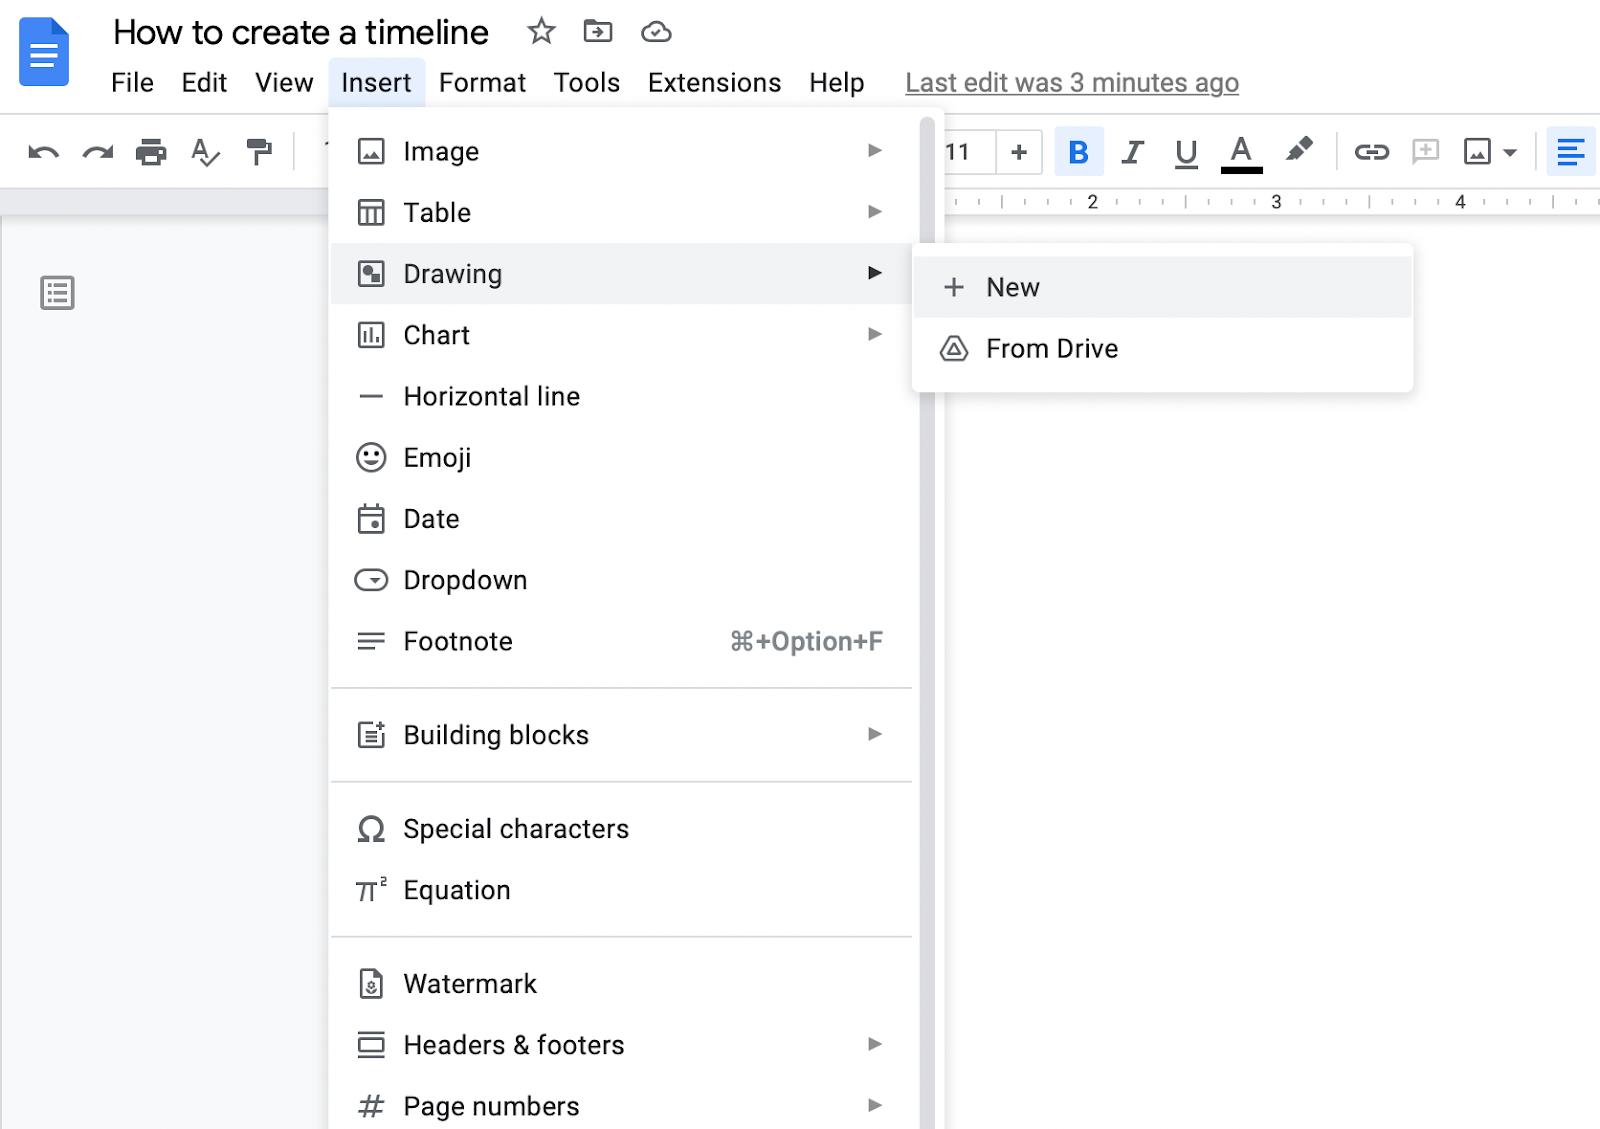
- Click Insert > Drawing > New
- Then click the shape icon to add the shapes you want. Once you choose a shape, additional formatting options will appear, and you can double-click on any shape to add text
- When you’re finished, click Save and Close.
If you don’t need a complicated visual for your presentation, Google Slides has a quick solution too. You can easily customize any of the provided templates to satisfy your needs.
To create a timeline in Google Slides:
Choose the right slide and open the Insert menu. Then select Diagram. From the right sidebar, choose the Timeline template.
You can also create a timeline free with the help of Canva and Adobe Express.
The best way to make timelines on a Mac
Mac native tools can be really handy in many cases but not always the right option. When you need a professional, nice-looking timeline, dedicated third-party apps may be your best bet. We suggest using Timemator, SheetPlanner, Taskheat, and Diagrams to make timelines and manage tasks in a timeline. All five tools mentioned in the article are available for free as part of a seven-day trial of Setapp. Along with these three apps, you’ll have unlimited access to the full Setapp catalog of over 260 apps for Mac and iPhone. When the trial ends, continued access to Setapp is only $9.99 + tax per month. It’s a great bargain, so why wait? Give Setapp a try today!


