Back up and migrate your Mac files without Migration Assistant
Get Backup Pro creates bootable clones, scheduled backups, and encrypted transfers — so when Migration Assistant fails, you have a reliable plan B already in place. Available on Setapp.
Is Apple Migration Assistant stuck on your Mac? Let me walk you through fixes and solutions that will make the migration process more efficient and easy.
How to fix Migration Assistant not working
Typically, Apple Migration Assistant is stuck due to one of the common issues below. Here are the fixes you should start with.
1. Check sharing settings
To start Migration Assistant, you need to check your sharing settings.
Go to System Settings > General > Sharing.
Turn on File Sharing.
Click on i near the File Sharing section, and ensure the folders that have been shared are listed. If not, click the + button to add them manually.
Select each shared folder and confirm that the proper users have read and write permissions.
Now, try migrating again.
2. Check cable connection
The next thing to do if you're experiencing issues with Migration Assistant unable to connect is to verify your cable connections.
Check that the cable you're using is appropriate for your Mac model. It may be an Ethernet, Thunderbolt, or USB-C cable.
Check the ports and wires on your Mac for any damage.
Go to System Settings > Network (if you're using an Ethernet cable) to ensure that Ethernet is enabled and set up correctly on both Macs.
Ensure that both Macs are linked to the same network when wired.
You can also restart both devices.
3. Turn off the firewall on Mac
Security software can prevent file migration, so if Migration Assistant is not connecting, you should try to disable the firewall.
Go to System Settings > Privacy & Security.
Select the FireVault tab.
Click the lock icon.
Enter your administrative login and password.
Select Turn Off Firewall to disable the firewall.
Click the Turn Off Firewall button once more in the confirmation dialog box.
Firewalls are essential for safeguarding your Mac against unauthorized access and attack. However, they can occasionally conflict with Migration Assistant, causing problems with the data transfer procedure. CleanMyMac can be especially useful in this situation. CleanMyMac checks your Mac for strange, unusual or malicious behavior and delivers a detailed report on its health, as well as specific instructions to remove any discovered malware, ensuring your system is in peak condition for data transfer. With it, you can feel completely safe while using your Mac without firewall.
4. Try to run Apple Diagnostics
If you get the message "this Mac can't be used to migrate data", you should try running Apple Diagnostics to detect any hardware issues.
Unplug all external devices except the keyboard, mouse, monitor, and Ethernet connections.
Turn off your Mac completely (Apple menu > Shut Down).
Restart your Mac, then immediately press and hold the D key on your keyboard.
Use the arrow keys or mouse to choose your desired language for the diagnostic tool, then press Return.
Apple Diagnostics will automatically perform a number of tests on your Mac. Once the diagnostics are completed, the reports will show any errors discovered. Each issue will have a reference code that you can use for additional troubleshooting or to contact the Apple Support team.
5. Use target disk mode
Problems with data transmission between Macs may be resolved by using the target disk mode. In this mode, one computer behaves like an external disk of the other.
Turn off both the source and destination Mac.
Connect two Macs using a USB-C, FireWire cable or Thunderbolt.
Hold down the T key and push the power button on the source Mac until you see the target disk mode icon.
Activate the destination Mac.
Go to the destination Mac and open Finder. The disk from the source Mac should appear on the desktop or in the sidebar of the Finder as an external drive.
Select the desired files and drag them onto the destination Mac's drive from the source Mac.
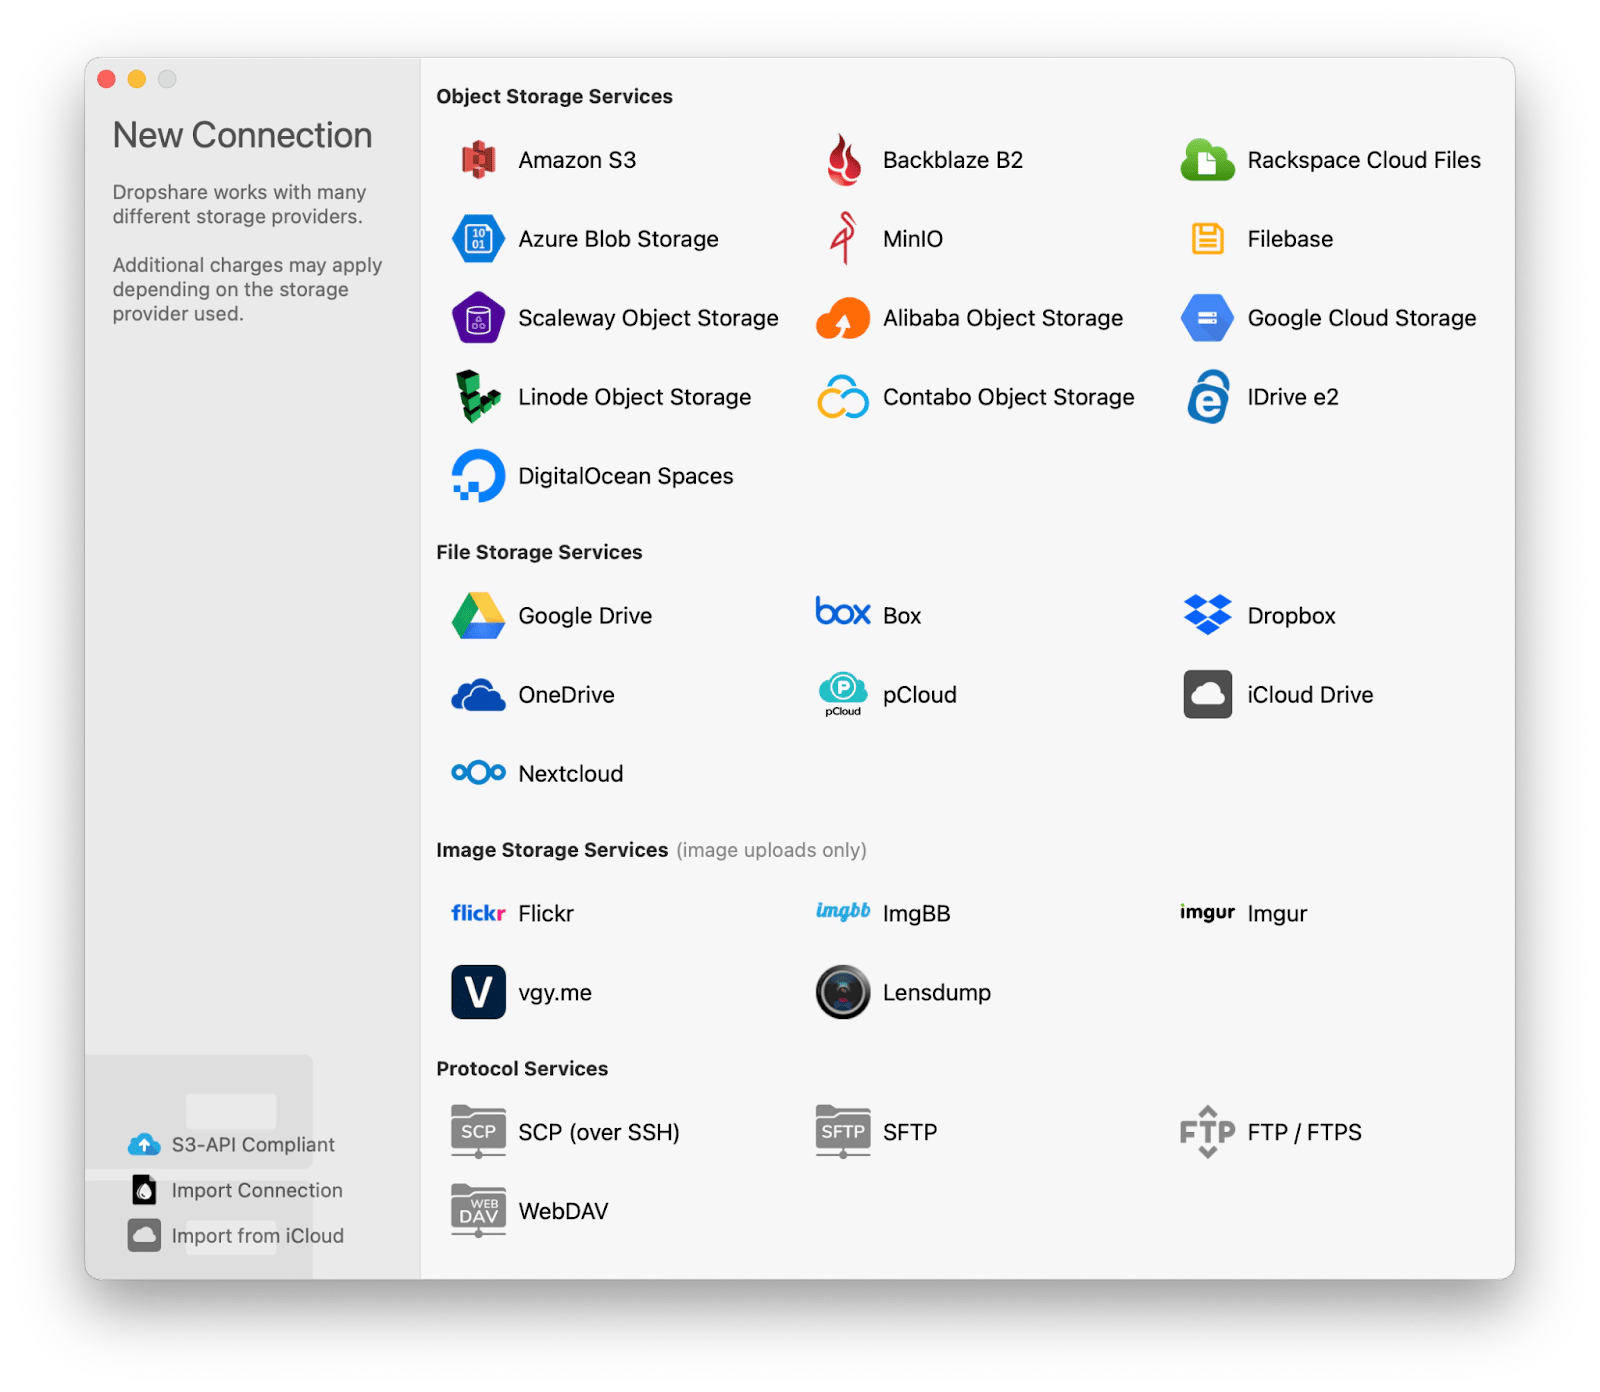
Cables are fine, but if you prefer wireless data transfer, I suggest you try Dropshare. It connects all your cloud storages under one roof and helps you easily upload any files you need. Data migration with Dropshare works like this:
Download and install Dropshare on both of your Macs.
On the source Mac, go to Preferences > Connections > Add Connection and connect your cloud storage (Google Drive, Amazon S3, Dropbox, etc.).
Drag the files to the Dropshare icon in the menu bar.
Open Dropshare on the target Mac, access the storage you need, and download the files.
You can also specify options like expiration dates and password protection to increase security. Easy, right?
6. Reinstall macOS
If you keep getting the "Migration Assistant logging out failed" message, try reinstalling macOS.
Back up your Mac. Use Time Machine (built-in tool) or GetBackup Pro (my favorite tool, which allows me to back up selected files).
Shut down your Mac (Apple menu > Shut Down).
Enter the Recovery Mode. Depending on your Mac model, you have two options (you can try them both, it's okay):
Press and hold power button until you see startup options. Go to Options and enter Password.
Press and release the power button. Then immediately press one of the combinations: Command + R, Option + Command + R, Shift + Option + Command + R.
Select Reinstall macOS > Continue.
Do not turn off your Mac or close its lid until the reinstallation process is complete. Then turn on your Mac and try to transfer your data again using Migration Assistant.
7. Start Mac in recovery mode
Recovery mode can be a good solution for Migration Assistant not connecting because it creates a clean and controlled environment for troubleshooting and your Mac maintenance.
Turn on your Mac.
Press the key combination:
For Macs that use Apple Silicon (M1 chip): Press and hold the power button until you see Loading startup options. Then, press and hold Option to view the Startup Manager.
For Macs with Intel CPUs: When the startup sound plays on, simultaneously hit and hold the Command + R. Hold them until you see a spinning globe or the Apple logo.
After a while, depending on your Mac's processor type, you should see either the macOS recovery screen or the macOS utility window.
Recovery Mode assists in resolving the Migration Assistant problem by providing tools such as Disk Utility to correct disk faults that may be preventing the migrating process. It also supports macOS reinstallation, which can resolve system corruption that impacts Migration Assistant.
8. Reset System Management Controller (SMC)
Resetting the SMC can help resolve Apple Migration Assistant got stuck by fixing low-level hardware issues that may be causing connectivity or performance problems. Here is how to reset the SMC on your Mac:
For Mac with T2 chip:
Click the Apple menu, then Shut Down.
Press and hold Shift + Control + Option + power button for ten seconds.
Release all keys and the power button.
Press and hold the power button for like five seconds to turn on your Mac.
For Mac without T2 chip:
Click the Apple menu, then Shut Down.
Press and hold the Shift + Control + Option + power button for ten seconds.
After ten seconds, release all keys.
Turn on Mac by pressing the power button and wait a few seconds.
For Mac Pro, iMac and Mac mini:
Click the Apple menu, then Shut Down.
Disconnect the power cord from your Mac.
Wait and unplug it for 15 seconds.
Reconnect the power cord and plug it back in.
Wait for 5 seconds, and press the power button to turn on your Mac.
After resetting the SMC, try Migration Assistant again.
9. Migrate using a Time Machine backup instead
If other options fail or you find them inappropriate, you can try to migrate from Time Machine backup directly. For this, you need an external disk and a recent Time Machine backup of all your Mac. This backup ensures that your files, settings, and programs are properly restored during transfer.
Connect the external disk with your Time Machine backup to your newly installed Mac.
Open Time Machine.
Select the file or folder you want to restore on the timeline and click the Restore button.
The migration process will begin. This can take some time, based on the amount of data.
If, for some reason, you are looking for an alternative to Time Machine, let me offer you a nice option – Get Backup Pro. I first tried it when I needed to back up a few of my apps and folders that were vital to me (while all other content was not). Backing up individual files with Time Machine is very cumbersome, so I tried Get Backup Pro. I soon discovered that it provides even more seamless backups than Time Machine, so it became my go-to tool for every occasion.
Get Backup Pro offers bootable clones for speedy system restoration, customizable scheduling for automated backups, and file synchronization across numerous devices. It also contains additional security features such as encrypted backups.
Using Get Backup Pro is also simple: launch the app and choose the backup you require: a simple file backup, a whole system clone, or a synchronization task. Set up your backup options, choose a location (such as an external drive), and initiate the backup procedure. And… done!
Migration Assistant vs. Time Machine
At this point, you might wonder if you need Migration Assistant at all if you already have Time Machine. Well, there is a thing to understand: Migration Assistant is a file transfer method, while Time Machine backup actually holds those files.
Time Machine continuously makes incremental backups of your entire system, allowing you to restore specific files or take your Mac back to a previous configuration. Migration Assistant is a file transfer tool.
This means you can restore your files from a Time Machine backup with or without Migration Assistant. At the same time, Migration Assistant can use either a Time Machine backup or another file source to transfer files.
It's not very accurate to compare different types of tools, but let's give it a try.
Migration Assistant not working? Solved
If your Migration Assistant fails, you have at least a few options to try to fix it. You can reboot your Mac, disable the firewall, reset the SMC, or if nothing else works, simply restore from backup using Time Machine (or Get Backup Pro as a smoother and more effective alternative). Another option is to move files via cloud services (in this case, try Dropshare).
Note that if you temporarily disable the firewall, make sure CleanMyMac is running in the background. It will catch any malware while you are unprotected. All these apps are available on Setapp, and there is a seven-day trial period that allows you to try all 240+ apps free of charge.
FAQ
What is Migration Assistant?
Migration Assistant is a utility that comes with macOS and helps you transfer files, user accounts, apps, and settings between two Macs or from a Windows PC to a Mac.
What to do if Migration Assistant doesn't work
Here are the steps you should try if your Apple Migration Assistant stuck.
Verify that all connections, whether made over Ethernet, Wi-Fi, or cables, are correct for both Macs (or the Mac and the external disk).
Check if the both Macs are running the most recent version of macOS.
Restart both Macs.
Turn off the firewall temporarily.
Reset SMC.
Make sure there are no network issues or interferences if you are transferring over Wi-Fi.
Use Disk Utility's First Aid to fix any potential disk issues on both Macs.
Make sure there is enough free space on the destination Mac to store the transmitted data.
Try transferring files in target disk Mode.
Restore files from Time Machin directly.
If the issue continues, you might want to visit an Apple Store or get in touch with Apple Support for more help.
How long does a Migration Assistant take?
The migration time is determined by the speed of the connection and the volume of data being transferred. It could take from a few minutes to several hours.
Does the Migration Assistant transfer everything to my new Mac?
The Migration Assistant transfers a wide range of data: apps, settings, documents, user accounts, and other data. However, for security reasons, it may not transfer some system files, non-compatible apps, and some passwords.
How do I transfer Mac without Migration Assistant?
Without Migration Assistant, you can restore your files from backup with Time Machine or Get Backup Pro, manually copy files to an external drive, use cloud storage services like iCloud or Dropbox (or all together through Dropshare).