Create a new sticky: Open Stickies (pre-installed) > File > New Note, or press Command + N.
Customize notes: • Change color: Stickies menu > Color. • Change font: Font > Show Fonts. • Collapse: Double-click on the title bar. • Keep on top: Window > Float on Top.
For many years, I jokingly called myself an unofficial ambassador of Stickies. By the end of each day, my desktop was covered in colorful sticky notes filled with reminders and ideas. During this time, I mastered all their tricks, secrets, and features, and I want to share with you how to get sticky notes on your Mac and use them to improve your workflow.
I'll start with a quick overview of Stickies' features. If you're just looking for the basics, you can wrap things up with the table below. But if you're interested in more advanced tips and tricks, keep reading for detailed insights.
I want to…
How to do it
Make a new sticky
Open the Stickies app > File > New Note.
Add more stickies
Open the Stickies app > File > New Note or press Command + N.
Edit and update sticky notes
Drag and drop images or PDFs onto a sticky note. Click the Markup icon to edit the note.
Hide stickies
Double-click on the title bar to collapse the note.
Click the box in the upper-left corner > Delete Note.
Change the color of stickies
Click on the note, select Color in the Stickies menu, and pick from a selection of colors.
How to add sticky notes to desktop Mac
So, there's a dedicated app on macOS for creating and managing sticky notes — Stickies for Mac. It's a pretty old program that's been around for over a decade and didn't receive any significant updates in recent years, so it might feel a bit clumsy. Yet, it does the job. With Stickies, you can create as many sticky notes as you want, collapse them or make them float on top, and more.
How to make a new sticky
To make a new sticky on Mac, open the Stickies app — it comes pre-installed on your Mac. In the app's menu, choose File > New Note. Once the note pops up on your screen, type or paste the text.
How to add more stickies on Mac
You can create as many stickies as you like — or as many as your screen space allows — by using the same method: File > New Note. Alternatively, use the Command + N keyboard shortcut to add more stickies to the desktop.
If you want to add more notes in a specific style, using custom fonts and colors, you can save a sticky note template: Window > Use as Default.
Edit and update sticky notes
Feel free to insert images or even PDF files — you can simply drop them onto a sticky note. Stickies have Markup support, so you can click the Markup icon on an image inside your sticky note if you want to crop, rotate, or draw on it.
To update a sticky note, click on it and start editing. You can also switch to full screen by clicking the box in the upper-right corner — it will simplify the editing process.
How to hide stickies on a Mac
Double-click the title bar to collapse or expand a sticky note. You can also use the app menu: Window > Collapse. If you want to change the size of the note, use its Zoom setting (Window > Zoom) or click the boxes in the upper-right corner — similar to entering full screen in a browser.
Delete sticky notes
It's a bit annoying that you can't use the Delete key to remove stickies from your desktop even though it feels like an intuitive option. But that's how it works. You can delete a sticky note by clicking the box in the upper-left corner > Delete Note.
If you close the Stickies app, all your notes will disappear from desktop automatically.
Why I stopped using Stickies
Now that we've covered the basics, I'd like to make a few comments before diving into other Stickies features. Stickies had been my go-to for years, but I stopped using them about a year ago for a couple of reasons.
First, I started working in an office and coworking spaces more often. And Stickies, as you see, are always in plain sight. It's not always ideal when you're working in public, especially when you're making private notes.
Second, I got tired of their settings and design. There's no problem as long as you're happy with the default yellow sheets. But as soon as you want to customize them, the settings become clunky.
While I still think Stickies is great for certain situations, other note-taking apps are now better suited to my workflow. These days, I use SideNotes. They are always on the screen (so I can open it while I'm in other apps), but the notes remain hidden until I need them. Like this:
With SideNotes, you can create groups of notes — like folders — to organize your thoughts by topic, date, or whatever works best for you. Some people even use it as an alternative to Apple Notes, but that comes down to personal preference.
Your notes deserve to be private, organized, and one swipe away. SideNotes slides in from the edge of your screen — always accessible, never in the way. Rated 97% by 1,400+ users. Free for 7 days on Setapp. Try SideNotes free. Or get SideNotes standalone via Marketplace, no membership needed.
Why can't I open Stickies on Mac?
Now, let's get back to Stickies. In my experience, problems with them are rare — I can only recall two or three issues over the years. But when they happen, there are a few possible explanations. First of all, make sure you have active stickies. If the app itself seems to be open and you see the Stickies title bar and its menu in the menu bar, go to Window and check the list of your stickies at the bottom. If there are no stickies listed, you should go and create a new one.
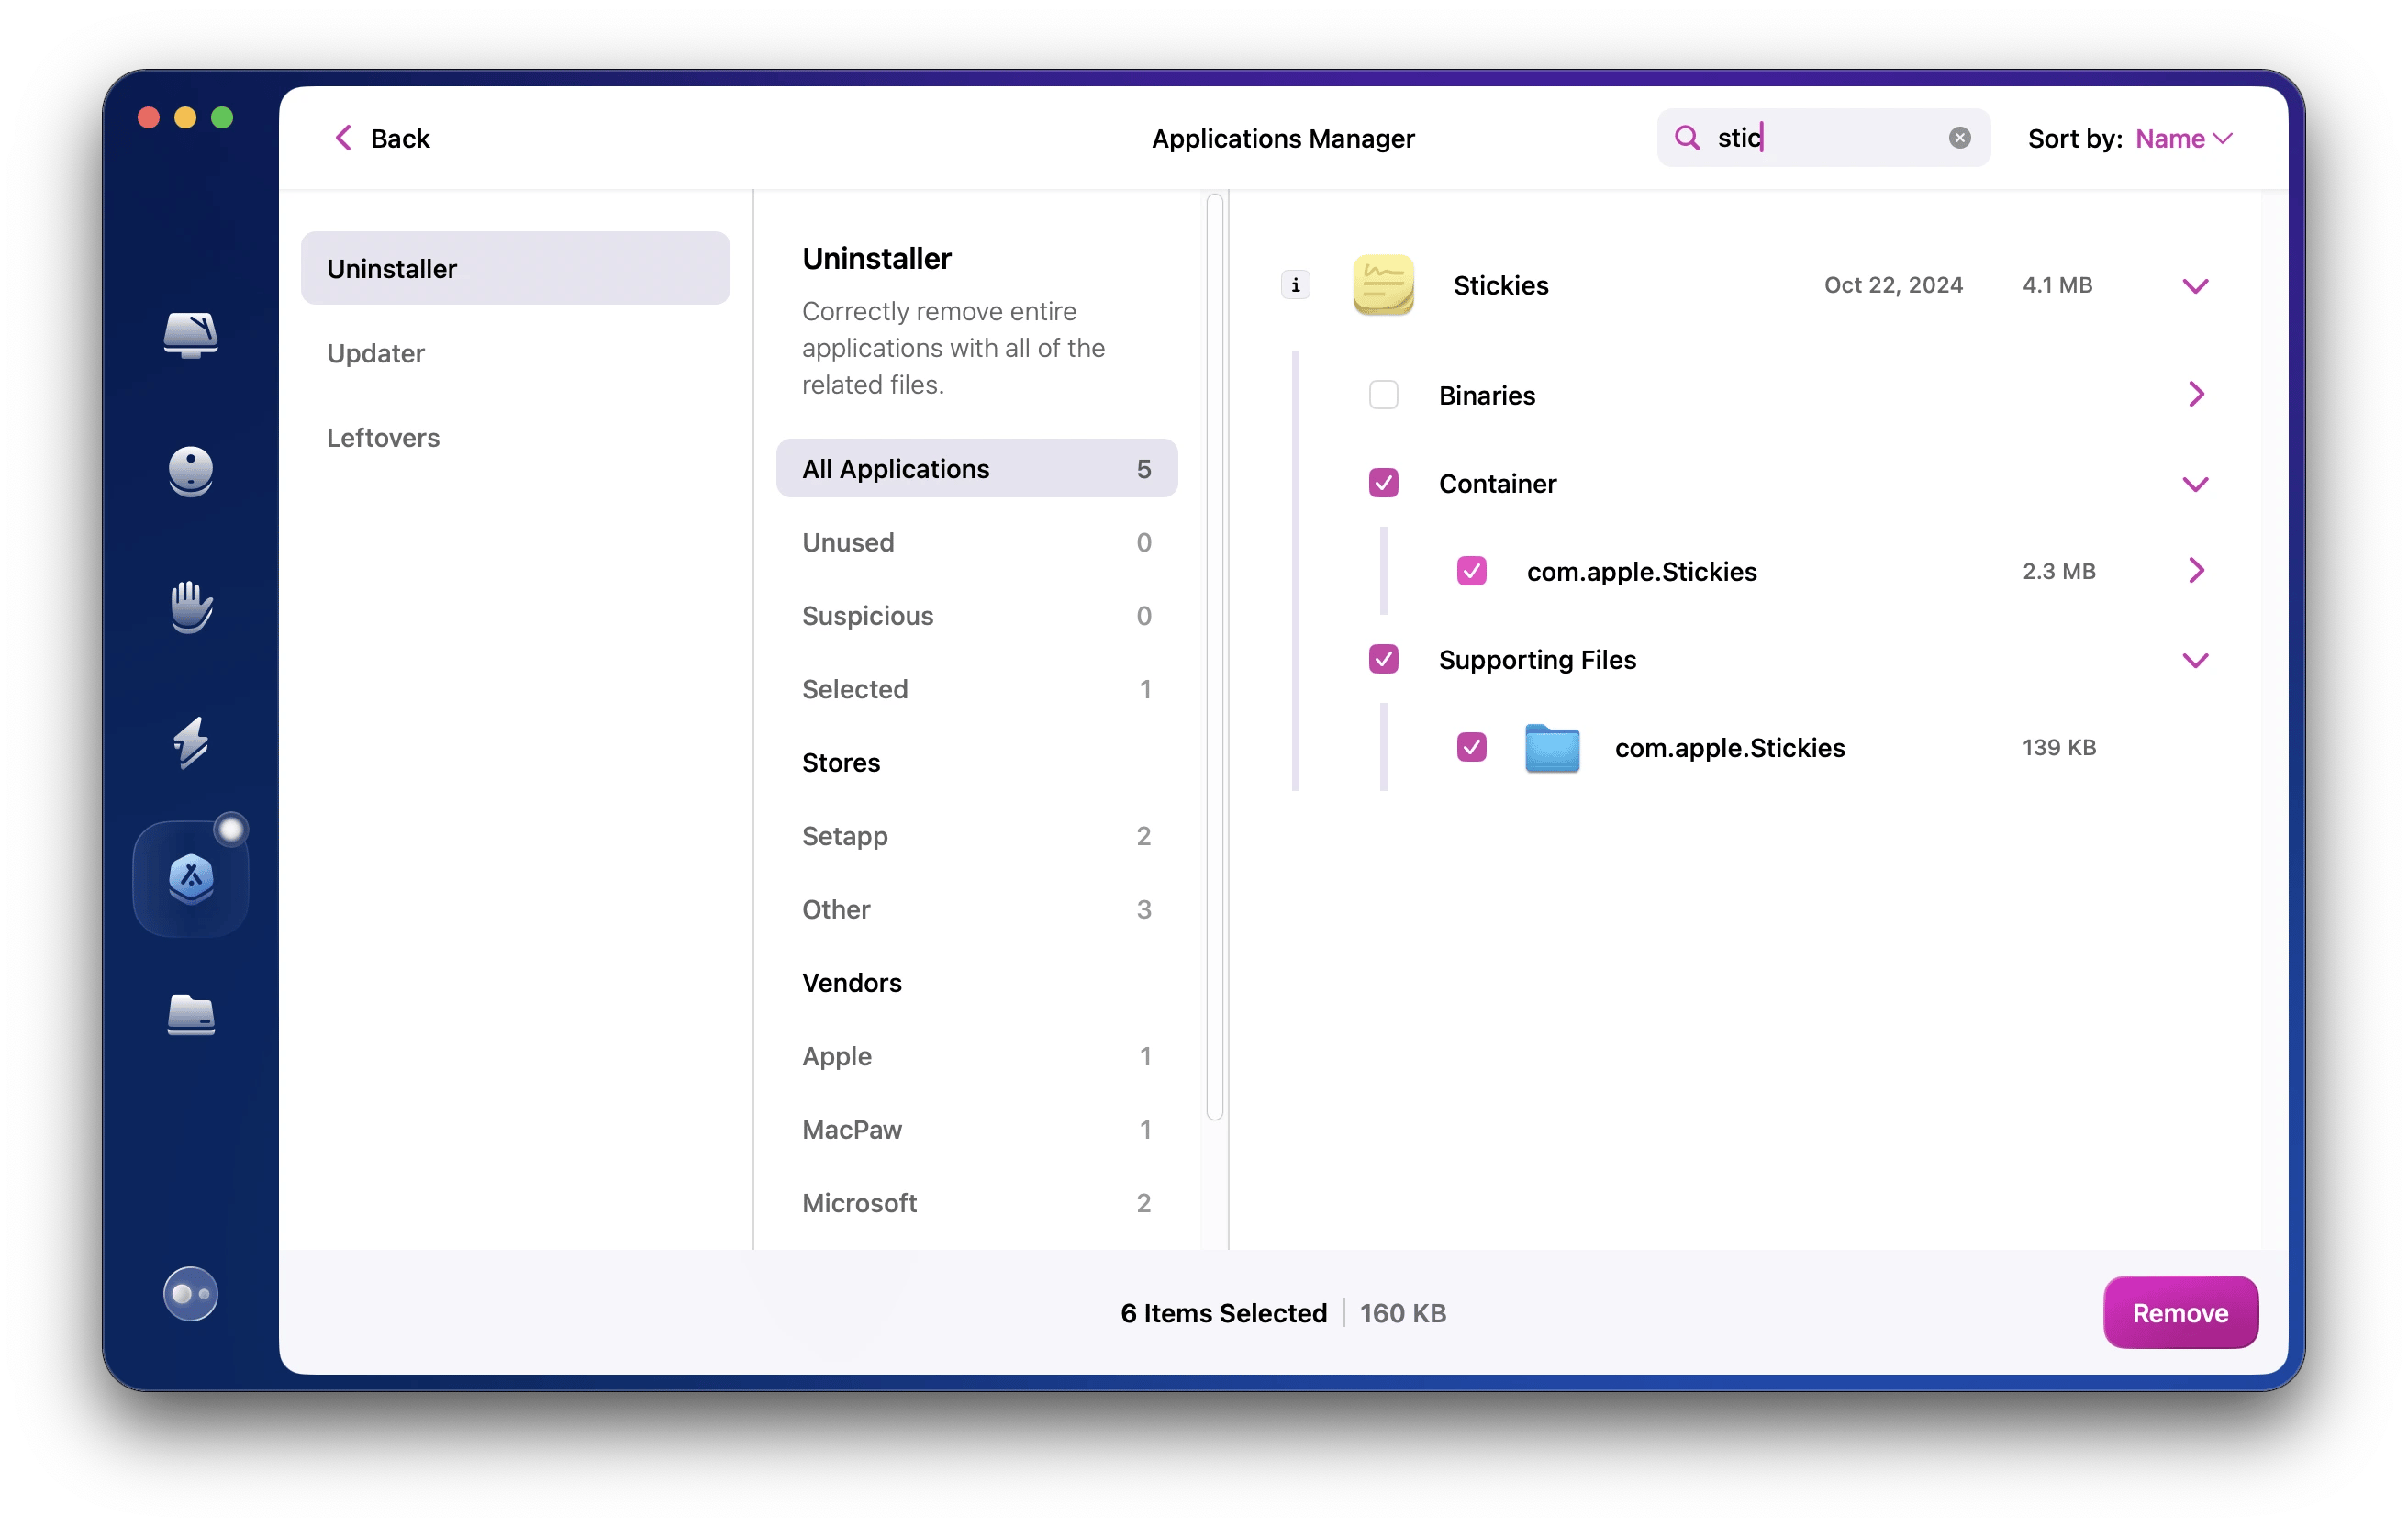
If you can't open the Stickies app — either you can't locate it on Mac, or it hangs — try resetting the app with CleanMyMac:
Install and open CleanMyMac.
Click Applications > Scan.
Click Manage All Applications > Uninstaller.
Select Stickies from the list, then click the Show arrow to see its associated files.
Select all items except for binaries and click Remove.
Lastly, you can switch to a different tool for creating stickies on Mac. SideNotes, which I've already mentioned, is a great replacement. It doesn't look like a traditional sticky notes app, but it goes one step further, keeping all your notes conveniently on the side of the screen, ready to slide in and out anytime.
How to customize your stickies
Now that you know how to add sticky notes to your desktop, customize them so they truly serve your goals. Here's what you can do with sticky notes on Mac.
How to change the color of stickies on Mac
If your stickies don't match your desktop wallpaper, you can change their color:
Click on a sticky note.
In the Stickies menu, choose Color.
Enable the color you like.
Repeat this for every sticky note.
How to change the font used on your sticky note
Stickies integrates with Apple's native Fonts utility, which means you get a selection of fonts to choose from. Here's how to change font in Stickies:
In the Stickies menu, choose Font > Show Fonts.
In Fonts, select any family, typeface, and size. You can even import your own fonts!
You can also use Stickies' Font menu to make the text bigger or smaller, bold, italic, or underline. All you have to do is highlight the text in a sticky note, go to Font, and apply the changes.
Float on top: make always visible stickies
When you open an app window or a browser, your stickies will “hide” beneath them. Stickies has a feature that lets you keep them on top:
Click on a sticky note.
Go to Window in the Stickies menu.
Select Float on Top.
Floating stickies could help solve many tasks faster. For example, you can create a sticky note that has all your contact information in it, so whenever you fill in some online form, you don't have to dig around — just open the sticky, keep it on top of your form, and copy the information from there.
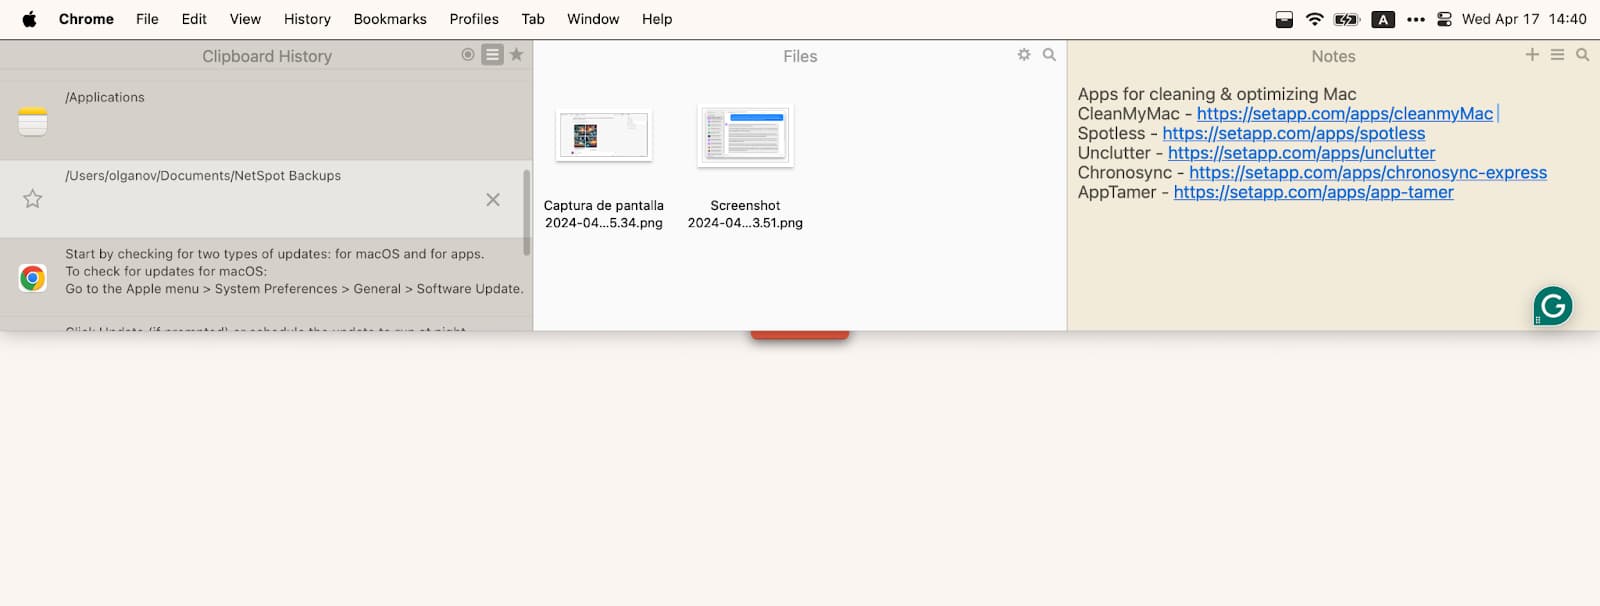
What can simplify it even more, is Unclutter. With this tool, you can keep your stickies in the menu bar, always one click away. So you don't have to search the right note and pin it manually every time, just use Unclutter's search to find the right note in the menu bar.
Unclutter is more than a sticky notes app — it lets you save files on its temporary “shelf” and saves your clipboard contents (just in case you forget to create a sticky note). So we can confidently say it's a more powerful version of Stickies for Mac.
Collapse a sticky note
To collapse a sticky note, double-click its title bar or go to Window > Collapse. Repeat the same step to expand your sticky note.
Create a list in your sticky note
You can insert a list into a sticky. Here's how it works:
Press Option + Tab.
Type or paste the first item.
Press Return.
To end the list, click at the end of the last item and press Return twice.
How to add images and other files to your stickies
You can drag and drop images and PDF files into your sticky notes. Stickies also lets you use Markup to annotate, crop, or resize the media you insert into your notes.
Needless to say, you'll have to do a lot of resizing and edit your images in separate windows because they won't fit into your default-sized stickies. This is why, for me, SideNotes and Unclutter seem like much better options for creating notes with files and images in them.
How to get the same stickies to appear on every desktop
If you work across workspaces, you might want to be able to see your stickies on every desktop you use. Or vice versa, maybe you want to work with your stickies on one desktop and keep the others clean. One way or another, here's the setting you'll find useful:
Right-click the Stickies title in the Dock.
From Options, choose Assign to.
Select All Desktops if you want to have stickies in each workspace, or This Desktop if that's the only place where you want them.
How to arrange Stickies notes in a specific order
It's great that Stickies is basically limitless. If you want to add more stickies across all your desktops, you can do that. However, be ready you'll have to shape some kind of workflow that will help you find the right note fast because you don't want to turn your workspace into a sticky mess.
Stickies can help you arrange your notes on desktop:
Choose Window in Stickies' menu.
Navigate to Arrange by.
Choose how you want to arrange your notes — by color, date, content, or location on screen.
Most people will be satisfied with arranging notes by location because it's easy to remember that your leftmost or rightmost notes are the most recent. In this regard, date-based organization makes sense, too. And if you have some kind of color-coding system or you start your notes with certain tags, consider color- or content-based organization respectively.
Copy and paste stickies
If you paste text from the web or any other app into a sticky, you'll notice it will mess with your default formatting. Most likely, the text will appear in a different font — not the one you use in stickies — and there will be some weird background text color.
Here's how to solve this problem: hold Shift as you paste or copy text in Stickies. This way, you'll be copying or pasting plain text and not the formatting.
Try a superb alternative to Stickies on Mac
If you would like to try a new approach to using stickies, I'd recommend SideNotes and Unclutter. Both these apps solve the main task — which is how to put sticky notes on a desktop Mac — while staying out of your way. They don't make your desktop look cluttered. Neither do they have an overcomplicated flow of deleting and collapsing notes. But they do have some powerful extra capabilities that might improve your workflow, such as saving clipboard history.
The Stickies app is native to Mac, so simply search for it through Spotlight, in Finder, or in the Launchpad and create a new note.
Why can't I open Stickies on Mac?
If you can't open the Stickies app, you may need to reset it. The best way to do this is by using CleanMyMac X. Launch the app, go to Uninstaller, select Stickies from the list, and reset its files before trying to open the Stickies app again.
How do I open a Stickies File on a Mac?
Open the Stickies app from your Applications folder or use Spotlight to find it. Then, in the menu bar, click on File > Import Text. Navigate to the location of your saved Stickies file, choose it, and click Open. This will import the text into a new sticky note.
Superpowers for your Mac
Tackle your tasks with dozens of helpful apps on Setapp.