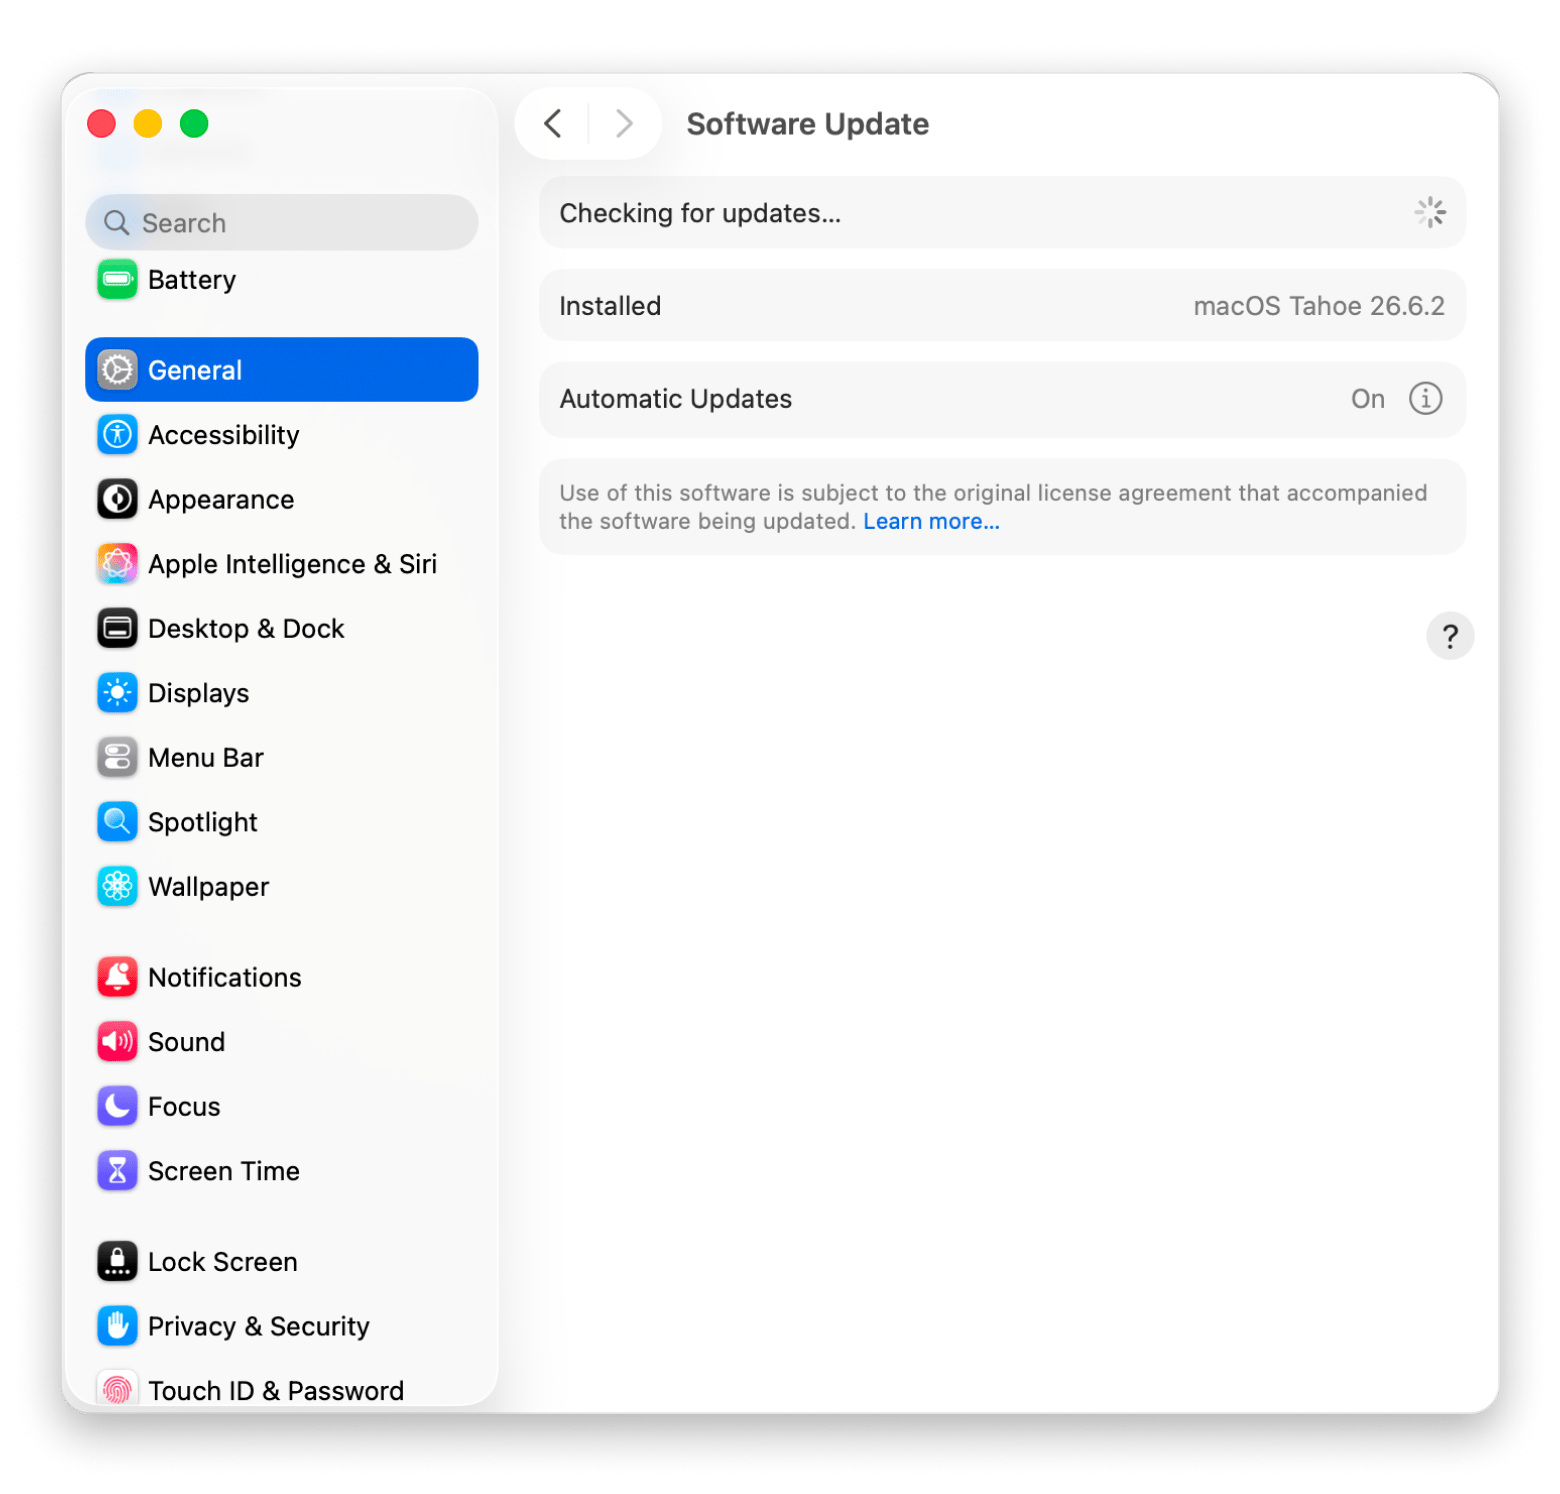
Go to Apple menu > System Settings > General > Software Update Click the button to update, upgrade, or restart now. If Software Update says your Mac is up to date, your Mac may not be compatible with the newest macOS.
Prepare your Mac before updating:
Free up as much storage as you can. Apple doesn't publish a fixed amount for macOS 27.
Every year, Apple introduces a new macOS update with exciting features. As for fall 2026, the newest version is macOS 27 Golden Gate. But upgrading isn’t always seamless. From Reddit stories and personal experience, I’ve seen how updates can sometimes cause compatibility issues or slowdowns.
In this guide, I’ll show you how to properly prepare your Mac for an update, the best way to upgrade, and some apps that can make the process smoother.
How to update macOS: Quick solutions and fixes
What went wrong?
Why did it happen?
How is it fixed?
Broken apps after update
Mac updated to incompatible software
Disable automatic system updates in System Settings > General > Software Update > Automatic Updates. Setapp solution: Use CleanMyMac from Setapp to bulk-update all apps to their latest compatible versions after the OS update.
Mac running poorly after update
Outdated operating system or residual junk
Update via System Settings > General > Software Update. Setapp solution: Run CleanMyMac's Smart Care scan to clear caches, broken preferences, and leftover files the update left behind.
No update option for your Mac
Your Mac model is not supported by the new macOS
Check Apple's macOS compatibility list. Third-party patchers like OpenCore Legacy Patcher exist but are risky, unsupported by Apple — see the disclaimer section below.
Too many redundant files backed up
Used Time Machine (backs up everything by default)
Use Get Backup Pro from Setapp to create incremental backups and bootable clones — back up only the files you choose, on any schedule you set.
Progress stopped during update
Unreliable internet connection
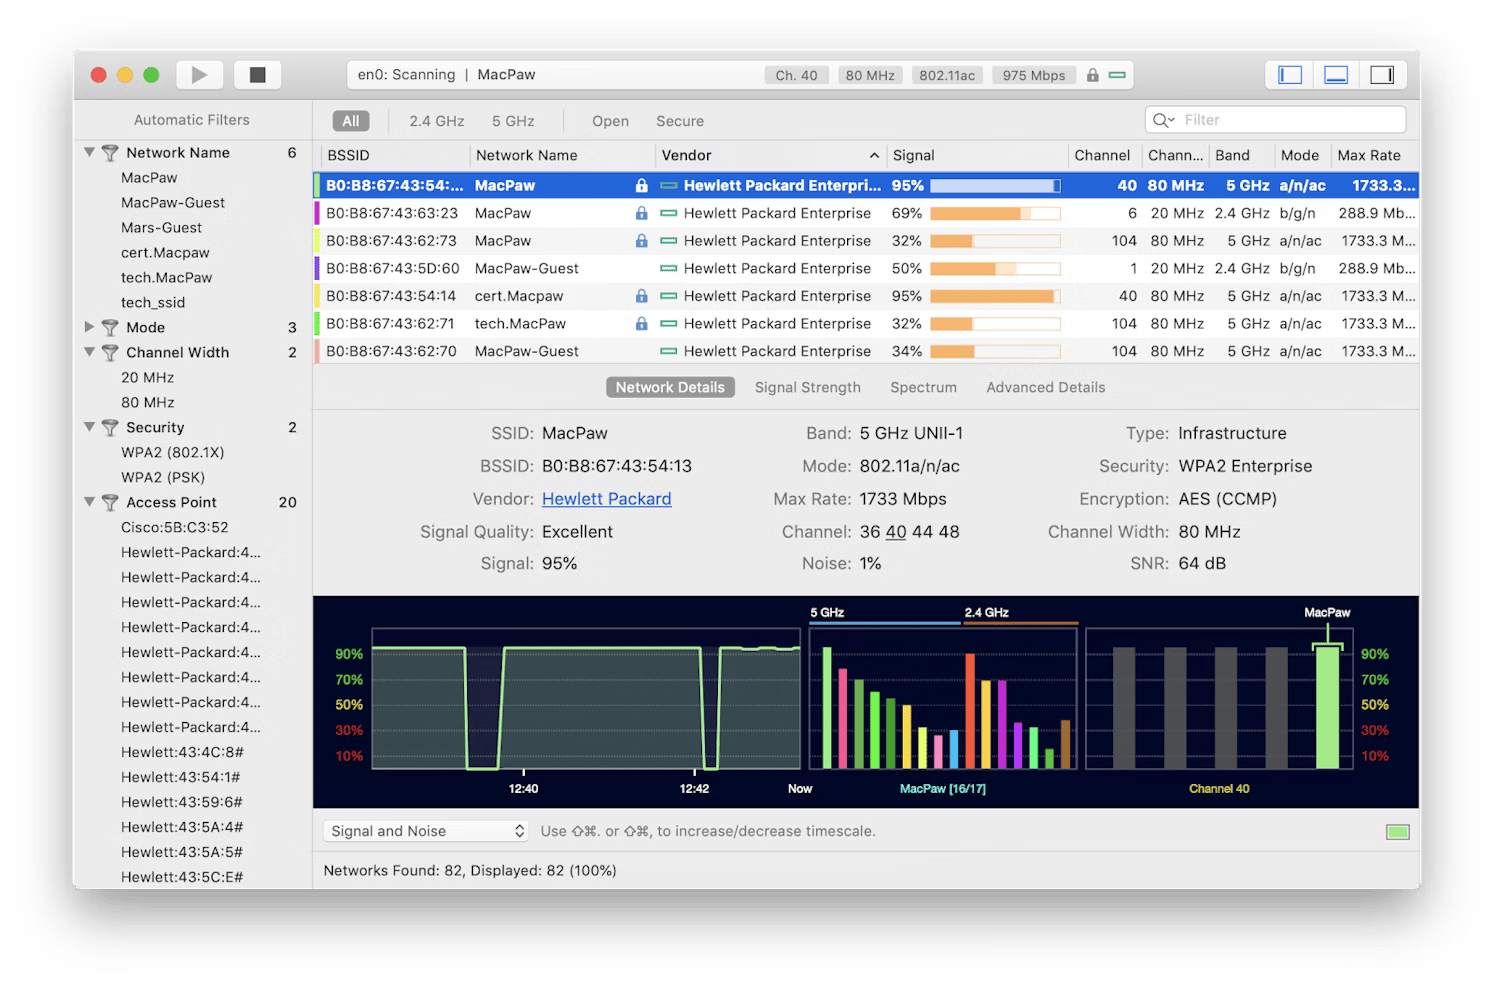
Check your connection with WiFi Explorer from Setapp before starting the download — visual signal graphs, channel analysis, and interference detection.
Not enough storage for the update
A major update needs free space to download and install
Run CleanMyMac > Smart Care > Scan > Run. Removes system junk, caches, and large hidden files in minutes.
Let's start with the simplest things. Apple designs its OS and software with the user in mind, ensuring everything is easy and intuitive. Updating macOS is no exception — it’s designed to be a straightforward process that anyone can handle.
Here is how to update a Mac:
Click the Apple menu > System Settings, click General in the sidebar, then click Software Update. You can also search for Software Update in Spotlight.
Software Update checks for updates compatible with your Mac model. If one is available, click the button to update, upgrade, or restart now.
Enter your administrator password if asked.
Let the installation finish. Don't put your Mac to sleep or close its lid. Your Mac might restart and show a progress bar or blank screen several times.
If Software Update says your Mac is up to date, there's no update for your Mac model. To check again, click Check for Updates, press Command-R, or close and reopen Software Update.
A macOS update can be a minor release (such as macOS 26 to 26.4) or a major release (such as macOS 26 to 27)
That's all you need to do. Next time you're thinking "How do I upgrade my operating system on my Mac?" remember this simple process.
How to turn on automatic updates
You can trigger your Mac to update automatically, but first, a word of caution. Many set their Mac to update automatically so they don't ask themselves "How do I update macOS?" every few months. It's typically fine to have your Mac update automatically, but there have been some features that break old apps in newer macOS builds. I would caution you to consider your needs; if you can't risk apps not working or perhaps files being shifted around, I would advise against automatic updates.
But for most, it's fine to automatically upgrade your Mac. Here's how to do that on macOS Ventura and later:
On the top left, choose Apple menu > System Settings.
Click General on the left side of the System Settings window, and then click Software Update on the right side.
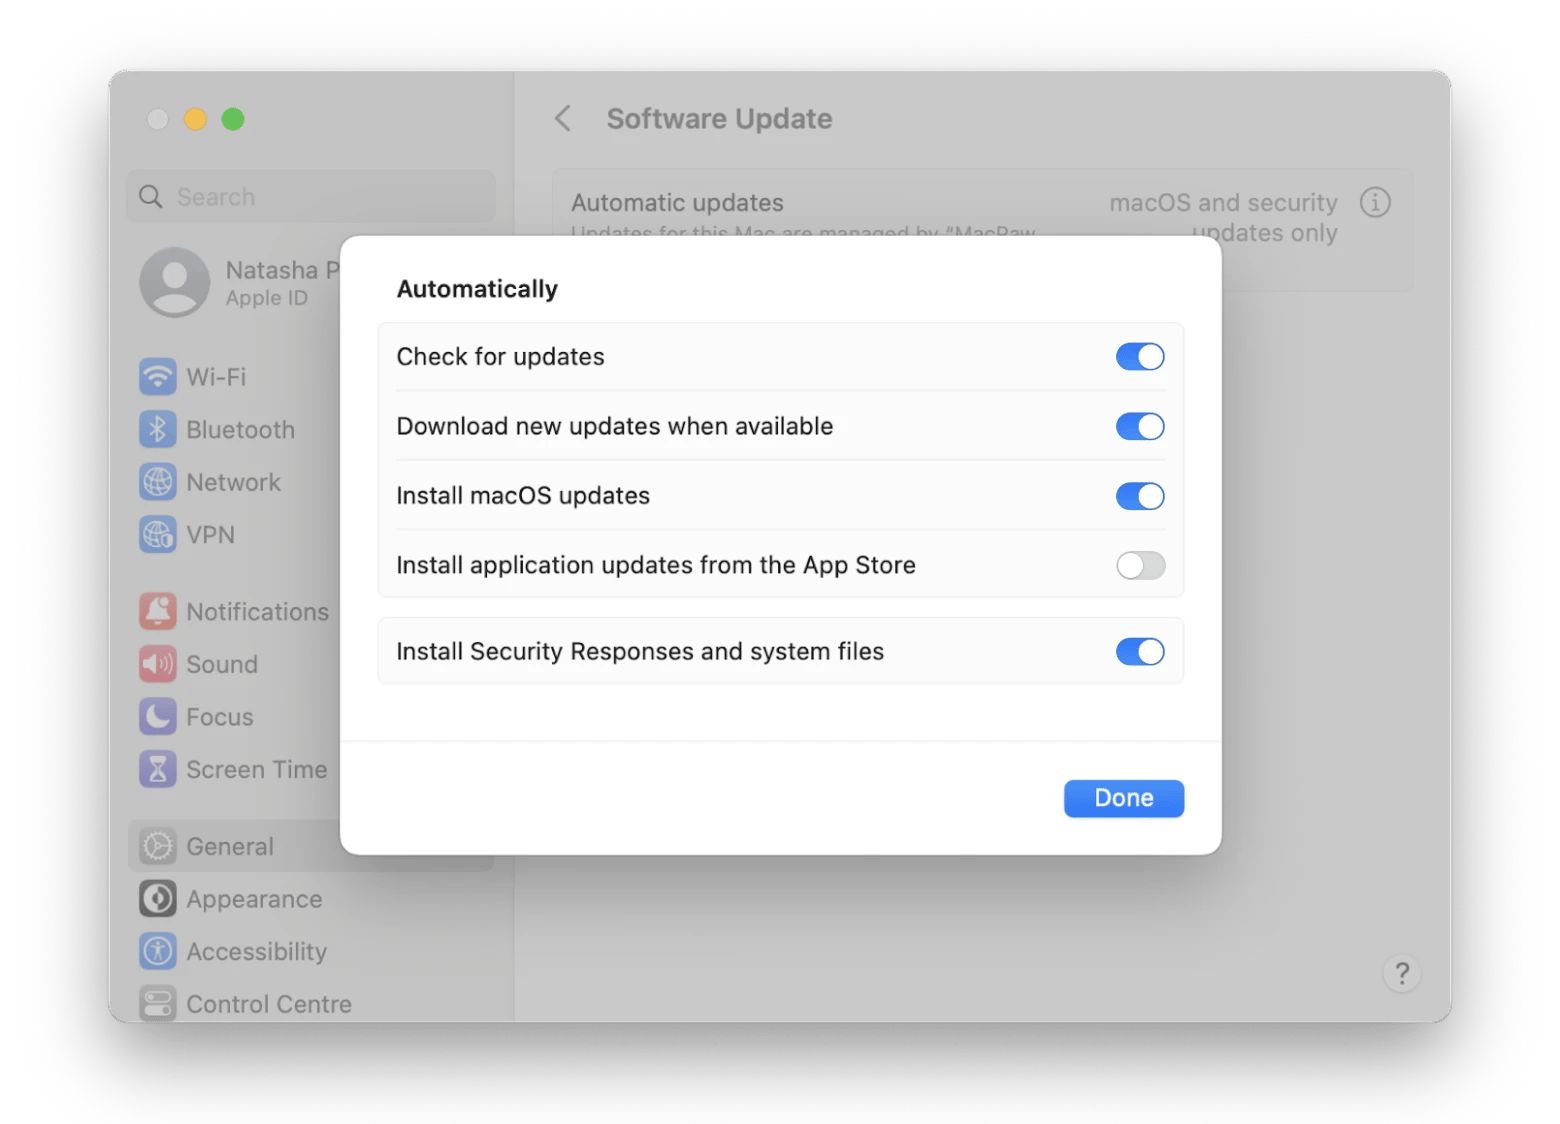
Next, click on the info button next to Automatic Updates.
There you'll see options for "Check for updates," "Download new updates when available," "Install macOS updates," and "Install application updates from the App Store." Toggle what you want to do for automatically updating your system. Click Done. And that's it.
Note! For a Mac to automatically update, it must be connected to power.
As you can see, you have a bit of control here. You can choose to have your Mac check for updates automatically, but not download them. This is a smart choice for those who want a bit more control over when their Mac updates.
Apple can also send some security fixes between full macOS updates. Since macOS Tahoe 26.1, these arrive as Background Security Improvements, which replaced Rapid Security Responses. They cover Safari, WebKit, and other system libraries, and you can control them in System Settings > Privacy & Security. If you turn them off, you get the same fixes in a later software update.
Update all your Mac software instantly
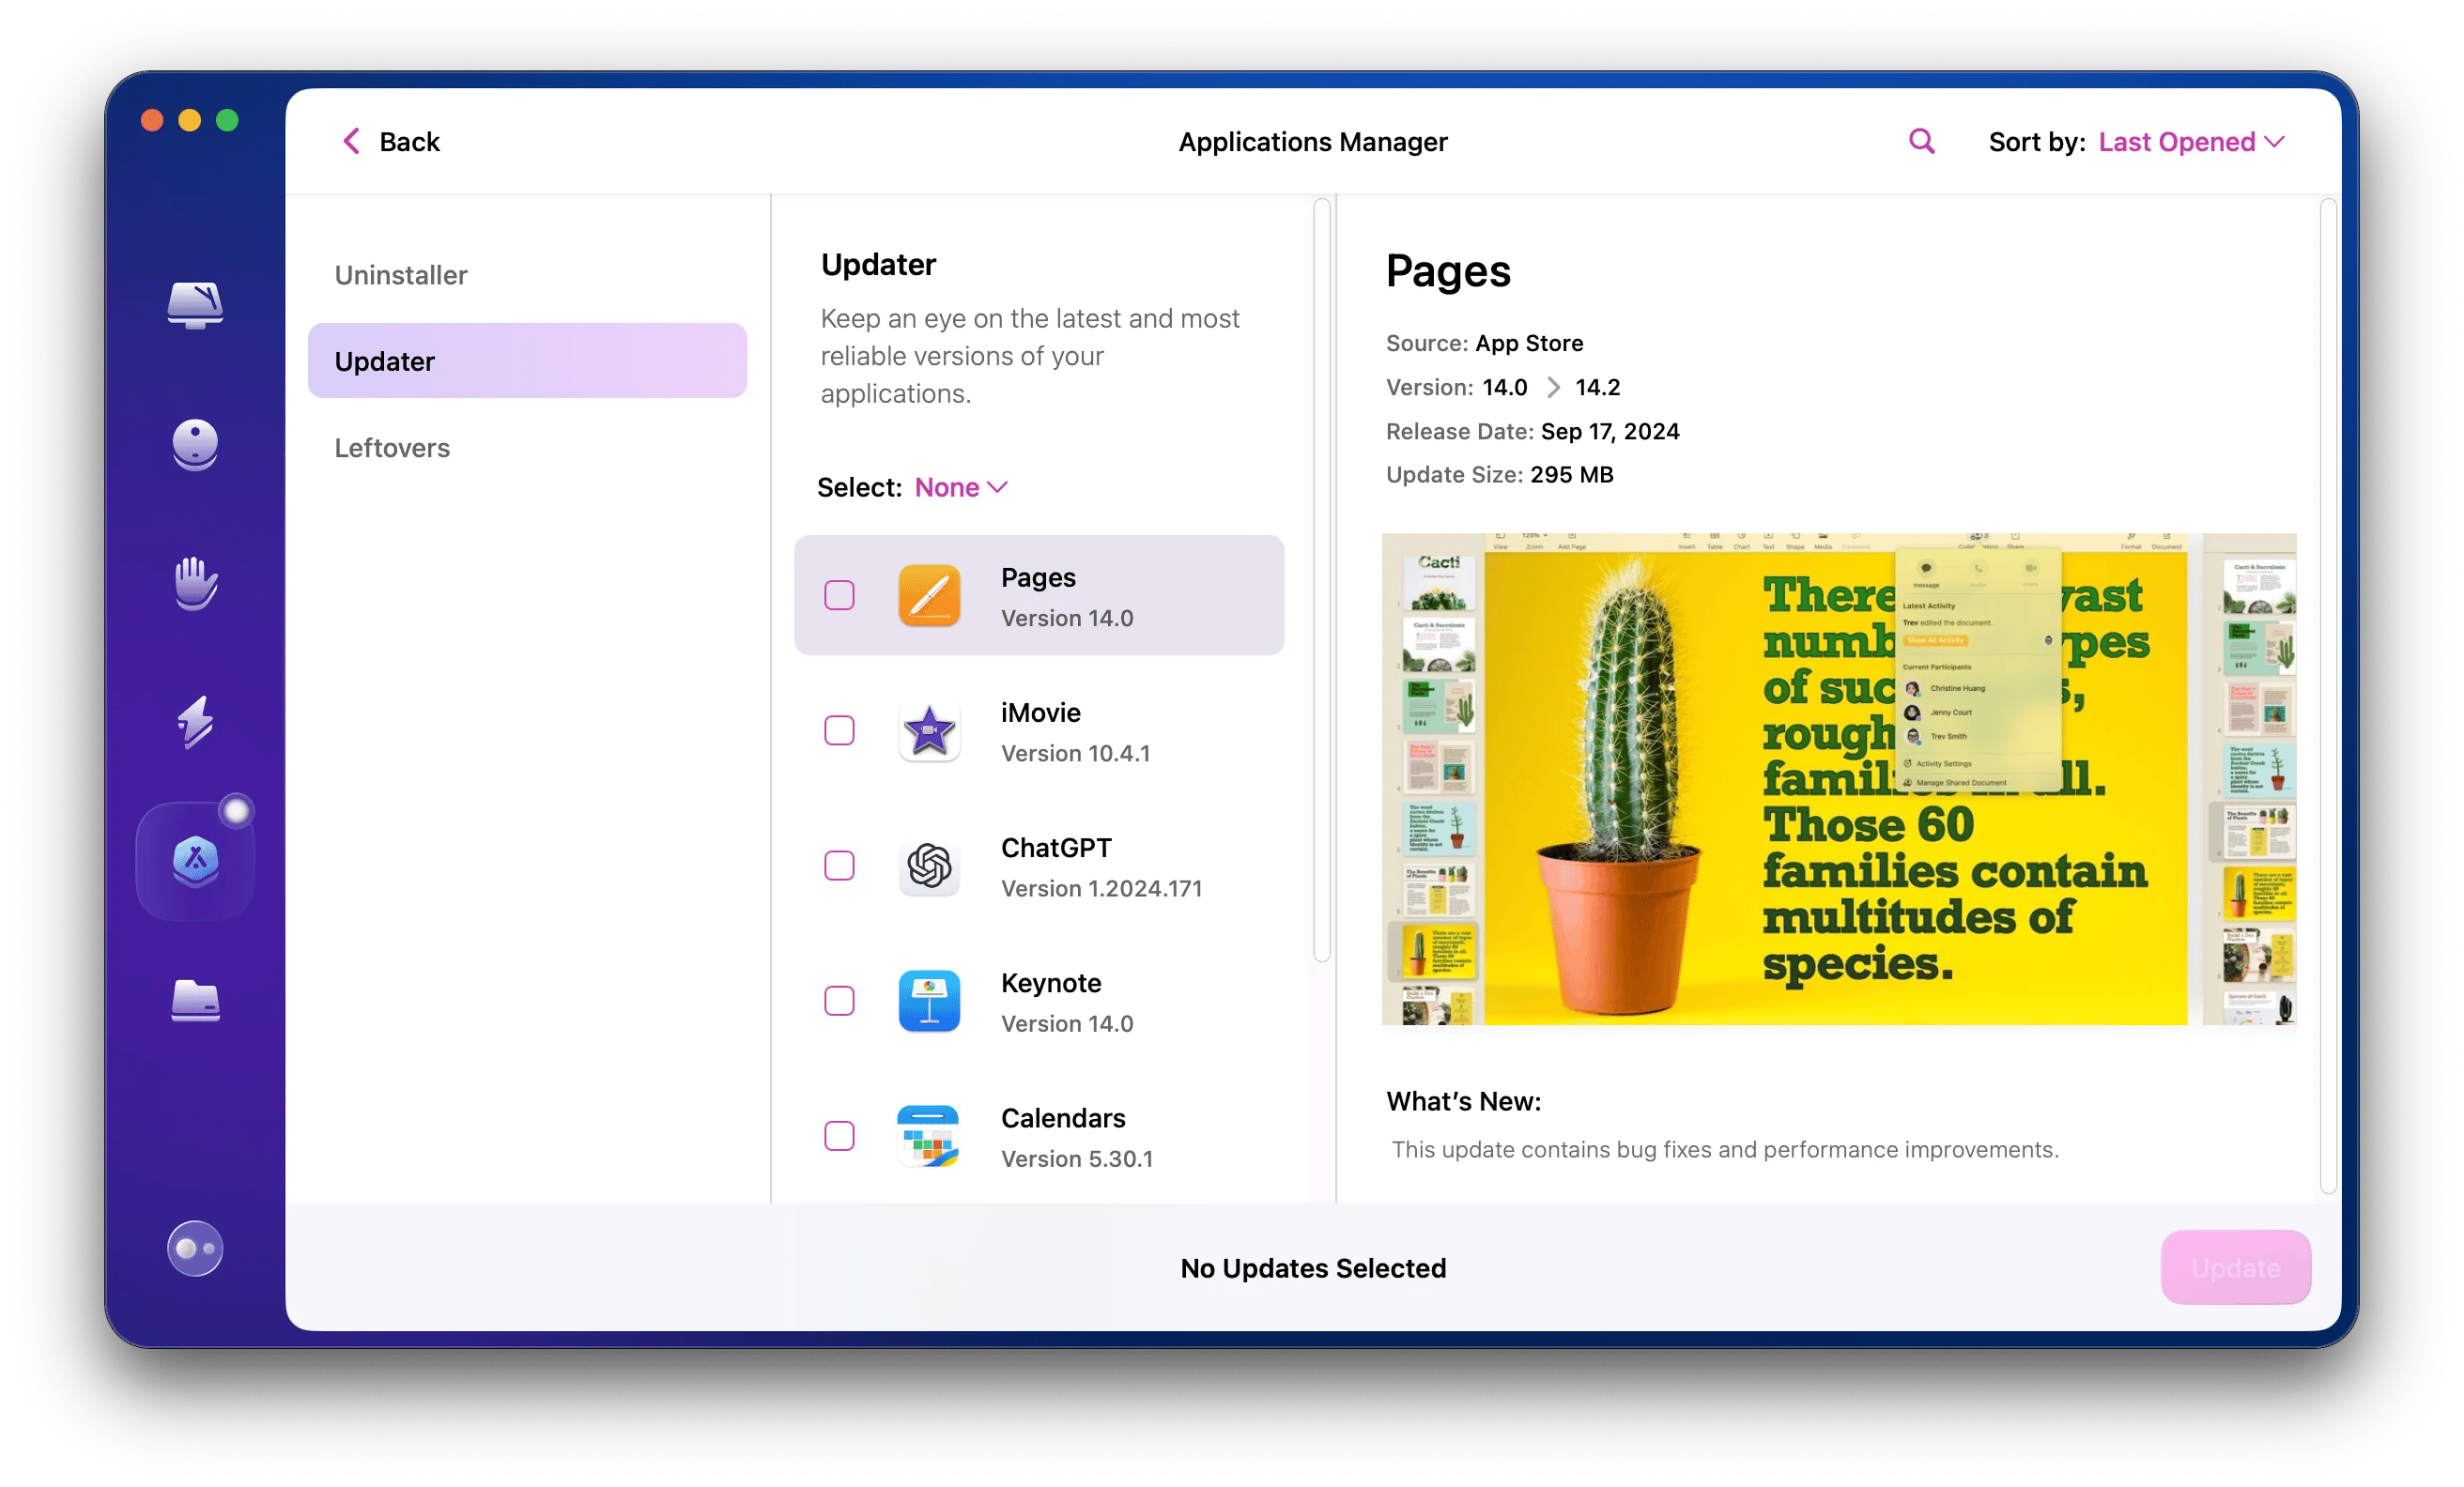
One thing to remember when you update your Mac is that the next step should be updating your apps for them to work properly on a new system. You will find some pending software updates in the App Store (if you install your apps from App Store) but not all. I have my favorite method to do that. I prefer to bulk update all apps with CleanMyMac.
CleanMyMac from Setapp (a free 7-day trial with Setapp Membership) is a smart and effortless Mac care app that has a dedicated Updater tool. Here's how to use it:
Install and open CleanMyMac.
Click Applications on the left panel > Scan.
If you see a window saying "X Application Updates Available," click Update. Alternatively, click Manage Applications at the top of the CleanMyMac window and select Updater.
macOS needs 26-44 GB free to install. CleanMyMac finds the junk taking up that space in one scan.Remove system clutter, large hidden files, and app leftovers before the update. Takes minutes. Rated 97% by 17,417+ users on Setapp. Try CleanMyMac free. Orget CleanMyMac standalone via Marketplacefrom $65.40/yr — no membership needed.
How to install macOS Tahoe
Hardware compatibility: macOS 26 Tahoe runs on Apple silicon Macs, including the MacBook Neo, and four Intel Macs: the MacBook Pro (16-inch, 2019), MacBook Pro (13-inch, 2020, four Thunderbolt 3 ports), iMac (Retina 5K, 27-inch, 2020), and Mac Pro (2019). It's the last macOS version that supports Intel Macs. See Apple's macOS Tahoe 26 compatibility list.
If you have an Intel Mac, Tahoe is the newest macOS you can install. In September 2025, Apple released a new macOS Tahoe that brings multiple improvements and new features to your Mac. If you haven’t updated to Tahoe yet and are considering making the switch, I’ll guide you through the process.
Go to Apple menu > System Settings > General > Software Update.
Here you'll find the latest information about which software updates you can download.
If your Mac is compatible and able to download Tahoe, you should see a macOS Tahoe icon in the Software Update menu with a large "Upgrade Now" button next to it. Click on the button to upgrade to macOS Tahoe. Your Mac will then download and install the update. You may need to restart your Mac to complete the process.
Here is how Tahoe looks on my Mac:
How to install macOS Golden Gate
Hardware compatibility:macOS 27 Golden Gate drops Intel Mac support entirely. Only Apple silicon Macs can install Golden Gate: any Mac with an M-series or A-series chip, including the MacBook Neo. See Apple's macOS 27 compatibility list.
Go to Apple menu > System Settings > General > Software Update.
If your Mac is compatible, you'll see macOS Golden Gate with a button to update, upgrade, or restart now. An Intel Mac won't be offered Golden Gate, and Software Update may say your Mac is up to date.
Click Upgrade Now. Your Mac will download and install the update. Restart when prompted.
Before upgrading: Back up with Get Backup Pro, free up storage with CleanMyMac, and check your Wi-Fi with WiFi Explorer — all apps from Setapp (free for 7 days).
How to install macOS updates on an unsupported Mac
If your Mac is too old for the latest macOS, a third-party tool called OpenCore Legacy Patcher (OCLP) can sometimes force-install newer macOS versions. Here's what you need to know:
macOS version
OCLP support status
Notes
macOS 27 Golden Gate
Not supported
Runs only on Apple silicon Macs; Intel support is entirely dropped.
macOS 26 Tahoe
Supported (Beta / RC)
Supported via OCLP v3.0.0-rc.1 for ~80 models; excludes Intel T2 Macs.
Recommendation: If your Mac is no longer supported by the latest macOS, the safer path is to stay on the newest macOS your Mac officially supports, keep it updated with security patches, and use CleanMyMac from Setapp to keep it running at peak performance.
How to update a Mac running macOS High Sierra or earlier
Unlike recent macOS, High Sierra and earlier versions can’t be installed directly from the Software Update pane in the Mac menu.
Here's how to run updates for old (or shall I say ancient) versions:
Use the download links in Apple's guide to downloading and installing macOS. It has App Store links for recent versions and web downloads for older ones. In most cases, you must download from a Mac that's compatible with that macOS.
Once you find the right version, click the Get or Download button.
Wait for the installer to finish downloading.
Once the download is complete, click Continue.
Wait for the installation to complete (feel free to continue your work with your update running in the background).
How to prepare your Mac for an OS update
Knowing how to update the latest Mac system is one thing – preparing your machine is equally important. To prepare your Mac for an upgrade, you'll want to make sure your files are organized properly, all of your system settings are correct, and that your file system is backed up. It's also important to know if your Mac is eligible for an update.
Step 1: Check the general requirements (and hardware)
To see what specs your Mac has, follow these steps:
From the menu bar on your Mac, select the Apple icon on the top left.
Select About This Mac from the drop-down menu.
This will tell you what year your Mac was made, the version of macOS or OS X you're currently on, the computer's RAM (Memory), processor, and which graphics card your Mac has. These are important to know, as upgrading macOS can require up to 44 GB of storage available on your Mac.
Note
To see how much available storage space you have, follow the two-step process above, then go to the Storage tab at the top of the window.
When you want to upgrade macOS, keep in mind the Mac models this macOS version is compatible with. You can find this information on Apple's official website under the macOS compatibility section and by visiting the "About This Mac" menu on your Mac and comparing your model with the list of supported devices for the macOS version you want to install.
Step 2: Back up your Mac
When it's time to back your Mac up, Apple has an official method dubbed Time Machine. It backs up your files, apps, and user account to an external or network disk, and you restore them with Migration Assistant. Apple recommends backing up before a major upgrade.
The purpose of creating a backup is most often to have a recent safe point you can reboot from. It's important to run backups as often as possible. The problem is, Time Machine creates too many redundant copies and often backs up the files you don’t want to back up. There's a much better way to back up your Mac: Get Backup Pro.
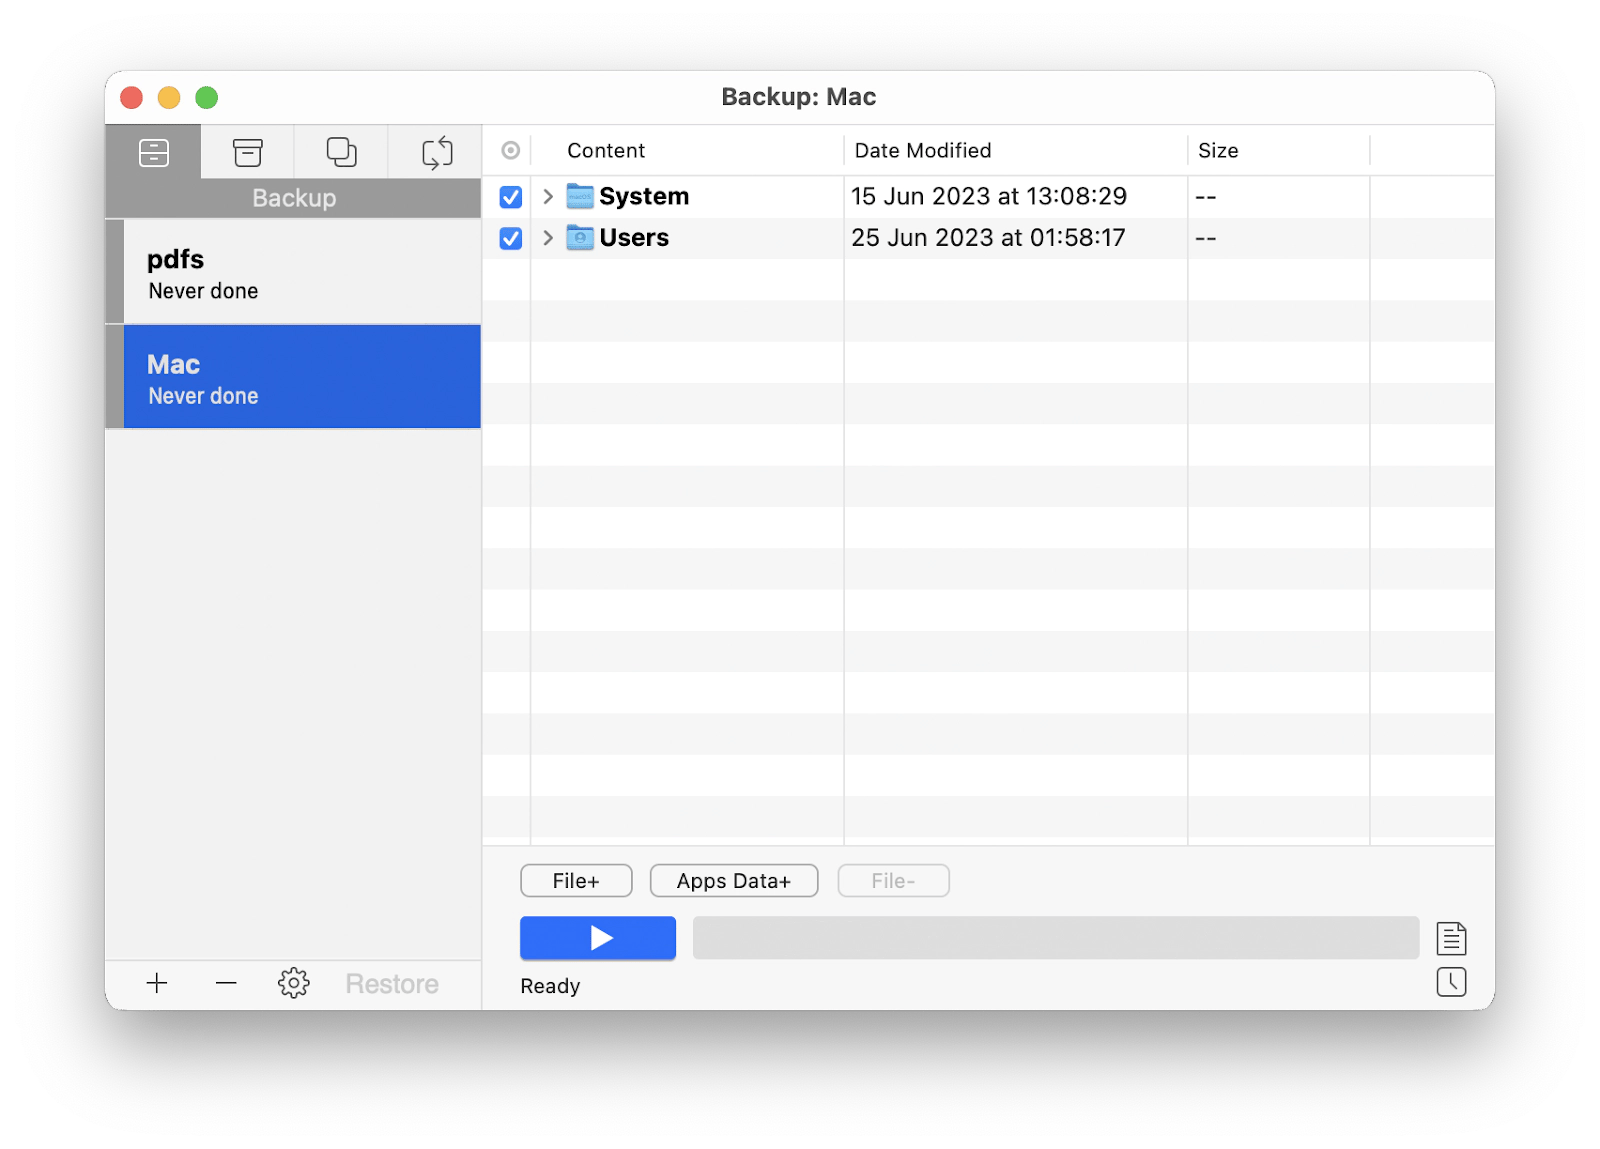
Get Backup Pro from Setapp (a free 7-day trial with Setapp Membership) makes the backup process simple, and you remain in total control. One issue many have with Time Machine is it often starts backing up during the day, which consumes resources on your Mac, and things you're working on may not save in your backup. Get Backup Pro lets you back your Mac up to any device you like, and you can set the schedule you want for backing your Mac up. You can even choose how many backups you want to keep; Time Machine doesn't allow such customizations.
Step 3: Make sure you have sufficient space for macOS update
Apple doesn't publish a fixed amount of free storage for macOS 27. A major upgrade needs room to download and install, so free up as much as you can first. If the installation stops with a storage message, free up more space and try again. It's also wise to have a strong internet connection, as the download can take quite a bit of time!
Upgrading to
Minimum free storage required
macOS 27 Golden Gate (2026)
~26 GB (Apple silicon only)
macOS 26 Tahoe (2025)
~26 GB
macOS 15 Sequoia (2024)
~26 GB
macOS 14 Sonoma (2023)
~25 GB
Upgrading from macOS Sierra (10.12) or earlier
Up to 44 GB
Here's how to check your system to see if your Mac has enough space for an Apple OS update:
From the menu bar on your Mac, select the Apple icon on the top left.
Select About This Mac from the drop-down menu.
Click More Info.
Scroll down to Storage and check if you have enough storage space available.
Which team are you on?
Here’s a quick statement for you: “I regularly update my software and operating system”.
How would you respond — Always, Sometimes, Rarely, or Never?
We at MacPaw asked this very question in our 2024 Scams and Disinformation Survey, and the results were pretty interesting:
55% said Always
32% said Sometimes
10% said Rarely
4% said Never
So… which group are you in?
Step 4: Clean your Mac
When you think "How do I update my Mac operating system?," you should also be thinking about how to prepare your Mac for the update.
Here's how to clean your Mac before a macOS update using CleanMyMac:
Click Smart Care on the left panel and click Scan.
Click Run to instantly remove system junk, caches, and broken files — freeing up the 26–44 GB needed for the macOS update.
For a deeper clean before a major update:
Click Applications > Scan > Manage My Applications > Uninstaller to remove apps you no longer need, including their hidden support files.
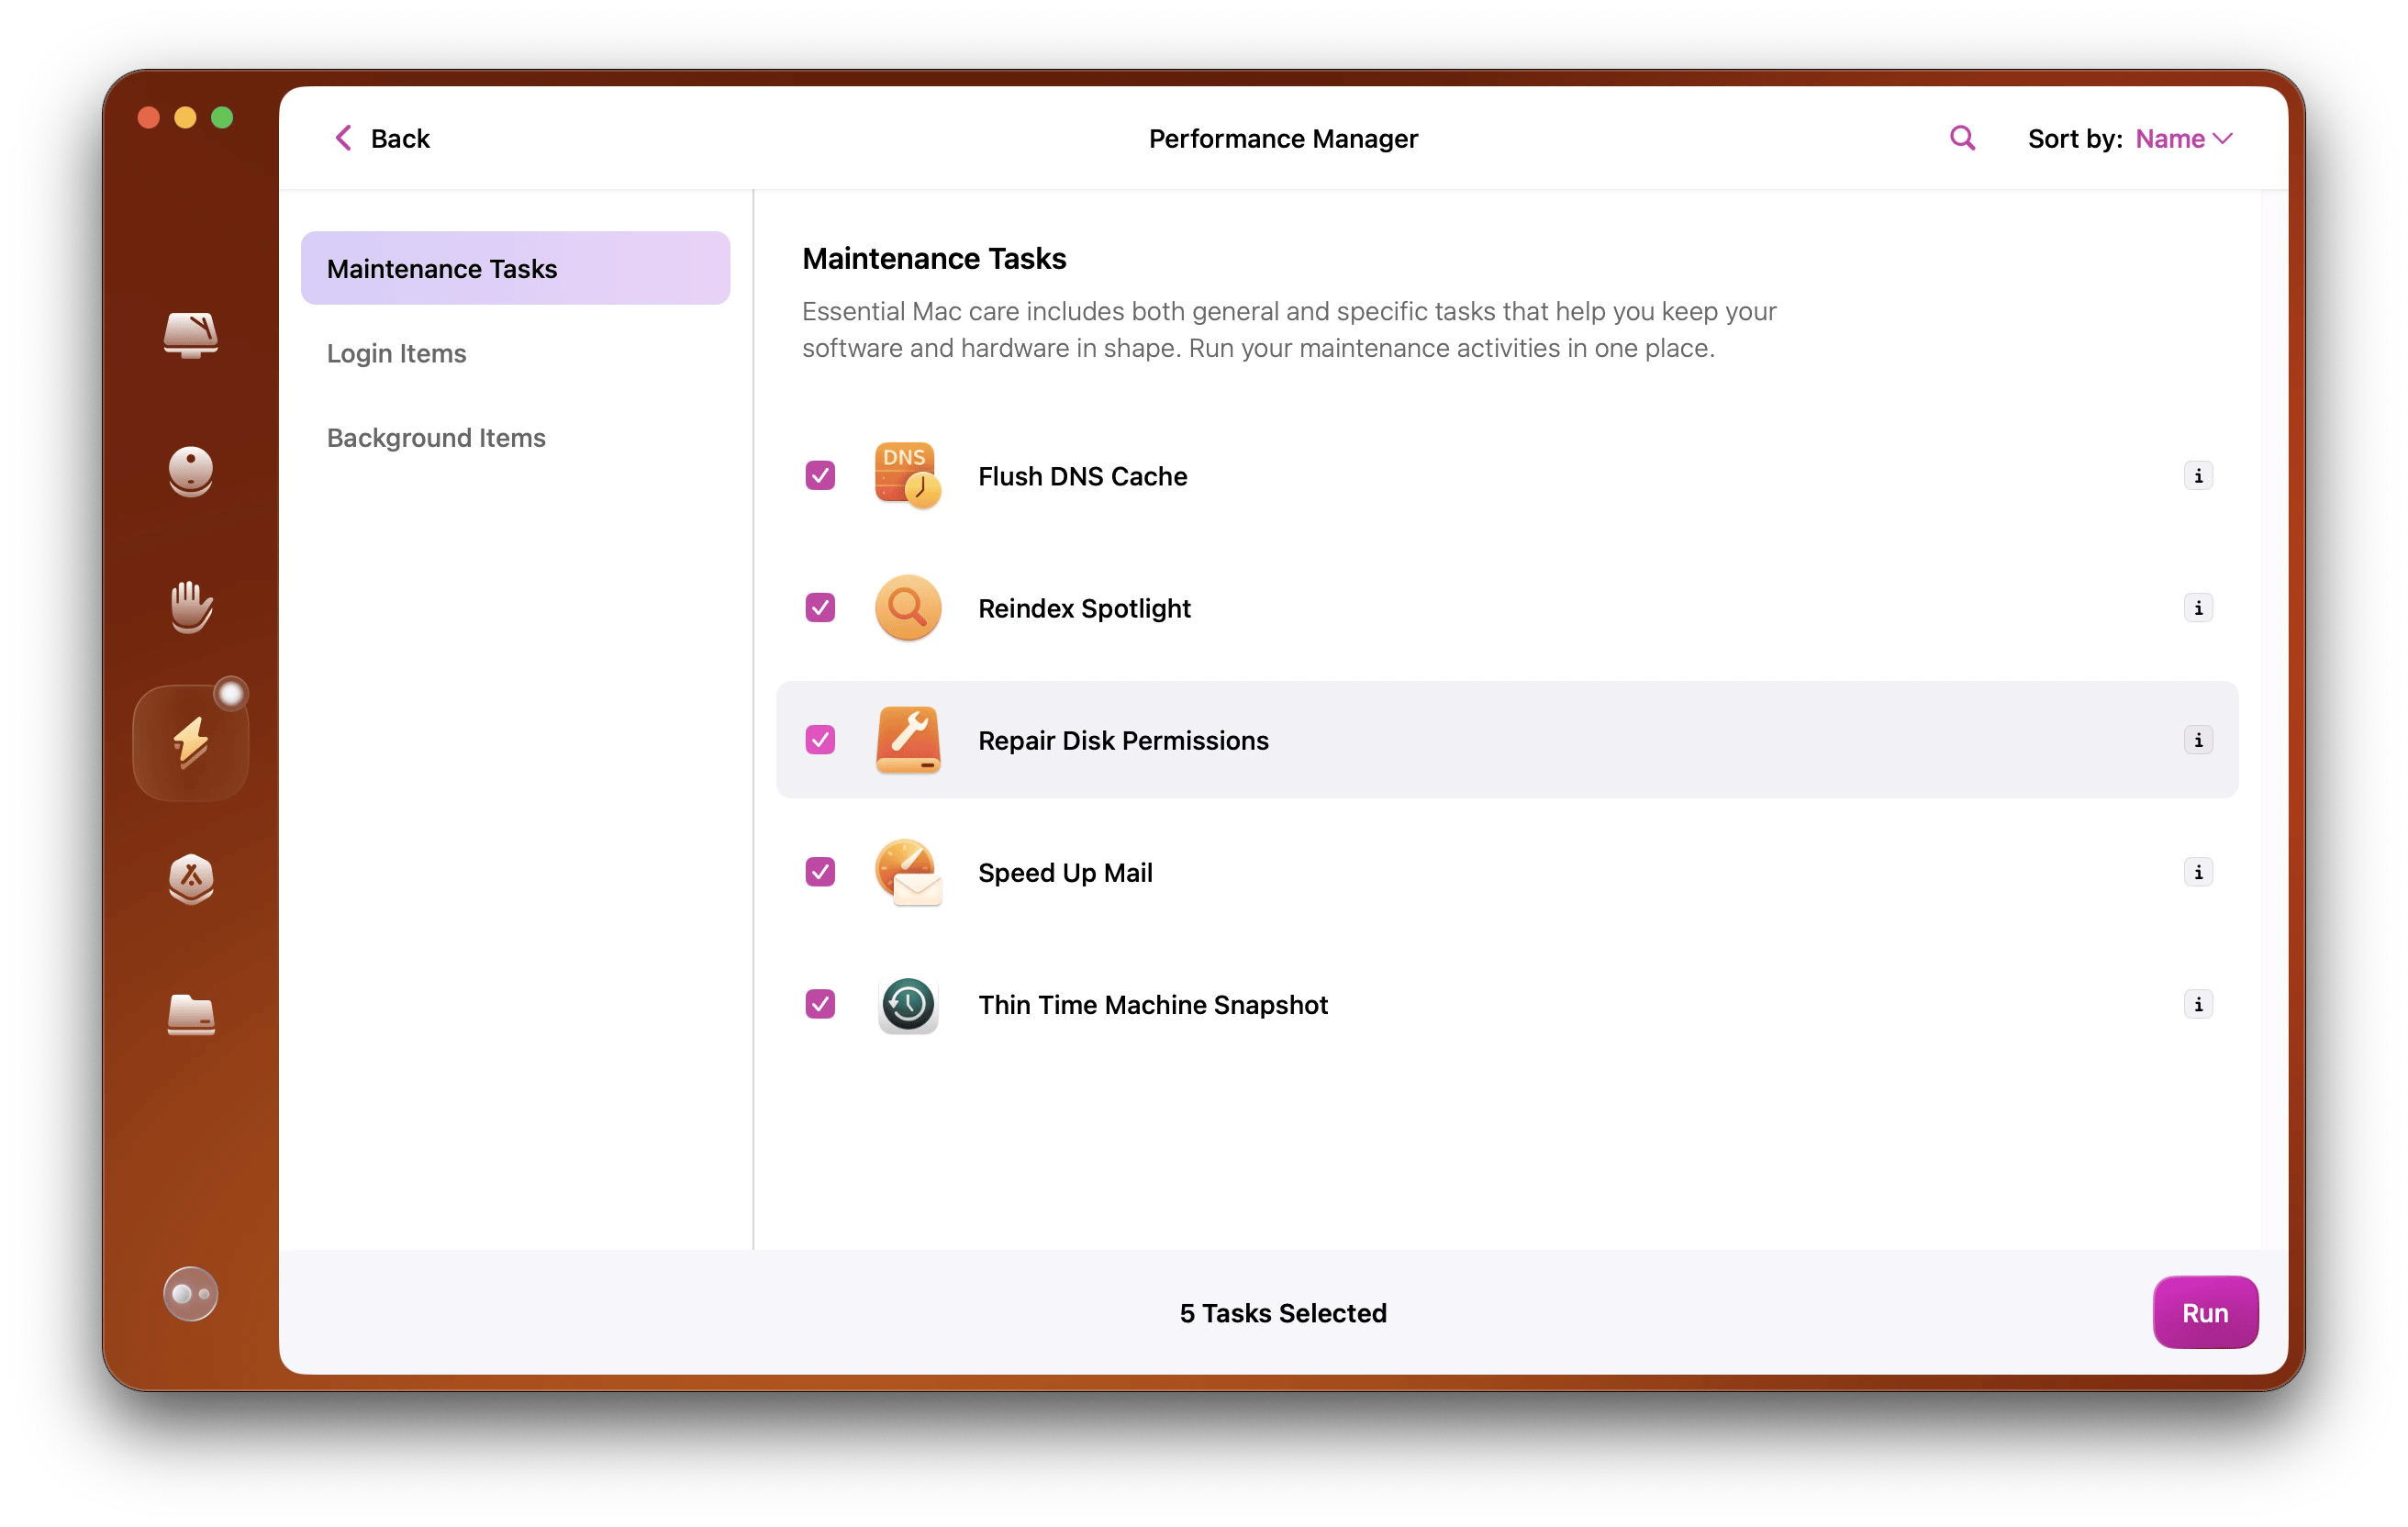
Click Performance > Scan > View All Tasks > Maintenance Tasks to free up RAM and run maintenance scripts
Step 5: Check your internet
While your macOS will remind you to plug in your device if the charge is not high enough for the update process, the quality of your internet connection will remain overlooked as long as it's there.
This means you are better off checking your WiFi with tools like WiFi Explorer from Setapp and doing your best to help everything work nicely for your large update to fully download without a hitch. This WiFi analyzer and monitor can help you check your connection parameters.
Know your Wi-Fi signal is strong before downloading gigabytes of macOS — visual graphs, channel analysis, no guessing.Start your 7-day Setapp trialand get WiFi Explorer + 300+ apps included.
Get a small toolkit to ensure smooth macOS updates
New versions of macOS are exciting for Mac enthusiasts, but don't rush to download them. Always make sure you've cleaned your Mac using CleanMyMac, and back up your machine with Get Backup Pro.
Drivers are what allow your Mac to communicate with peripherals like graphics cards, speakers, or printers. You can't directly update drivers on a Mac; your best bet is to update your operating system, which has all the necessary drivers.
If you're using a specific app to communicate with peripherals, like an app for a printer, updating the app itself may install new drivers.
Mac won't update?
If your Mac won't update, first check whether it's compatible. Software Update shows only updates compatible with your Mac model, and says your Mac is up to date if none apply. As I noted, you'll need quite a bit of storage to update your Mac. If you don't have the space for a new OS, you will be unable to run the latest version of macOS.
Your Mac may also be too old. Though the system requirements help avoid this, Apple only supports older machines for a certain amount of time; this is often because other specs, like graphics cards, are no longer adequate for newer versions of macOS.
It's also possible the update was interrupted; this is why we advise you to have a strong internet connection before updating your Mac. These are core issues with a Mac that won't update. If you're experiencing issues, get hold of Apple for support.
Should I update my Mac?
The short answer is yes. Updating macOS is not only a path toward new features and Mac capabilities, it’s also an important security measure. While Apple updates privacy and security features with each new update, getting those updates is vital.
How to run Catalina on an older Mac
To run Catalina on an older Mac, you can use the patcher. Download the Catalina patcher from the website of the developer, DOSDude1. On the website, you’ll find a detailed video tutorial on how to install Catalina using this patcher. Make sure you prepare a flash drive for a bootable installer — this will be necessary to carry out the installation.
How to run Mojave on an older Mac
Similar to Catalina, you can install Mojave on an unsupported Mac with a patcher. Download the Mojave patcher from DOSDude1's website here. It also contains all the requirements and a step-by-step guide on how to use the patcher. By the way, these websites usually have a Donate link, so feel free to reward the devs for their hard work creating the patchers!
What's the difference between a macOS update and an upgrade?
Apple counts both as updates. A minor update moves you to a new release of your current macOS, such as macOS 26 to 26.4. A major upgrade moves you to a new macOS, such as macOS 26 to macOS 27 Golden Gate. Software Update shows only releases compatible with your Mac.






 Best solution
 Best solution

 You can even choose how many backups you want to keep; Time Machine doesn't allow such customizations.