How to change screen brightness on Mac: Quick adjustments
I love hybrid working, but ever since I began my new outdoorsy lifestyle, people have been asking me, "How do you see your laptop’s screen outside in sunlight?"
A reasonable question! I often switch back and forth between day and night shifts, as well as between my MacBook and iMac. So, I have to adjust my Mac’s screen brightness often.
I’m putting together all the shortcuts, manual and automatic methods, and some amazing apps (well-tested) to adjust screen brightness on Mac without a hassle.
But first, here’s a quick overview of the easiest ways to adjust brightness on your Mac:
I want to | How to do this |
Manually adjust screen brightness | Use F1 (dim) and F2 (brighten) keys, or go to System Settings > Displays. |
Let my Mac adjust brightness automatically | Enable Automatically adjust brightness in System Settings > Displays. |
Stop dimming when on battery | Go to System Settings > Battery > Options and turn off Slightly dim on battery. |
Make the screen easier on my eyes at night | Enable Night Shift, Dark Mode, or True Tone in System Settings. |
Save battery by lowering brightness | Turn on Low Power Mode in System Settings > Battery. |
Adjust brightness on an external monitor | Use physical buttons or System Settings (if the monitor supports macOS control). |
Easily manage multiple monitors | Use DisplayBuddy to adjust brightness from your Mac’s menu bar. |
Increase brightness beyond system limits | Use the Vivid app to unlock higher brightness levels. |
Make my Mac last longer on battery | Use the Endurance app to dim the screen and manage power-hungry processes. |
How to adjust brightness for different Mac models
Adjusting screen brightness isn’t exactly the same on every Mac. It depends on what you’re using: MacBook, iMac, or something else. Here’s how to do it on each one, step by step.
How to adjust brightness manually on a Mac
You can adjust the brightness on MacBook models via the keyboard (F1/F2), Touch Bar, and Control Center.
To use the keyboard, simply press the F1 key to decrease and the F2 key to increase brightness. If you’re using an external keyboard, you may have to press and hold the Fn key while pressing F1 or F2.
If you prefer to adjust the brightness through System Settings, here's how:
- Click on the Apple logo in the top-left corner.
- Select System Settings.
- Click Displays in the sidebar.
- Drag the Brightness slider left to dim the screen or right to make it brighter.
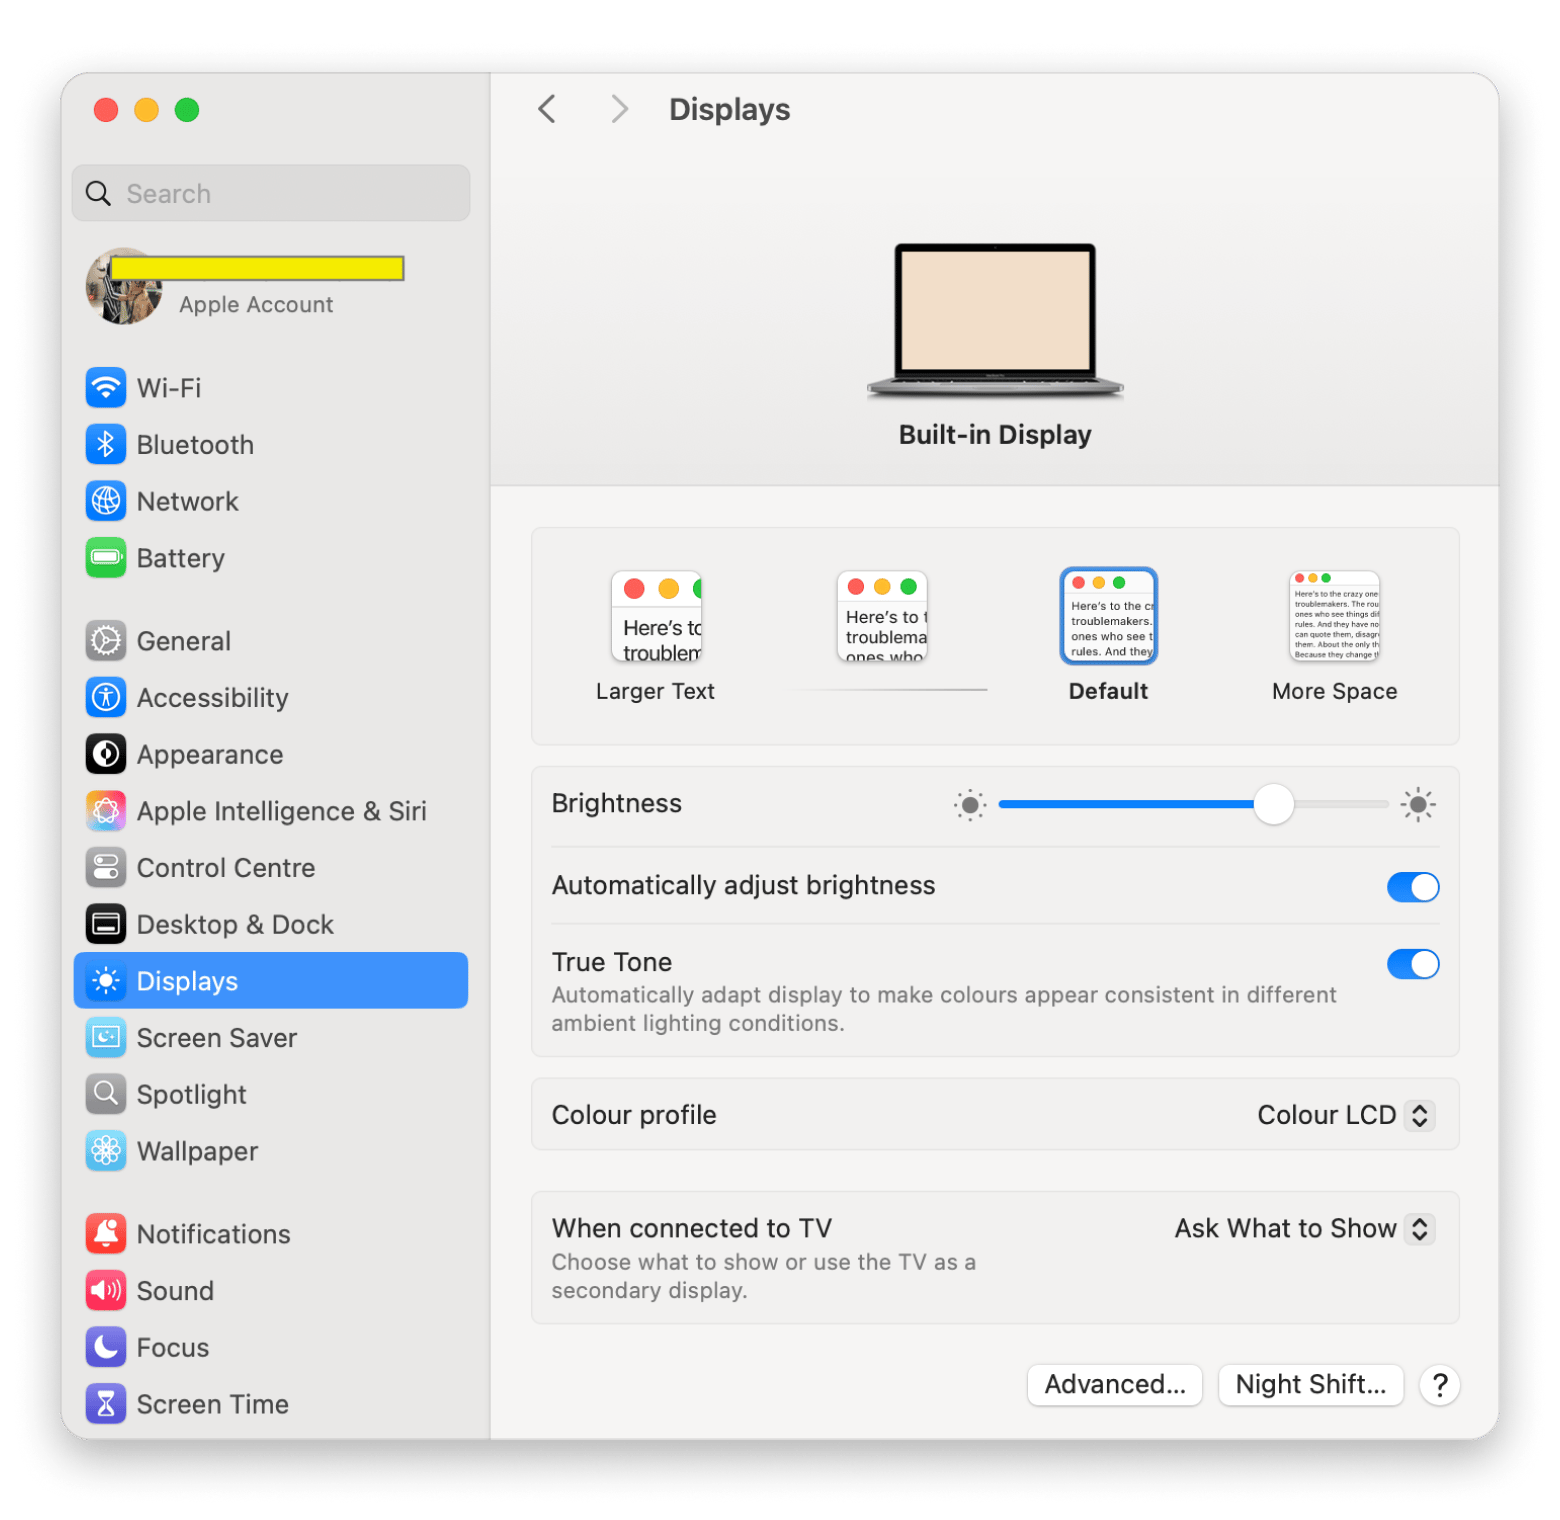
If you want your Mac to adjust brightness automatically based on ambient light, enable the Automatically adjust brightness toggle.
If your MacBook has a Touch Bar, tap the sun icon in the Touch Bar. Then, drag left to decrease and right to increase the brightness.
The sun icon is not visible? Tap the expand (<) button to see more controls.
Read also:
Adjusting brightness on iMac & Pro Display XDR
To adjust the brightness on iMac and Pro Display XDR, you can use System Settings.
The process is exactly the same:
- Click on the Apple logo in the top-left corner.
- Select System Settings.
- Click Displays in the sidebar.
- Drag the Brightness slider left to dim the screen or right to make it brighter.
On the iMac, you can do this in one keystroke, with the F1 and F2 keys.
One problem here is that Pro Display XDR is mainly designed for video editing, photography, and graphic design. So, users often need extreme brightness and color accuracy, which the system may not support otherwise. If this is your case, try using an app like Vivid.
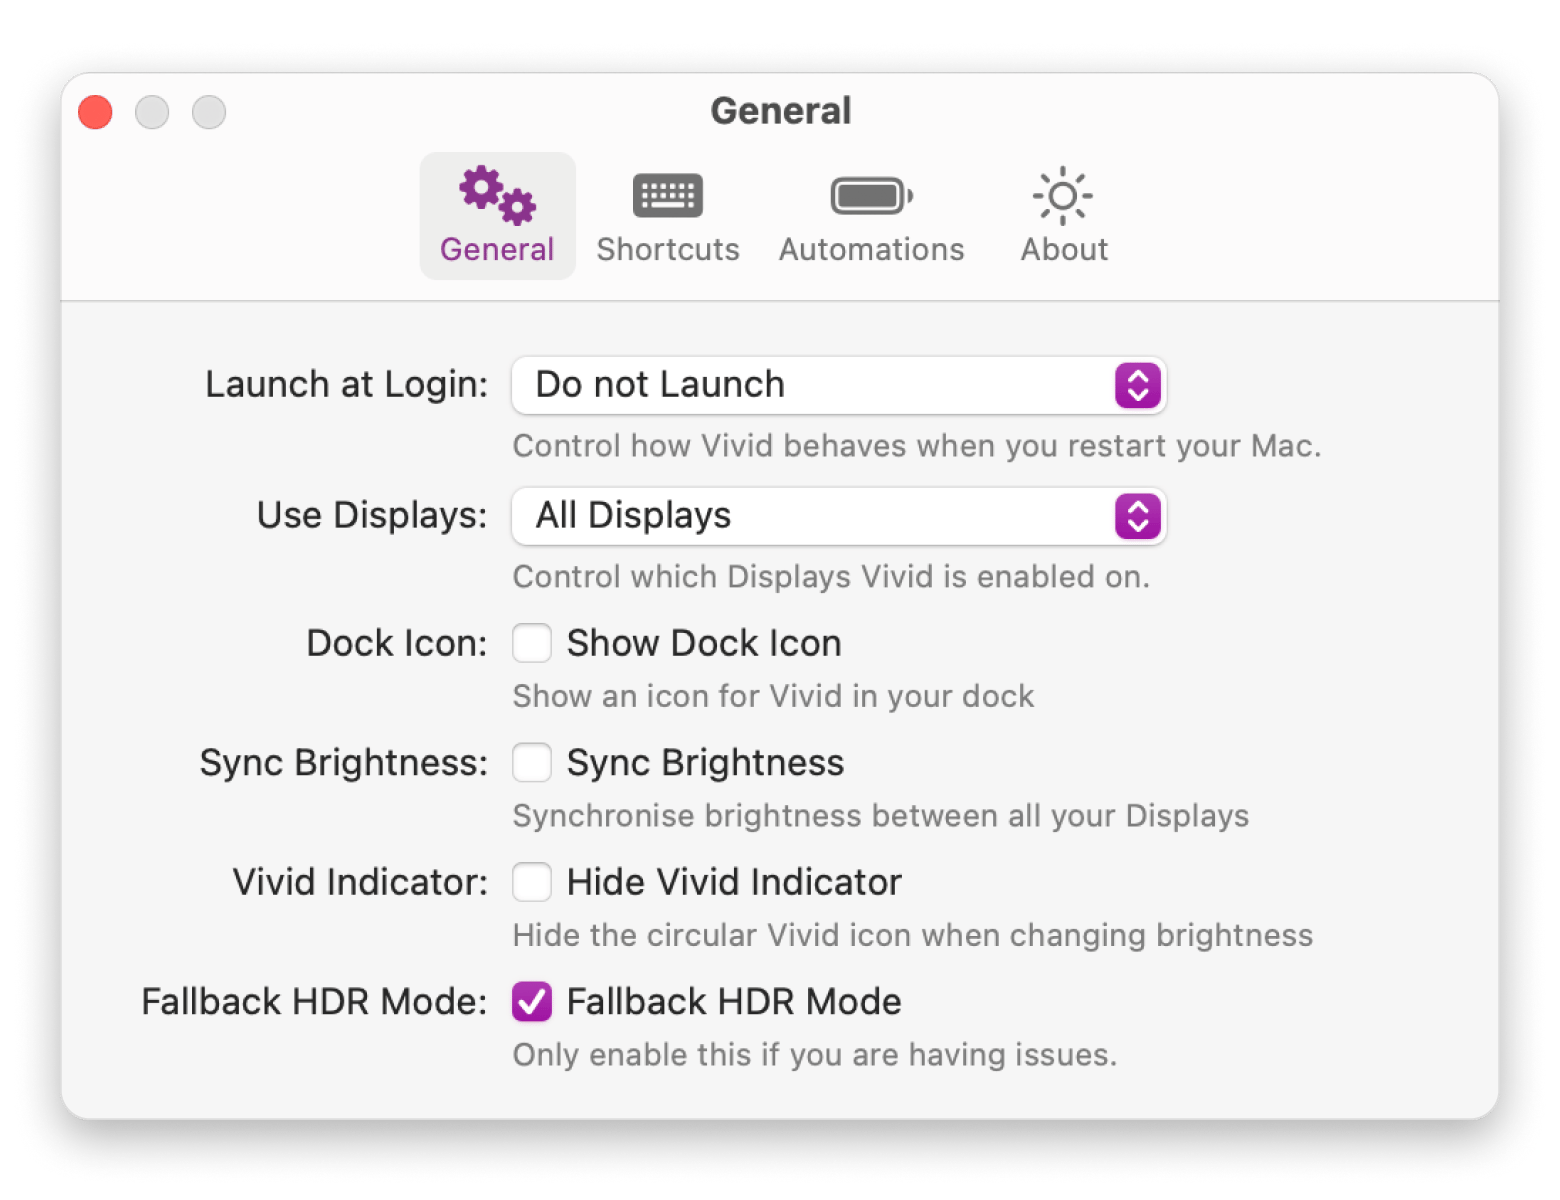
With this app, you can double your display’s brightness. It works on MacBook Pros with M-series Pro and Max chips, as well as the Pro Display XDR. If you own any of these systems, Vivid can give striking results, without overburdening your CPU.
Adjusting brightness on external monitors
Most external monitors have physical buttons to control brightness. You need to look for these buttons to tweak the brightness.
Some external monitors, like LG UltraFine and Apple Studio Display, support macOS control. On such monitors, you can control brightness directly from System Settings, keyboard, or Touch Bar, just like you would with your Mac’s built-in display.
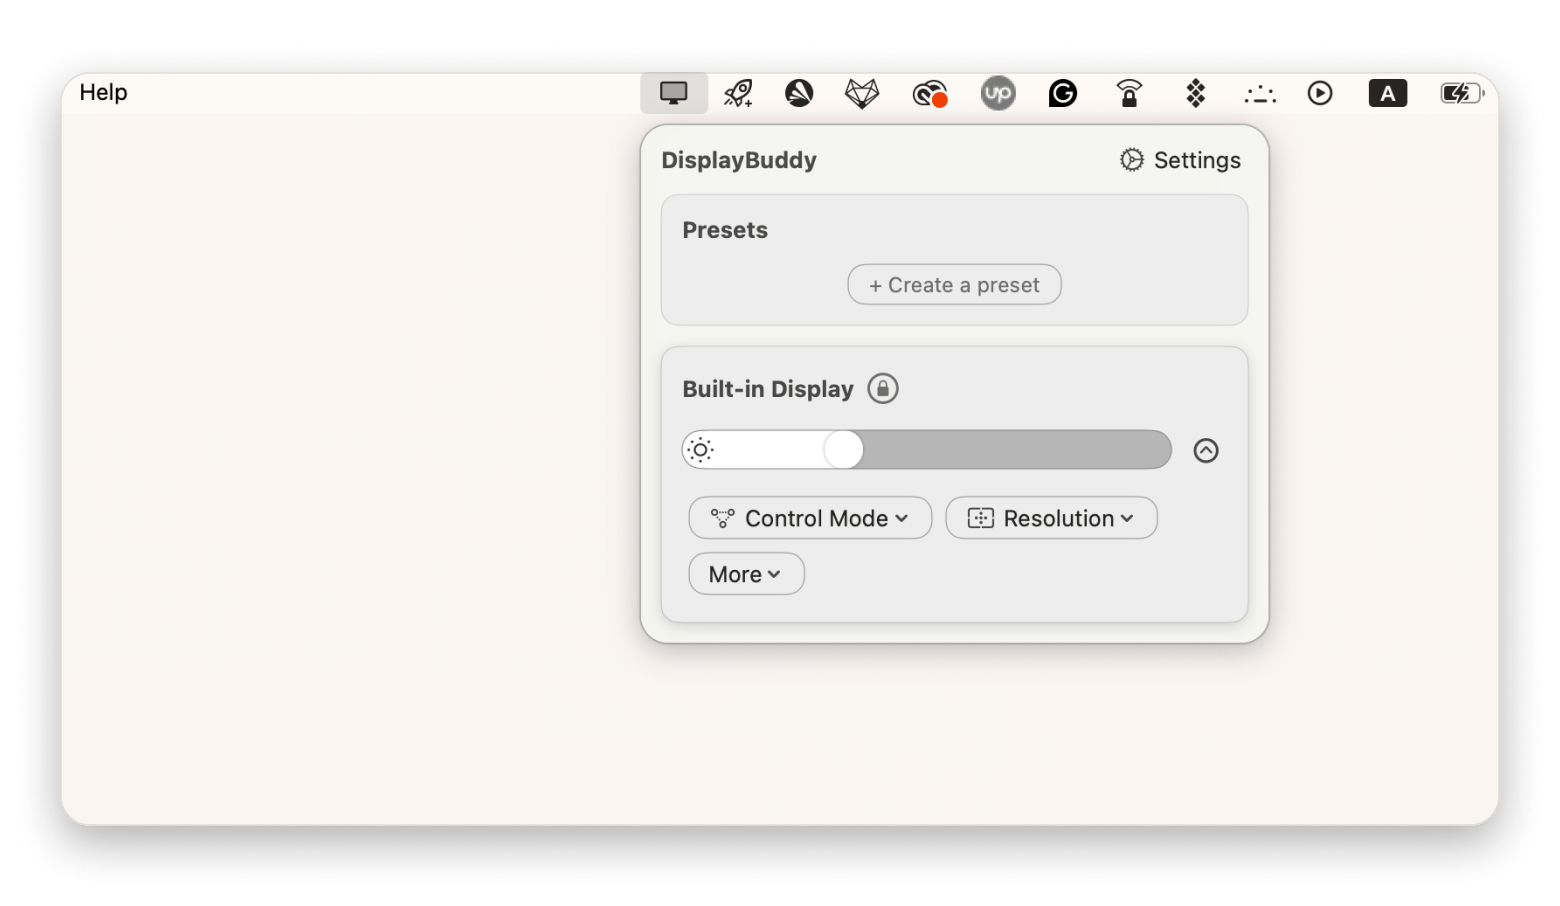
But if your monitor doesn’t support that, I recommend DisplayBuddy, a dedicated app that lets you control external monitors connected to your Mac. The app will build external display controls into your Mac’s menu bar. Just one click, and you can adjust the brightness of your external display. You can even create custom keyboard shortcuts using the app. What’s more, you can use DisplayBuddy to control multiple monitors connected to your Mac.
macOS features to manage brightness
Now, aside from the basic Displays settings, there are a few macOS features working behind the scenes that can change how bright your screen looks. I’ve run into these myself, and they're super helpful, but sometimes they do their thing when you least expect it.
So if your screen looks dim or warmer than usual, one of these might be the reason.
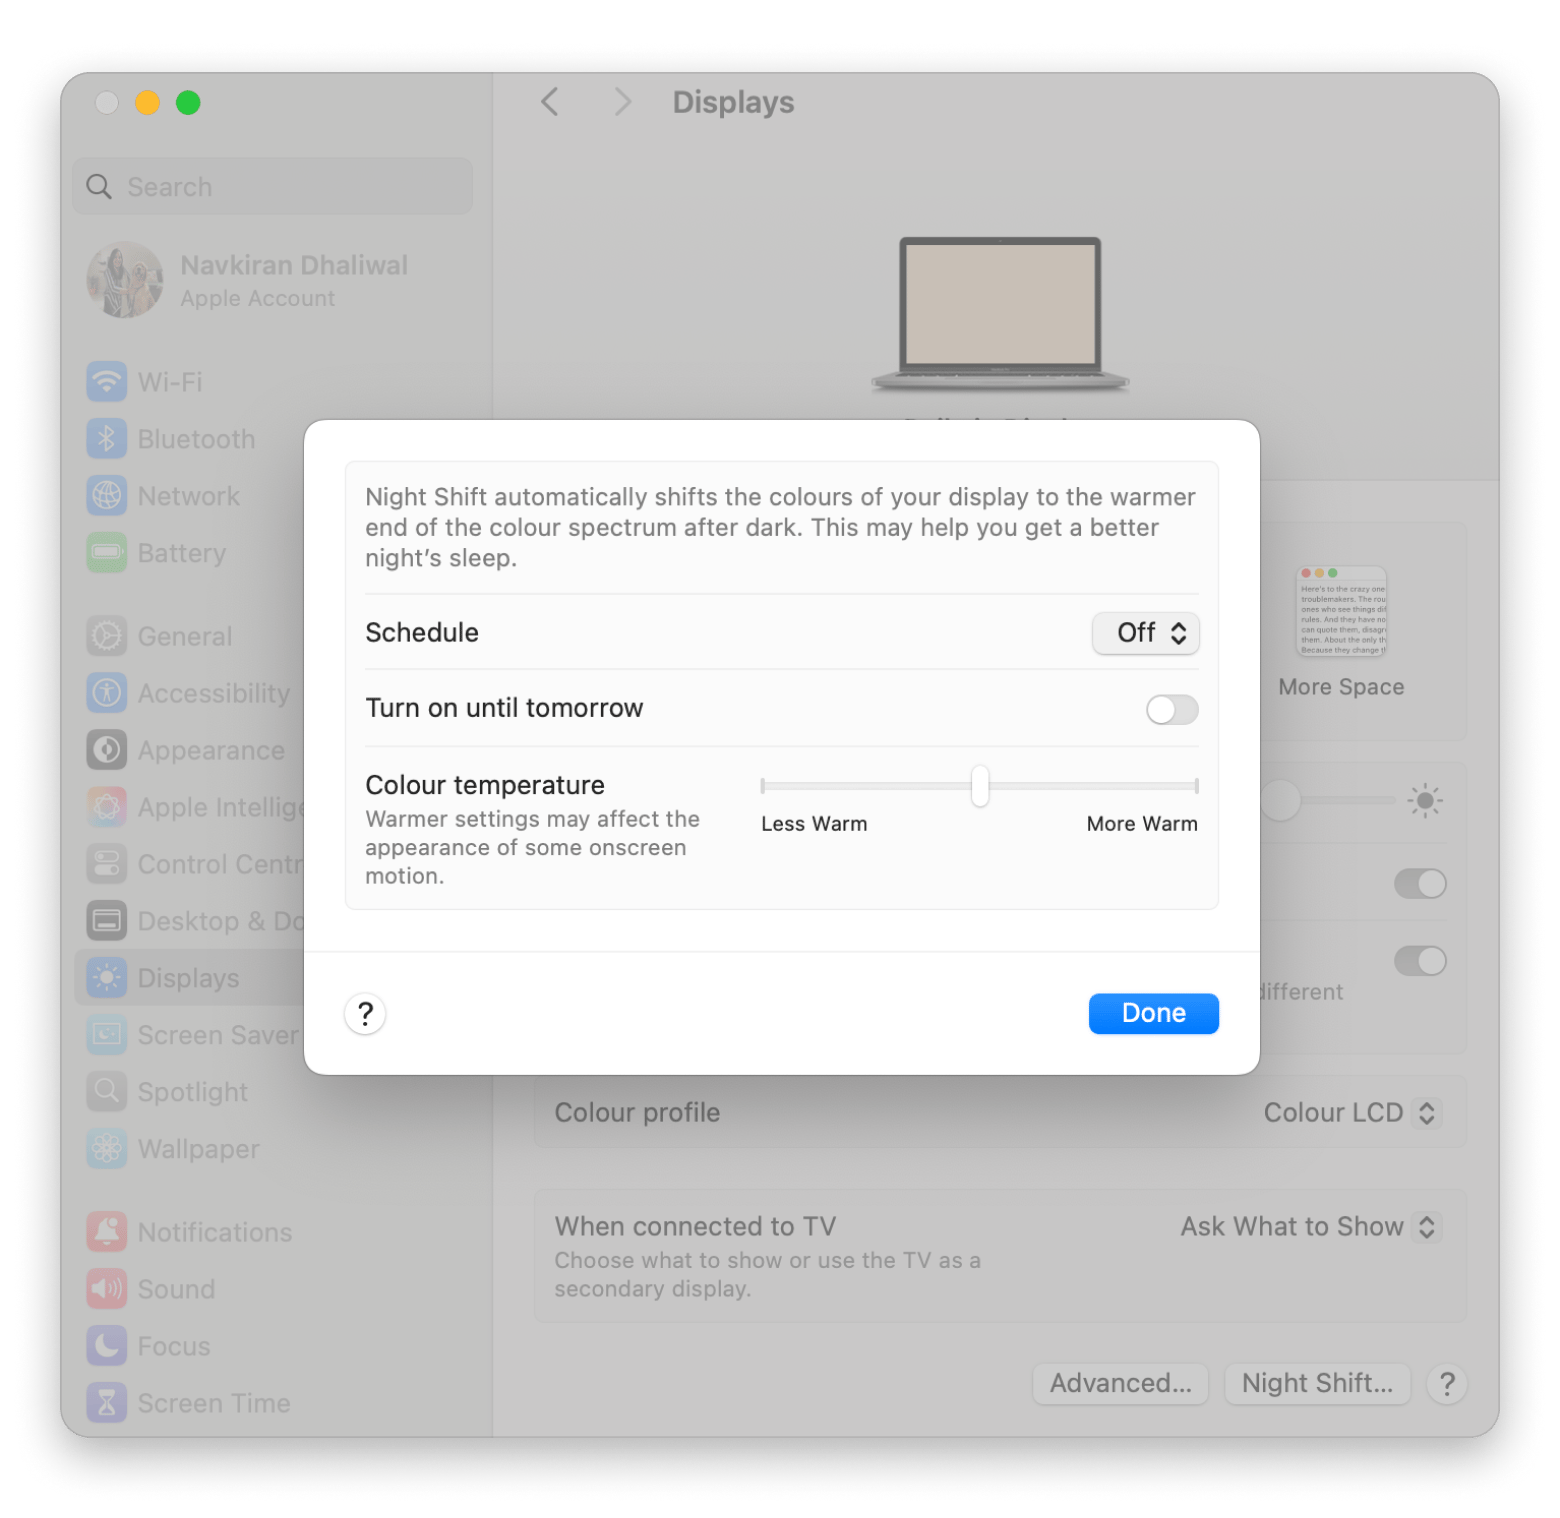
Night Shift
This feature uses your Mac’s clock and geolocation to decide if it's sunset. It then automatically changes the screen color to warmer tones and the perceived brightness.
To keep the Night Shift from making your screen appear uncomfortably dim, you should:
- Click on the Apple logo in the top-left corner.
- Go to System Settings > Displays.
- Scroll down to Night Shift in the bottom right corner.
- Move the Color temperature slider toward Less Warm.
- Click Done to save the settings.
True Tone
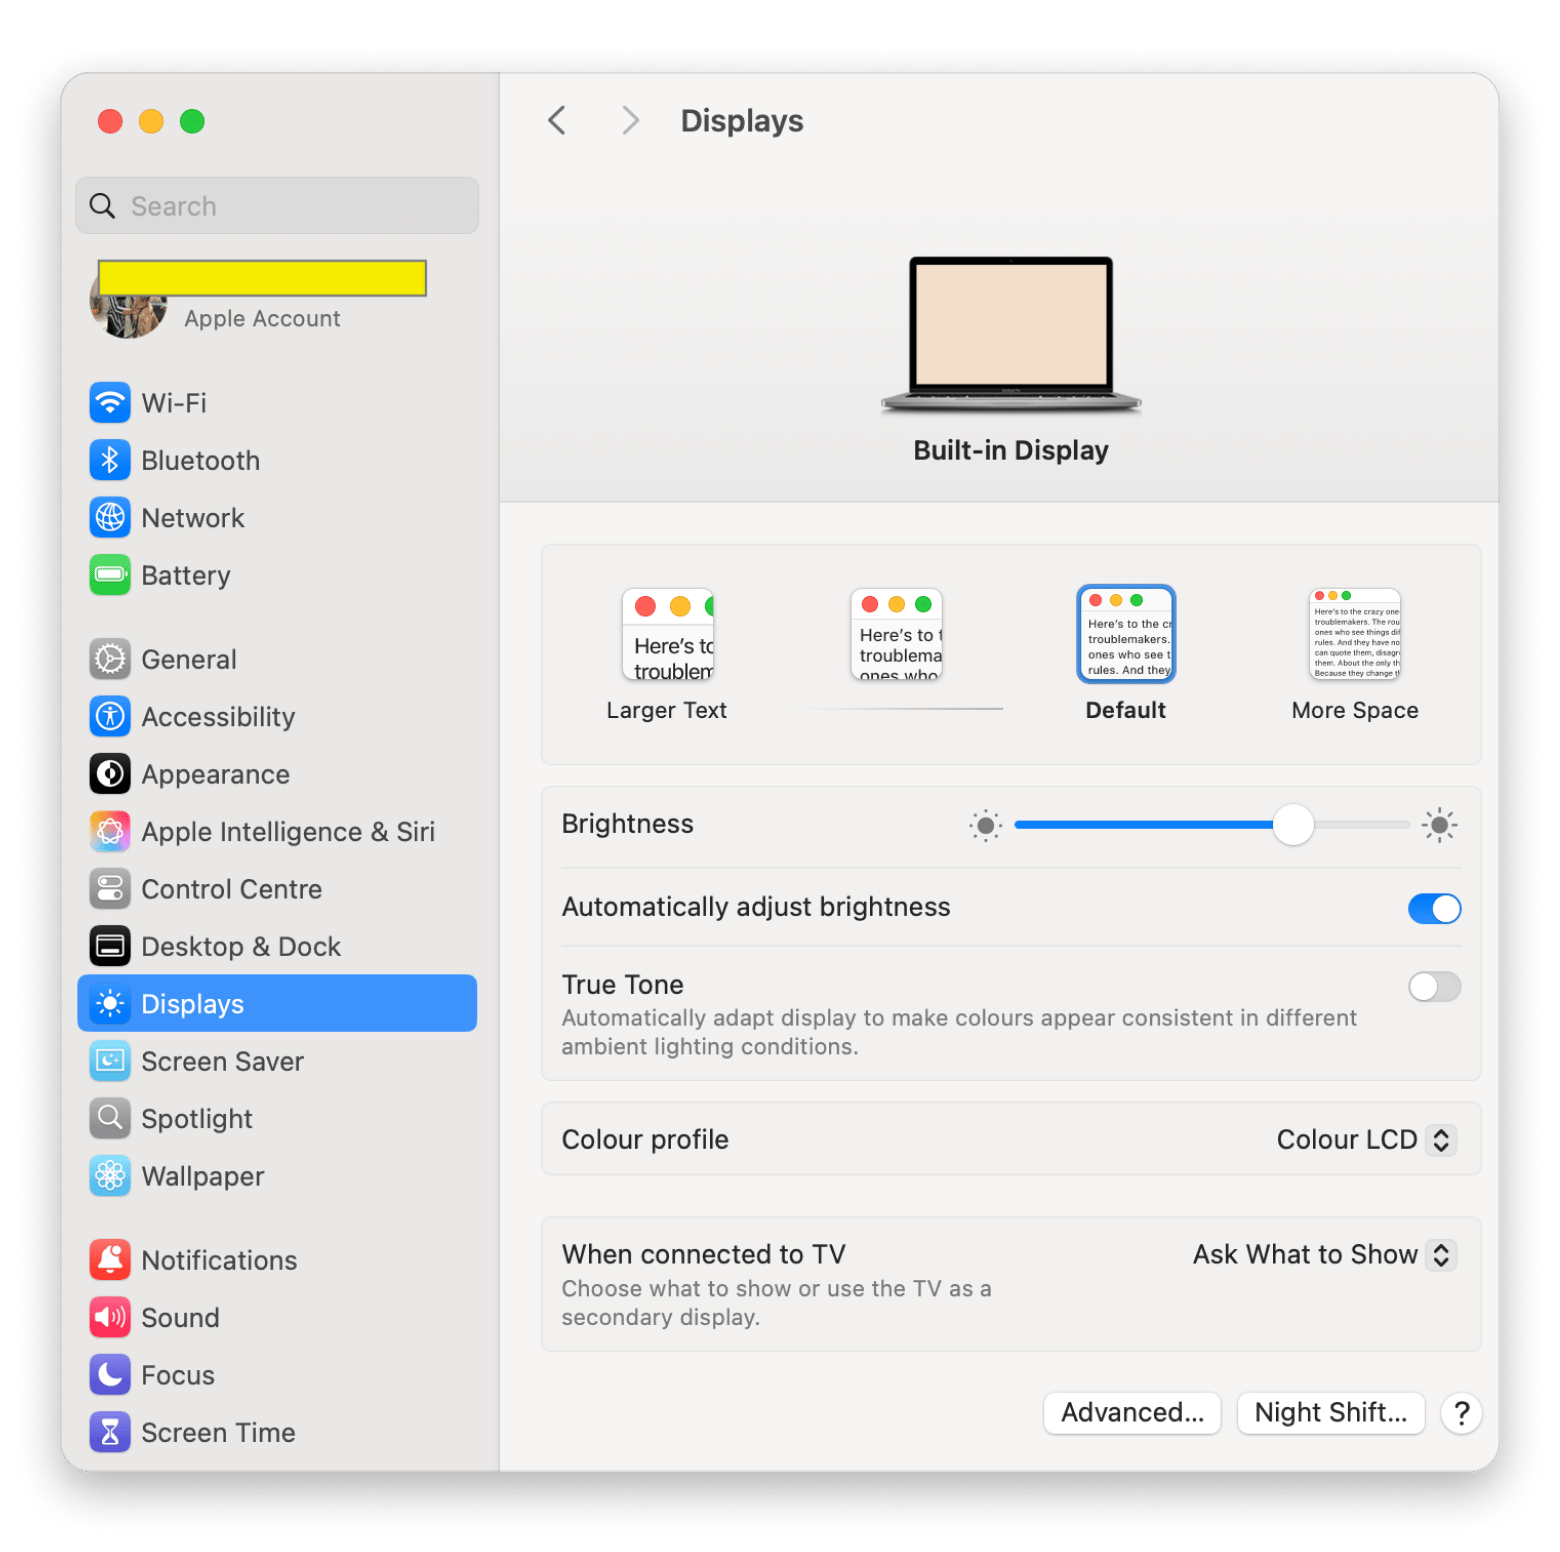
Like Night Shift, True Tone also affects perceived brightness. When enabled, it tweaks the intensity of your display to match the ambient light, dimmer indoors and brighter outdoors.
To adjust True Tone settings:
- Click on the Apple logo in the top-left corner.
- Go to System Settings > Displays.
- Disable True Tone toggle.
You can always leave True Tone enabled and adjust the brightness manually.
Dark mode
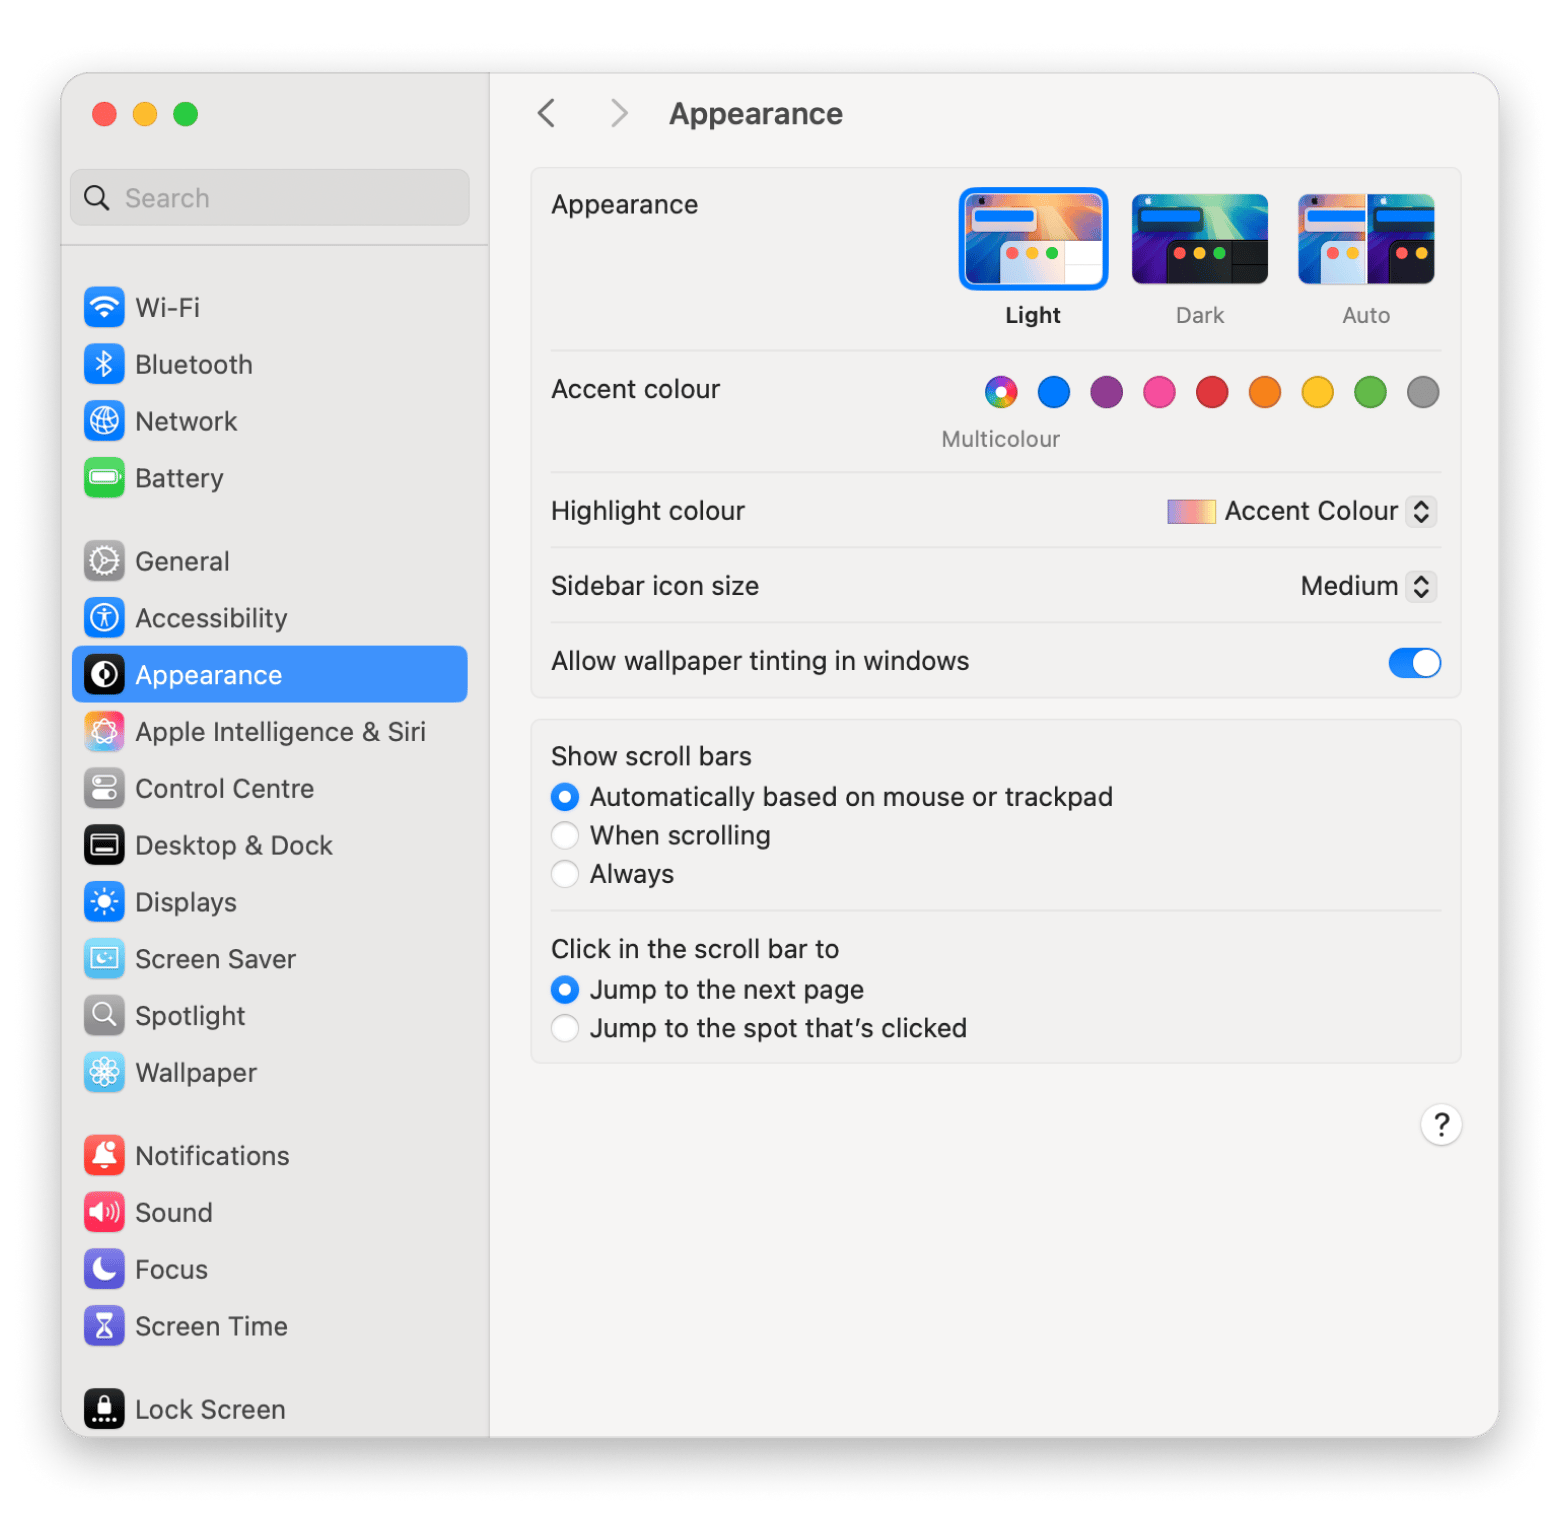
Dark mode is another feature that affects the perceived brightness. When enabled, it makes the screen feel less intense on the eyes, which is great for night-time use.
Here's how to enable or disable Dark Mode:
- Click on the Apple logo in the top-left corner.
- Go to System Settings.
- Click Appearance in the sidebar.
- Click on either Light or Auto.
That’s it! Your Mac will now switch to the mode you selected.
Low Power Mode
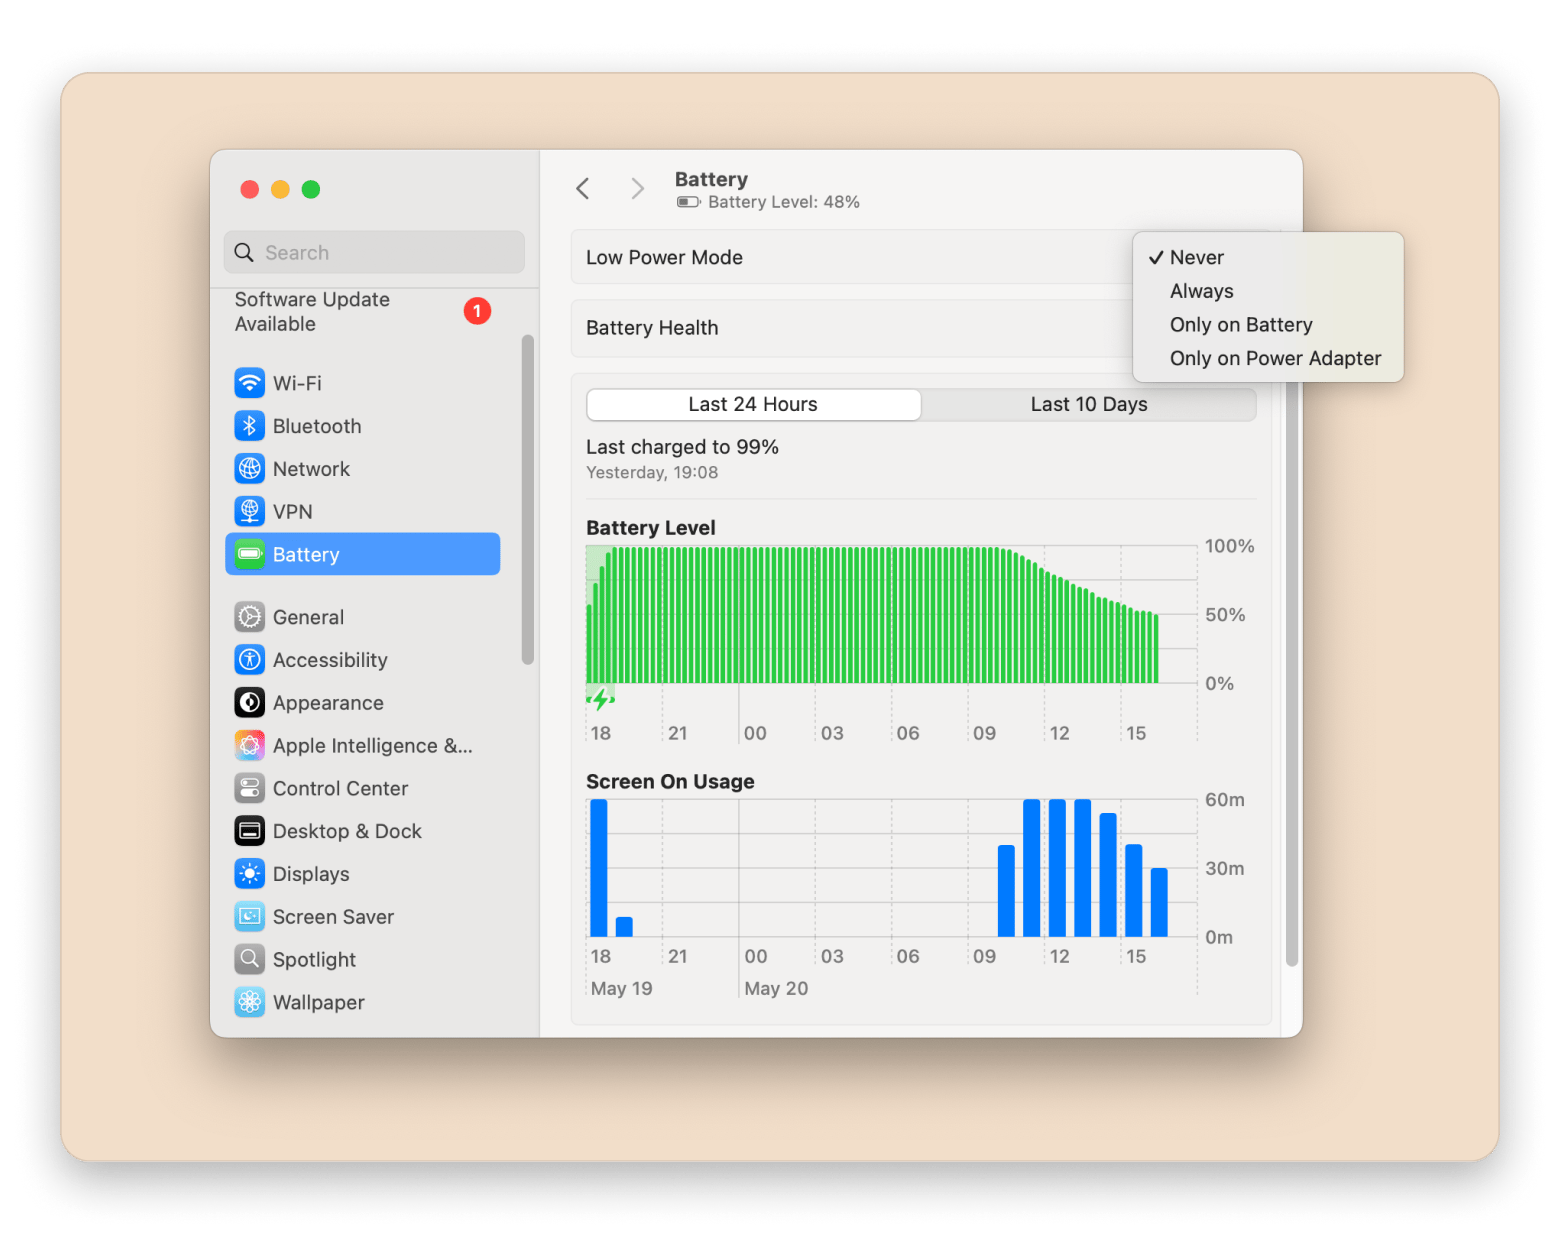
The brighter the screen, the faster the battery drains. Low Power Mode on Mac reduces (when enabled) battery usage by dropping the brightness. To enable or disable this feature:
- Click on the Apple logo in the top-left corner.
- Go to System Settings.
- Click Battery in the sidebar.
- Choose any preferred option from the Low Power Mode dropdown: Never, Always, Only on Battery, and Only on Power Adapter.
Why is my Mac screen so dark?
If your monitor goes all black, most likely, your Mac was shut down, it’s sleeping, or the monitor is not connected. Those are relatively easy to fix — turn on your Mac, press any key to wake it up, and check the cables to make sure your monitor is securely connected.
In most cases, macOS will keep your display brightness at 500 nits. But you should know that modern Mac monitors can handle much more! And the brightness will indeed go up when you’re watching an HDR video, for example. But how do you take control of this setting if your Mac brightness is too low? How to brighten the screen on Mac whenever you want? You already know the answers.
Final thoughts on how to change monitor brightness on Mac
Whether it’s a quick tap on the keyboard or a couple of clicks in System Settings, adjusting brightness is now something I don’t even think twice about.
Along the way, I also discovered a few helpful tools that made things even easier. If you're looking for more control over your display, there are some great apps worth trying.
The Vivid app can increase the brightness of the MacBook Pro and Pro Display XDR to their maximum limits. DisplayBuddy lets you control multiple external monitors connected to your Mac right from the menu bar. If you think you need the highest possible brightness but are worried about the battery, try the Endurance app, which balances the brightness and battery life very well.
The best part is that you can get all these apps with a single subscription to Setapp. Setapp is a one-stop productivity platform for Mac users. With Setapp, you get access to 260+ Mac and iOS apps for development, time management, file organization, and more. You can try it free for 7 days and see how it fits your workflow.
FAQ
Why is my Mac screen so dark even at full brightness?
The reason why your Mac screen is dark even at full brightness might be because you have the Automatically adjust brightness option enabled. When this is turned on, your screen will dim according to surrounding light conditions. Go to System Settings > Displays and turn off Automatically adjust brightness.
Another setting is Slightly dim the display on battery. To change this, go to System Settings > Battery > Options, and look for the option to slightly dim the display on battery.
Does increasing brightness drain the battery faster?
Yes, increasing brightness drains your battery faster. If you need high screen brightness, you can close battery-draining apps and processes to save battery. With apps like Endurance, you can make your Mac’s battery last longer by 20% with a few energy-saving moves. The app dims the screen, slowly enough that you won’t notice, but with substantial battery benefits.
How do I disable automatic brightness adjustment on Mac?
To disable automatic brightness adjustment on your Mac:
- Click on the Apple logo in the top-left corner.
- Select System Settings.
- Click Displays in the sidebar.
- Disable Automatically adjust brightness.
Can I increase brightness beyond macOS limits without third-party apps?
No, it’s not possible to increase the brightness of your Mac beyond the limits set by Apple, not even by using a third-party app. However, there are apps like Vivid that help unlock the full brightness of your device.


