Edit PDF on Mac: Here's all you need to know
I use my Mac for all kinds of things. A lot of the stuff I deal with is in PDF form: manuals, invoices, whitepapers, you name it.
Over time, I’ve learned some helpful ways to work with PDFs, and I’m still finding new tricks. If you’re also looking to make managing your PDF files easier, this guide should help.
I'll walk you through the best way to edit PDFs on Mac, and I'll mention some built-in apps and third-party tools that can be of great help.
But first, let's look at common PDF issues on Mac and what you can do to solve them:
| What's the problem? | What you can do |
| I only need basic PDF edits like signing or highlighting | Use the built-in Preview app or Quick Look for simple, quick edits. |
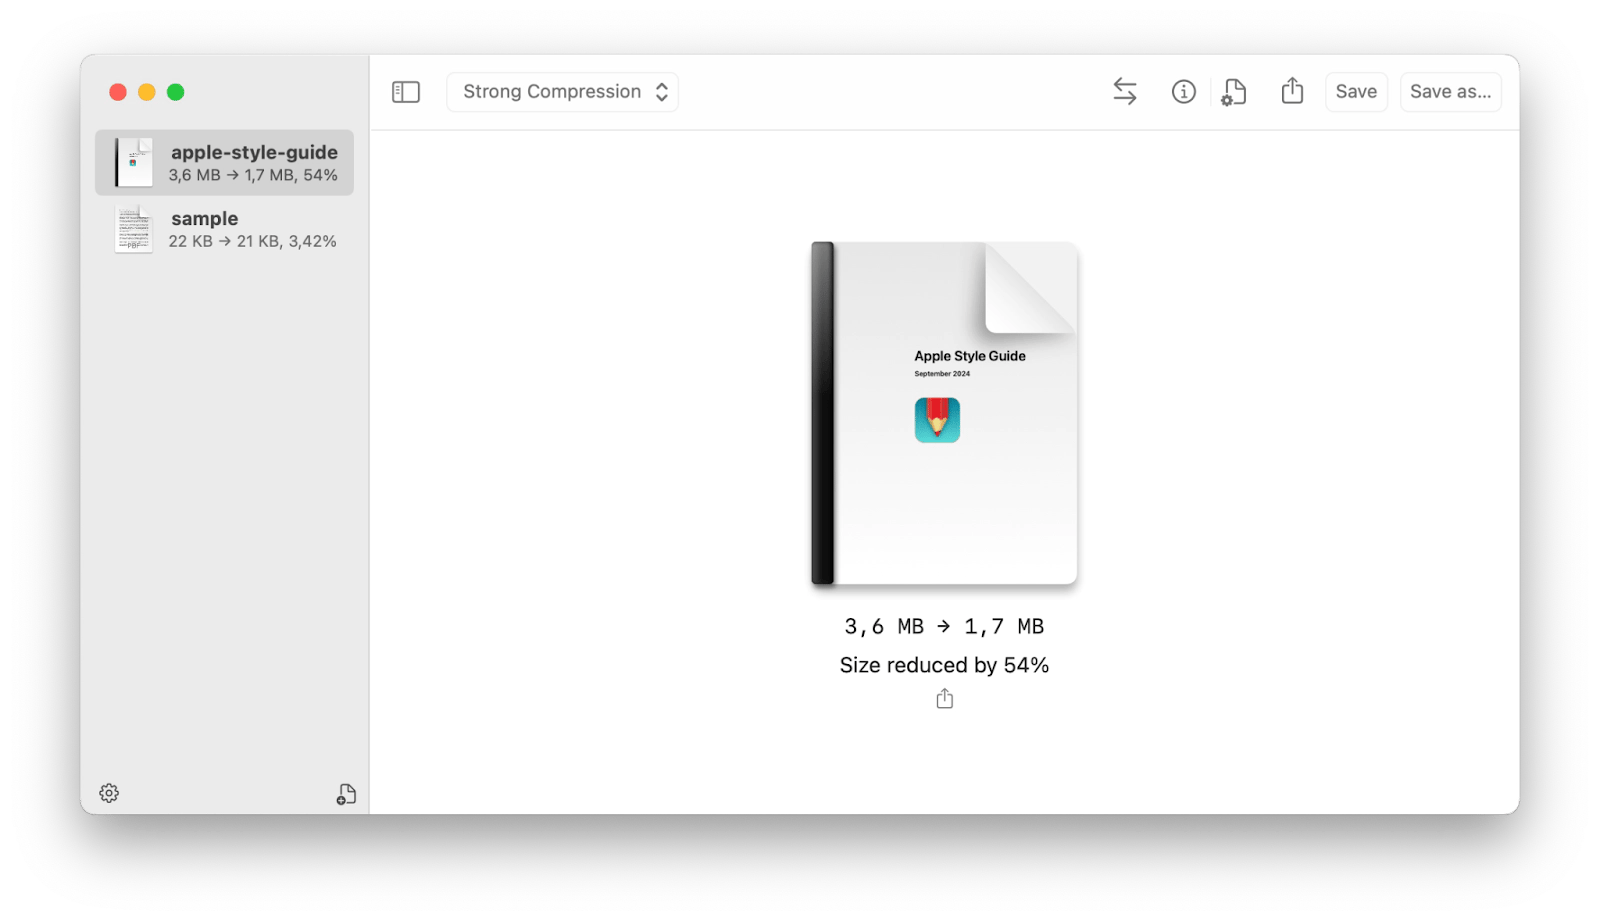
| My PDF is too large to share | Compress it using Preview’s export option or a dedicated app like PDF Squeezer. |
| I need to sign a PDF without printing | Create and place your signature directly in Preview or Quick Look. |
| I want to rearrange or merge pages from multiple PDFs | Open files in Preview and drag pages around in the thumbnail sidebar. |
| I need to copy text from an image-based PDF | Try TextSniper to grab text that Preview can’t select. |
| My scanned documents look cluttered or too large | Use Prizmo to clean up scans and save them as cleaner PDFs. |
| I need more editing power than Preview can offer | Use third-party tools like Nitro PDF Pro for OCR, redaction, forms, and more. |
| I want to extract text scattered throughout the PDF to get the main information. | Use PDF summarizer, a free custom GPT. |
How to edit PDF on a Mac
Looking to make quick edits to a PDF on your Mac? The Preview app that comes built into macOS is a solid option. You can use it to rearrange pages, add simple notes, or make minor tweaks without installing anything extra. It might not offer the most advanced tools, but it gets the job done for everyday tasks.
Typically, editing a PDF file on a Mac using Preview involves these steps:
- Go to the folder with your PDF file or search for it via Spotlight and open it in Preview.
- Click Edit in the menu bar. Here, you can find options like inserting a new blank page or a page from another PDF file.
- Click File in the menu bar, choose Save, or press Command + S to save your changes.
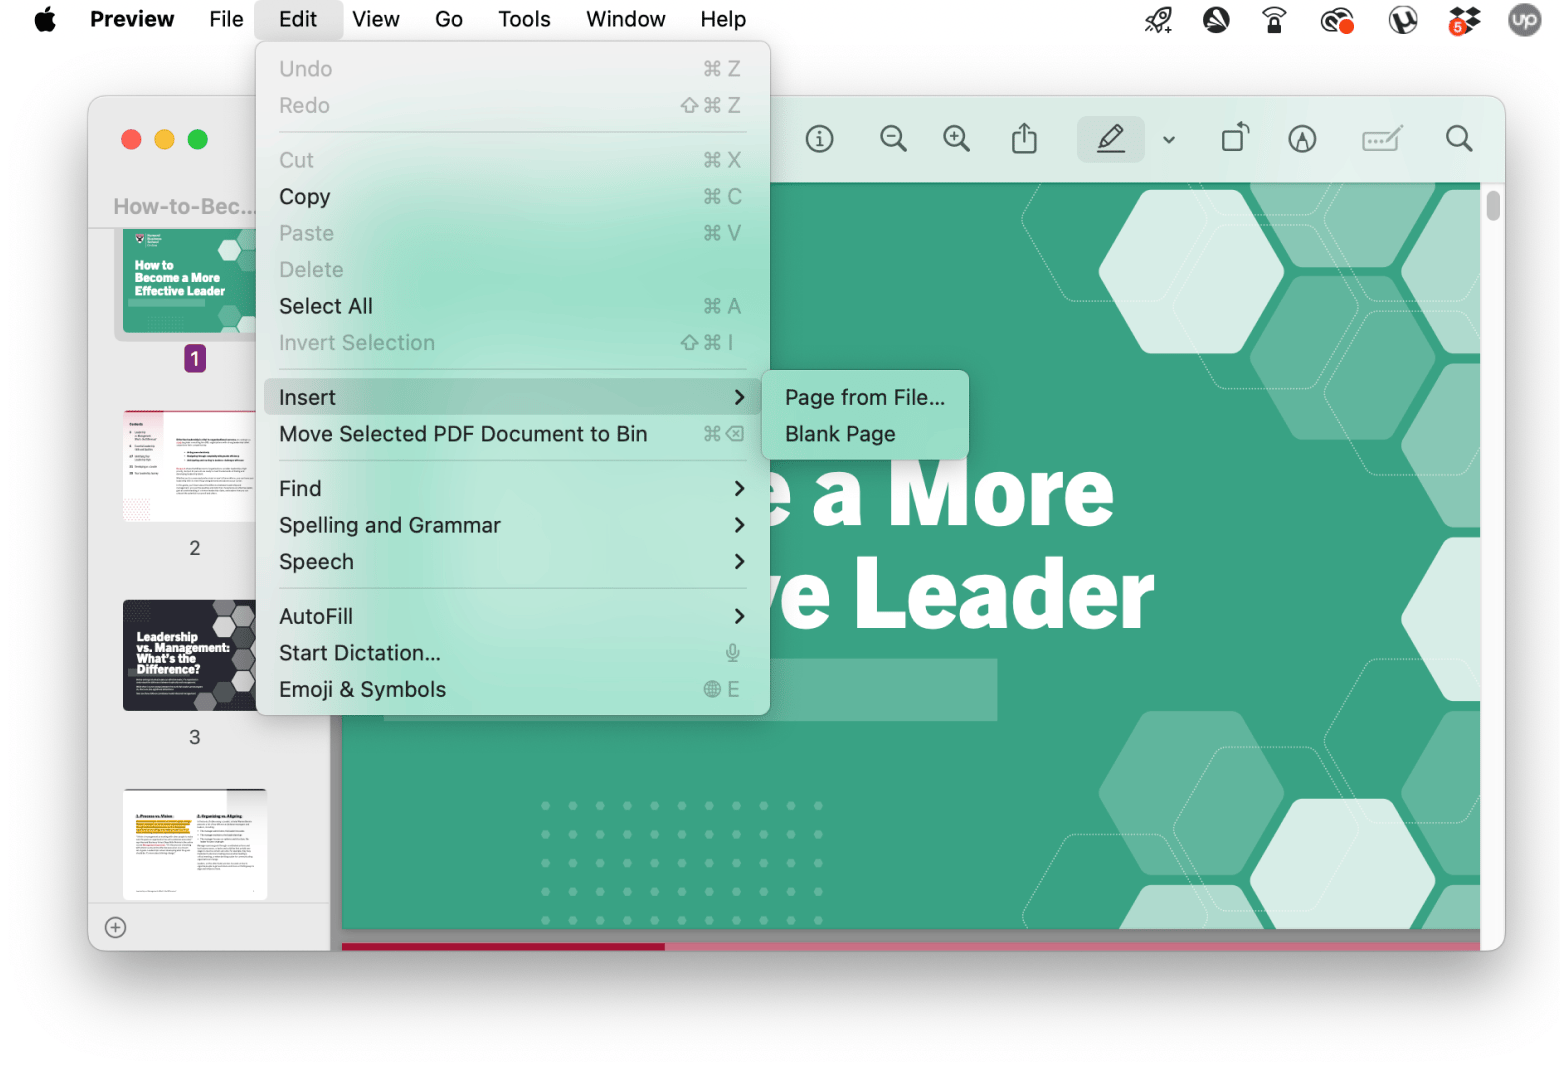
Preview can be a bit limited in what it can offer. If you need more advanced features, you can go with a third-party tool like Nitro PDF Pro. You'll be able to use OCR to scan documents, add headers and footers, create bookmarks, and more. In a nutshell, you'll be able to edit, sign, and redact documents with Nitro PDF Pro with ease.
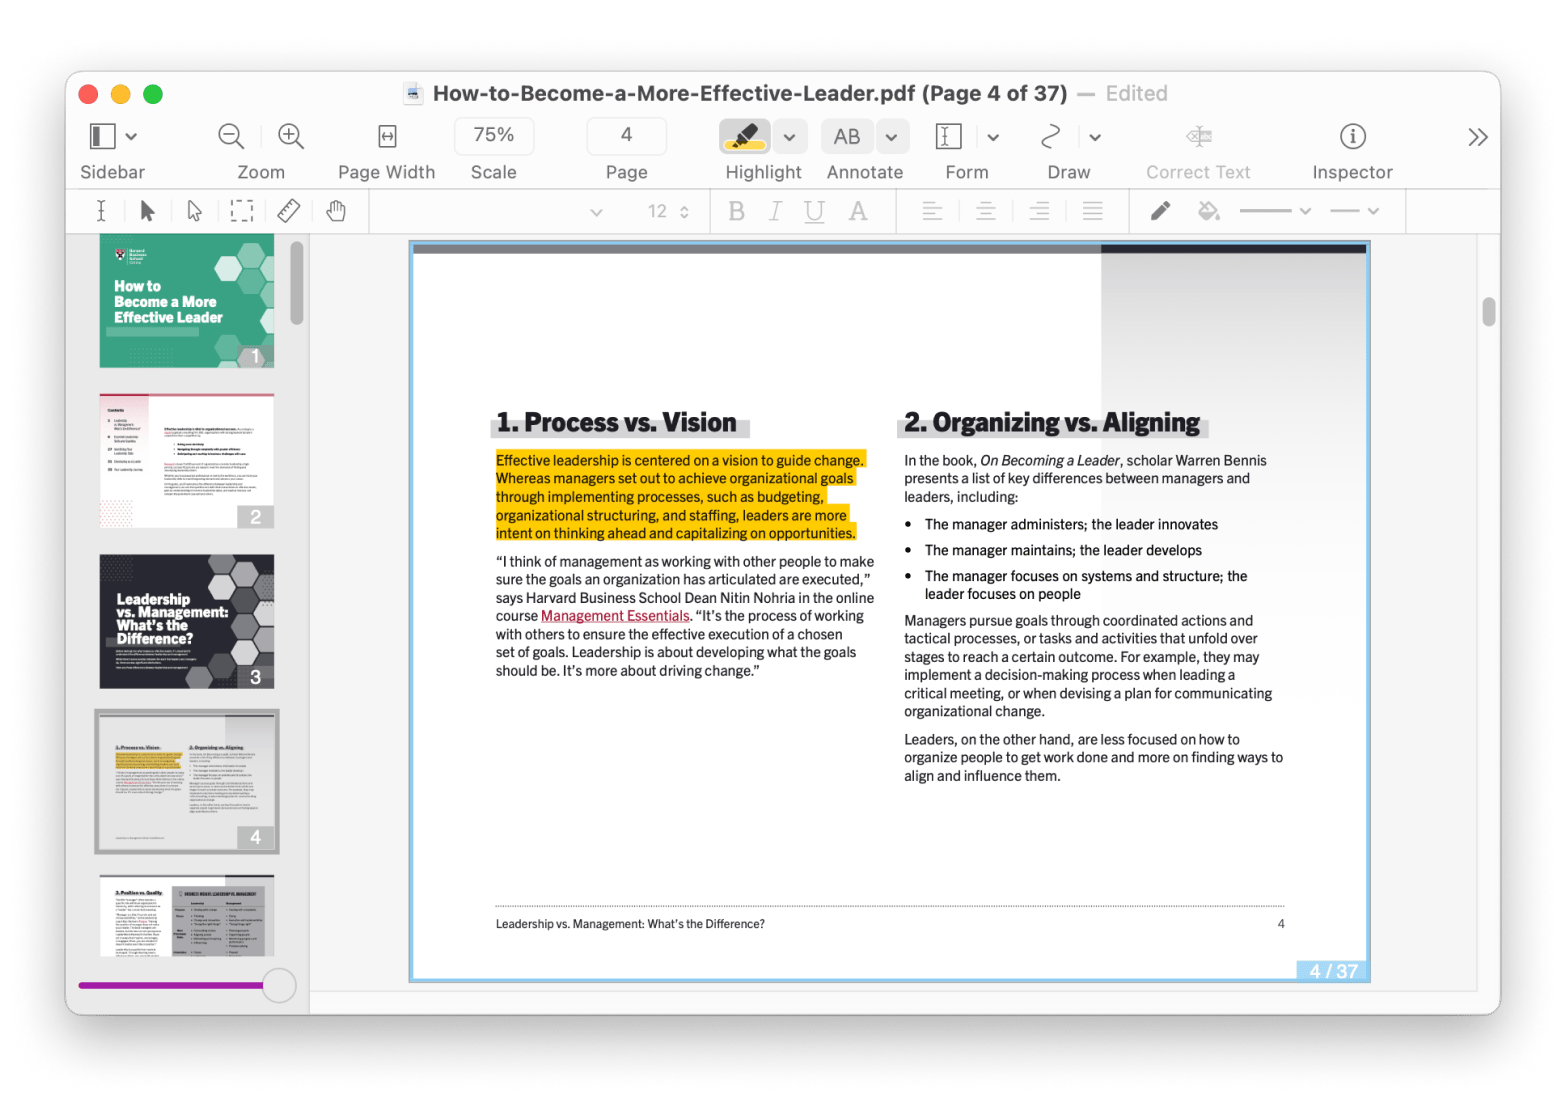
If you're looking for powerful tools without spending a dime, check out the guide to the best free PDF editor for Mac.
Work on iPhone? Learn this: How to edit a PDF on iPhone.
How to annotate and comment on your PDF
Information in PDFs may need more context or complementary data hinting at objectives, supplements, references, and other relevancies. You can do this by adding words or using other design elements under the Annotate feature.
To do this:
- Open your PDF file in Preview.
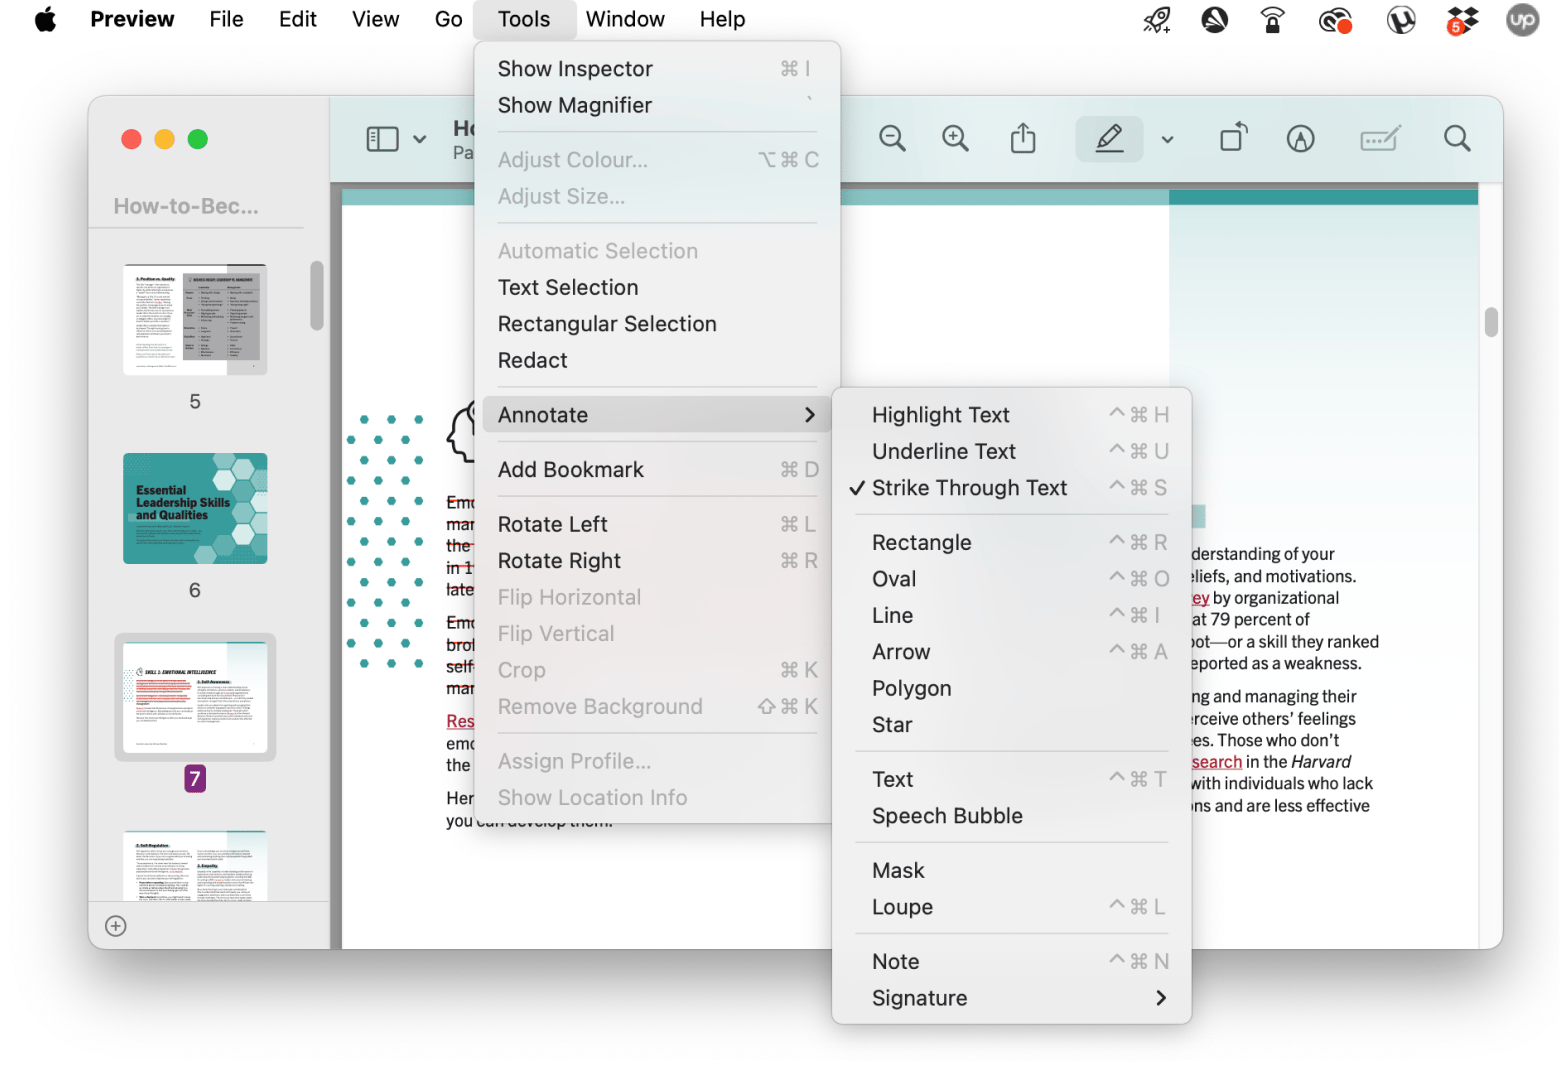
- Click Tools in the menu bar.
- Choose Annotate from the menu.
- Choose the element you want to add or the design feature you want to use.
- Highlight the text or go to the area where you want to have an annotation and proceed with your changes.
To add a comment to your PDF using Preview:
- Click Tools in the menu bar.
- Choose Annotate from the menu and proceed to Note.
- Write your comment in the box on the page, then drag it to your preferred position.
- You can also use the Text or Speech Bubble option to add design items to your PDF that encapsulate a comment.
Alternatively, you can:
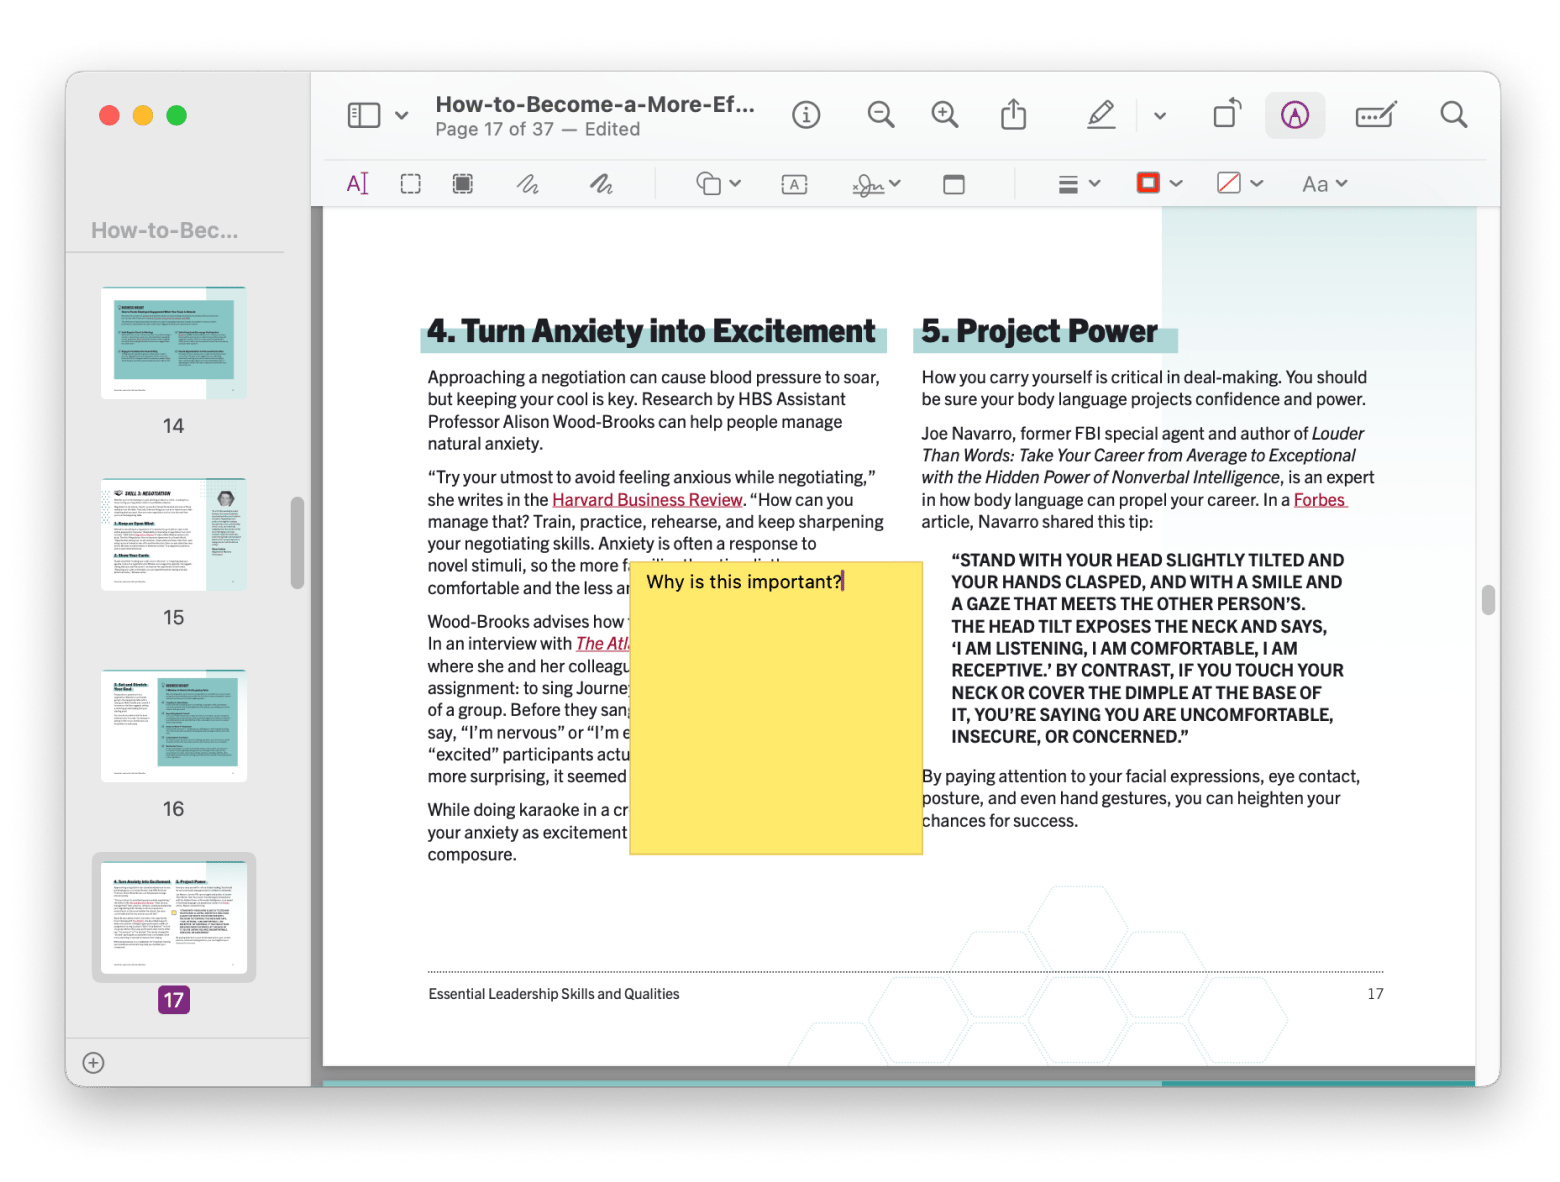
- Click the pen tip icon at the top of the Preview window to show the markup toolbar.
- Click the Note icon in the markup toolbar.
- Add your comment to the box on the page and drag it to your preferred position.
- Click outside the box to close the note.
The beauty of Preview’s annotate feature is that you can do things like striking through, highlighting, or underlining, then add a note explaining that choice. I find this to be a more casual and relaxed take on how to edit a PDF on a MacBook.
How to fill and sign PDFs (e-sign)
Some documents, like contracts, may have declarations and other information you need to assent to by signing.
You can do this in Preview by following these steps:
- Click the pen tip icon at the top of the Preview window to show the markup toolbar.
- Click the Sign icon in the markup toolbar.
- Click the Click Here to Begin button and create your signature using the trackpad.
- Press any key when done, enter a description for the signature, and click the Done button.
- Click on the created signature, and it will appear on the page. You can then drag it to your desired position and resize it to your liking.
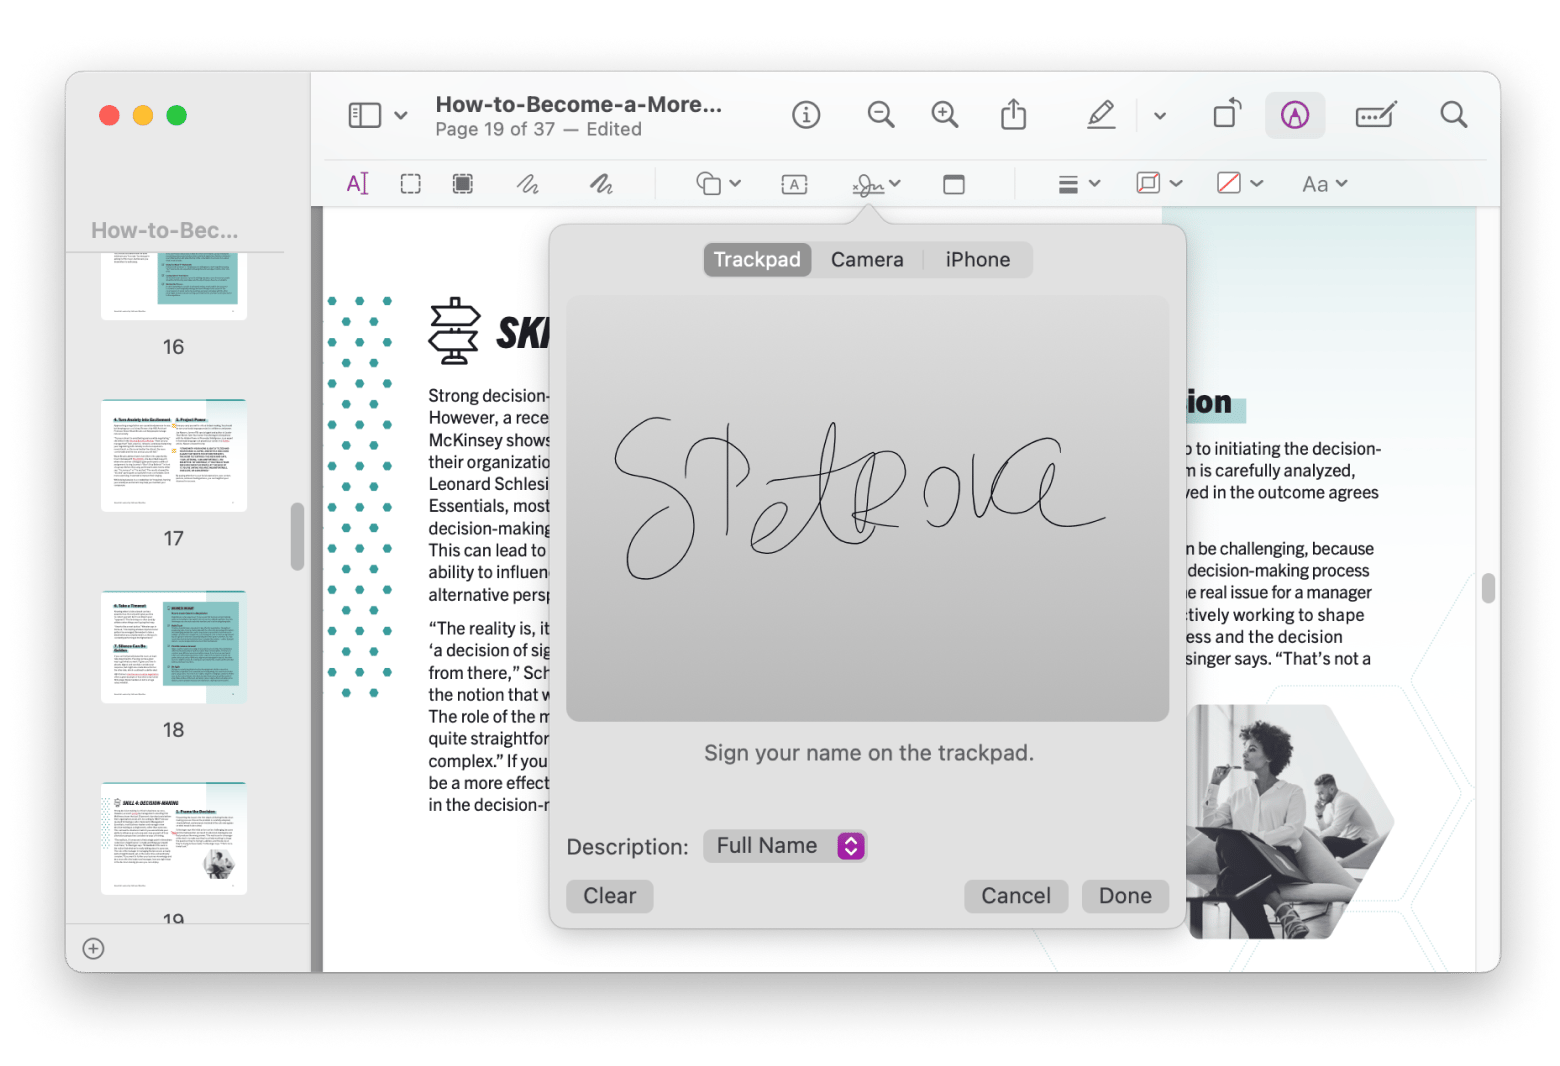
After creating a signature, you can always reuse it since it will be listed.
Sensitive information in PDFs and how to redact it
Depending on your work, the PDFs you handle may often contain sensitive information such as payment details. To keep these protected, you can use the redact feature in Preview by following these steps:
- Click the pen tip icon at the top of the Preview window to show the markup toolbar.
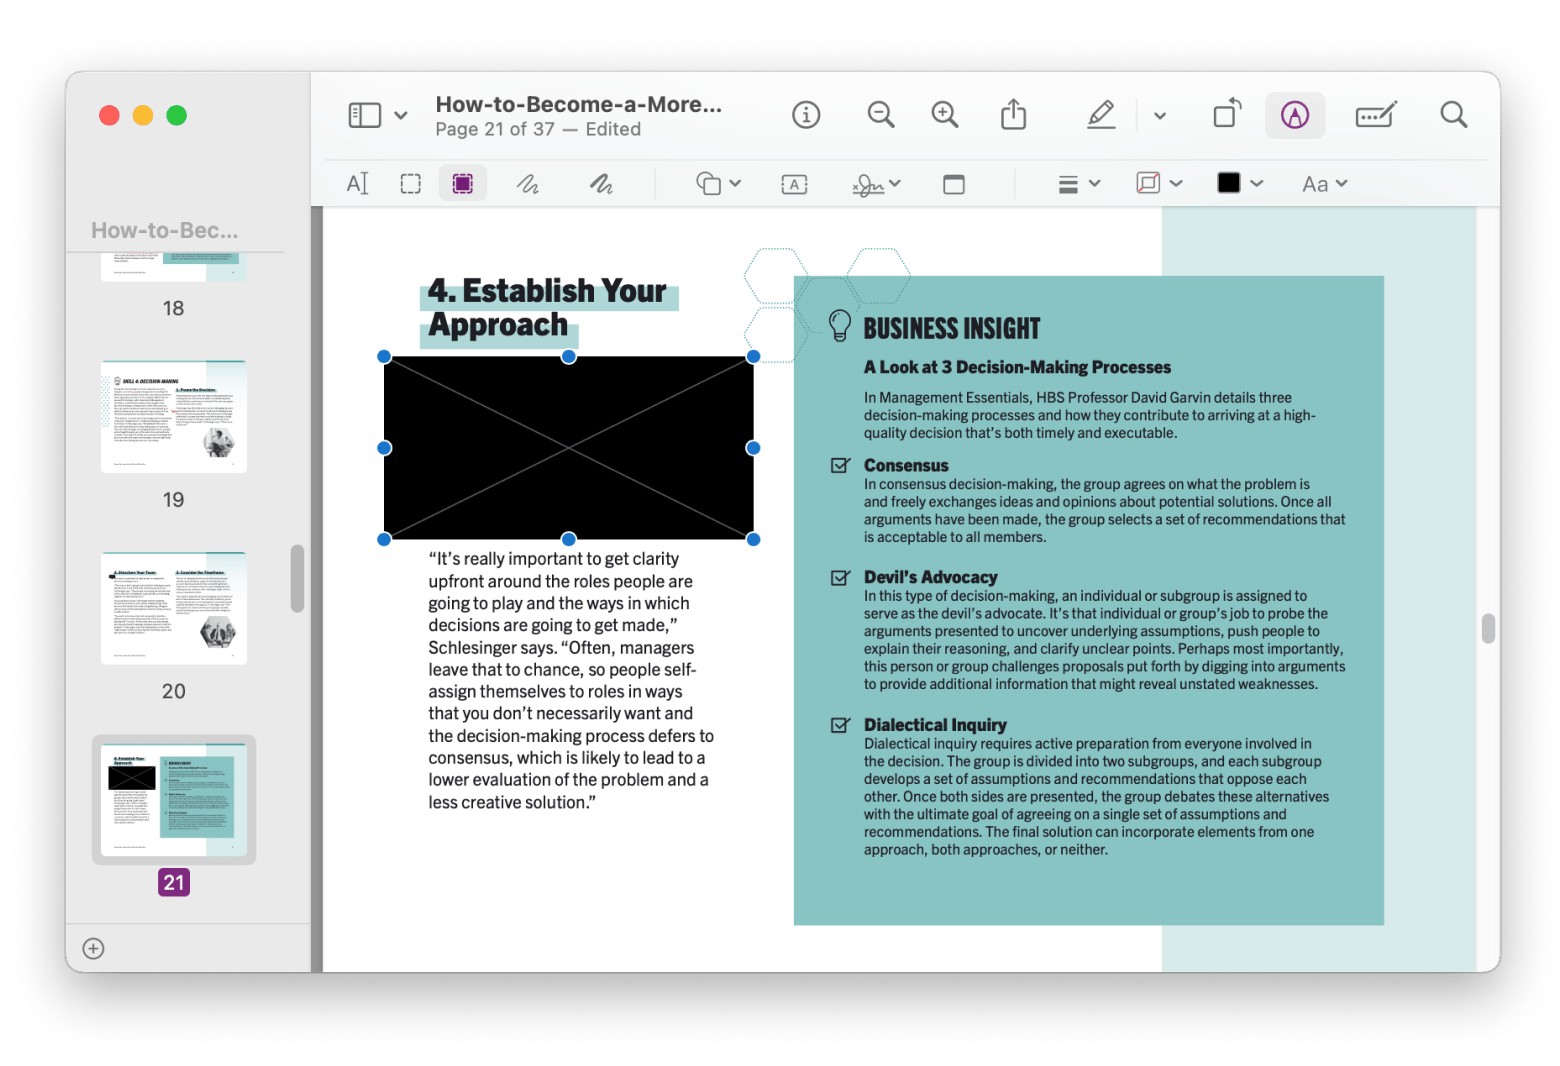
- Click the Redact icon in the markup toolbar.
- Use the cursor to select the text or element you want redacted, and a black patch will cover it.
How to compress and share PDFs from a Mac
I often send PDFs to different people for various purposes. It could be to point them to an insightful piece of research or to submit information they need to generate a transaction document.
Here's how to do it:
- Open your PDF file in Preview.
- Click the Share the document button at the top of the Preview window.
- Choose your desired share option and send the PDF.
If you want to compress PDF before sharing it:
- Open Finder and go to the folder with your PDF file.
- Right-click it and choose Compress “Filename”
- Right-click on the zip file created in that folder and choose Share.
- Choose your preferred share option and send the zip file.
Read also:
This method also helps when I want to copy words that aren’t in text format but are part of a logo or some other image. So, if I’m describing the inscriptions on a piece of cloth someone wore in a picture, I can capture that part of the picture and paste it as text.
How to add text and notes on PDFs in Preview mode
The text and notes features often help me add words that aren’t supposed to be part of the sentence flow, or reminders and instructions on modifications to make. I can also use them to quickly add corrections or clarifications when there’s no time to re-edit a PDF section with errors or information that could be misinterpreted.
To add text and notes to a PDF in Preview:
- Click the Tools option in the menu bar.
- Choose Annotate from the menu and proceed to Note.
- Write your comment in the box on the page, then drag it to your preferred position. You can also use the Text or Speech Bubble option to add design items to your PDF that encapsulate a comment.
Alternatively, you can:
- Click the pen tip icon at the top of the Preview window to show the markup toolbar.
- Click the Note icon in the markup toolbar.
- Add your comment to the box on the page and drag it to your preferred position.
- Click outside the box to close the note.
How to merge different PDFs
I often end up with related information spread across multiple PDFs that really belong in a single document. Redesigning a whole new PDF just to combine everything isn’t exactly practical.
Luckily, I can merge these PDFs using Preview. Here's how:
- Open the PDFs in Preview that you want to merge and make sure the thumbnail sidebar is showing.
- Drag pages from the thumbnail sidebar of the other PDFs into the sidebar of the main PDF where you want them converged, and reposition them as preferred.
- Alternatively, you can go to the Edit menu, choose Insert, then select Page from File and pick the PDF you want to add. This will insert the entire file at the end of your main document.
- Click File in the menu bar and choose Save.
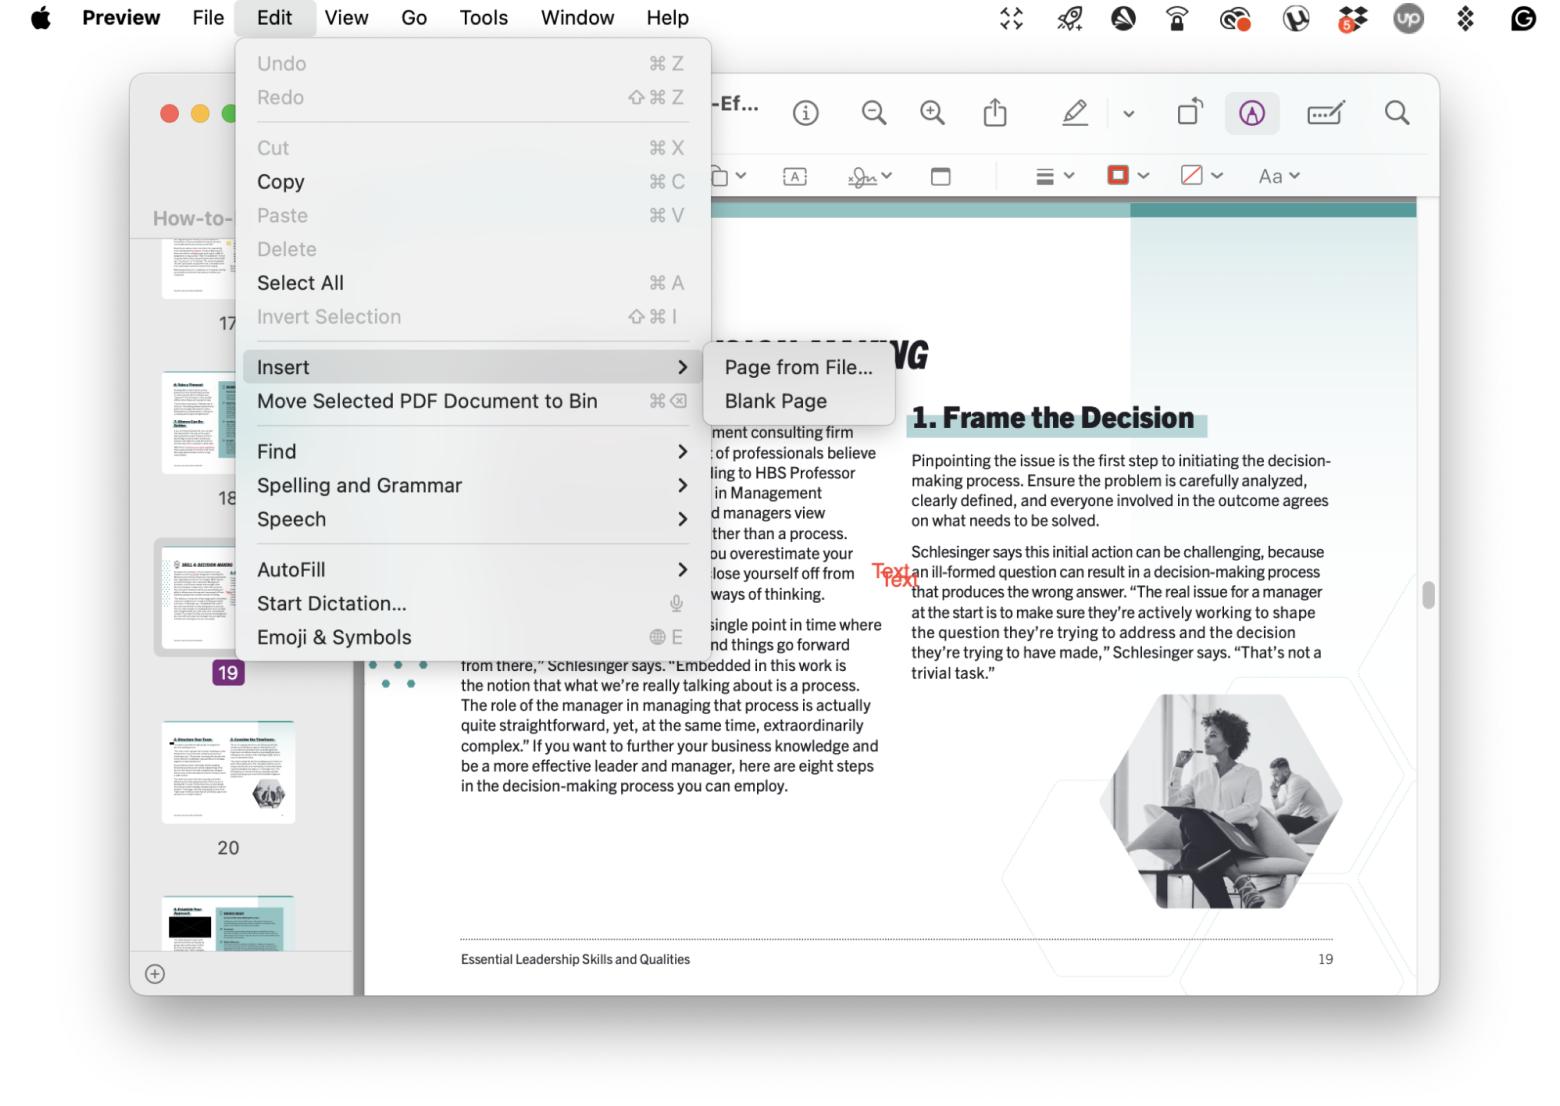
I find that opening multiple PDFs works better when you need to reorder pages, especially if you're dealing with longer documents. If you have only one PDF to merge with the main one and it has only a few pages, the insert page from file approach should work.
How to arrange pages inside a PDF
Sometimes, I receive PDFs with different elements that aren't in order, and I have to do a little tweaking to make the information easier for others to digest. Here are a few things you can do to make your PDF more coherent using Preview:
- Rotate a page: You can rotate a page by clicking the Rotate Left button at the top of the Preview window. Or, click Tools in the menu bar and choose Rotate Left or Rotate Right.
- Delete a page: To delete a page, click its thumbnail in the sidebar and press Command + Delete.
- Rearrange pages: To rearrange pages, click and drag a page's thumbnail in the sidebar to the desired position.
Preview doesn't let you do more advanced changes like adjusting headers, footers, or page numbers. Go with Nitro PDF Pro if you need these capabilities.
How to split PDF files on a Mac
I like being able to split a PDF quickly when it contains information I use to apply for different licenses, contracts, and more, since the requirements vary for each process.
To split a PDF in Preview:
- Select the pages you want in the thumbnail sidebar.
- Click File in the menu bar and choose Print.
- Select Selection in Preview under the Pages section and set your desired page orientation.
- Click the PDF button at the bottom of the window and save the file to your preferred location.
Alternatively, you can use the Range from or Select pages from the sidebar option to specify the pages you want in the new PDF file. I find the Select pages from the sidebar option ideal if you want to skip some pages but don’t want to rearrange the original PDF. I can pick 1, 3, and 7 for one file, then pick 2, 4, 5, and 6 for another one. The Range approach is ideal if you want to select pages chronologically.
PDF is too big — How to reduce its size
While Preview isn't the most suitable PDF compression tool, it offers some flexibility when your PDF is too big.
Here's how to reduce the size of a PDF file:
- Open your PDF file in Preview.
- Click File in the menu bar and choose Export.
- Open the Quartz Filter dropdown in the dialogue box and choose Reduce File Size.
- Click Save to create a new, smaller version.
How to use Quick Look to edit and sign PDFs
macOS has a handy feature called Quick Look that lets you preview files without fully opening them. Whether it’s a document, a song, a video, or a PDF, you can take a quick look at the content right from Finder.
With PDFs, it does more than let you peek. For example, to edit and sign your PDF using Quick Look, you need to:
- Click on a PDF in Finder, hit the spacebar, and the Quick Look window will appear.
- Click the pen tip icon in the top-right to show the markup toolbar, then click the Sign icon in the markup toolbar.
- Click the Click Here to Begin button and draw your signature using the trackpad.
- Press any key when done, enter a description for the signature, and click the Done button.
- Click on the created signature, and it will appear on the page. You can then drag it to your desired position and resize it to your liking.
It’s a quick and easy way to sign documents without even opening a full app.
Final words on how to edit PDFs on Mac
Now you've got a pretty good idea of how to edit a PDF on a MacBook using the native Preview app. And if the app is too basic for your needs, you can try some of the third-party tools we mentioned in the post.
Nitro PDF Pro is great when you need more editing power, like working with scanned files, adding forms, or redacting sensitive info. PDF Squeezer helps shrink those oversized PDFs without wrecking the quality. If you've ever wanted to copy text from an image or a non-editable PDF, TextSniper lets you do just that in seconds. And when it comes to scanning documents and cleaning them up so they actually look good in a PDF, Prizmo has your back.
The best part? You don’t have to buy each one separately. They’re all available on Setapp, a subscription service packed with over 260 Mac and iOS apps. For $9.99 + tax per month, you get full access to all these tools and a whole bunch more. There's a 7-day free trial included, so you can explore Setapp to the fullest.
FAQ
What’s the easiest way to edit a PDF on a Mac?
The easiest way to edit a PDF on a Mac is with Preview. It's already on your Mac, so no setup is needed. And if you're really just trying to drop a signature on a doc and send it off, Quick Look can handle that in seconds. No apps, no drama.
Is it possible to edit PDFs on a Mac without downloading anything?
Yes, you can edit PDFs on a Mac without downloading anything by using the native Preview app. You can use it to fill out forms, add notes, move pages around, and even sign stuff. If your editing needs are pretty basic, this app does the job.
What if I need to make changes but keep the original layout exactly the same?
If you need to make changes but keep the original layout exactly the same, you can use Preview. It lets you do small tweaks like adding a comment or fixing a typo. If you need something more advanced, like updating bigger sections of text or working with tables, you need a more capable tool like Nitro PDF Pro.


