How to fix slow Mac after software update on Sequoia
One thing you should know about me before reading this article: I love Apple updates and new releases. Ever since the Apple presentation, I’d been waiting for the new macOS update in September. I wanted to try out the new features like Record and Transcribe Voice Notes (I use Notes for almost everything) and the revamped Trail Maps for planning my hikes around Europe.
The moment macOS Sequoia was released, I hit Install without a second thought. But then... my Mac started running slow.
As it turns out, I wasn't alone. A quick googling revealed that other users also faced similar slow Mac after upgrading issues. If you’re in the same boat — your Mac is running slow after the update — don’t worry. I’ll get you covered.
What might slow down your Mac after the macOS update
Let me share what I've learned to get things back to normal so you can enjoy every cool feature macOS Sequoia has to offer:
| Reasons your Mac’s slowing down | What to do | |
|---|---|---|
| Performance issues | For performance testing, use Novabench to identify problems. | |
| High CPU | Throttle CPU-heavy apps with App Tamer. | |
| Too many apps launching at startup | Go to System Settings > General > Login Items and Extensions to manage and disable unnecessary startup apps. | |
| Incompatible or outdated apps | Update apps using CleanMyMac or uninstall incompatible ones. | |
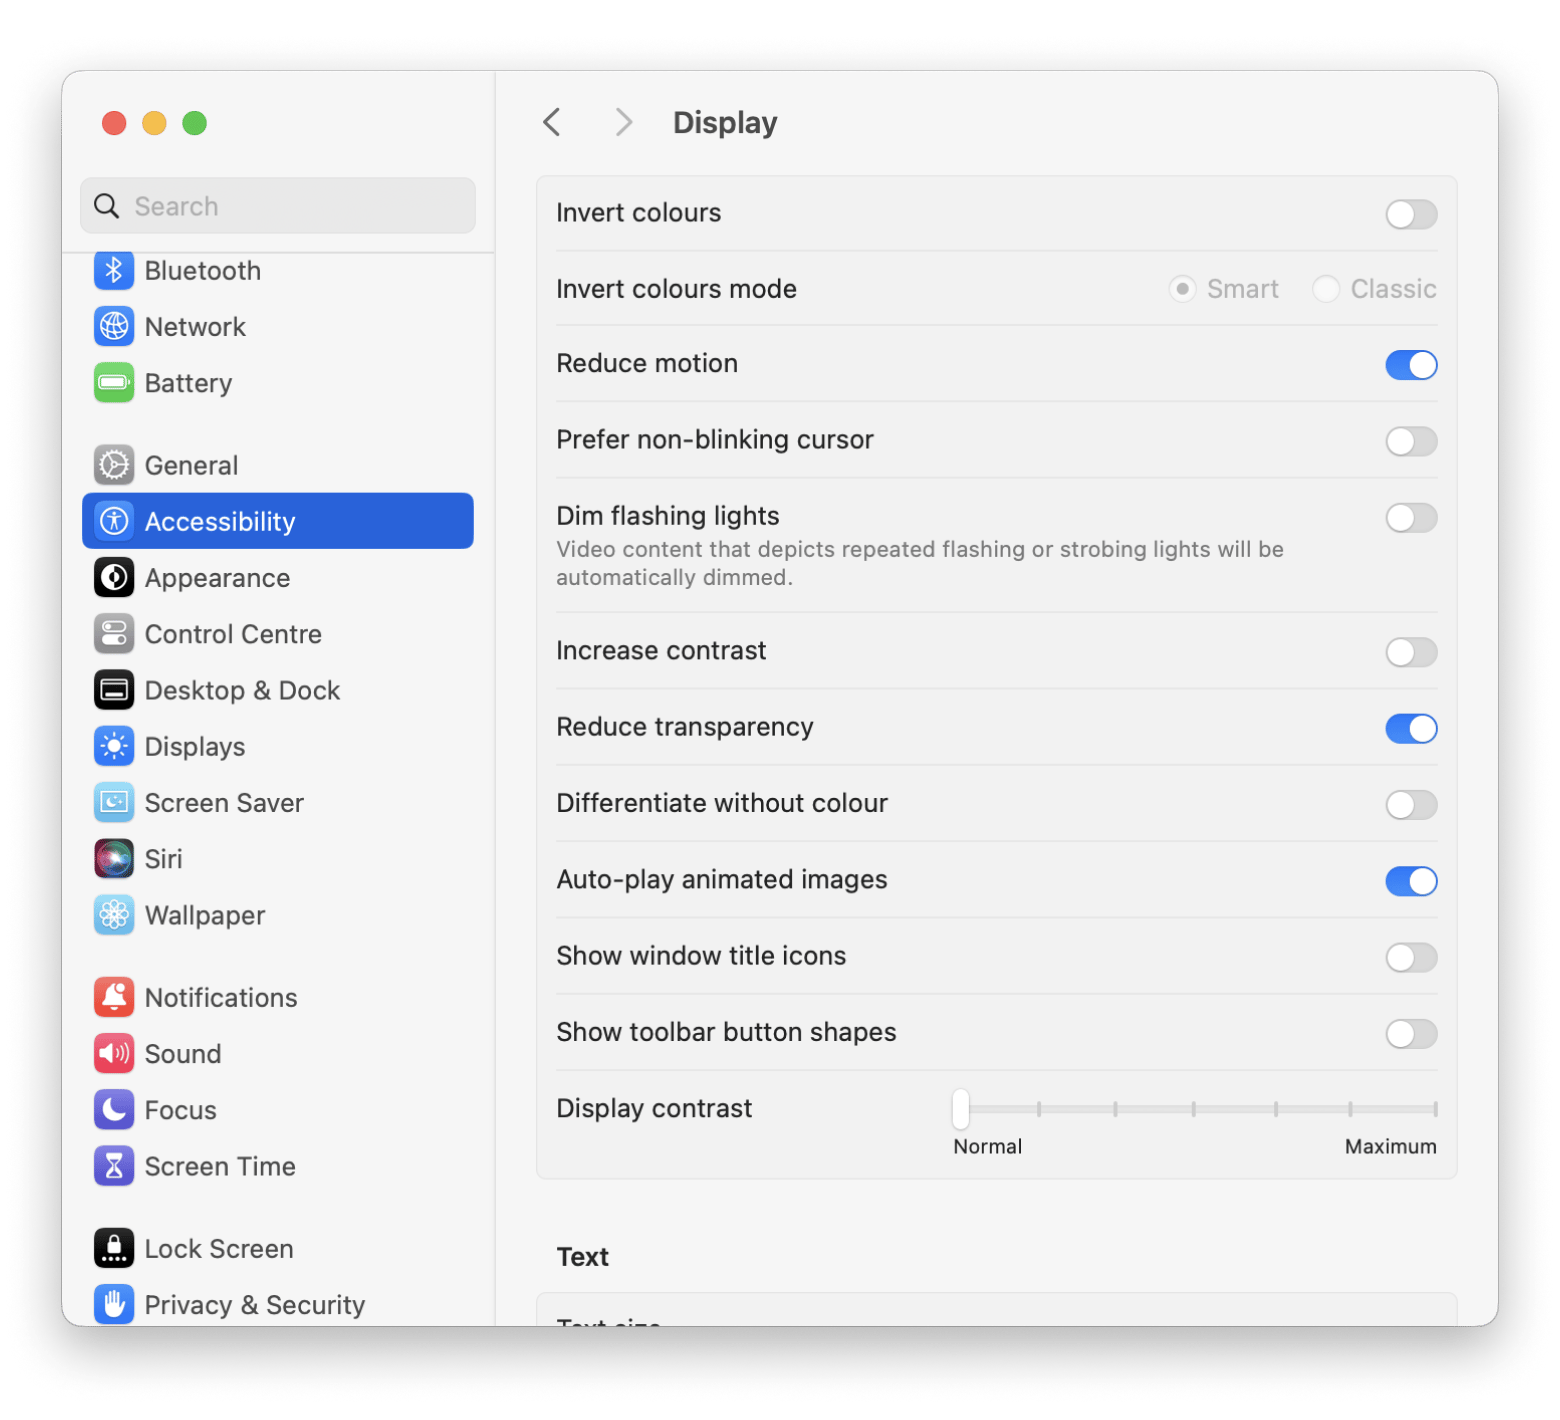
| Visual effects | Disable visual effects in System Settings > Accessibility > Display > Turn on Reduce Motion and Reduce Transparency. | |
| Multiple browser tabs | Close unused apps to reduce slowdowns. | |
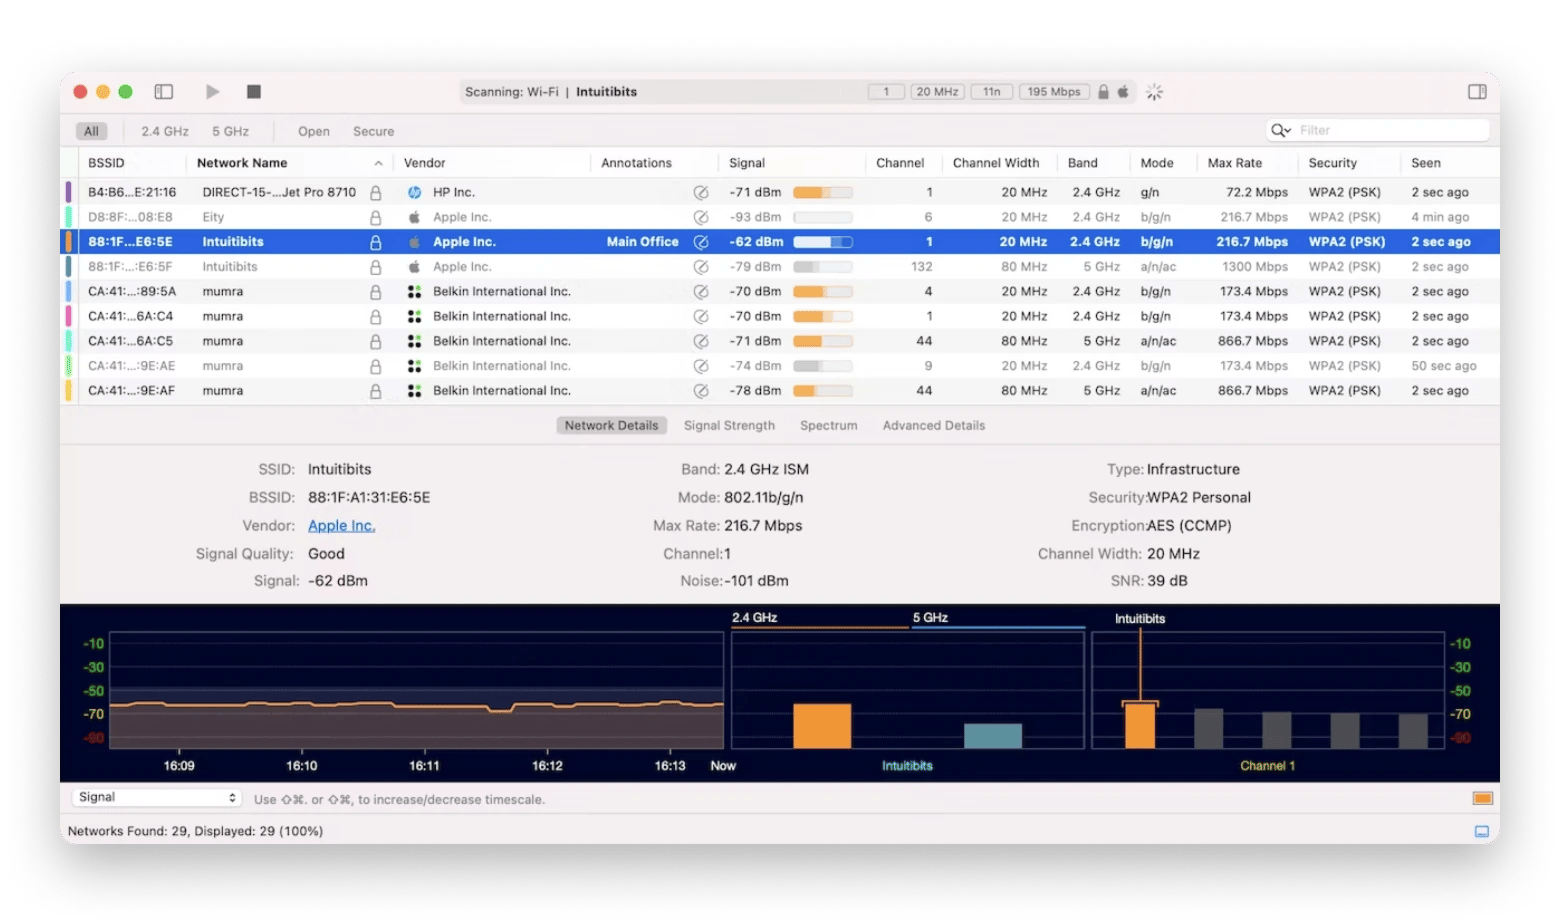
| Slow Wi-Fi | Use WiFi Explorer to scan networks, identify conflicts, and choose the best channel for your connection. | |
| Increasing strain on processors, software, apps, and hard drives | Restart and shut down your Mac more often. | |
Why is my Mac so slow after a software update?
It’s pretty common for your Mac to feel slower after a major update like Sequoia 15. In most cases, if you notice your Mac running slower on a new system right after the update — it’s normal and easy to fix.
Maybe some apps require more CPU on Sequoia, you’ve spent a big chunk of your storage on the new update (FYI: the installer for macOS Sequoia is 12.1 GB, but you’ll need almost twice that amount to complete the installation), or there’s some kind of bug that Apple will fix soon.
However, your Mac shouldn’t be noticeably slower for most everyday tasks. If it is, you should take steps to fix it.
Quick and easy fixes to speed up Mac running slow after update
Before diving into solutions, it’s good to know what’s actually causing the slowdown. Running a performance test will give you insights into whether your CPU, RAM, or storage is causing the bottleneck.
I used Novabench for this — it only takes a few minutes and provides a detailed report on CPU, GPU, and disk performance.
How to use Novabench to run a performance test:
- Install and open the Novabench app.
- Run the Benchmark Test to measure CPU, GPU, and disk speed.
- Use the results to identify problem areas — high CPU usage, slow disk read speeds, etc.
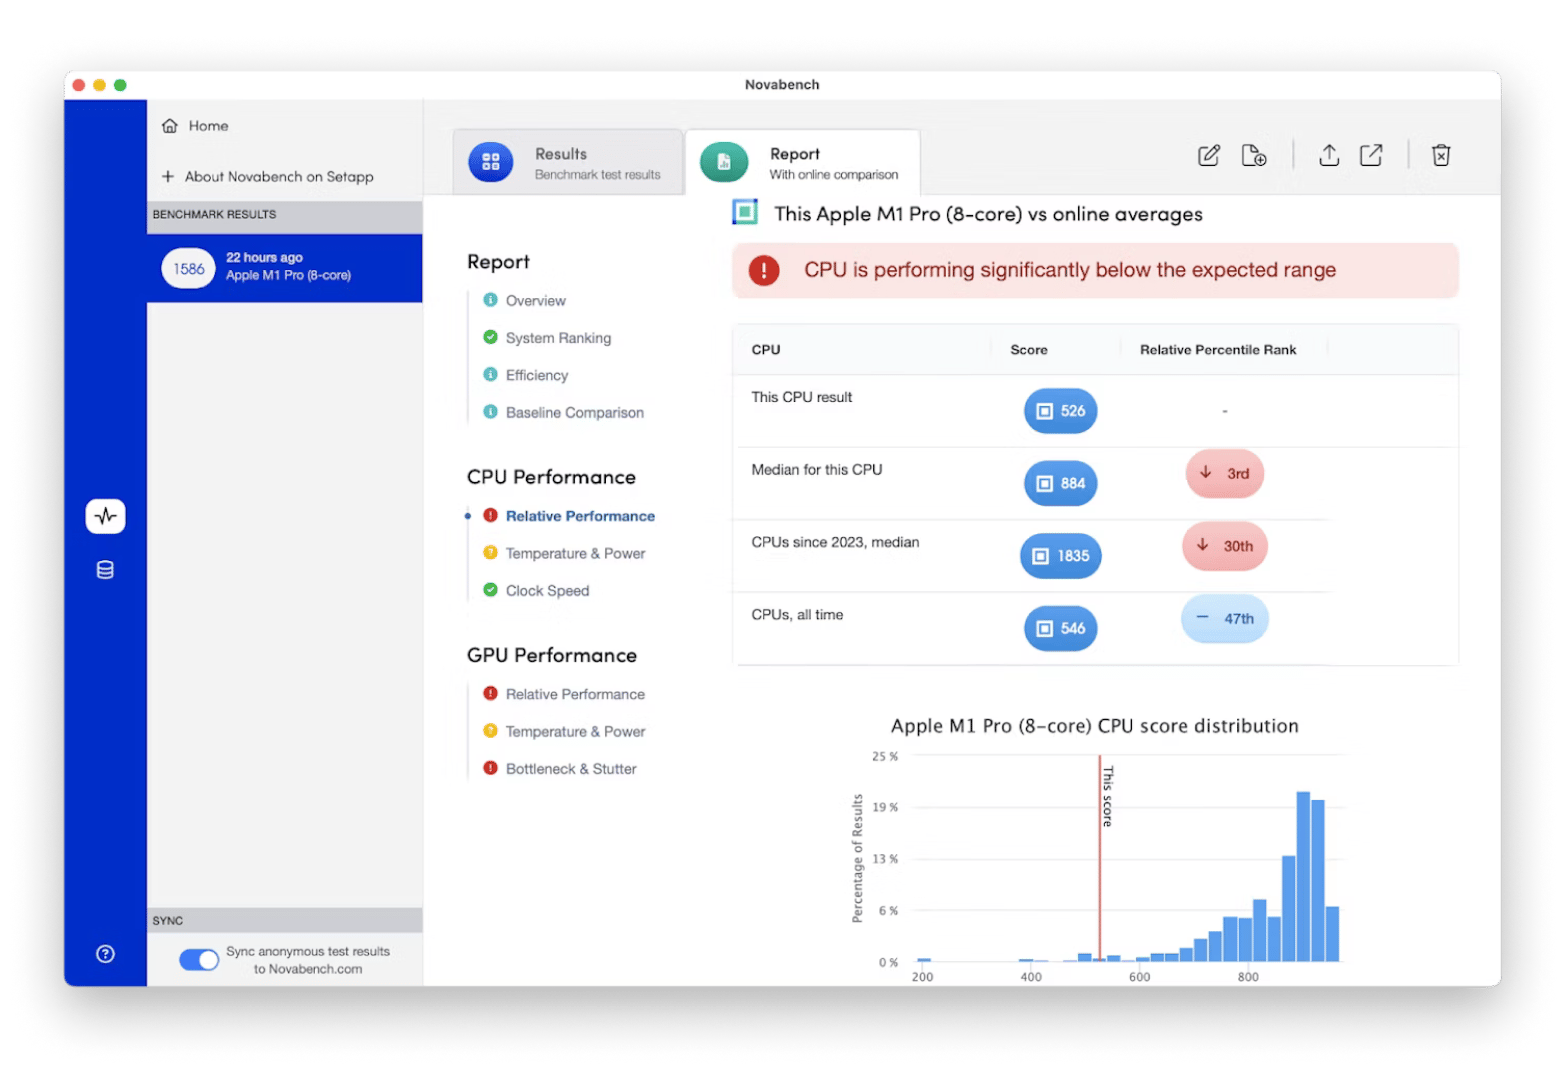
In my case, the tests only take 2-4 minutes, and it's like getting a clear snapshot of your Mac's health. After my first run, I found out that my CPU was hitting 80% capacity during basic tasks. That was the wake-up call I needed to investigate background processes and start managing my app usage more carefully. However, persistent slowdowns can be addressed with a few tweaks — for more insight, read on how to speed up a slow Mac.
Free up disk space for better performance
One of the first things I did when my Mac slowed down was to check available storage. It turned out my hard drive was almost maxed out after the update. A cluttered hard drive is often the root cause of a slow Mac.
I used CleanMyMac to run a Cleanup scan, which cleared out outdated caches, system junk, and unnecessary downloads. This freed up 5GB, and my Mac immediately felt faster.
Here’s how to free up disk space using CleanMyMac:
- Install and open CleanMyMac.
- Click Cleanup in the side menu.
- Click Scan > Review All Junk.
- Review System Junk and select files you want to remove > Clean Up.
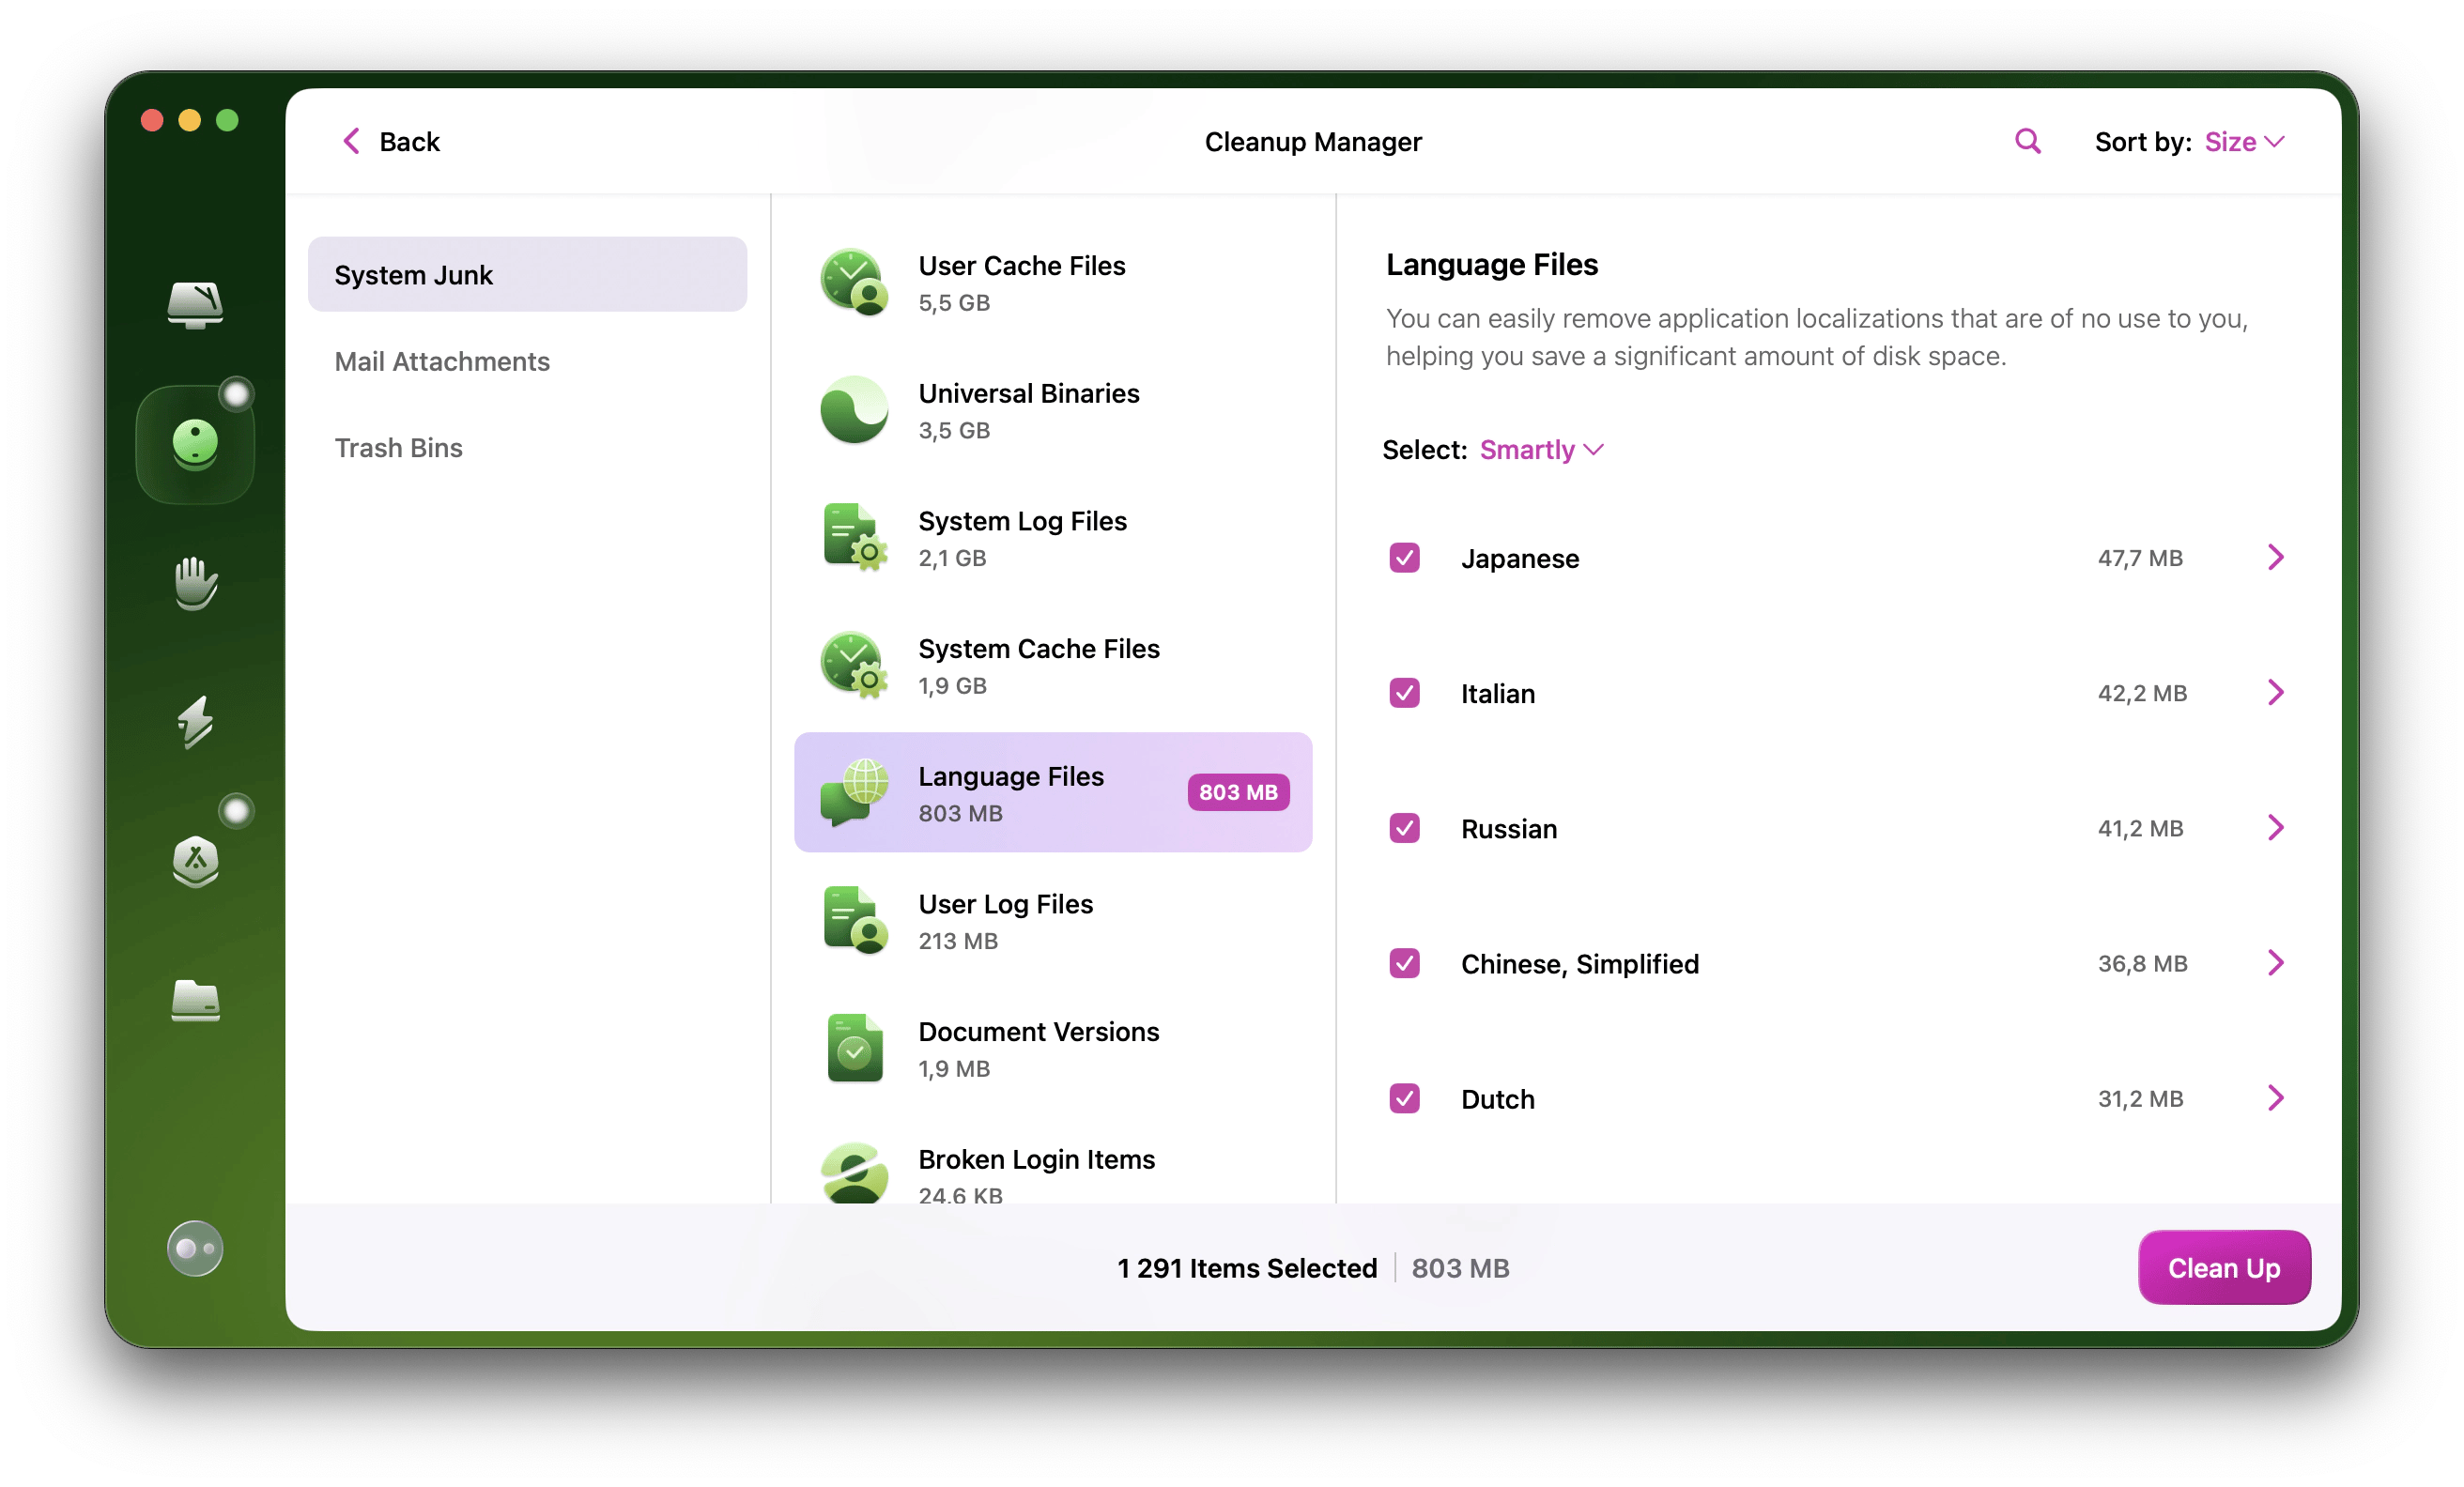
I recently read Greg McKeown's Essentialism: The Disciplined Pursuit of Less. It inspired me to be more minimalistic about what I store on my devices, as digital clutter also tends to clutter my mind. I now make it a habit to run a Cleanup every week.
Disable apps from launching at startup
I’m a fan of convenience, so I tend to install lots of apps that launch at startup: my work Slack, Google, Notes, and a few others. But I quickly learned that a long list of auto-launch apps could choke my Mac’s performance. Trimming down the list made a huge difference.
To disable apps from launching at startup, go to System Settings from the Apple menu > General > Login Items & Extensions > Remove any apps you don’t need to auto-start by clicking the minus icon.
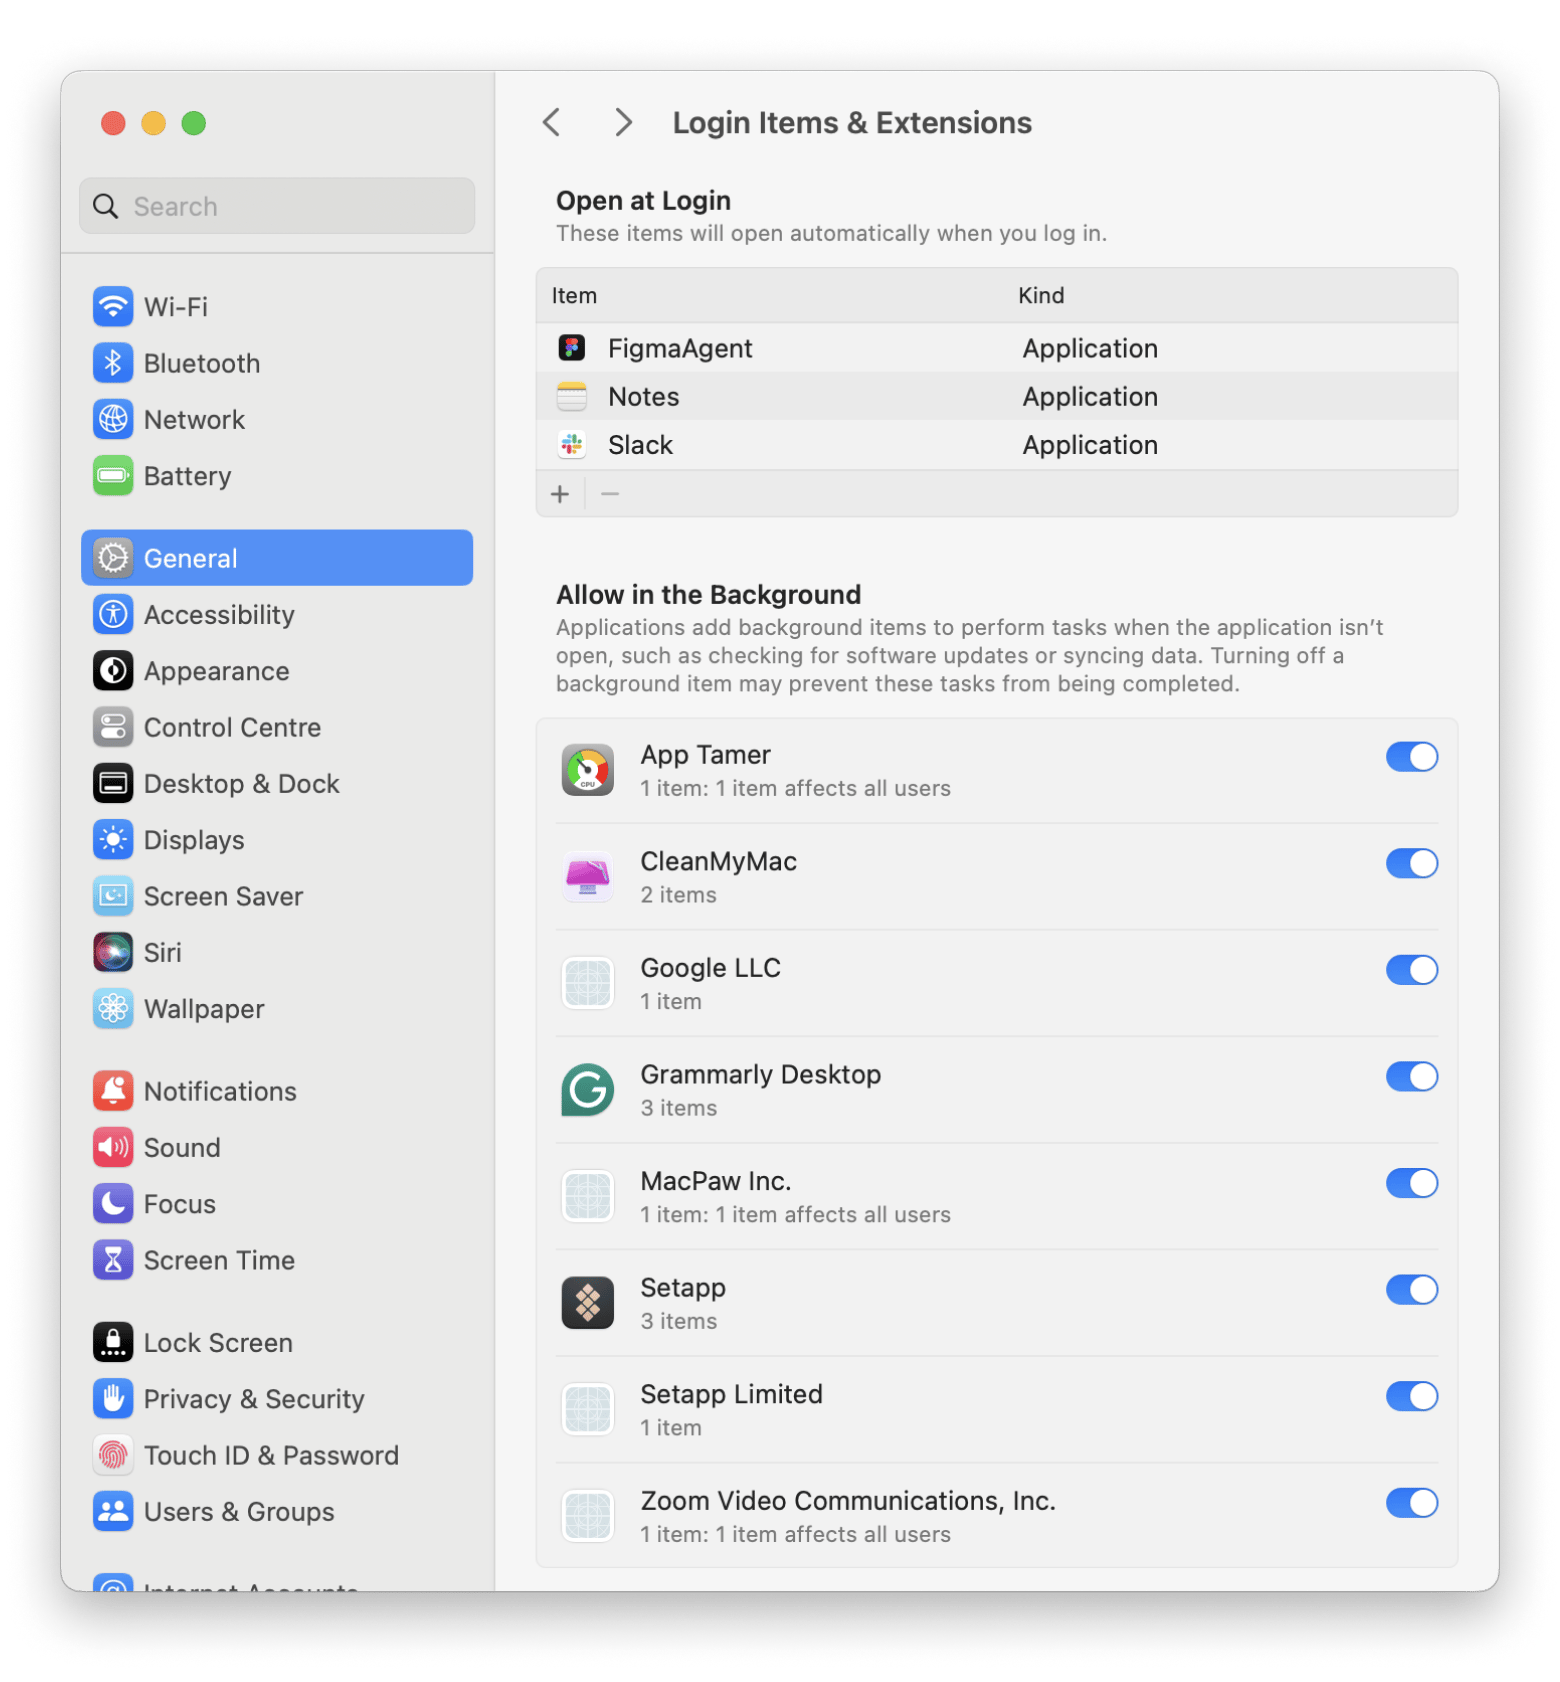
After disabling some unnecessary startup apps, my Mac’s boot-up time improved noticeably. I now only keep essential apps like my to-do list in the startup queue.
Tame CPU-hungry apps
After the update, I noticed some of my design software was gobbling up the CPU like there was no tomorrow. Rather than quitting it entirely, I decided to manage it better.
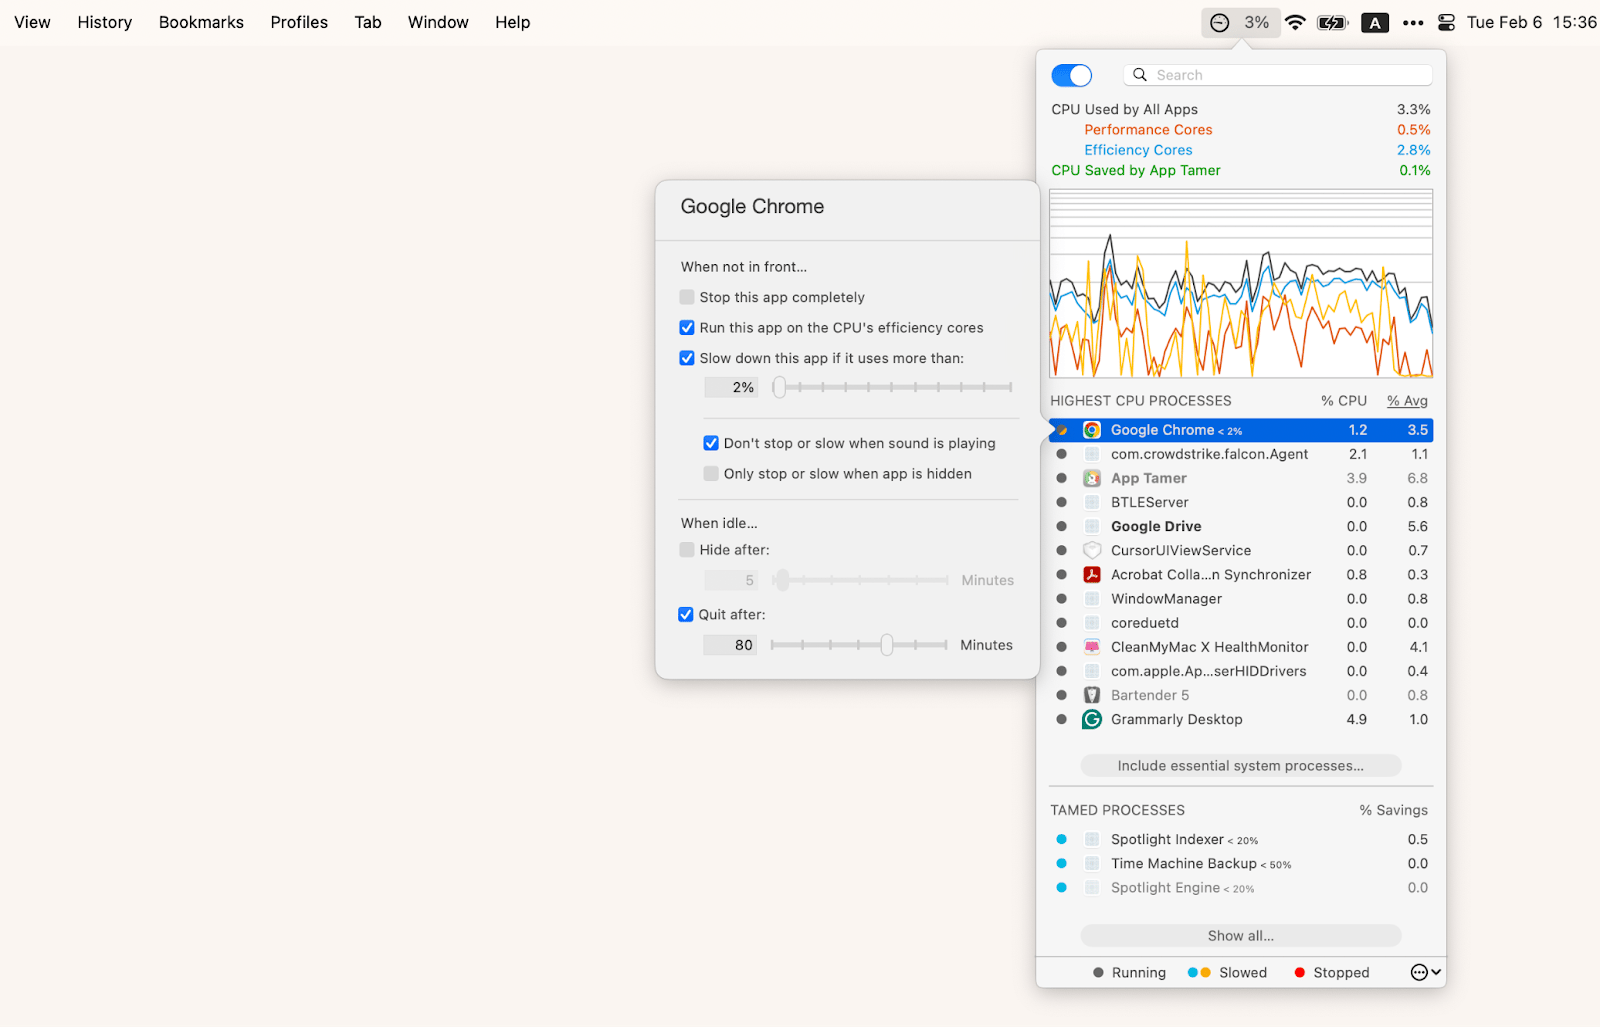
Use App Tamer to throttle app resource usage. It slows down inactive apps automatically, allowing me to focus on what’s important without draining my system.
You can also set rules for high-CPU apps so they slow down after reaching a certain usage threshold.
To do that with App Tamer:
- Install and open App Tamer.
- Click on the app for which you want to set the rules.
- Set the rules for CPU limits.
The app will then slow down or stop the selected app completely when it reaches the set CPU limits.
Update or uninstall apps
Some older apps don’t work nicely with the latest macOS. If apps crash or run slowly after an update, it’s likely due to compatibility issues.
I personally use CleanMyMac to maintain all the updates and uninstalls with the Applications feature—it is so much easier than doing this manually.
Here’s what I do:
- Open CleanMyMac > Applications.
- Click Scan.
- After scanning is complete, review results and follow recommendations.
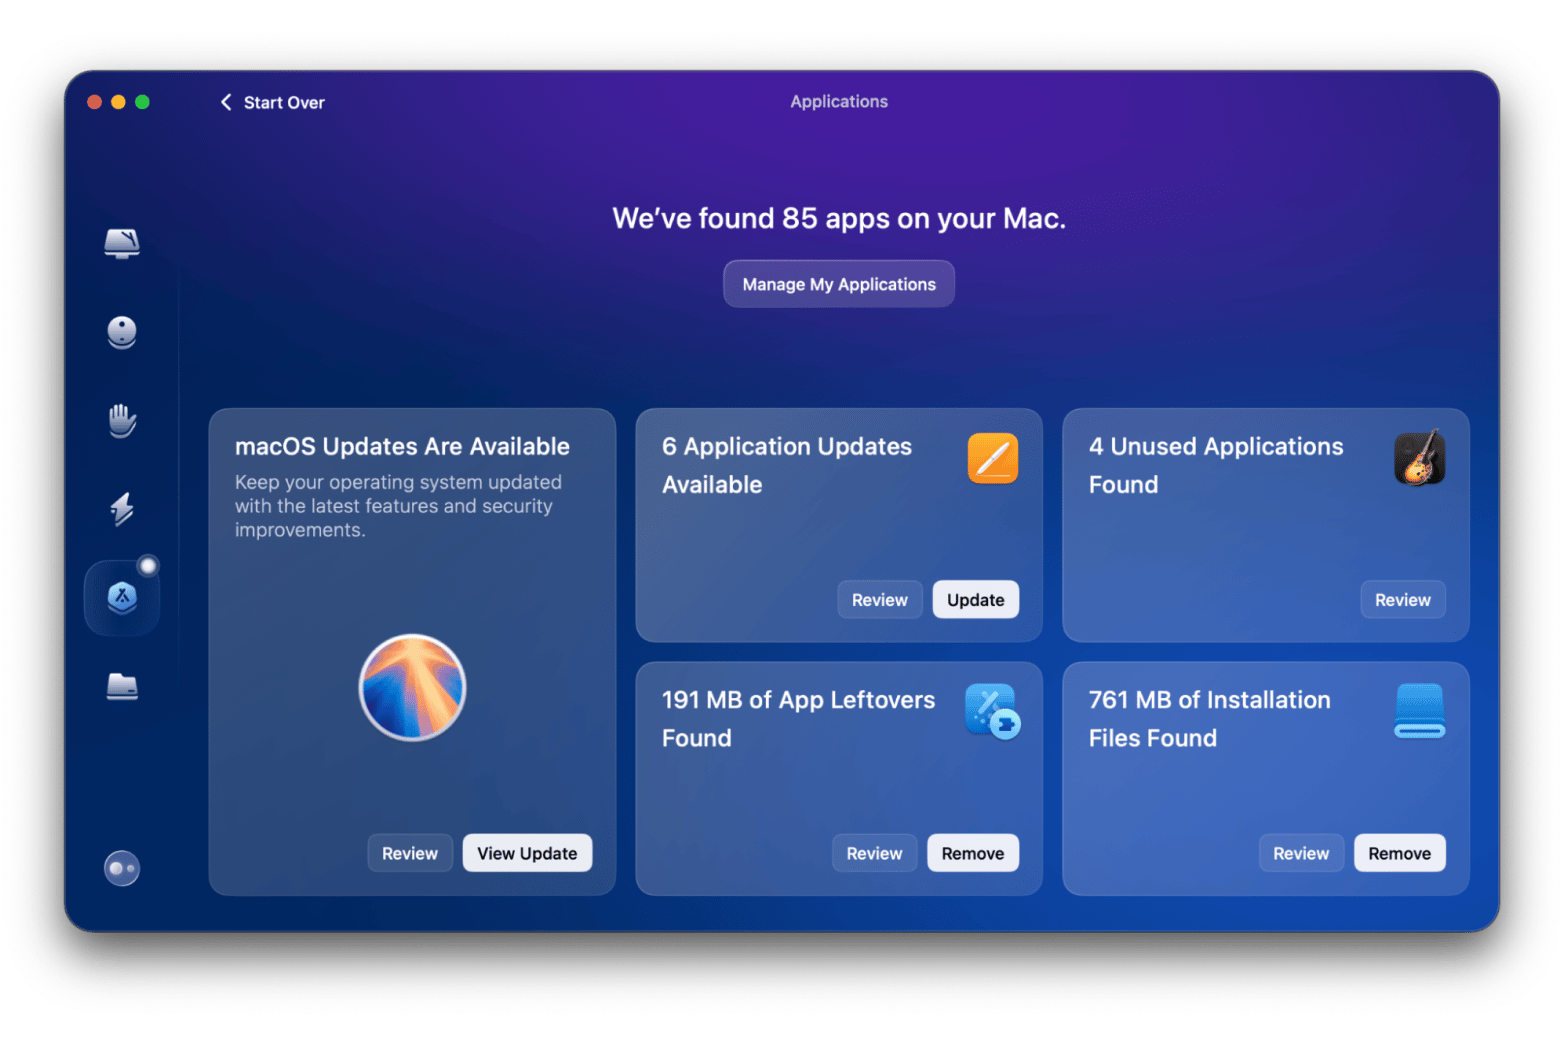
After updating my apps, I saw a big performance improvement. For the few that didn’t have updates, I had to let them go and find alternatives.
Reduce visual effects
I love the animations that come with each new macOS release, but they can slow down older systems. So, I decided to sacrifice a bit of eye candy for a smoother performance.
To reduce visual effects on Mac, go to System Settings > Accessibility > Display > Turn on Reduce Motion and Reduce Transparency.
I could feel the difference. Window transitions were snappier, and I didn’t miss the fancy visuals as much as I thought I would.
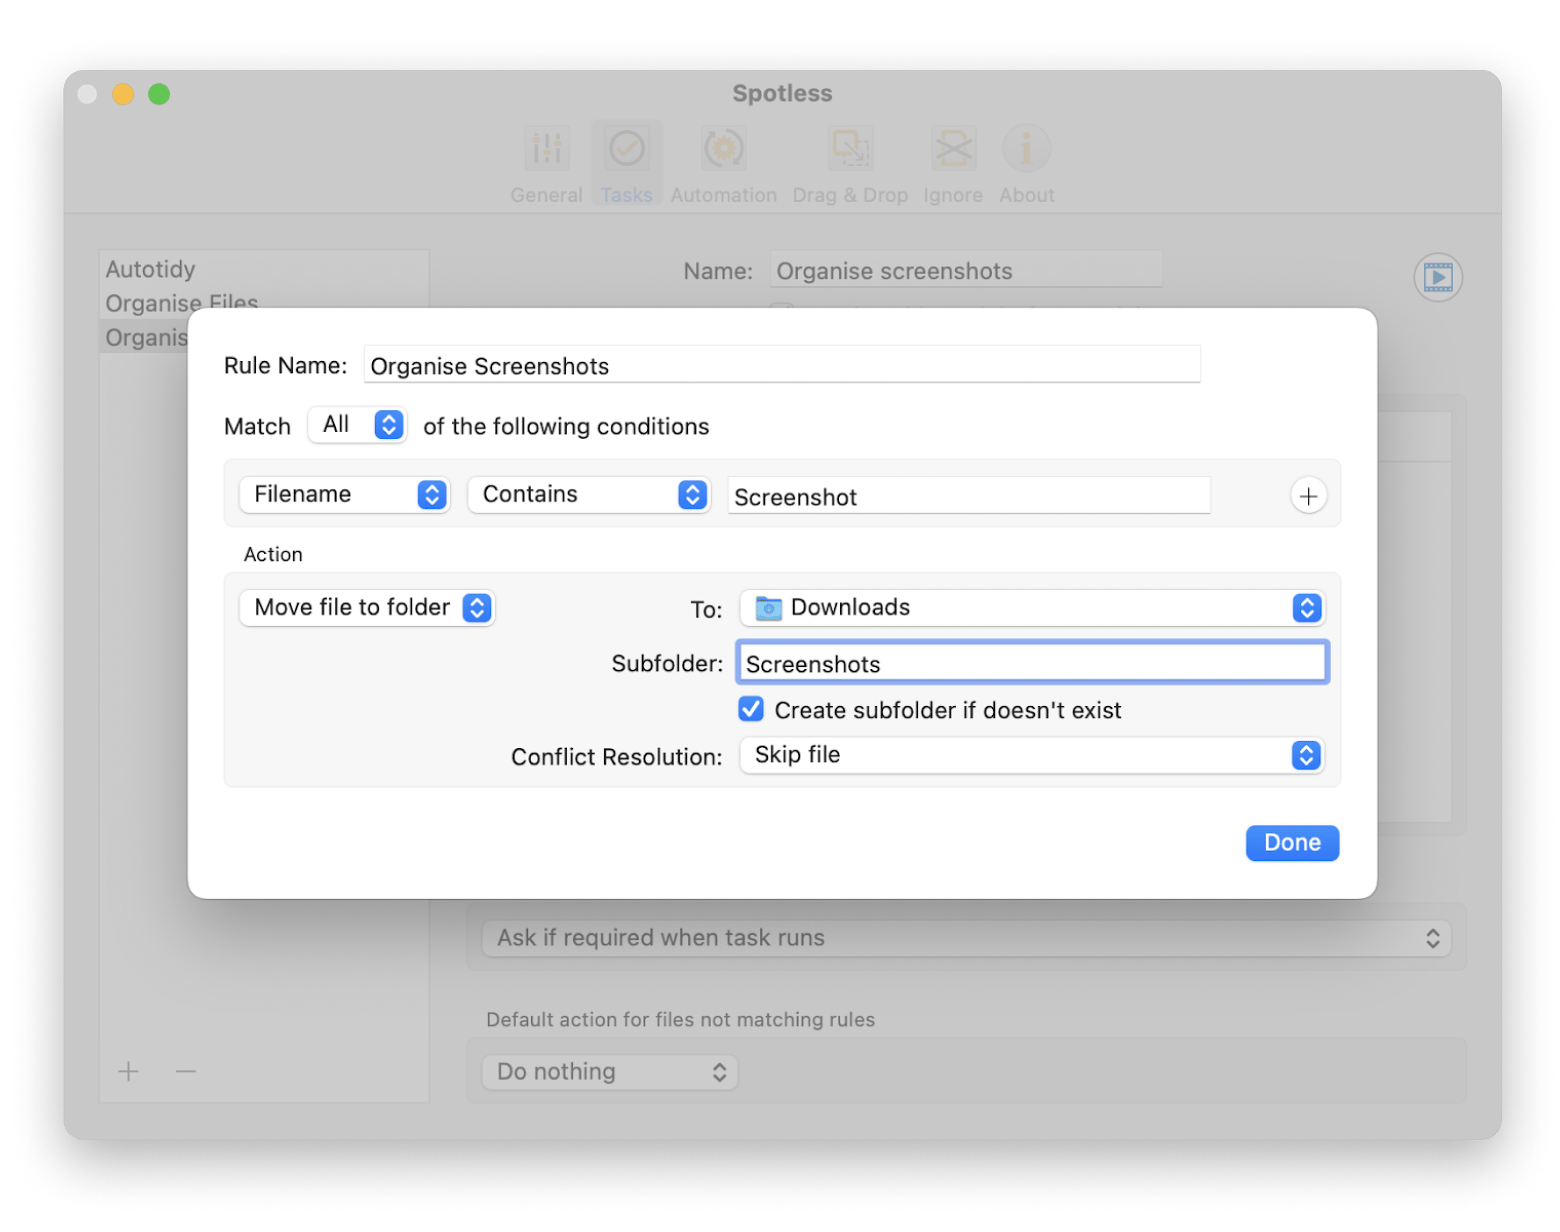
Spotless helps declutter your desktop, while also learning to run cleanups for you in the future. Simply create tasks — for example, if you have a problem with screenshots (as I do — I’m the type that screenshots everything cool I find online), set Spotless to automatically move all the new screenshots to a certain folder.
To organize your files with Spotless:
- Install and open Spotless.
- Click the Spotless icon in the menu bar > Click the hamburger button > Add / Edit Tasks.
- Go to the Tasks tab > Click the plus “+” button to create a new task.
- Name the task and click on the plus “+” button in the File processing rules.
- Set rules > Done.
Here’s an example of the rules I set to organize my screenshot:
Close browser tabs
I used to be the kind of person who always had 30+ tabs open (clearly, I needed a lesson in digital minimalism). But I quickly realized this habit was dragging down my Mac’s performance, with the browser consistently topping the CPU usage list.
Now, I’m way more intentional about keeping only the tabs I actually need open, and my Mac’s running a lot smoother because of it. It's a simple habit that goes a long way toward avoiding a slow Mac after upgrading.
Check your Wi-Fi connection
After updating to Sequoia, I also noticed my internet was crawling — web pages took forever to load, and any app that needed a reliable connection was struggling. Standard internet speed tests weren't telling me much.
Then, I tried WiFi Explorer. Unlike regular speed tests, it actually gets to the root of the problem. It scans all the nearby Wi-Fi networks, shows you which ones have the best signal, and points out any channel conflicts that might be causing poor performance after the macOS update.
Thanks to this app, I figured out exactly what was wrong with my connection. Now, if my MacBook is lagging after a software update, the first thing I do is run a scan with WiFi Explorer. It’s saved me from countless Wi-Fi headaches and gets my Mac back on track.
Restart your Mac more often
Let’s be honest: most of us aren’t great at giving our Macs the rest they deserve. We close the lid at night and fire them up the next morning, expecting them to handle even heavier tasks.
But just like us, our Macs need a break. Instead of just putting them to sleep, try shutting them down or restarting them more often. This simple habit can reduce the strain on processors, software, apps, and hard drives, giving your Mac the refresh it needs to prevent a slow Mac after upgrading.
Recap: fixing problems when you update the Mac to the latest macOS
Updating to macOS Sequoia felt like unwrapping a gift — until my Mac started slowing down. After some trial and error — and a lot of tips from fellow Mac users — I found solutions that worked for me.
Here’s a quick recap of what I did to get my Mac back up to speed:
- Run a Performance Test with Novabench.
- Declutter your desktop with Spotless.
- Free up Disk Space using CleanMyMac.
- Reduce startup apps to cut down boot time and improve performance.
- Tame CPU-Hungry apps with App Tamer to keep background processes in check.
- Update or uninstall apps.
- Turn off visual effects.
- Limit browser tabs to free up memory and CPU usage.
- Check your Wi-Fi with WiFi Explorer.
- Restart your Mac regularly to refresh your system.
You can find all these apps I used on the Setapp platform, along with 250+ others. They’ve made keeping my Mac in shape a whole lot easier, and you can try them all free for 7 days.
FAQ
Does updating a Mac make it slower?
It's common to experience a slow Mac after upgrading to a new macOS due to background tasks like reindexing, syncing, and updating apps. If your MacBook is lagging after a software update, this is typically a temporary issue that resolves on its own.
If your Mac is too old, it might not handle newer macOS versions well, leading to poor performance after the macOS update. For example, macOS Sequoia doesn’t support MacBook Pros older than 2018 or MacBook Airs older than 2020. Always check your device compatibility before upgrading.
Some users encounter Mac running slow after update due to increased CPU usage, app incompatibilities, and visual effects straining older hardware. Regular maintenance (like clearing system junk, updating software, and reducing visual effects) can improve performance.


