Access your router through a browser using its IP address.
Connect to your Wi-Fi, enter the router’s IP (commonly 192.168.1.1 or 192.168.0.1) in your browser, and log in using the credentials on the router label.
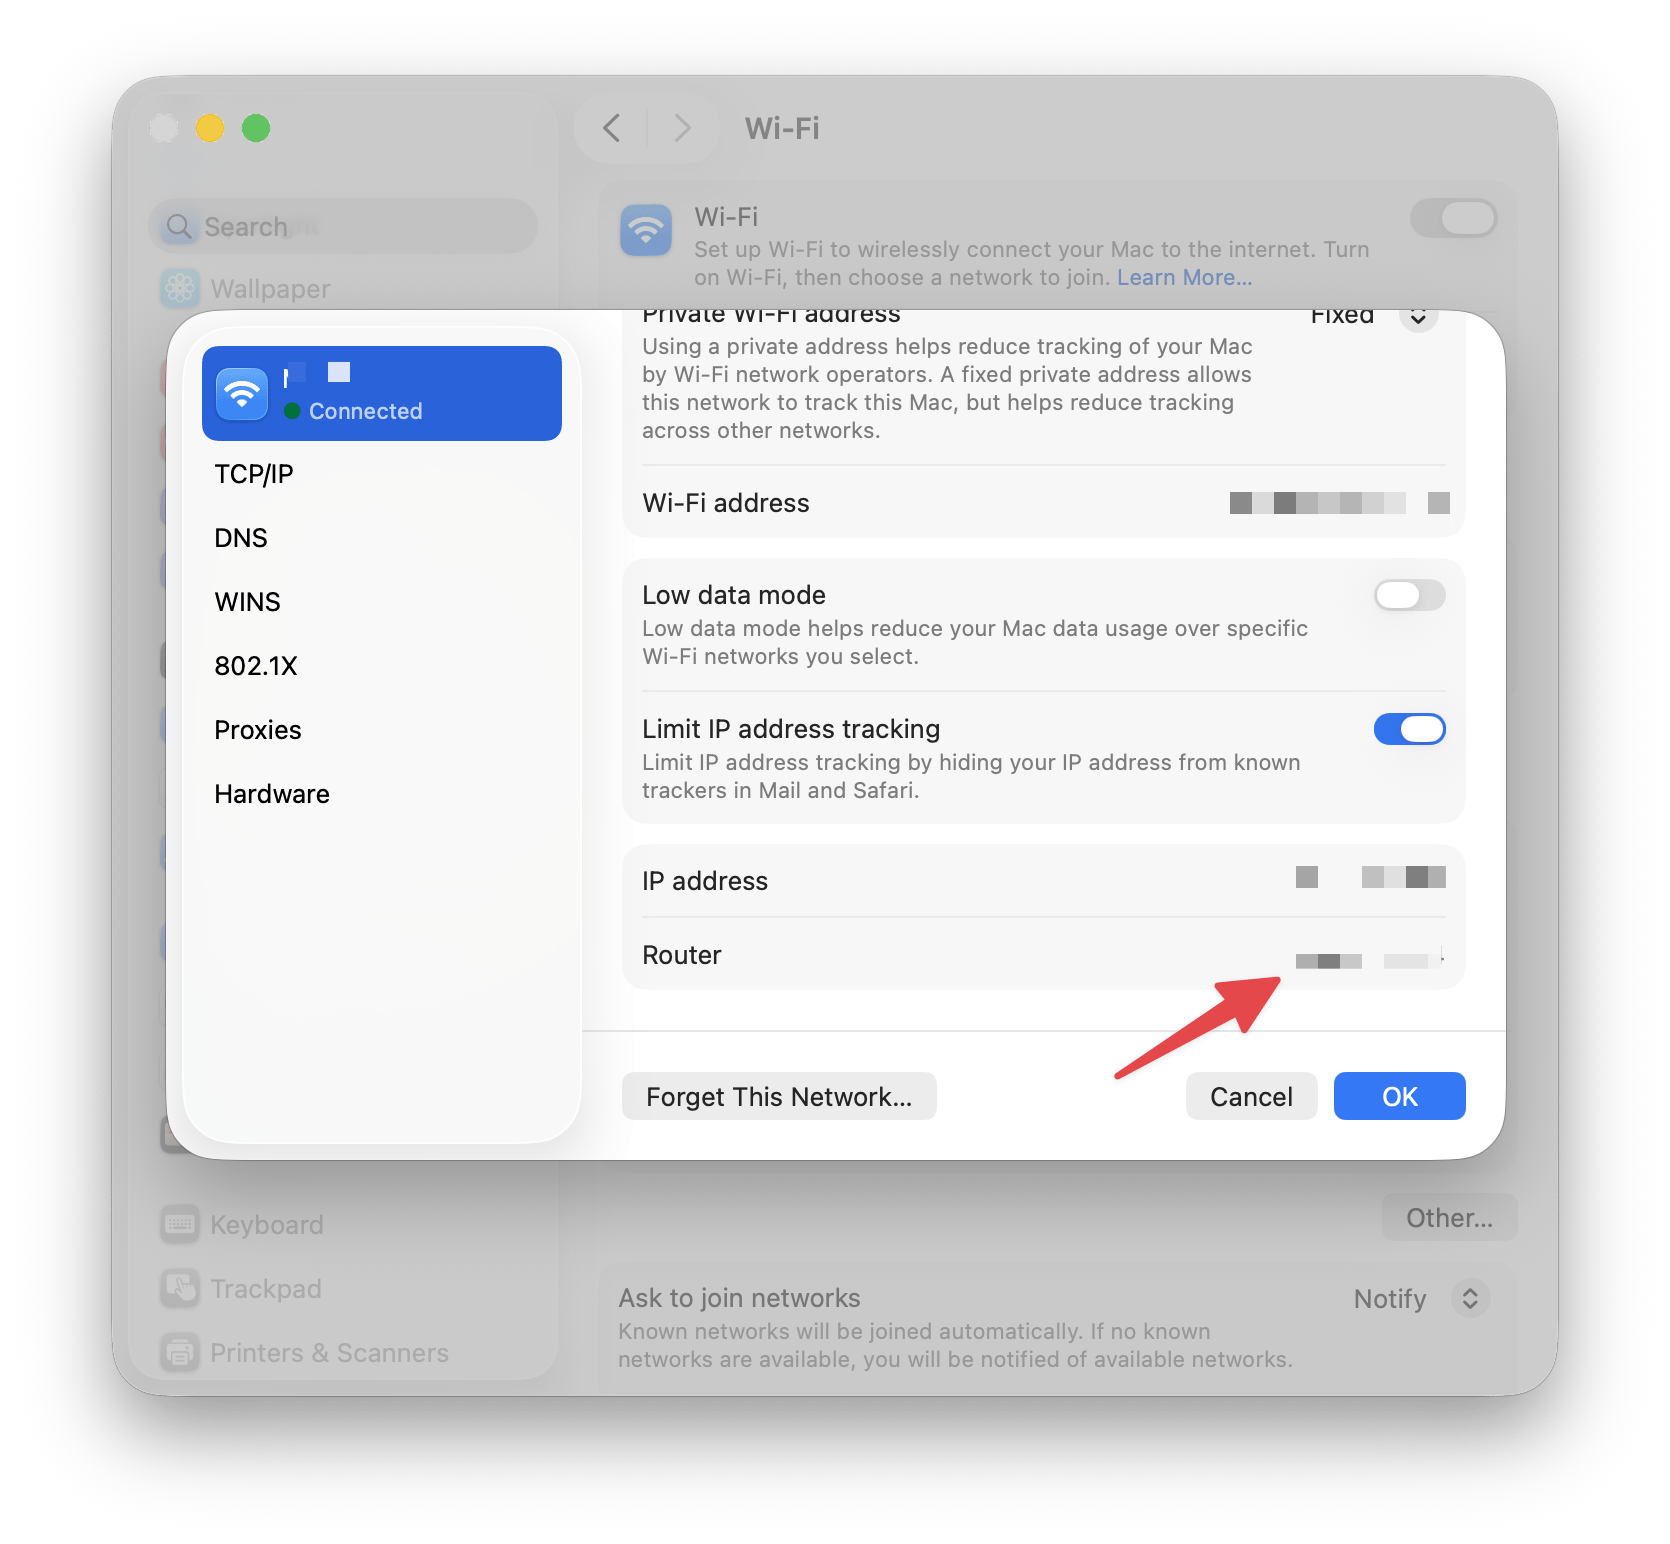
Find your router’s IP easily on a Mac.
Go to System Settings › Network › Wi-Fi › Details and look for the Router field. If common IPs don’t work, check the router label or restart the router and Mac.
Update key settings like Wi-Fi name, password, and security.
Use the Wireless or Wi-Fi section in the admin panel to change your network password, switch to WPA3/WPA2 security, and update the router’s firmware.
Improve security and manage devices from the admin interface.
You can enable firewalls, set parental controls, block devices, run diagnostics, and update admin credentials for better protection.
If you’ve ever stared at your router when the Wi-Fi goes down, wondering how to actually use this little black box to fix things, you’re not alone. Over the years, I’ve learned that most routers have web interfaces you can access to troubleshoot and configure your network with no IT degree required.
In this guide, I’ll walk you through how to access router settings on a Mac, change your Wi-Fi password, boost security, and solve common connection issues. I’ll also share the tools I use to make the process easier.
Need a quick Mac fix? Check out this GPT assistant that will provide the best solutions for any specific case.
Access router settings step-by-step
Most routers follow a standard login process regardless of brand. Here’s how I typically access the admin interface:
Connect to your router’s Wi-Fi (or use an Ethernet cable).
Find your router’s IP address.
Enter the IP address in your web browser.
Log in with the admin username and password.
Change your settings as needed.
Let’s break down each step.
Find your router’s IP address
Router IP addresses may look like random numbers, but they usually follow common patterns. Most routers use one of a few standard IP addresses:
192.168.1.
192.168.0.1
10.0.0.1
10.0.1.1
192.168.2.1
To find your router’s IP:
Open Safari or another web browser.
Enter one of the common IPs above in the address bar and press Return.
If a login screen appears, you’ve reached your router’s admin page.
If none of these work:
Check the label on the bottom or back of your router. Most manufacturers list the default IP, username, and password there.
Once you have the IP address, type it into your browser’s address bar. You’ll see a login screen.
The default username and password are often “admin” and “admin”, “admin” and “password”, or “admin” and “12345”. Check your router’s label or manual.
If you’ve changed the password and can’t remember it, look for a “forgot password” link, or reset the router by holding down its reset button for 10 seconds (this will restore factory settings).
I can’t tell you how many times I’ve forgotten router passwords, which is why I started using a password manager for everything. Secrets 4 offers intuitive password management for all your login needs. I store all my router credentials there to avoid login issues, thanks to its AutoFill feature.
Once you’re in the admin interface, you can explore and change a variety of settings:
Change your Wi-Fi network name or password
To change network settings and password in the admin interface:
Go to the Wireless or Wi-Fi section.
Find Security, Passphrase, or Password.
Enter your new Wi-Fi password.
Click Apply or Save.
If you want to change the router’s admin login itself (recommended for security), look for Administration or Management under Advanced Settings. Always use a strong, unique password and save it in your password manager.
Improve network security
To improve network security:
Switch to WPA3-Personal (if available) for the best security. If not, use WPA2.
Set up a firewall or parental controls to restrict access as needed.
After making changes, your devices may disconnect briefly. Reconnect using your new Wi-Fi password.
Recommended tools for Mac network management
Here are a few apps I rely on for diagnosing and optimizing my home Wi-Fi:
iStat Menus: Real-time monitoring of Mac and network performance.
ClearVPN: Lets you easily control your VPN connection and location masking, which is helpful if VPNs interfere with router access.
Secrets 4: Securely store all your passwords, notes, and license keys.
WiFi Explorer: Scans all networks nearby, showing signal strength, channels, and security details.
NetSpot: Lets you map Wi-Fi coverage throughout your space, so you can find dead zones and optimize placement.
For me, it’s the best app pack for network managers, and the coolest part is that you can use them all under a single Setapp subscription, which gives you access to over 260 curated Mac and iOS tools, so you don’t have to manage them separately. Plus, all the apps get automatic updates with the latest features.
Why access your router on a Mac?
Here’s something that surprised me when I first learned it: most routers actually have their own websites built right in, which you can use to change settings and fix problems. Router owners and renters can access their device’s web admin interface using a browser on any device connected to the network.
Some common reasons to access the router include:
Changing your Wi-Fi network name (SSID)
Updating your Wi-Fi password
Improving network security (like enabling WPA3)
Setting up a firewall or parental controls
Blocking or allowing specific devices
Running diagnostics or ping tests
Restricting access to certain websites
Before I start messing with router settings, I always make sure I have a good monitoring app running on my Mac. It helps me figure out if the problem is actually with my router or something else on my system. For years, I have used iStat Menus from Setapp. It quietly keeps track of network, CPU, memory, and more happening on my Mac system without getting in my way.
How to access router settings and solve tech problems like a pro
Once you know where to look, accessing your router settings on a Mac becomes one of those simple tech tasks you can rely on whenever something goes wrong. With just a browser and your router’s IP address, you can:
Change your Wi-Fi password
Improve security
Check what’s slowing your network down
Keep everything running smoothly and more.
And when you pair the built-in router interface with helpful Mac tools like iStat Menus, WiFi Explorer, or a password manager such as Secrets 4, troubleshooting starts to feel a lot less like guesswork and a lot more like control. All the apps mentioned above are part of Setapp, so you can get a seven-day free trial to test them all and learn how to access and manage router settings effectively.
Frequently asked questions
How do I access my router settings?
To access router settings:
Join your router’s Wi-Fi or connect via Ethernet.
Open a browser and enter the router’s IP address (usually 192.168.1.1 or 192.168.0.1).
Enter the admin username and password found on your router’s label (defaults are often “admin” / “password”).
Once logged in, you can change the network name, password, and security settings.
What if 192.168.1.1 or 192.168.0.1 won’t open?
If those IPs don’t open, try the following:
Make sure you’re connected to the correct Wi-Fi network.
Try other common IPs: 10.0.0.1, 10.0.1.1, or 192.168.2.1.
Check the router label for its exact IP.
Turn off any VPN.
Restart the router and your Mac, then try again.
How can I find my router’s IP address on a Mac?
To find your router’s IP address on a Mac:
Go to System Settings > Network.
Click Wi-Fi (or Ethernet) > Details.
Find the number next to Router — that’s the address to enter in your browser.
What are the default router login credentials?
Most brands use “admin” as the username and either “admin”, “password”, or “12345” as the password. Always change these defaults and store your new details in a secure password manager like Secrets 4.
Can I change router settings from my phone?
Yes. To change your router settings using your phone:
Connect your phone to the router’s Wi-Fi.
Open a mobile browser and enter the router’s IP address.
Many routers also offer dedicated apps (like NETGEAR Nighthawk or Google Home) for easier management.