How to increase disk space on Mac
All modern Apple computers start with at least 256 GB of storage. However, even casual users run out of that capacity rather quickly, not to mention those who store large media files or play games on their Mac. Because there’s no way to upgrade your hard drives after you’ve bought your Mac, and configuring your laptop with more storage in the Apple Store is expensive, this leads to the conundrum of finding a better way for how to get more GB on Mac.
Whether you’d prefer to clear out your computer to make space for the new data or look for an external drive as a possible solution, let’s explore some of the best options for both.
Top reasons to get more storage on Mac
The first, obvious reason is the fact that your Mac doesn’t have enough storage for your needs. That’s a good-enough motivation to begin wondering “can I buy more storage for my Mac?” But if you need another rationale, there’s more.
It’s a less-known fact that a Mac converts the available space on its startup disk into virtual memory used for daily operations. That’s why it’s recommended to keep at least 10% of the disk space free on your Mac to avoid the device slowing down. No matter which Mac model you own, it will start to encounter issues if you run out of storage. To prevent this from happening, keep an eye on how much free space you have on your Mac. Here’s how:
- Click on the Apple icon.
- Go to System Settings ➙ General.
- Select Storage.
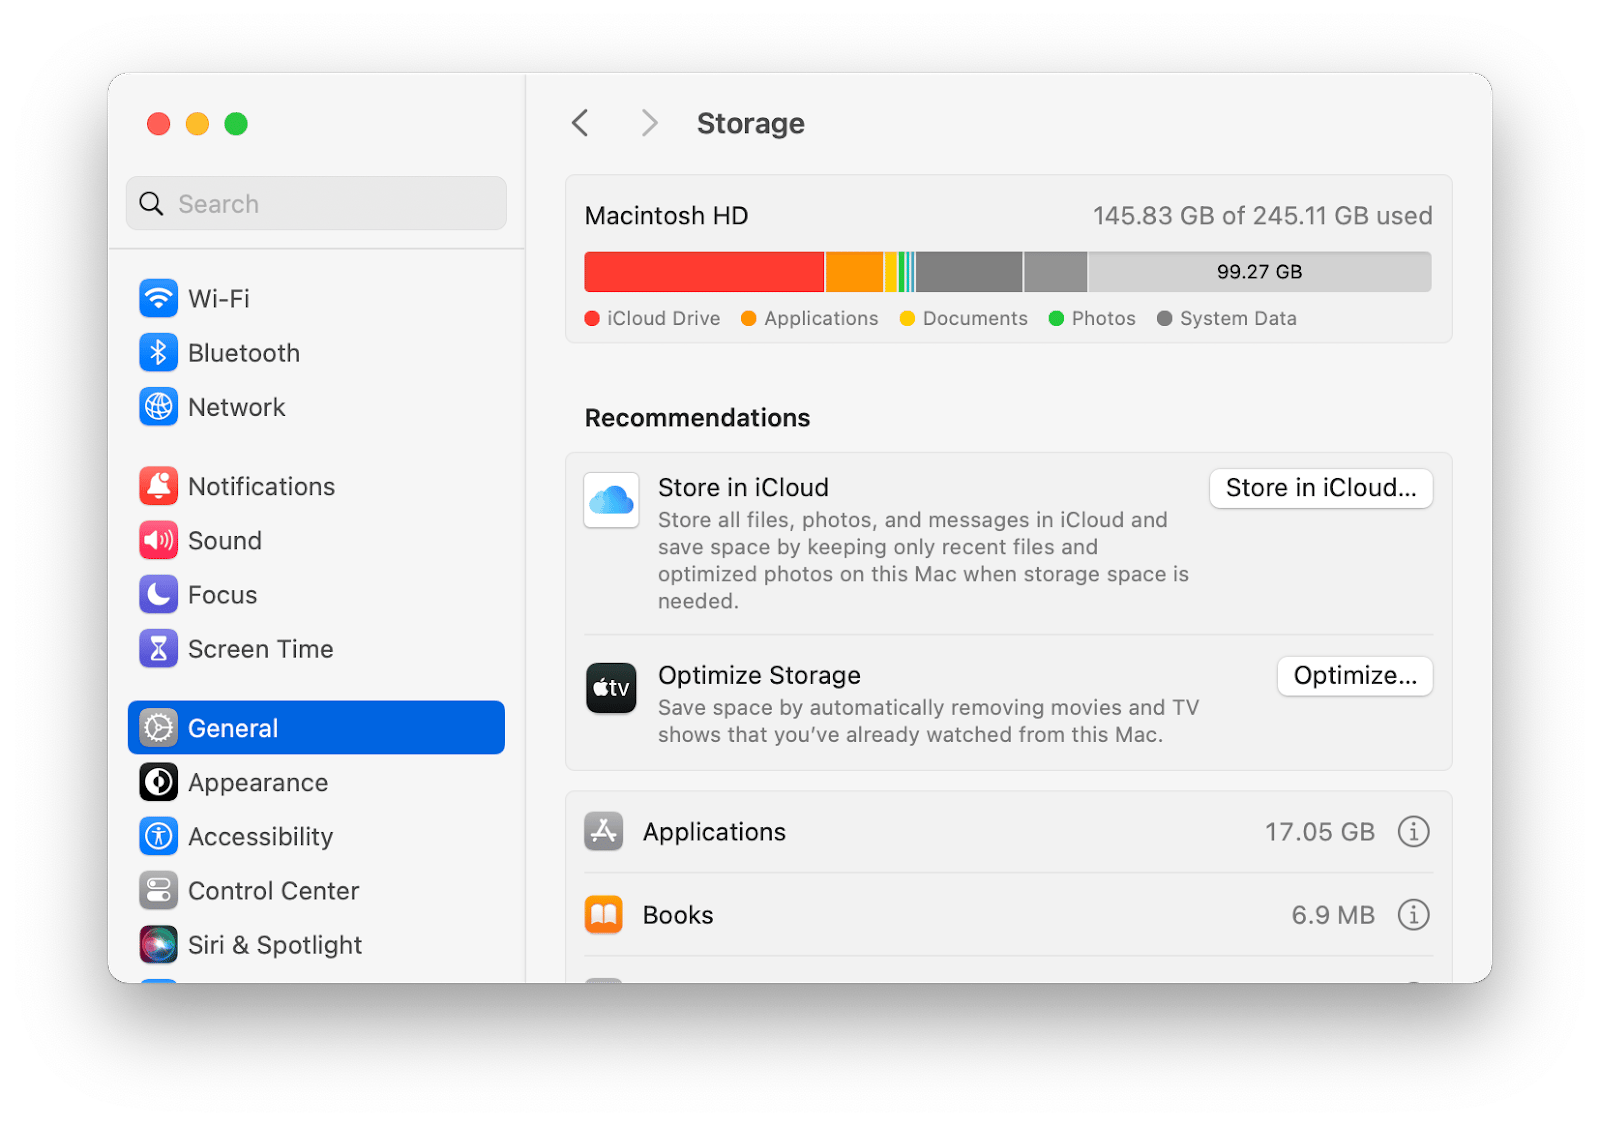
Here you’ll see a colored graph showing how your Mac’s storage is being used, with light gray representing free space. Move the pointer over any other color to see the amount of space each category uses (e.g. Documents, Apps, Photos, or System Data).
How to add extra storage to your Mac
The answer to this question will depend on the Mac model you own. Older models have the option to upgrade storage internally by replacing an existing hard drive with a larger one, but that’s become impossible to do on the newer machines. With these adjustments to the modern Mac models, Apple has left its users with just external options for how to get more flash storage on Mac.
Buy more iCloud storage
Let’s start with a virtual solution that can often prove more cost-effective than getting an external hard drive, for example.
Although most Apple users have iCloud, the majority quickly find the 5 GB basic plan very limiting and want to buy more storage on Mac by upgrading to a paid iCloud subscription. If you’re one of those users, here’s how to get more GB on Mac from iCloud:
- Click on the Apple icon.
- Go to System Settings ➙ Apple ID.
- Select iCloud and click Upgrade to iCloud+.
- Choose your plan and select Upgrade to iCloud+ again.
- Enter your Apple ID username and password, then click Buy.
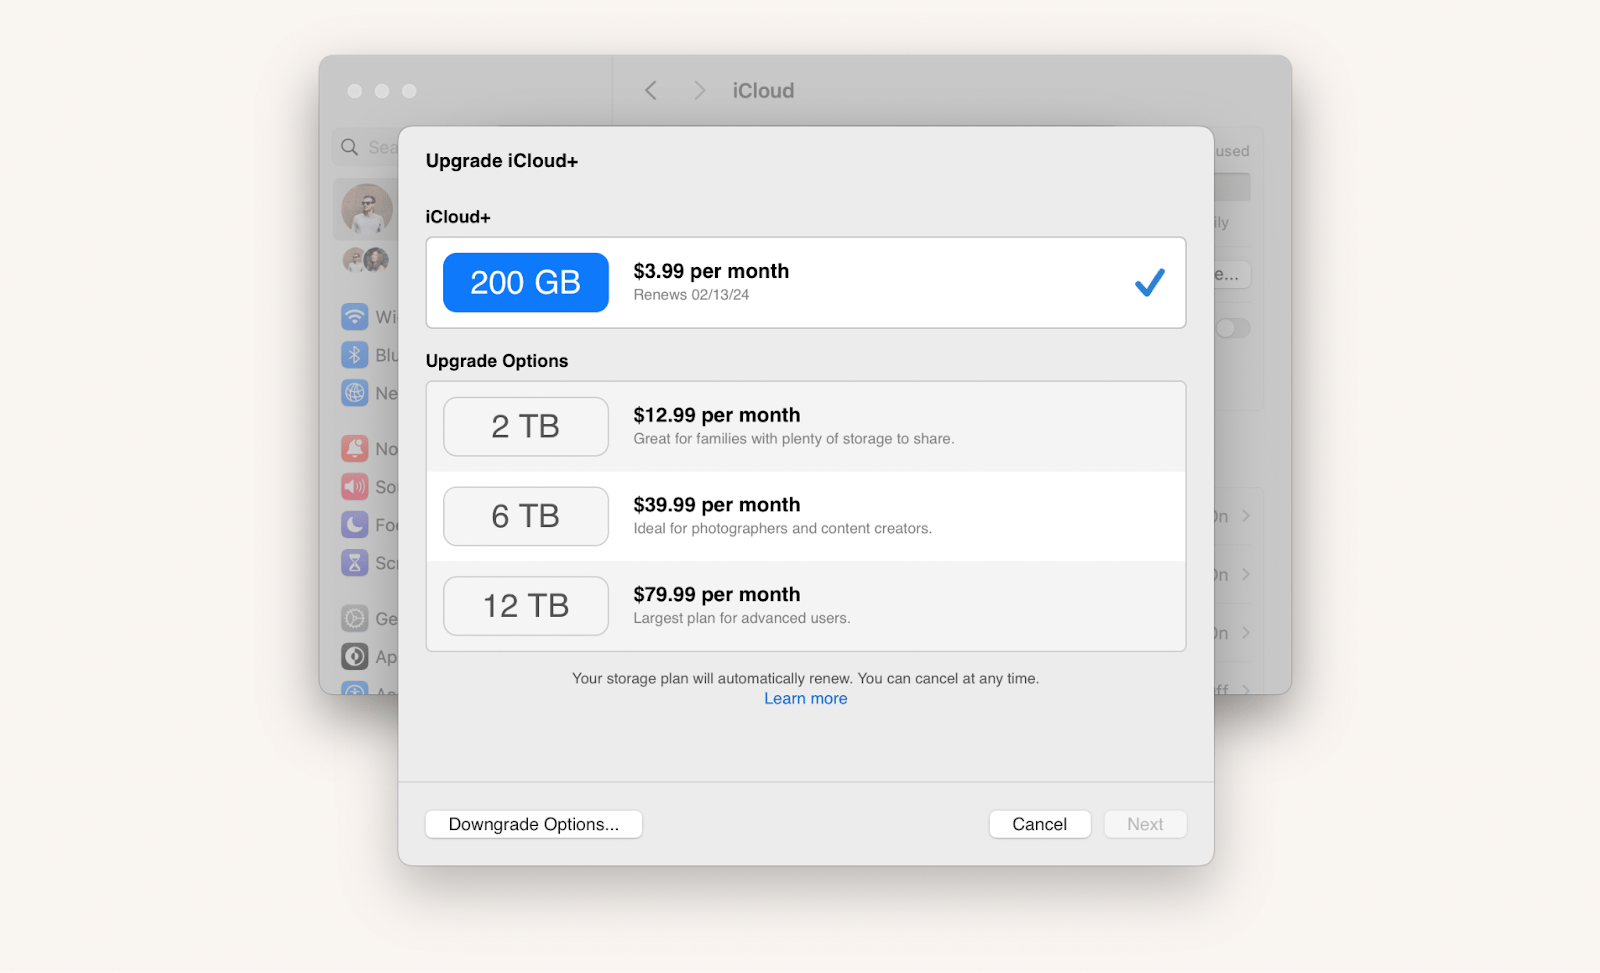
Now you can start using your new iCloud subscription plan immediately. And if you have more than one cloud storage account, it’s a good idea to connect those reserves to your Mac’s Finder using CloudMounter.
CloudMounter is a unique utility that lets you easily access cloud storages right from your desktop. From Google Drive to Amazon S3 and Box, CloudMounter supports eight most popular cloud storage solutions. Use CloudMounter’s Connections menu to choose which drive you want to mount your cloud as a disk to, log in, review the information, click Mount, and forever stop wondering how to increase disk space on Mac.

Add solid-state drive (SSD) capacity
Solid-state drives, or SSDs, have a high storage capacity, are fast and reliable, and present the most radical, yet wholesome solution for how to get more storage on Mac. Unfortunately, you can’t upgrade the SSD on all MacBooks, because Apple changed the manufacturing process on its newest models.
To check which Mac model you have, follow these steps:
- Click on the Apple logo.
- Go to About This Mac.
- Note the model at the top of the window.
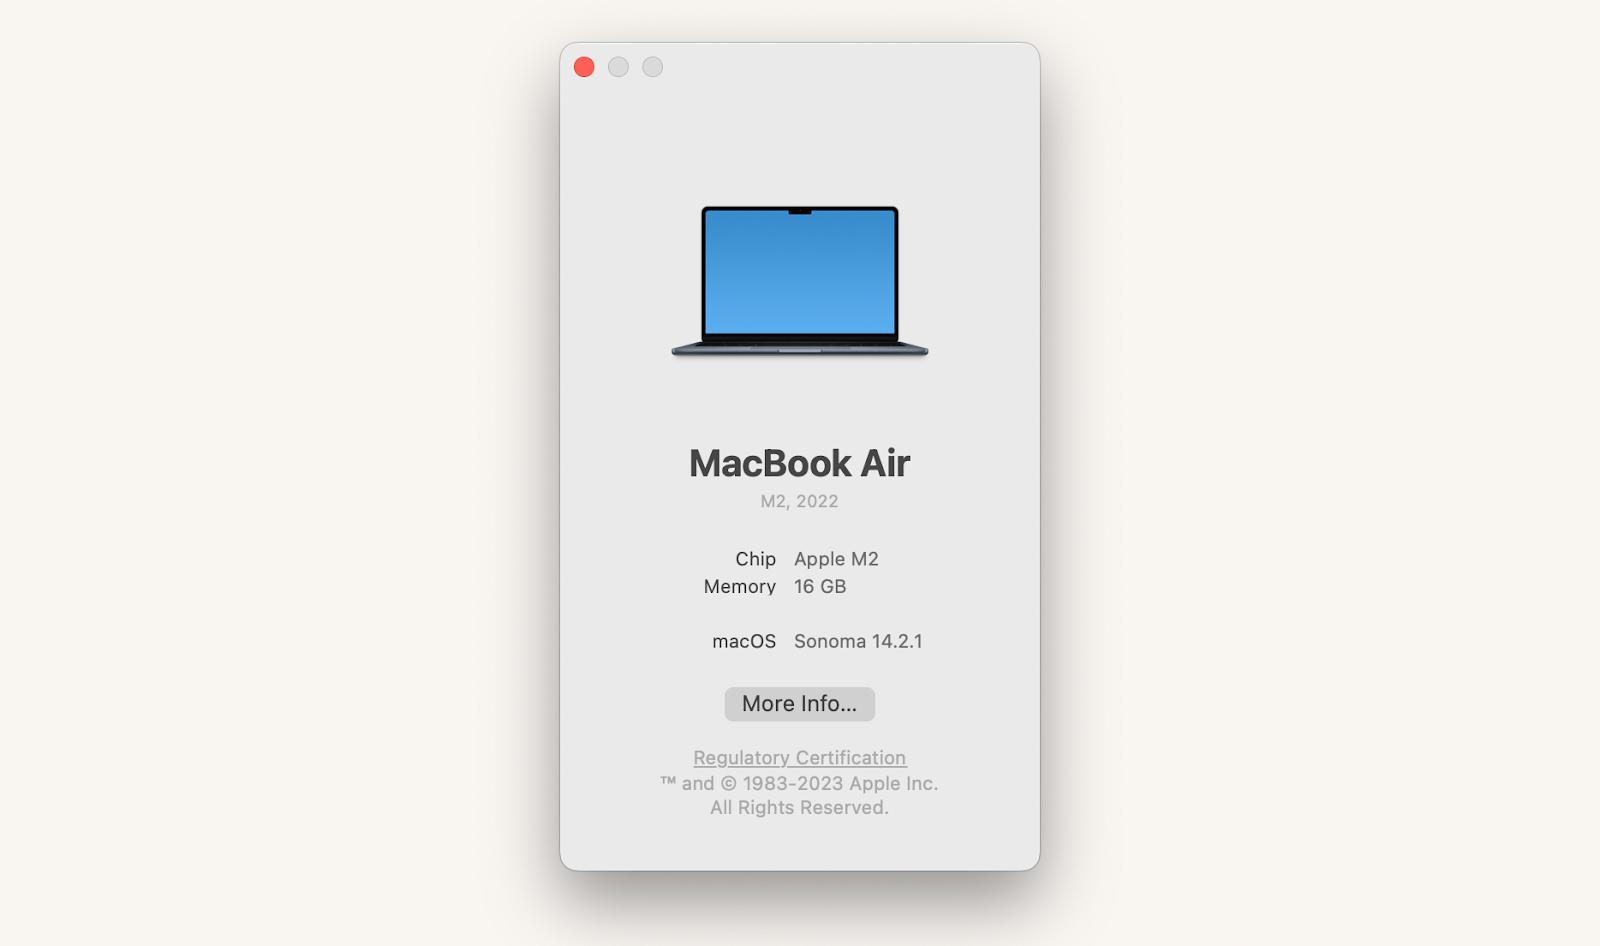
If you find your model is still supported for an SSD upgrade, the most cost-effective way to get it done would be by getting a kit with the new, larger SSD, required tools, and an enclosure for your old drive to transfer data. Then you can search for an SSD upgrade guide specific to your MacBook model.
Note that Apple advises against doing an SSD upgrade yourself because you risk damaging your Mac, which will void its warranty, so it’s best to visit an Apple Store, or get a professional to do the upgrade for you.
Use an external hard disk drive (HDD)
Hard disk drives, or HDDs, are one of the most popular solutions for how to get more flash storage on Mac externally. These drives come with various storage capacities and price tags, so it’s easy to choose one for your needs.
With an average lifespan of about 10 years, hard disk drives are great options for storing Time Machine backups and offloading files. Because HDDs are known to be slower and have a tendency to crash more regularly than SSDs, they’re not recommended for running programs on your Mac.
To connect an external hard disk drive to your Mac, simply plug it in with a USB cable on both ends and you should be able to view its contents and use them from Finder.
Use network disks
A network-attached storage device (NAS) is another option for how to increase disk space on Mac. By connecting a network disk to your router, you can access it wirelessly from your Mac and share files with other devices on your network.
To set up a NAS on your Mac, follow these steps:
- Open Finder and press Command + K to bring up “Connect to Server”
- Type the path of the network drive you’re trying to map and click Connect
- Enter your login and password, then click OK to mount the network drive

Now you can access your network disk from the sidebar in Finder, just like other local disks.
A downside of using NAS to buy more storage on Mac is that its transfer and loading speeds will be fully reliant on your internet connection. Plus, you’ll only be able to access and manage your data when your Mac and your virtual disk are on the same network.
Use SD cards or USB drives
Two portable alternatives to the above method of how to buy more storage on Mac are SD cards and USB drives. Investing in a USB drive with a large storage capacity can really help in a situation when your Mac is out of space. To use a USB drive or an SD card on your Mac, simply connect the two through a USB port (or get an Apple SD card adaptor if you have a newer MacBook) and start moving files through Finder.
Both SD cards and USB drives only work for storing static files and won’t be a good solution if you need read or write capabilities. However, you can actually install and launch some Mac apps from an SD card. Install an app on your Mac first, then move it from the Applications folder to the SD card to save space.
Clean your Mac storage
If you’re not interested in how to buy more storage on Mac, but still want to create room for additional files, another solution would be to clean up your Mac manually, or using dedicated software.
Clean up Desktop and Downloads folders
There are two folders on our Macs that tend to accumulate the most outdated files we actually don’t need: Desktop and Downloads. While this method of tidying up our desktop and deleting all outdated downloads may sound too obvious, it’s also proven to be an effective solution for how to get more GB on Mac.
Here’s how to clean up your Downloads folder:
- Go to Finder ➙ Downloads.
- Select the files you want to delete, right-click and choose Move to Trash.
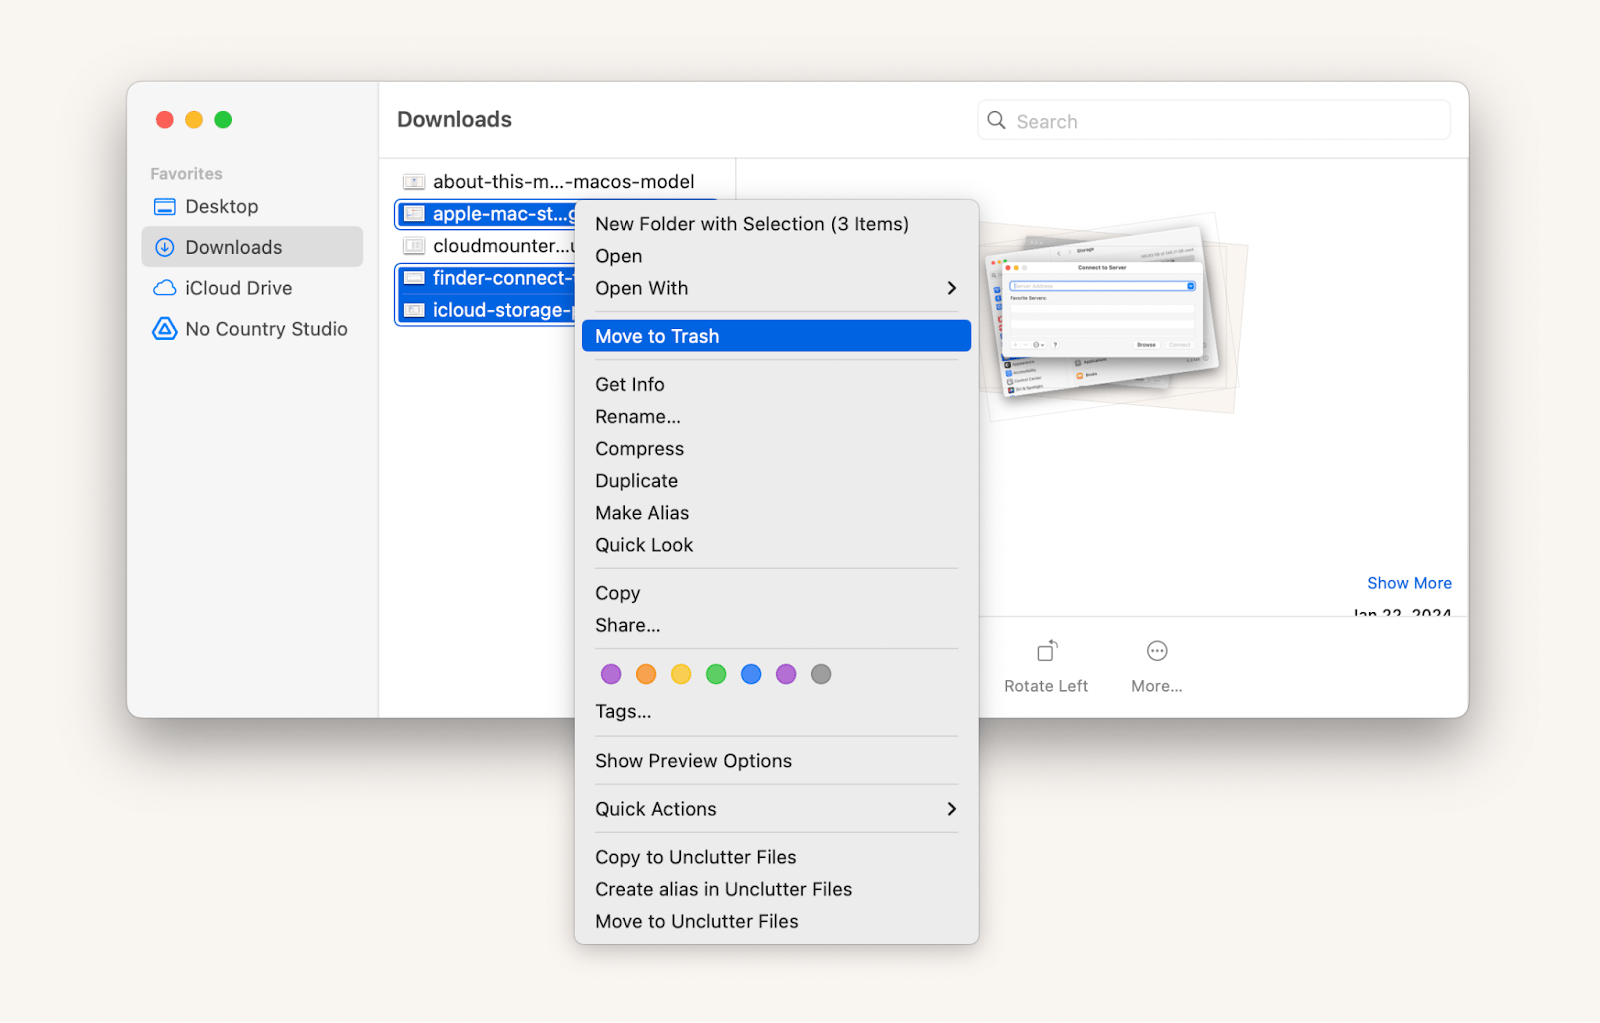
Now you can right click on the Trash icon and select Empty the Trash. To automate this process and have files stored in the Trash folder for more than 30 days to get permanently deleted automatically follow these steps:
- Go to Finder ➙ Settings.
- Click Advanced.
- Check “Remove items from the Trash after 30 days.”

And since a messy desktop has a negative effect on both yours and your Mac’s performance, it’s a good habit to periodically check your screen and move or delete the files you no longer need. But if you want to maximize the effort, here’s how to get more storage on Mac by deleting the largest files on your desktop:
- Go to Finder ➙ Desktop.
- Choose List under the View section.
- Sort your items by size and delete the largest files.

It’s a good manual way to free up space on Mac, but there’s another way to organize and manage your desktop with the help of a file organizer, such as Unclutter.
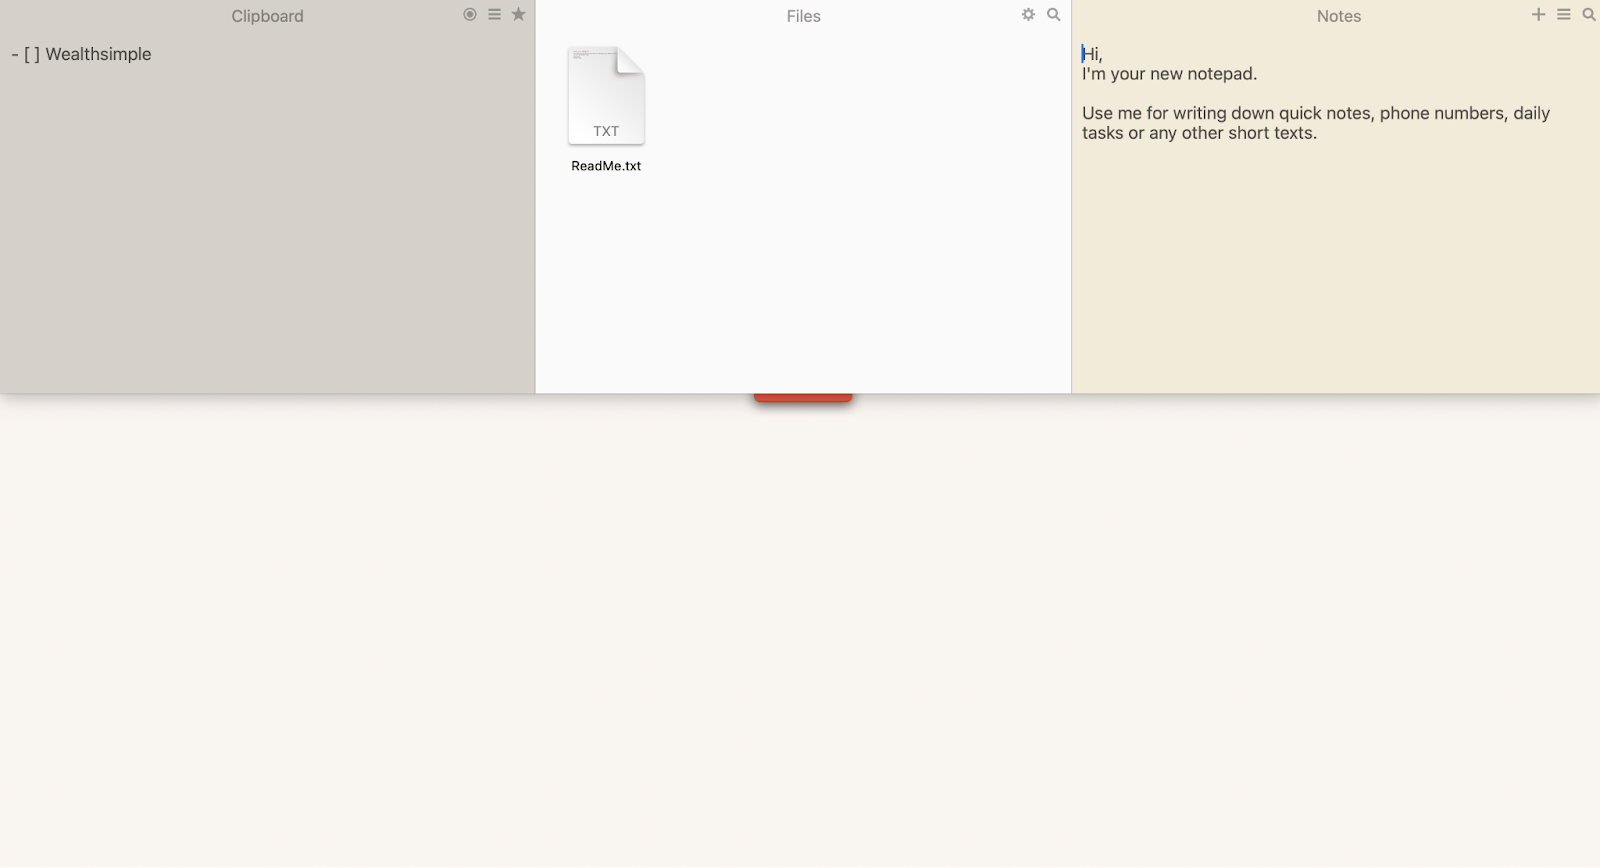
Unclutter is a robust desktop sticky notes app and a full-featured memo assistant giving you unlimited clipboard copy-pasting powers as well as a clean place to store all your temporary notes. Unified in one handy window, Unclutter’s tools range from quick full-text search and clipboard history tracking, to drag and drop file management and consolidated temporary storage.
Delete unnecessary files
On average, a Mac can accumulate several gigabytes worth of junk, temporary files, and caches over its lifetime. Getting rid of these files can help figure out how to get more GB on Mac on a regular basis. If you’re dedicated to tidying up your laptop, follow these steps to remove system junk manually:
- Open Finder and select Go to Folder.
- Paste in ~/Library/Caches and press Enter.
- Go through all your Cache folders and delete the contents inside.
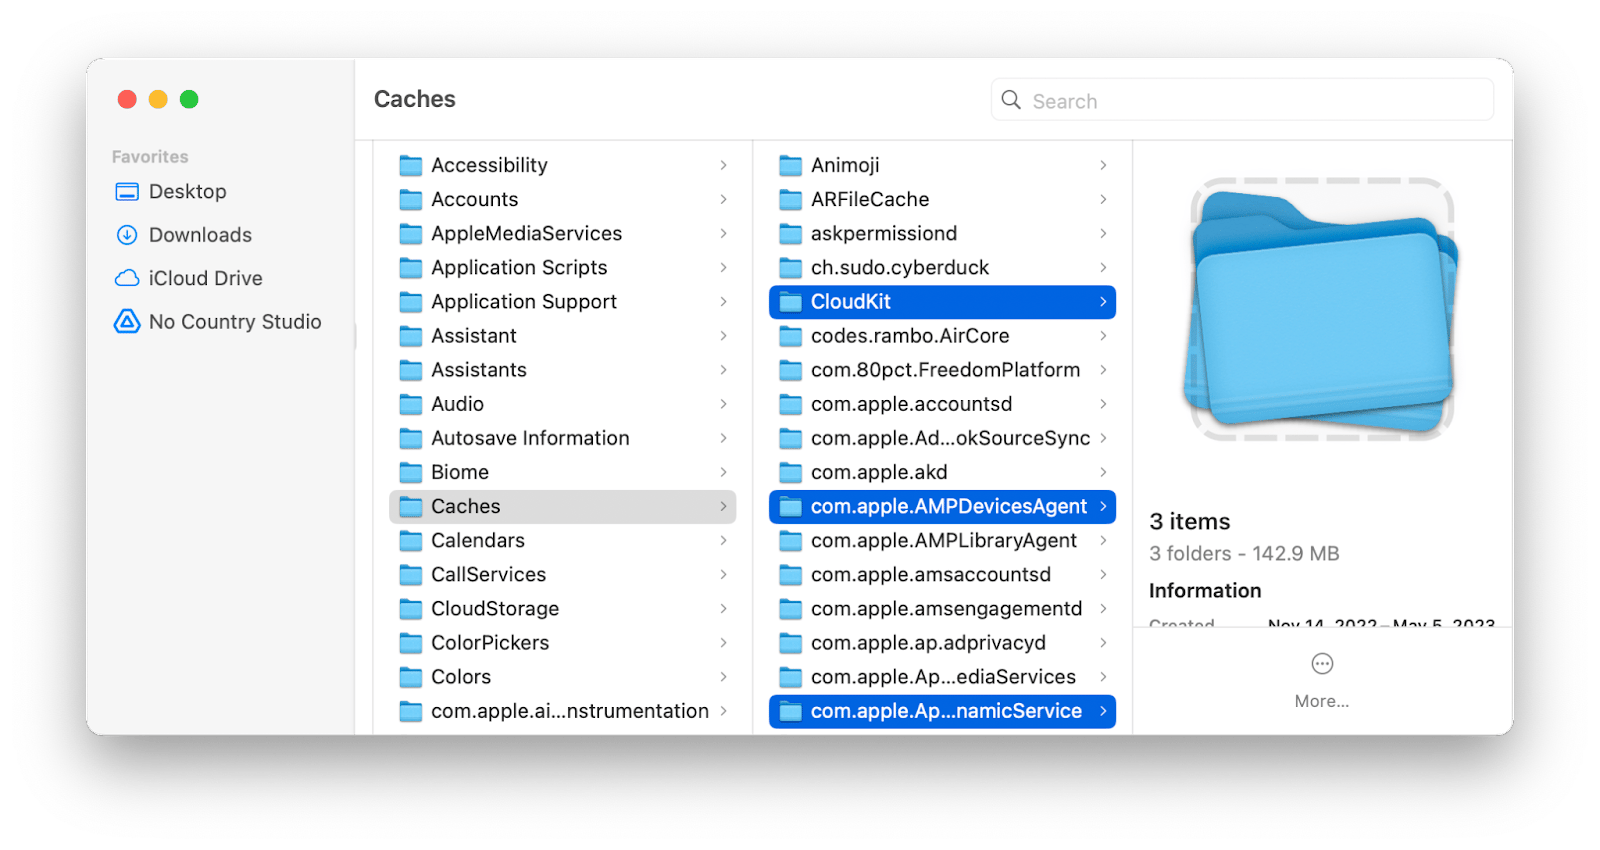
Tracking these “unnecessary” files down isn’t easy and can take a long time, but there’s a quicker way to do it, and that requires using a professional cleaner app for your Mac. Try CleanMyMac X.
CleanMyMac X is the easiest and safest way to optimize your Mac. Its intuitive interface lets you complete various pro-level tasks at the click of a button. This utility is tailored for helping you speed up and protect your Mac by running instant system cleanups, uninstalling and updating apps, removing malware, and erasing files of any size.
Here’s how to get more storage on Mac using CleanMyMac X:
- Launch the app and go to the System Junk tab in the sidebar.
- Select Scan and wait for it to complete.
- Clean.
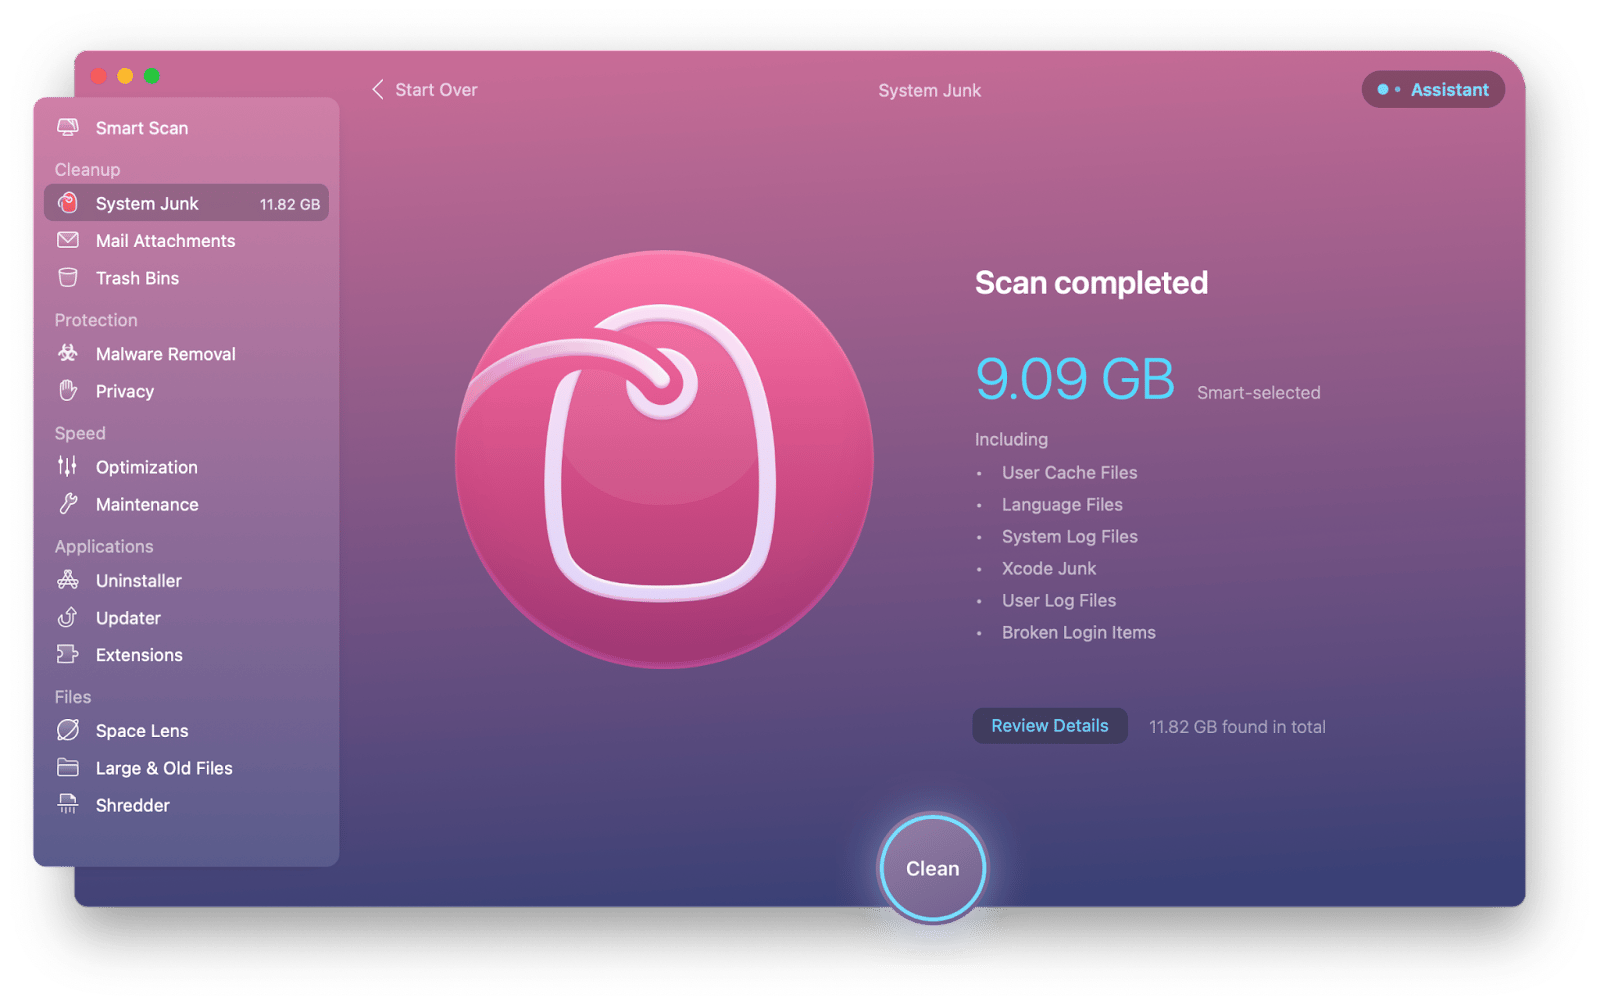
CleanMyMac X can remove up to 74 GB of junk on average. And if that seems impossible, try it once to check for yourself!
Remove duplicate files
How many times have you had to re-download something because you couldn’t remember whether or where you saved it? Meanwhile, all those duplicate files can be one of the reasons you’re searching how to get more flash storage on Mac, because they can occupy up to 30% of available space!
Searching for duplicate files and deleting them one by one is a tedious task, so even if you do it once, chances are, you’ll never do it again. But the problem of figuring out how to get more GB on Mac won’t go away. That’s why you need to try a reliable duplicate cleaner, such as Gemini.
Gemini is the most advanced duplicate finder for Mac. This utility can search your whole device in seconds and present you with not only copies of the same files, but also similar files you might not need as well. And if you end up deleting something by mistake, Gemini offers a safe file recovery too!
Here’s how to get more storage on Mac using Gemini:
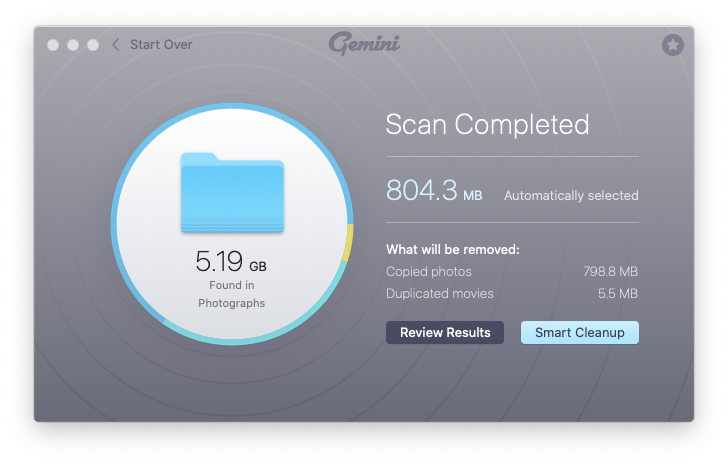
- Launch the app and click the large + (plus) button.
- Select which folders or sections of your Mac you’d like to scan.
- Click Scan For Duplicates.
Now all you need to do is wait for and review Gemini’s findings to choose which files you want to remove.
Use third-party storage apps
Cloud storage allows your files to be readily available on any network-connected device, anywhere in the world. Plus, it can help you offload some data from your Mac’s internal storage onto the cloud. Apple’s iCloud isn’t the only option for this type of virtual storage. Some other popular third-party providers are Google Drive, Amazon Drive, and OneDrive.
Most cloud storage apps function similarly to one another but will offer different space capabilities and prices, as well as support select operating systems. All three of these apps support macOS, but Google Drive gives 15 GB of free storage, compared to Amazon Drive and OneDrive, which allow only 5 GB at no cost.
Be mindful that just like iCloud, Google Drive too mirrors its contents locally on your Mac, so storing files there doesn’t automatically move them off your internal drive. In general, cloud storage services are way more suitable for backing up or archiving files than for files you need regular access to.
Running low on disk space is common for many Mac users, and unless your machine has terabytes of storage, sooner or later you’ll want to use certain tricks to clear space or simply buy more storage on Mac.
To get ahead of this issue and help your Mac run smoothly, get into the habit of cleaning up your Mac and removing system junk, duplicate, and other unwanted files. If that sounds like too much work (and it often can be!), automate this process by using Unclutter to keep your desktop tidy, plus let CleanMyMac X and Gemini quickly delete unnecessary files while you keep all your important data intact with CloudMounter.
Best of all, the apps mentioned above — Unclutter, CleanMyMac X, Gemini, and CloudMounter — are available to you absolutely free for seven days through the trial of Setapp, a leading platform with more than 240 best-in-class Mac apps to help you solve any problem at hand. Try every Setapp app today at no cost and see what productivity really feels like.
FAQs: How to get more storage on Mac?
In addition to the above methods for how to get more GB on Mac, here are some answers to the most common questions about this topic.
Can you add more storage to Mac?
If you’re still wondering “can I buy more storage for my Mac?” — the answer is yes. You can add more storage by purchasing additional iCloud space or getting an external hard drive, for example.
Is it worth it to buy more storage for MacBook?
Although a Mac with large storage capacity costs more, it’s worth the price if you plan to use it for tasks that involve working with and storing large files, backing up your iOS devices to iCloud, and editing or streaming music and video.
Why is my Mac storage full even with iCloud?
That’s because, by default, everything you save to iCloud is still stored on your Mac. It’s convenient for quickly opening files even with a slow internet connection, but can become a problem if your Mac is running low on space.
How much storage is ideal for MacBook?
Starting from 2021, MacBooks come with a default storage of at least 256 GB, which is good enough for regular use that won’t require storing incredible amounts of heavy data, media, or video games.


