How to rename a screenshot
If you have trouble finding certain screenshots, you’re not alone. That’s no surprise considering how Mac names them, right? Thankfully, I’ve found ways to rename the saved screenshots so I can locate them more easily. See how my files looked before and how clean they look now:
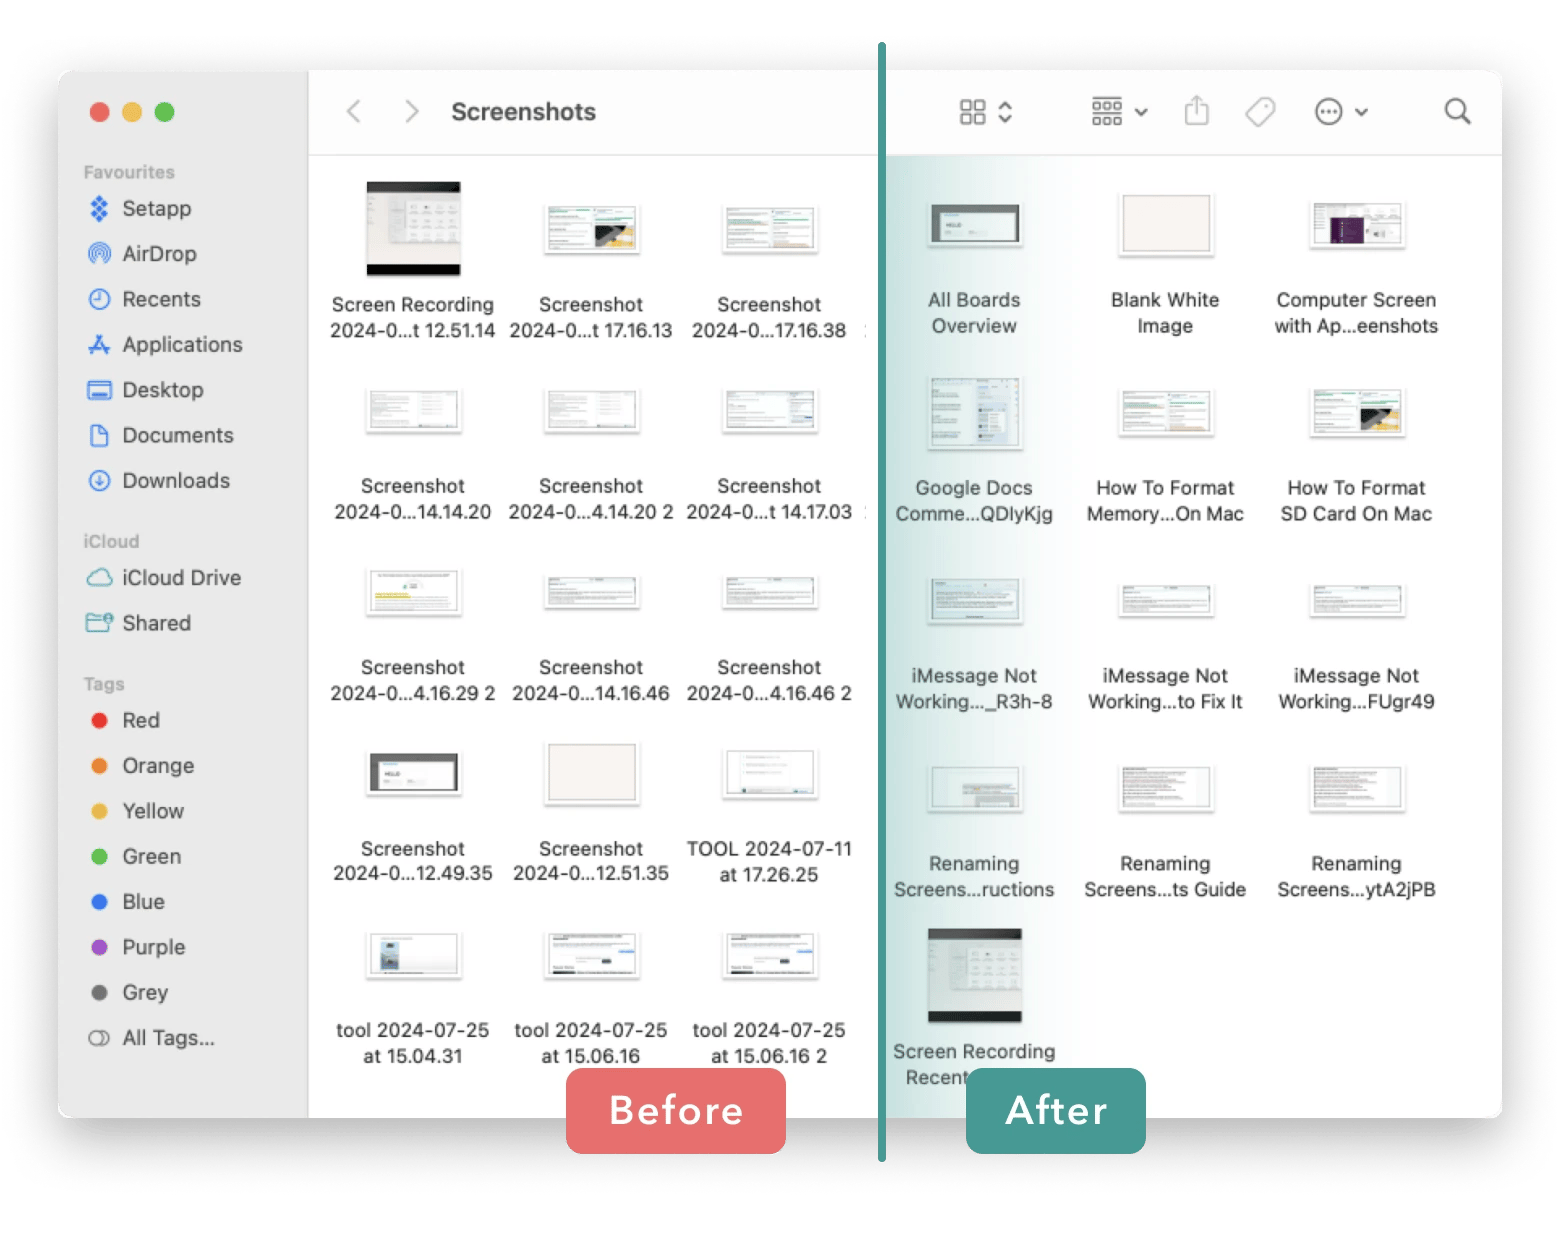
Nice, right? And I’m so excited to show you exactly how to rename a screenshot with ease.
Tip: Don’t want to read the whole article? Try our free custom GPT: How to screenshot on Mac. It will quickly suggest the right solution based on your exact use case.
How to rename screenshots on a Mac
Imagine wanting to share a screenshot of web content that you took years ago for an upcoming workshop. Sounds challenging, right? It’s widely known that Mac saves images as Screenshot [date] at [time].png by default.
So, it’s not surprising if you have better luck finding a needle in the haystack than that particular screenshot. Trust me, the ordeal I went through wasn’t fun. So, I made it a habit to rename my screenshots, and I believe you should, too.
Below, I’ll show you different ways to change the name of screenshots on a Mac.
Rename after taking the screenshot.
If you use Apple’s Screenshot tool to capture your screen, you can’t rename it immediately. However, you can rename them in the folder where the screenshots are saved.
If you’re not sure where to find the screenshots after you made them:
- Press Command + Shift + 5 to open the Screenshot tool.
- Click Options to see which location has a tick next to it.
- Then, open the folder on your Mac
- Rename the latest screenshot file to something related.
The problem with this approach is that you’ll need to juggle between taking screenshots and manually renaming each file. This is probably not the best way to use your time if you ask me.
Automatically rename screenshots with meaningful names with Keep It Shot
If you spend more time renaming screenshots than taking them, you will love this method. Instead of manually renaming screenshots, I recently switched to Keep It Shot, an intelligent and advanced renamer, to provide descriptive names automatically.
Keep It Shot uses powerful AI technologies to rename screenshots into meaningful ones. It analyzes the image captured and automatically suggests names that best describe it. The great thing is that you can rename multiple screenshots simultaneously.
When writing this article, I took several screenshots to demonstrate how to rename them quickly. Initially, they appeared on my Mac with their default names. Then, I renamed them by doing these simple steps:
- Download and install Keep It Shot.
- Choose files to rename.
- Click the Keep It Shot icon at the top menu.
- Select Rename Selected.
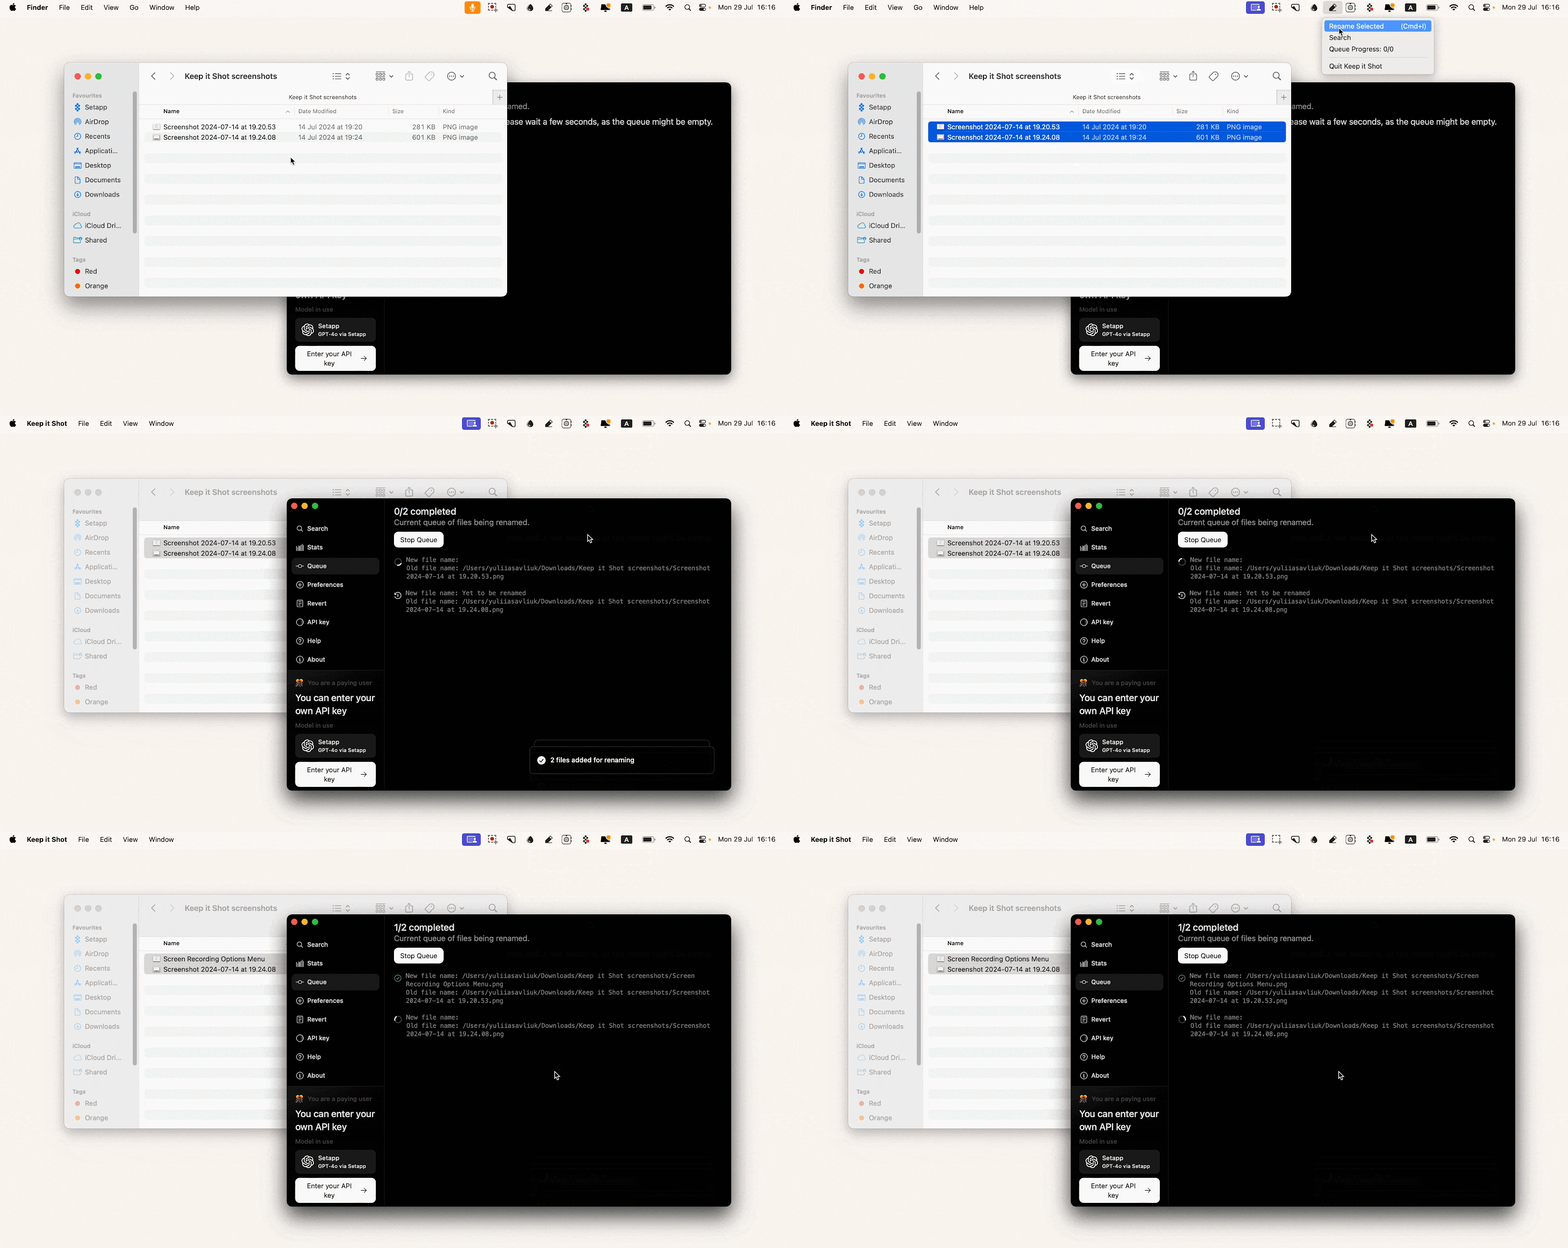
Once Keep It Shot bulk-renames the screenshots, I can locate them by referring to their more meaningful names.
It took me just ten seconds to rename two screenshots, and the best part is that it all happened automatically in the background. I hardly had to do anything!
Rename in bulk with Apple’s native tool
Another way to rename a group of screenshots is to use Finder, which comes with your Mac.
Here’s how to bulk rename screenshots:
- Open the folder containing your screenshot files.
- Select multiple files you want to rename.
- Right-click on any of the selected files.
- Choose Rename.
- Type a new name in the Replace with field and type the old name you want to remove in the Find field.
- Click Rename.
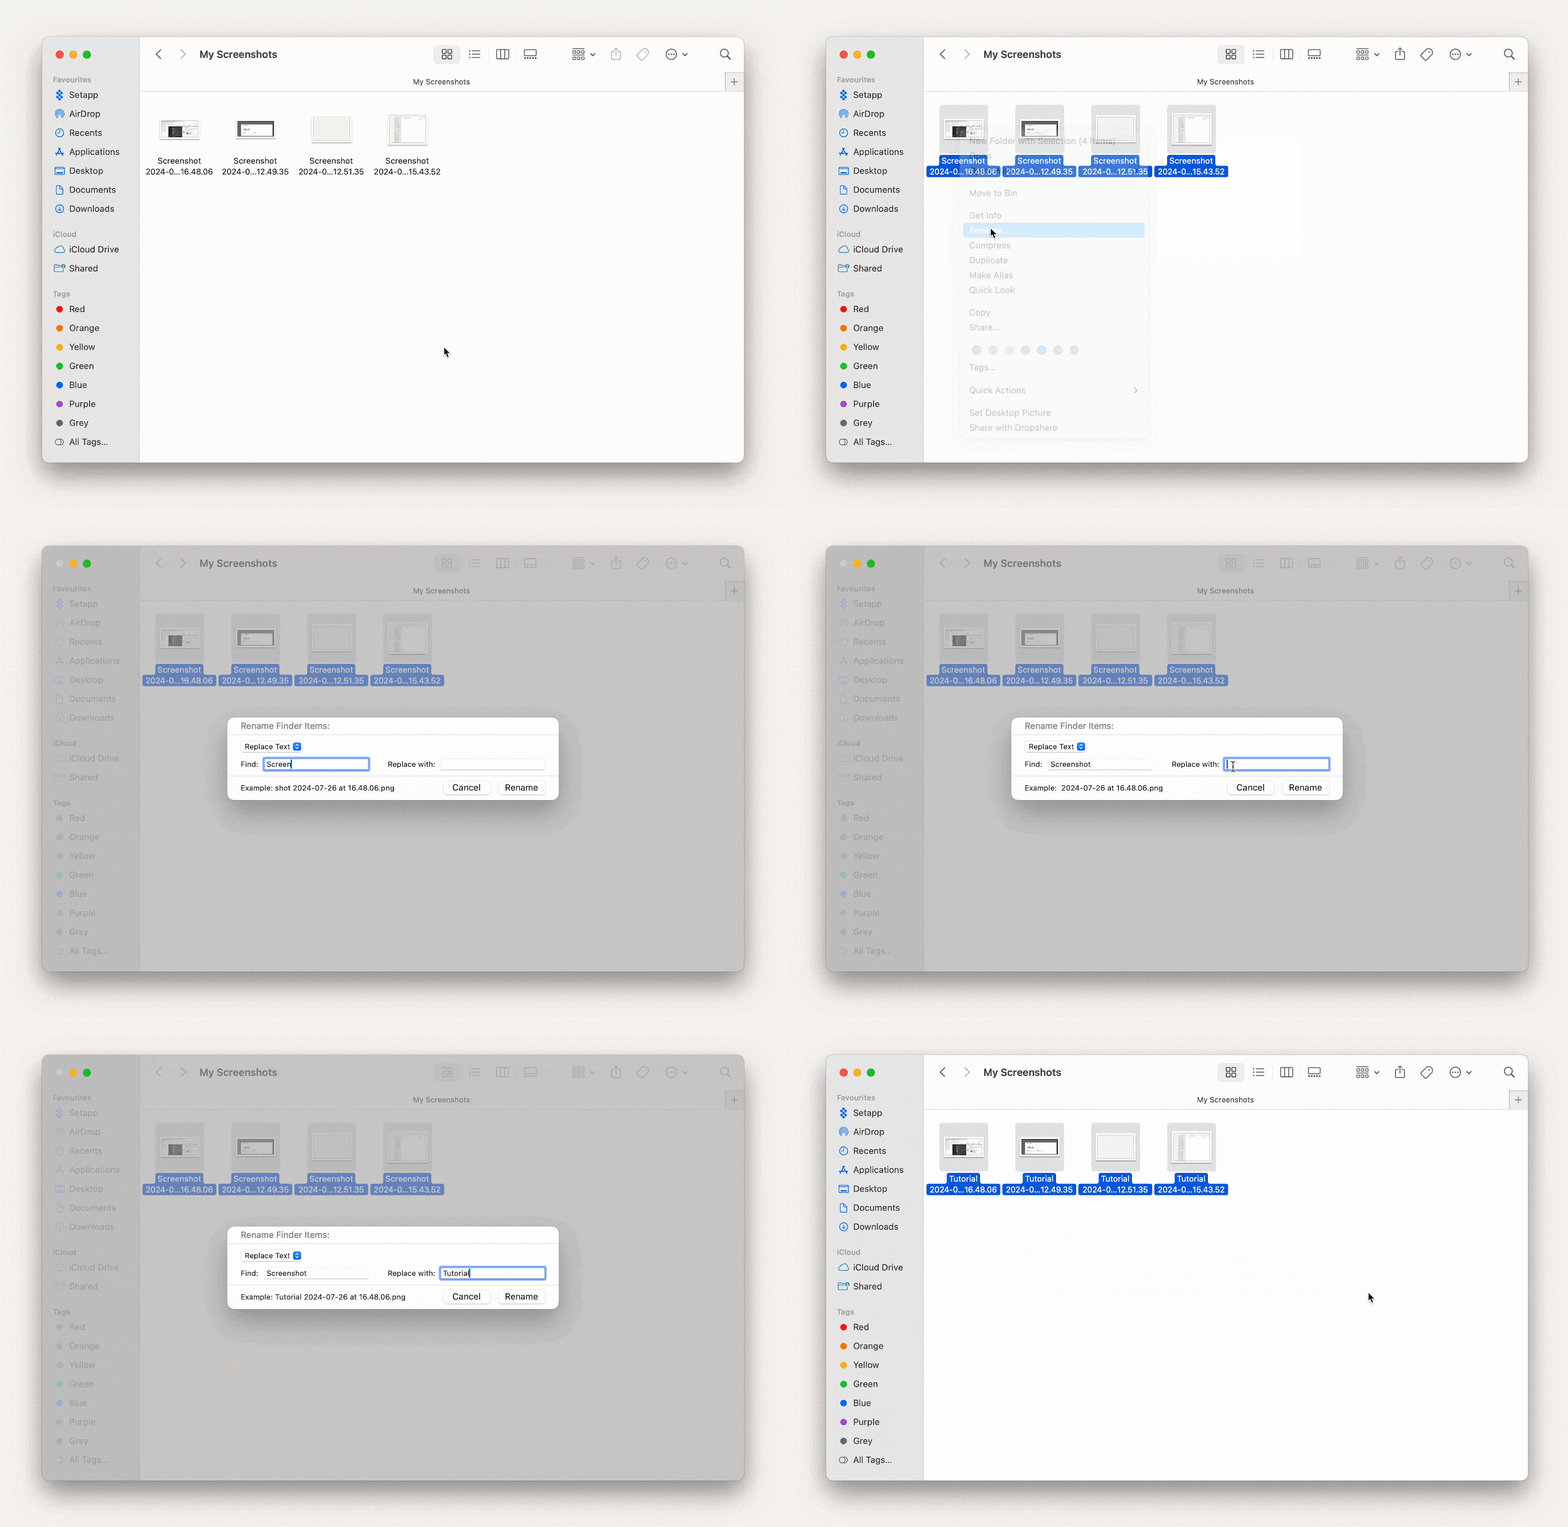
The Finder tool will rename all the selected screenshots accordingly. Bear in mind that this method finds specific text in the file name and replaces it with a new one. You can only use this method if the file names share overlapping text. For example, instead of having Screenshot as the default name, you can rename it to Project, Tutorial, or Recipe.
Edit the screenshot’s name with the Renamer app
Sometimes, you need to edit screenshot names in ways that Mac’s basic tools can’t do. Let’s say you want to serialize the instruction screenshots so you can easily arrange them in your blog post later. Or if you want to change the date and time format from Mac’s default name.
Such tasks require more than the basic renaming capabilities that the Mac’s built-in tools offer. If you make those changes manually, you’ll take almost forever. That’s when you’ll find Renamer useful. With Renamer, you can number your files sequentially, remove specific characters, convert lower to upper cases, and more. Here’s how to edit the screenshots’ names in bulk:
- Instal and open Renamer.
- Drag files to Renamer from your Mac.
- Click Photos in the sidebar menu and choose Append Dimensions.
- Choose Overwrite Characters in the drop-down menu.
- Type a new name in the Replacement field.
- Click the Play icon on the top to rename screenshots.
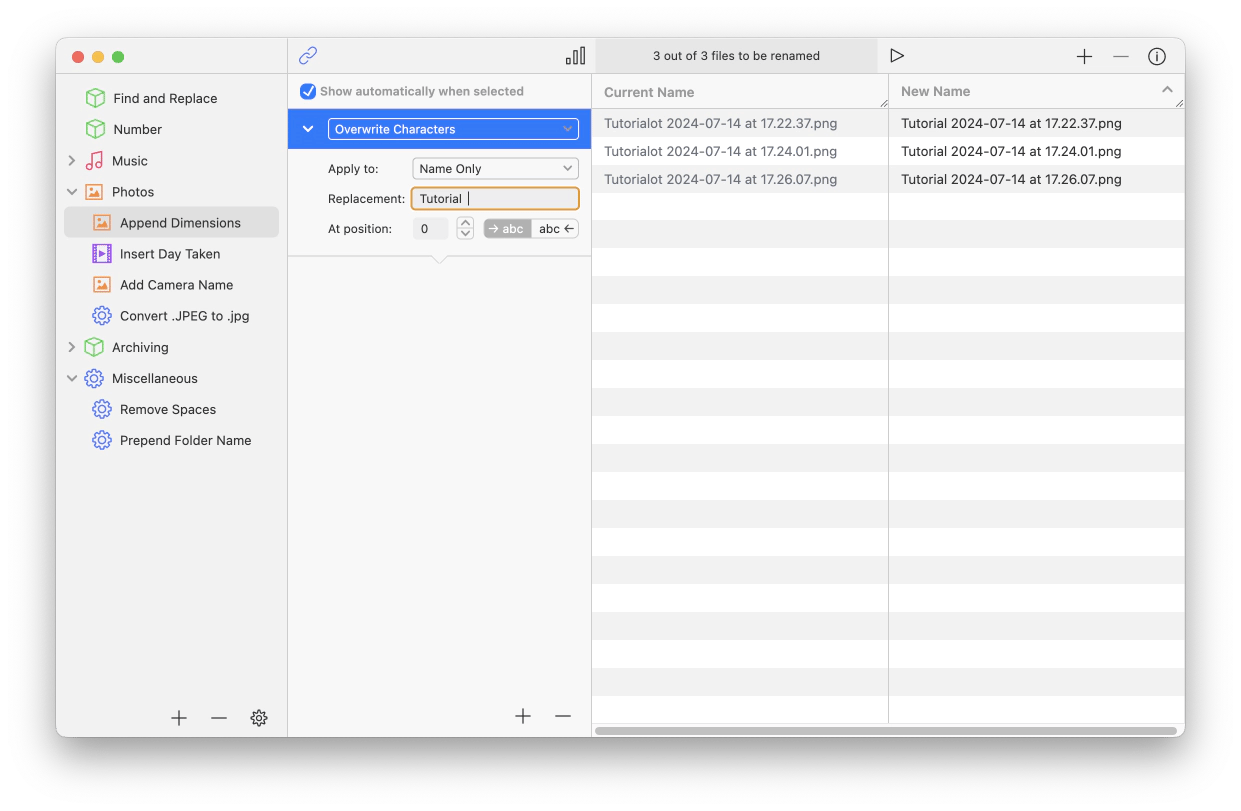
If you need more than just bulk renaming, go to the drop-down menu in Append Dimensions and choose a feature you want to add to your file name.
More importantly, Renamer lets you create a sequence of actions so you can rename screenshots more flexibly. If you’re worried about making mistakes while renaming batches of files, you can use Renamer to preview the changes before committing them. And even if you make mistakes, the app lets you reverse the changes.
Change the default filename of screenshots in macOS with Terminal
If you don’t know what Terminal is on Mac and how it will help with screenshot renaming, here’s a quick explanation. Terminal is a window that lets you communicate with Mac’s internal system with command prompts. Think of it as a gadget that techies like me use to access Mac’s functions hidden from regular users. If this doesn’t sound too intimidating, read on.
With Terminal, you can change how your Mac names the screenshots you capture. All you need to do is to instruct it with the following steps.
- Click on the Launchpad icon and type Terminal in the search field.
- Click Terminal and write the following: defaults write com.apple.screencapture name "screenshots filename"
- You can replace "screenshots filename" with any name you want.
- Press Enter.
Now, try capturing several screenshots. Your Mac will save them with the new name you instructed it to. But if you don’t like how it sounds, you can revert the naming convention to Mac’s default by typing the following command: defaults delete com.apple.screencapture name; killall SystemUIServer.
Edit the name in a screenshot with CleanShot X
You can save a lot of trouble renaming dozens of screenshots if you use the right screen capture tool. Rather than revisiting multiple screenshot files with similar names, it’s better to get their names right the first time. And CleanShot X lets you do that.
CleanShot X tops my list of screen recording apps. It lets you easily capture images, record short videos, and share them. Taking a screenshot with CleanShot X is quite simple. All you need to do is to drag a frame surrounding the screen you want to capture.
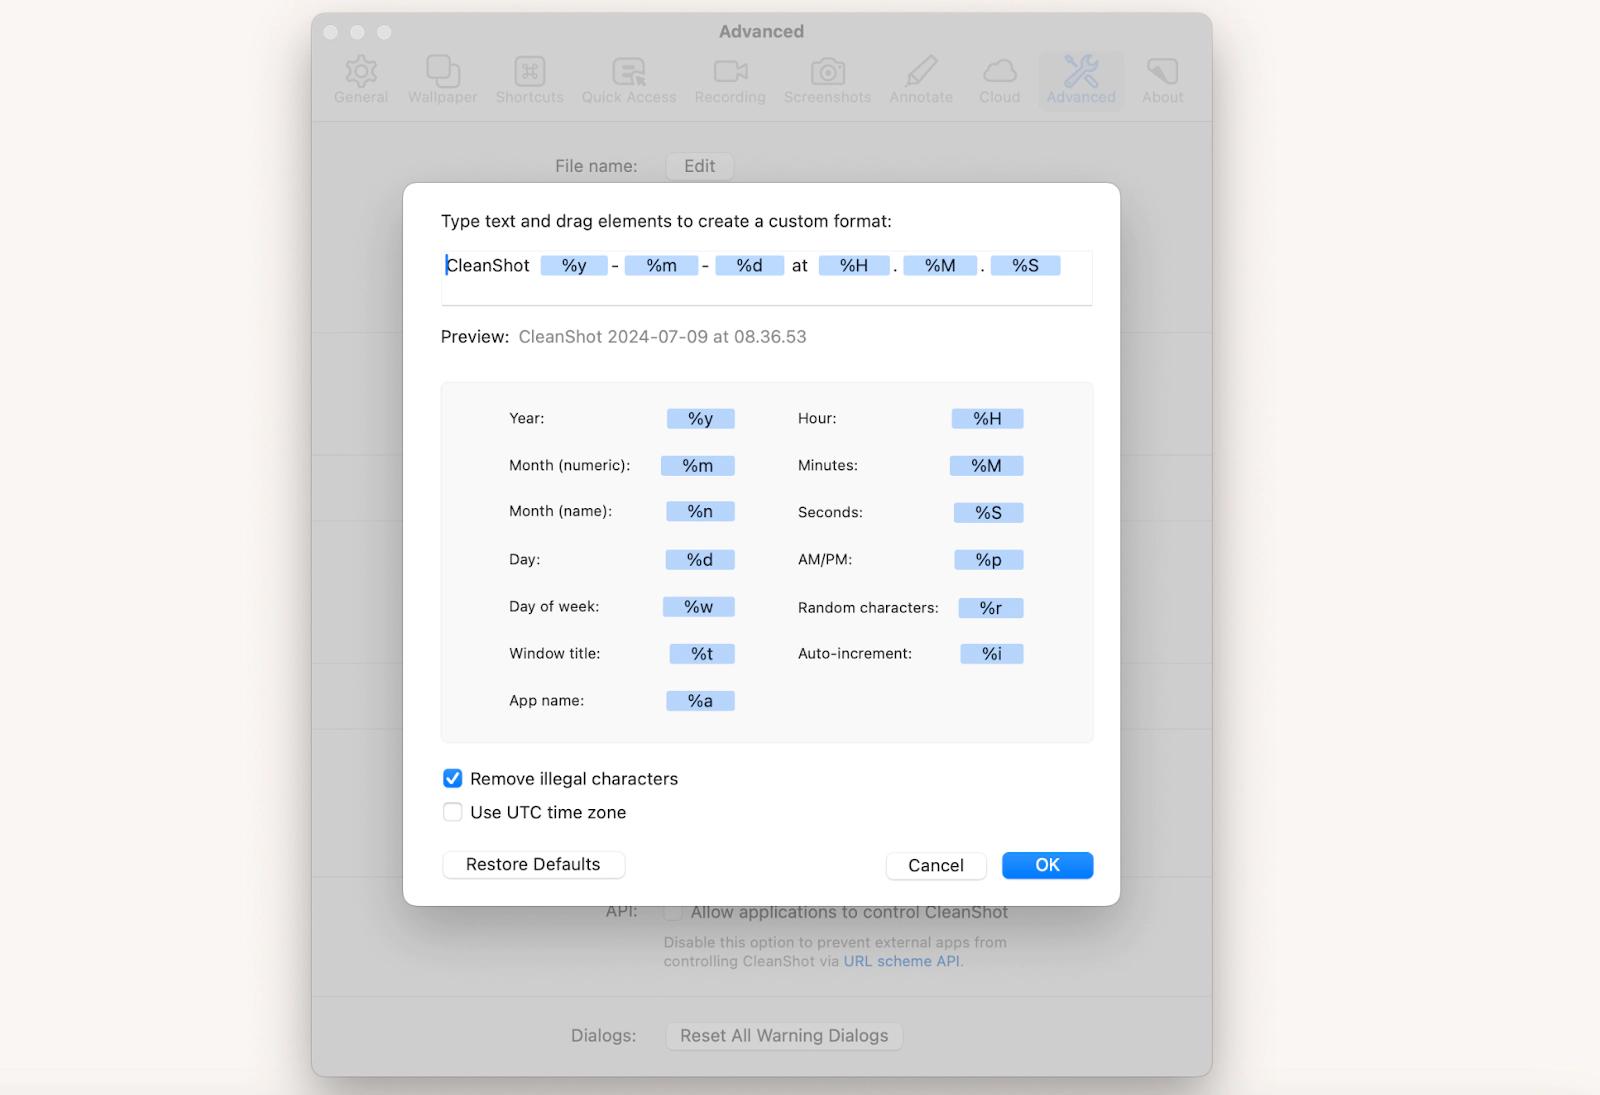
Then, CleanShot X would take a snapshot. But before saving it, the tool lets you edit the file’s name. That way, you can save the screenshot with the exact name you want. You can also change the screenshot’s default name. Here’s how to do this:
- Go to Settings in the top menu bar.
- Click Advanced.
- Click Edit next to the File name.
- Type text to create a custom name.
How to edit the name in a screenshot on iPhone and iPad
Changing the screenshot’s name on an iPhone or iPad is trickier because there are fewer ways to do so. But with a workable method, you will manage to organize your screenshots effectively, and I’ll show you how.
Rename the screenshot on the iPhone before sharing
If your iPhone runs on iOS 16, you can rename the screenshot right after taking it. Here’s how to rename a screenshot on your phone:
- Take a screenshot by quickly pressing and releasing the volume up and power button.
- Tap the screenshot’s thumbnail at the bottom left of the screen.
- Tap the share icon at the top right of the screen.
- Tap Options and type a new name for the screenshot.
- Tap Done to confirm the changes.
Now, you can share the screenshot with its new name. However, the caveat with this method is that the changes don’t carry over to the files saved in Photos.
Rename a screenshot on iPhone and iPad with AnyTrans
Unfortunately, you can’t rename the iPhone screenshot file name with the Photos app. You will have to save them to the Files app instead, just to keep a screenshot with a new name. It’s not worth the effort if you ask me.
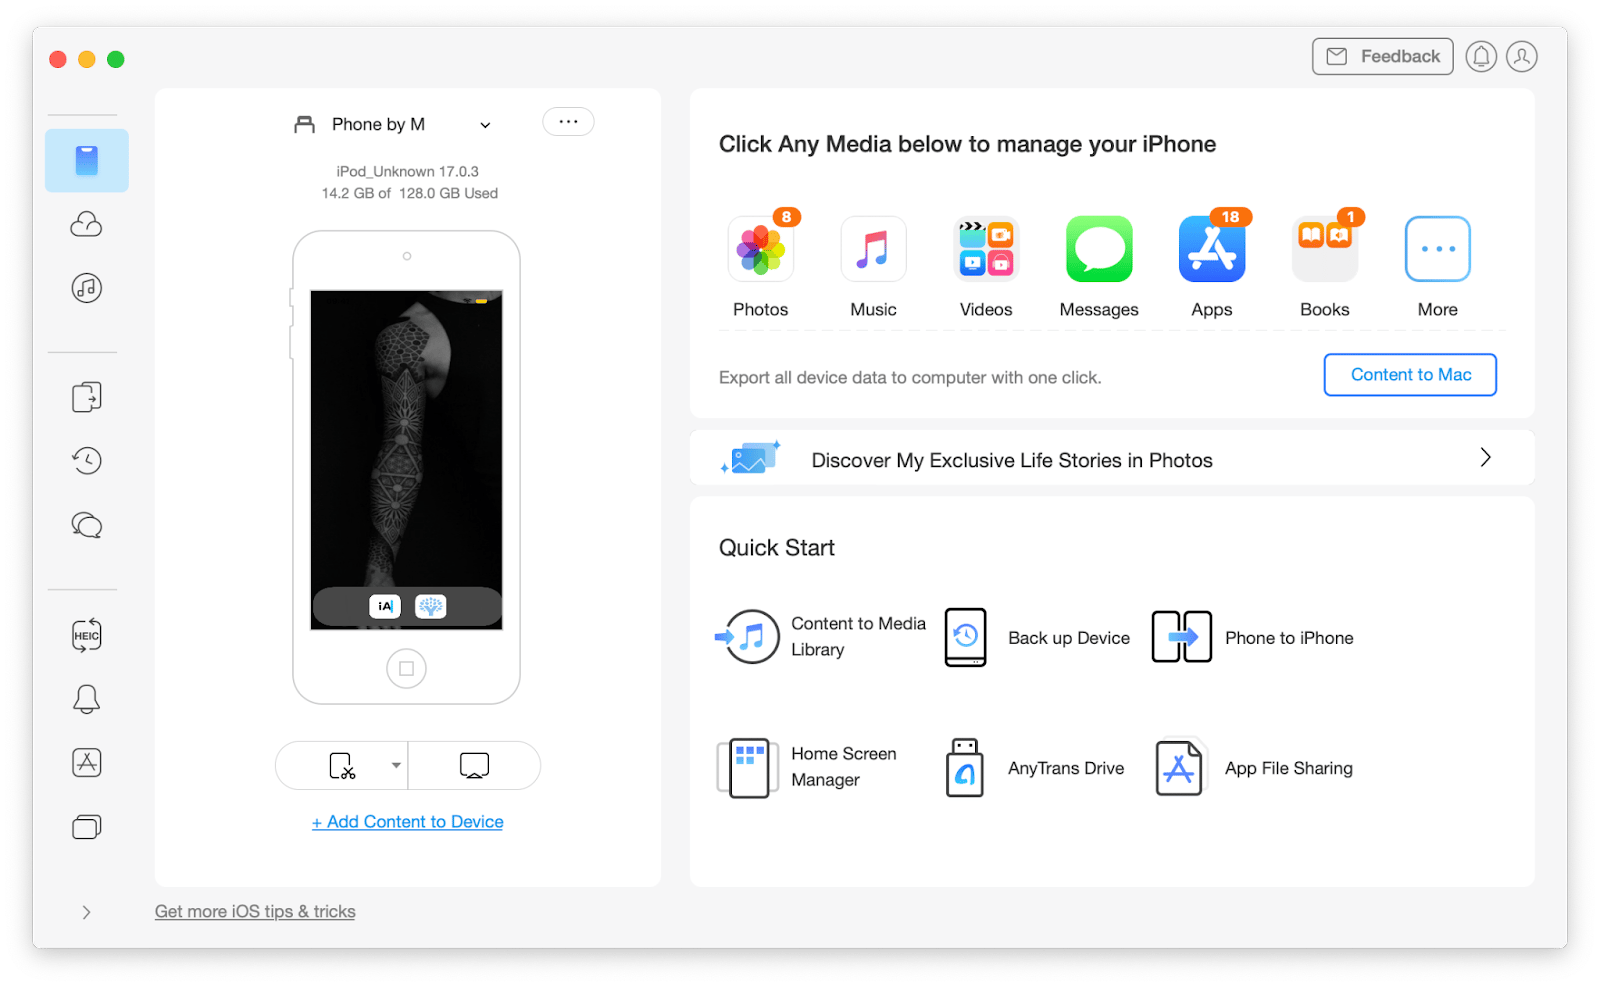
If you want to rename screenshots on your iPhone or iPad more easily, try AnyTrans for iOS. It’s a simple file transfer tool that lets you move screenshots between Apple devices easily and securely. With this tool, you can transfer your files to your Mac, where you can rename them manually or use the Keep It Shot app to return them to your phone. Here’s how to do it:
- Install and open AnyTrans for iOS on your Mac.
- Connect your iPhone or iPad to the laptop using a USB-C cable.
- Click the Photos icon after your device appears in AnyTrans for iOS.
- Choose the screenshots you want to rename and click the to Mac button.
- Rename your files on your Mac.
After renaming, transfer the files back to your iPhone or iPad.
Rename saved screenshots and find them easily
You can rename screenshots in different ways, but what’s important is to do it quickly and intelligently. Of course, you can edit their names individually, but I’m sure you have better use of your time. So, let’s be more productive and let the professional apps do the heavy lifting.
- Keep It Shot — Automatically renames files meaningfully with AI.
- Renamer — Let you perform complex renaming in batches.
- Clean Shot X — Rename the screenshots right after taking them.
- AnyTrans for iOS — Transfer screenshots to your Mac from your iPhone or iPad, so you can rename them more effortlessly.
To download any of the apps and more, subscribe to Setapp. With a single subscription plan, you can access dozens of apps that boost your productivity. As a bonus, you can try them out free for seven days.


