How to record the screen on your iPhone or iPad in 2026
- Screen recording is built into the iPhone and iPad.
You can capture everything happening on your screen using the built-in feature, accessible via the Control Center once enabled. - Add audio to enhance tutorials.
Long-press the Screen Recording button in Control Center and enable the microphone to include your voice or system audio during recordings. - Edit recordings directly on iOS.
Use the Photos app to trim videos, adjust brightness, contrast, and saturation, apply filters, or crop and rotate your screen recordings. - Use a Mac for advanced recording.
Apps like Capto and iShowU let you record your iOS device screen on a Mac with more control, editing options, and audio management. - Keep storage in check.
Screen recordings can take up space quickly; CleanMy®Phone helps remove clutter and free storage after recording.
For professional tutorials and precise editing, check out Setapp free for 7 days, trying apps like iShowU, Capto, SnapMotion, and CleanMy®Phone.
After spending over twelve years in tech, I've found myself needing to show app features, make tutorials, or even record bugs on my iPhone quite a bit. Screenshots are good for this purpose, but iPhone screen recordings are sometimes much better. I have also repeatedly used them to share insights and solve technical tasks for friends.
So, in this article, I'll show you how to screen record your iPhone and iPad and polish the result with some editing tips.
Here's a quick summary of the steps you should take:
| I want to... | I can... | |
|---|---|---|
| Record my iPhone screen | Use the built-in screen recording feature to capture everything on a screen. | |
| Enable screen recording on iOS 26 | Add it in the Control Center by tapping the “+” icon to get quick access. | |
| Add audio to my recordings | Long-press the screen recording button in the Control Center to enable the microphone. | |
| Edit my screen recordings | Use the Photos app to trim, adjust, and personalize recordings. Use SnapMotion to create covers for your recordings. | |
| Share my recordings | Use the Share icon to send recordings through AirDrop, Messages, or social media. | |
| Record iPhone screen on Mac | Use Capto to record the screen of the iPhone or iPad while connected to a Mac. | |
| Create professional videos | Use iShowU to record and edit videos with advanced features for better quality. | |
| Clean up storage space | Use CleanMy®Phone to remove clutter and manage storage after recording. | |
Want to screen record on Mac, too? Use the GPT assistant that guides you on how to screen record on Mac and also recommends the best screen record software based on your goals.
How to set up screen recording on iOS 26
Before you capture your screen, set up your iPhone or iPad for screen recording. Namely, here's how to enable the screen recording on iPhone:
- As a first step, confirm that your iPhone or iPad is running iOS 11 or later. For this, open the Settings app > General > About.
- If you're running an outdated version of iOS, open the Settings app > General > Software Update and install the latest version available.
- As mentioned, you'll need to enable screen recording in the Control Center. I'll guide you through the process below.
Also, check out the quick guide on how to take a screenshot on iPhone 17.
How to record a screen on iPhone and iPad
Now, let's jump right into the screen recording process. I'll show you how to get a screen record on iPhone and iPad.
Enable screen recording in Control Center
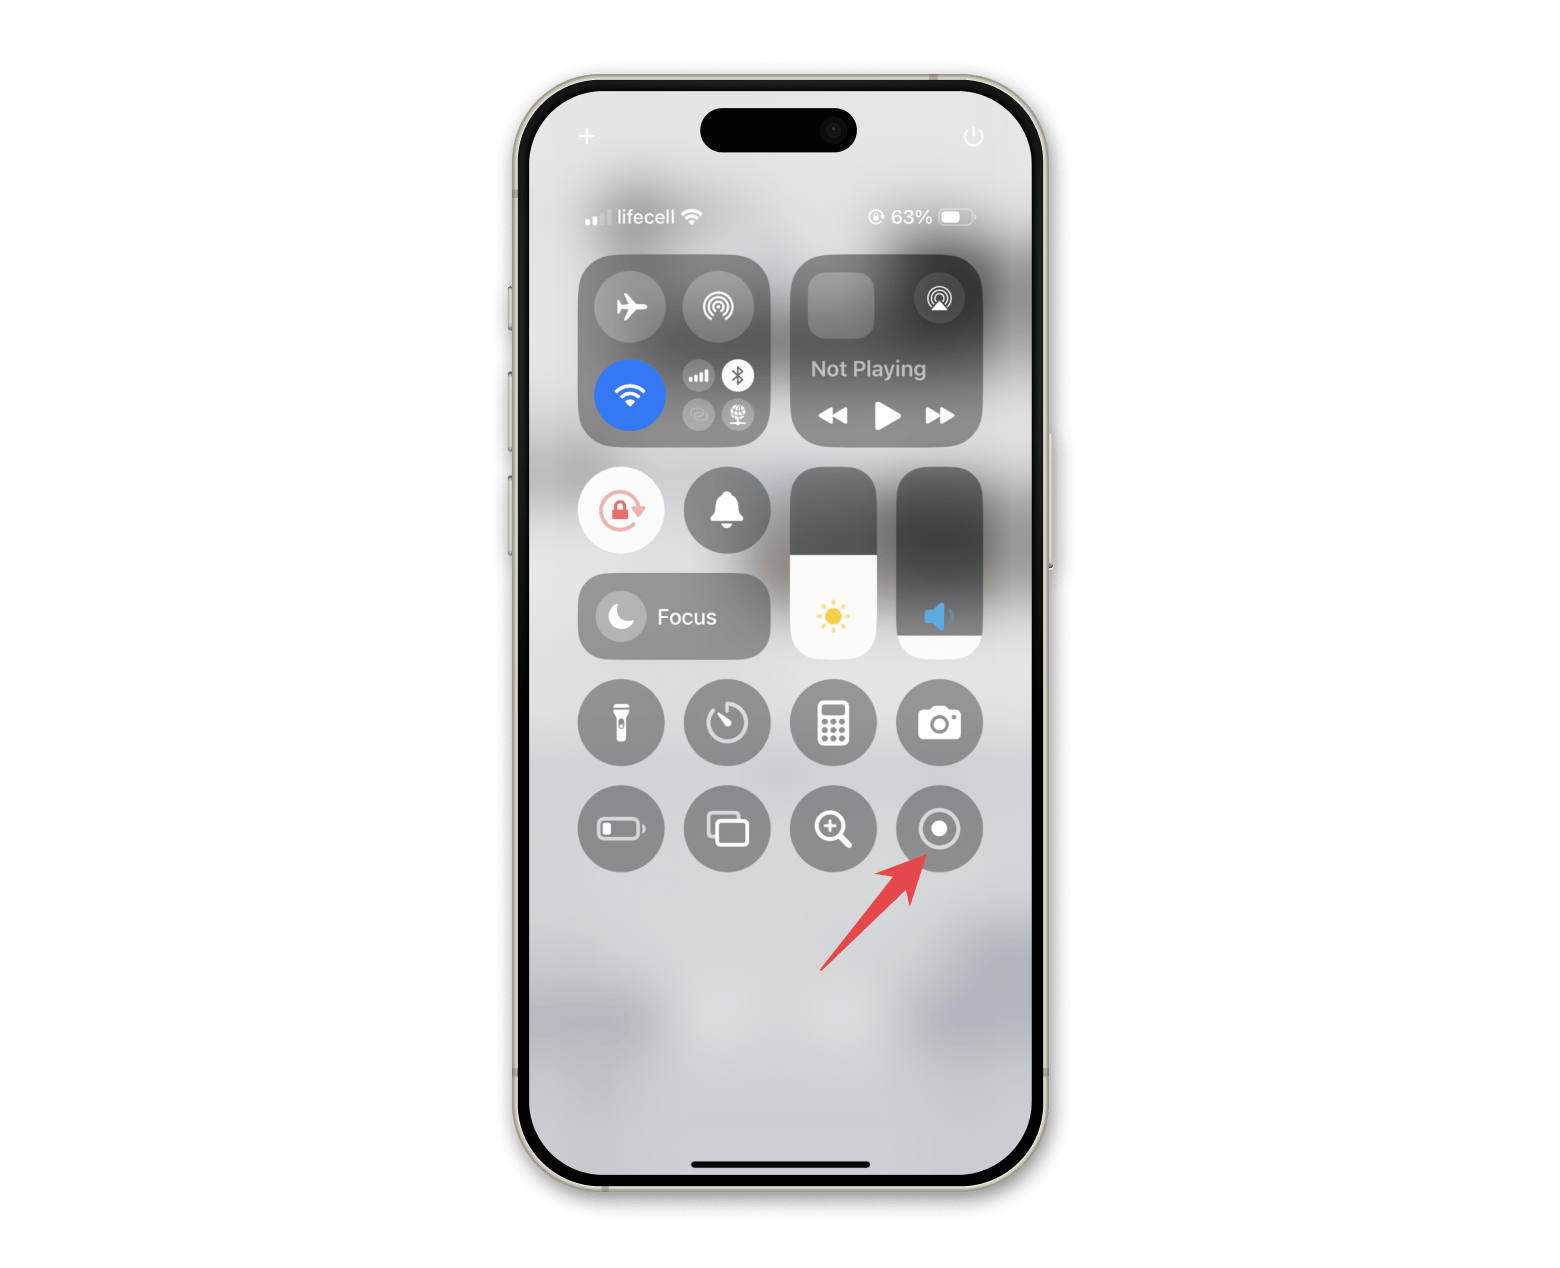
Please check if there is a screen capture button in your iPhone's or iPad's Control Center. Swipe down from the top right of your screen and look for a dot inside a circle. That's what the Screen Recording button looks like.
If you don't see the button in the Control Center, here's how to add screen recording on iPhone with iOS 26:
- Open the Settings app > Control Center and make sure the option for Access Within Apps is turned on.
- Go back to Control Center by swiping down from the top right corner.
- Click the “+” icon at the top left corner > Click Add a Control.
- Under Display & Brightness, choose Screen Recording.
I still use iOS 18, but the instructions remain the same for newer iOS versions.
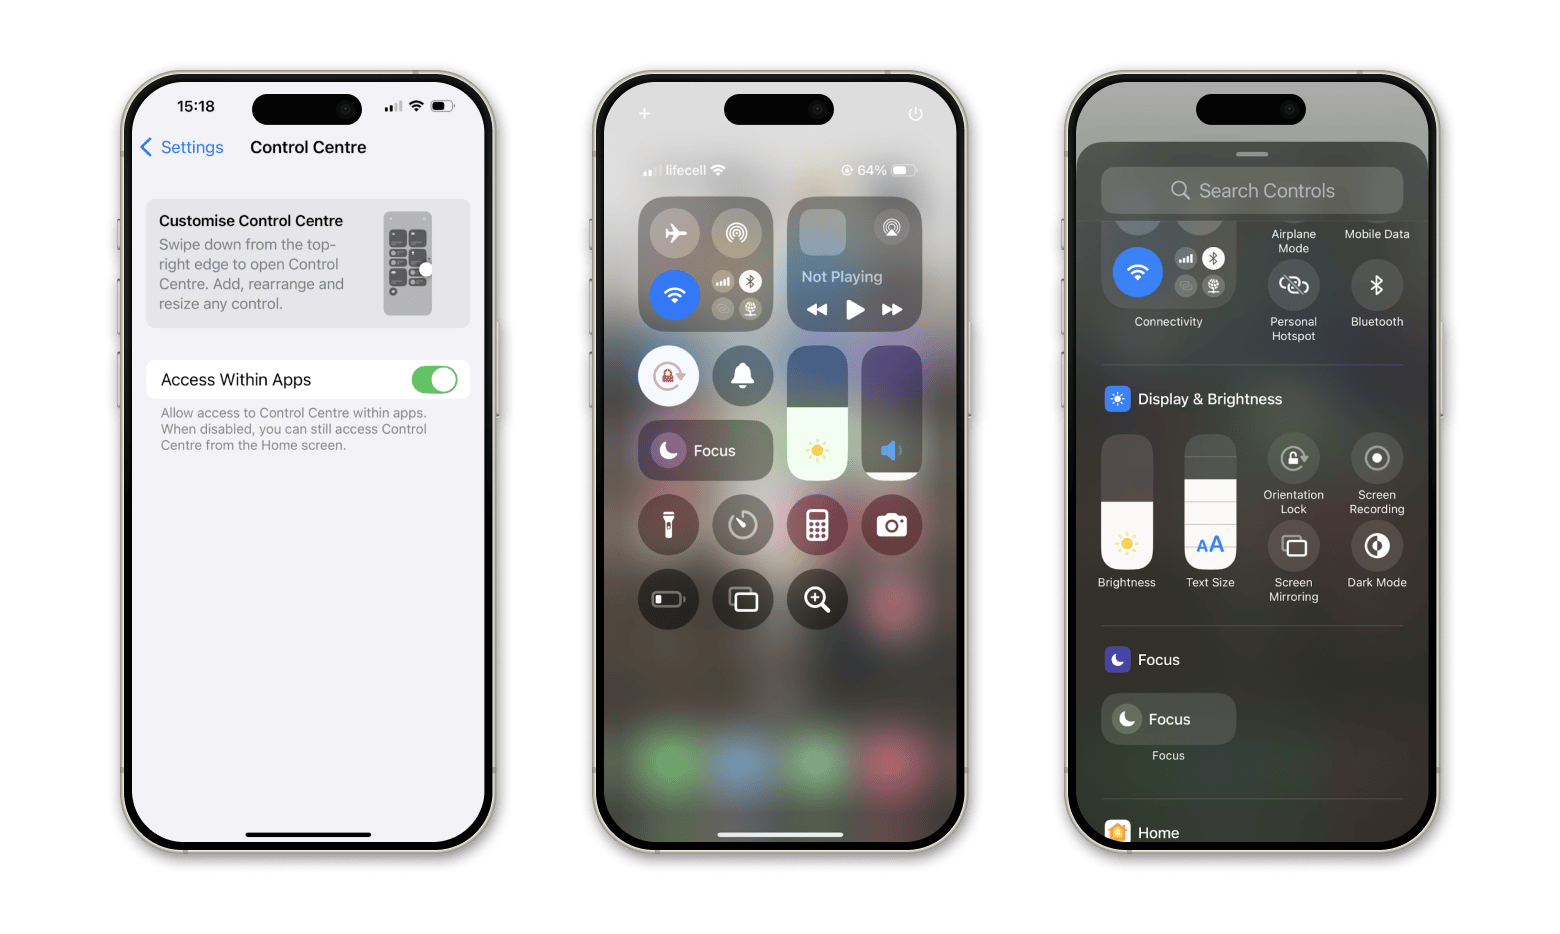
After this, the button will appear in the Control Center, and you will be able to screen record your iPhone.
How to start screen recording
With screen recording now enabled on your iPhone or iPad, you're all set to begin recording. Ready?
Here's how to record the screen on an iPhone:
- Swipe down from the top right corner to access Control Center. On some iPhone models, you'll need to swipe up to open the Control Center.
- Tap the screen recording button.
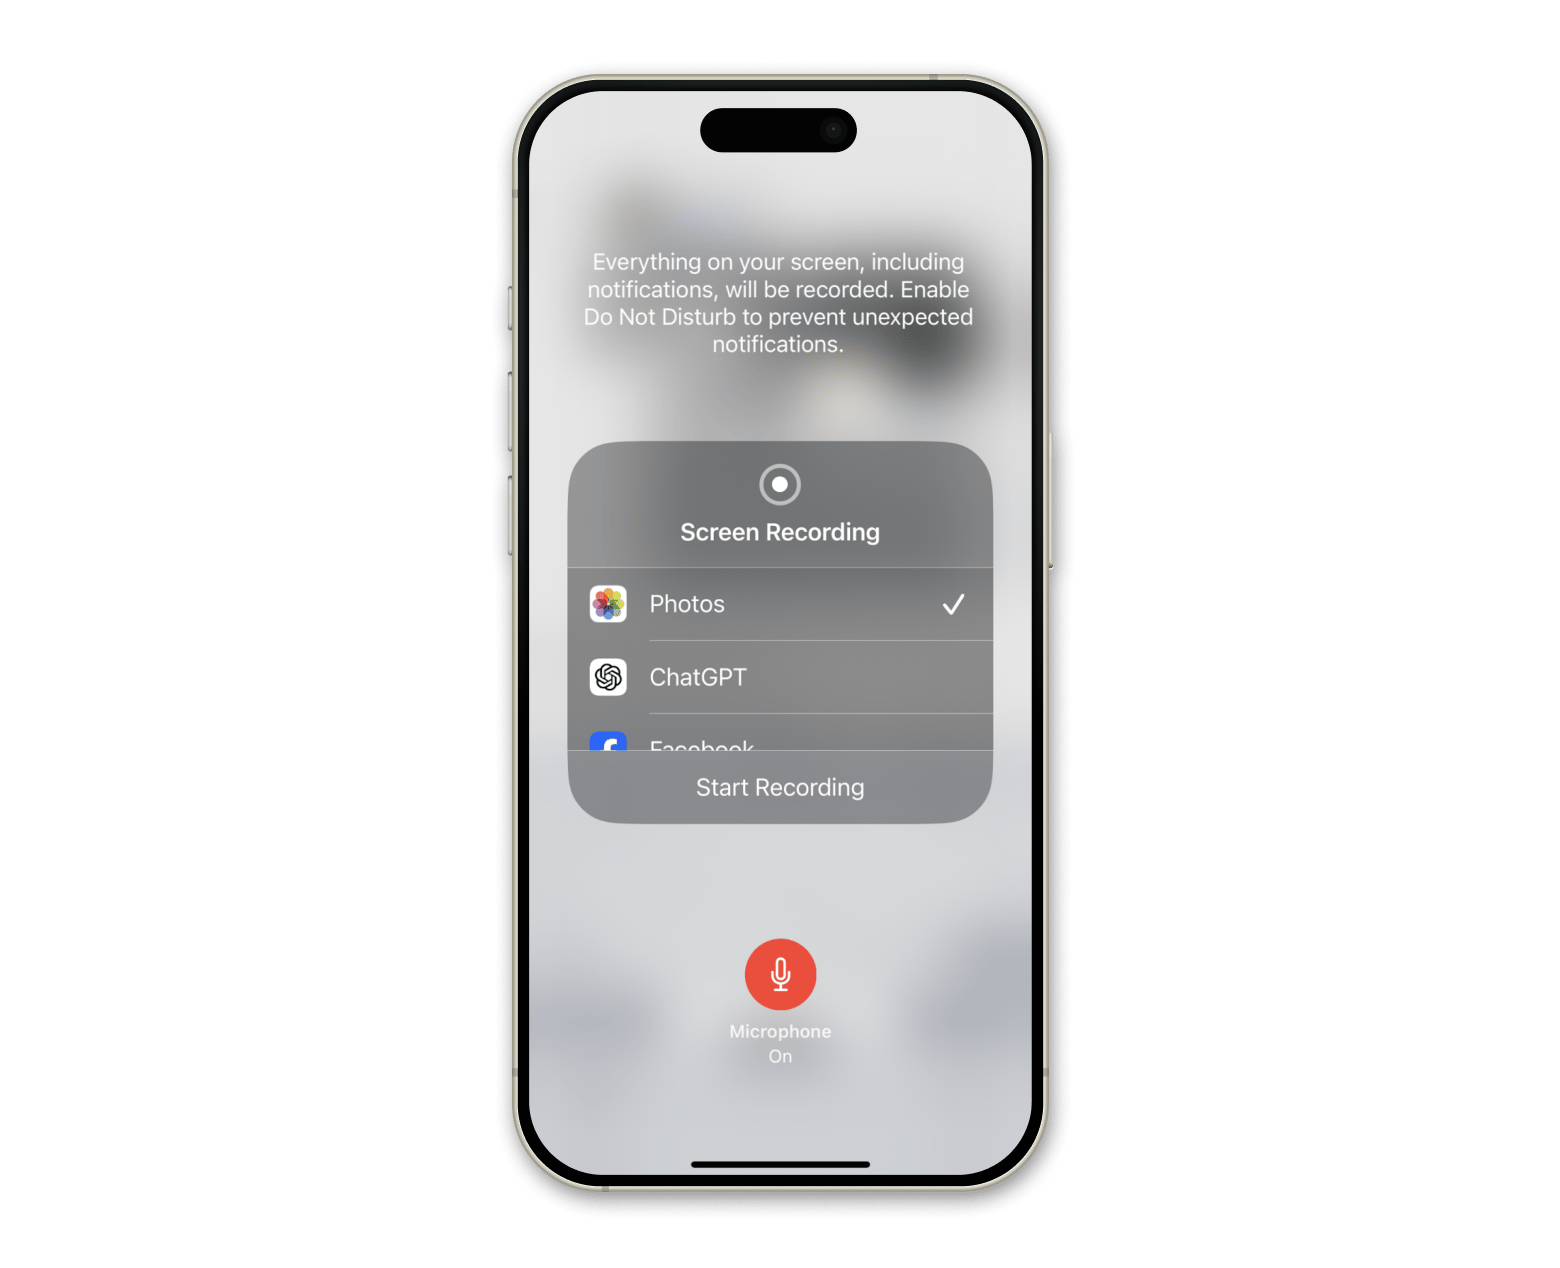
I recommend you add audio to your screen recordings. This might be helpful if you want to record a walkthrough tutorial, for example. To add external audio, such as your voice, turn on your microphone. I'll show you how.
Here's how to screen record with audio on iPhone:
- Swipe down from the top right corner of your screen to access the Control Center.
- Then, long-press the Screen Recording button and tap the microphone icon to turn it on.
- Now, tap Start Recording.
How to end and save screen recording
To stop your recording, follow the steps below:
- Open the Control Center.
- Tap the Screen Recording button once more.
- Alternatively, you can tap the red status bar at the top of your screen and choose Stop.
Once you stop recording, your video is automatically tucked away in the Photos app. From there, you can tweak it with some basic edits or share it with friends.
How to edit a screen recording
Now you know how to turn on screen recording on iPhone and iPad with iOS 18. Want to make what you've captured clearer for your mom, colleague, or friend? Now, I will show you how to edit your screen recording on iPhone.
First, let's find your screen record on your iPhone to edit:
- Open your Photos app.
- Tap the video that you recorded.
- Next, tap the edit icon at the bottom (for iOS18 and later) or tap Edit at the top right corner (for iOS 17 and earlier).
- To set where the video starts and ends, drag the edges of the timeline. Find this option at the bottom of your video.
- Then, play the video to check if everything is all right and you're happy with how it looks.
- Tap Done.
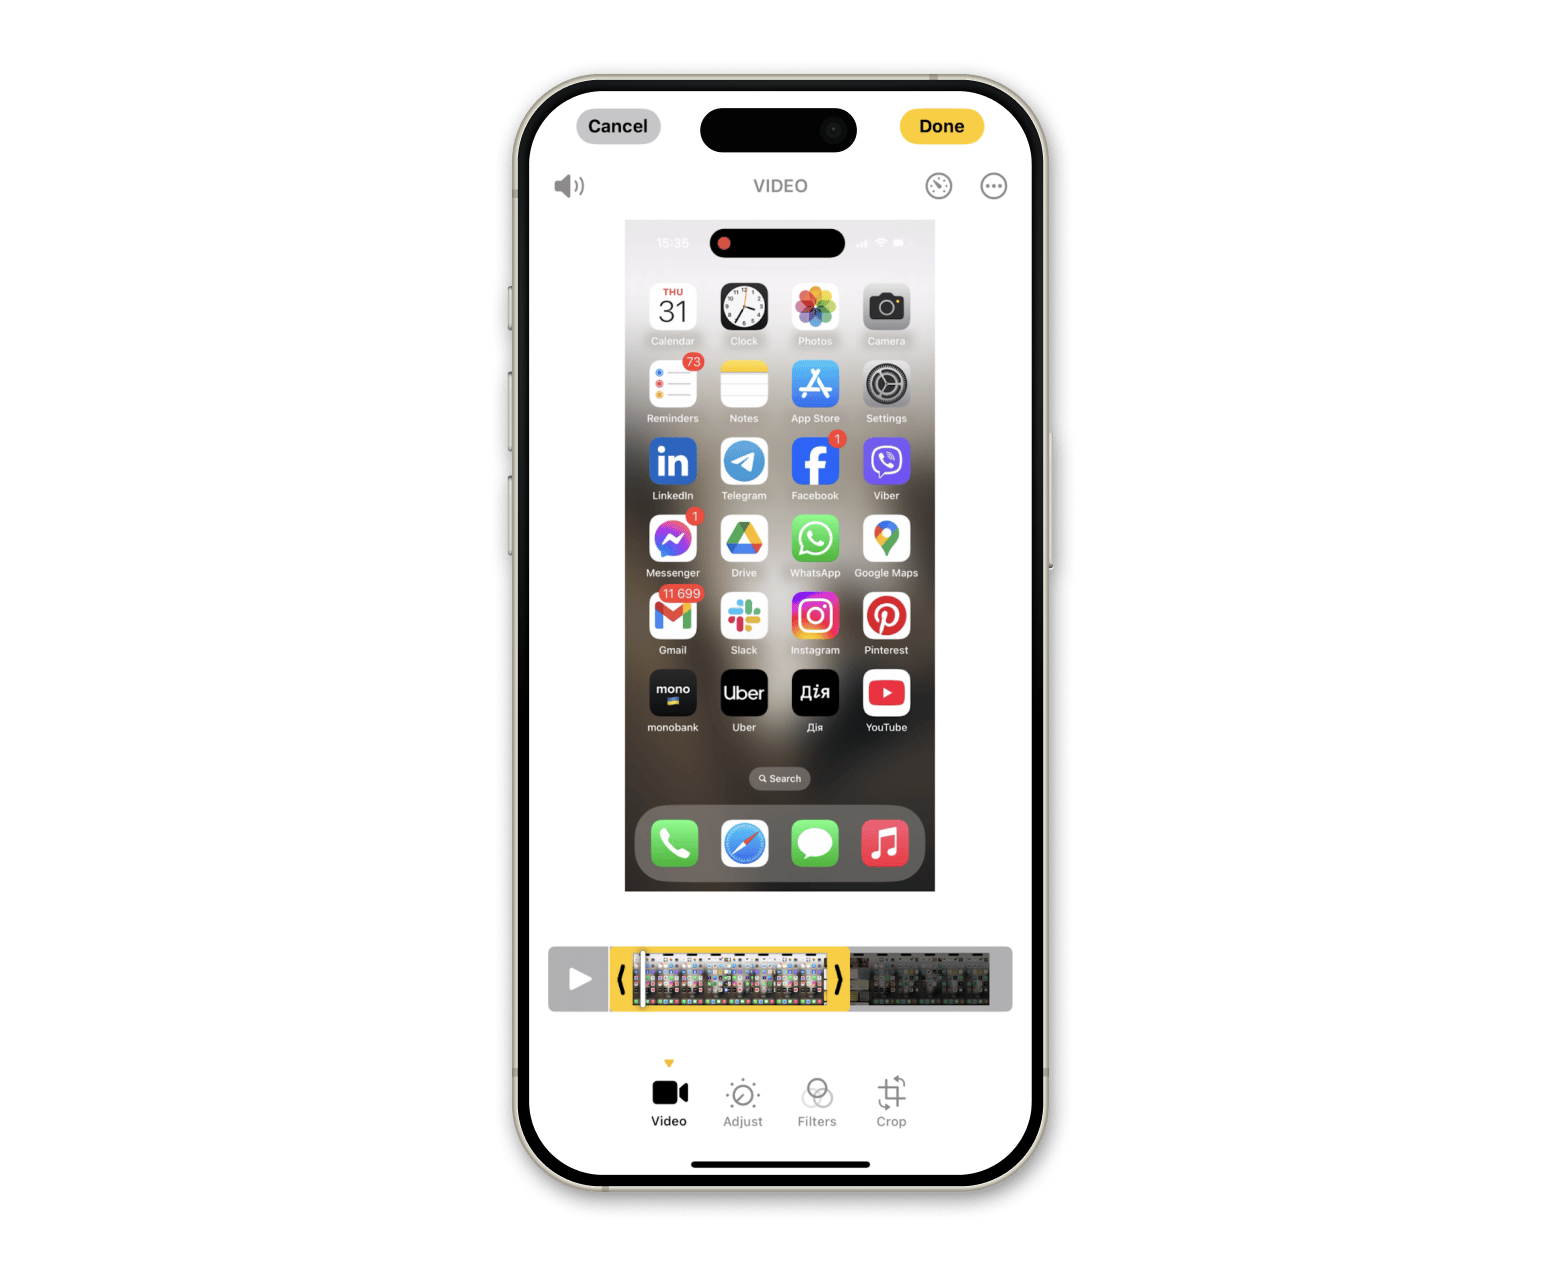
You can improve your video even more. Tap the Adjust button to adjust brightness, contrast, shadows, and saturation. Use Filters to apply preset filters and change the look of your video. Finally, rotate or crop your video if you want.
Bonus tip: Add cover image to your screen record
In the next section, I'll show you how to share what you've recorded. But let's first talk about one important thing — a cover image.
Most sharing services require a cover image to showcase your video. It's no surprise that your cover image should be awesome to get people to click and watch. Of course, you can use any photo from your Library or take a screenshot with the iPhone's built-in tool, but it's really not that precise. Let me show you my method.
I use SnapMotion. For me, it is the most convenient way to take quality images from videos.
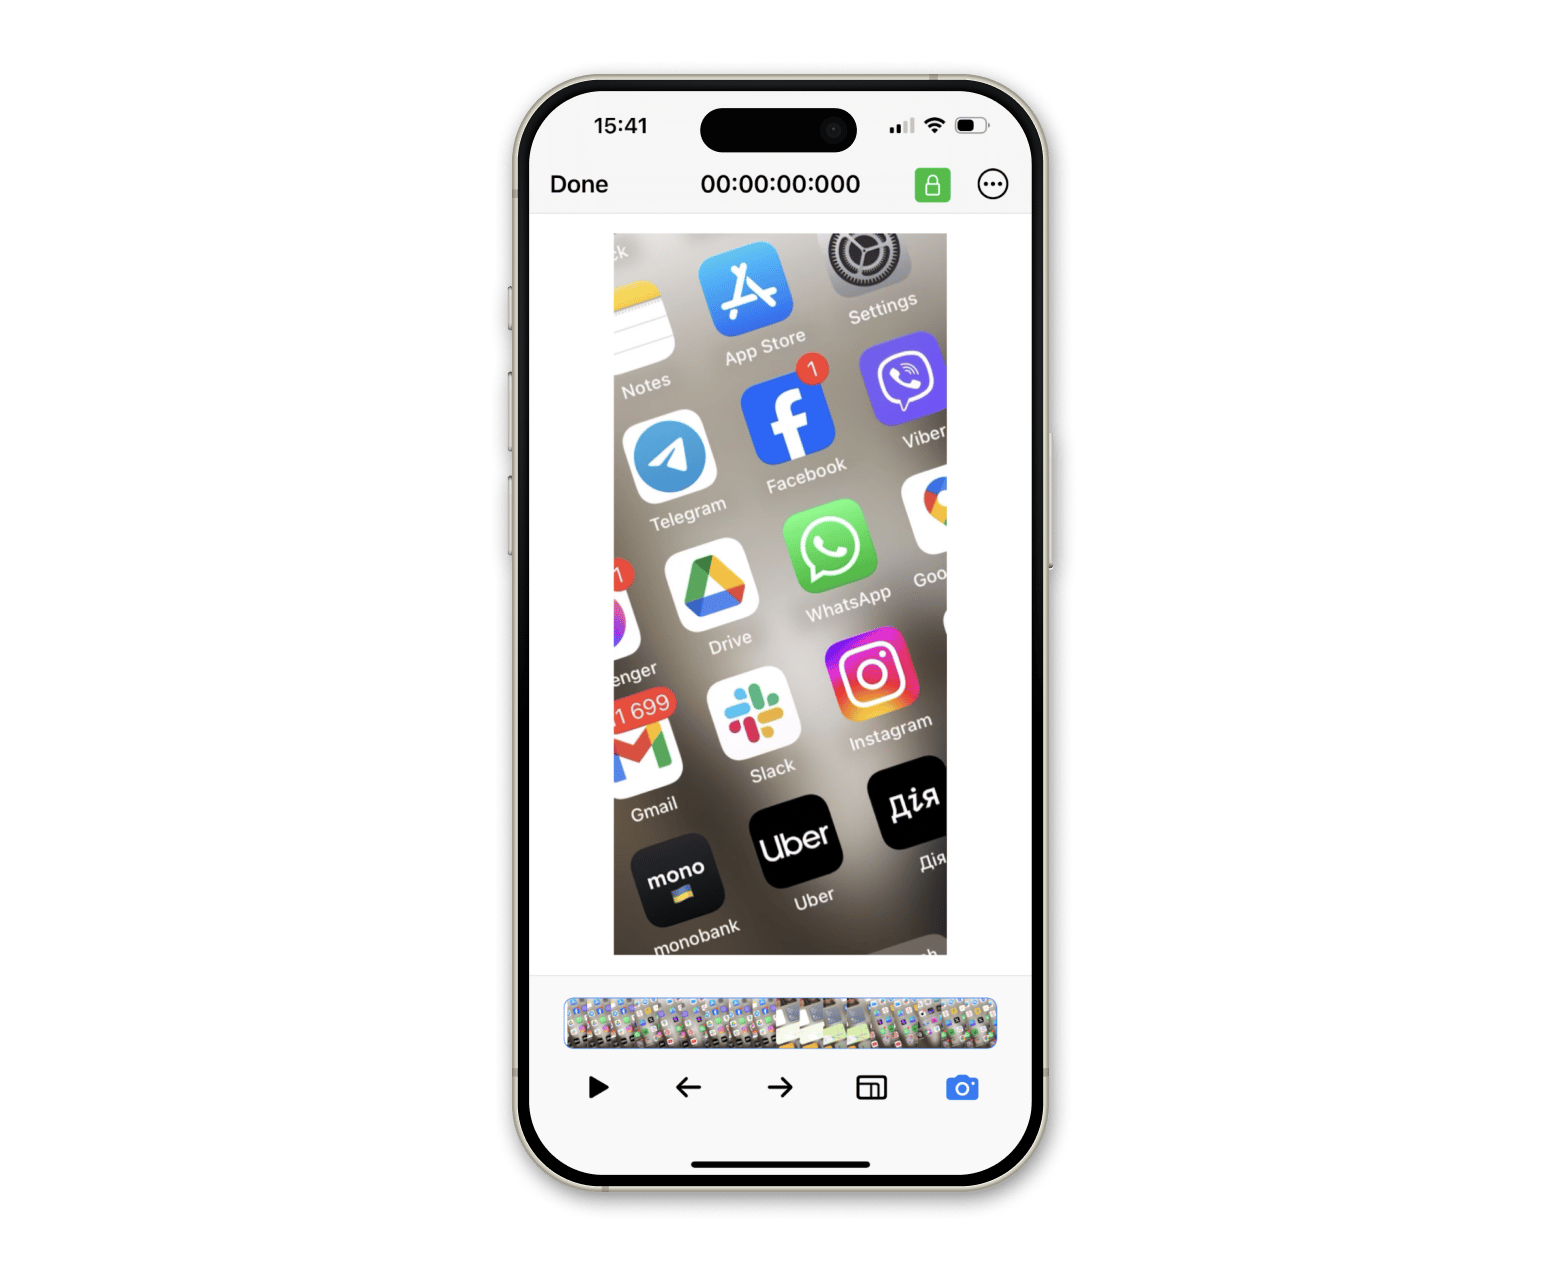
The app measures video speed down to the thousandths of a second, allowing you to select the exact moment you want to feature as your cover. Even if you've recorded a video in a vertical orientation and need to upload a screenshot in a horizontal orientation, no problem. Simply flip the video directly into SnapMotion. You can also take as many screenshots as you want, all in seconds!
How to share a screen recording
If you didn't record your phone screen to save a moment for yourself, you probably want to share your recording.
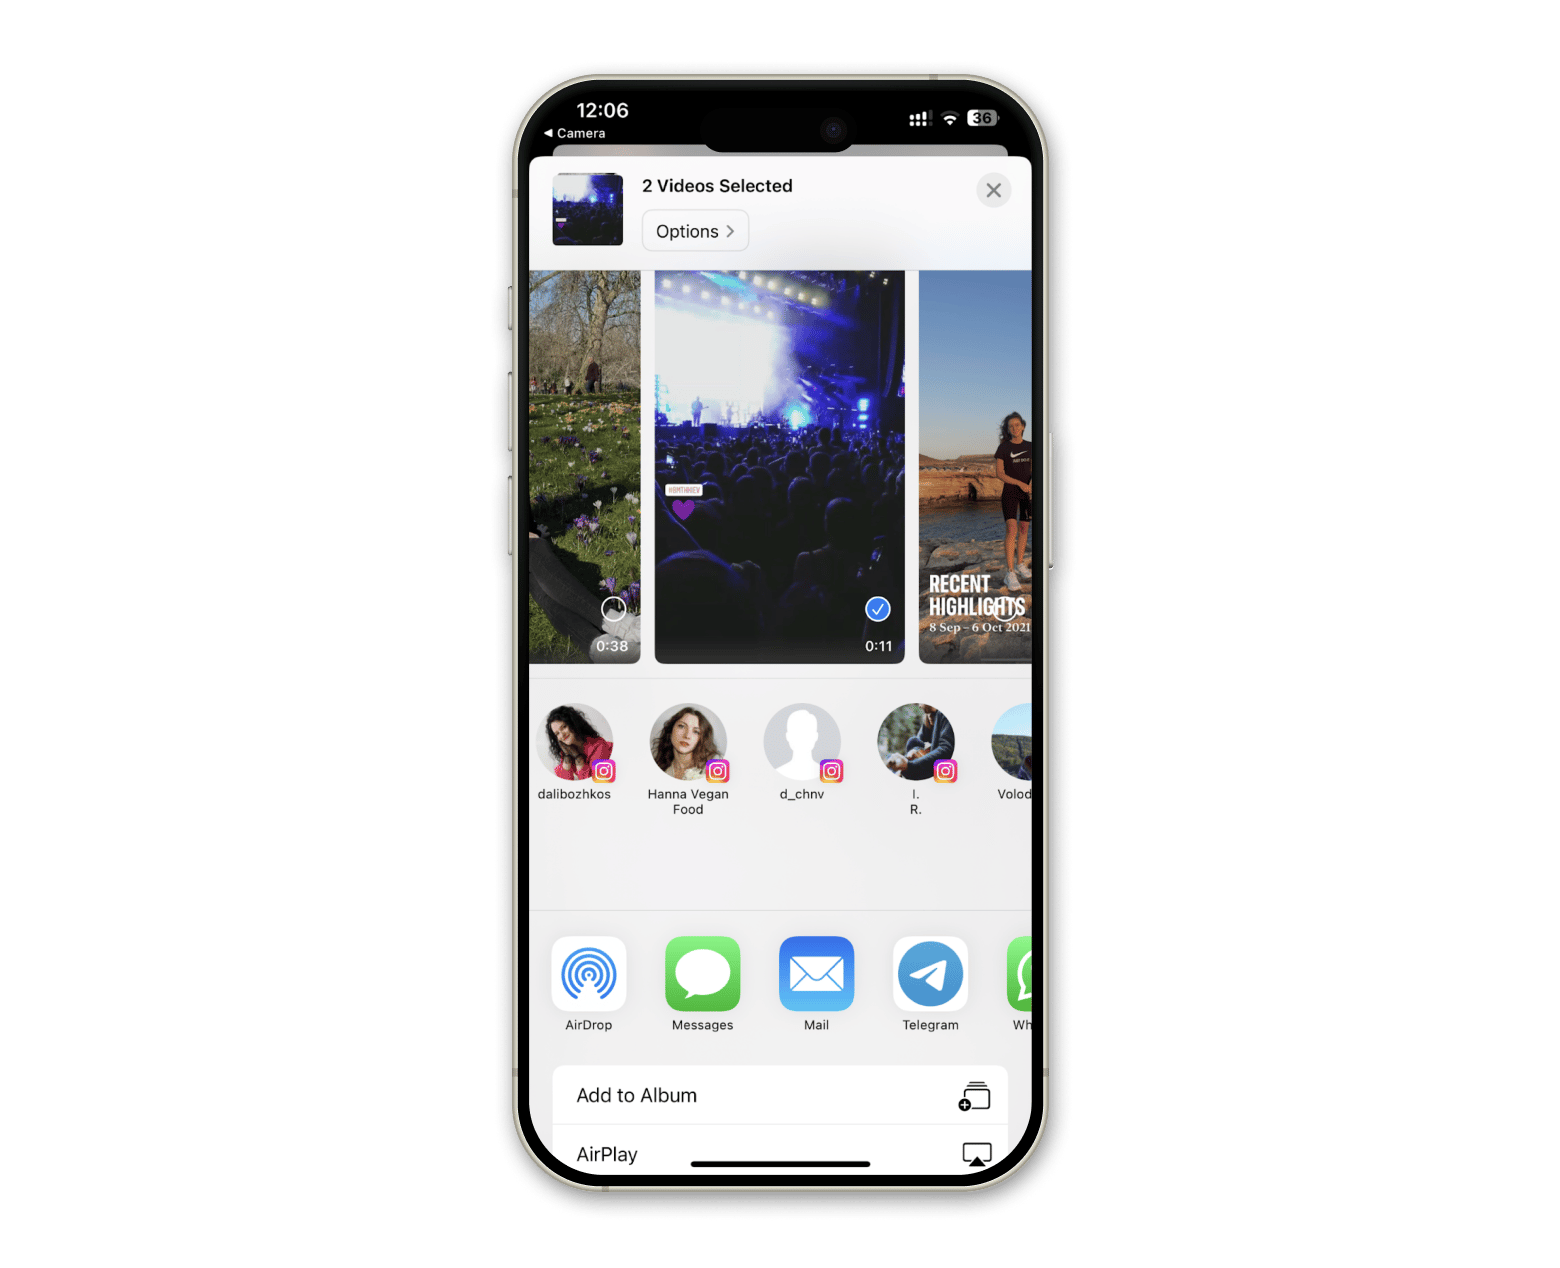
Just like a normal video or photo, you can share it via email, AirDrop, Messages, Instagram, or WhatsApp.
To share screen recordings on iOS, do that:
- Open the screen recording you've made.
- To see the options available to you, tap the Share icon (the first icon in the bottom left corner of the screen).
Record your iPhone screen by connecting to a Mac
The iPhone's screen recorder is handy, but sometimes it doesn't have all the options you want. This is especially true when you need to do a bit of editing on it. So, I want to show you how to use your Mac instead. For me, it's a great way to get more control over your recordings.
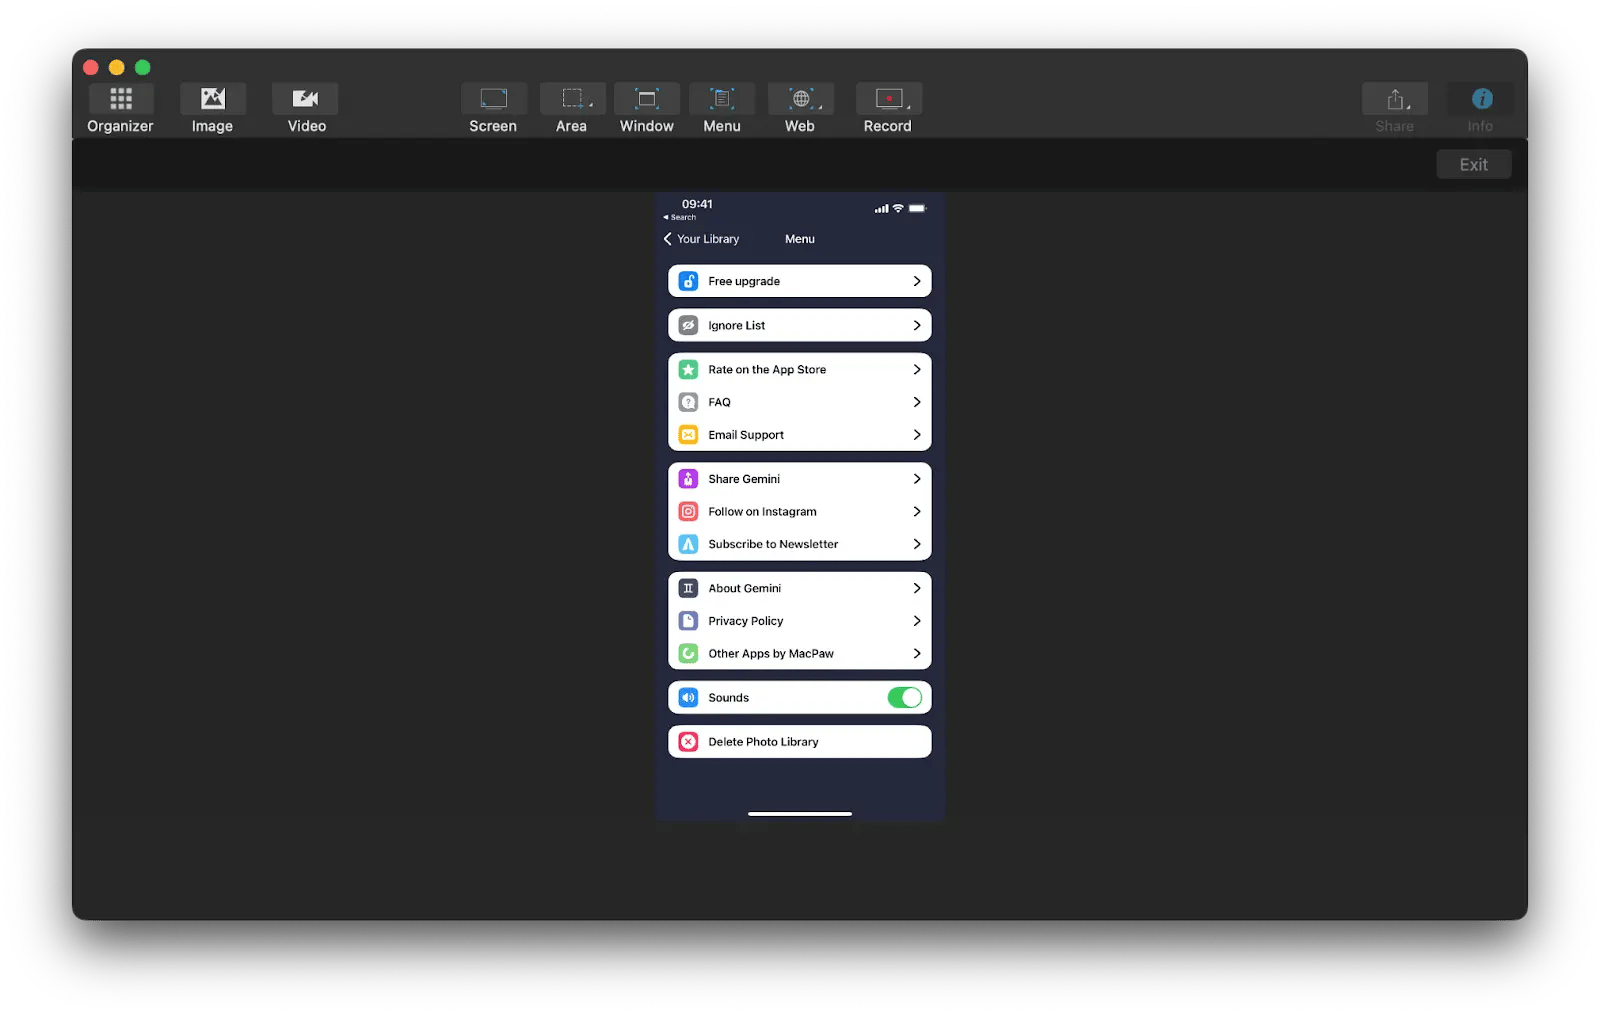
The method is pretty straightforward. You need to connect your iPhone or iPad to a Mac using the Capto app. It lets you record the screen of your iOS device while you're on a Mac.
The main reason I use the app is that once you're done recording, you can use Capto's editing tools to trim, crop, and add effects to your video before sharing it with others.
To screen record your iPad or iPhone with Capto, follow the steps below:
- Connect your iPhone or iPad to your Mac with a USB cable.
- Open the Capto app on your Mac.
- In Capto, click the Record button at the top of the window. This will open a dropdown menu.
- The next step is for Capto to detect your iOS device. Click on it to display it on the screen.
- To start recording your iOS device screen, click the red Record button.
- Once you've finished, click the same button to end the recording.
- Capto automatically saves your recording in its library. To edit your recording, select it from the library and use the editing tools provided by Capto.
- You can then export and share what you've recorded in various formats, including MP4, AVI, and MOV.
Create professional videos with iShowU
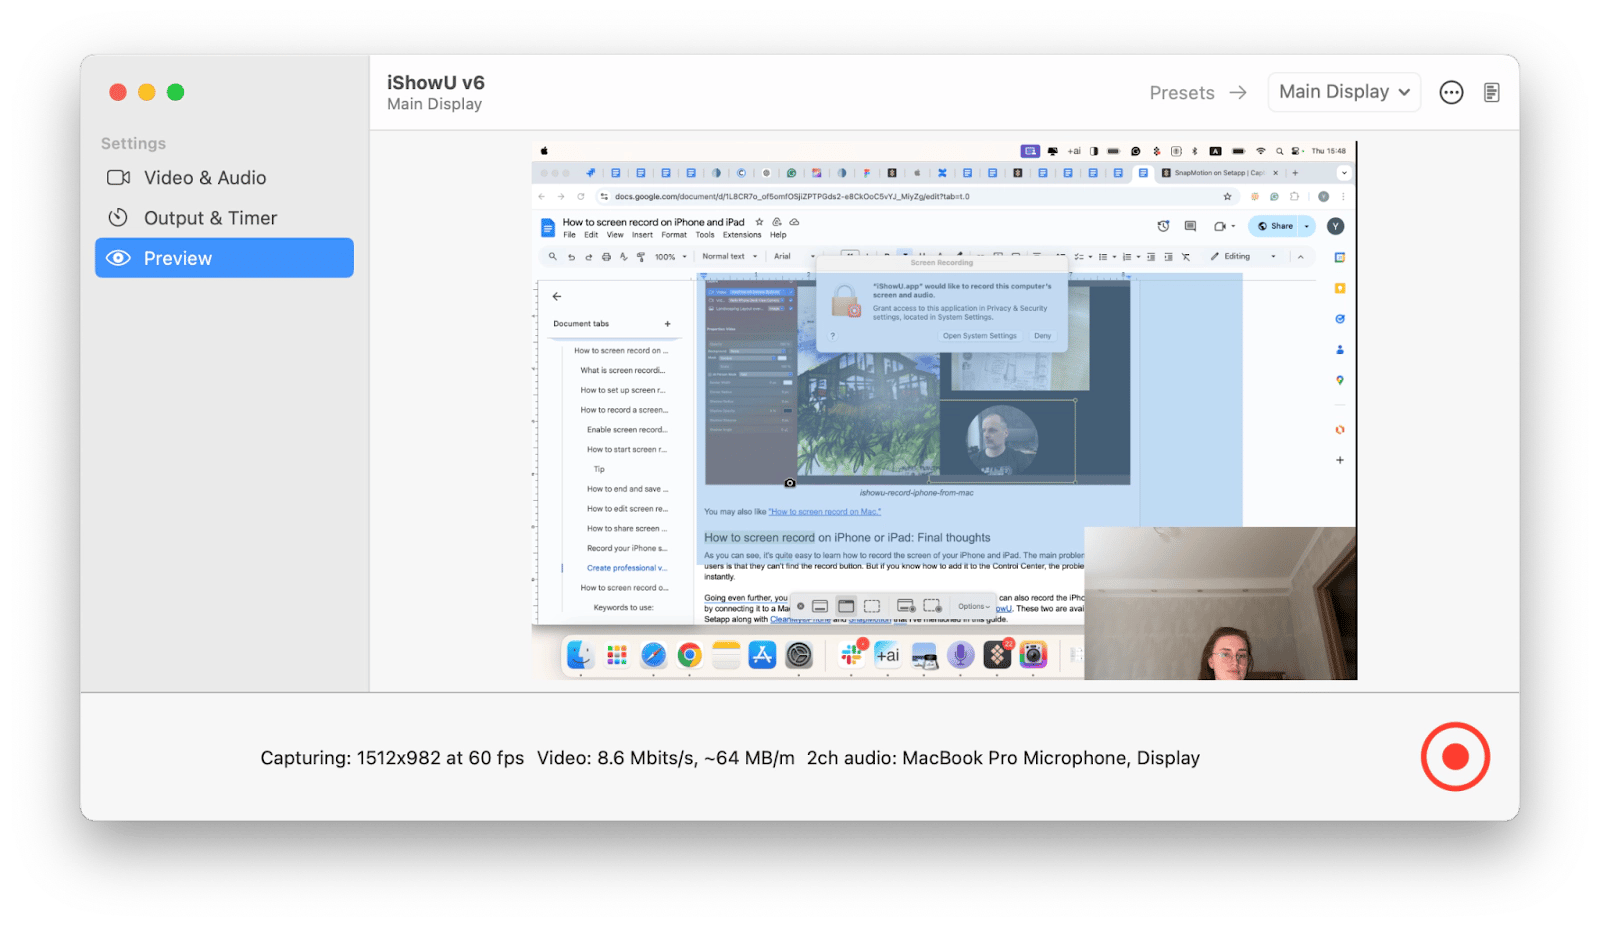
I love Capto, but there's another cool tool that deserves your attention — iShowU. It also allows recording directly from your connected iOS devices.
iShowU differs from Сapto in that it has many advanced features on how to screen record on Mac. For example, you can personalize your content by layer editing and uploading your own images. What I like even more is that you can use the AI background removal tool to make your tutorials look more professional. Another killer feature is the ability to record audio from an application and the user's microphone at the same time while still playing back the application audio to the user.
What is screen recording?
If you're wondering what is screen recording on iPhone and iPad, I can help.
Screen recording is a tool that lets you record what's happening on your screen. It works like this: You capture your screen. Then you save the video and watch it later. Or you can share it with others.
Want to know how I use the feature? For me, it's a great way to show someone how I use an app or how I fix something on my iPhone. I also like to screen-record reels with recipes or knitting tutorials and share them with my mom.
Want to use screen recording, too? You must own an iPhone or iPad with iOS 11 or later. Previous versions don't support the feature.
How to screen record on iPhone or iPad: Final thoughts
As you can see, it's quite easy to learn how to record the screen of your iPhone and iPad or how to screen record on iPhone with sound. The main problem of many users is that they can't find the record button. But if you know how to add screen recording on iPhone to the Control Center, the problem is solved instantly.
Going even further, you can edit your screen recordings using the Photos app. You can also record the iPhone screen by connecting it to a Mac. For this, I recommend applications called Capto and iShowU. These two are available on Setapp along with CleanMy®Phone and SnapMotion that I've mentioned in this guide.
Setapp is a platform with more than 260 outstanding apps and utilities for Mac and iOS that can solve almost any task you can imagine. The best part? All the apps are free to try for seven days for all new users. Give Setapp a try today and save time and money!
FAQ
How do I turn on screen recording on iPhone?
You can turn on screen recording on iPhone by going to Settings > Control Center and making sure Access Within Apps is on. Then add the Screen Recording button if it’s not already in your Control Center. Swipe down from the top-right corner (or up on older iPhones) and tap the circle-with-dot button to start recording.
How do I add screen recording to iPhone Control Center?
Adding screen recording to your Control Center is simple. Open Settings > Control Center, tap + Add next to Screen Recording, and the button will now appear in your Control Center for quick access.
How do I enable screen recording on iPhone with sound?
You can enable sound in your screen recording by long-pressing the Screen Recording button in Control Center and tapping the microphone icon. This captures both your voice and system audio during the recording.
Where are screen recordings saved on iPhone?
Screen recordings are automatically saved in the Photos app, where you can trim, edit, adjust colors, add filters, or share via AirDrop, Messages, email, or social media.


