Top 5 benchmark apps for Mac performance tests
Benchmark tests are a key part of my laptop maintenance routine. After much trial and error, I’ve selected Mac benchmark tools I believe are the best for this purpose and want to share them with you. These tools will help you easily perform tests — whether you're a beginner or experienced — and provide insights on how to improve your Mac’s performance.
What are the most common Mac benchmarks?
While user benchmarks are great, what exactly do they measure? In general, there are six common metrics that Mac benchmark software performs: a CPU speed test, a RAM speed test, a GPU benchmark test, a network connection test, and a disk speed test Macs use to check how long it takes for information to be written on and read from your hard drives.
Here are the seven best apps to help you perform Mac speed tests quickly and effectively.
1. Test and compare your Mac's performance with Novabench
I’ll start with my go-to Mac performance testing tool, Novabench, which I consider an all-in-one solution. It runs a series of tests on your Mac and compares the results to other Macs (thousands are in their database) as well as a baseline. Here’s what Novabench does:
- checks CPU, GPU, memory, and storage;
- runs stress, bottleneck, and stutter tests;
- checks temperature, sensors, and battery health.
Despite the comprehensive list of tests, it usually takes my Mac no more than 2-5 minutes to complete them, which is fantastic. Once the tests are done, you’ll get a report that’s easy to interpret. Instead of a list of confusing numbers, you get clear explanations like "CPU is performing significantly below the expected range." Take a look at the screenshot:
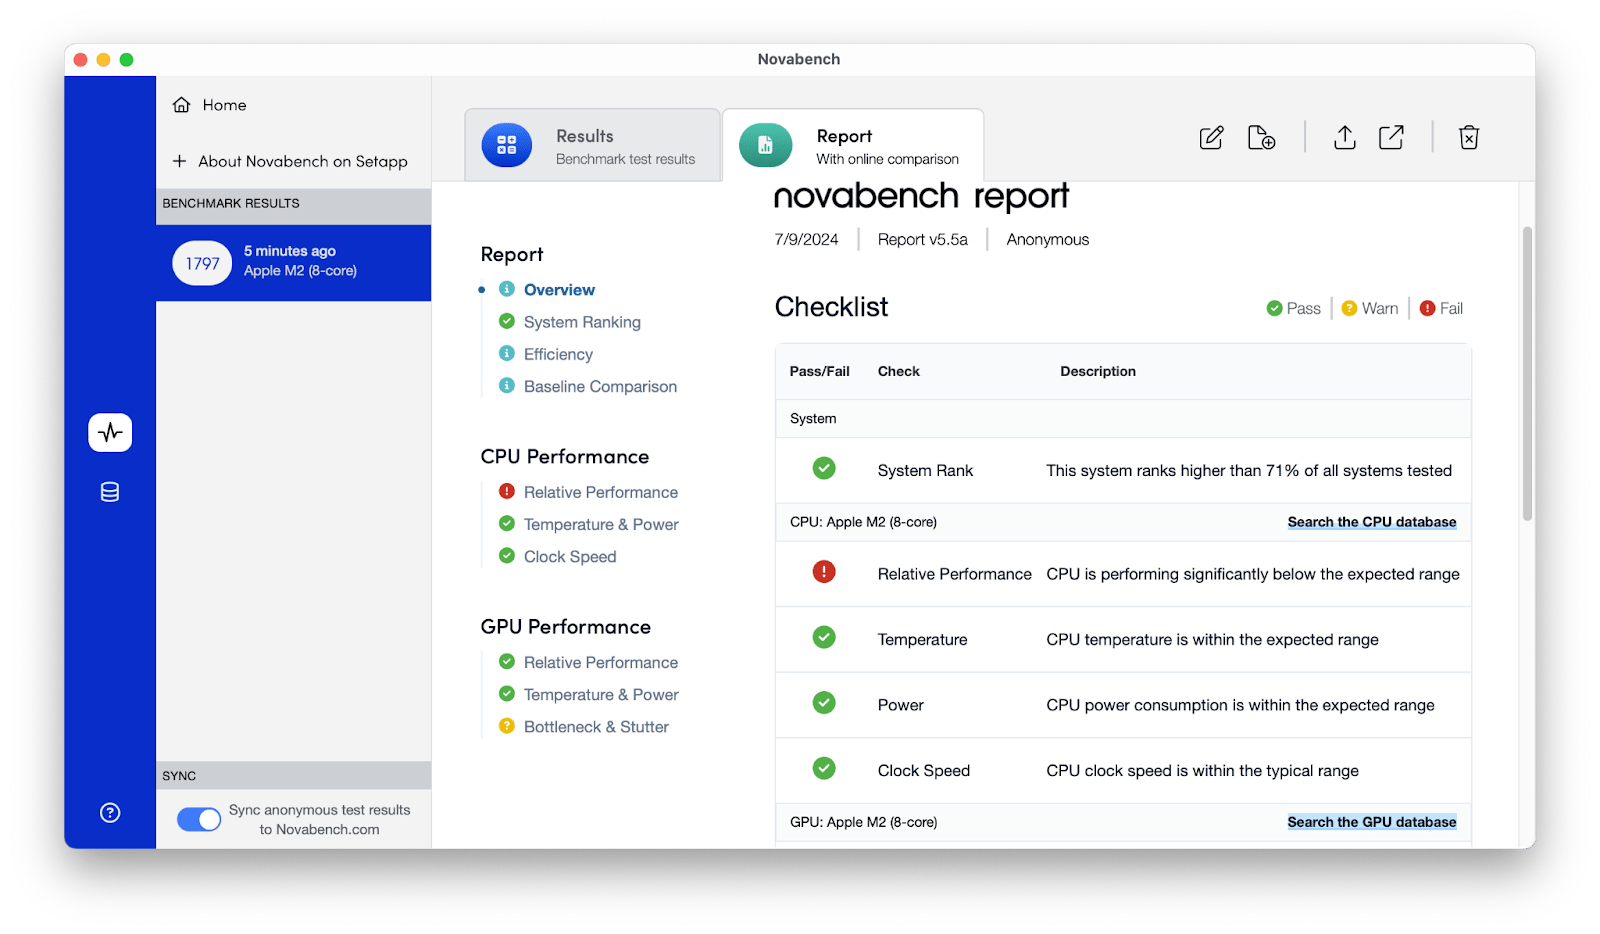
When I see such a result, I know exactly that I need to lower the CPU usage and take action. In my opinion, Novabench is one of the most reliable, visually appealing, and user-friendly benchmarking tools. You won't regret trying it.
2. Conduct CPU and GPU tests with Geekbench Mac
If you only need to test the CPU and GPU, I recommend giving Geekbench a try. Geekbench is a cross-platform (Mac, Linux, Windows) GPU and CPU test utility that measures the performance of your Mac against a widely publicized and well-known standard. For Geekbench 5, the passmark CPU was 1,000, as performed by an Intel Core i3-8100 chip.
Getting started with Geekbench couldn’t be easier — just download the app from the website and run the tests you need with a single click. Take a look at the screenshot. The interface is more than straightforward, right?

I like the way Geekbench works, but two factors bother me. First, the price — $99 — is a bit steep for a single tool with limited features (though that’s just my opinion). Second, the app can be a bit finicky — you’ll see a warning before the test: "Geekbench works best when it is the only application running." I wish I didn’t have to adjust my workflow for the application.
Otherwise, this tool is very good. With it, you can always be aware of how your Mac performs and potentially consider various tactics to improve it (closing Safari tabs, using fewer apps, etc.) or replace it altogether.
3. Check your hard drives with Blackmagic
The second most important parameter after CPU and GPU benchmarks is the hard drive speed test Macs can perform with the help of Blackmagic disk speed test Mac utility.
Blackmagic is as straightforward of an app as possible, with only one large interface button — Speed Test Start. Simply press the button to calculate your user benchmark score based on the performance of your hard drives. Done!

Make sure to undergo the tests regularly (once a quarter or so) to consider swapping your storage disks when they get too slow.
4. Manage your network with WiFi Explorer
Another crucial Mac performance test, especially since nearly all our work today takes place online, is measuring the efficacy of your network. After all, maybe it’s not your MacBook that should be replaced but your Wi-Fi provider?
WiFi Explorer is exactly the app you need to see how good your internet connection really is. It clearly maps out the strength of your signal, displays signal quality, and calculates the level of interference.

Anytime you think your Wi-Fi has been underperforming, just turn on WiFi Explorer and it’ll start to do its job automatically (press the play icon if not). Then you have the precise information to tell your ISP and get them to fix it or agree on a discount (hopefully), or both.
5. See all metrics in real time with iStat Menus
Tools that I mentioned earlier require you to run tests. If you’re looking for a solution to consistently monitor your Mac in real time, I don’t think you’ll find anything better than iStat Menus.
iStat Menus is one of the most comprehensive and unobtrusive Mac monitors on the market today. This utility lives in your menu bar and gives you a complete overview of what’s going on with your processor, graphics card, hard drives, memory, and various sensors.
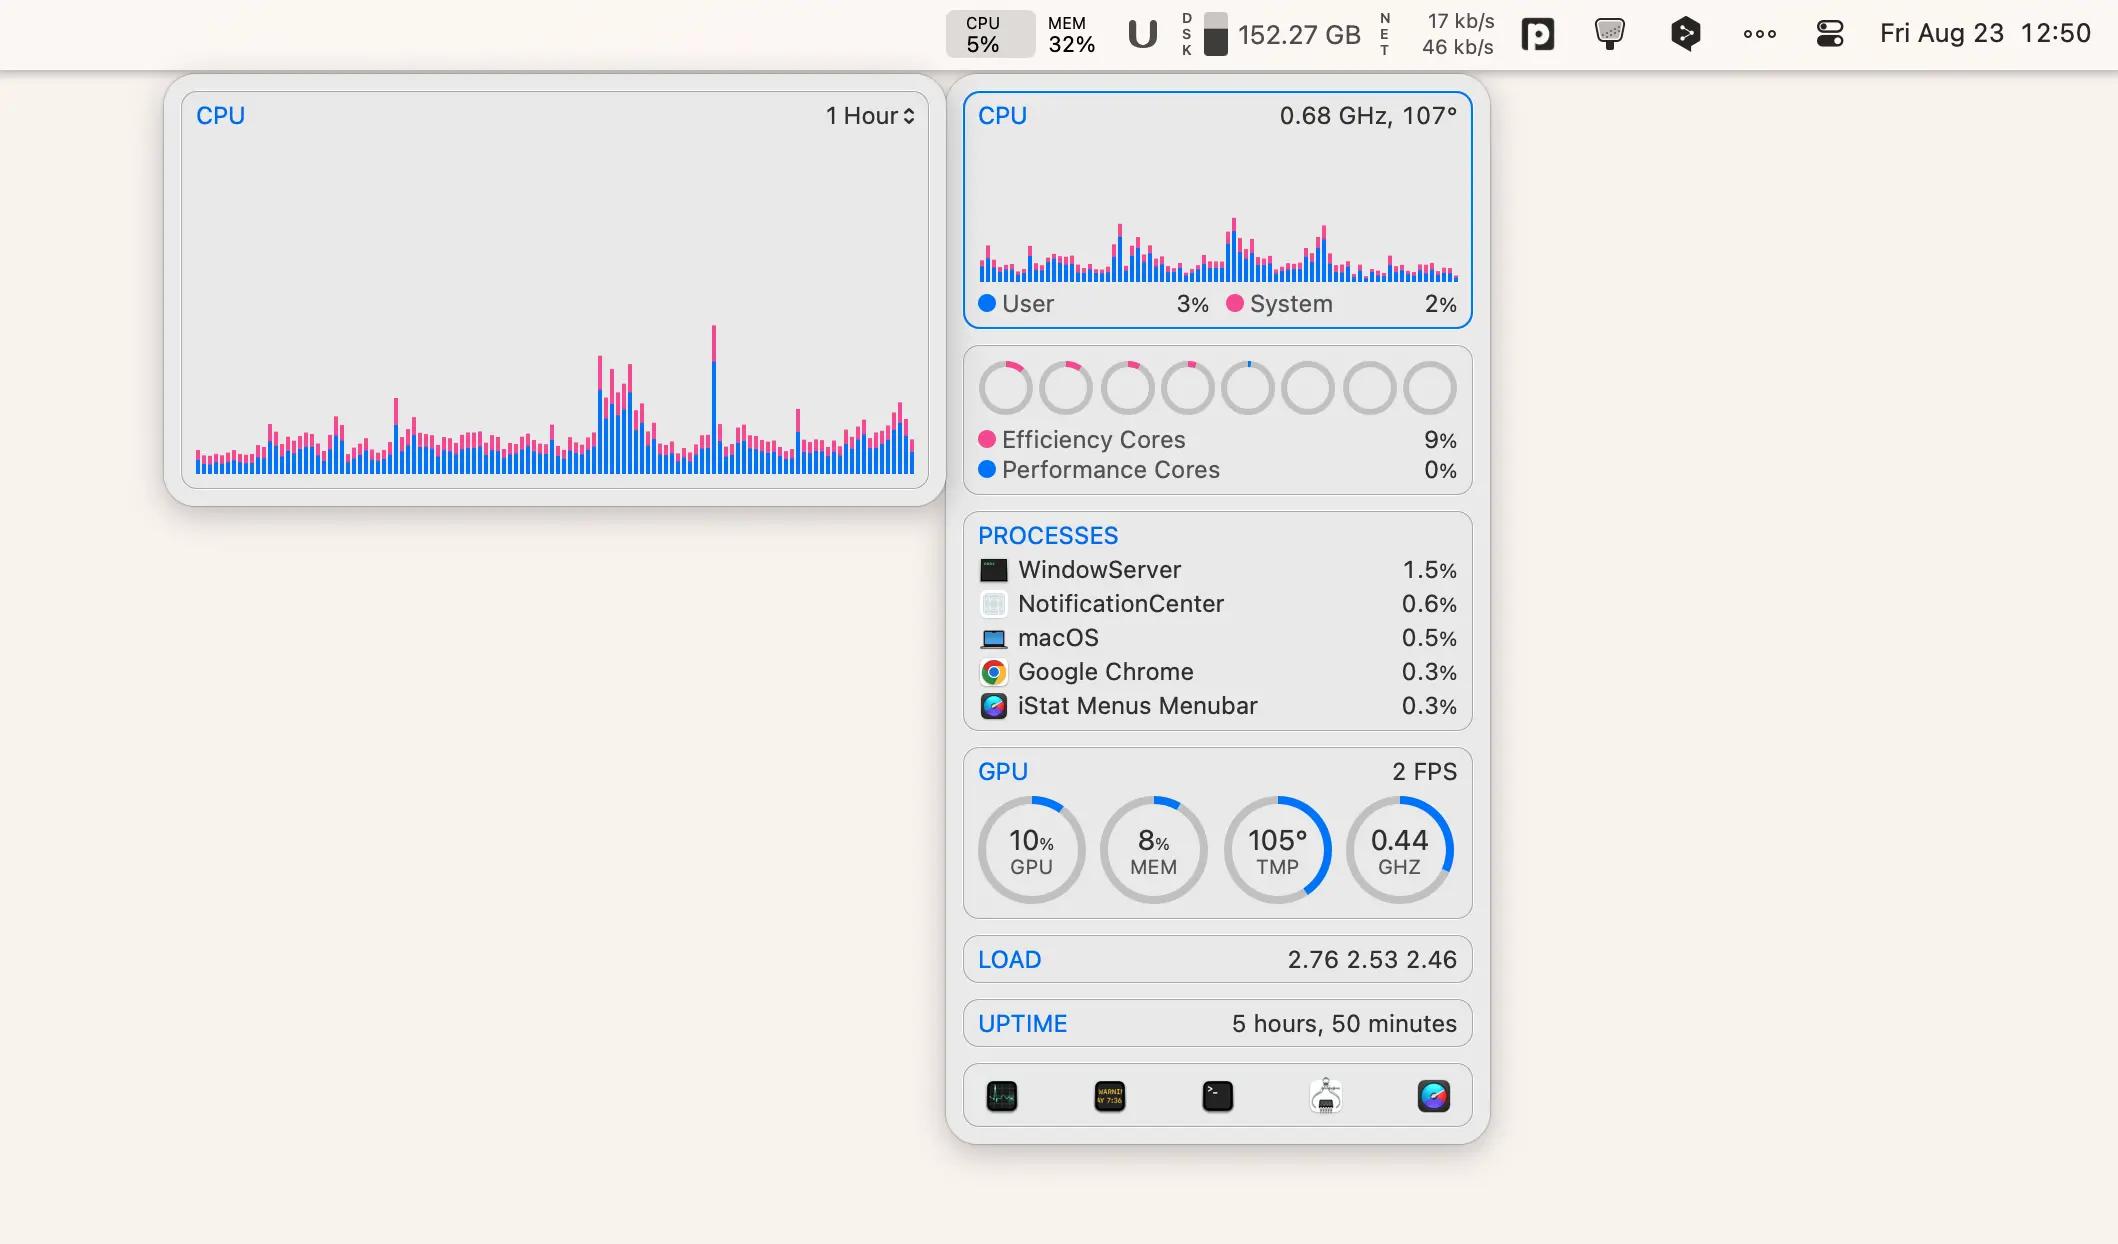
Unlike many other GPU and CPU benchmark tools, iStat Menus provides you with a real-time picture of what’s going on, so you can react to any issues as soon as they come up or see the dip in performance over time more clearly. All the best Mac performance tests in one!
6. Monitor Mac's performance through widgets
Usage is another app that tracks processor load, memory usage, network connectivity, battery health, and more. What sets it apart from similar apps is how it presents all this data in concise and visually appealing widgets on your desktop. With just one glance, you have all the information you need. I love it.
 7. Improve benchmark tests with CleanMyMac X
When iStat Menus and Usage are giving you clear indicators of user benchmarks not being reached, what do you do? Of course, you can run to the Apple Store and buy a new Mac, but a more sensible (and inexpensive!) solution would be to try to fix the problem with a good optimization tool.
I highly recommend CleanMyMac X, which is often regarded as the best optimization app on the market, able to perform a variety of tests to free up RAM, speed up your hard drives, clear useless cache files, and smoothen your Mac’s performance overall.
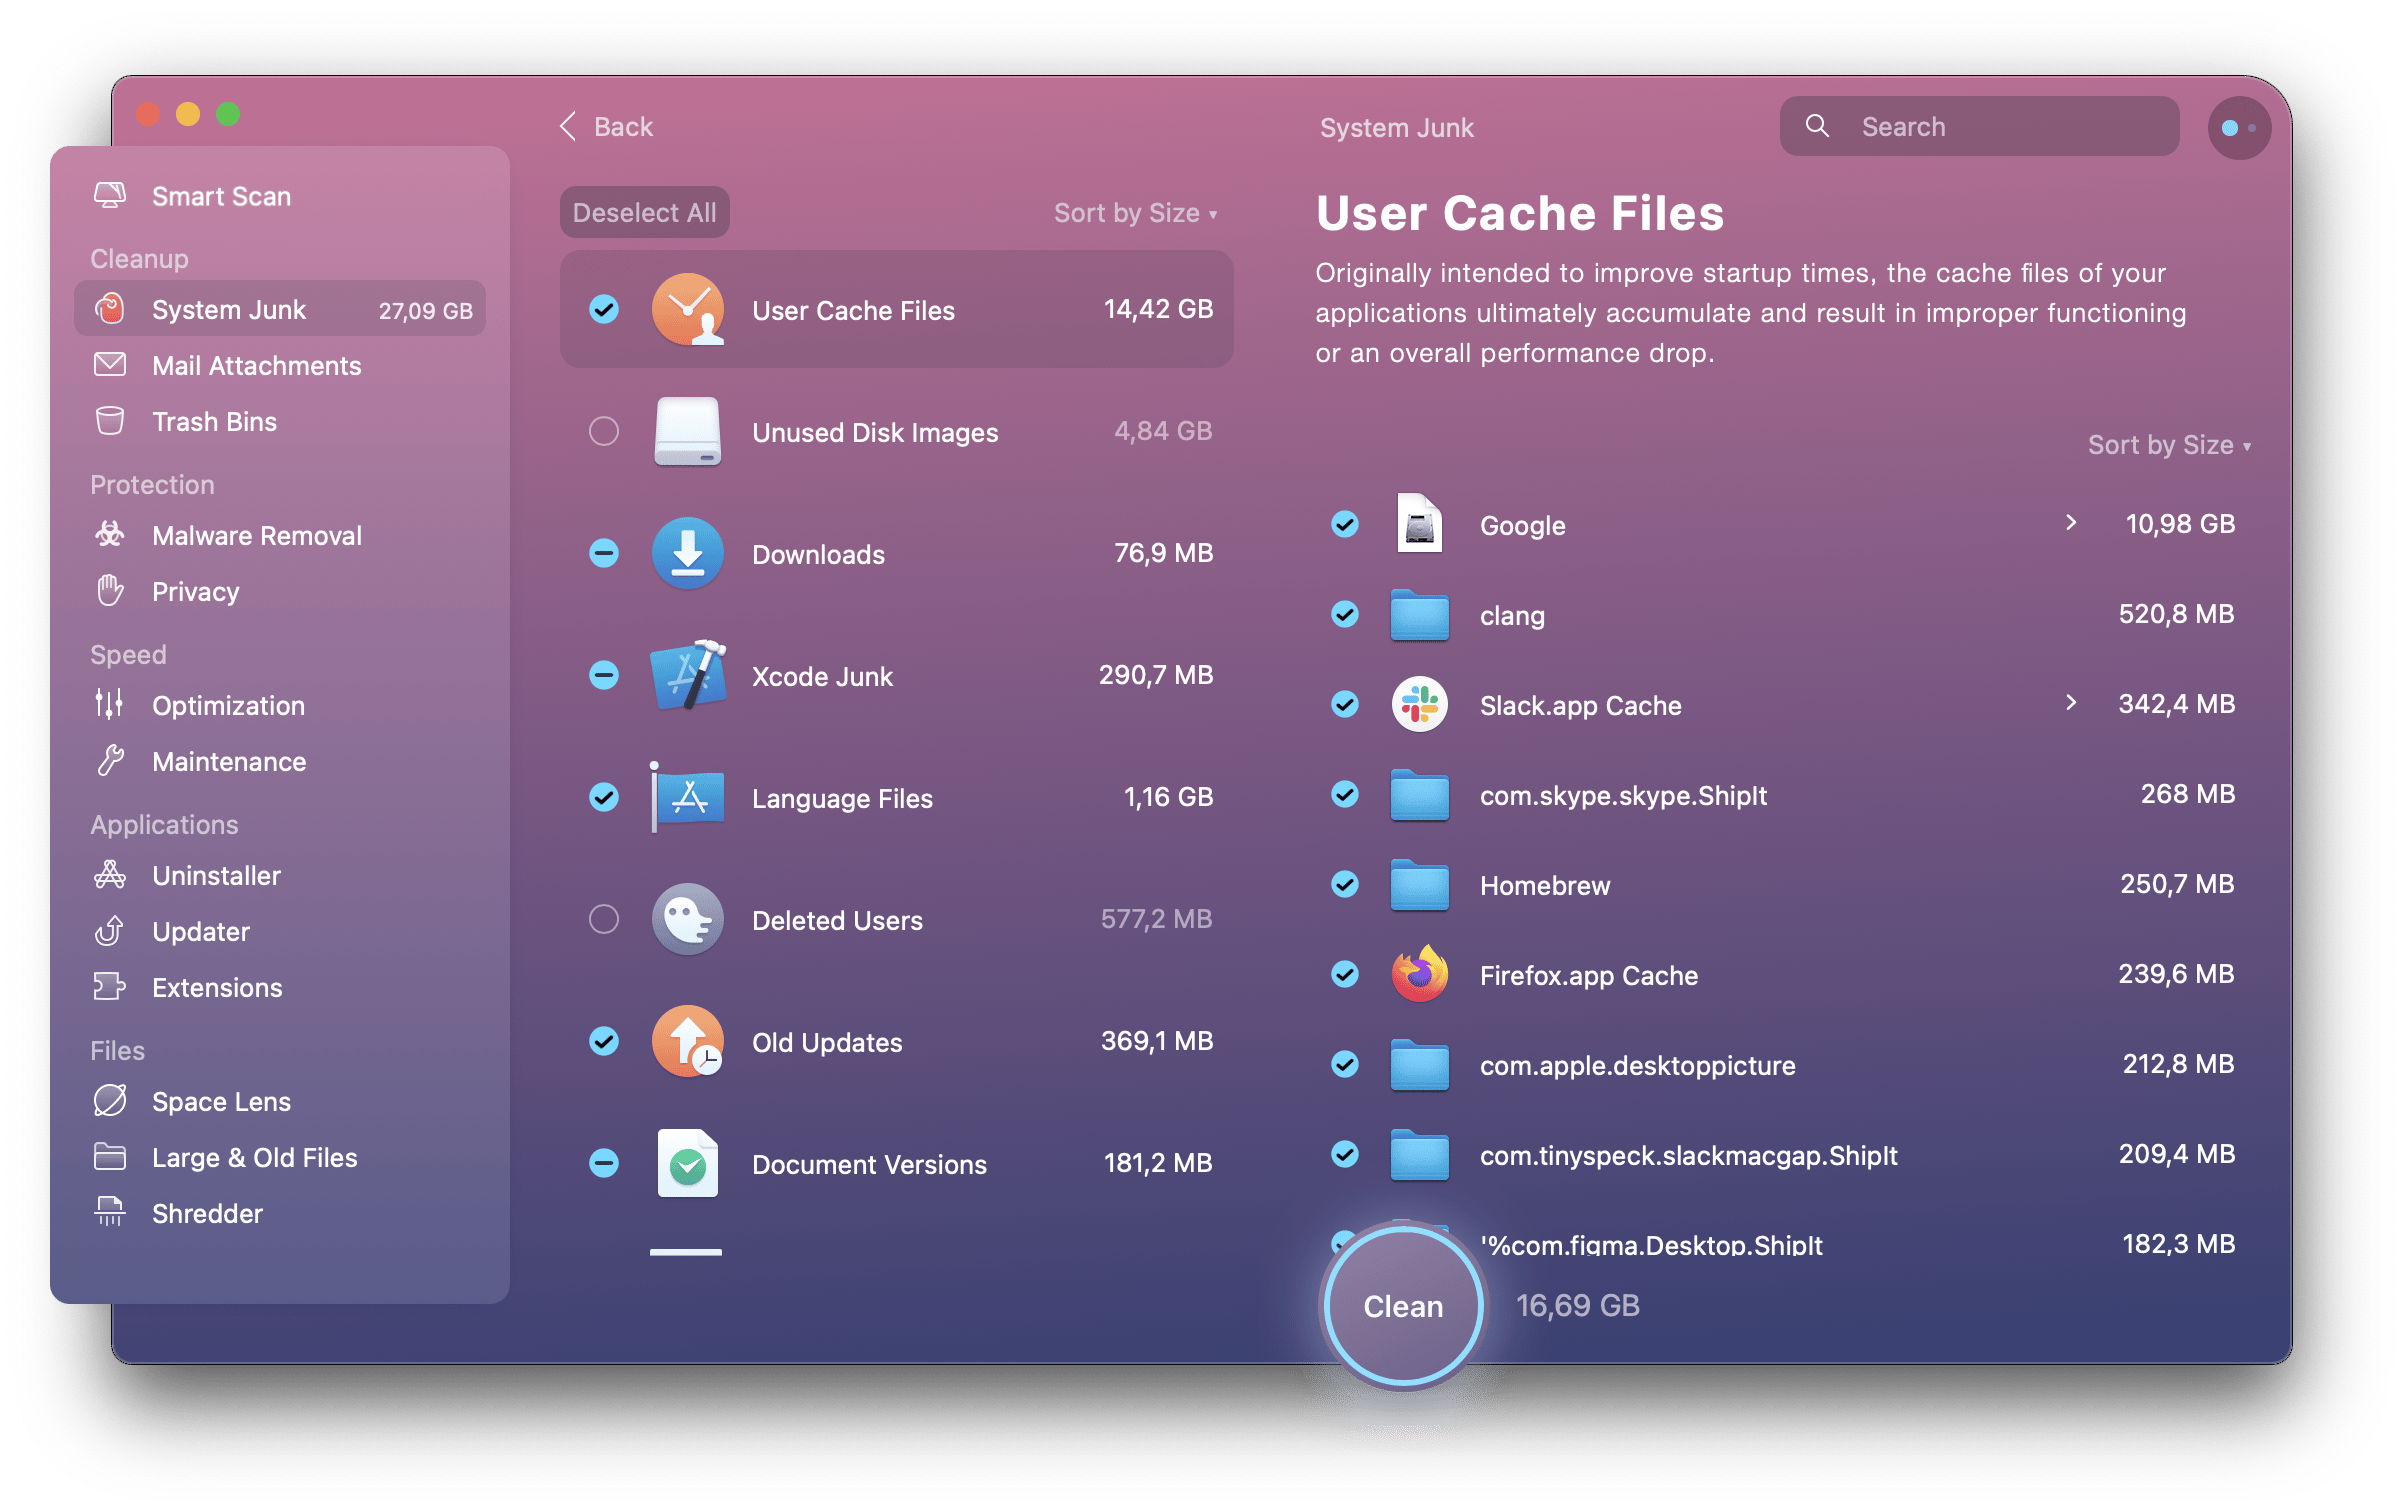
Let’s walk through a few CleanMyMac X tests for a real-life example of its possibilities. Start with a general system cleanup to act on your CPU speed test:
- Navigate to the System Junk tab and hit Scan.
- Click Review Details.
- Check all log files, login items, downloads, and more, and press Clean
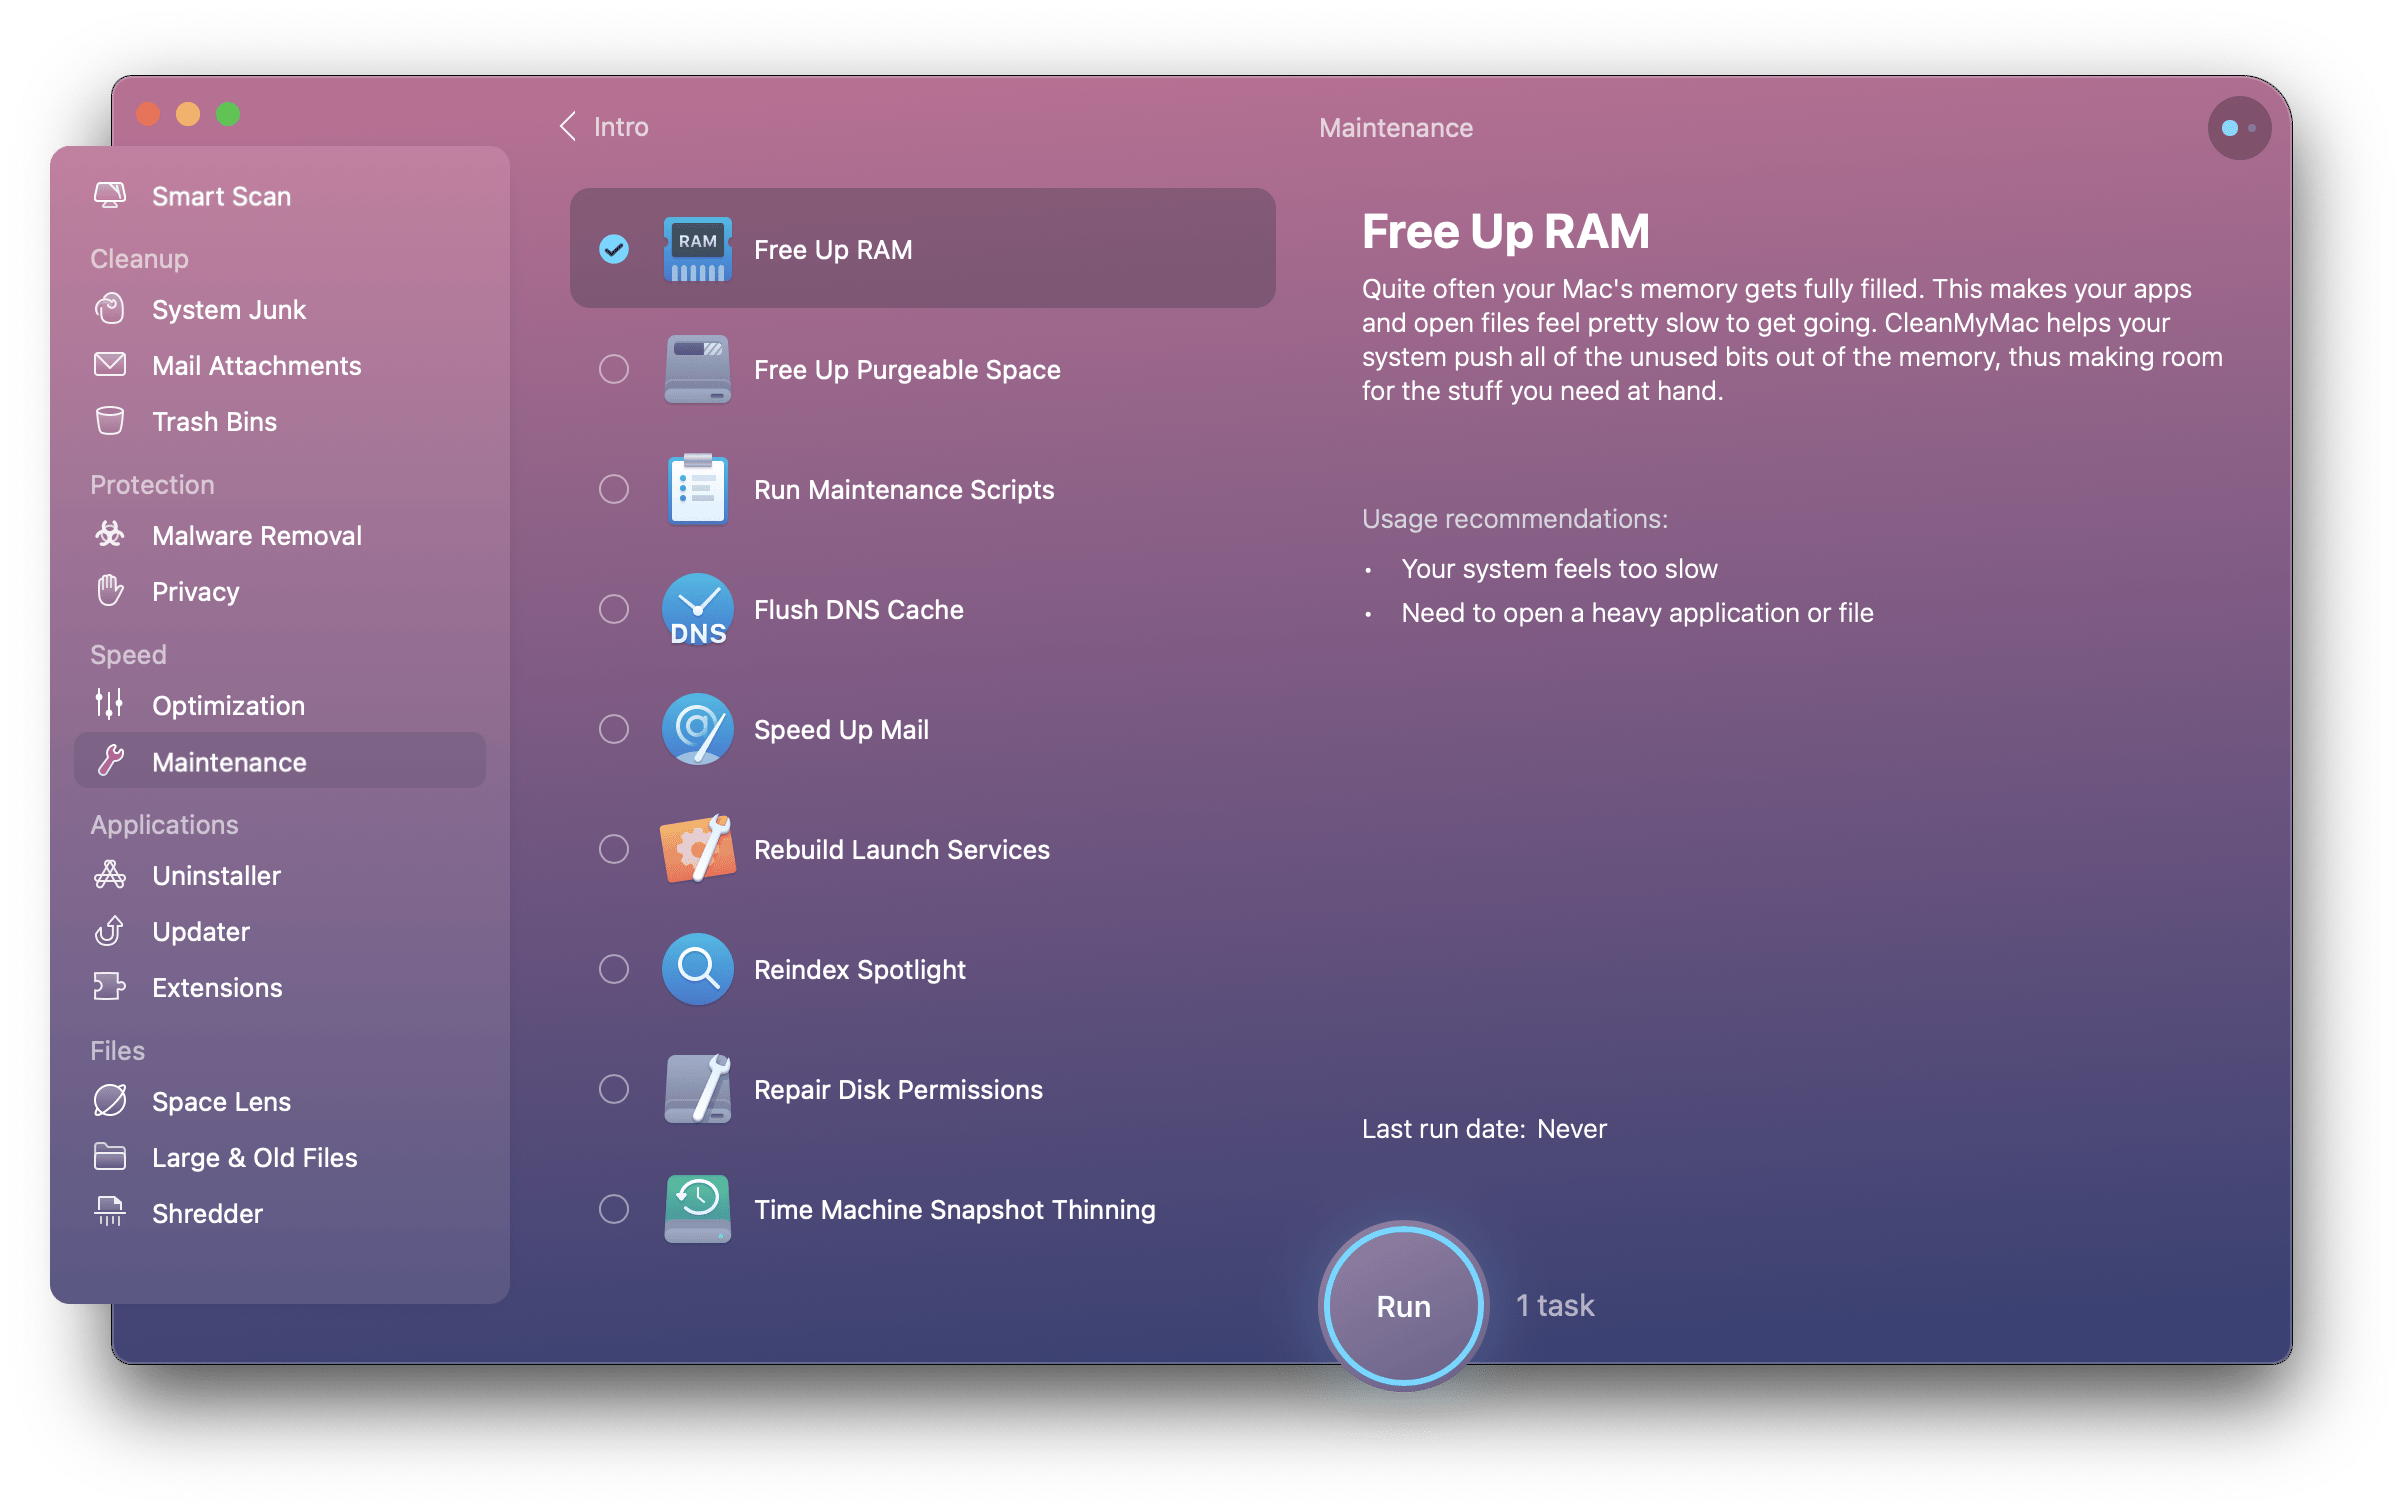
Next, optimize RAM:
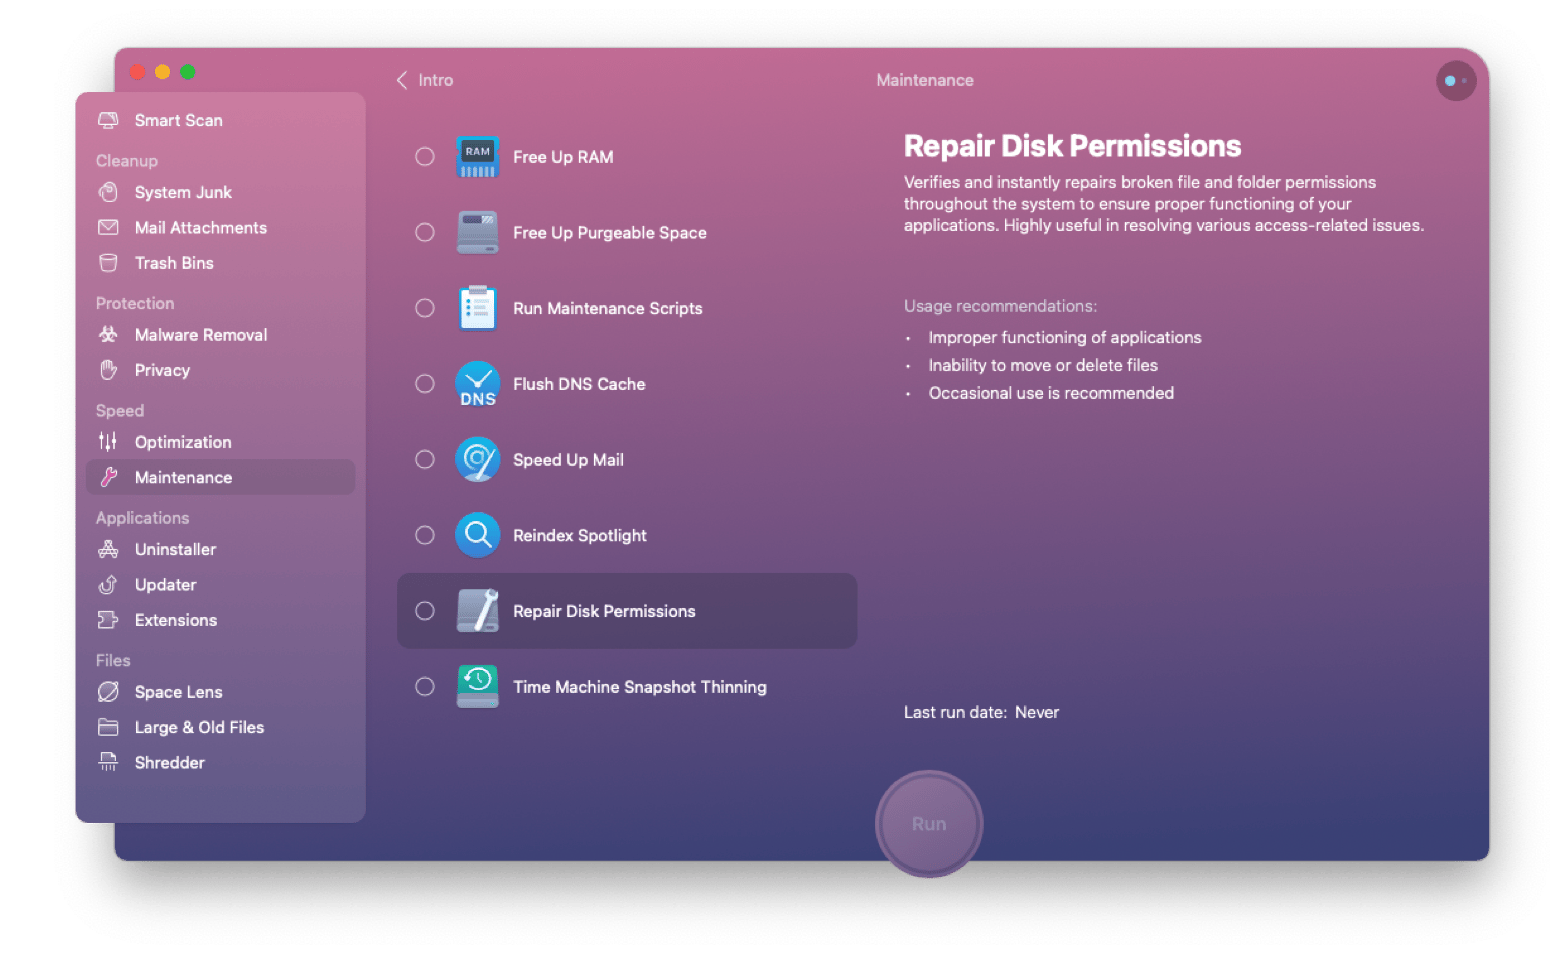
- Go to the Maintenance tab, under Speed.
- Check the box next to Free Up RAM.
- Hit Run.
Next stop — Purgeable Space and Disk Permissions.
- Make sure you’re in the same Maintenance tab.
- Select Free Up Purgeable Space and Repair Disk Permissions.
- Click Run.
Try Mac benchmark software for free
Depending on your preferences and tasks, there are many benchmarking tools out there. Personally, I always start with Novabench. I recommend trying it as part of a Setapp subscription, which also includes over 250 other applications, such as Usage, CleanMyMac X, Wi-Fi Explorer, and iStat Menus, which I also mentioned in this article. You can try them all for free for 7 days, with no hidden fees or restrictions.


