How to zoom in and out on Mac
- Quick app zoom: Cmd + +(plus) (in), Cmd + -(minus) (out) — hold to continue.
- Full-screen zoom: Enable in System Settings > Accessibility > Zoom > Use keyboard shortcuts to zoom.
- Shortcuts: Cmd + Opt + = (in), Cmd + Opt + - (out), Cmd + Opt + 8 (toggle), Cmd + Opt + / (soften pixels).
- Trackpad zoom: Pinch apart/together or double-tap (enable Smart zoom in Trackpad settings).
- Zoom styles: Fullscreen, Split-screen, or Picture-in-Picture (set in Accessibility > Zoom).
- Hover Text: Enable in Accessibility > Zoom; press Cmd + hover to magnify text.
- Magic Mouse: Hold modifier key (Ctrl/Opt/Cmd) + scroll; or double-tap with Smart zoom enabled.
- Customize gestures: Use BetterTouchTool for custom triggers/actions; Swish for dozens advanced trackpad gestures.
- Try hundreds of productivity apps free for 7 days on Setapp — including Swish, BetterTouchTool, TextSniper, Vivid & QuickLens.
The options to magnify the entire screen or make a specific part of it larger on demand were originally created as part of the accessibility feature set on Mac. However, these features have quickly become popular with all kinds of users.
So, let’s explore all the possible ways to zoom in on a Mac. This tutorial applies to all types of Macs, including the MacBook Air, MacBook Pro, iMac, and Mac Mini.
Here's a quick breakdown on how to activate zoom in and zoom out on Mac. For more details, scroll below.
| Task? | Solution |
| Zoom in/out quickly in apps | Cmd + +(plus) (zoom in), Cmd + -(minus) (zoom out); hold to continue. |
| Zoom entire screen |
Enable: System Settings > Accessibility > Zoom > Toggle “Use keyboard shortcuts to zoom” Shortcuts: Cmd + Opt + = (in), Cmd + Opt + - (out), Cmd + Opt + 8 (toggle), Cmd + Opt + / (soften pixels). |
| Zoom with trackpad | Enable: System Settings > Trackpad > Scroll & Zoom > Check “Smart zoom” Pinch apart/together or double-tap. |
| Enhance trackpad gestures | Swish: Dozens of custom gestures for window/app control. |
| Customize any input gesture/shortcut | BetterTouchTool: Assign any triggers (trackpad, mouse, keyboard, Touch Bar) to actions. |
| Choose zoom style |
System Settings > Accessibility > Zoom > Select: Fullscreen, Split-screen, or Picture-in-Picture. Advanced: Adjust magnification, movement, notifications, cursor detach. |
| Magnify small text on hover | Enable: System Settings > Accessibility > Zoom > “Enable Hover Text” Press Cmd + hover. |
| Zoom with Magic Mouse | Enable: System Settings > Accessibility > Zoom > “Use scroll gesture with modifier keys” > Choose key (Ctrl/Opt/Cmd) Hold key + scroll. |
| Zoom with Touch Bar | Enable: System Settings > Accessibility > Zoom > “Enable Touch Bar zoom” Slide finger to adjust. |
| Zoom 1x–32x on any area | Use Accessibility Zoom shortcuts (Cmd + Opt + =/-). |
How to zoom in and out on Mac using keyboard shortcuts
The screen magnification feature comes built-in with all Apple products and allows you to enlarge the whole screen or zoom in on anything that appears on it, including web pages, photos, docs, and videos.
The quickest way to begin using zoom option when you’re in an app is to hold Command key and press the plus key (+) to zoom in or the minus key (-) to zoom out on Mac. To increase zoom level, simply keep holding the plus or minus keys instead of repeating the command. This one zoom in shortcut can become quite handy in your daily life and successfully answer the question of how to zoom on Mac.
If you need to zoom in on the whole screen and not just a specific app window, you’ll need to enable Accessibility Zoom and configure some zoom settings there. Here’s how:
- Click on the Apple icon from the menu bar and go to System Settings.
- Select Accessibility and choose Zoom from the sidebar.
- Toggle on “Use keyboard shortcuts to zoom”.
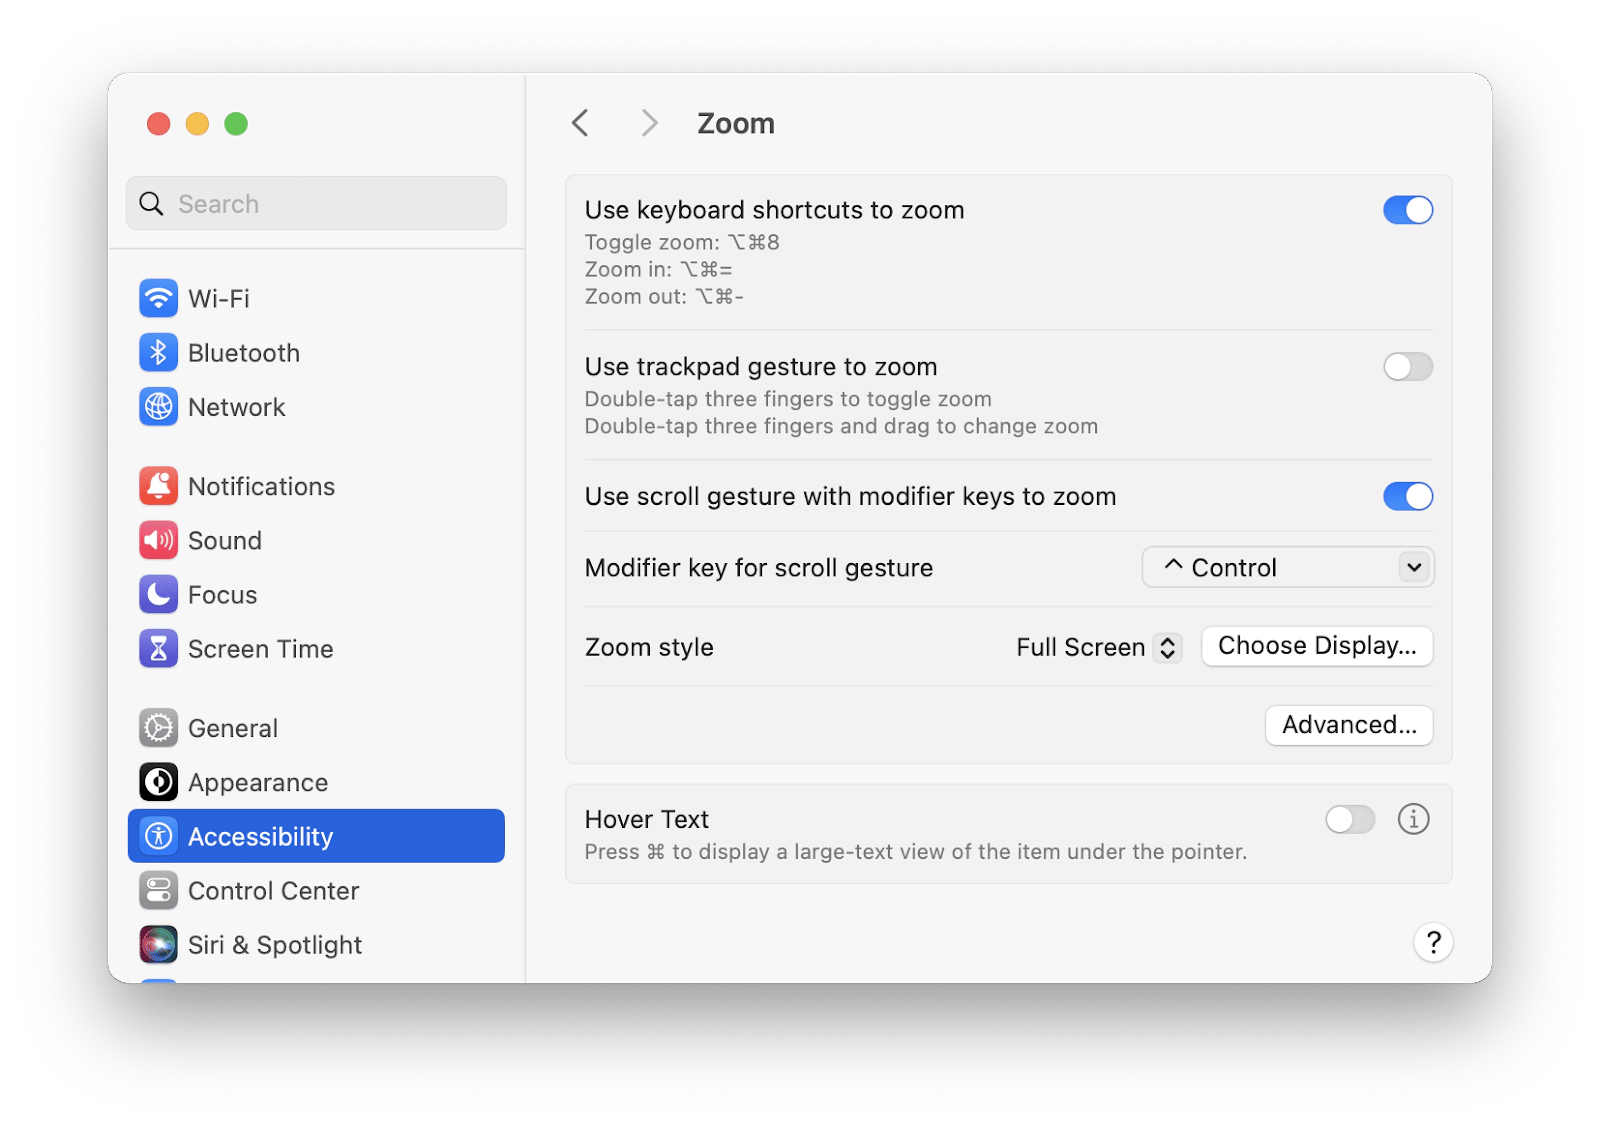
This option will activate the following Accessibility Zoom keyboard shortcuts:
- Zoom in: Command + Option + =
- Zoom out: Command + Option + -
- Toggle zoom off: Command + Option + 8
- Toggle soft images (softens the appearance of pixels in images when they are magnified): Command + Option + /
How to zoom in and out using a trackpad
For those who dislike memorizing any kind of keyboard shortcuts, there’s a method that doesn’t require additional commands: you can use trackpad gestures to zoom on Mac. So if your device has a trackpad, check that you have gesture support enabled by going to Trackpad in System Settings, navigating to the Scroll & Zoom tab, and checking the box next to “Smart zoom.”
Now you can zoom in by placing two fingers on the trackpad and pushing them away from each other. To zoom out on Mac, move the two fingers back together on the trackpad. You can also double tap the trackpad to zoom in and then double tap again to zoom out.
How to customize shortcuts and gestures to zoom in and out
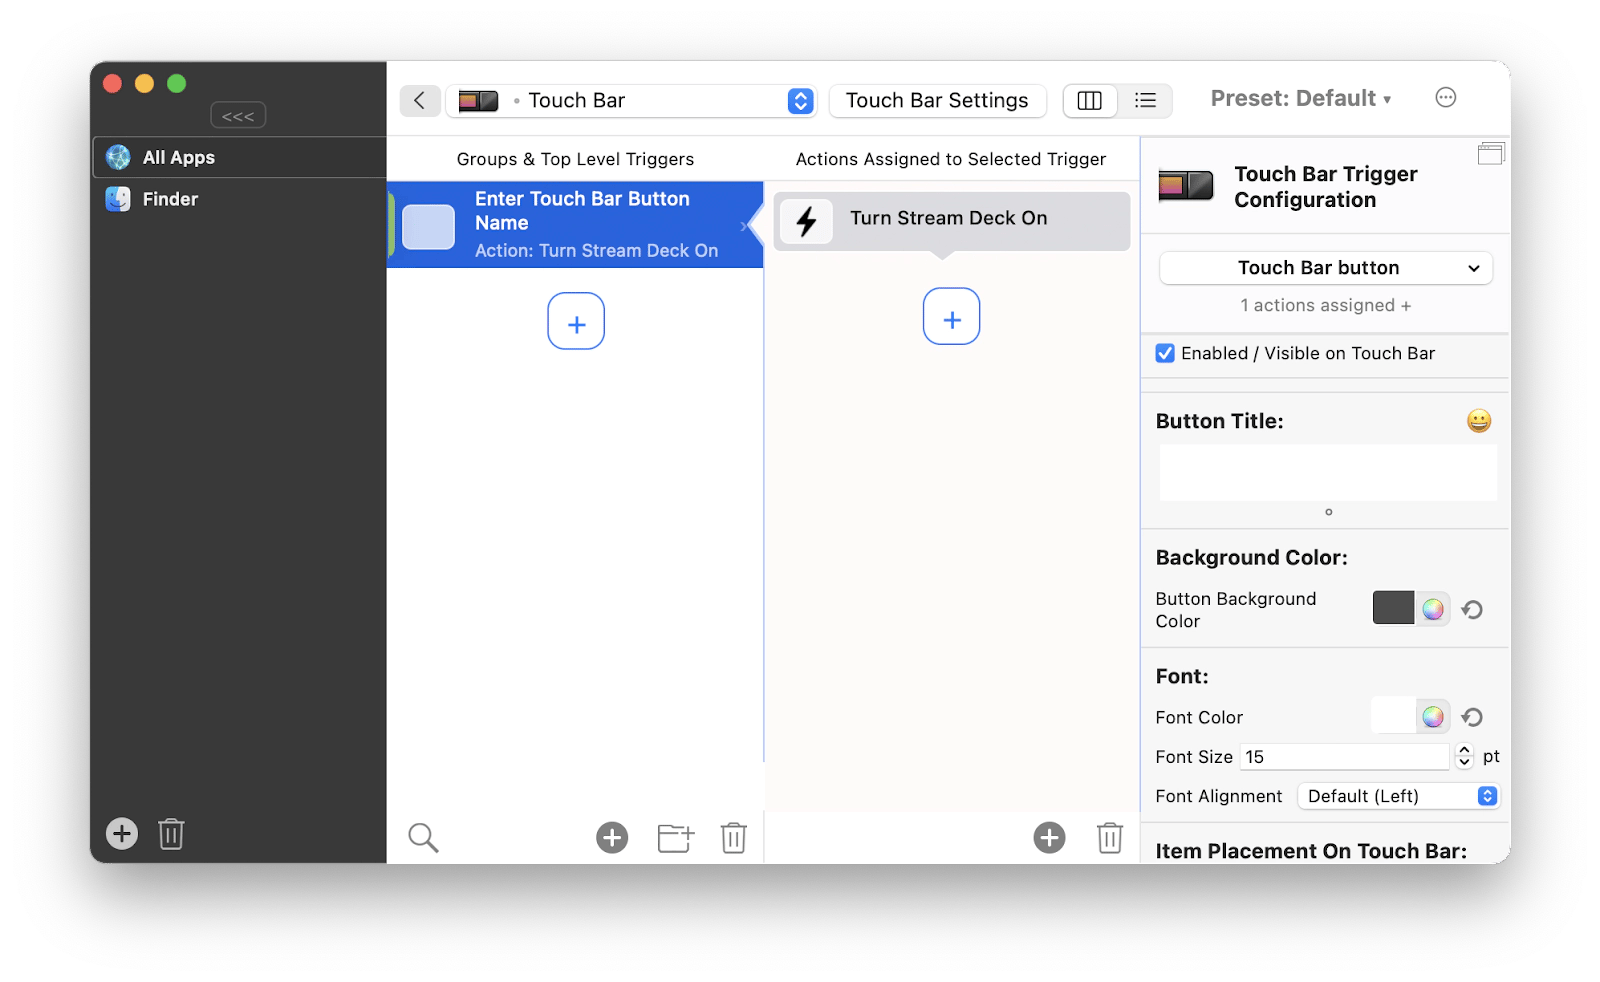
If you want to get serious about customizing how you enter information on your Mac, including creating numerous personal shortcuts, you need to try BetterTouchTool.
BetterTouchTool is a powerful utility that gives you total control over your Mac’s input devices, including a touchpad, Touch Bar, mouse, and keyboard. Automate any task with your own shortcut and assign it to the device of your choice to extend the default Mac capabilities and create a workspace you enjoy to the fullest!
With a guided interface to create your custom action shortcuts, BetterTouchTool delivers unparalleled Touch Bar personalization and editing options, a significant trackpad productivity boost, an integrated clipboard manager, and chained actions to handle complicated tasks.
Here’s how to create a gesture with BetterTouchTool:
- Launch the app
- Choose the input device you want to set a gesture for
- Click the plus button and select a trigger from the list
- Assign an action to that trigger (browse the entire list for ideas or use the search to quickly find the desired action)
How to choose your Mac zoom style
There are three different ways that Mac zoom can appear on your screen: a whole screen zoom and a split screen zoom, which are self-explanatory, plus a picture-in-picture style zoom, which resembles a rectangular magnifying glass. All you have to do is decide which works best for you and set the style you prefer. Here’s how:
- Open System Settings from your Mac menu bar
- Select Accessibility ➙ Zoom from the sidebar
- Choose your new style from the “Zoom style” dropdown menu
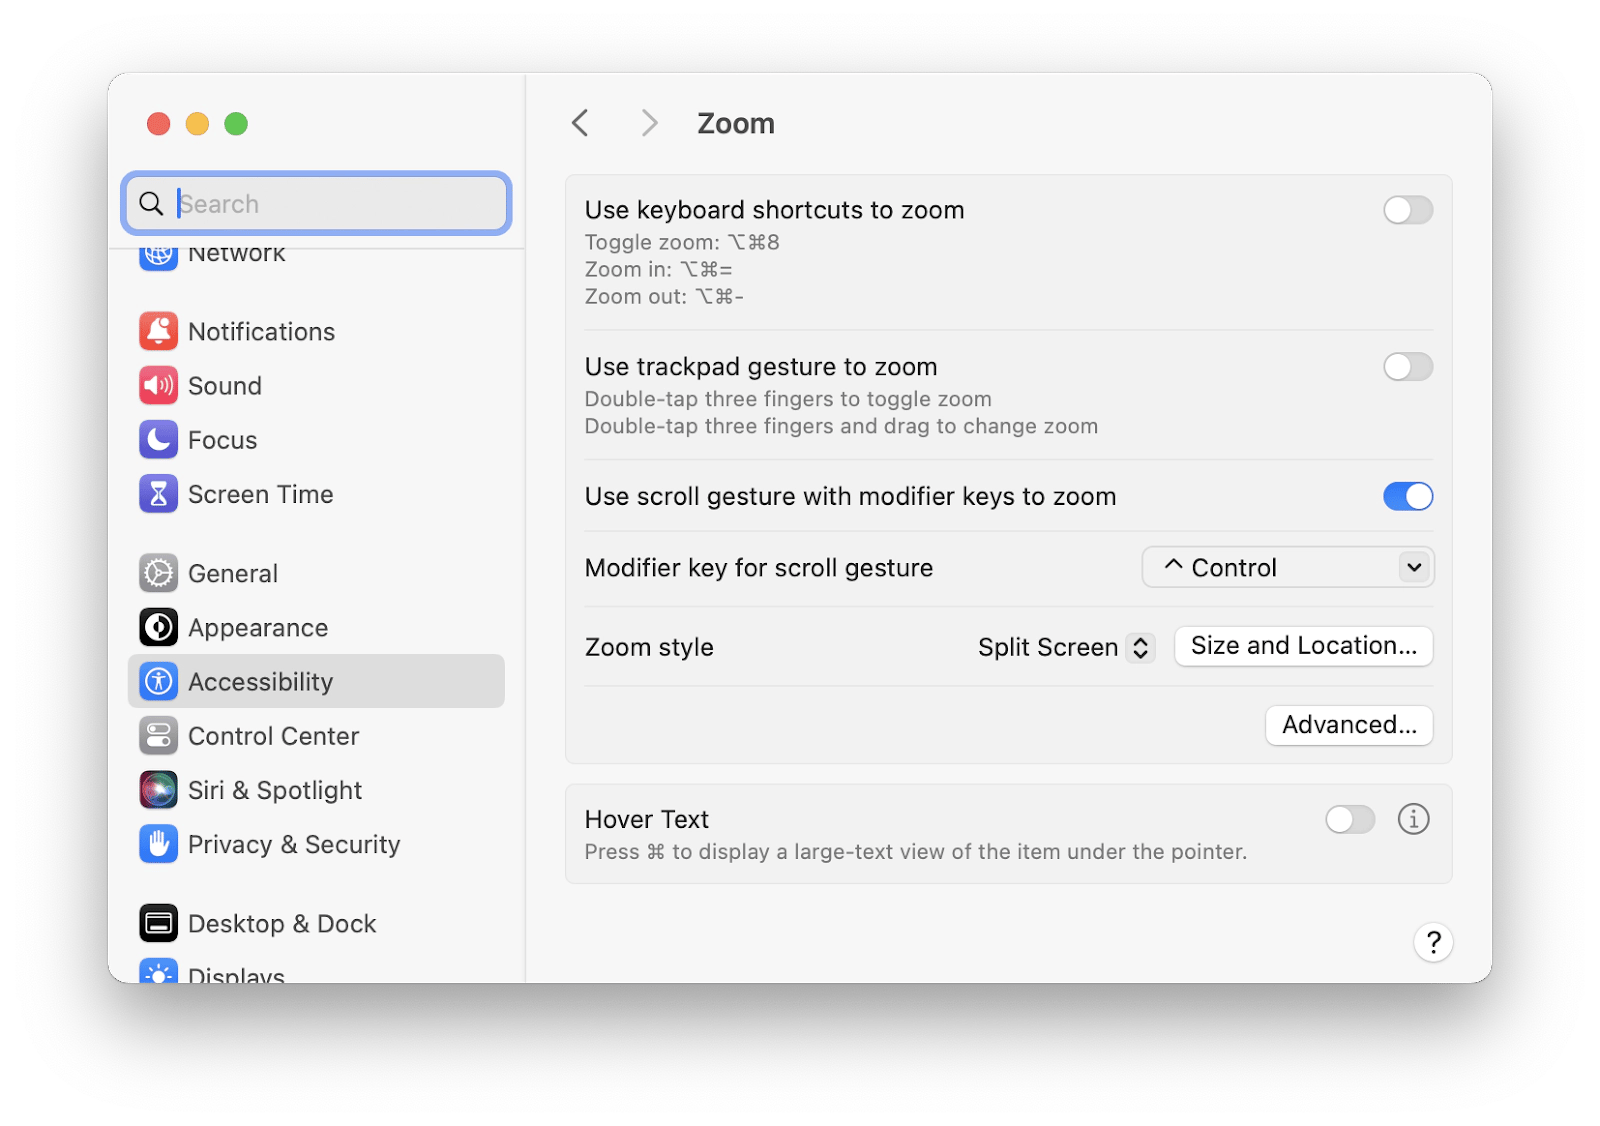
Apart from choosing your zoom style, you can click into the Advanced tab within the Zoom Accessibility panel in System Settings to customize fullscreen zoom by choosing how much or little magnification you prefer, how the screen moves when it’s enlarged, how system and app notifications appear on your screen, and edit the option to detach zoom view from cursor temporarily.
Customizing the picture-in-picture zoom is done the same way as altering the fullscreen or split screen styles described above. Specific to the picture-in-picture zoom, you can adjust the size of the window, decide on its location on the screen, and choose if you want it to be stationary or follow the cursor.
Tip: You might also be interested in how to go full screen and exit full screen on Mac.
How to magnify screen with Hover Text
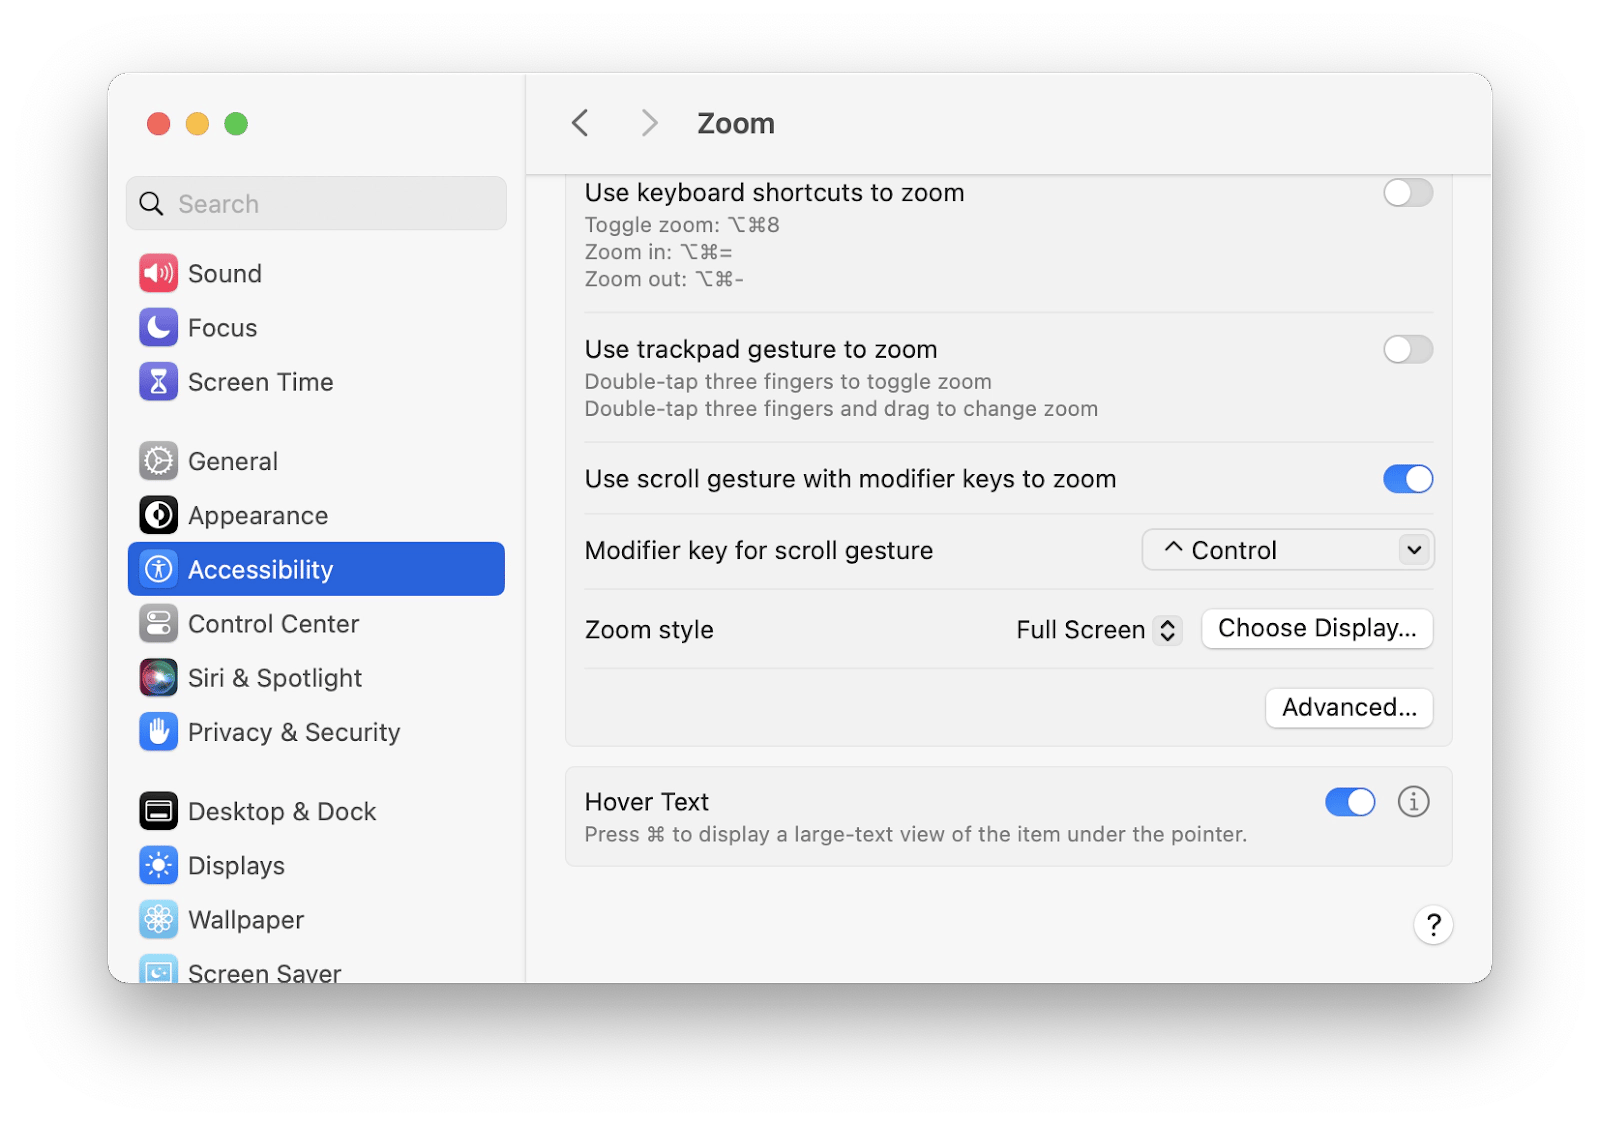
Newer Macs have another assistive feature called Hover Text, a hovering, adjustable magnifying glass window allowing you to zoom in on tiny text materials on your Mac display.
Here’s how to zoom in and out on Mac using Hover Text:
- Open System Settings from the menu bar
- Click on Zoom in the Accessibility section
- Select the option to “Enable Hover Text”
- Press the Command key and hover your cursor to enlarge text under the pointer
Sometimes, the reason you’re having trouble reading text on your Mac is not its size, but it’s your display brightness levels. To go beyond Mac’s built-in options, try Vivid.
Vivid is a tool created to unlock the brightness built into your machine for HDR media. You can set the app to launch at login or use on demand to instantly double display brightness using the regular keys!
How to zoom in and out using Magic Mouse
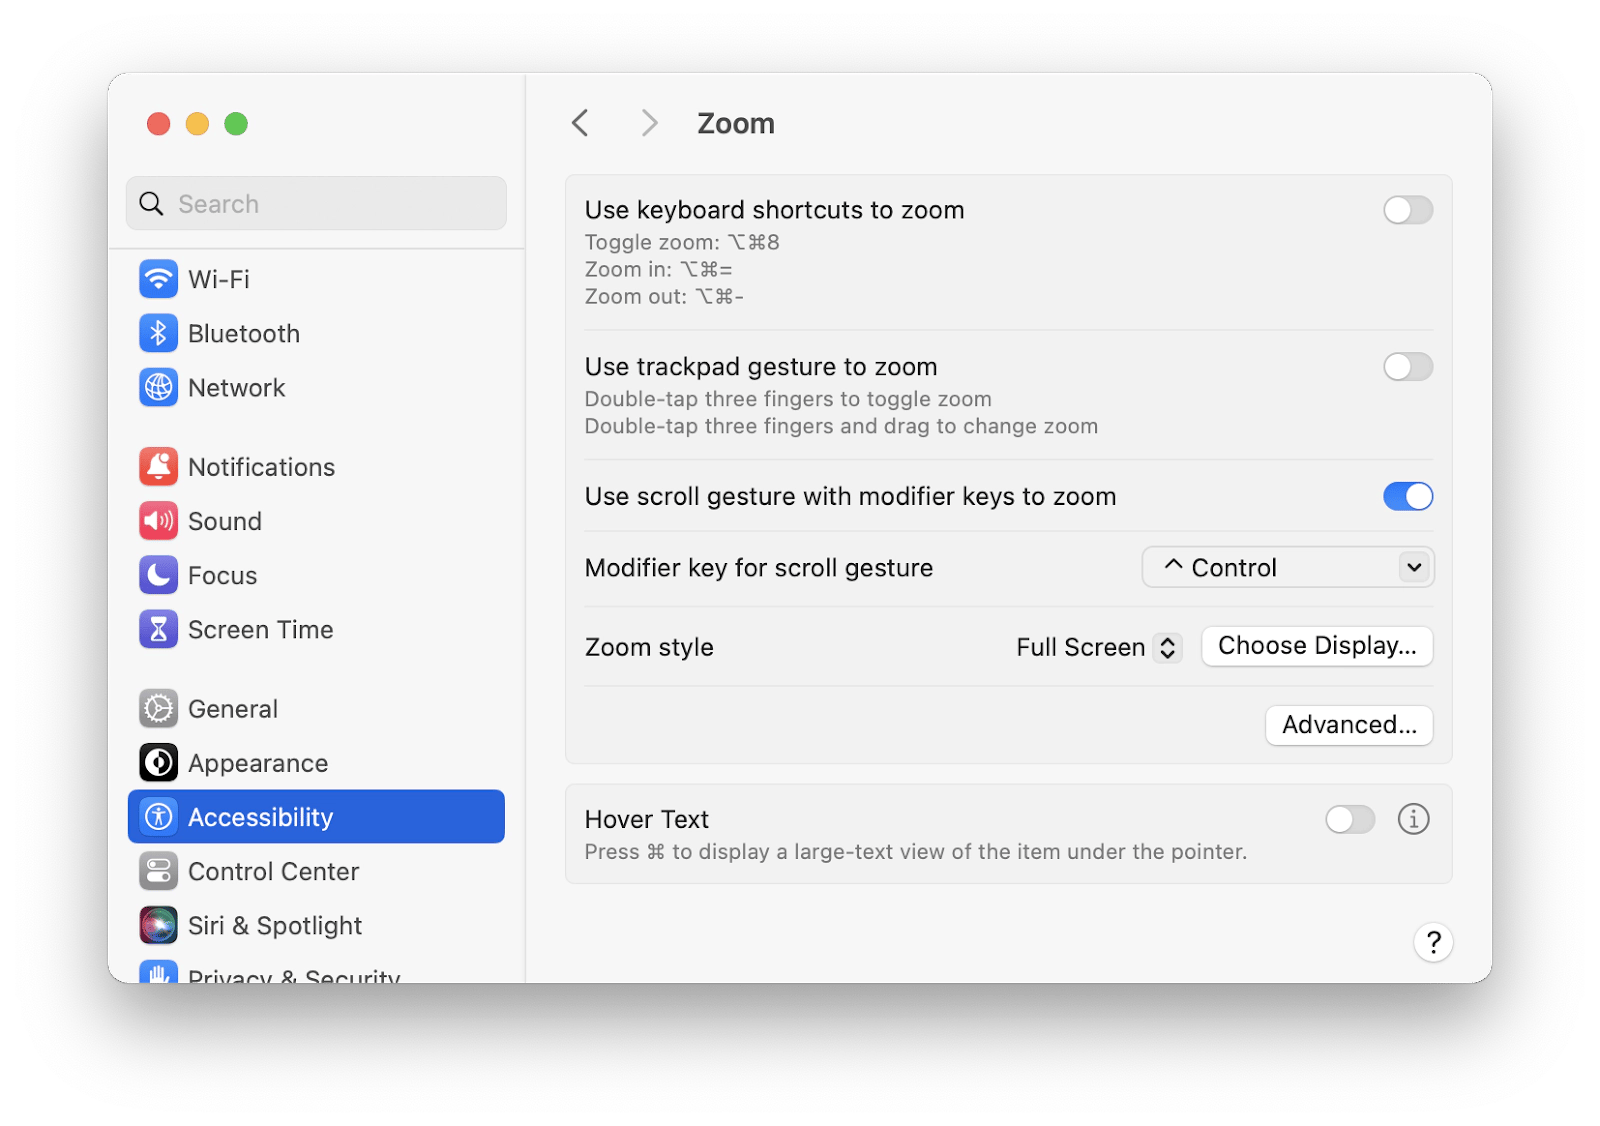
If you have a mouse connected to your MacBook, you can use it to magnify the entire screen by simply holding the modifier key and scrolling up with your mouse to zoom in or down to zoom out.
Here’s how to zoom in on Mac by activating the mouse zoom feature:
- Click on the Apple icon from the menu bar and go to System Settings.
- Open Accessibility panel and choose Zoom in the sidebar.
- Select the option “Use scroll gesture with modifier keys to zoom”.
- Choose the modifier key (Control, Option or Command key).
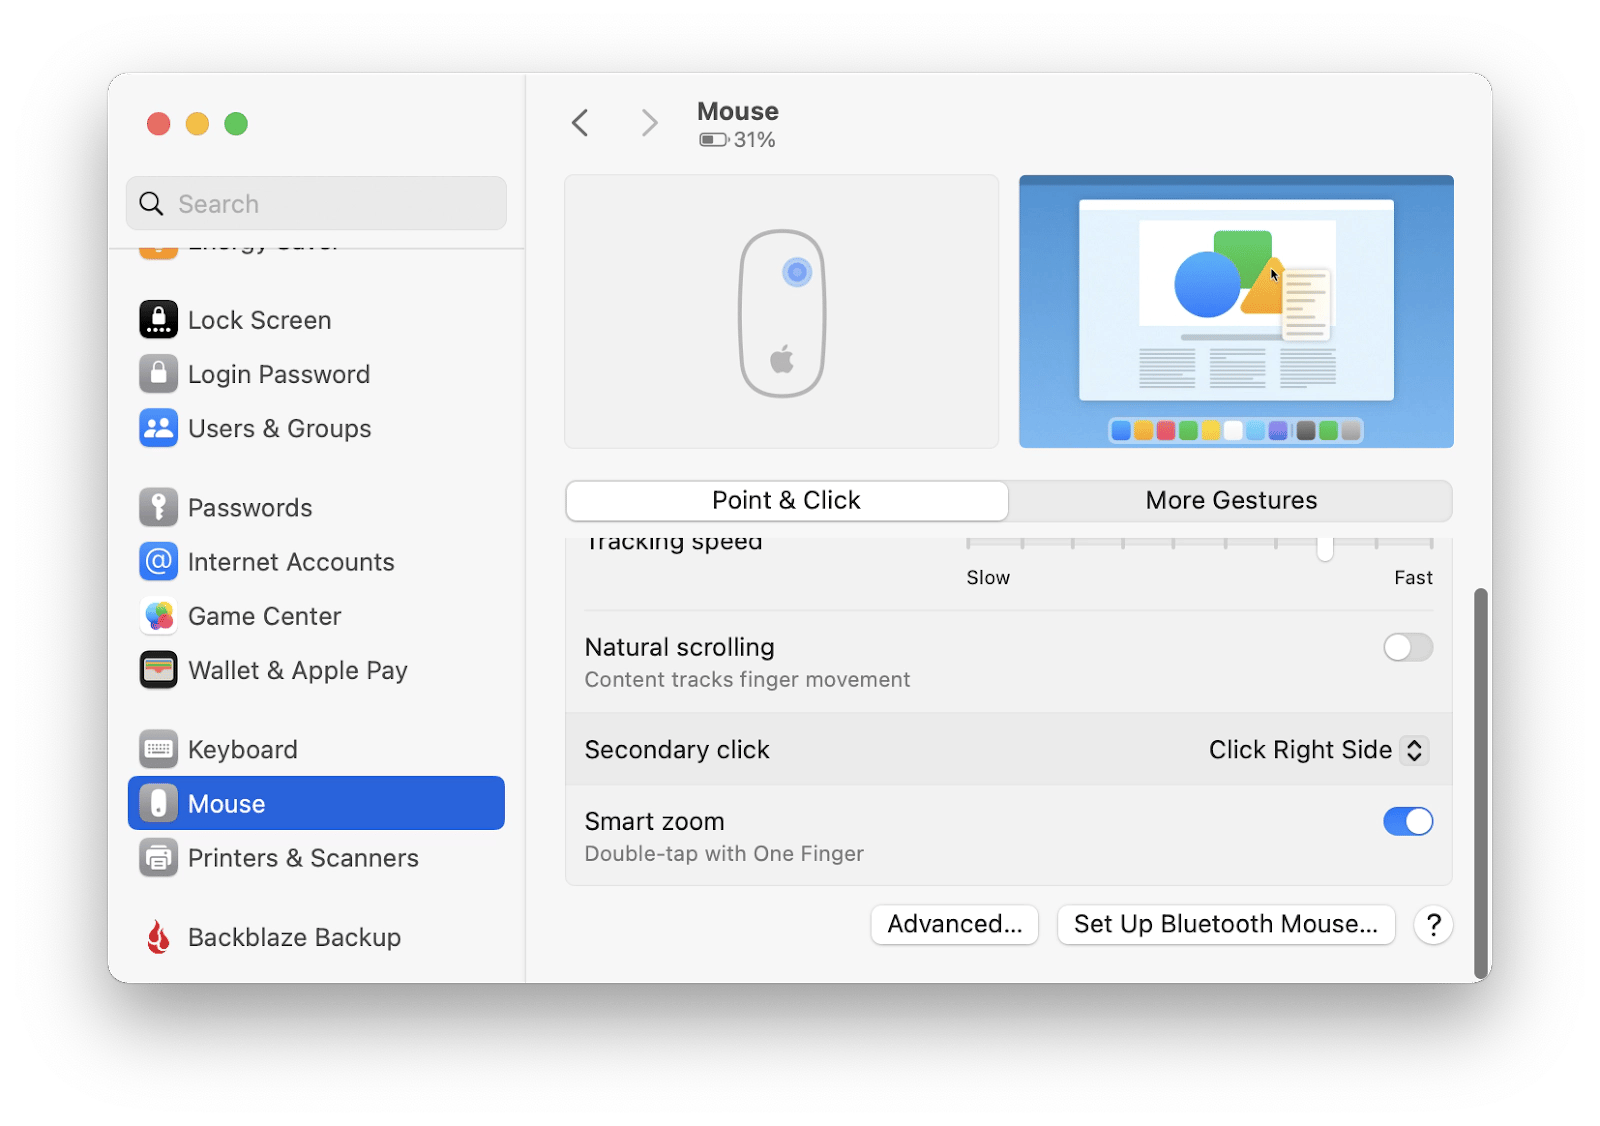
In case you use an Apple Magic Mouse, you can also enable the Smart zoom feature to be able to zoom in and out by double tapping with one finger.
Here’s how to zoom on Mac by activating Smart zoom with Magic Mouse:
- Go to System Settings from your Mac menu bar.
- Click Mouse and select Smart zoom. If you have any issues, learn how to fix Apple mouse problems.
How to zoom with Touch Bar
This option is readily available to users whose Macs have a physical Touch Bar. If yours doesn’t, you can enable a virtual version at the bottom of your screen to use as a zoom shortcut.
Here’s how to zoom in with Touch Bar:
- Go to System Settings from the menu bar.
- Click Zoom in the Accessibility section.
- Check the box next to “Enable Touch Bar zoom”.
Now you can slide your finger back and forth to zoom in and zoom out on Mac.
How do I get my screen back to normal size on Mac?
Simply go to System Settings on your Mac, click on Displays and choose the settings you want to customize fullscreen zoom and return your screen to normal size.
Zoom in shortcuts and other zoom on Mac options can be great for various daily tasks, and now you know how to enable these features in multiple ways.
It’s time to further elevate your workflow with the help from apps like Vivid, Swish, and BetterTouchTool for enhanced display settings and custom actions. TextSniper can read text from your screen aloud, while QuickLens is a tool that can generally improve your UI experience as a whole in no time!
Great news! You can try all these apps — Vivid, Swish, BetterTouchTool, TextSniper, and QuickLens, along with 240 other utilities for free through a seven-day trial of Setapp. This platform of top macOS and iOS tools for improved productivity gives you unlimited access to all the apps in its library, so you can find the right one for every kind of use case out there.
FAQs about Mac magnification affects
The methods above make up a complete guide for how to zoom on Mac, but here are some additional answers to the most common questions about this feature.
Why is my Mac stuck on zoomed in?
If it looks like your zoom on Mac has gone out of control and the screen is stuck on zoomed in, it might be due to a recent software update, newly installed macOS, or incorrectly set display resolution.
How to zoom in on any part of the screen from 1x to 32x
To zoom in on any part of the screen from 1x to 32x on Mac:
- Go to the Apple menu > System Settings > Accessibility > Zoom.
- Turn on Use keyboard shortcuts to zoom.
- Press Option + Command + = to zoom in and Option + Command + - to zoom out.


