How to trim MP3 files and shorten videos on Mac in 2026
- Filmage Editor simplifies video editing.
Import videos, cut clips with the scissor tool, add effects or subtitles, and save multiple segments efficiently. - Pulltube is perfect for YouTube content.
It extracts, trims, and saves specific parts of videos or audio, even without re-encoding, preserving quality. - QuickTime Player handles basic edits.
For simple video or MP3 trimming, use Edit > Trim and adjust the slider to save the desired portion. - Setapp gives access to all essential Mac tools.
Try apps like Filmage Editor, Pulltube, n-Track Studio, and Permute with a free 7-day trial on Setapp.
Trim MP3 file tasks (and video cuts) usually come up the moment you hit record and realize not every take is usable. I ran into this fast with my YouTube videos — bloopers, long pauses, or parts that just didn’t sound right. Publishing everything “as is” wasn’t an option, so I started shortening video and audio files on my Mac. The surprise? You don’t need editing skills to get clean, professional-looking results.
With modern apps, trimming video clips or cutting MP3 tracks is quick and beginner-friendly. I tested several tools, and I’ll share the ones that worked best for me.
Small tip before you trim an audio file from an MP3: If your Mac refuses to save trimmed files, exports come out broken, or an editor suddenly stops responding, run my Fix My Mac tool first to quickly troubleshoot.
What’s the trouble? | How to fix |
Inexperience in video trimming | Download Filmage Editor for a user-friendly way to edit videos. |
Only want one or multiple small parts of YouTube video | Extract, cut, and save a portion of a long YouTube video with Pulltube. |
Need a simple video cut | Use Photos on macOS or iOS. In the Photos app, drag the frame to change the length and click Done. |
Need to cut, rearrange, and add accompaniments to MP3 files | Install n-Track Studio to edit MP3 and use Pulltube to extract audio files from YouTube. |
Little experience in audio trimming | Use QuickTime Player basic tool. Adjust the time frame slider, select Tri, and save to Mac. |
Have multiple MP3 tracks to export from video | Install and open Permute > Permute’s Workshop > Choose Track Export > Drag and drop video file into the program. |
Need to get 4K YouTube video | Install Downie to download high-resolution videos and trim audio MP3 and video from YouTube and other sites. |
Best ways to trim video on Mac
Honestly, trimming is often the first step of video editing. If you own a Mac and only need to cut out a few seconds' worth of clips, you can easily cut and extract short videos with the QuickTime player. I’ll show you how. However, if you need advanced editing features, I’ll suggest a few other apps.
How to trim videos like a pro
When I first started my creator journey, I found video editing intimidating. Because I publish tutorials on YouTube, I often have to cut my video after a screen recording. I compared several video editing tools and stayed with Filmage Editor.
My experience with Filmage Editor has been generally pleasant. It’s simple to use and allows users to easily add stunning effects to the video. I can easily cut, merge, and insert subtitles to my recordings by following a simple workflow.
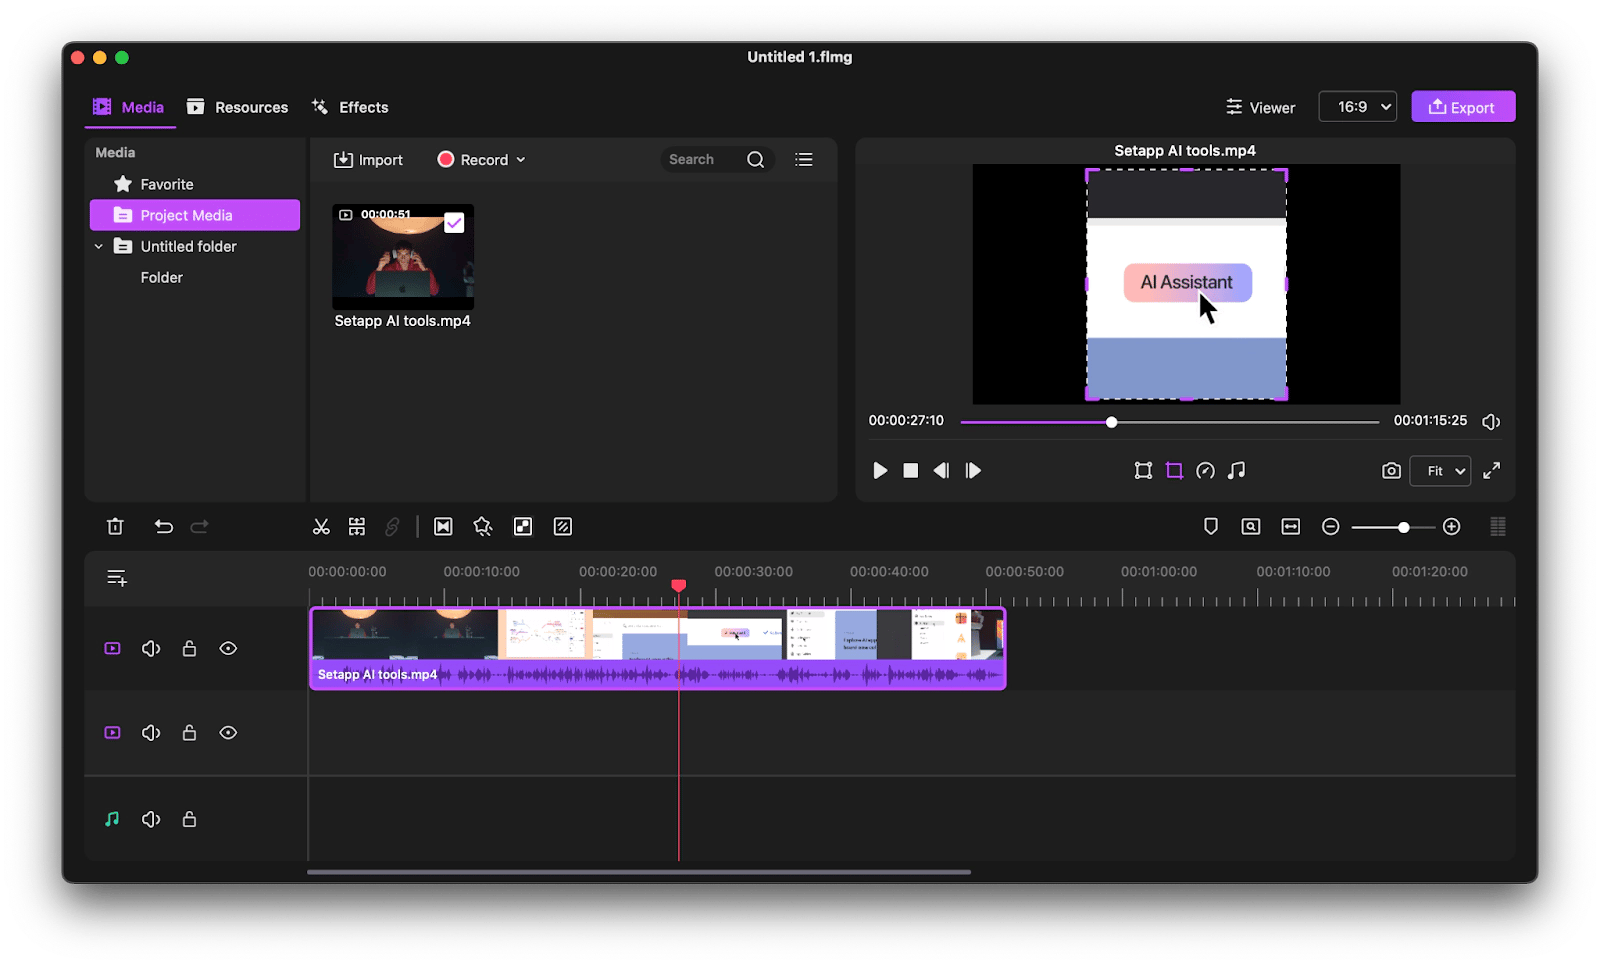
Here’s how to trim a video on Mac effortlessly with Filmage Editor.
- Download and open Filmage Editor.
- Start a new project.
- Import a video. You will see the video clip on the timeline.
- Play the video to the point that you want to make a cut. Or drag the red indicator line on the ruler to the desired position.
- Click the scissor icon at the top of the timeline.
Now, the video is split into two. You can remove, reposition, or make more cuts by following the steps above.
How to extract a part of a YouTube video to a separate file
Sometimes, all you need from an hour-long YouTube video is just a few minutes of it. For example, I watch webinars by other marketers and cut parts of them so that I can insert them in my video to better explain my points ( with credits, of course).
If you use a conventional video editor, you would need to go through several steps. First, you need to manually download the video. Then, you’ll need to cut specific scenes and save them. It sounds simple, except when you need to extract multiple parts of the video.
These days, I use Pulltube to cut and download YouTube videos. Pulltube lets me effortlessly download, cut, extract, and save parts of the video to my Mac. Moreover, I can extract portions of video without re-encoding to preserve their quality.
Here’s how.
- Install and open PullTube.
- Copy and paste or drag the video URL to Pulltube. Wait for Pulltube to fetch the video.
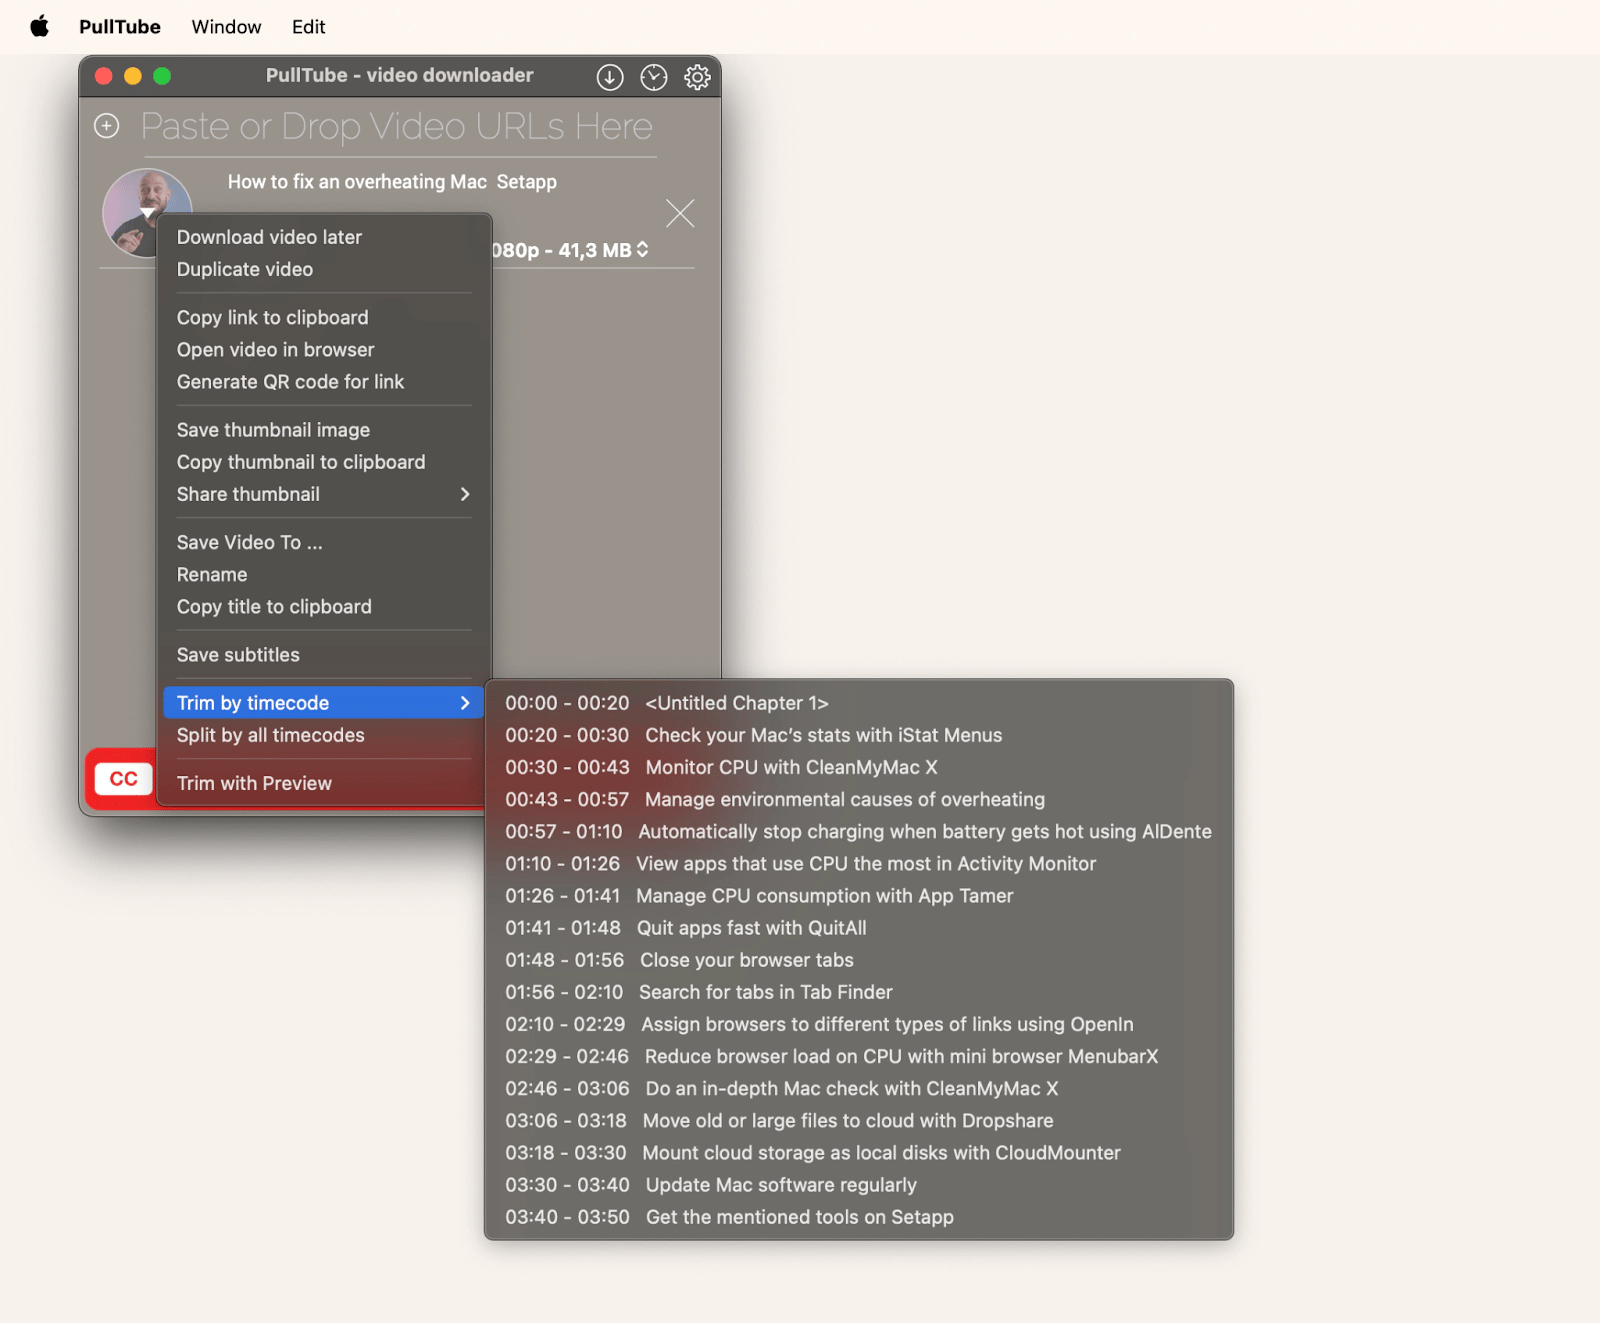
- Click on the circular frame that displays the video’s thumbnail.
- Click Trim by timecode. You will see a list of time codes with their respective duration and subtitles.
- Select the timecode to trim. Pulltube will duplicate the video but limit the duration to the selected timecode.
- Click Download to download part of the YouTube video to your Mac.
Pulltube not only allows you to download and trim YouTube videos but also those from Facebook, Dailymotion, Instagram, and thousands of other sites. The best thing is that it also lets you extract and save all the time codes simultaneously.
To do that,
- Fetch a video on Pulltube by providing its URL.
- Click on the video’s thumbnail.
- Select Split by all timecodes.
- Click Download all videos.
Pulltube will automatically download and save all the timecodes into separate video files.
How to shorten videos using Photos
Another video editing hack you need to know is that you can actually use Photos to trim your videos. Photos might not have all the powerful editing features that Filmage Editor does, but it’s good enough to make simple video cuts.
Follow these steps to edit video length with Photos.
- Open the Photos app.
- Choose the video from the library on the left panel.
- Double-click on the video you want to trim.
- Click Edit.
- Drag the frame to change its start and end position. Click Done to remove the unwanted frames.
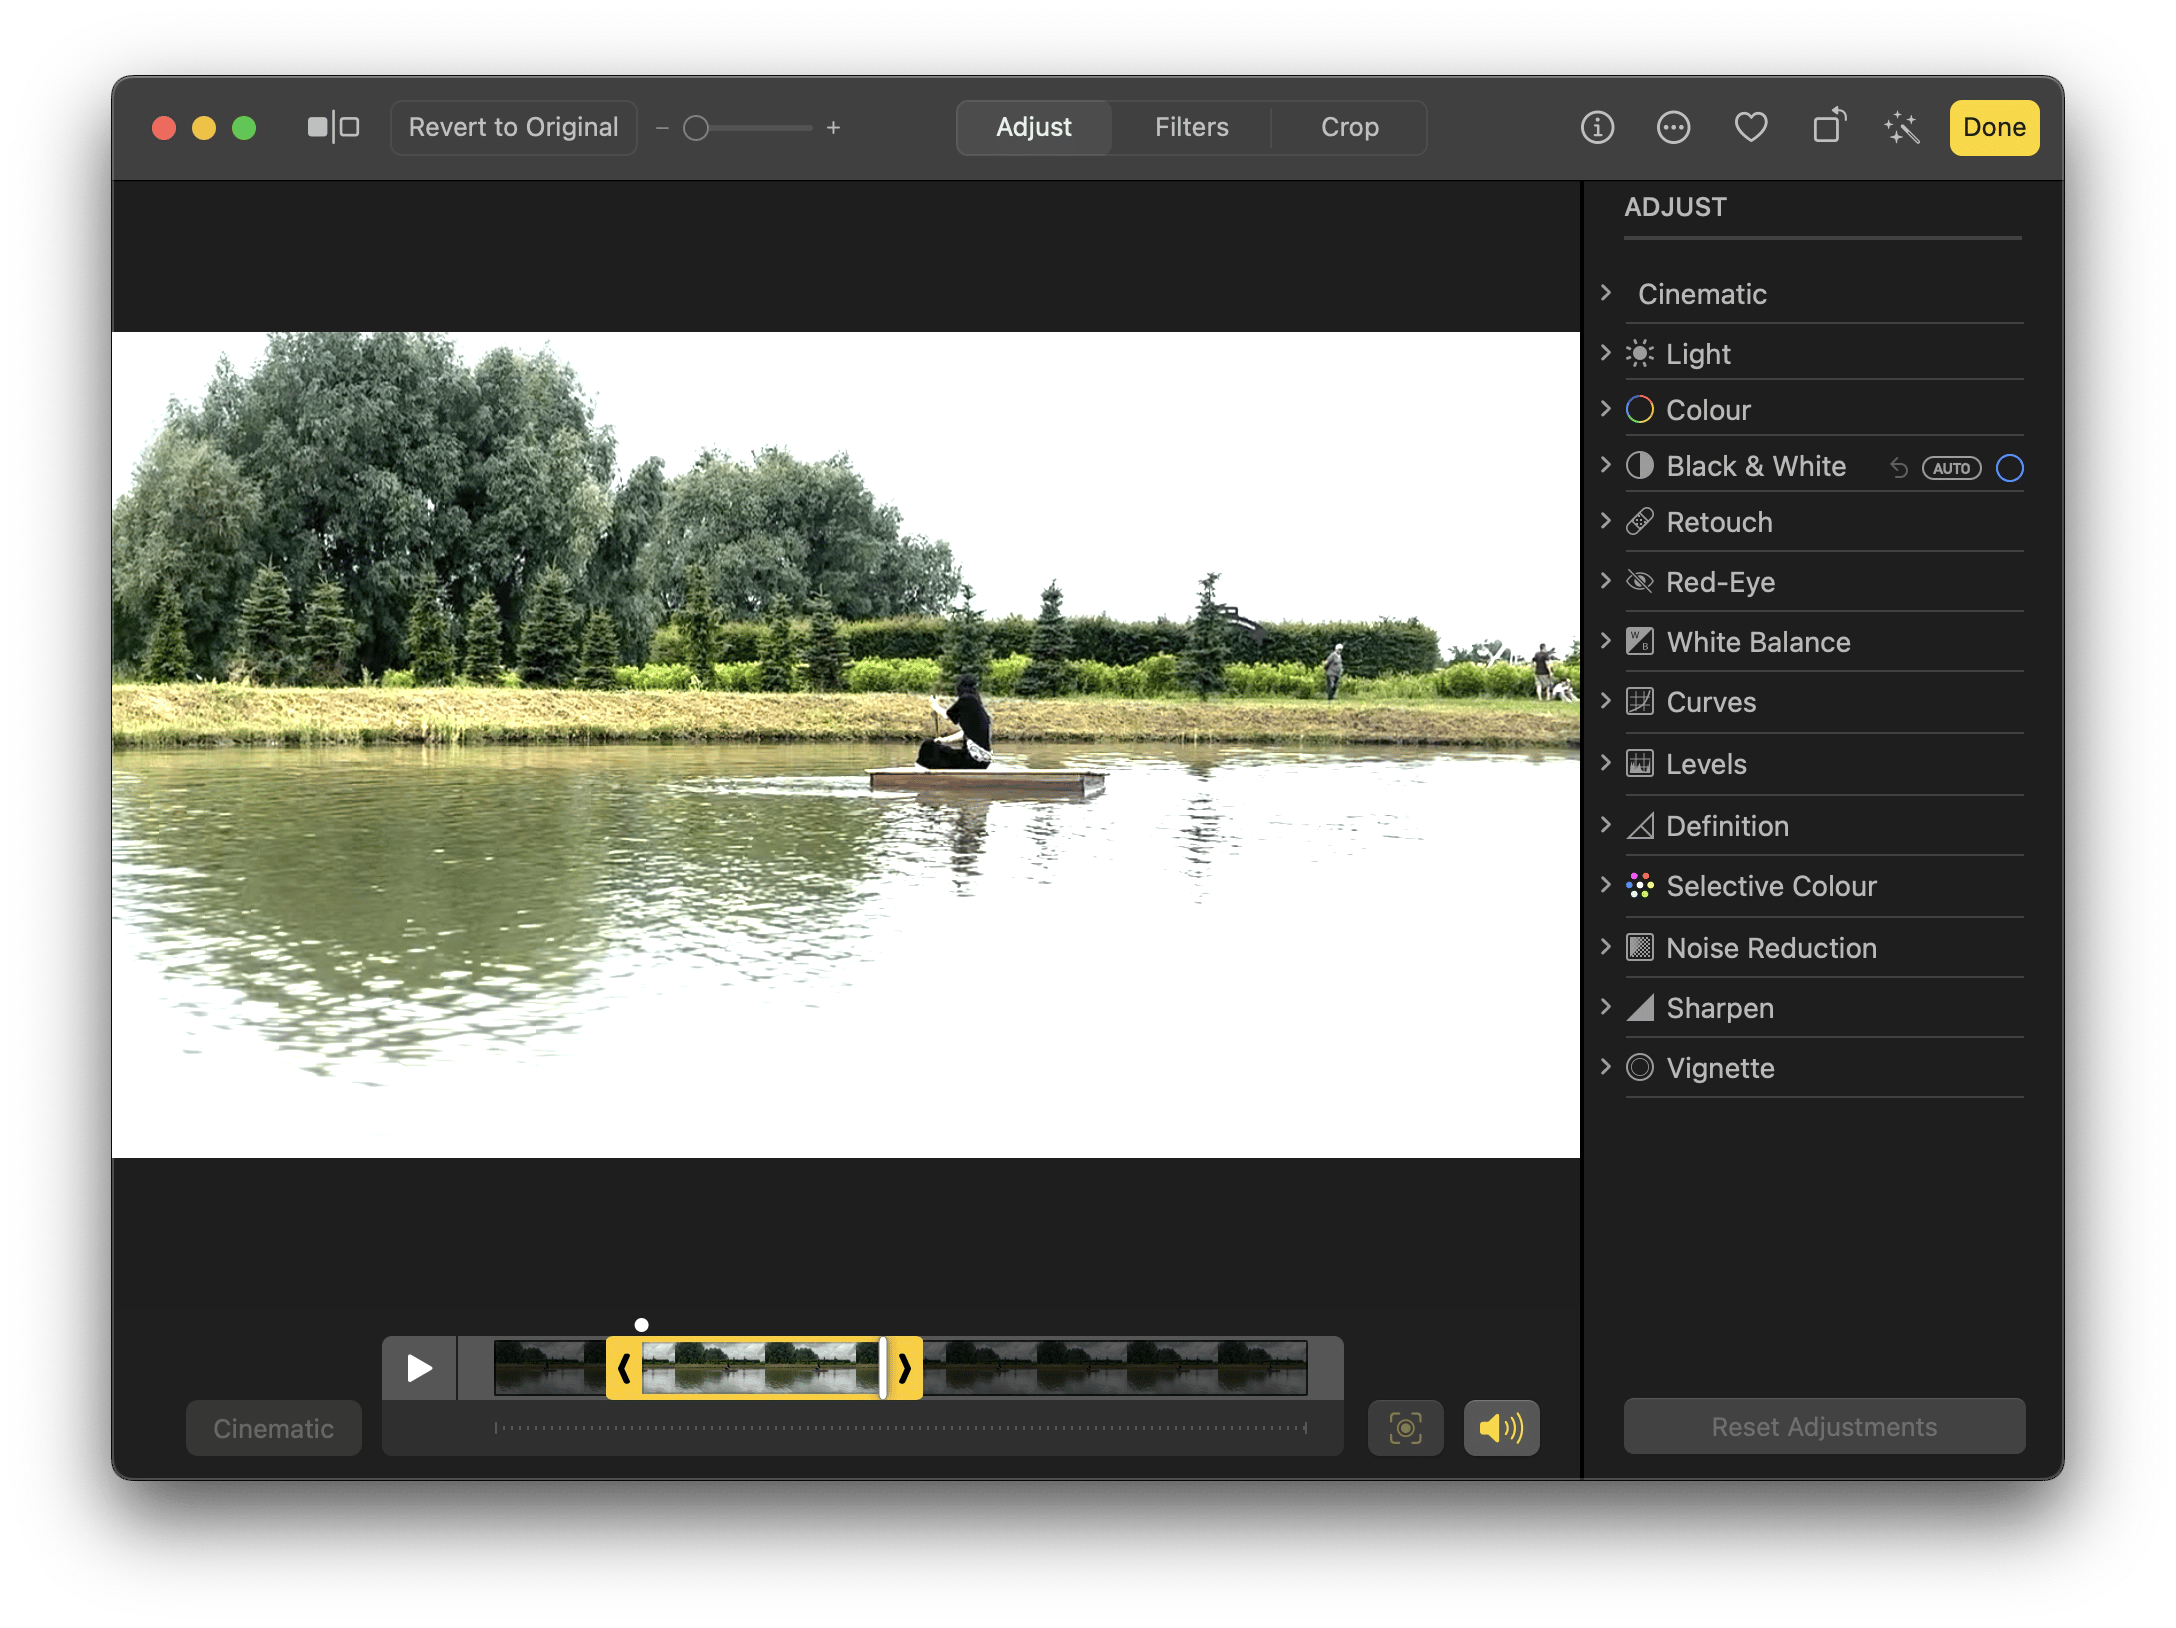
- Save the video as a new file or replace the existing one.
Don’t worry if you’ve made mistakes when trimming with Photos. You can easily undo the changes by clicking Edit > Revert To Original and dragging the timeframe back to its initial position.
How to cut a video with QuickTime Player
Most Apple users might not realize that QuickTime Player is more than a video player. It has a trimming tool that lets you split a video into separate parts. Here’s how to use the app for simple video trimming.
- Open QuickTime Player.
- Open the video file you want to trim.
- Click Edit > Trim.
- Drag the yellow frame to the desired position.

- Click Trim.
But that’s not all. The app lets you cut the trimmed videos into smaller parts. After saving the initial edits, click View > Show Clips. There, you can choose a clip, cut it, and save a part of it to a new, smaller file.
Personally, I find the process cumbersome if I want to extract multiple scenes from a saved recording. That’s why I prefer Filmage Editor, which lets me cut and save all the scenes without opening multiple clips.
How to trim a video online
If you’re publishing videos on YouTube as I do, you can use the trim and cut feature it provides.
- Sign in to YouTube Studio.
- Select Content on the left menu.
- Click on the video you want to trim.
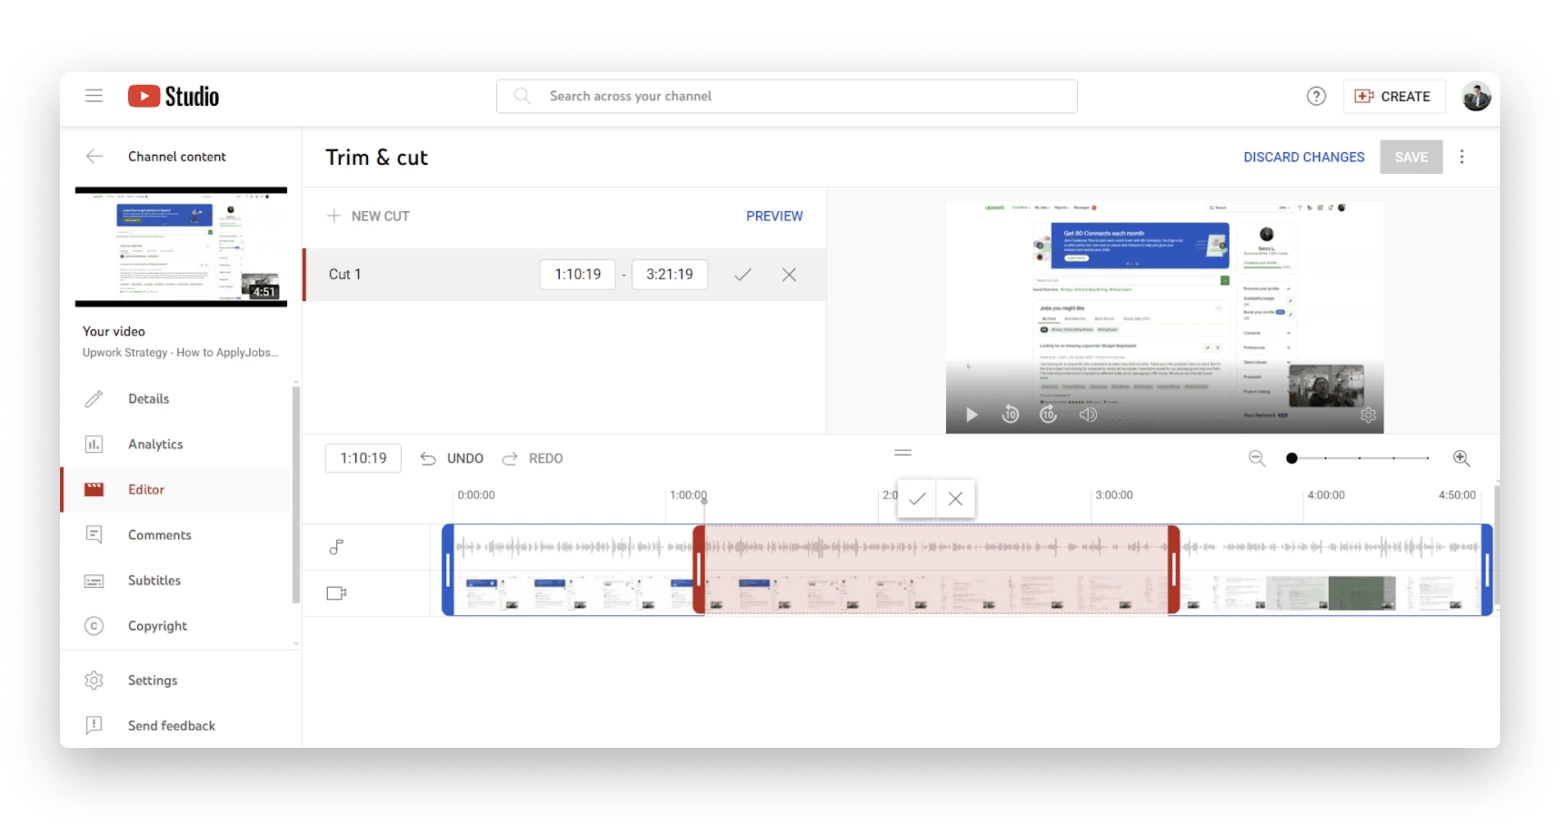
- Then, select Editor on the left. You will see a video editor loaded with your video.
- Click Trim & Cut > New Cut.
- Drag the red frame to a position you want.
- Click the tick button to confirm the cut.
- Then, click Save to publish the new changes on your channel.
Tip: If all you need is to edit YouTube videos on Mac, the above steps are enough. However, trimming videos on other platforms is trickier. Usually, it involves downloading the video, cutting it with a different tool, and republishing the trimmed scene. In this case, I’ll suggest using Downie to download the video first.
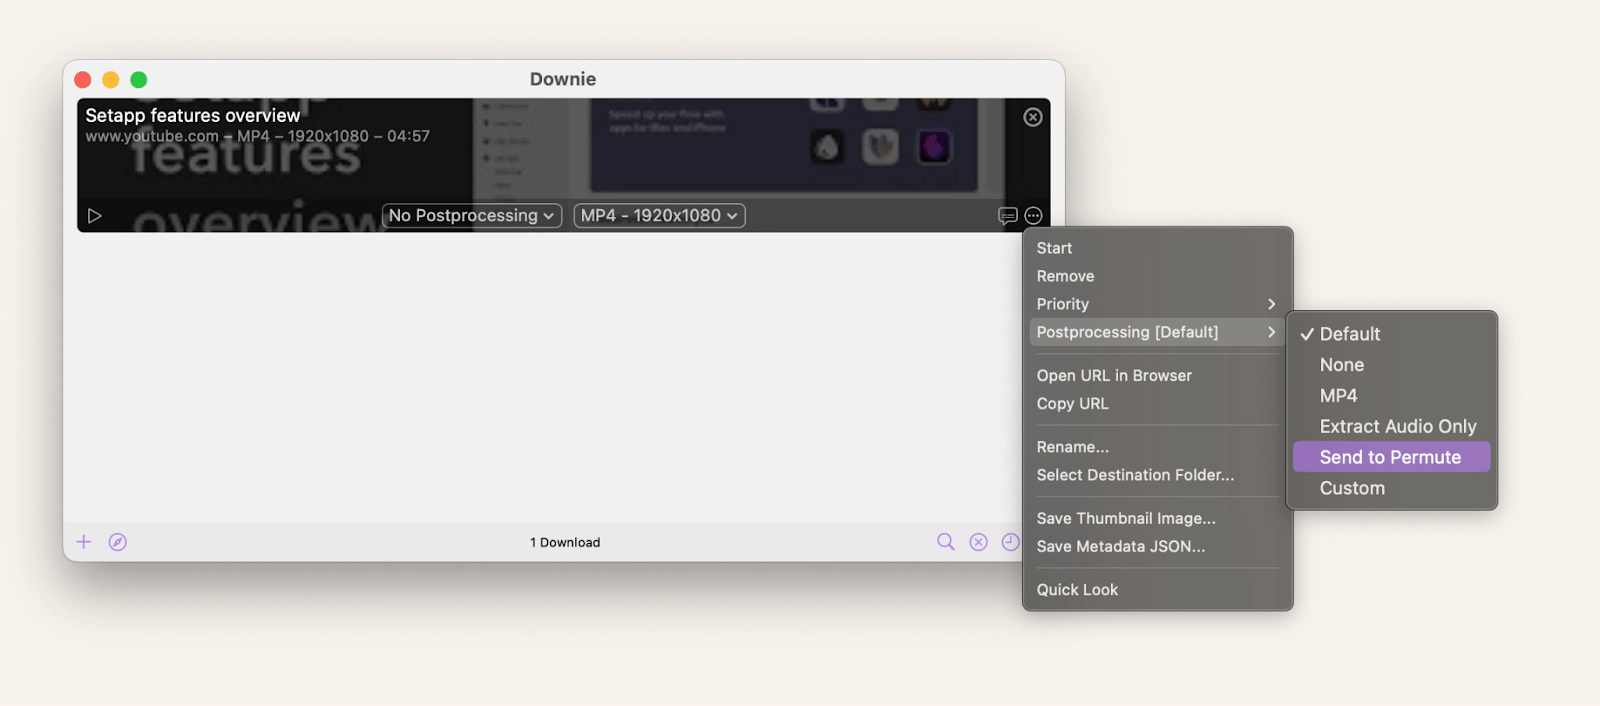
Downie can save high-resolution videos from YouTube, Vimeo, Facebook, and many other websites to your Mac. Then, you can send the video to Permute to trim the files by simply dragging the slider.
Best ways to trim MP3 audio on Mac
I’ve covered pretty much everything about video, but what about audio files? At times, you might be intrigued by certain music and want to make it your video’s background audio. Or you might want to edit a podcast recording before publishing. Regardless, there are several ways to cut an MP3 file or make YouTube to MP3 trim on your Mac. Let’s explore the few I’ve tested.
How to cut music on a Mac
If you’ve already downloaded Filmage Editor, you can also use it to trim music files. Filmage Editor is a versatile editing tool for both video and audio. Otherwise, try n-Track Studio.
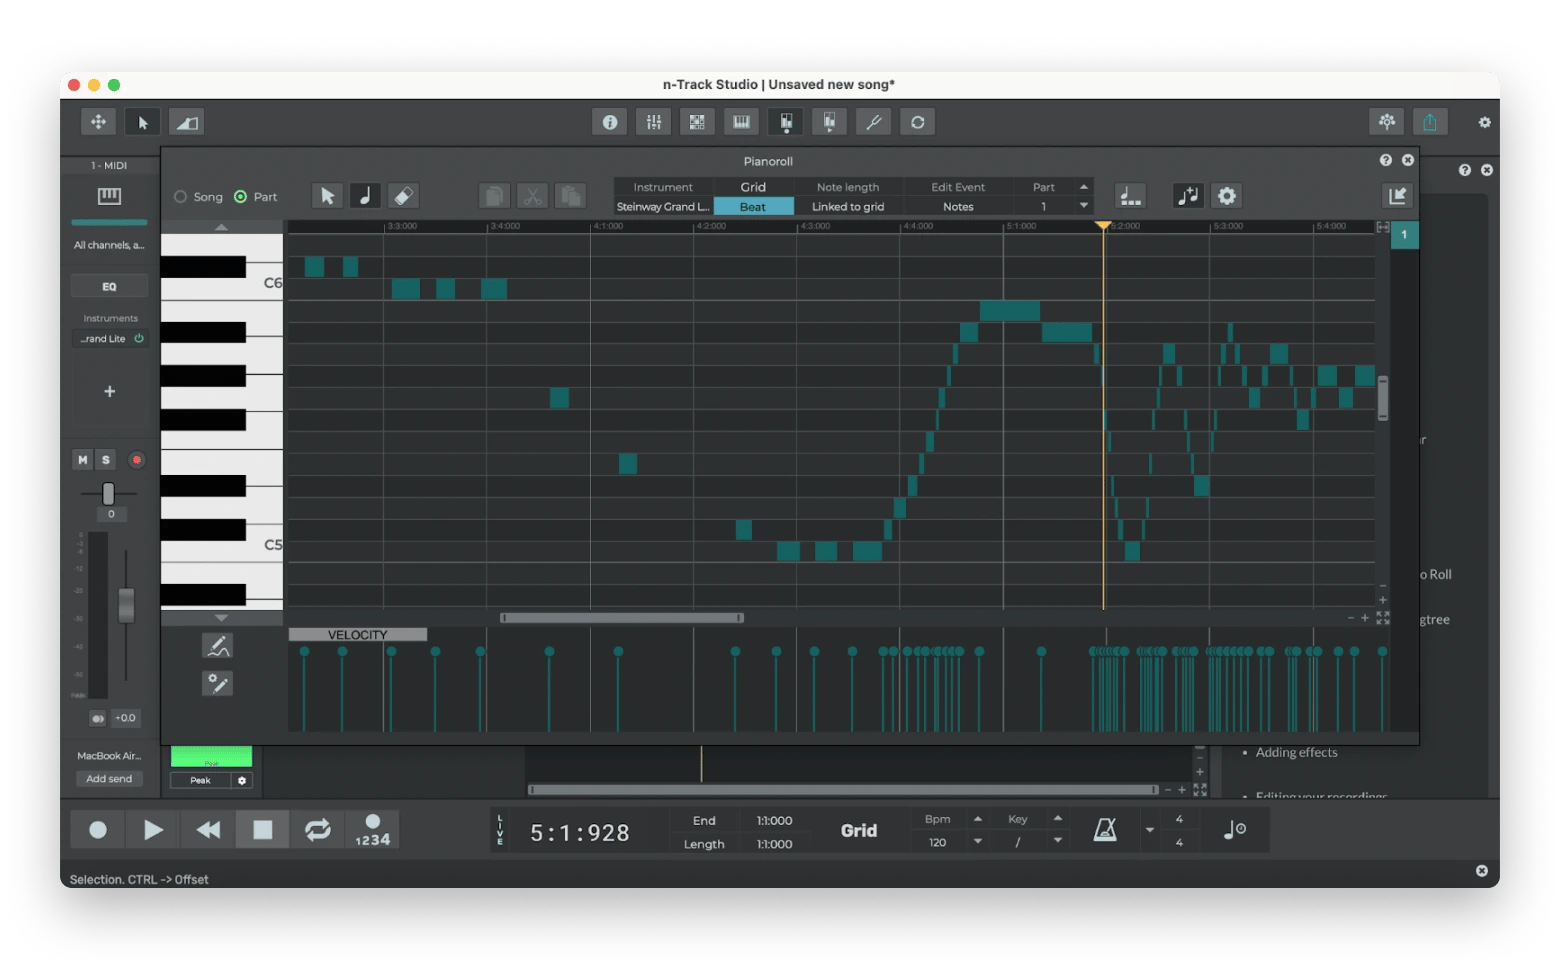
With n-Track Studio, you can cut MP3 files, rearrange them, add drum accompaniments, and polish your track with dozens of other enhancements. On top of that, you can record a song and layer it on top of your MP3 with other audio effects.
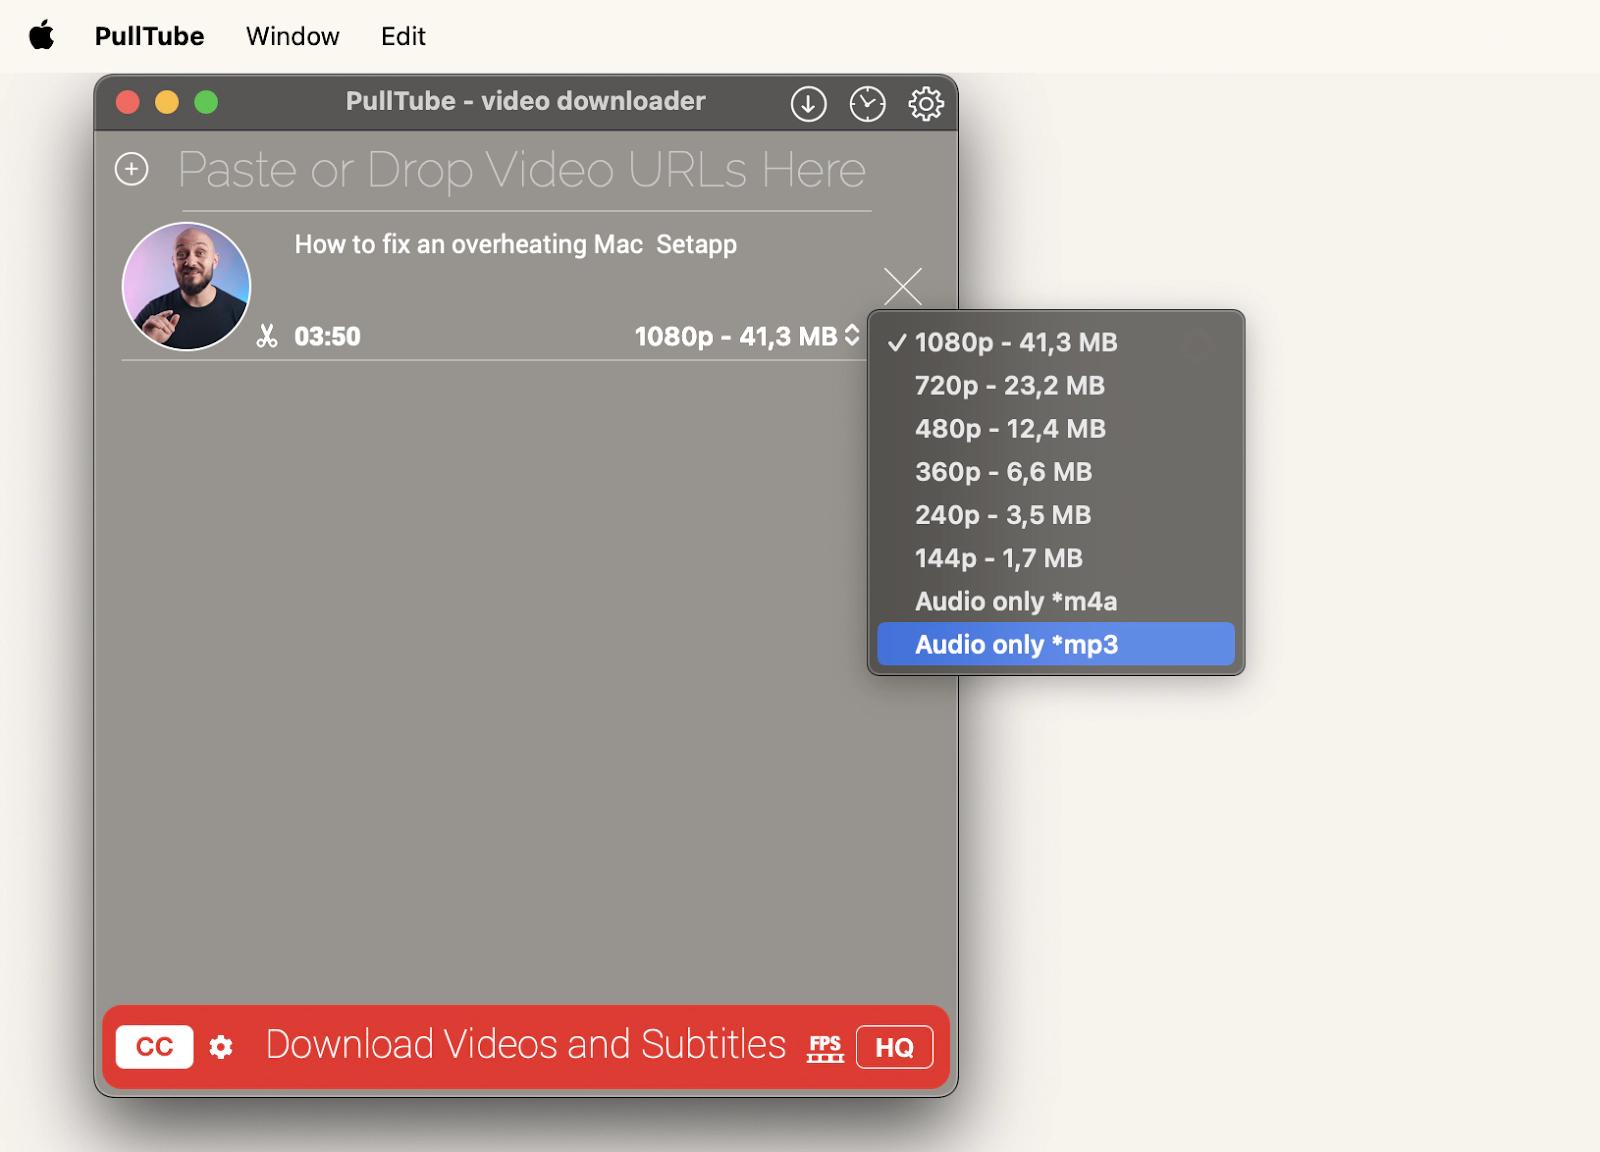
Now, the problem lies in extracting audio files from YouTube videos. Usually, you’ll need a downloader app to save the video file to your Mac. Then, you use a music editor to separate the audio from the video track. But if you want a more effortless way, just use Pulltube, which I’ve already mentioned.
- Copy & paste the video’s URL to PullTube.
- Click on the resolution and select Audio only.
- Then, click the duration beside the scissor icon.
- Select Enter Trimming Mode.
- Drag the frame to the desired duration.
- Click Trim.
- Click Download to save the trimmed audio part to your Mac.
If you stumble across some beautiful music on YouTube and want to turn it into a ringtone, you can also do it with Pulltube. Adjust the audio fragment, click on the ringtone icon, and specify the destination folder. Then, save the trimmed audio. The only thing to be mindful of is keeping the ringtone duration to less than 40 seconds, the limit that Apple sets. If your ringtone exceeds the limit, it might not be copied over or played by your iPhone.
How to trim an MP3 file with QuickTime Player
QuickTime is a handy tool for basic audio trimming. Just like how you can use it to cut video files, the media player is equally helpful for cutting MP3.
- Open your audio file with QuickTime Player.
- Click Edit > Trim... on the menu (or use a keyboard shortcut Cmd+T).
- Adjust the slider to the desired time frame.

- Click Trim to confirm the changes.
- Save the trimmed audio file to your Mac.
Of course, QuickTime’s features are quite limited. You need complex editing, n-Track Studio is the better option.
How to export individual tracks on a Mac
Imagine listening to a mesmerizing soundtrack on a video and wanting to extract the audio file from it. Using a basic media editor is out of the question. Rather, you need apps like Permute, a media converter that lets you extract and export individual tracks from a video.
- Install and open Permute.
- Go to the Permute’s Workshop (it's a robot face in the lower left corner).
- Select Track Export.
- Drag and drop a video file onto Permute.
- Wait for the app to identify and extract individual tracks from the video.
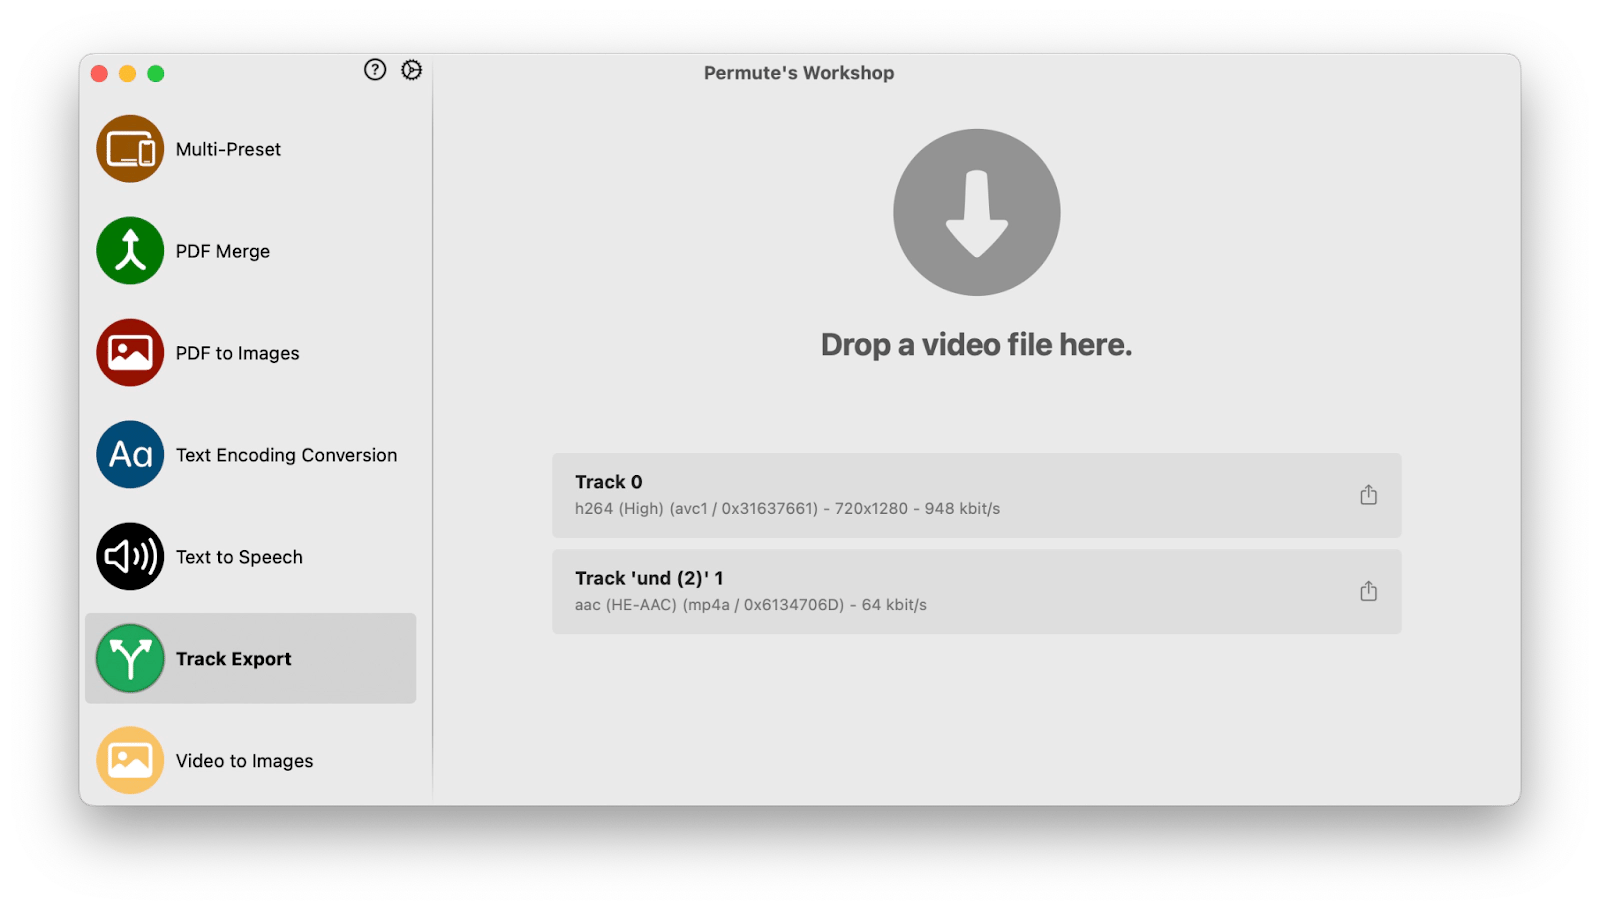
Now, you can choose to save a specific track to your Mac.
Why do you need an MP3 cutter and a video cutter?
Of course, you can publish raw, unedited videos or audio. But guess what, most people don’t have the patience for awkward silences and irrelevant commentaries. That aside, MP3 and video cutters can be helpful in many situations.
- Splitting large files into smaller ones. It’s easier to transfer smaller files between storage.
- Posting shorts or mini video clips on YouTube, Instagram, and other channels. These videos are usually less than a minute long.
- You can extract part of a video and share it with your family and friends. I usually do this when I record cats' behavior.
The list is not exhaustive, and I’m sure you’ll have other reasons to trim video clips.
Effortless video and MP3 trimming on Mac
You don’t need to be an expert to know how to shorten a video and cut an MP3 on a Mac. Instead, let the video editing apps for Mac do the heavy lifting so you can focus on the creative side of your work. I rely on user-friendly, effective, and affordable tools for my content creation.
- Filmage Editor is a powerful video editor that lets you trim and create cool videos for social media.
- Pulltube automatically extracts YouTube videos based on their time codes.
- Downie lets you trim short audio and video scenes from YouTube and other sites.
- n-Track Studio is handy when you want to layer audio files with voice-over, singing, and other sound effects.
- Permute is great for converting one media format to another.
Don’t let video or audio trimming become a major productivity blocker when creating content. Download the apps I mention, along with other useful ones, on Setapp. You can try them for 7 days for free and decide which suits you best.
FAQ
How do I shorten an MP3 on my Mac?
You can trim an MP3 using QuickTime Player for basic cuts (Edit > Trim), or use n-Track Studio if you need more control, like rearranging clips, adding effects, or layering audio. If the MP3 comes from YouTube, Pulltube lets you trim and save only the audio part before downloading.
How do I shorten a video file on a Mac?
For quick cuts, open the video in QuickTime Player and use the Trim tool. If you want smoother workflows, multiple cuts, or subtitles, Filmage Editor is easier to work with. You can also trim videos directly in the Photos app for simple edits.
How do I extract MP3 from a video on a Mac?
To extract MP3 from a video, use Pulltube to download a video and choose Audio only, then trim the exact fragment you need before saving it as an MP3.
How do I edit video and audio on Mac?
To edit video, use Filmage Editor: import your video, cut clips with the scissor tool, rearrange or add effects, then export. For audio, n-Track Studio lets you trim, rearrange, and enhance MP3 files. For simple edits, QuickTime Player works for both video and audio — just open the file, choose Edit > Trim, adjust the slider, and save.


