How to upgrade RAM on your Mac
Ideally we’d prefer things to be happening lightning fast on our Macs — no matter what we do or how many app windows we have open. Not always the case in real life, unfortunately.
If you notice your Mac slowing down, get extended wait times for certain processes, or sudden system crashes seem to have become the new norm, chances are your MacBook RAM replacement is due.
Deciding whether to upgrade memory on your Mac requires deliberate reasoning, attention to technical specifications, and a light touch when it comes to manipulations with sensitive hardware. Let’s start with the reasoning first.
A few reasons to upgrade RAM on Mac
RAM (Random Access Memory) is what your Mac relies on to temporarily store data it’s currently using or processing — i.e. to run all of your open apps and documents.
The amount of RAM on your Mac determines how much data you can work with at any given point of time and how quickly this data can be accessed. This means that when considering Mac upgrade RAM boost, you can expect:
- More apps open at the same time without your Mac slowing down or crashing. This proves handy if you’re used to juggling messaging, emails, video conferencing, web browsing, and working on a project or two at the same time.
- Faster performance of resource-intensive apps. Think gaming, design, buffering for hi-res printing, video editing: when your system has to keep source files open, track changes, and run video editor as processes that are happening simultaneously
- Longer life for your hardware. Potentially reducing wearout of your Mac’s battery, as well as SSD or HDD drives that no longer need to be used to compensate for RAM shortages.
On the other hand, adding memory to Mac is also associated with a chance of running into unnecessary trouble. Once you attempt MacBook RAM replacement, you risk voiding manufacturer warranty, purchasing a faulty RAM module, or accidentally compromising sensitive hardware of your Mac. All the things we’d naturally prefer to avoid.
How to speed up your Mac without memory upgrade
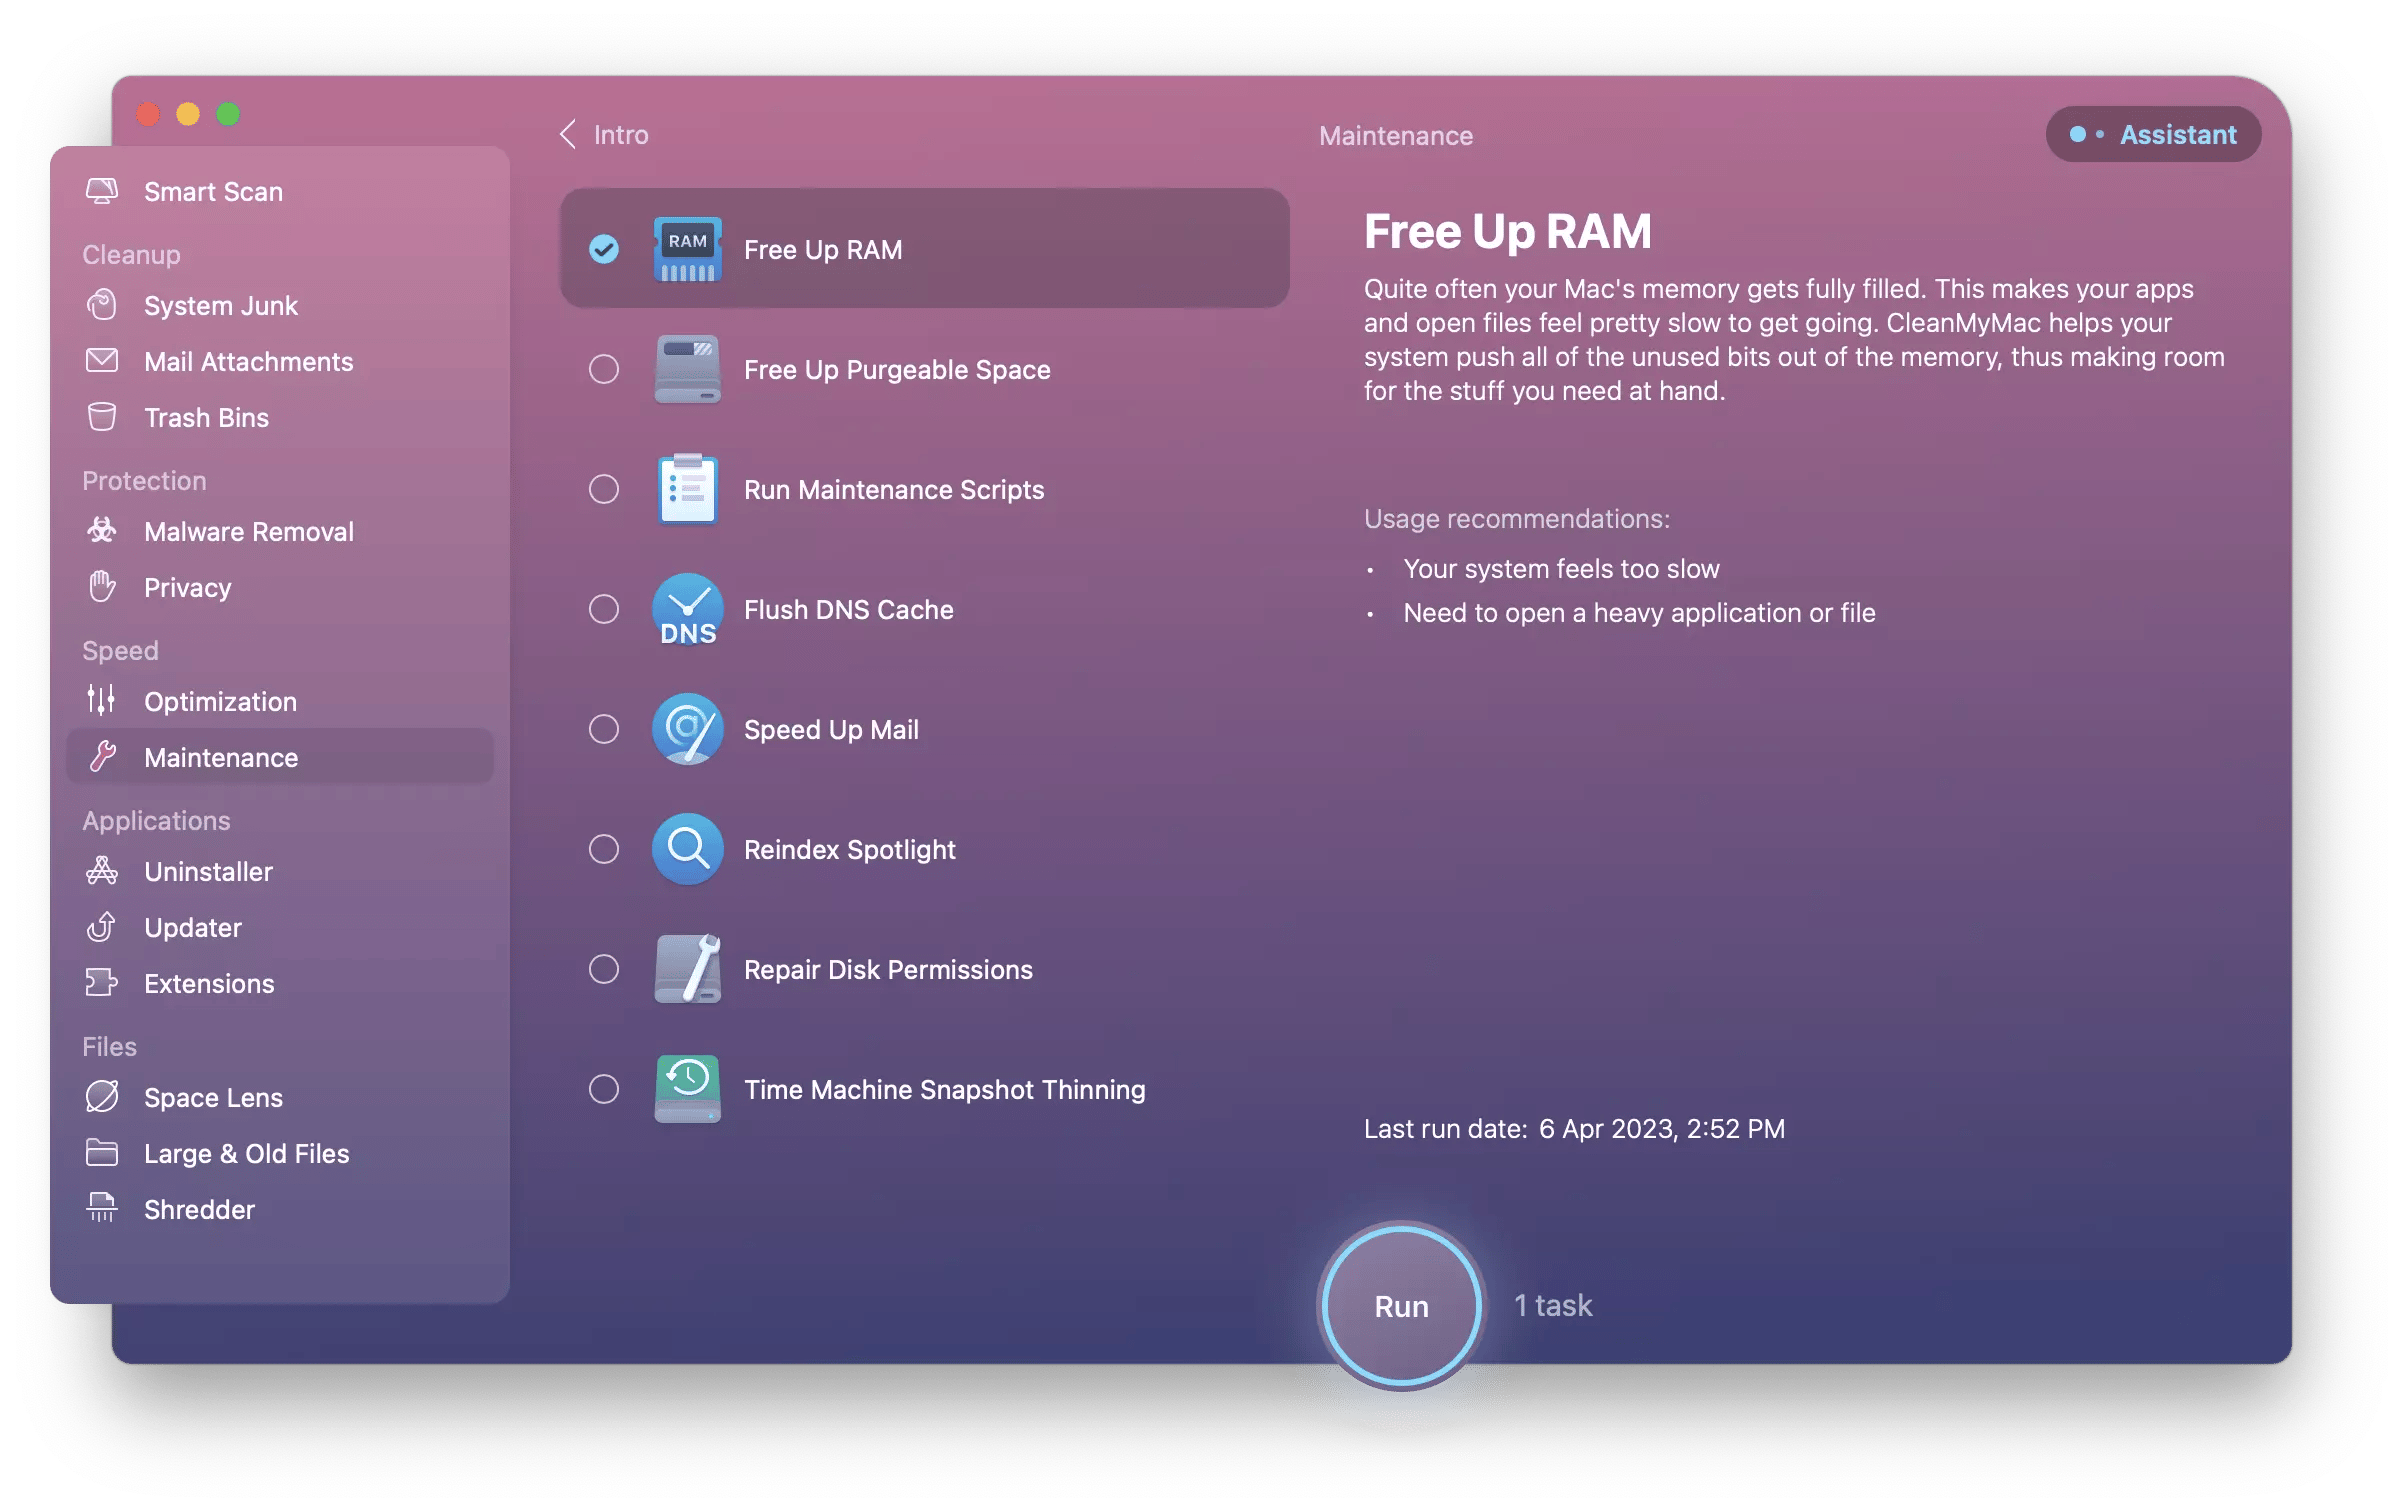
If you feel your Mac is starting to get noticeably slower, don’t think your only alternative is to upgrade Mac RAM. First try to bring your Mac back to speed with CleanMyMac X.
CleanMyMac X is a collection of powerful tools that declutter, protect, and detect performance leaks to revive your Mac’s general performance. With a single click you’ll be able to perform regular full system cleanups or run a special Free Up RAM maintenance module to optimize memory.
How to find out if lack of RAM is limiting you
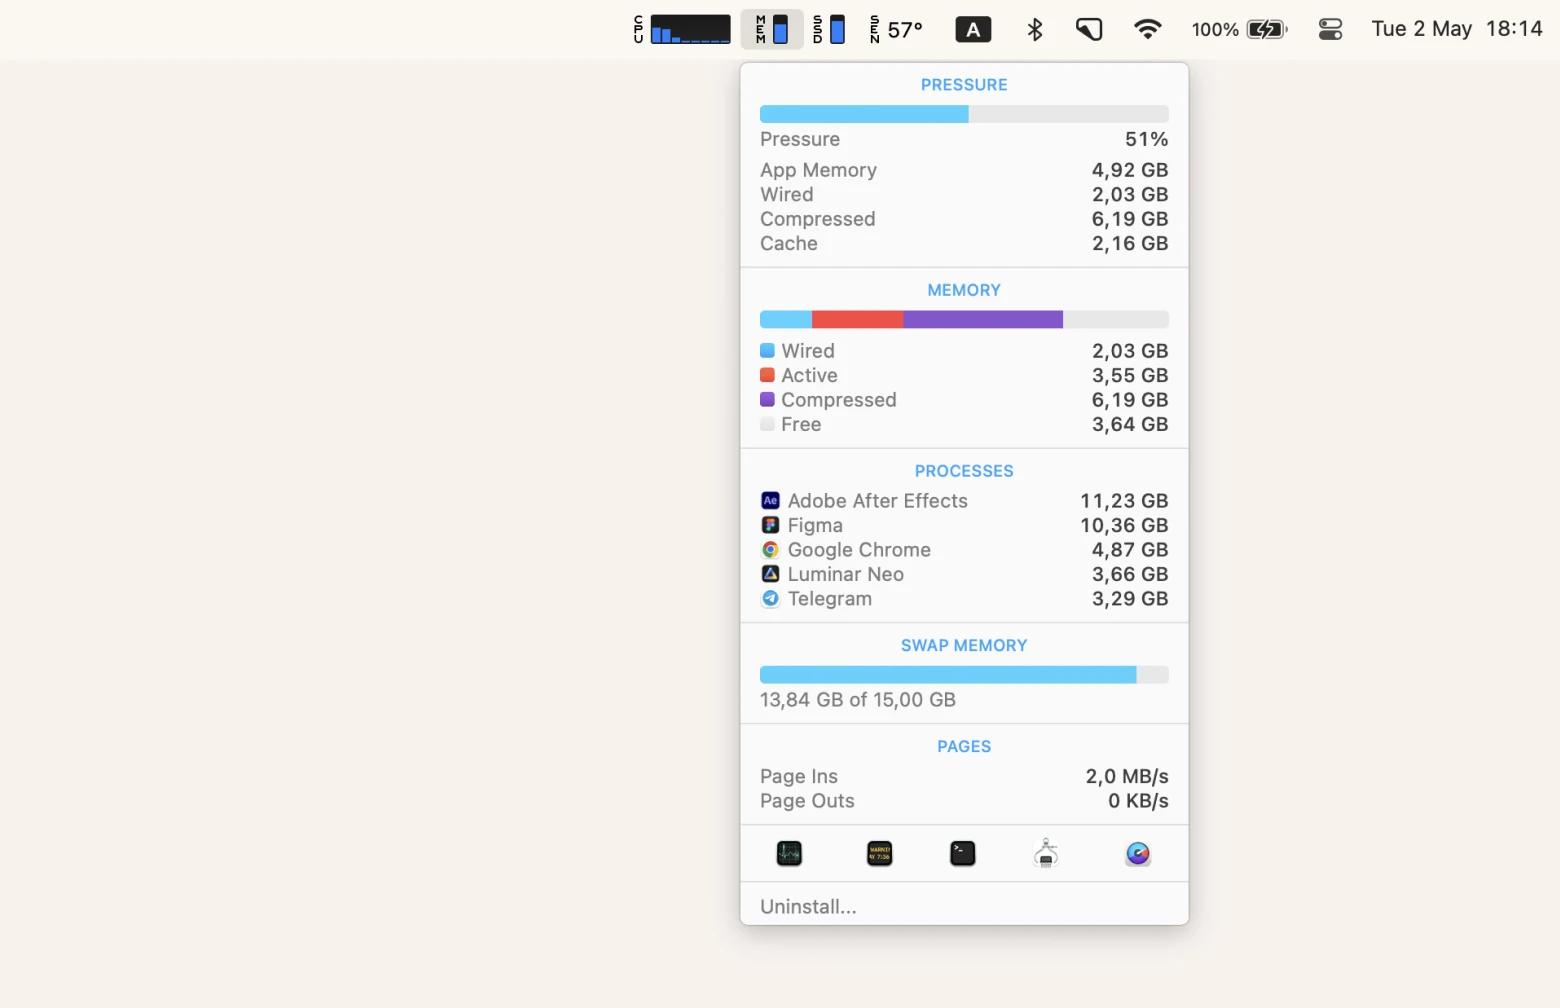
One of the key system factors you need to understand when considering MacBook Pro RAM upgrade is your Mac’s memory pressure. In addition to the amount of free memory your Mac has, it helps to determine how efficiently your RAM is used and takes into account swap rate, wired memory, and file cached memory.
Note: You know your Mac needs more RAM only if the memory pressure graph is in red. If the graph is yellow — try closing any apps or processes that you don’t need at the moment or start thinking about eventually getting more RAM.
An easy way to keep an eye on your Mac’s memory pressure is adding a menu bar icon from iStat Menus that shows real-time memory stats.
iStat Menus is a comprehensive macOS data collector that lets you choose performance indicators important to you and have them displayed as menu bar icons with live feed.
In addition to detailed memory stats, you also instantly see a list of apps using the most memory, so you know which ones to quit if you need to.
Which Mac models allow RAM upgrades?
When thinking about Macintosh memory upgrade, note that not all Mac models allow for adding RAM. For instance, all the newer MacBooks, including all MacBook Air models, have non-removable memory and aren’t suitable for Mac memory upgrade.
MacBook
Allows Mac memory upgrade:
- All MacBook Pro 17” models
- 2008–2012 MacBook Pro 15” models
- 2009–2012 MacBook Pro 13” models
- 2008–2011 MacBook models
Doesn’t allow Mac memory upgrade:
- All models, except for the ones listed above
Mac Pro
Allows Mac memory upgrade:
- All models
iMac
Allows Mac memory upgrade:
- All models, except for the ones listed below
Doesn’t allow Mac memory upgrade:
- 2019 iMac Retina 4K 21.5”
- 2017 iMac Retina 4K 21.5”
- late 2012–2017 iMac 21.5” models
iMac Pro
Doesn’t allow Mac memory upgrade:
- All models*
Mac mini
Allows Mac memory upgrade:
- 2010–2012 Mac mini models
Doesn’t allow Mac memory upgrade:
- 2023 Mac mini
- 2020 Mac mini
- 2014 Mac mini
- 2006–2009 Mac mini*
- Mac mini Original*
* The memory in this model isn’t user-accessible: if you want to have it replaced, contact an Apple Authorized Service Provider.
How to find out your Mac model
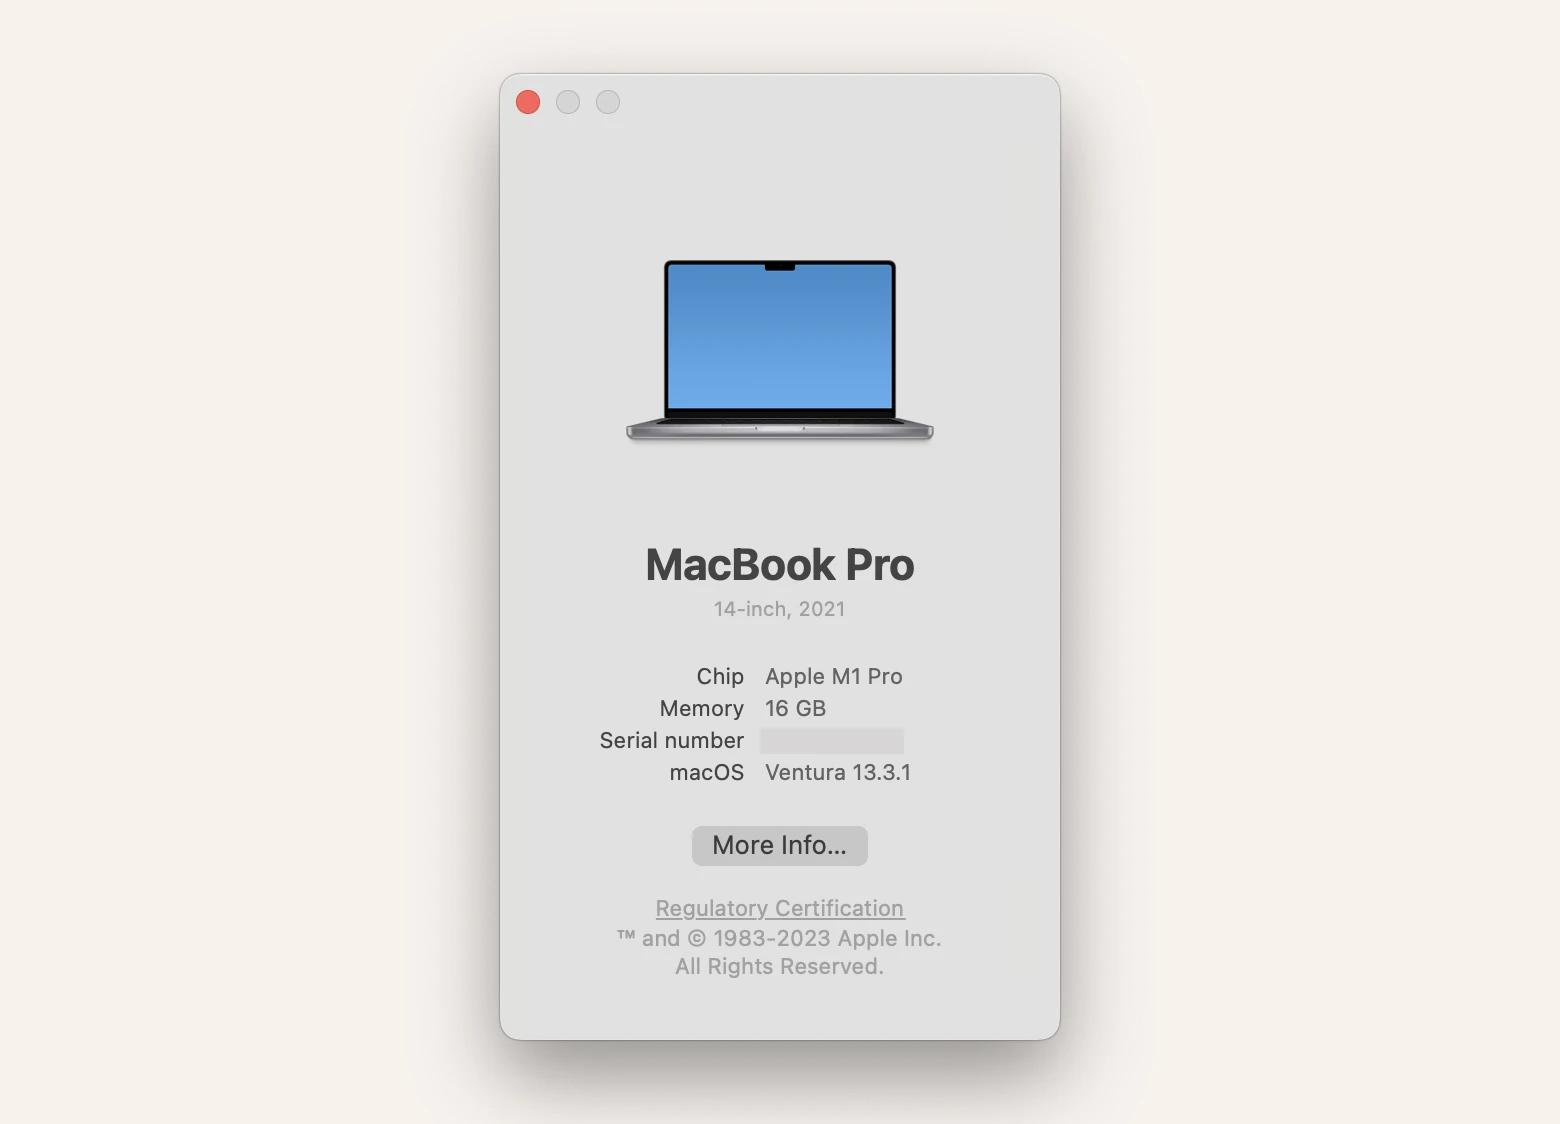
To check your Mac model and understand whether it’s suitable for Mac memory upgrade:
- Go to Apple Menu ➙ About This Mac
- Choose the Overview tab from the top menu
- Find your Mac’s model listed under the name of your current macOS version
How to upgrade RAM on MacBook Pro
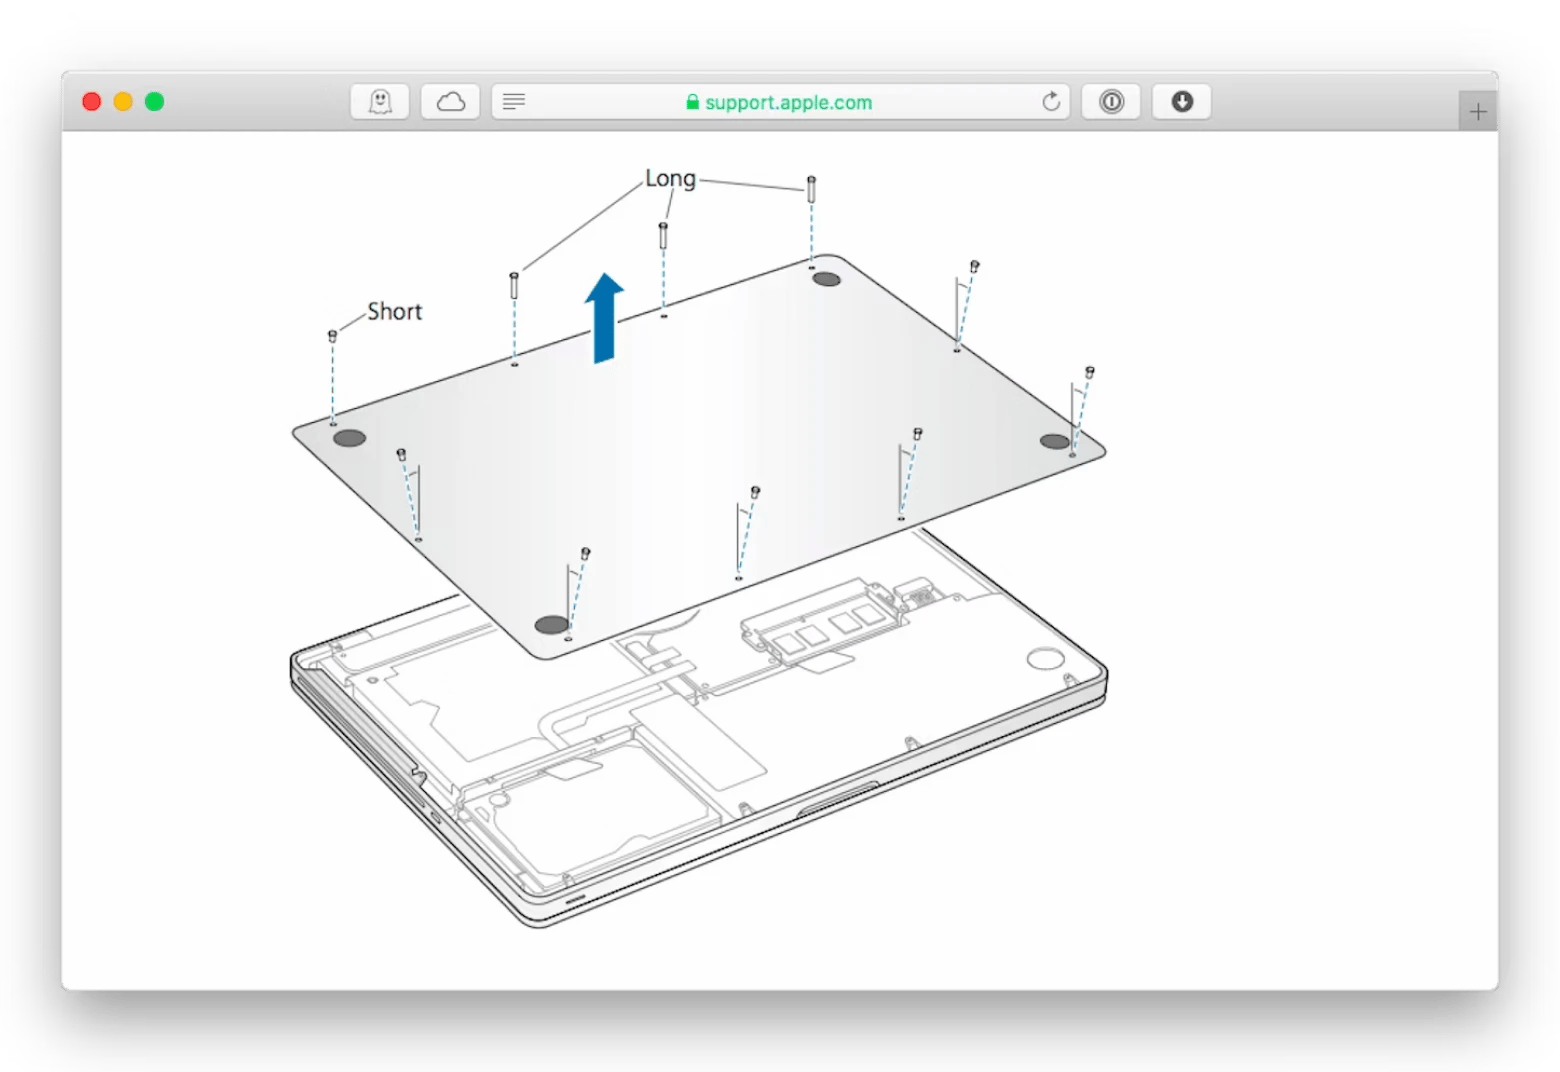
If you own a 17” MacBook Pro or want to upgrade Mac RAM on an older pre-2012 MacBook model, here are the steps you need to follow:
- Turn off your MacBook and disconnect all cords, cables, and accessories from it
- Let it cool down for at least 10 minutes
- Turn your MacBook over and unscrew its bottom lid (make sure to notice the locations of the three longer screws so that you can place the bottom lid back correctly when you’re done)
- Touch a metal surface inside the computer to discharge any static electricity from your body
- Locate the RAM module and push the levers on its sides outwards to release it
- Remove the module carefully holding it by the half-circle notches on the sides (avoiding touching the gold connectors)
- Insert your new RAM module — also carefully holding it by the half-circle notches on the sides and make sure not to touch the gold connectors
- Push the new module down until it clicks into place
- Screw the bottom lid back into place to complete your MacBook Pro RAM upgrade
How to upgrade RAM on Mac mini
As we have already mentioned above, adding memory to Mac mini is only possible in the 2010–2012 models. If this is the case, here’s what you need to do:
- Turn off your Mac mini and disconnect it all the cords and cables from it
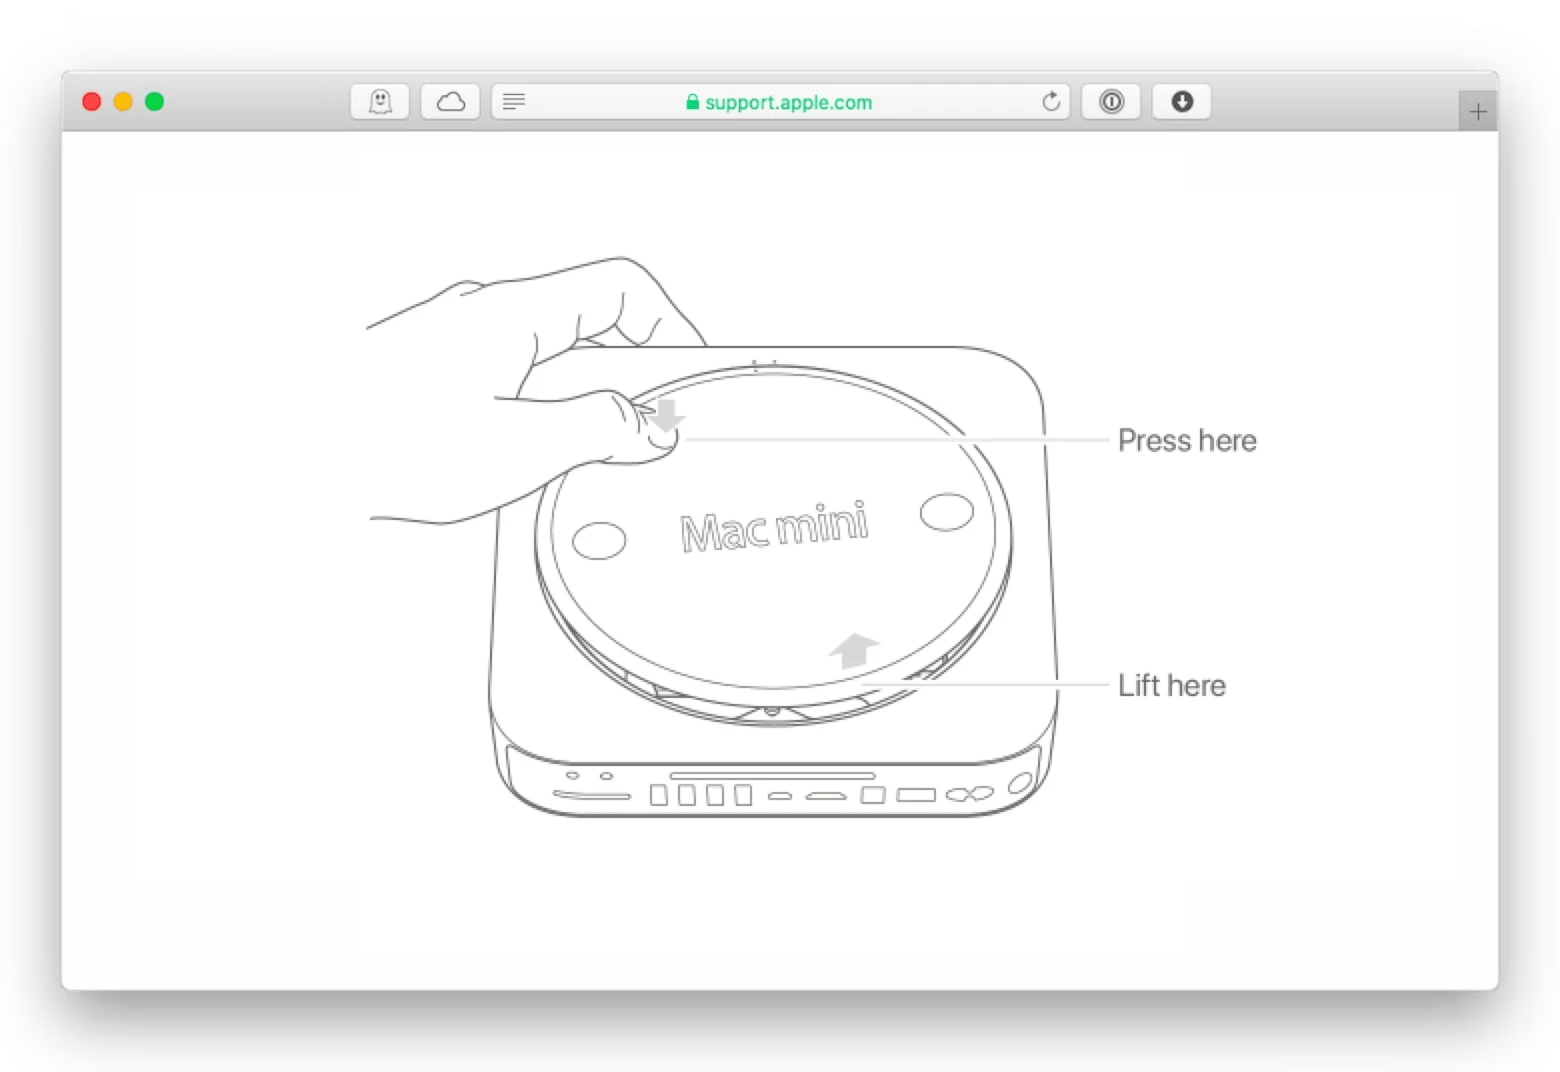
- Turn your Mac upside down and rotate the bottom cover counterclockwise to unlock it
- Press on one side of the cover till the other side pops open and remove the cover
- Carefully open the clips on either side of the top RAM module to pop it out of the slot and remove it
- Repeat to remove the second module
- Install the new memory into the bottom slot by pressing the notched edge in and keeping the opposite edge slightly raised until it snaps into place
- Repeat for the upper module
- Replace the bottom cover and reconnect the cables
How to upgrade RAM on iMac
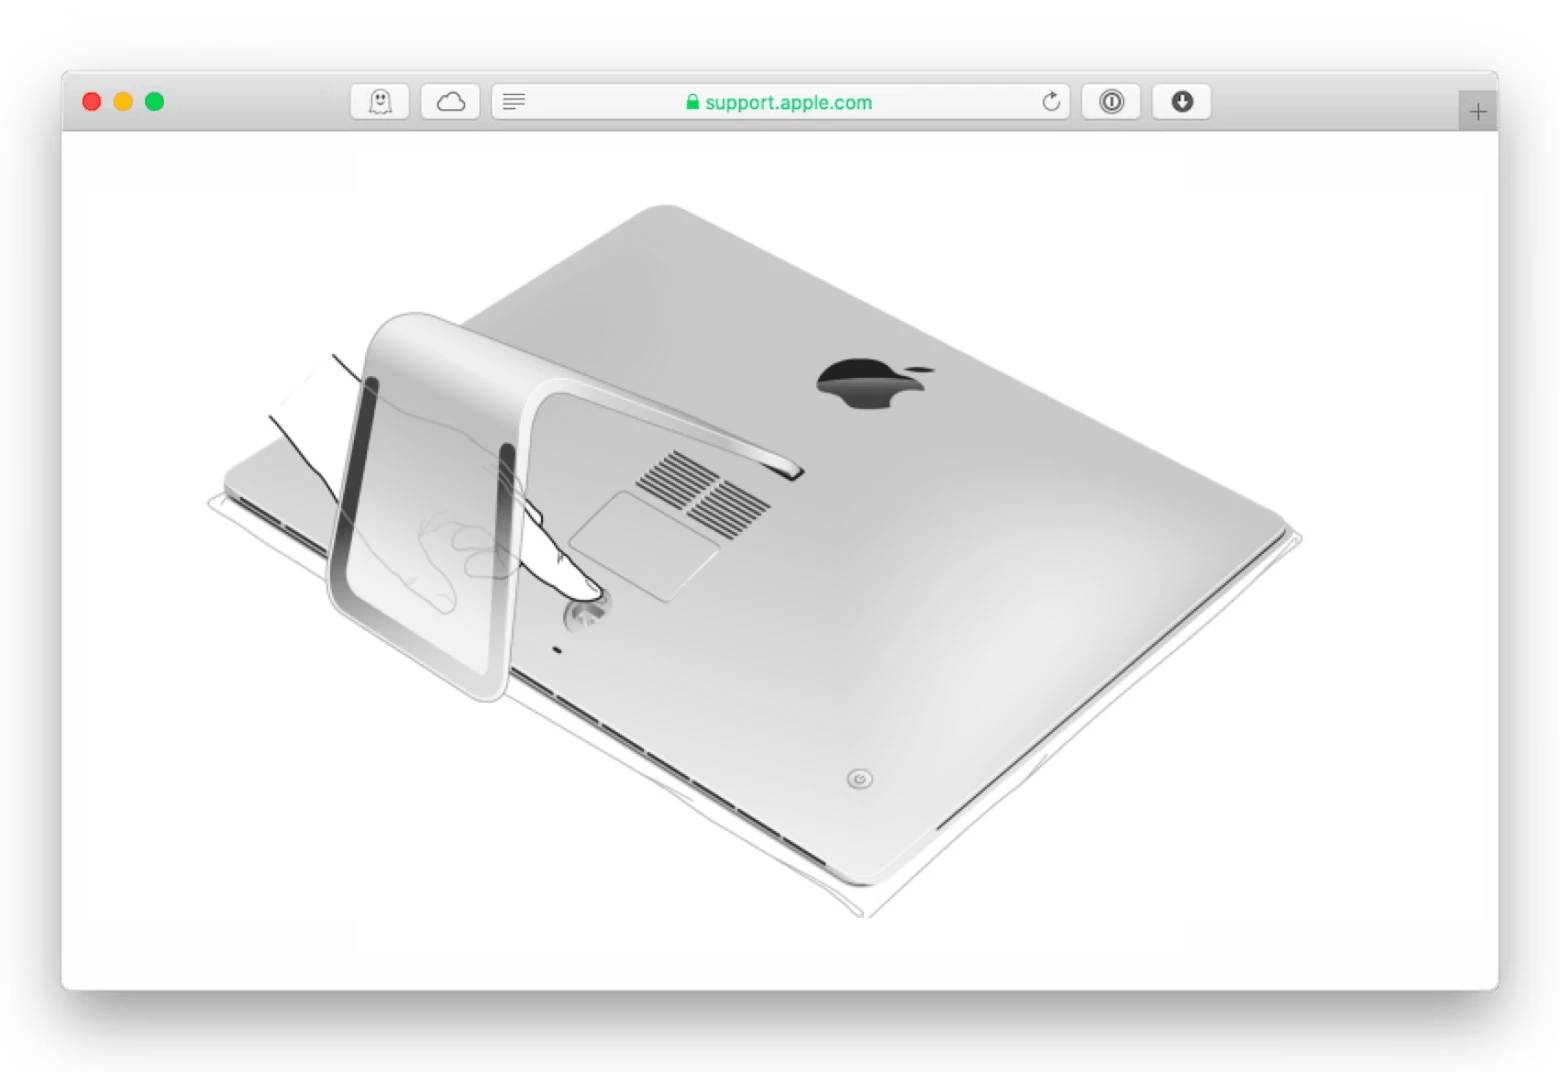
All models that allow for iMac memory upgrade fall into one of the two categories in terms of where their RAM port is located: behind the door on the back or along the bottom edge of your iMac.
To upgrade Mac RAM on a 2012 or newer 27” iMac:
- Shut down your iMac, let it cool down for at least 10 minutes, and disconnect all the cords and cables from it
- Carefully lay your iMac face down on a soft towel
- Press the button under the memory storage door on the back of your iMac, open it and remove
- Find the diagram of the memory-cage levers and correct orientation of the RAM modules on the reverse side of the memory storage door you’ve just removed
- Push the levers on the sides of the memory cage outwards to release it, then pull it up to get access to DIMM slots
- Remove DIMM modules one by one by pulling each one straight up and out
- Insert new RAM, making sure that all new modules are oriented correctly and the notch on each of the DIMMs is aligned with its slot
- Push memory cage levers back into into place
- Place the memory storage door back in and close it
- Return your iMac back to its upright position and reconnect all the wires
Steps for iMac memory upgrade on older iMacs that store RAM along the bottom edge are a bit different but are still quite easy to follow:
- Shut down your iMac, let it cool down for at least 10 minutes, and disconnect all the wires from it
- Carefully lay your iMac face down on a soft towel
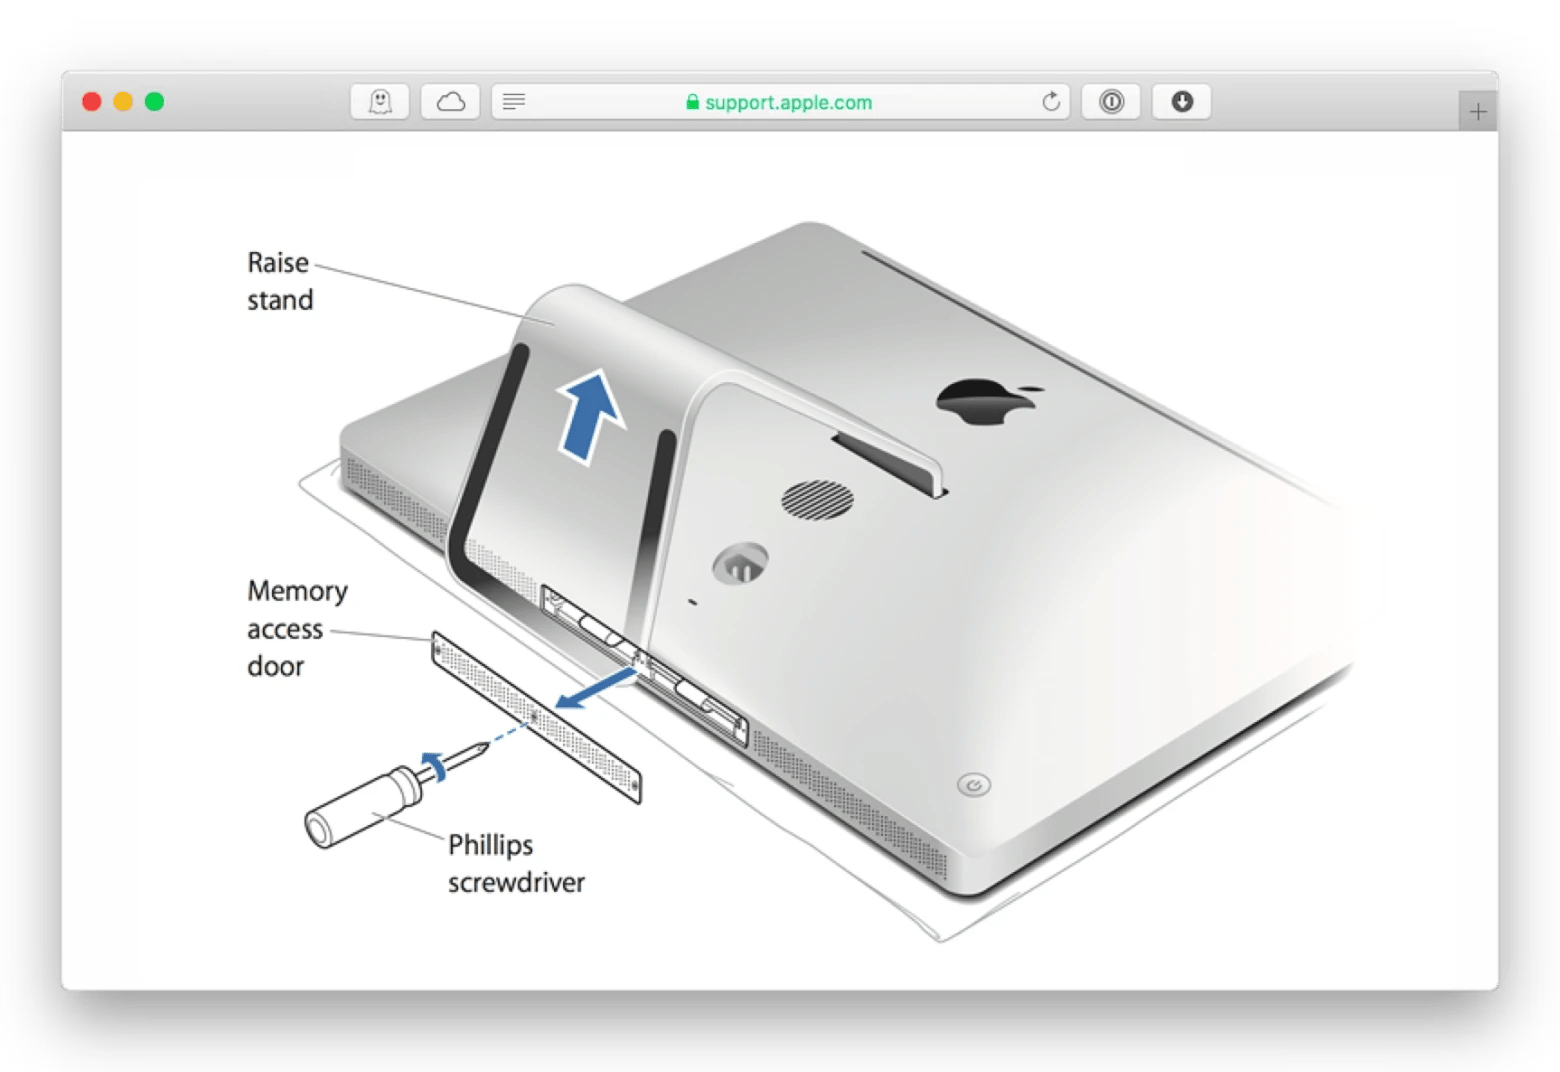
- Unscrew the RAM access door in the bottom of your iMac and set it aside
- Untuck and gently pull the tabs or open the clips to eject a memory module (depending on a model, you’ll either see a set of pull tabs or ejector clips)
- Insert new RAM into the slot and gently push it in until it clicks into place
- Tuck the tabs over the new RAM module or close the ejector clips
- Reinstall the memory access door
- Bring your iMac back upright and reconnect all the wires
Source: apple.com
What you should do after adding memory to Mac
After you upgrade Mac RAM you need to let your Mac complete a memory initialization procedure and check that it recognizes the new memory.
To perform the verification:
- Turn your Mac on
- Allow 30 seconds or more for memory initialization (the display will remain dark until the initialization is finished)
- Once the system is back up, go to the Apple menu ➙ About This Mac
- Confirm that the memory you see listed matches the specifications of the memory you’ve installed
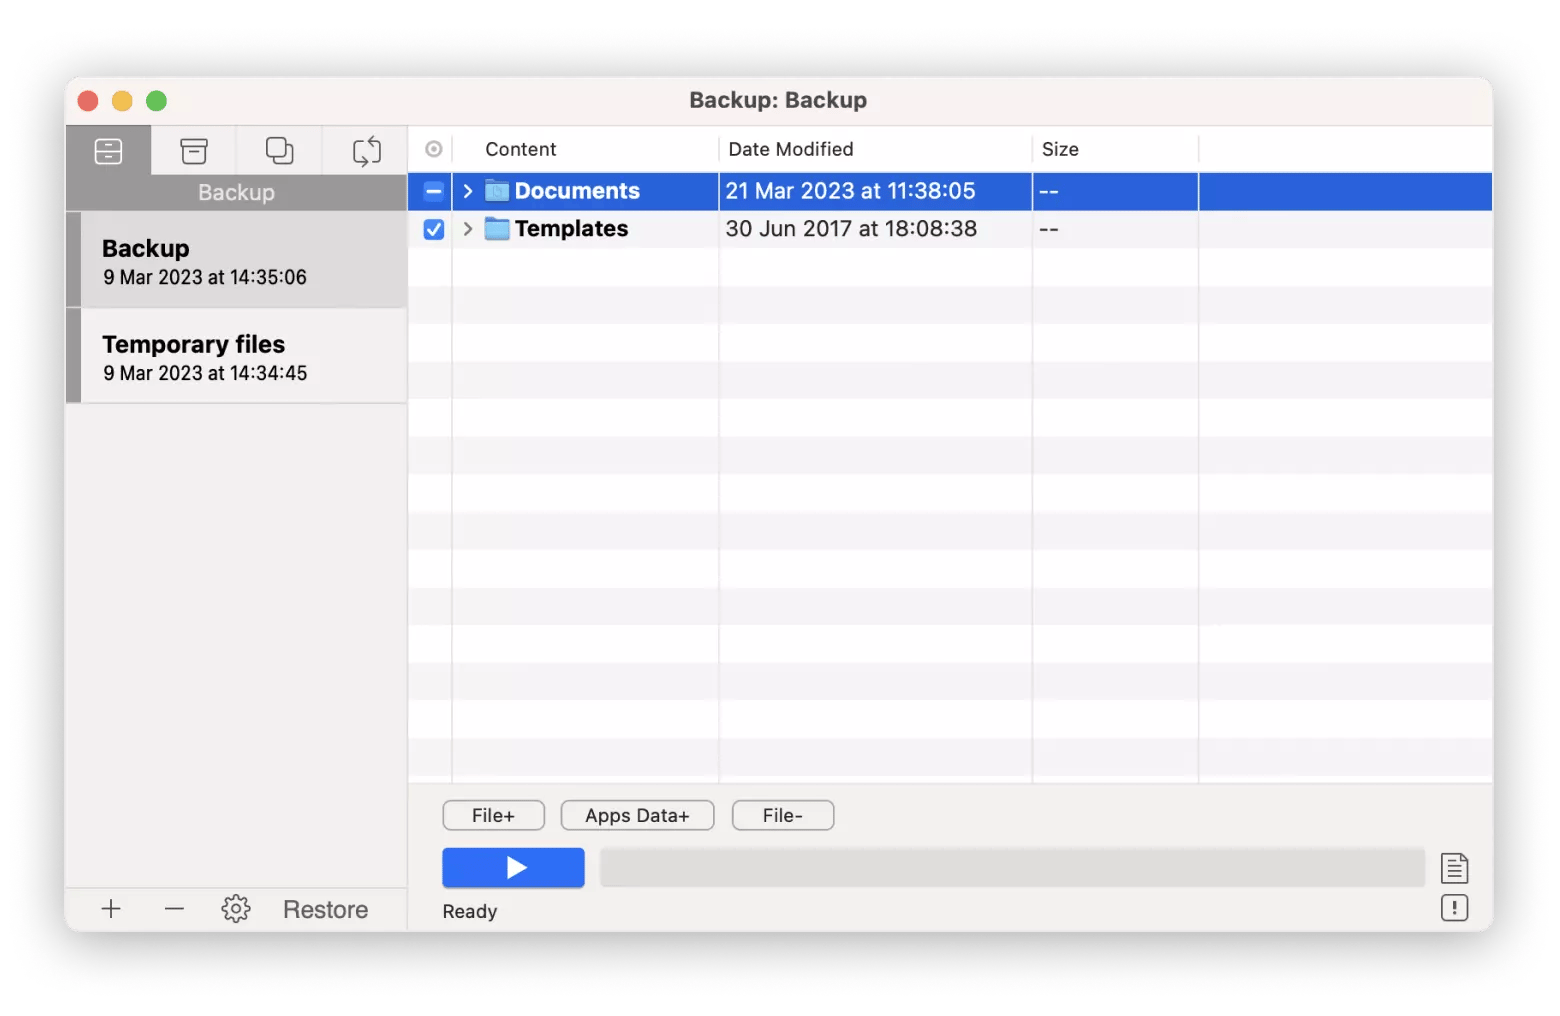
Another great idea we strongly recommend you think about before going ahead and tempering with your Mac’s memory is getting yourself a solid backup of the most valuable data. Get Backup Pro can easily help you on that front.
Get Backup Pro is a smart and reliable A-level backup app that lets you:
- Create bootable clones of your disk
- Back up only the files you find essential or only those altered since the last backup
- Save space with compressed backups
- Synchronize files between computers or mounted drives
- Schedule Stealth mode backups that copy files automatically and close off once all processes are finished
- Recover your data to any Mac, even if it doesn't have Get Backup Pro installed on it
FAQ
Is it worth it to upgrade RAM on MacBook?
The idea behind MacBook RAM replacement is to help revitalize your Mac by improving its speed and performance.
Despite the possible risks involved, if your Mac is still compatible with the apps you need, a RAM upgrade will by all means be cheaper than buying a new Mac.
Where to buy RAM for Mac and how much does it cost?
If you’re looking to upgrade Mac RAM, the most obvious and secure choice is to buy from Apple. It’s also the most expensive one: 16 GB RAM for a 27” iMac comes at $400.
But since Apple doesn't manufacture RAM itself and is known for using different RAM brands, there’s no such thing as "genuine" Mac RAM. So be sure to check out other trusted vendors like macsales.com or Crucial.com. They both offer competitive pricing and a lifetime warranty for the RAM you buy from them.
Is upgrading from 8 GB to 16 GB of RAM worth it?
To be fair, 8 GB of RAM generally should get you a comfortable enough experience with web browsing, basic 4K video editing in Adobe Premiere or Final Cut Pro, photo editing in Photoshop, streaming, and even some pretty decent 1080p gaming.
But if you feel that your Mac could use a performance boost for RAM-intensive tasks you regularly engage in, definitely consider adding memory to Mac.
Tip: The difference in upgrading from 8 GB to 16 GB will be more noticeable on older (2019 or earlier) Intel-based Macs, since they need more RAM to perform the same type of tasks as Apple Silicon Macs do.
Does RAM upgrade make Mac faster?
Any Mac memory upgrade is beneficial for running memory-consuming tasks or heavy multitasking. But because of the Apple Silicon unified memory architecture, expect less striking performance increase from Silicon-based Macs.
Adding memory to Mac — should you?
Learning to install Mac upgrade RAM doesn’t require any special computer skills — as long as your Mac model supports memory updates and you have clear step-by-step instructions, you are good to go.
The big question, though, is whether you need a Mac memory upgrade in the first place. Turns out your system efficiently using whatever memory it already has is key to effective performance of your Mac. So first try monitoring your Mac’s memory pressure with real-time statistics from iStat Menus for some time. And if the numbers aren’t in the red yet, try bringing your Mac back to life with a deep cleanup from CleanMyMac X and save MacBook RAM replacement for later.
If and when you decide to go ahead with RAM replacement, you have our full support — as long as you proceed with a gentle touch to both memory modules and your Mac’s hardware. Just don’t forget to first backup your data with Get Backup Pro.
Also, don’t pass on a unique chance to take iStat Menus, Get Backup Pro, and CleanMyMac X for a free test run with the seven-day trial of Setapp, a platform of high-performance, best-in-class iOS and macOS apps. Learn the tricks of Macintosh memory upgrade and check out more than 240 potential options to boost your productivity.


