In recent years, digital drawing has advanced significantly. High-quality drawing tablets and applications have made it possible to produce incredibly realistic and detailed drawings with few resources. However, there is still some disagreement regarding the ideal option for digital drawing — an iPad or a drawing tablet — and whether you may use your iPad in place of a drawing tablet.
Not sure if you can use an iPad as a drawing tablet on a Mac? Let me show you how to do that.
How to use iPad as drawing tablet
Before you let out your inner artist, set up your iPad so it can be used for drawing. Connect the Apple Pencil, install drawing apps, and connect your iPad to your Mac (optionally).
Plug your iPad’s USB-C charge cable into the Apple Pencil with the cable’s other end in the iPad’s USB-C port.
Tap the Tap to Connect prompt on your iPad to pair the pencil.
Keep your Bluetooth on when connecting these two devices.
To connect an Apple Pencil Pro to an iPad:
Open the Control Center by swiping down from the top-right corner.
Tap the Bluetooth icon to activate it.
Attach the pencil to the magnetic charging port with its cap off, and your iPad will pair with it.
Since the Apple Pencil lacks an on/off switch, turn off Bluetooth to disconnect it from your iPad. If you want to keep Bluetooth on for other uses, choose the Forget Device option for the Apple Pencil.
There are plenty of great drawing apps for iPad, like Procreate, Photoshop, Illustrator, and Inspire Pro—each with unique tools and brushes. Try a few to see which fits your style best.
Read also:
Connect an iPad to a MacBook
If you want to sketch on your iPad and quickly get that drawing onto your Mac, Apple makes it super simple. One way to do this is with Continuity Sketch — just right-click on a Mac app, like Notes or Pages, and choose Add Sketch. Make sure both devices are logged in with the same Apple Account and have Bluetooth, Wi-Fi, and Handoff turned on. Your iPad will pop up with a blank canvas where you can draw with your Apple Pencil, and when you’re done, just tap Done to send it right into your Mac document — no saving or transferring necessary.
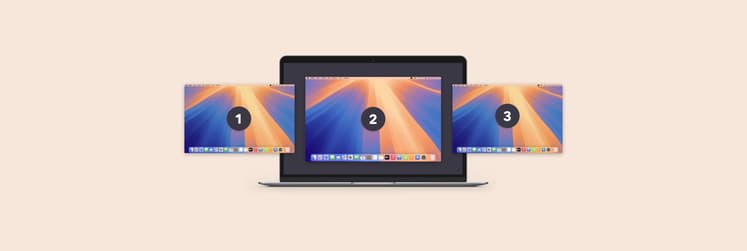
For more serious drawing, Sidecar lets your iPad act as a second screen. It works wirelessly and supports full Apple Pencil input, including pressure and tilt, which is perfect for using design apps on your Mac with your iPad as the canvas. To kick things off, just click the AirPlay icon on your Mac and choose your iPad. It will be an extension of your Mac, ready for some creative fun wherever you are in the room. If you want to use this method, check out the Sidecar user requirements.
Different capabilities of iPad Models and Apple Pencils
Apple Pencil functionality has undergone significant evolution, and this isn't only on the hardware end. If you have a first-generation Apple Pencil, you can’t just pair it with the latest iPad and do a software update to access the latest features. So, let me explain how newer Apple Pencil models differ from older ones.
Apple Pencil (1st generation)
This pencil lets you vary pressure and tilt to get different results, which is great for emulating natural drawing. Its functionality is available on older iPads.
Apple Pencil (2nd generation)
This iteration introduced a flat edge you can double-tap to switch between the most recently used tool and the eraser in apps like Notes. You can also customize this double-tap feature to change presets. This pencil provides wireless pairing and charging using magnetic attachment.
Its functionality is available on 11-inch 1st to 4th generation iPads and 12.9-inch 3rd to 6th generation iPads. It can also support Apple Hover on M2 iPad Pro models.
Apple Pencil (USB-C)
This model switches to USB-C wired charging and pairing for wider compatibility. While it has low latency, it lacks the double-tap feature, pressure sensitivity, and wireless charging and pairing. This pencil works with any iPad with a USB-C port.
Apple Pencil Pro
This model introduces features like barrel roll, squeeze for extra menus, haptic feedback, and Find My tracking capabilities. It retains double-tap functionality and Apple Pencil Hover support on M2 iPad Pro models. This pencil works with M2 and M4 iPad Pro models, M2 and M3 iPad Air models, and the iPad Mini A17 Pro.
iPad vs. drawing board — Which is the better choice?
While the combination of an iPad and Apple Pencil offers an impressive drawing experience, there are alternatives, such as drawing boards that primarily focus on drawing features. Let’s get a quick look at how they stack up against each other.
iPad pros:
Integration with the Apple ecosystem
Unique controls and gestures attached to shortcuts for efficient workflows
iPad cons:
Limited compatibility with professional drawing apps
Hard to upgrade hardware specifications
Personally, I like the fact that with an iPad, I can get many sample pictures for inspiration and practice, easily switching between the picture and my drawing to refine my technique.
Drawing board pros:
Higher precision that enables near-real-world drawing
Variety of screen sizes, with a larger maximum size
Support for professional software
Drawing board cons:
Low portability
May offer fewer supplementary features, like playing music while drawing
Can be quite costly
If you want to build a professional career around high-quality, cost-efficient drawing, choose a drawing board. However, if you're more of a casual drawer looking to quickly turn ideas into adequate drafts while enjoying other apps, go for an iPad.
Can I use an iPad as a drawing tablet for Mac?
The short answer is yes. With little effort, you can turn your iPad into a professional graphics station. Before I explain how to use an iPad as a drawing tablet, let’s briefly cover the difference between a traditional drawing tablet and an iPad.
First: The iPad is a versatile gadget that can be used for web browsing, texting, and gaming. A graphics tablet, on the other hand, can only be used for drawing. A good graphics tablet provides a better drawing experience than an iPad as a result.
Second: The lack of a screen on the graphics tablet is another key distinction that requires linking it to a personal computer. If you have an iPad, you have the option of doing the same or using it independently.
Third: Also, you presumably know that a graphics tablet, especially one from a more expensive brand, costs more than an iPad. Some inexpensive drawing tablets may be found in the same price range as an iPad, although they typically lack the performance of the iPad. If that’s the case, it seems more reasonable to use an iPad as a drawing tablet for Mac.
However, drawing tablets offer the most realistic sketching experience, which is why they are still so well-liked.
Final thoughts: Should you get an iPad for drawing?
In general, working on an iPad is great if you like being mobile and drawing right on your screen. On the other hand, if you usually work on your computer, a professional drawing tablet would be a great choice.
Keep in mind that on the Apple iPad, you can do a lot more than just draw. With the numerous apps available, you may also use them to view movies, play games, or simply keep up with your email and social media. Speaking of apps I’ve mentioned in this article (like PhotosRevive): they are available on Setapp. It’s a platform that hosts the best 260+ apps for your Mac, iPhone, and iPad. Explore apps on Setapp and try them all for free for seven days.
So now you know that you can use an iPad as a drawing tablet for Mac. Are you ready to start making some awesome art?
FAQ
Can I use an iPad as a drawing tablet on Mac?
You can use an iPad as a drawing tablet on a Mac, but with specific model combinations that support Sidecar, a Continuity feature by Apple.
What are the advantages of using an iPad as a drawing tablet?
The advantages of using an iPad as a drawing tablet are that you can easily swap between tasks and run some concurrently, work on the go, and connect to other Apple ecosystem devices for more functionality.
Does my iPad Pro from the third generation work as a drawing tablet on Mac?
Yes. You can use your 3-generation iPad Pro as a drawing tablet on Mac via Sidecar. This feature allows your iPad to function as a second display where you can use an Apple Pencil for precise drawing in creative apps on your Mac, like Photoshop or Illustrator.
Where to find information about the pressure sensitivity on my iPad?
To find information about the pressure sensitivity on my iPad, check the Apple Pencil section of Apple’s Support pages or the settings page of drawing apps like Procreate.
Superpowers for your Mac
Tackle your tasks with dozens of helpful apps on Setapp.