How to screen share on a Mac for personal and professional projects
If you work with people who live in another city or country, the ability to collaborate online is crucial. Your life will be easier once you learn about a few screen sharing tools for Mac computers. At least, that was my experience.
If you’re using Sequoia on your Mac, you definitely have more screen sharing options available. Sometimes, third-party apps can even work better, depending on what you’re looking for.
In this article, I’ll cover a few ways to share the screen of another Mac user and give you some tips to make it easier.
Prepare your desktop for a Mac share screen session
As someone who works remotely, I know all too well the frustration when a Zoom session freezes or screen sharing tools fail. If you worked from home in 2020, chances are you also experienced this. Before you start, take some time to prepare your computer before you activate Mac screen sharing. Sometimes, you may want to test a screen sharing app on a Mac to see which one works best for you.
Screen sharing with Sequoia installed
Every macOS update makes your Apple computer even better. With the Sequoia update, for example, you can decide whether to show or hide the tab bar when sharing your laptop screen. The update also has other features that improve your screen sharing and video chat experience, including:
- Presenter preview: See exactly what you're sharing and get better control over your video conference background.
- Background replacement: Easily change your video chat background across apps for a professional appearance.
- Drag-and-drop window tiles: Organize multiple apps into an attractive layout for efficient screen sharing.
- Phone mirroring: View and control your phone from your Mac, perfect for iPhone collaboration during screen sharing sessions.
How to tidy desktop clutter before you share screen on Mac
When you share your screen, it’s easy to show more than you intend. You may not want your colleagues to see your embarrassing high school photos, social media feeds, or romantic texts from your sweetheart. This is why I tidy up my desktop before a scheduled video call or meeting. Fortunately, Macs have an automatic feature to make the desktop look tidier.
To tidy desktop clutter:
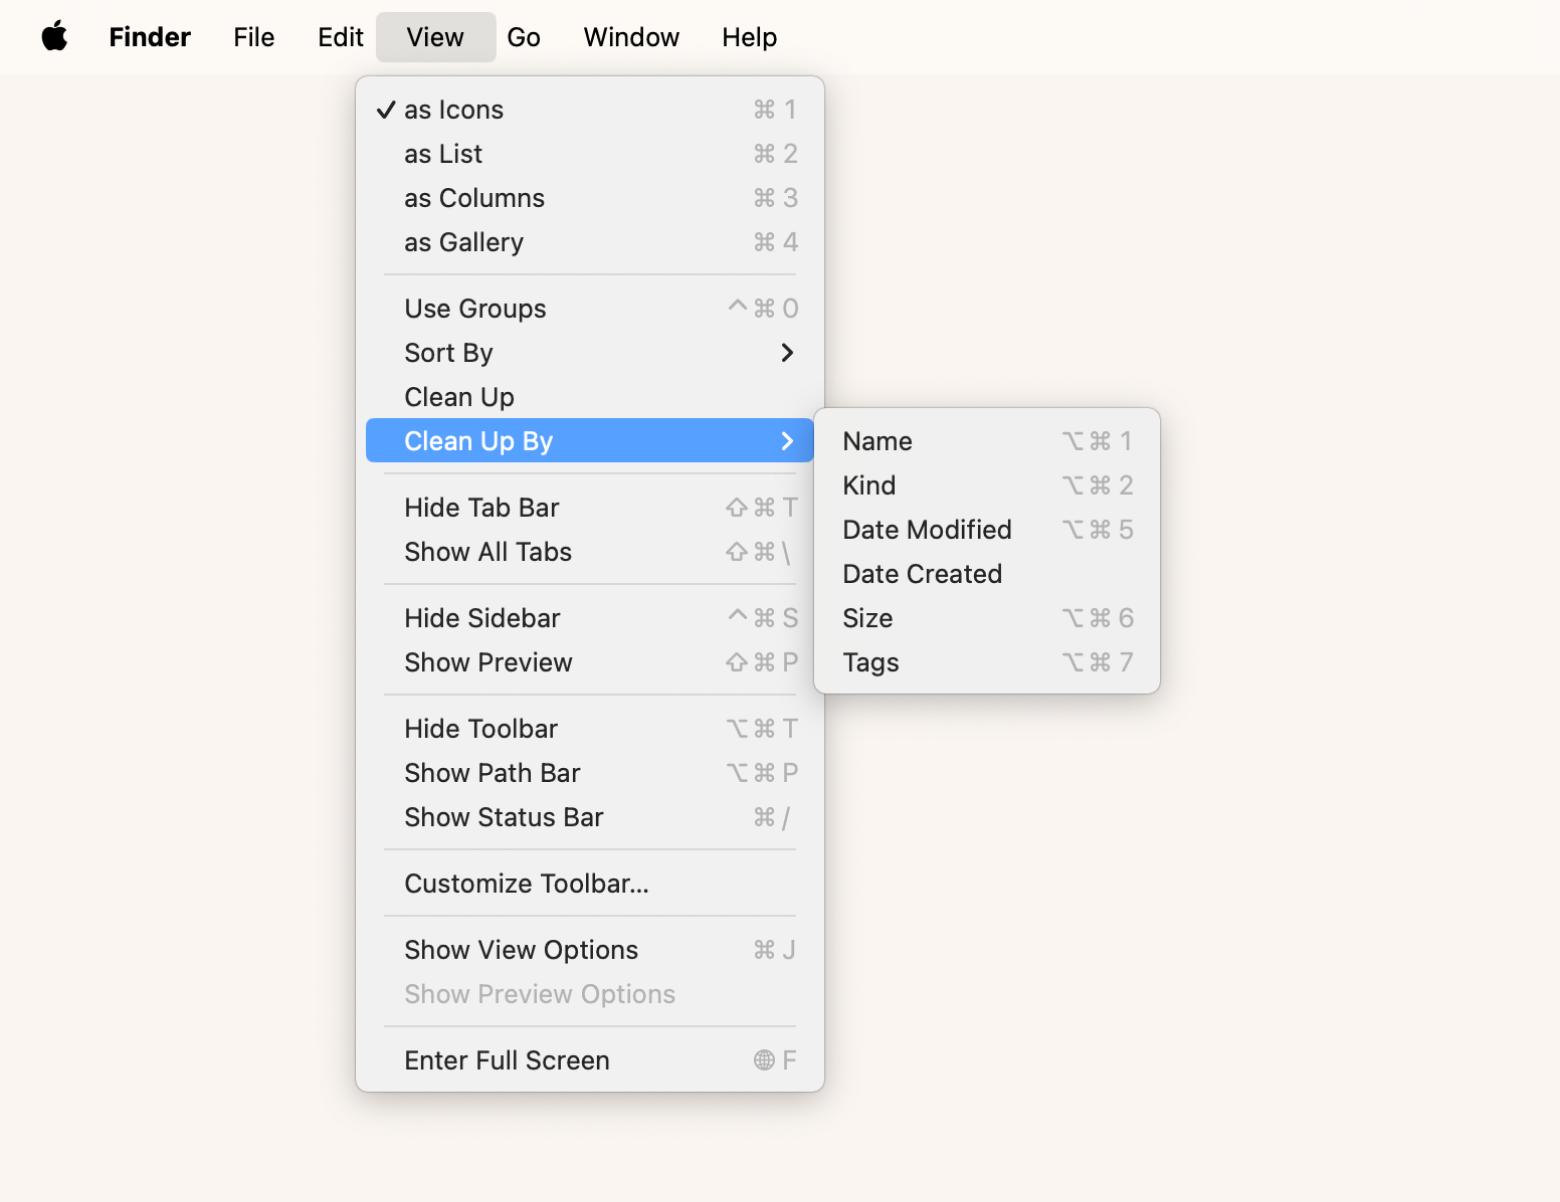
- Open Finder > Desktop.
- Click View in the menu bar > Select Clean Up or Clean Up By to arrange files in an orderly manner.
- Manually move any sensitive files you don’t want to share out of the desktop folder or put them in a folder for quick access.
Customize your Mac menu bar for screen sharing
If you want to maintain a professional vibe, it’s a good idea to clean up more than just your Mac’s desktop. Your menu bar can show more about you than you might want. Thankfully, it’s super easy to customize it, so you can keep the apps you need for video chats visible while hiding the ones you’d rather keep to yourself.
To customize your menu bar:
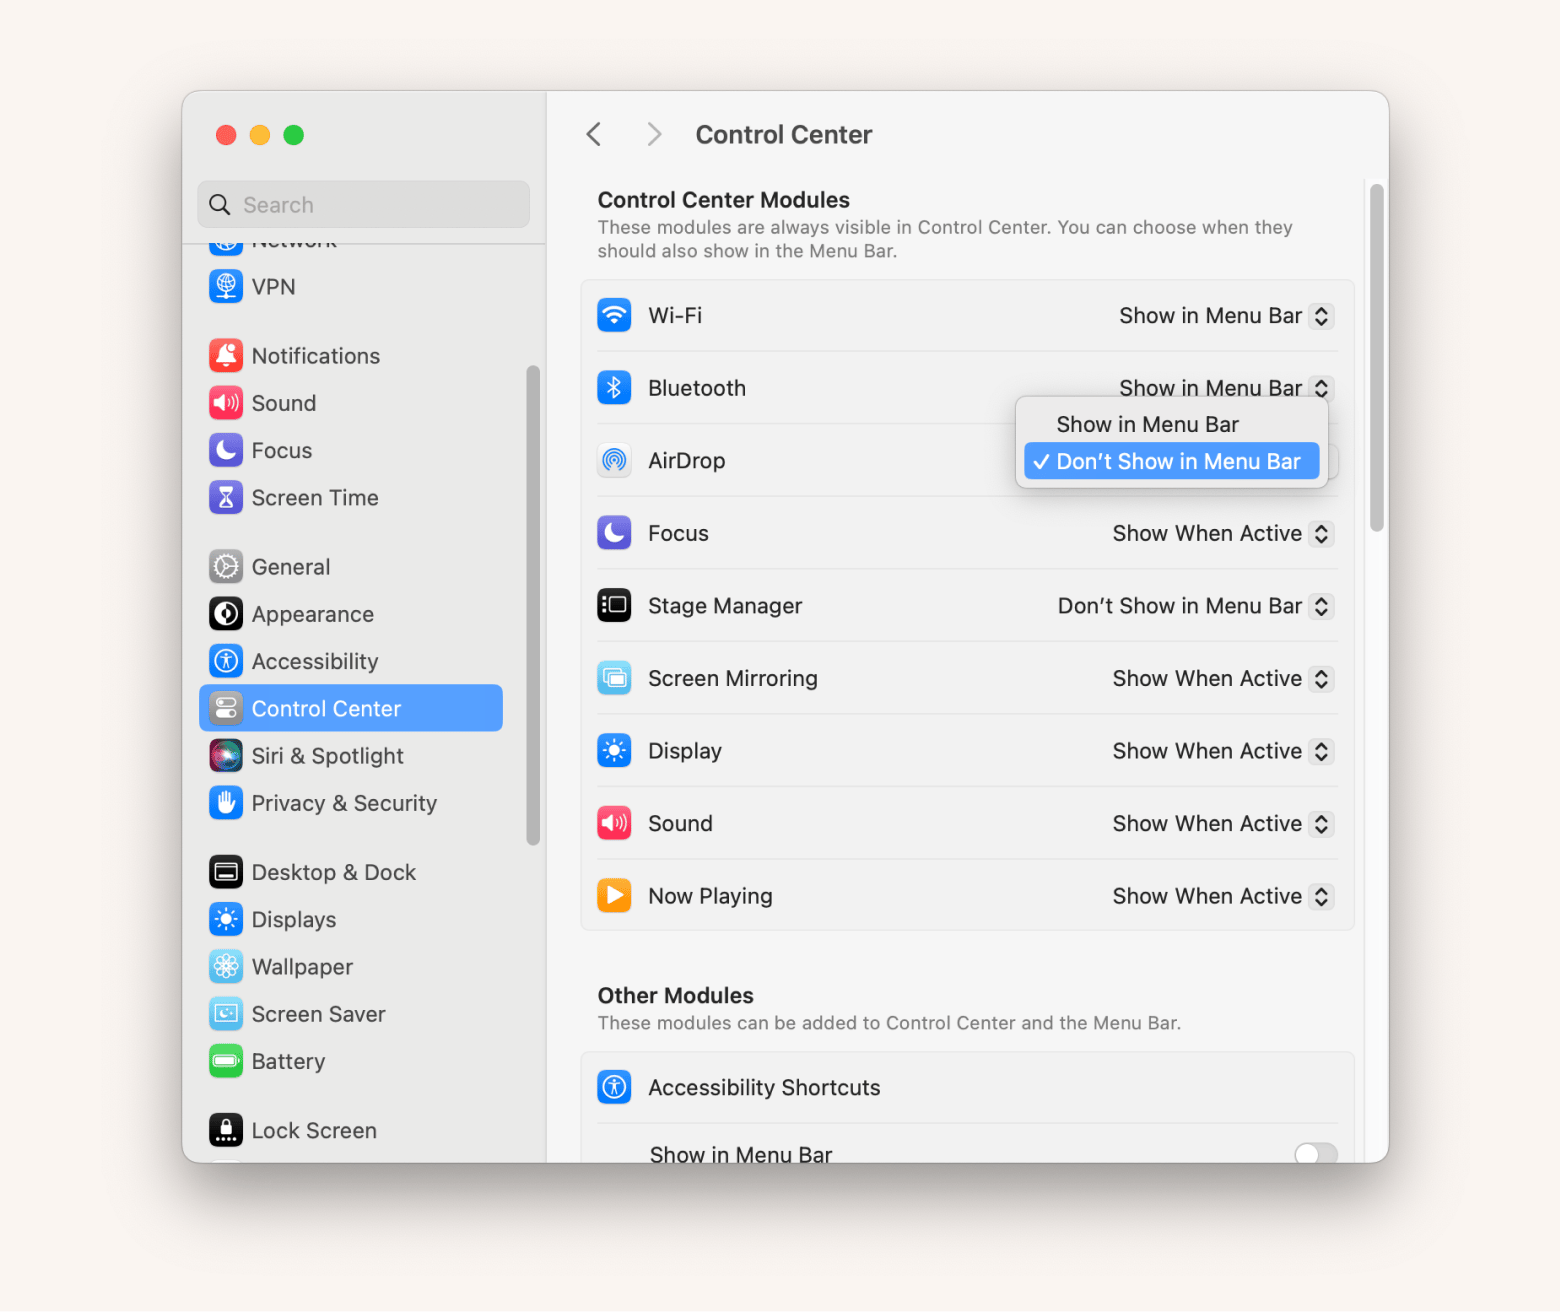
- In the Apple menu, click System Settings > Control Center.
- Choose apps you don’t want to show, and turn on Don’t Show in Menu Bar.
- You can always add them back to the menu bar later.
If you want to tidy up your menu bar like a pro, especially to keep distractions to a minimum during screen sharing, try Bartender. You can easily hide or shuffle around icons, so only the important ones show up while you're sharing your screen. No worries about random apps or personal tools popping up unexpectedly!
Plus, if you need certain apps visible for specific tasks, you can set up custom configurations to switch things around quickly. It's a simple trick to keep your screen organized and focused on what really matters.

How to screen share on Mac computers
When you want to turn on screen sharing, you have several options as a Mac user. The best depends on factors like:
- Are you doing a presentation to people in the same room?
- Do you need to share your screen remotely with a colleague or collaborator?
- Is it a professional project, or are you sharing something with friends or family?
Whether you use a third-party app like Zoom or native Facetime, OS 15 Sequoia adds a few new features, like the ability to preview what your screen will look like and to change the background during video conferences.
Here’s how to preview and share screen on Mac with FaceTime:
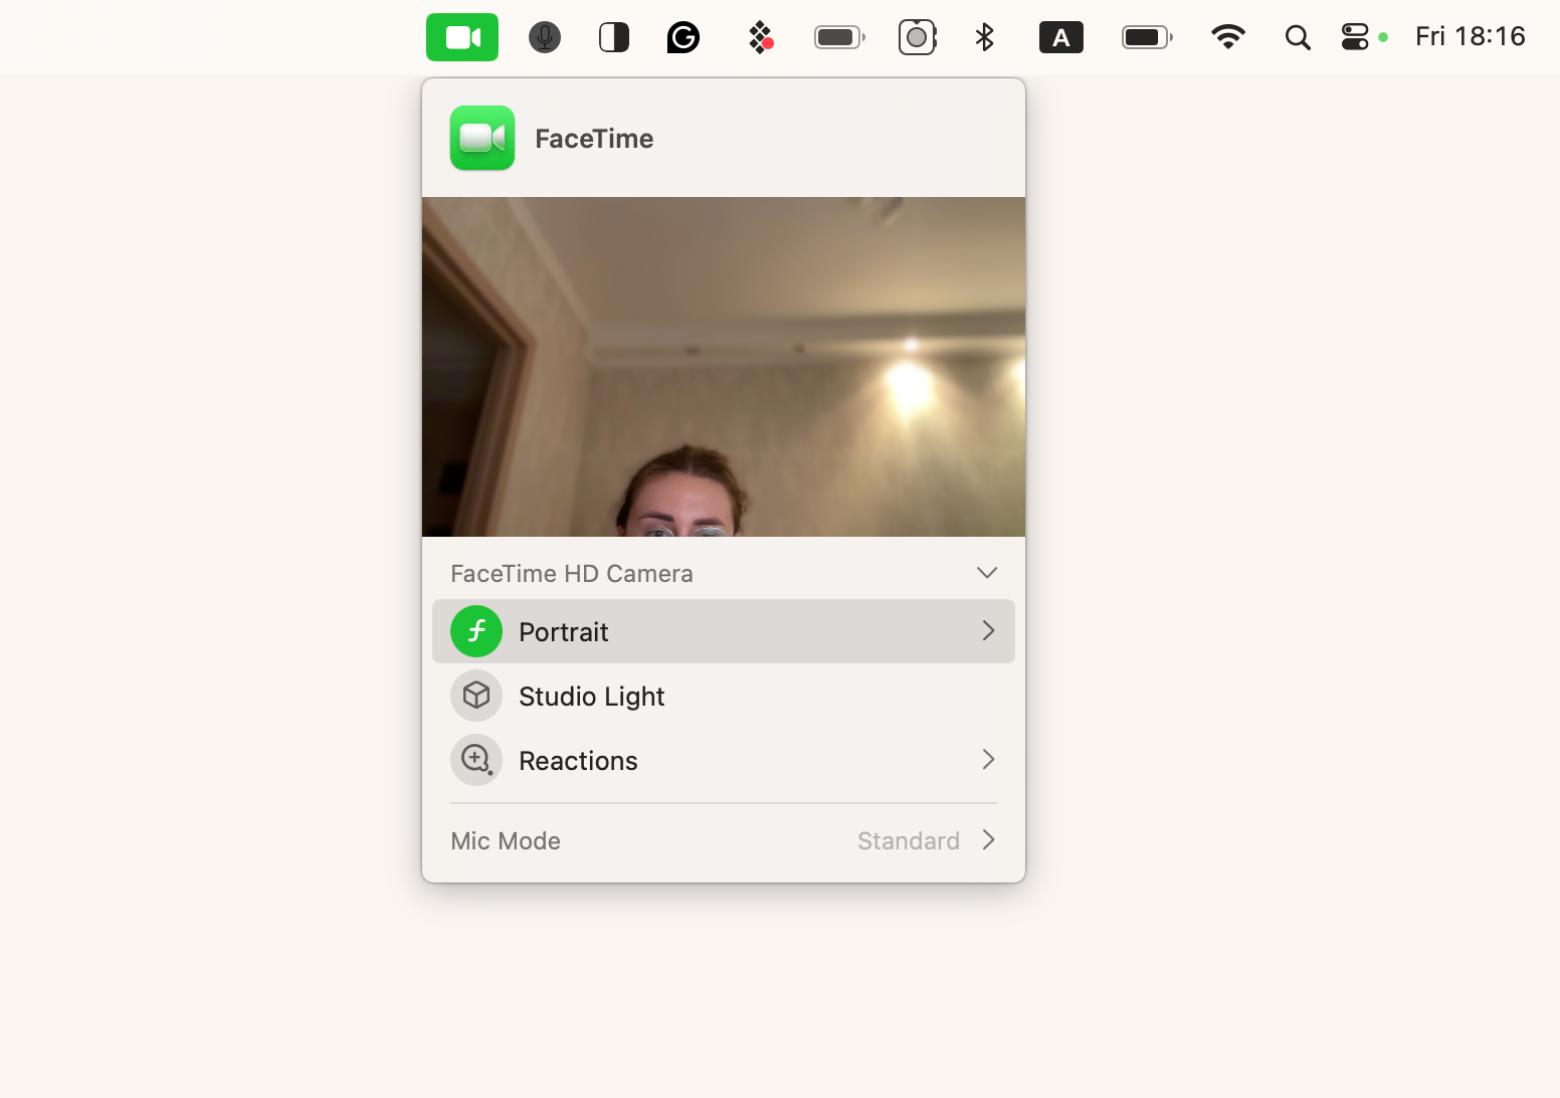
- Open FaceTime or any supported app.
- The green camera icon should appear in the menu bar. Click on the icon.
- Check and adjust the settings for the camera and microphone.
Teleprompter App is a great tool for recording videos where you need to stay on the script without losing eye contact with the camera. Instead of reading from a screen or notes off to the side, you can use this app to scroll your script directly in front of you. The app is useful for making video tutorials, giving presentations, or just sharing your thoughts clearly.

Activate screen sharing session on your Mac
Before you start a screen sharing session, you need to give your Mac permission to allow others to access your computer or monitor. Apple gives you options to cover whether your guest can contribute to a document or just passively watch.
Here's how to activate screen sharing:
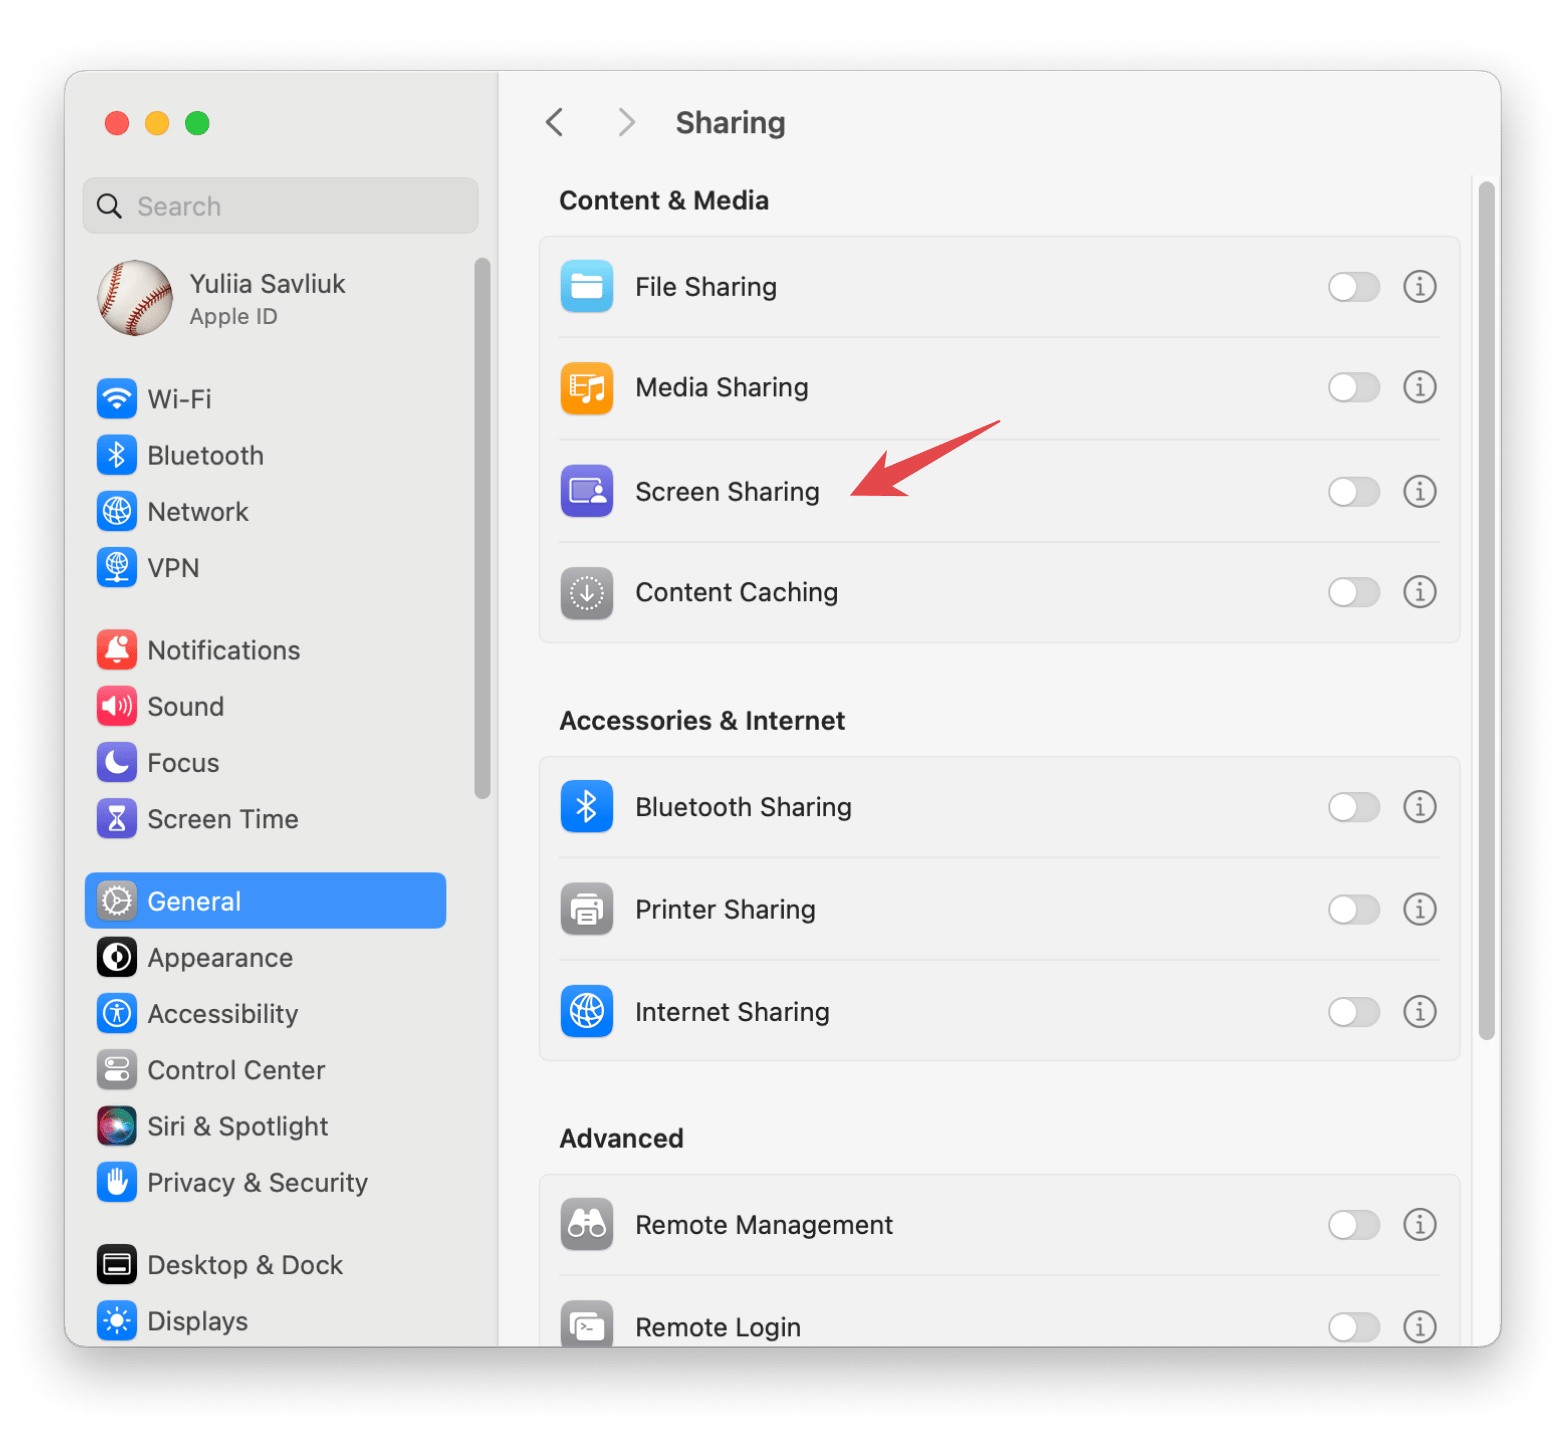
- On your Mac, go to the Apple menu > System Settings > General > Then, click Sharing.
- If you've got Remote Management turned on, turn it off. You can't use Screen Sharing and Remote Management at the same time.
- Turn on Screen Sharing.
- Click the “i” info icon next to Screen Sharing.
- Turn on either Anyone may request permission to control the screen, or VNC viewers may control the screen with a password.
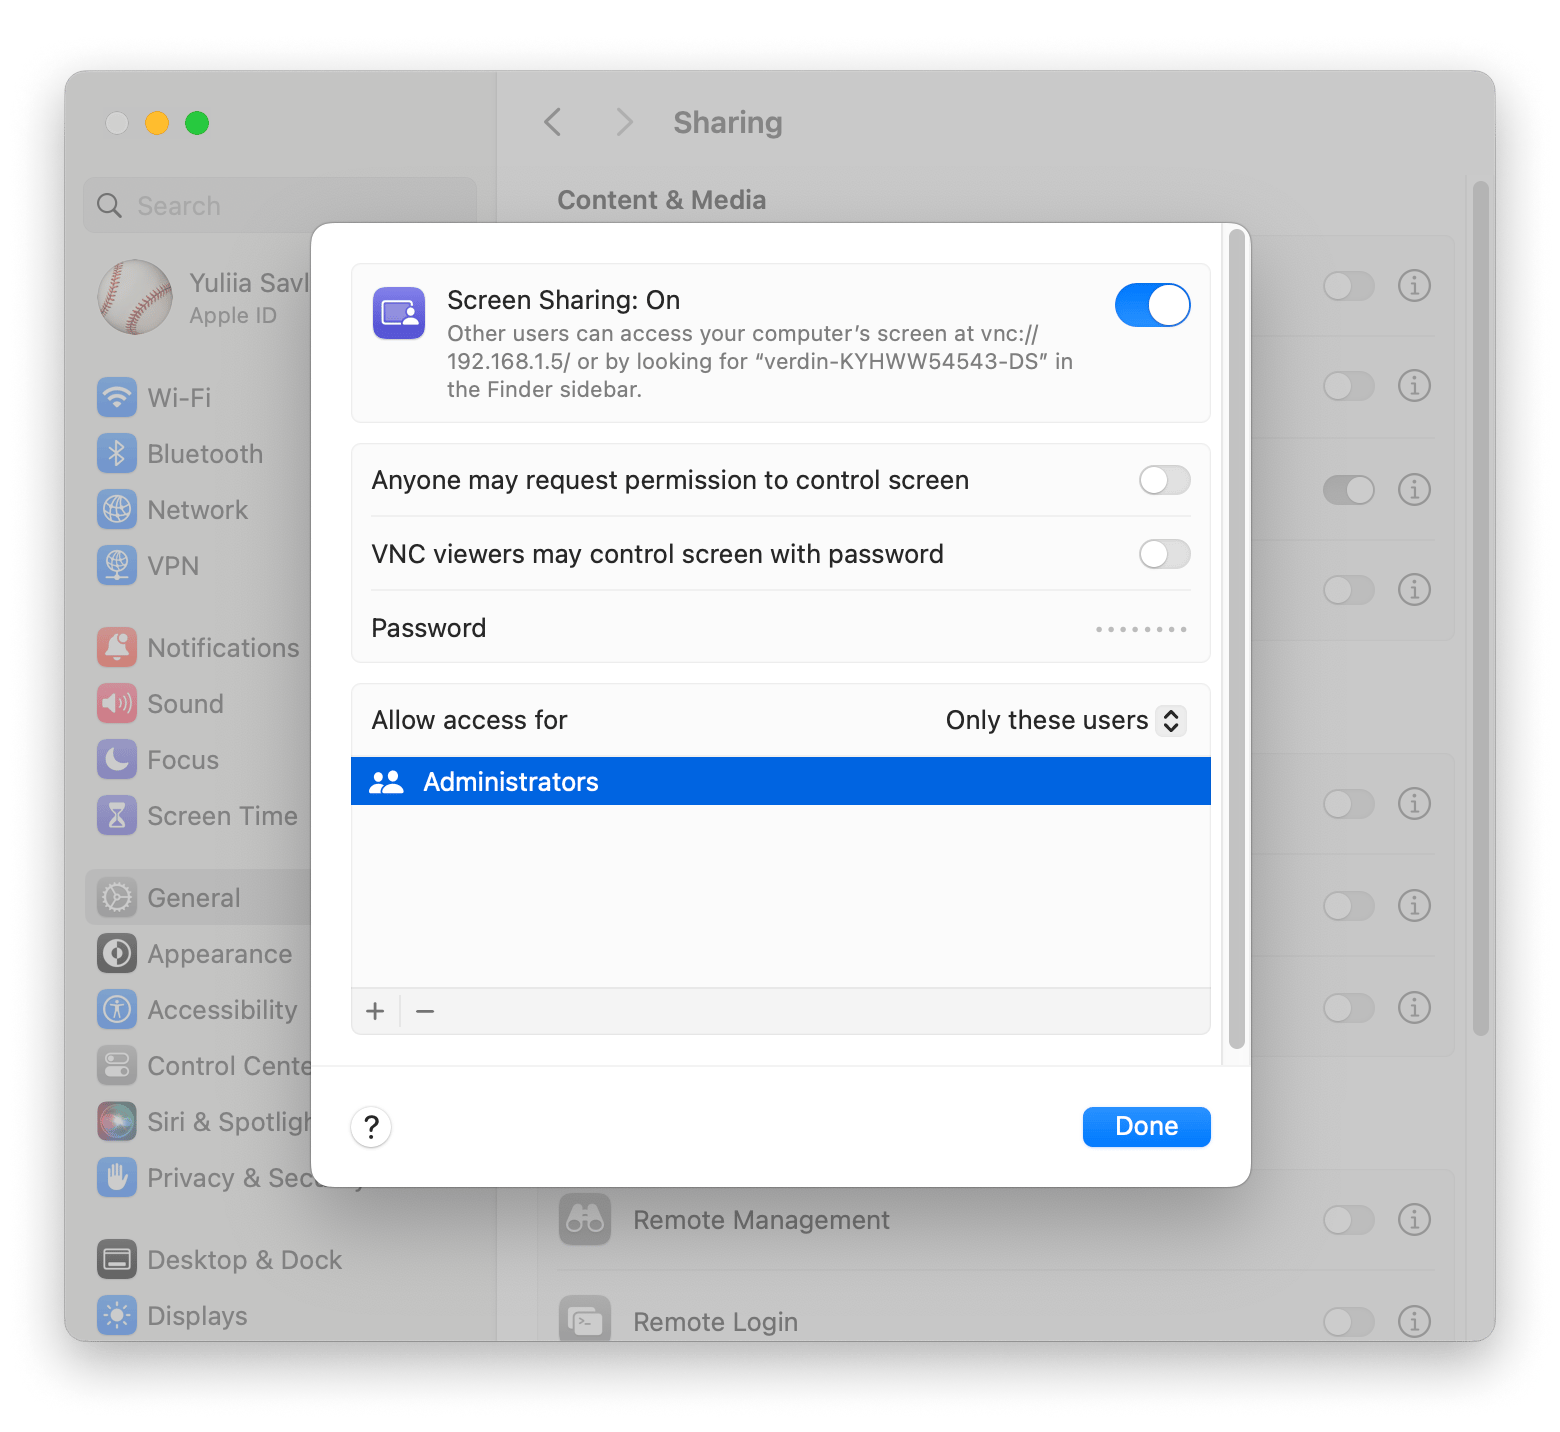
- Next to Allow access for, select All users or select Only these users > click the add “+” button > Select users > Select.
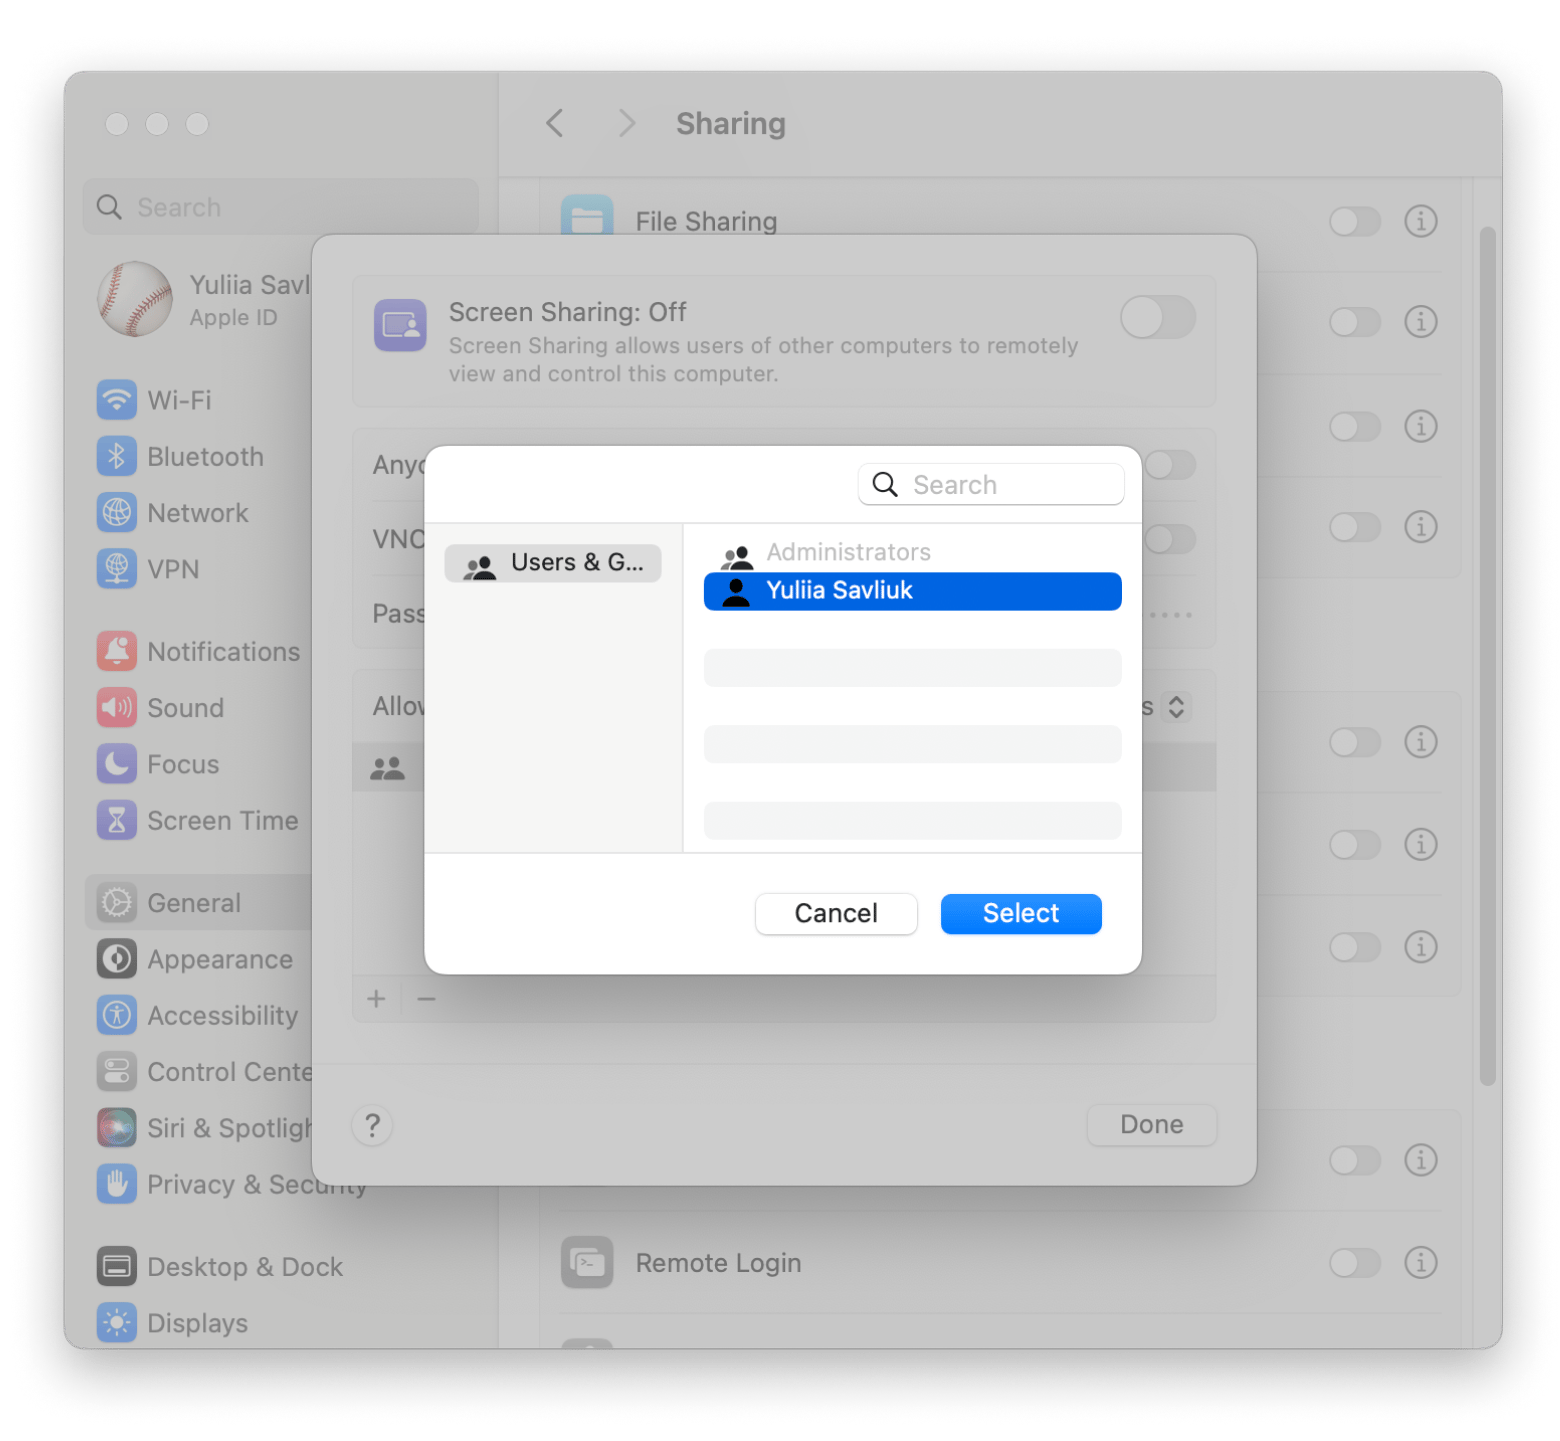
- Click Done.
After you turn it on, you can use the native Screen Sharing app on your Mac to start display sharing:
- Go to Finder > Applications > Utilities > Open the Screen Sharing app.
- In the sidebar, click Network or All Connections, then hover over the computer and click Connect.
- Alternatively, click the “+” New Connection button, enter the hostname or Apple Account, and click Connect.
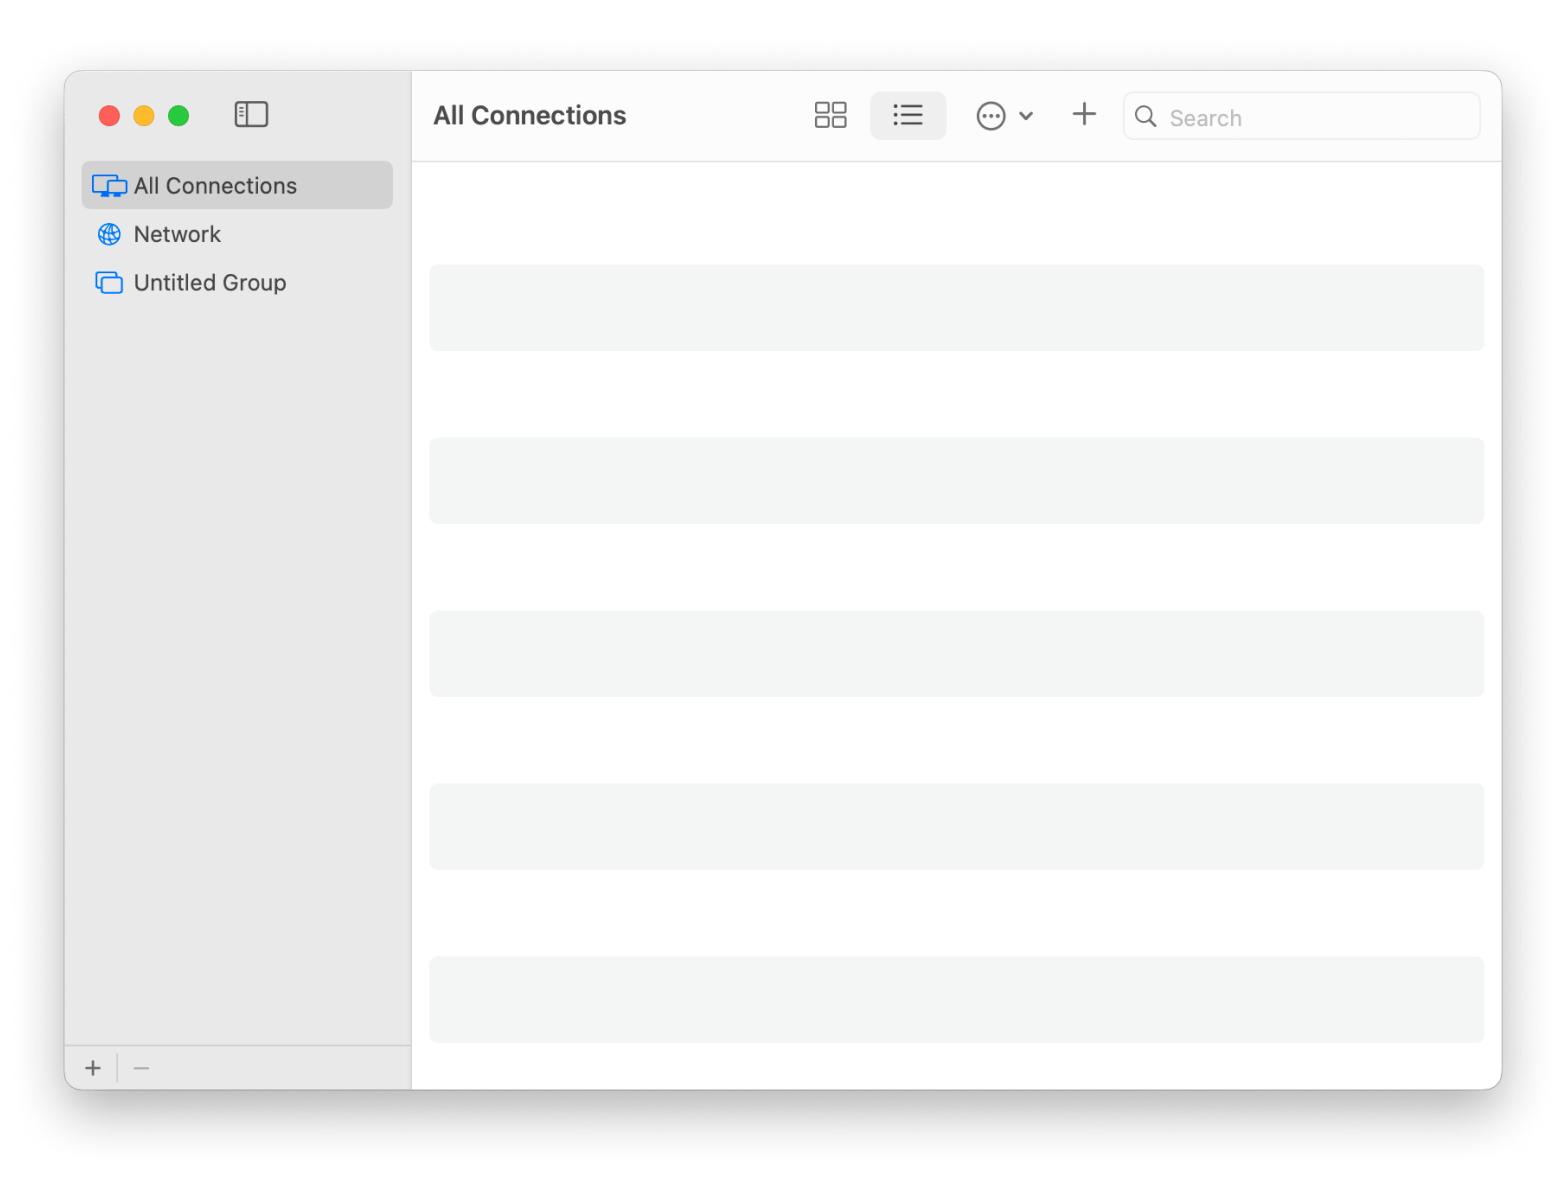
- If prompted, enter your username and password and click Sign In.
- Choose Standard or High Performance (for Apple Silicon Macs and macOS Sonoma 14 or later). If you choose High Performance, select the display type and click Continue.
When you’re done, you might want to turn off screen sharing for safety. Here’s how to do this:
- On your Mac, go to the Apple menu > System Settings > General.
- Then click Sharing
- Turn off Screen Sharing.
How to use FaceTime screen sharing
You can share your screen on FaceTime as long as everyone has macOS 12.1 on their Mac or iOS 15.1 on their iPhone or iPad.
Here’s how to screen share with FaceTime:
- On your Mac, go to Finder > Applications > FaceTime.
- Start a FaceTime call.
- Tap the Share Content icon > Choose Share Entire Screen or go to the window you want to share, and click Share This Window or click Share All [app name] Windows.
- To stop screen sharing, tap the Share Content icon in the menu bar.
Asynchronous screen sharing with Apple tools
Apple has some cool tools for sharing your screen asynchronously. For example, QuickTime Player lets you record your screen and your voice so you can create a video to share later. You can send those recordings directly through Messages, which means the person receiving them can check them out whenever they want. Plus, iCloud Drive allows you to share big files or folders with the right permissions, which is super handy for collaborations without the need to be online at the same time.
Sometimes, it's easier to show instead of explain. If you need to present, share ideas, or teach someone using your screen, a tool like Capto might work better than Apple's built-in screen sharing. It's a great way to quickly create screenshots and video tutorials.
Capto can record specific screen areas, add overlays, and hide desktop clutter, which is particularly useful for professional tutorials and presentations — all without the need for separate software.
Here’s how to use Capto:
- Install and open Capto on your Mac.
- Click Record > Screen.
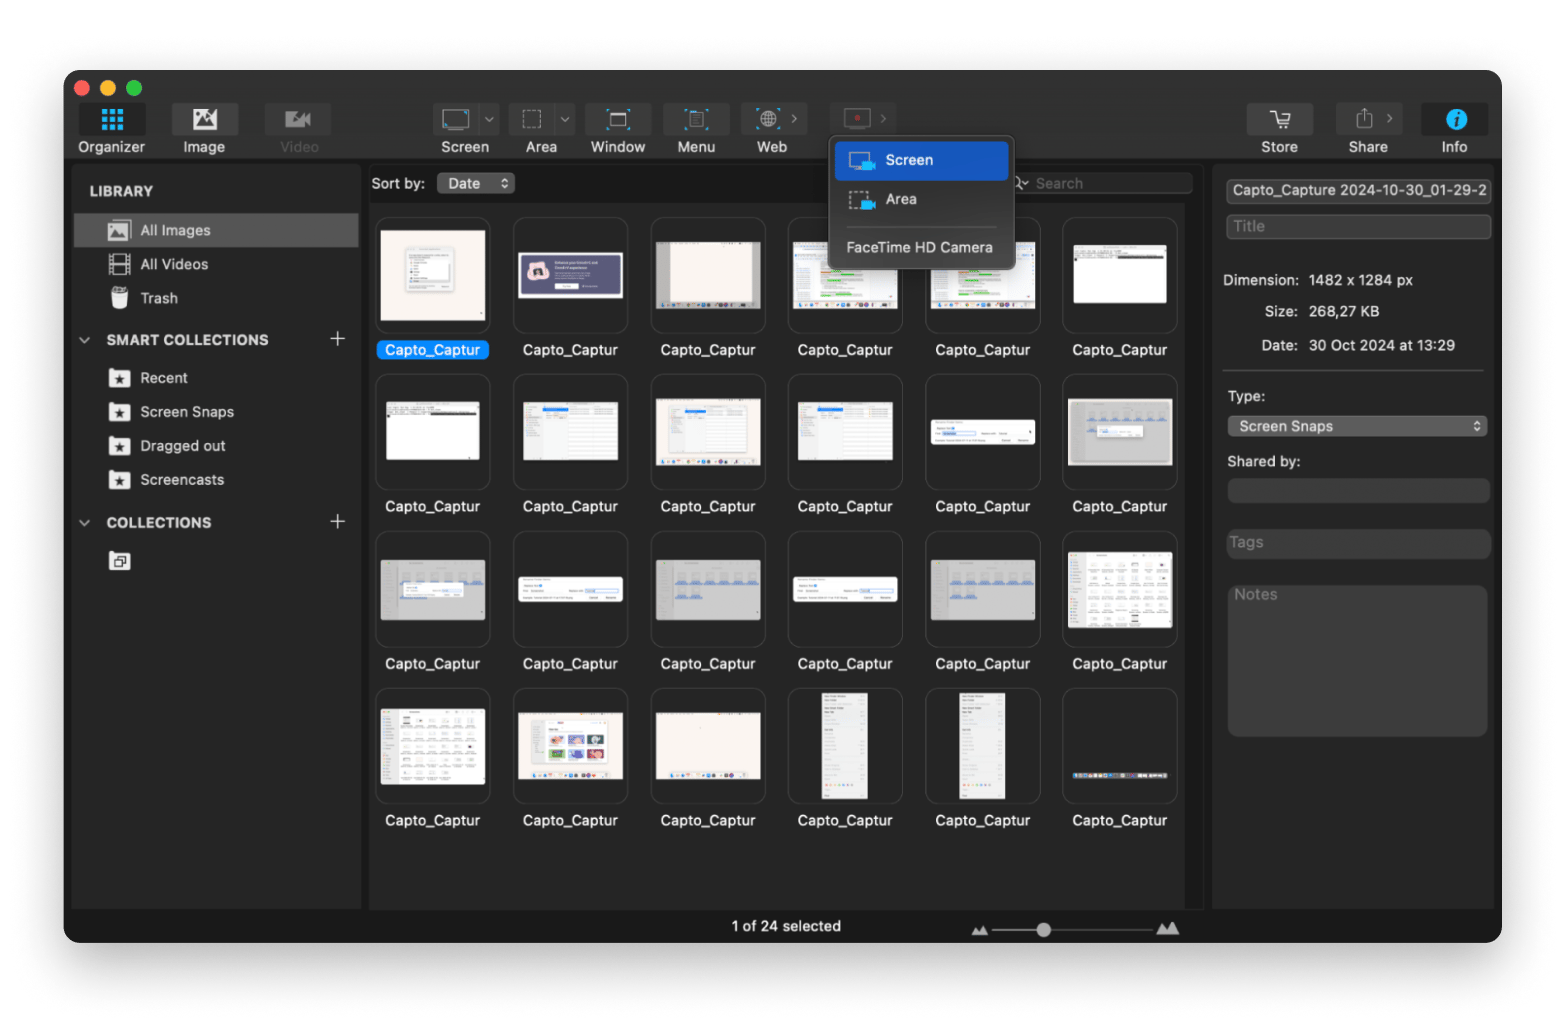
- Adjust recording settings > Click the Record button.
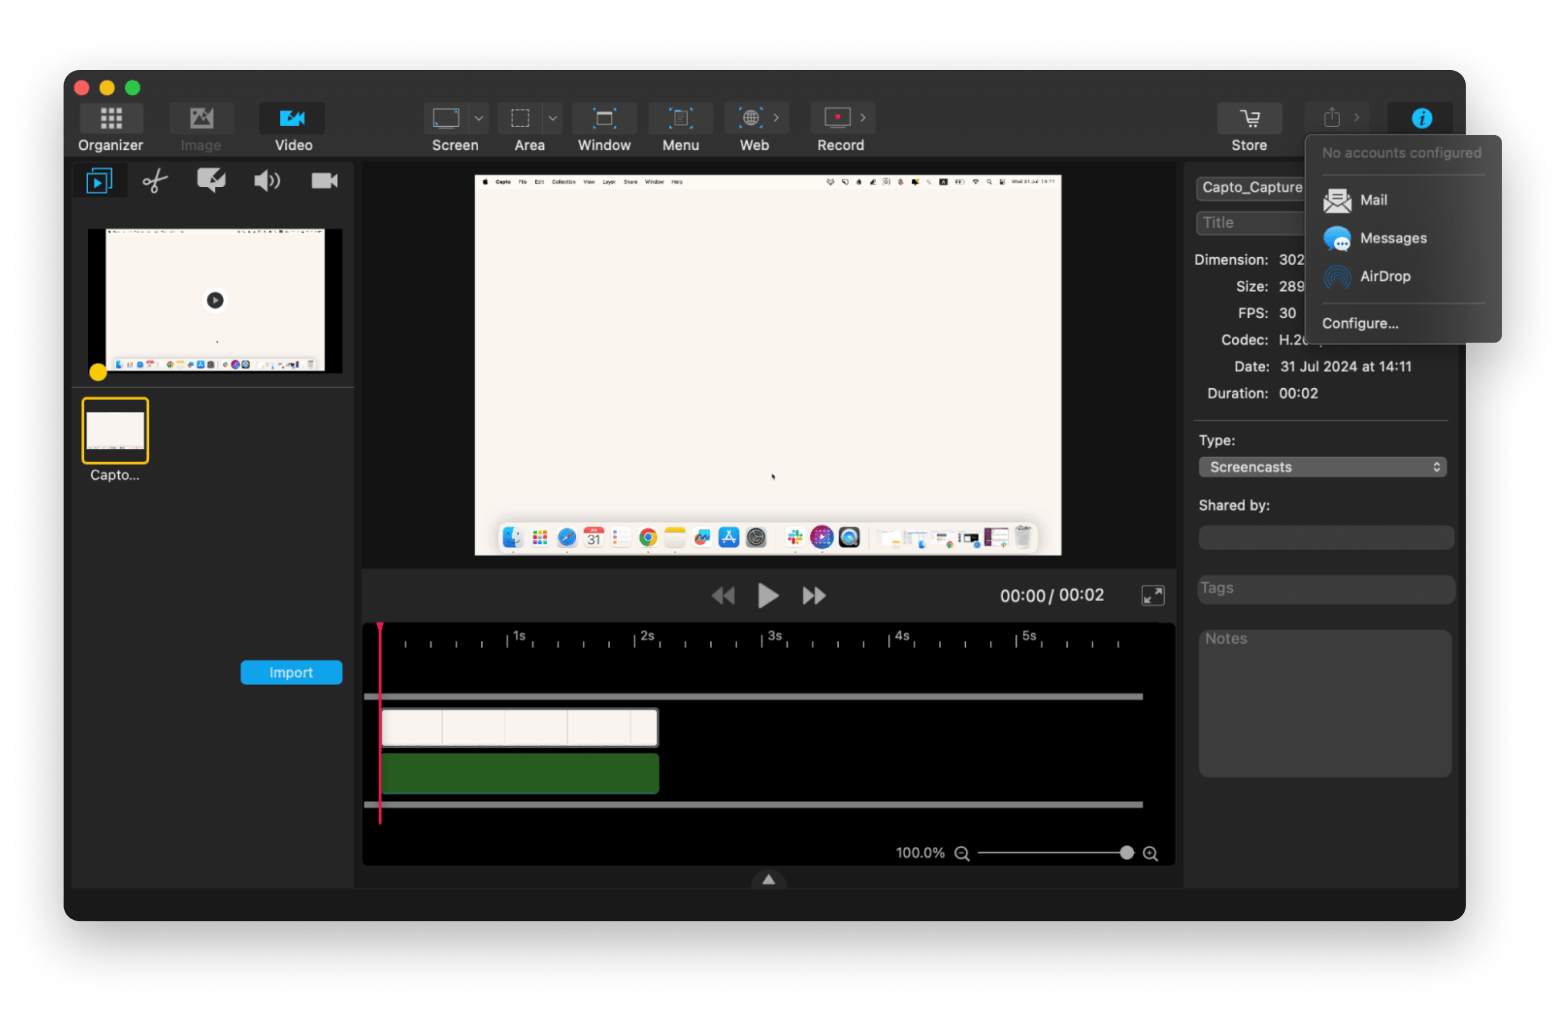
- After you finish recording, you can edit your video based on your needs.
- When the screen record is ready, click Share.
Add more power to Mac screen sharing
The built-in apps on your Mac are pretty helpful, but they might not cut it for everything you need — especially if you’re working remotely, doing client presentations, showing off products, or working on creative projects with others. Luckily, there are plenty of ways to make your screen sharing more powerful.
How to adjust your display settings (arrangement, resolution, and color profile)
To make your display settings better for a screen sharing session on your Mac, tweak the arrangement, resolution, and color profile. This way, everything will look clearer, and your presentation will be top-notch for your audience.
Here’s how to adjust Mac display settings:
- Arrangement: You can set up your displays however you like — change their positions, mirror what’s on each screen, or move the menu bar around. Just keep in mind, this option shows up only when you’ve got an external display hooked up to your Mac.
- Resolution: In the Displays settings, choose one of the Resolution settings. This can be super helpful for anyone looking at smaller screens.

- Color profile: Set the accurate color representation, which can be essential for design reviews or presentations with graphics. Go to Finder > Applications > Utilities > Open ColorSync Utility. In the Profiles tab or Filters, adjust color settings to your needs.

Adjust the size and quality of the shared screen
When you're sharing your screen with another Mac, you can tweak the screen sharing settings to change how big or clear the shared screen looks.
Here's how to adjust the quality of sharing:
- Open Screen Sharing > Start a screen sharing with another Mac on your network.
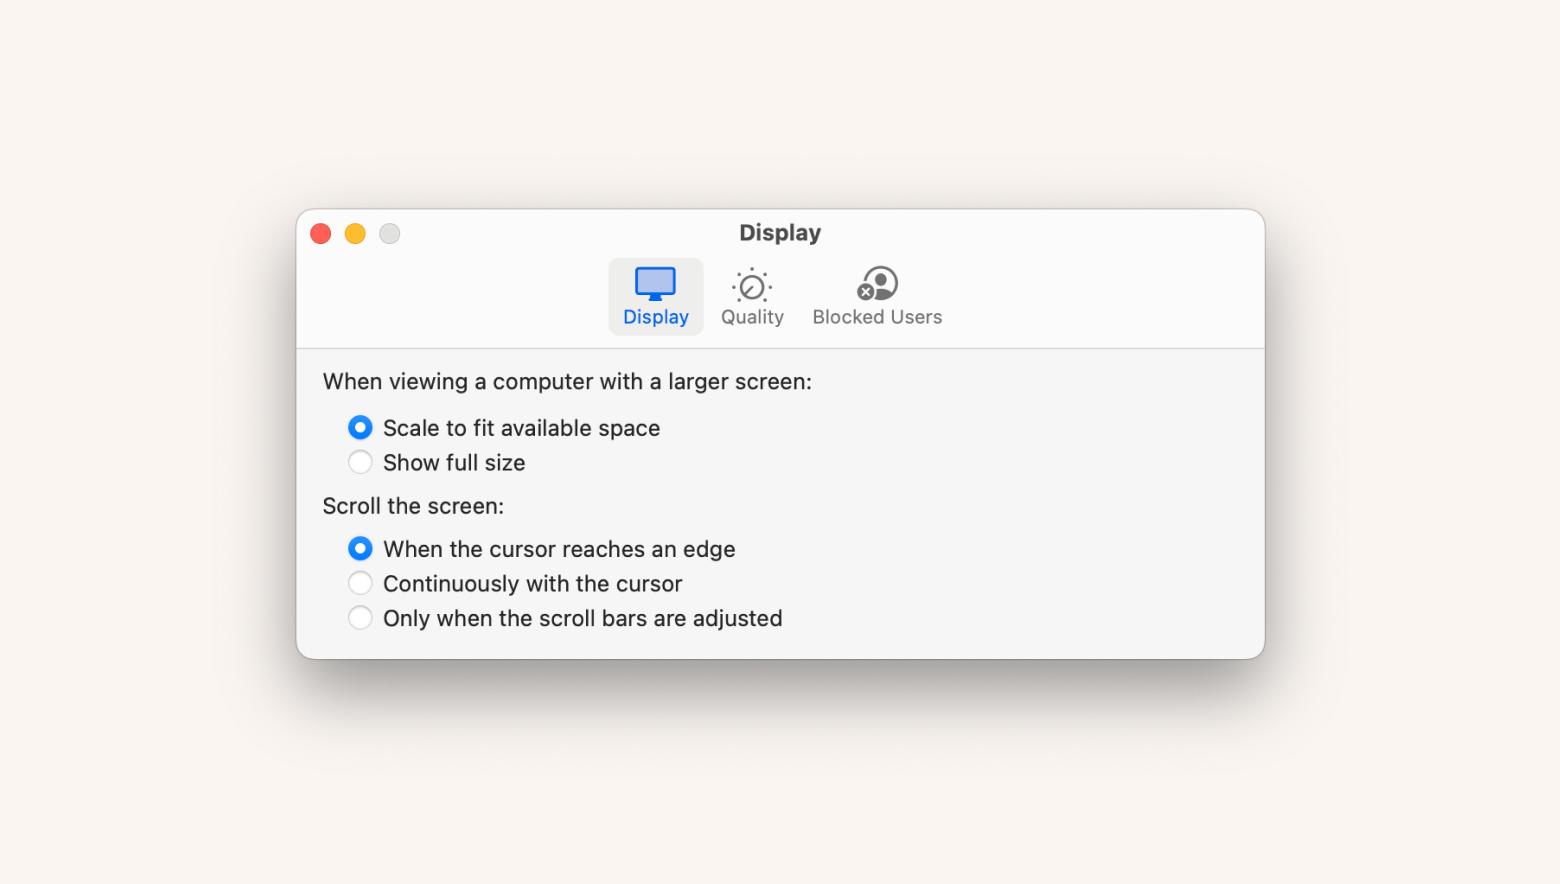
- Go to Screen Sharing in the menu bar > Settings.
- Set Display and Quality options based on your needs.
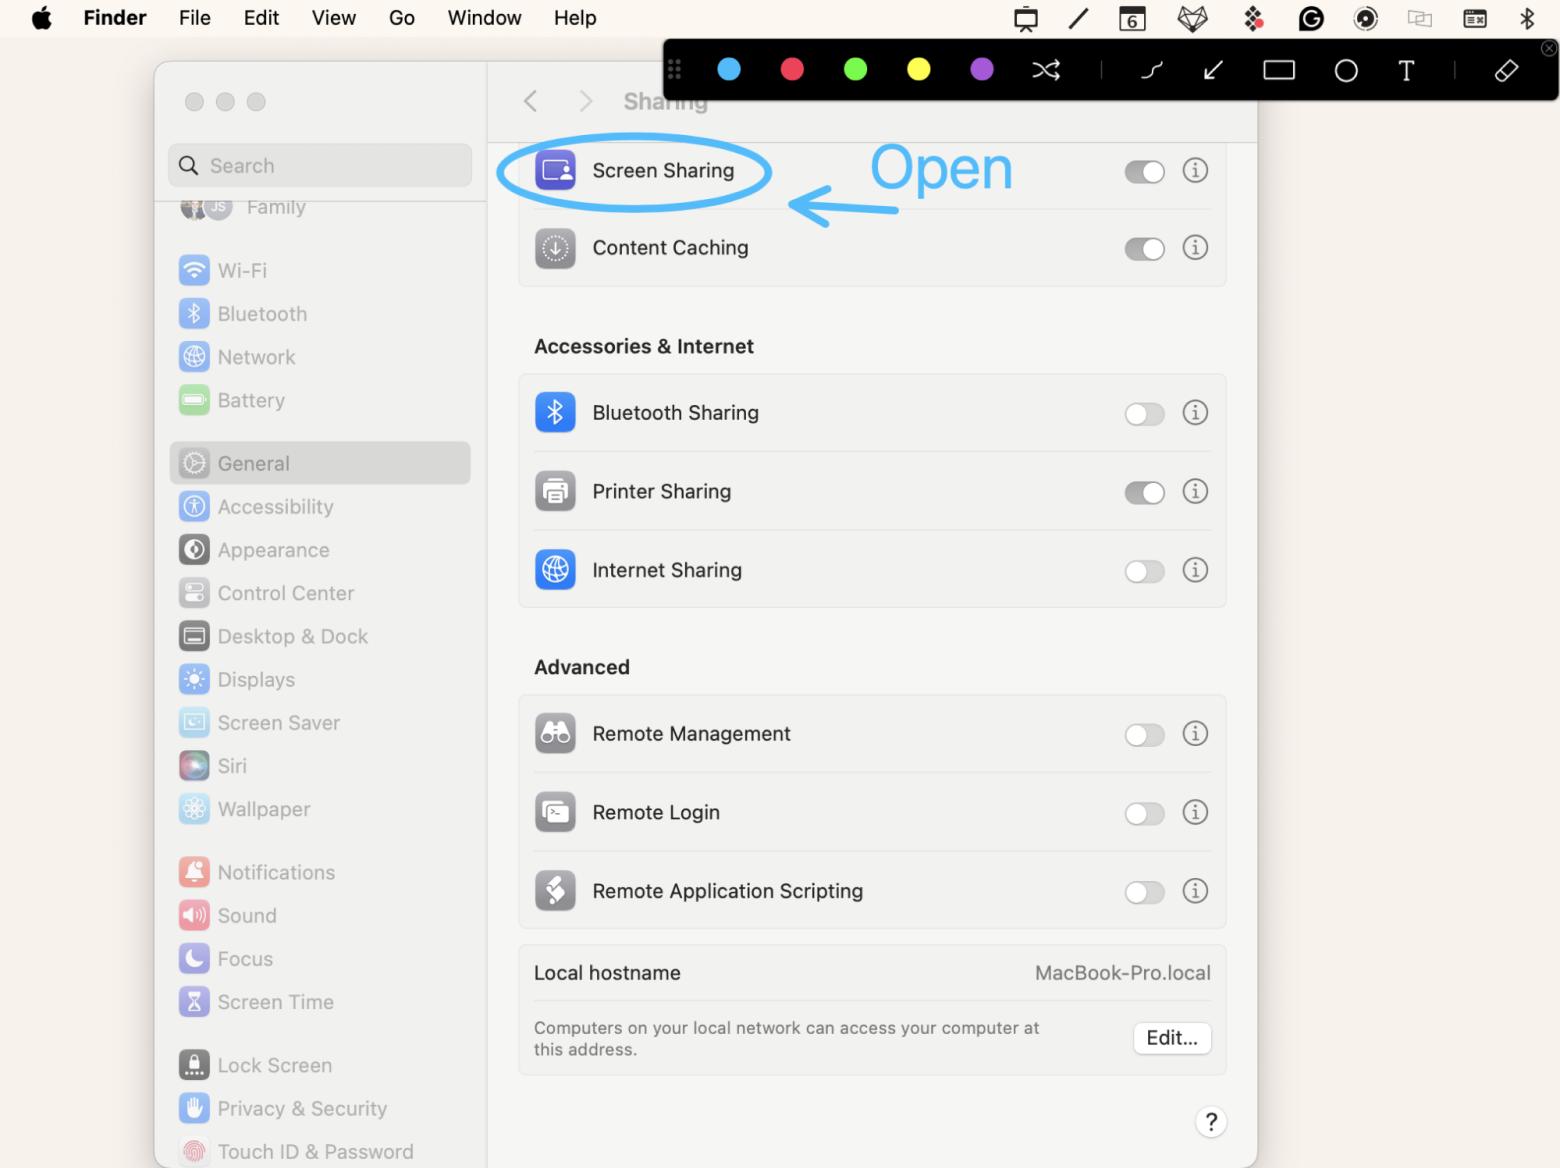
Tip: When you’re sharing your screen, it’s often helpful to quickly point out or mark certain areas while you talk. That’s where Presentify comes in. You can keep your audiences focused and engaged with interactive touches to your presentations, like highlighting your cursor or even drawing live using your iPad and Apple Pencil. Plus, you can spice things up by adding colorful shapes, arrows, and text to your screen — this will make your demos way easier to follow.
Set your viewing options on Mac
When you're getting ready to share your screen and show a specific folder, it's a good idea to tweak how it looks, especially if you have a ton of icons or files in there. For example, changing the icon size or how spaced out they are can make it way easier to find what you need while you're sharing your screen.
Here's how to do it:
- Go to Finder > Choose the folder you want to customize.
- In the menu bar, click View > Show View Options or press Command + J.
- Customize based on your needs.

Online tools for screen-sharing calls
With the growth of remote work and online collaboration, tons of video chat and communication apps are popping up that let you easily share your screen. These tools make it super easy to show your screen to anyone with an internet connection, no matter where they are or if they're on a Mac or an iOS device.
Here are some widely used tools for screen sharing:
- Zoom: Known for its user-friendly design and high-quality audio and video, Zoom is a top choice for meetings and screen sharing. To share your screen, simply click the Share Screen button during a call, then choose the window or application you want to display.
- Google Meet: This free video conferencing tool is available to anyone with a Google account. To share your screen, click Present Now, then choose which tab or window you'd like to share.
- Chrome Remote Desktop: Another Google product, Chrome Remote Desktop, is designed for accessing and controlling another computer remotely. It's perfect for collaborative work across platforms, remote troubleshooting, and working on shared projects.
- Slack: Primarily used for messaging within teams, Slack also offers video calls with screen sharing. To share your screen, start a call, then choose whether to share your entire screen or a single application window.
- TeamViewer: Created specifically for screen sharing and remote collaboration, TeamViewer requires both guest and host to have an account. The host initiates screen sharing by sending the session ID and password to the guest.
- Skype: Although mainly known for voice and video calls, Skype includes a simple screen sharing option. Start a call and click the Share Screen button to begin sharing.
For more details, check out the detailed guide to top Mac screen sharing apps.
Taking it to the next level: Now you know how to share screen on Mac
Screen sharing and remote collaboration are essential skills, much like word processing and spreadsheets, which are considered core basic digital literacy skills. Knowing how to screen share on Mac computers opens up a world of options.
Quick recap: Use PliimPRO, Bartender, and One Switch to control how your screen looks before a session. With Capto and Presentify, you may create polished presentations and tutorial videos that feature your screen. Teleprompter App may be your best-kept secret whether you want to record a pre-recorded video message or rehearse your presentation.
These apps are available through the Setapp membership. For one monthly subscription fee, you can use over 250 iOS and Mac and iOS apps to share your screen, enhance productivity, create content, and manage your system. With a free 7-day trial, you can try these apps risk-free.
FAQs about screen sharing
How does screen sharing work?
Screen sharing lets others see your computer screen over the internet or a local network. It's useful for presentations, getting feedback from colleagues, remote support, and collaboration. Since so many people video chat with friends and family, screen sharing may also be part of your personal life, particularly when sharing slides and video clips or helping less tech-savvy loved ones with computer issues.
Is Mac screen sharing safe?
Screen sharing on a Mac can be safe if you set it up with attention to security settings. Since it gives someone else access to view or control your computer, it's essential to consider the level of access granted — whether you allow them to control your computer or just view the screen. It’s also wise to ensure only trusted individuals connect to your Mac, which you can control by setting a password and monitoring who’s connecting. Authentication is required for access, and data transmission is encrypted, adding an extra layer of security. Plus, you can easily disable screen sharing when not in use to prevent unauthorized access.
Is it possible to share the screen from your Mac to a TV?
To share your Mac's screen with a TV, you need to use AirPlay.
- Requirements: You'll need an Apple TV or a compatible smart TV that supports AirPlay 2. It’s not necessary to log all devices into the same iCloud account, but they do need to be on the same Wi-Fi network for AirPlay to connect smoothly.
- How to use it: To activate screen mirroring, open the Control Center on your Mac (click the Control Center icon in the top-right corner), click Screen Mirroring, and choose the TV from the list of available devices.
Why can't you screen share on Mac?
If you're having trouble sharing your screen between two Macs or viewing a shared screen, here are a few things to check:
- Enable Screen Sharing and permissions: On the Mac, you want to share, ensure that Screen Sharing or Remote Management is enabled and the sharing permissions are properly set up. To do this, go to the Apple menu > System Settings > General, and click Sharing. Next to Screen Sharing, click the Info button to ensure you are listed as an authorized user.
- Prevent Sleep Mode interruptions: Make sure both Macs are awake by adjusting their sleep settings to prevent interruptions during screen sharing.
- Same network connection: Verify that both Macs are connected to the same network so that screen sharing works effectively.
What is the Mac shortcut for screen share?
Mac doesn't have a direct keyboard shortcut for launching the Screen Sharing app. However, you can quickly access it through Spotlight:
- Press Command + Spacebar to open Spotlight.
- Start typing Screen Sharing, and the app should appear in the search results.
- Press Return to open the app.
Alternatively, if you frequently use Screen Sharing, you could also add it to your Dock.
Can I send files to the other Mac while sharing screen?
While screen sharing, you can also transfer files between the host and guest computers. After you start a screen sharing session, you can either:
- Copy a file to the other Mac. Choose the file and drag it to the Screen Sharing window.
- Copy a file from another Mac to yours. Choose a file from the screen sharing window, then drag it to your Mac.
How to share a Mac screen with an iPhone?
If you want to share your Mac screen with an iPhone, you'll usually need to use a third-party app since macOS doesn't have built-in options for mirroring your screen to an iPhone.
Which tool is the best for recording a video on my Mac screen while sharing?
If you want to record your screen while sharing it, Capto is a great solution. It is particularly helpful for creating tutorials, demonstrations, or simply capturing your screen activities during a sharing session.


