On Mac: There's no native Live Photo converter. The closest alternative is Permute that converts the video to a GIF. It loops like Live Photos and works across platforms.
On iPhone: Use apps like intoLive and GIPHY (from the App Store) to handle conversions easily.
In this guide, I’ll show you simple ways to grab stills from videos using quick screenshots or more precise frame extraction with third-party apps. Plus, you’ll learn how to convert videos to Live Photos and GIFs on both iPhone and Mac, with step-by-step instructions.
Want to convert image files from different formats for free? Use the HEIC to PNG and HEIC to JPG converters to quickly convert files online.
How to turn a video into a Live Photo on iPhone (Step-by-step)
Live photos are a beautiful form of injecting life into your shots — they feel genuinely alive, letting you observe life moments in motion. It’s not only about the aesthetics, of course. Live photos are lighter than videos because they capture only 3 seconds of video, and this makes the file size smaller.
If you want to turn a video into a Live Photo on your iPhone, here’s the easiest way:
Use apps like intoLive or the iPhone Shortcuts app.
Keep your video short, around 5 to 15 seconds, for smooth conversion.
Best formats to use are MOV or MP4.
Step-by-step:
Download intoLive from the App Store.
Open the app and pick your video.
Edit it a little if you want (trim or choose a favorite part).
Tap Make in the top right.
Choose how many times you want the Live Photo to repeat.
Save Live Photo, and you’re done!
Using intoLive is beginner-friendly and works great for quick video-to-Live photo conversions on iPhone.
How to turn a video into a Live Photo on Android?
Android users often ask if they can do the same as the iPhone’s Live Photos. Android has Motion Photos, which combine a still photo with a short video snippet (usually 1.5–3 seconds), capturing motion and sound. However, these are mainly created during photo capture and not from existing videos.
Unlike the iPhone, Android smartphones don’t natively convert videos into Motion Photos, but you can use third-party apps from Google Play to create looping clips or GIF-like animations that mimic Live Photos. Still, the playback, editing features, and ecosystem compatibility of Android Motion Photos differ from Apple’s Live Photo experience.
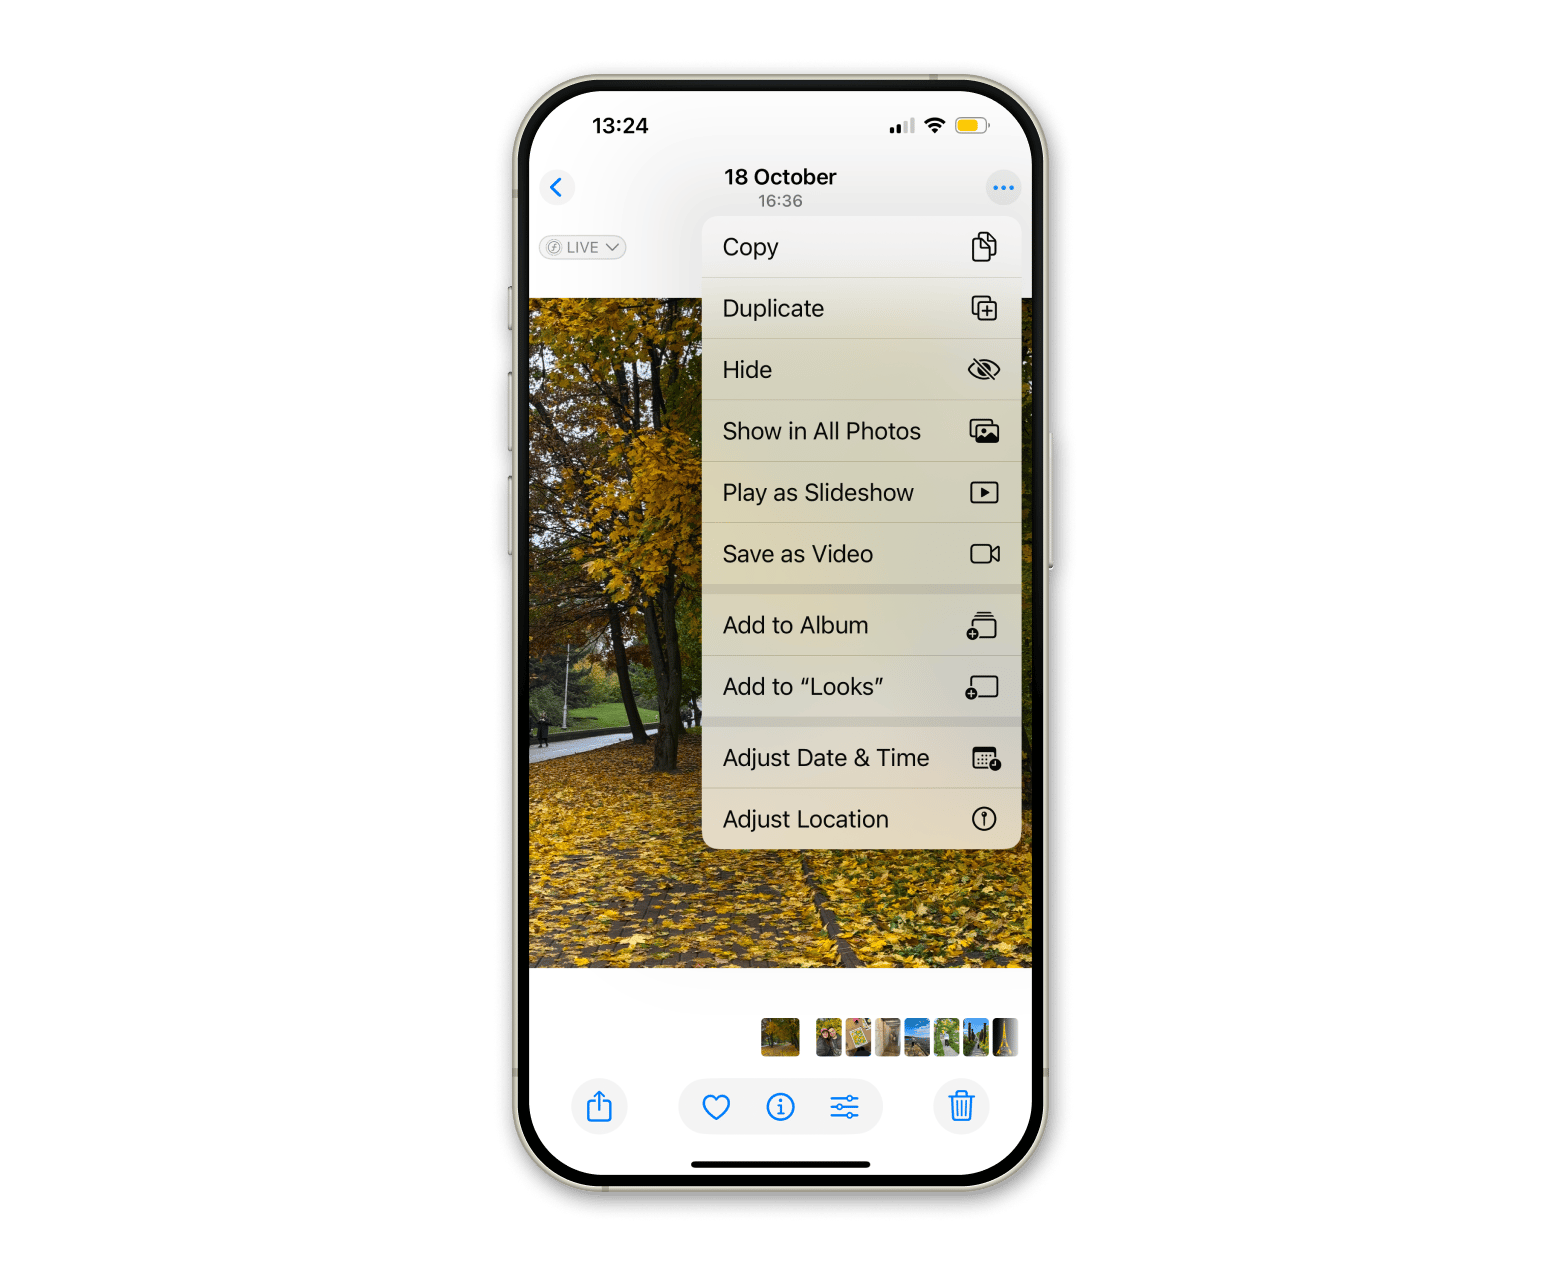
How to convert a Live Photo to video on iPhone
Sometimes you want to share your Live Photo on platforms that don’t support the format, or send it to non-iPhone users. That’s when you need to convert Live Photo to a video:
Open the Photos app and go to your Live Photos.
Select the Live Photo(s) you want to convert.
Tap three dots on the top right corner.
Choose Save as Video.
iOS will create a 3-second video file without deleting the original Live Photo. You can trim or mute the sound before sharing if you want a cleaner video.
Best apps to turn videos into Live Photos on iPhone
The easiest way to turn videos into Live Photos on iPhone is by using apps that focus on quick conversion and native Photos compatibility. These apps let you select a video, trim it if needed, and save it as a Live Photo without affecting the original file. Importantly, saving a Live Photo as a video does not delete the original photo. It simply adds another video file to your gallery, which can quickly create clutter if you do this often.
CleanMy®Phone is a great tool to get rid of all the redundant live photos and videos. It’s a duplicate finder that not only deletes duplicate files, but it can also spot similarities in your gallery and suggest deleting all of them, except for one best-quality shot.
If you need to move your newly created videos to a Mac, use AnyTrans for iOS. This device manager lets you migrate any data across devices super fast. We love the organized approach — it’s easy to select the exact category of files you want to move and run a bulk transfer. Here’s how it works:
Install and open AnyTrans for iOS.
Connect your iPhone to your Mac with a cable.
Access Device Manager.
Click the media type.
Hand-pick or select all the files you want to transfer.
If you want to set a Live Photo as wallpaper on your iPhone, you need to:
Open the Photos app and scroll to Media Type > Live Photos.
Locate your newly created Live Photo.
Tap the Share button and choose Use as Wallpaper.
Adjust positioning and ensure Live Photo mode is enabled.
Tap Add to confirm, and enjoy your updated home screen.
Using a video to Live Photo wallpaper iPhone setup makes your Lock Screen truly dynamic and personal, turning your favorite moments into a living one.
Tip If your Live Photo doesn’t animate on the lock screen, check that Low Power Mode is off and Reduce Motion is disabled in Settings > Accessibility > Motion.
How to convert a video to Live Photo on Mac (Workarounds + tools)
I’ve already mentioned a free tool intoLive that can help turn videos into live photos. It only works on iOS devices. Unfortunately, Mac doesn’t have an equivalent app to create live photos from videos. So, if you want to do the same on Mac, you can try the following flow:
Use AnyTrans for iOS to move your videos from your Mac to your iPhone.
Use intoLive on iPhone to convert videos into live photos.
Once again, use AnyTrans for iOS to move live photos to Mac.
I know, that’s a bit of an overkill. There might be good reasons why you need to convert those videos on Mac and not iPhone — maybe you’re downloading them on Mac, or you have to run them through some Mac video editing software. So let’s look for workarounds.
Get Pulltube in Setapp Marketplace, same app, same plan, $19.99 one-time, for a quick link to file downloads.
How to use Permute to convert videos to GIFs or Live Photos on Mac
One solution for how to make a video a Live Photo on Mac is to use the GIF format instead of a Live Photo. It’s very similar to a Live Photo, if you think about it. The only difference is that GIFs have a loop effect. If you’re okay with this, you can use Permute on Mac to instantly turn any video into GIF.
Permute is a swiss army knife when it comes to converting video, music, or audio on Mac. It supports tons of file formats, including HEIC, MOV, GIF, etc.
Click the plus button to upload your video, or use drag and drop.
Select GIF animation from the list of formats.
Click the Start button and wait a few seconds.
You’ll be notified when the conversion is complete.
Click the Show in Finder icon to access your GIF.
Unlike risky free online Live Photo converters, Permute guarantees privacy and no malware. For more on this, check out the detailed guide on Permute for image, audio, and video conversion.
What’s important, Permute is also the safest choice for converting media. Many people use free apps, or even worse, free online services, to convert their files. But those one-click solutions may be very dangerous since they often contain malware that could infect your Mac.
Needless to say, Permute works both ways, so you can use it to turn GIFs into videos, too.
How to convert a Live Photo as a Video on a Mac
To avoid the hassle of transferring your media files to a Mac, learn how to save live video as a photo on a Mac. Just as on iPhone, it can be done with your Photos app:
Open Photos and go to Live Photos.
Select all the photos you want to convert to video.
Go to File in the Photos menu > Export > Export unmodified original.
If you need to export image metadata along with your video, check the box next to Export IPTC as XMP.
Choose the file destination and click Export.
You’ll notice that the video in .mov will export along with a HEIC image. If you want to get rid of these leftover images, use Gemini. It will catch them fast and suggest that you delete them to free up storage space. You can even set up automatic duplicate monitoring so that Gemini notifies you about future duplicates and redundant similar files.
Tip: Remove duplicate Live Photo leftovers before they quietly eat your storage. Built for follow-up cleanup after conversions. Risk-free 7-day trial. Unlock cleanup tools.
Turning live photos into videos is easy to do. Just make sure you run a cleanup once it’s done. A more complicated thing to do is to turn a still photo into a video. Wait, is it even possible? Well, you can’t make one still photo or video — that would look pretty weird. But you can bring multiple images into one video. What you get as a result is called a time-lapse.
How to turn Live Photos into GIFs (and back again)
To turn a Live Photo into a GIF on Mac, use macOS native Shortcuts functionality. The shortcut is available in the app’s gallery, so you don’t have to set it up manually. Here’s how to add the shortcut to your toolkit:
Open Shortcuts on Mac.
Access Gallery and type ‘make gif’ in the search field.
Click Add Shortcut.
You can run the shortcut from the All Shortcuts section or add it to your menu bar.
Note that the Shortcuts app is only available on macOS Monterey and later.
Create an automated workflow with Shortcuts to turn your live photos into GIFs and clean up image leftovers automatically. You can set up this workflow by adding actions, as shown in the screenshot below.
Too cumbersome? There are easier ways to get rid of all the Live Photos and video leftovers on your Mac. One of them is Gemini, a duplicate finder we’ve mentioned before. A more comprehensive one is CleanMyMac, a Mac care app that deletes tons of redundant files from your disk after one automated Smart Care scan.
How to convert a GIF to Live Photo on iPhone
If you want to turn a GIF into a Live Photo, it’s easy to do on iPhone. You can convert GIFs with a click using GIPHY, the world’s largest library of GIFs. If there’s one place you get your GIFs from, that’s probably GIPHY. Apart from letting you save GIFs to your camera roll, it also lets you save them as live photos. This is great because you won’t have to save GIFs first and then convert them. Here’s how it works:
Install GIPHY on your iPhone.
Find the GIF you want to save.
Click the three dots on top.
Tap Convert to Live Photo.
Choose the size and save your Live Photo.
Tips for the best Live Photo conversions
I’ve spent some time figuring out how to get the best results when converting videos into Live Photos, and I want to share what worked for me. Whether you’re turning a favorite clip into a wallpaper or just want a smooth, high-quality Live Photo, these tips will help you nail the process. Here’s what I recommend:
Trim your videos before converting: Keeping your Live Photos short makes the animation smooth and saves space. I usually cut my clips with the built-in video editor to around 3-5 seconds for the best effect.
Use high-quality video files like MOV or MP4: The better the original clip, the clearer and more vibrant your Live Photo will be.
Mute the sound if you want silent wallpapers: Live Photos include sound by default, but sometimes a silent animation is cleaner and less distracting.
Declutter your device regularly: I use tools like CleanMyMac or CleanMy®Phone to keep storage free and avoid slowdowns caused by too many photos and videos.
Convert GIFs and videos only with trusted apps: To stay safe from malware and keep your Live Photos looking professional, I stick to well-known apps and avoid sketchy Live Photo converters.
Convert video to Live Photo: Now you know everything
Now that you know how to make a Live Photo a video and vice versa, the main thing to keep in mind is that almost each of the methods we’ve mentioned above has one serious downside — it leaves some clutter behind. Gemini and CleanMyMac can help you solve this problem, but you have to make it a habit to clean up your device with these apps regularly.
Can I turn a still photo into a Live Photo on iPhone?
No, a Live Photo requires capturing motion around the shutter moment, so a single still image cannot be converted into a true Live Photo. You can create animated effects with third-party apps, but these are not genuine Live Photos.
How do I turn a video into a Live Photo on a MacBook?
Turning a video into a Live Photo on a MacBook directly on a Mac is not quite possible. However, you can transfer the video to your iPhone using AnyTrans for iOS. Then, use intoLive to turn the video into a Live Photo before transferring it back to your Mac.
How do I convert a GIF to a Live Photo on iPhone?
To convert GIF to a Live Photo on iPhone, use GIPHY. Download the app on your iPhone, choose the GIF you want to convert and select Convert to Live Photo. Then, choose a size and save it to your phone.
How do I convert a video into a Live Photo on iPhone?
To convert a video to a Live Photo on an iPhone, download intoLive on an iPhone. Then, open a video from your Gallery and tap Make in the upper right corner. Choose the number of repeats and save the Live Photo.
How do I turn a video into a still photo on iPhone?
The fastest way is to pause the video and take a screenshot. For more precision, use a tool like SnapMotion to select specific frames. SnapMotion can capture multiple images from the same video at once, which is especially handy if you want the highest-quality stills.
How do I set my new Live Photo as an iPhone wallpaper?
After creating or saving your Live Photo, open Settings on your iPhone > Wallpaper > Add New Wallpaper, tap the Live Photo tab, and choose your new Live Photo. Make sure Live Photo is enabled before you set it. Now, when you press and hold the lock screen, the live wallpaper will animate for a few seconds.
What if I can’t see the Live Photo animation?
If the picture stays still, try these quick checks:
Confirm it’s a Live Photo: Open the image, then touch-and-hold. If nothing moves, the file might be a regular photo.
Turn off Low Power Mode: Go to Settings > Battery and switch Low Power Mode off. The feature pauses some animations to save energy.
Disable Reduce Motion: Settings > Accessibility > Motion, then turn off Reduce Motion so Live Photos can play.
Check Live option when setting wallpaper: In the wallpaper preview, tap the motion icon so it says “Live.”
Share another way: If an app won’t show the animation, share the Live Photo as a video.
Can I turn a still photo into a Live Photo on iPhone?
No. A Live Photo must be recorded with the camera’s Live option turned on, because it captures 1.5 seconds of video before and after the shutter press. A single still image has no built-in motion to recover later. You can, however, use third-party apps to add animated effects or turn several photos into a short video, but the result is not an original Live Photo.
Superpowers for your iPhone
Power up your workflow with apps for Mac and iOS on Setapp.