How to do a hanging indent on Word on Mac: Learn to “Hang” with style
- To create a hanging indent in Word on Mac, use Format > Paragraph.
Highlight the paragraph, select Format > Paragraph, and under Indentation > Special, choose Hanging. The default indent is 1.27 cm, but you can adjust this in the By field. - You can also use the Ruler or Command + T shortcut.
Turn on the Ruler via View > Ruler, then drag the bottom triangle to create the indent. Or, use the keyboard shortcut Command + T for quick formatting.
- Common issues are easy to fix.
Avoid using both left and first-line indents together, and ensure the indent isn't misapplied to lists. If things look off, set the Left and Right indent values to 0. - For clean formatting and writing, try distraction-free editors..
Tools like Ulysses offer a minimalist workspace with built-in grammar checks and markdown support, while MonsterWriter simplifies structured academic and technical writing. Setapp gives you a 7-day free trial to 250+ Mac and iOS apps, including Ulysses and MonsterWriter. Try Setapp free.
Hanging indents are one of the most common formatting styles, where the first line of a section or paragraph will stay to the left, and other lines after that are indented and aligned — just like this:
Tucker, S., & Williams, M. (2021). Formatting Styles and When To Use Them.
Capybara Press.
If you’re a Microsoft Word user, creating a hanging indent is a super simple task. I’m going to give you a rundown on how to do both and how to fix a few potential issues if they pop up. First, let's start with a quick overview. Below, you'll find more detailed instructions with screenshots, images, and GIFs.
| Method | Step-by-step |
| Paragraph settings in Microsoft Word |
1. Highlight the paragraph(s). 2. Go to Format > Paragraph. 3. Under Indentation > Special, select Hanging. 4. Adjust the indent size in the By field (default: 1.27 cm). 5. Click OK to apply. |
| Keyboard Shortcut in Microsoft Word | Press Command + T to instantly apply a hanging indent to the selected text. |
| Using the Ruler in Microsoft Word |
1. Open View and check Ruler to enable it. 2. Highlight the desired text. 3. On the ruler, drag the bottom triangle (Hanging Indent Marker) to set the indent position. |
| Menu path in Google Docs |
1. Select the paragraph or citation. 2. Go to Format > Align & indent > Indentation options. 3. Under Special indent, choose Hanging. 4. Set the desired measurement and click Apply. |
| Using the ruler in Google Docs |
1. Go to View > Show ruler to enable the ruler. 2. Select the paragraph. 3. Drag the upside-down triangle (Left indent) to the right. 4. Drag the small blue rectangle (First-line indent) back to the left margin. |
| Automate formatting with MonsterWriter | MonsterWriter (available on Setapp) automates the creation of academic formatting elements. It supports citation styles like APA, MLA, Harvard, and IEEE, automatically applying proper indentation when inserting citations, bibliographies, or reference lists. |
How to create a hanging indent in Word for Mac
Here’s how you’d input a hanging indent in Microsoft Word via paragraph options:
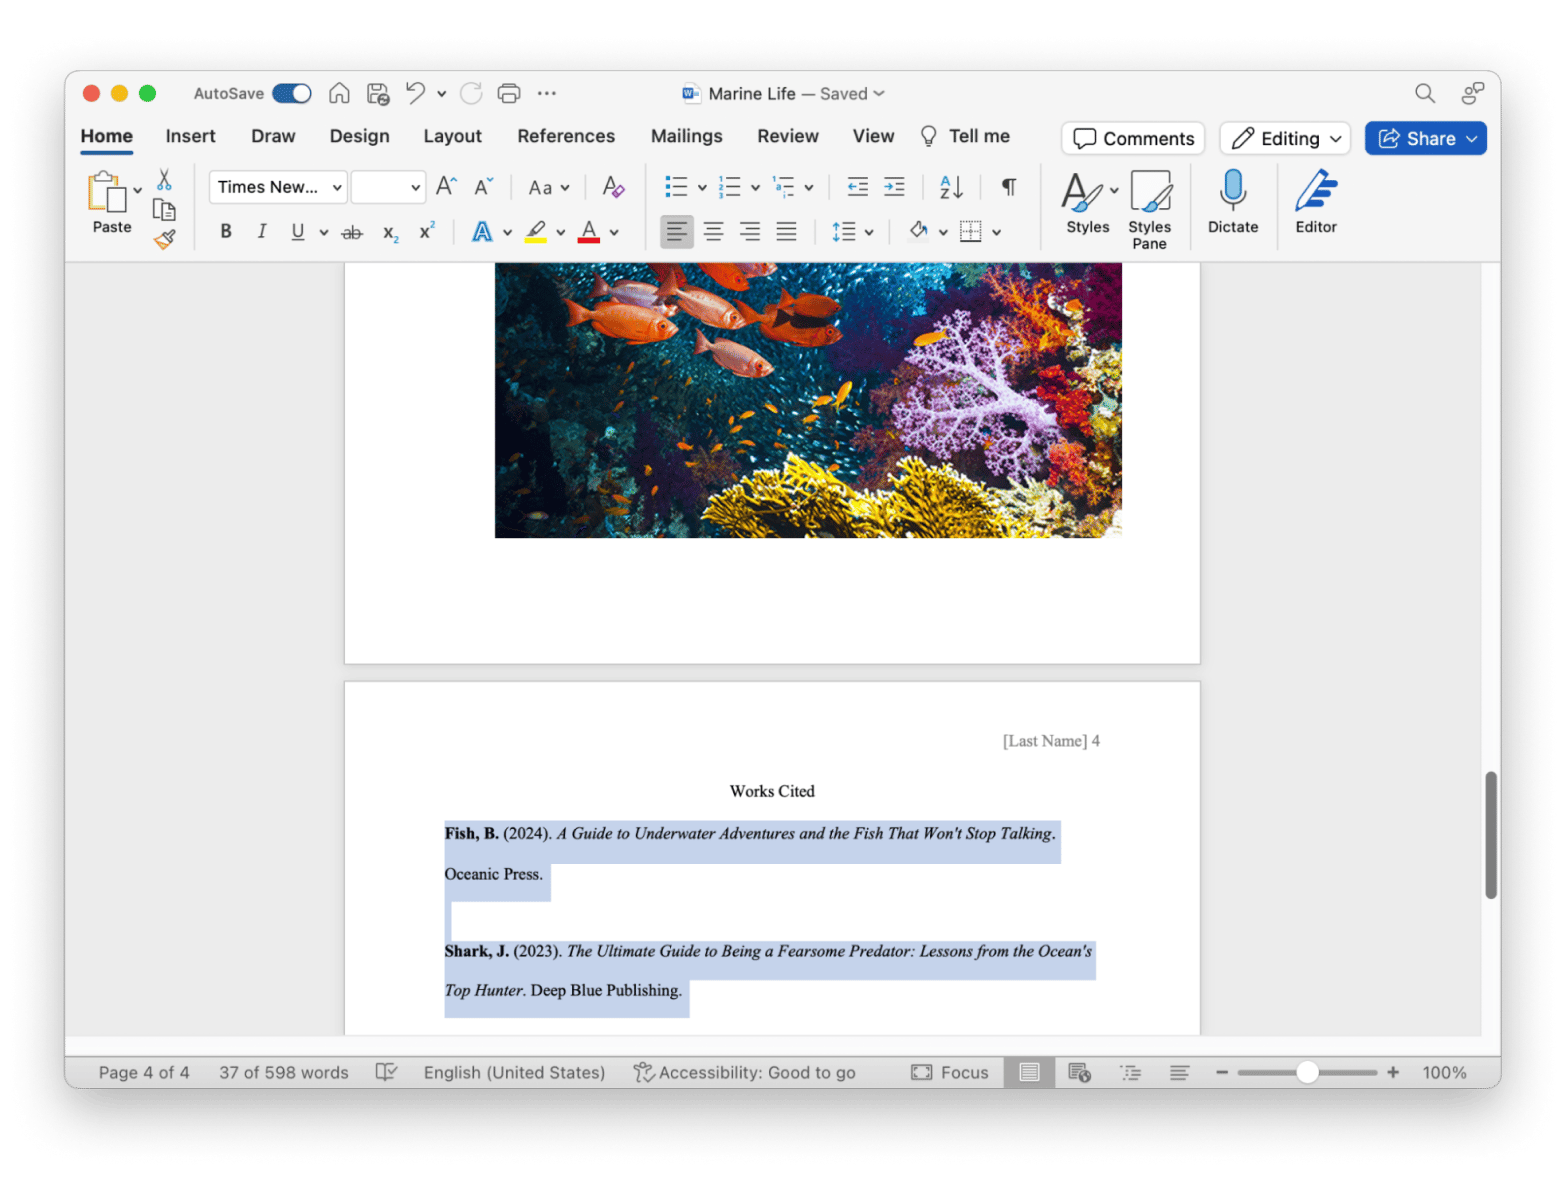
Open the Word document and highlight the paragraph(s) where you want to apply the hanging indent.
Click Format > Paragraph in the menu bar.
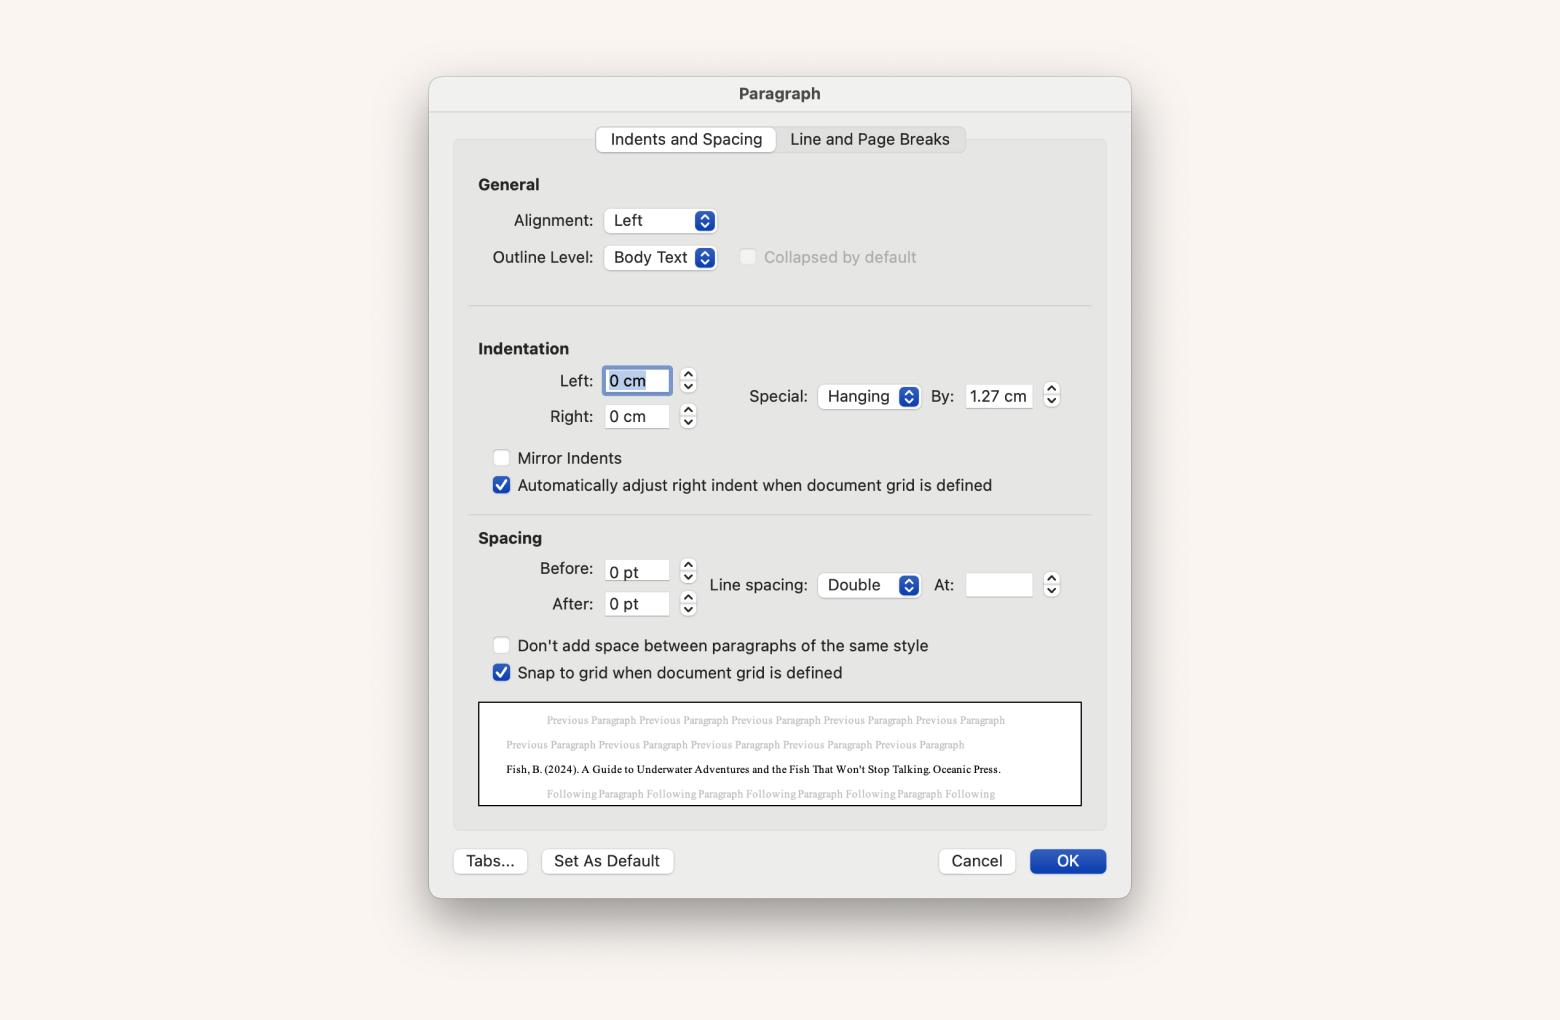
Open the drop-down menu under Indentation > Special and select Hanging.
Under Indentation, adjust the indent size in the By field if needed (the default is 1.27 cm).
Click OK to apply the hanging indent.
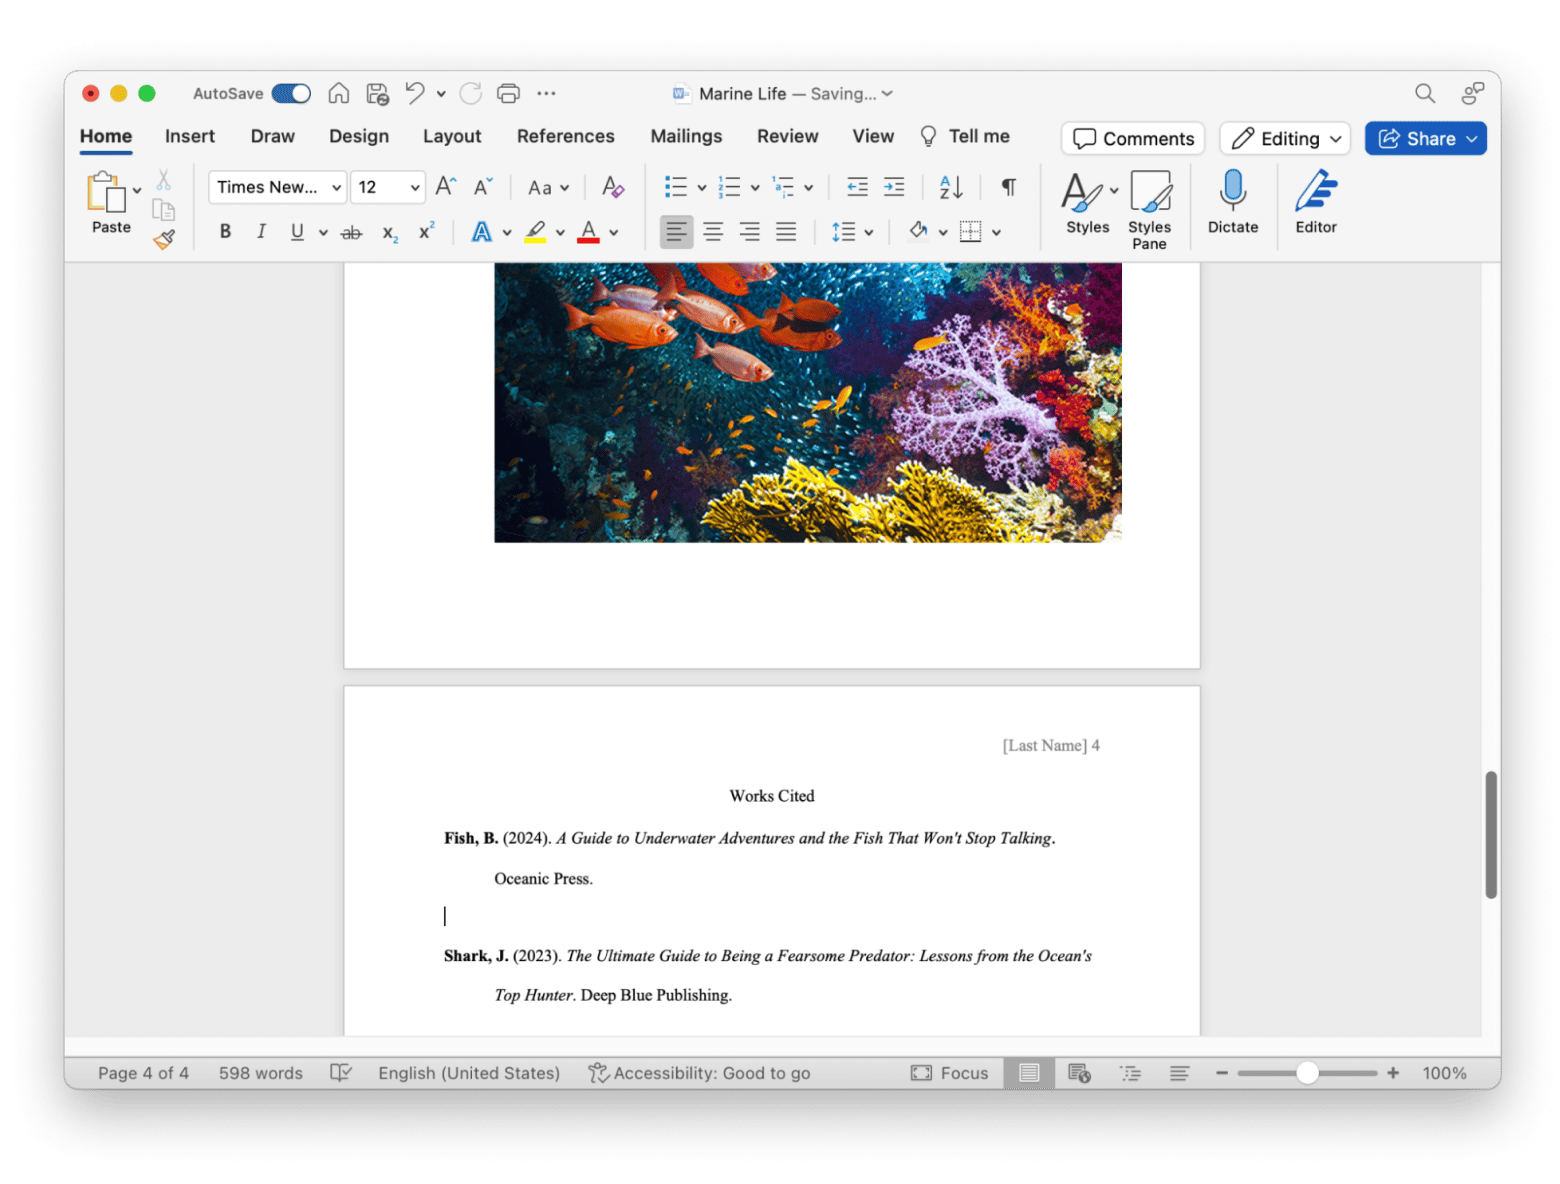
While you likely won’t have to deal with hanging indents throughout your entire document, it can still feel tedious going through the multi-step process every time. Luckily, there’s a nice keyboard shortcut for hanging indents: Command + T.
Focused writing in MS Word?If you want to focus on writing without distractions, Microsoft Word already has a focus mode option. It hides the formatting tools and makes the document full screen. For creative writing, this creates a nice, quieter digital environment with a clean interface. If you want to take it a step further and get a completely distraction-free environment, you could try Ulysses, a writing app, which acts as a focused workspace. It comes with plenty of features, including built-in grammar and style checking, beautiful export options, and a useful markdown editor. You can even publish directly to WordPress or Medium and sync your files across devices. I get Ulysses as a part of my Setapp subscription, along with 250+ other apps.
|
Using the Ruler to create a hanging indent
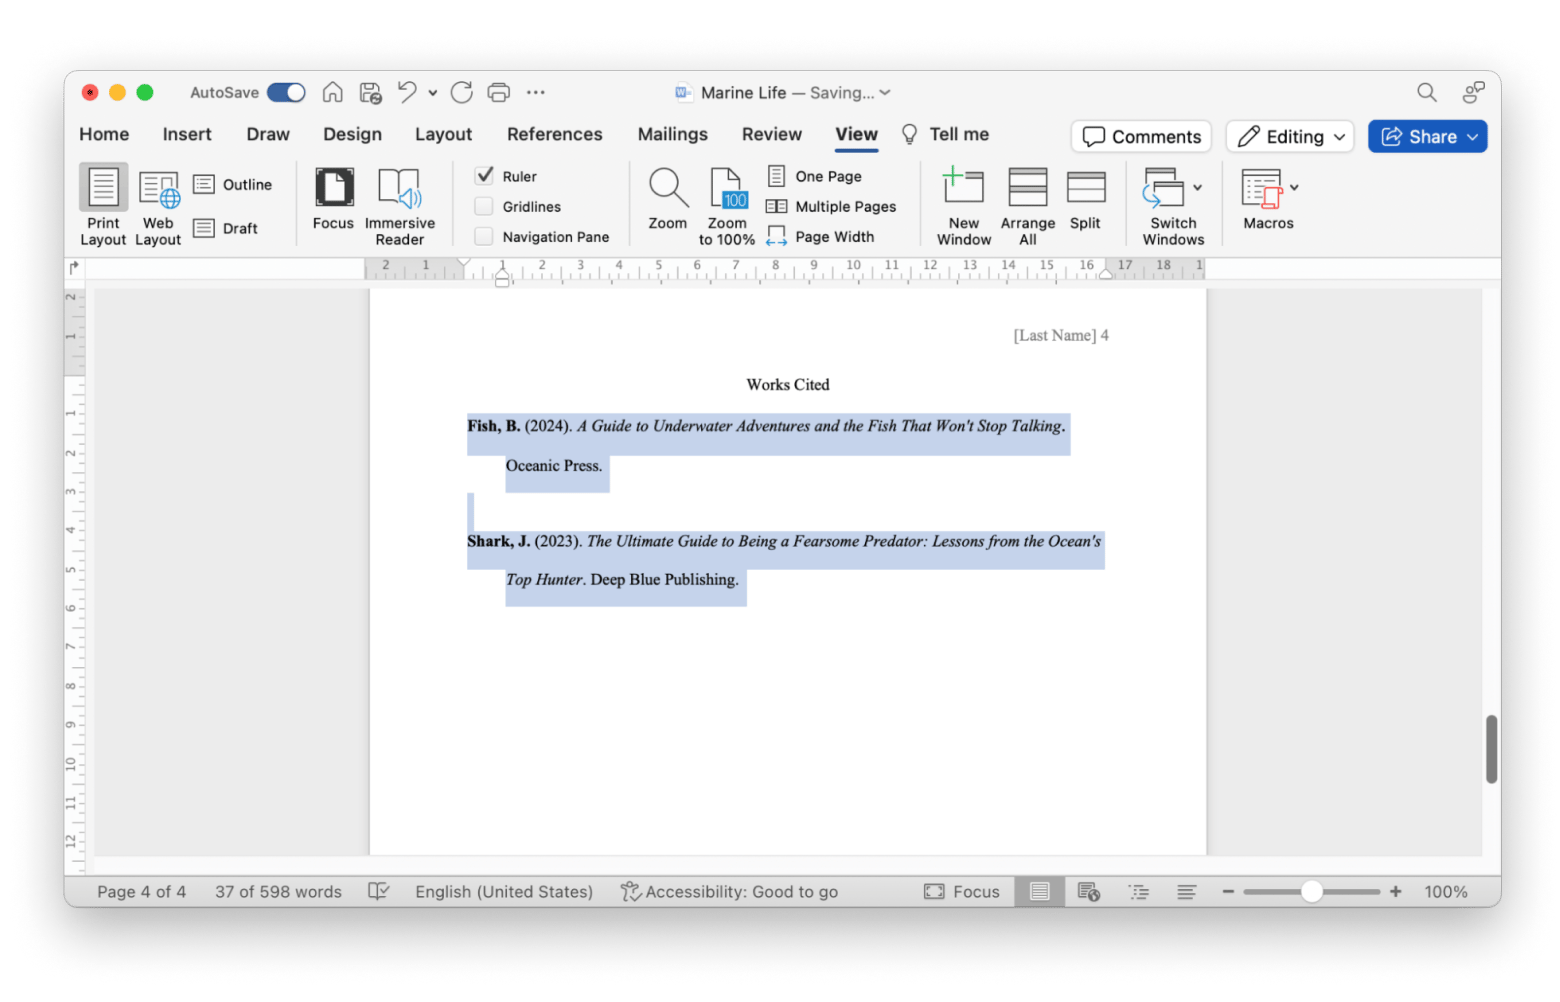
Another handy way to create a hanging indent on a Mac in Word is by using the Ruler tool. Nowadays, it’s not always visible by default, so you’ll have to start by enabling it. Here’s how to use the Ruler tool to create a hanging indent:
Open the Word document in Microsoft Word.
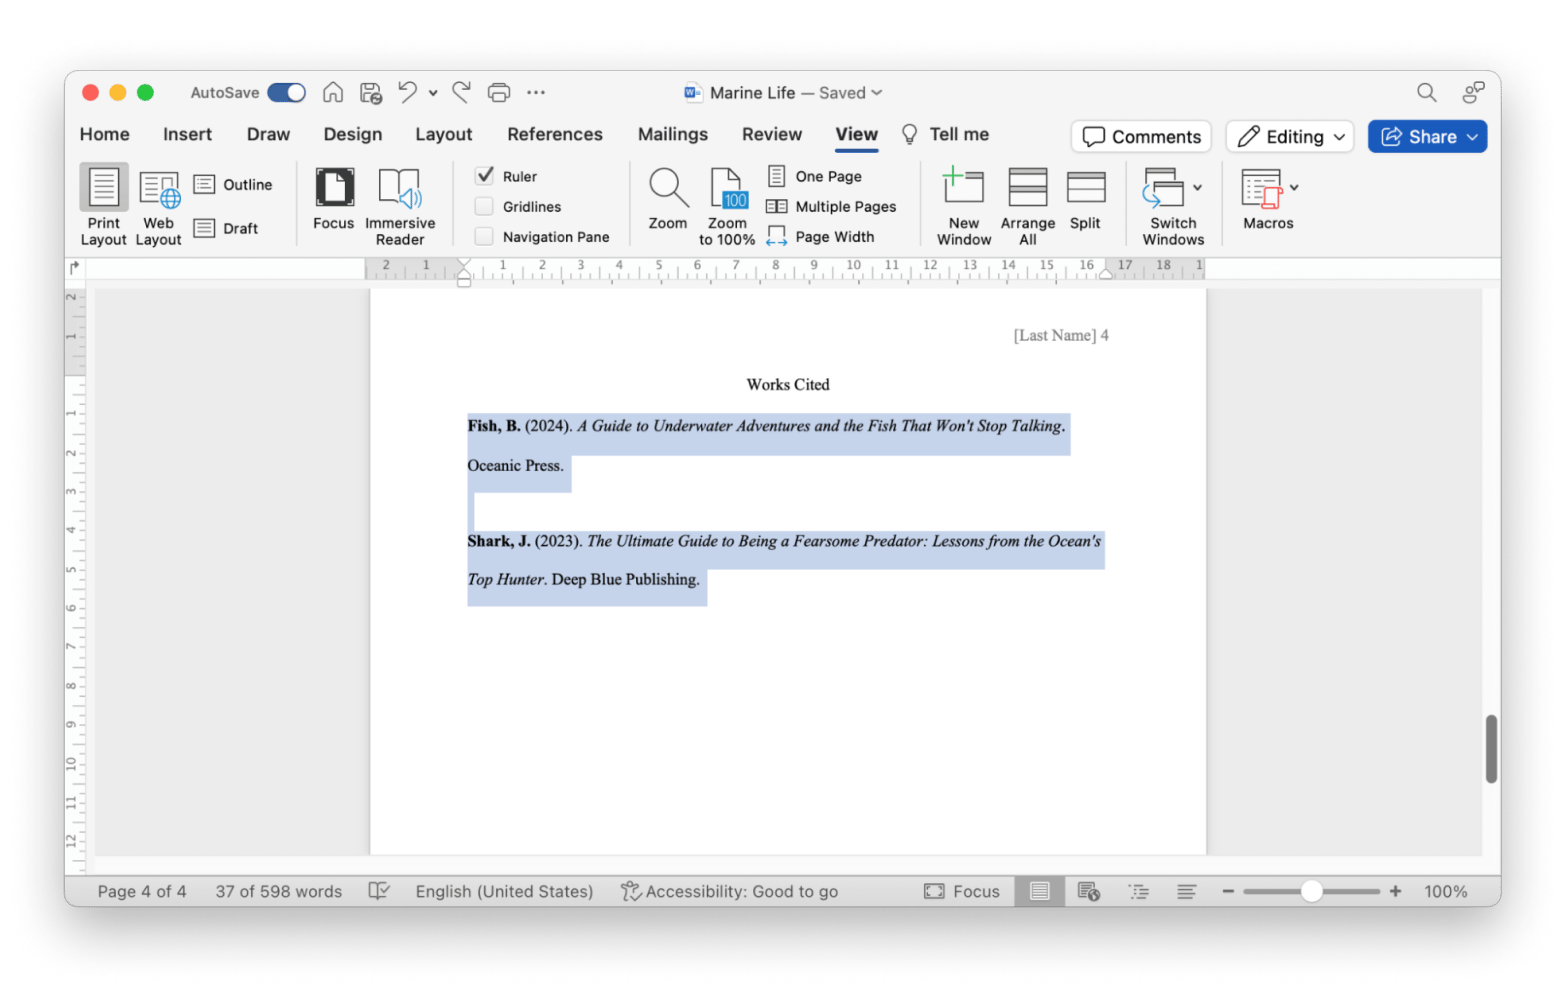
Click View in the toolbar > Select the Ruler box.
Highlight the text to which you want to apply a hanging indent.
Drag the hanging indent marker (bottom triangle) on the ruler to adjust the indentation level.
How to make a hanging indent in Google Docs
The methods are similar to those in Microsoft Word. You can use either the menu path or the ruler.
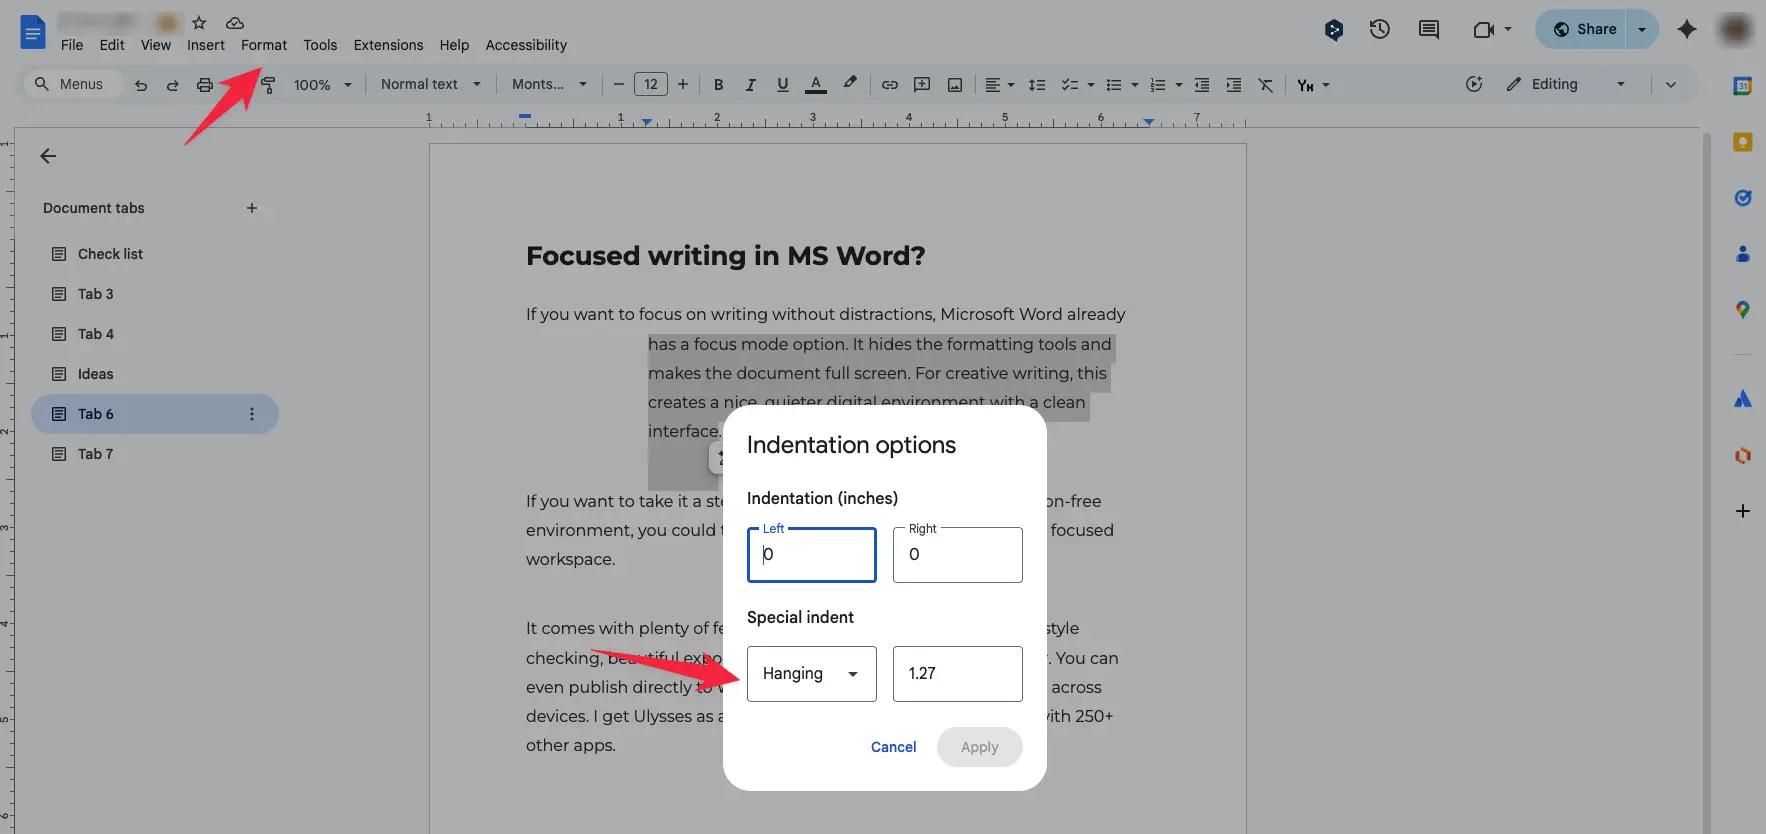
Here's how to create a hanging indent in Google Docs, using the menu path:
- Select the paragraph or citation you need to format.
- Go to Format > Align & indent > Indentation options.
- Choose Special indent: Hanging.
- Next to Hanging, set 0.5 inches (1.27 cm) for APA/MLA formatting (or any other value you need), then click Apply.
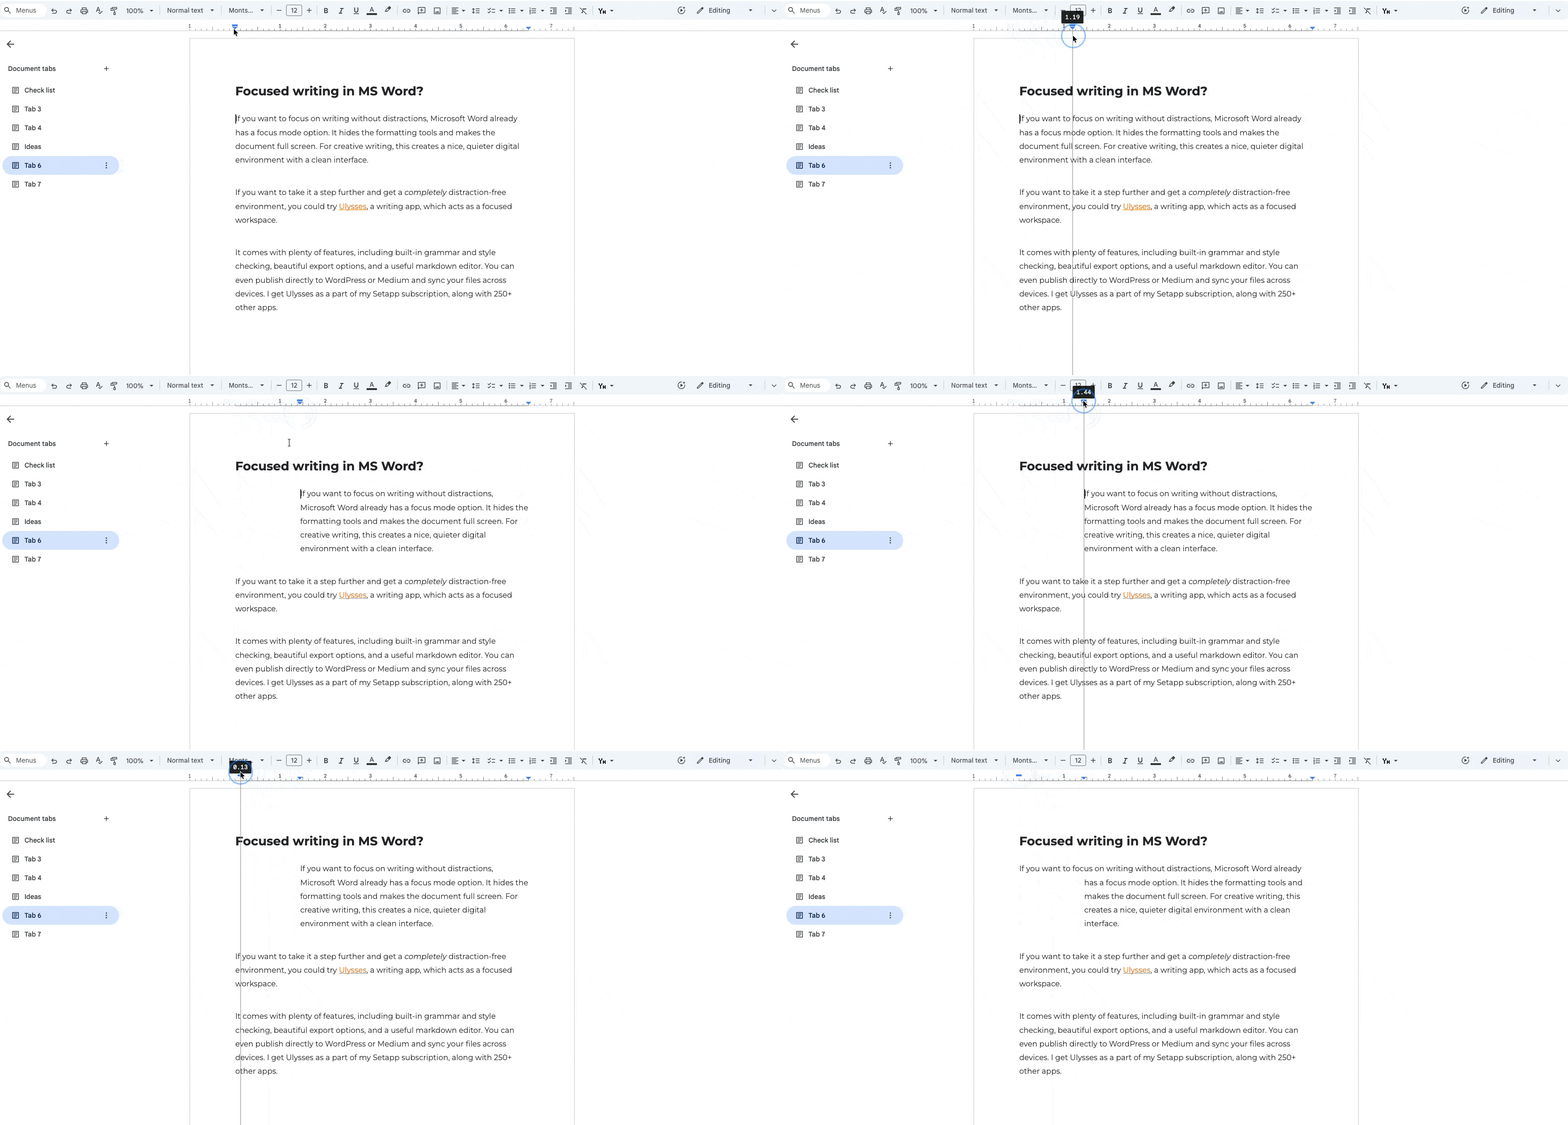
Here's how to create a hanging indent in Google Docs using the ruler:
- Turn on the ruler by going to View > Show ruler.
- Select your text or simply click on the paragraph you want to format.
- On the left side of the ruler, drag the upside-down triangle (Left indent) to the right. This will move the entire paragraph to the right.
- Drag the small blue rectangle (First-line indent) back to the left margin. This will return just the first line to the left edge.
See it live:
How to automate paper formatting
Did you know that you can fully automate your paper’s formatting? A special app, MonsterWriter, automates pretty much everything about academic papers.
For example, it automatically works with various citation styles, including APA style, Harvard, MLA, IEEE, and APA without parentheses.
If you need to insert a footnote, citation, cross-reference, inline equation, code block, bibliography, blockquote, reference list, or anything else, you just click and the block is inserted and formatted automatically. It even has specialized headings for the appendix and acknowledgments.
See what it looks like:

Basically, the app gives you the space to create a paper from scratch. You can add documents there and categorize them by tags, or jot down your ideas in a special blank field (like a to-do list) specifically created for keeping track of your thoughts.
Troubleshooting common issues with hanging indents
Hanging indents aren’t hard to implement, but it’s not always smooth sailing. If you’re not accustomed to the process just yet, you might come across these common issues:
- Indent applied incorrectly: If the indent doesn’t appear as expected, ensure you aren’t applying both left and first-line indents simultaneously. When you go into the Paragraph formatting settings, ensure the Left and Right indentation numbers are 0. With the ruler, be sure you didn’t drag the slider using the rectangle at the bottom of the slider and have only dragged the bottom arrow.
- Indent not applying to lists: If you use a numbered or bulleted list, check the List settings to adjust the indent separately. Lists are usually separated from other paragraphs and lines.
Leave those margins behind: How to create hanging indent on Mac
Creating hanging indents is easy. A few approaches include using the Ruler, Paragraph settings, and simply pressing a shortcut on your keyboard. These methods are simple, allowing you to format any document with ease. Looking for more specific text editors for your digital workflow? Ulysses and MonsterWriter each present their own benefits, whether distraction-free or feature-rich.
Both of these apps and 250+ more useful iOS and macOS apps can be used with a 7-day free trial of Setapp. The platform really helped me save time and keep my cool since I found the app perfect for just about everything I need to do — so why not sign up for a trial today?
FAQs
How do I create a hanging indent in Word for Mac?
To create a hanging indent in Word for Mac, highlight the text you want to format. Then, follow one of these methods:
- Click Format > Paragraph, and under Indentation, choose Hanging from the Special dropdown menu.
- Alternatively, click View to enable the Ruler. Drag the bottom triangle on the ruler to adjust where the hanging indent begins.
Can I use a shortcut to create a hanging indent in Word?
Yes, you can use the shortcut Command + T to create a hanging indent in Word on Mac.
How do I adjust the size of the hanging indent?
To adjust the size of a hanging indent in Word on Mac:
- Go to Format > Paragraph and specify the size in the By field under the Special dropdown menu.
- Or, use the Ruler by dragging the bottom triangle to your desired indent size.


