How to type bullet point on Mac keyboard
Presenting your content in a standard paragraph format may not always engage your audience. This is where bulleted lists come in handy. If you're having trouble finding bullet points on your Mac keyboard, this guide is for you. Let's figure out how to type bullet points on a Mac.
How to type a bullet point on a Mac
The easiest and quickest way to add a bullet is to use the Option + 8 keyboard shortcut. Just press two keys at the same time.

Here's a step-by-step instruction on how to add bullet points on Mac keyboard:
- Open the document in which you want to create the bullet list.
- Place the cursor in the document.
- Press Option + 8 on the keyboard and type the text.
- To move to the next bullet, press Enter.
However, there is more than one way to create a bullet point on your Mac. Below, we'll take a look at each of them.
System shortcuts are great, but sometimes they just aren't enough, and it can be hard to remember all the ones you might need. With Keysmith, you can create keyboard shortcuts for everything from highlighting text in a document to starting a meeting.
The first thing you do is record a set of actions that you want to shortcut (Keysmith calls this a "macro"). Next, you can assign a shortcut to that action.
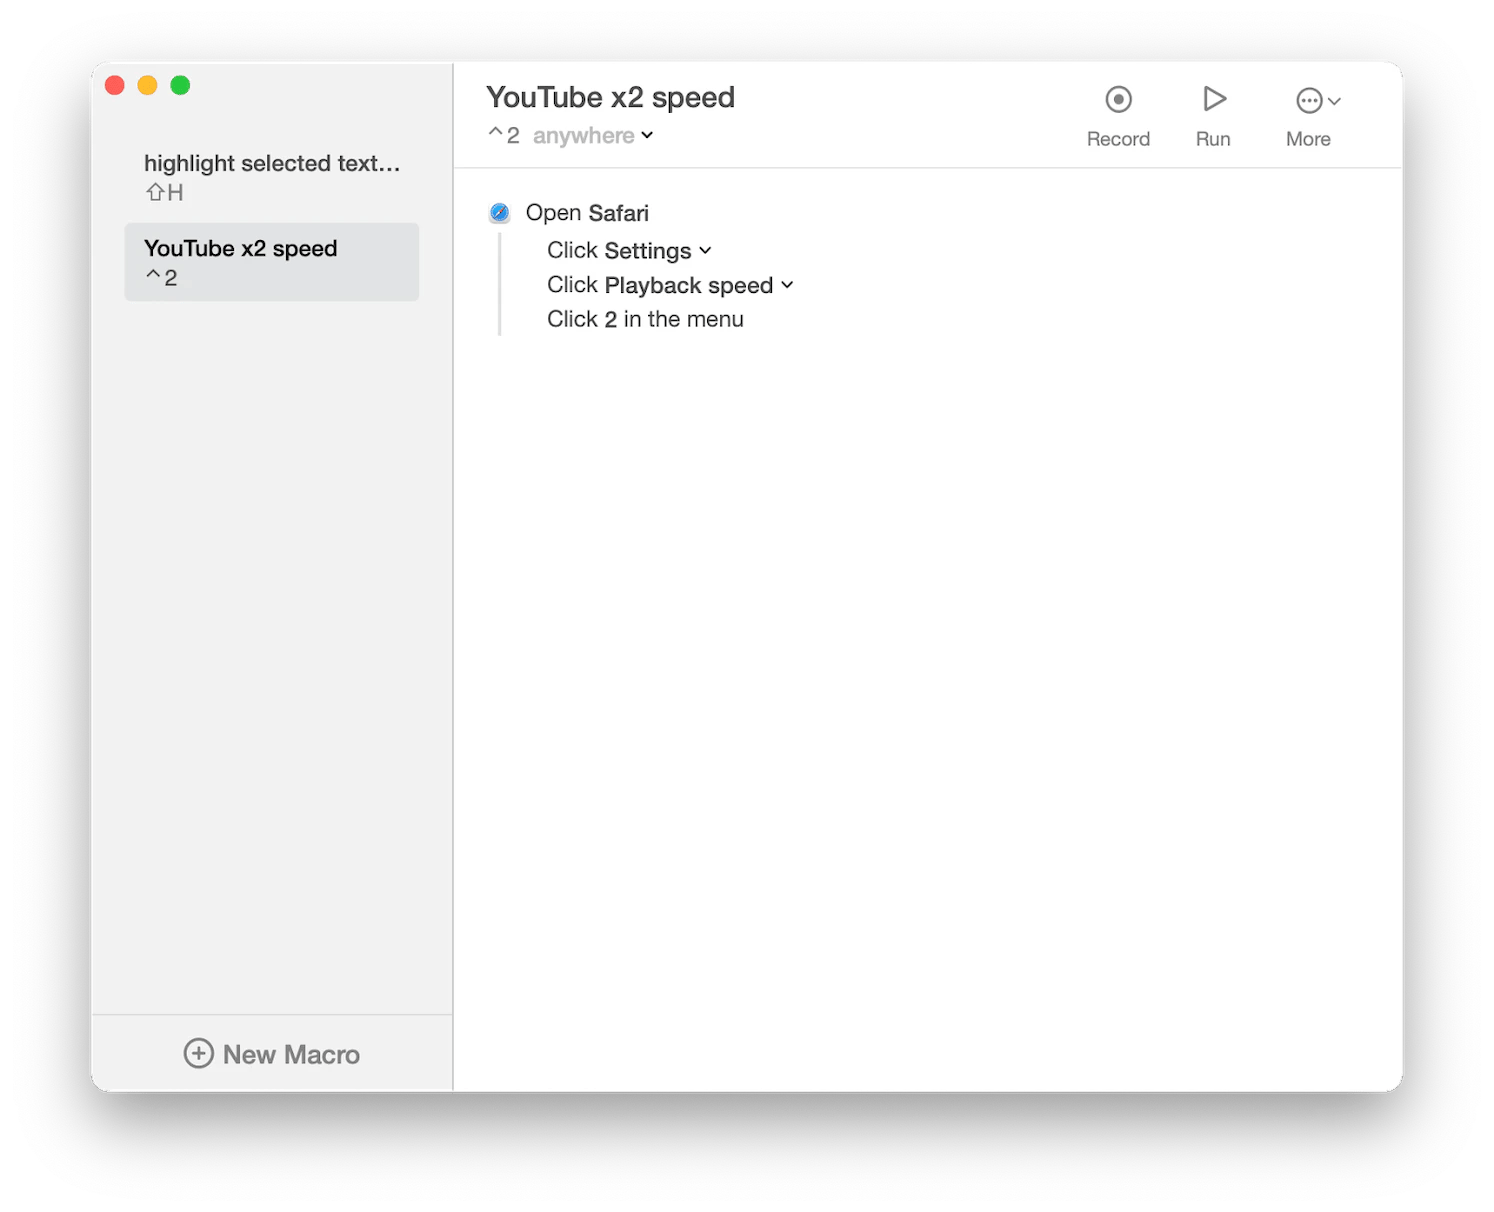
The best part? WIth Keysmith, you don't need to remember every hotkey. You can run your macros by name with a Spotlight-like search bar!
Use Format menu to add bullet point
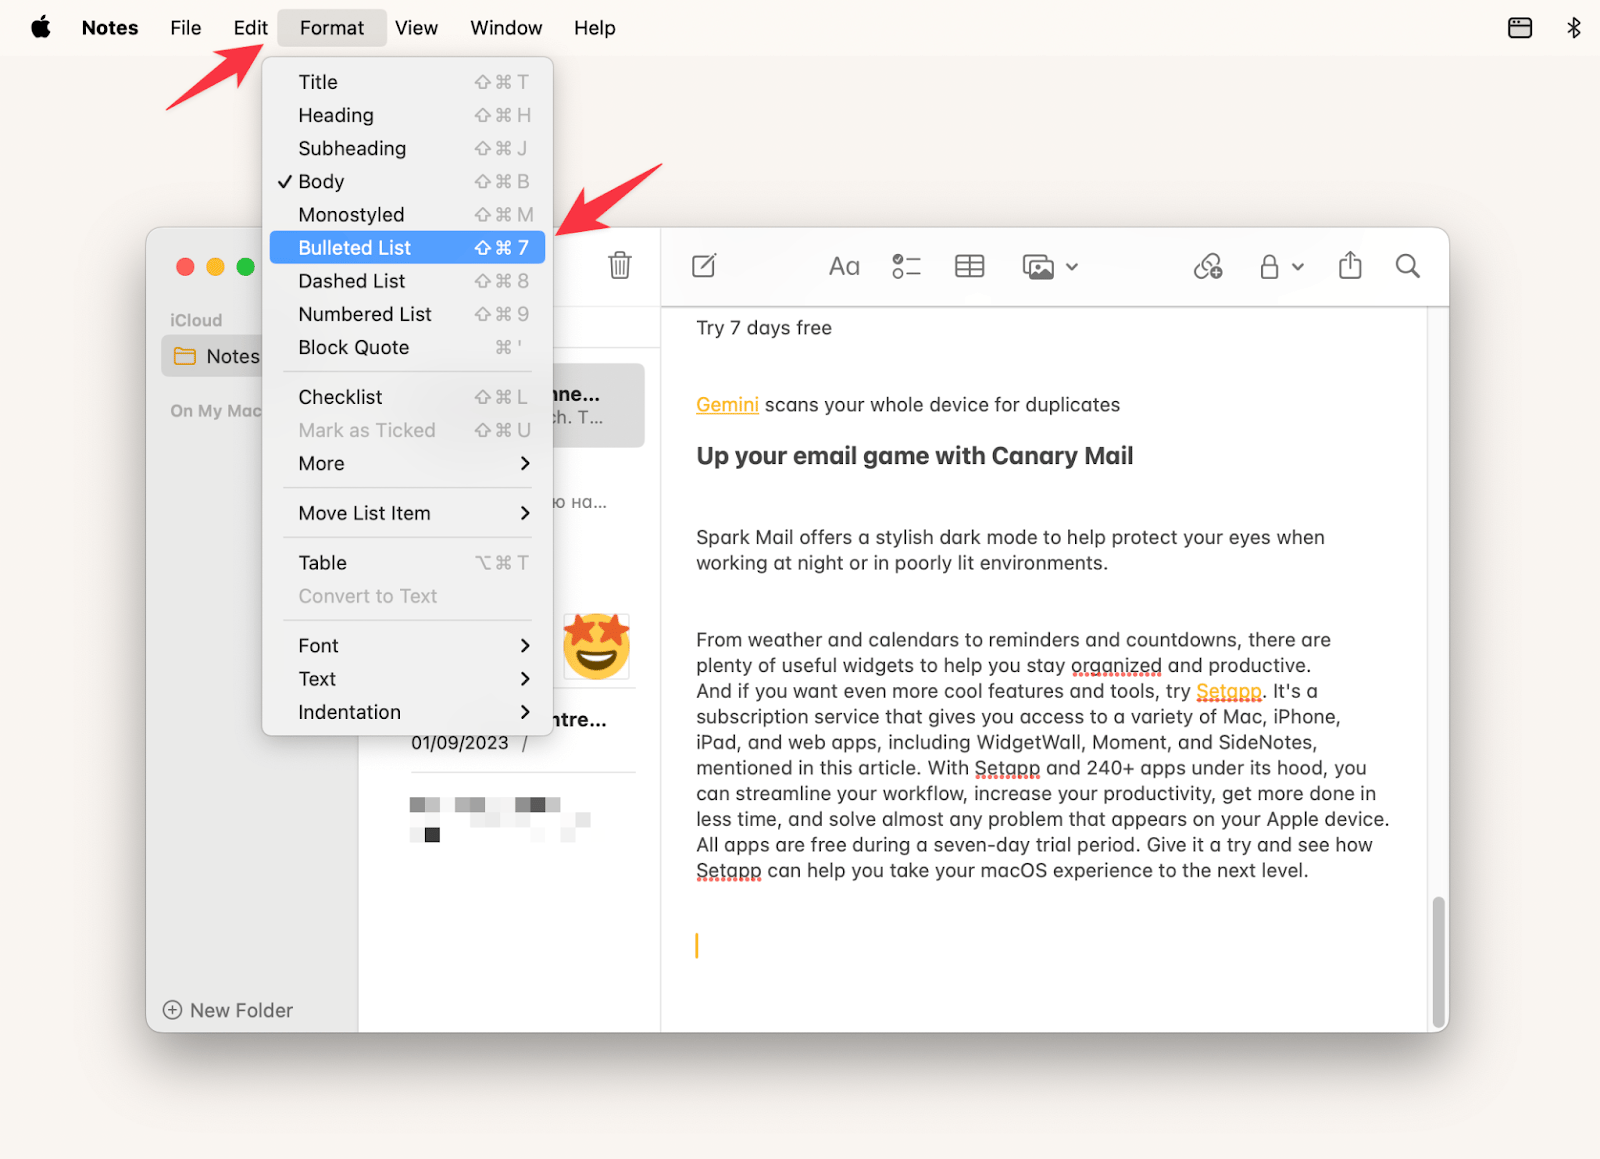
Another convenient method of adding bullet points on a Mac is by using the Format menu.
- On your Mac, open your document or Notes and locate the specific area you want to list in bullet points.
- Navigate to the top menu bar and click on the Format option.
- From the drop-down menu that appears, choose Bulleted List.
- The bullet point will appear in your document.
- Start typing your content; every time you hit Enter, a new bullet point will be created.
Creating a bulleted list using MS Word
To add bullets in Microsoft Word on a Mac, follow these steps:
- Open the Word document in which you want to add bullets.
- Place the cursor where you want to add a bullet.
- Click the Home tab in the menu bar at the top of the screen.
- In the Paragraph section of the Home tab, click the Bullets button. This adds a bullet at the cursor location.
- If you want to create a bulleted list, you can hit Enter after each bullet to create a new one.
The Scrub feature also works wonders by removing odd formatting and fixing mistakes. It's even customizable, so you can create your own scrub or set of cleaners to apply to your text. It's like having your own personal editor to make sure your copy is always clean and error-free.
Create bullet list in Keynote and Pages
If you prefer using Keynote or Pages to work with texts, these instructions are for you.
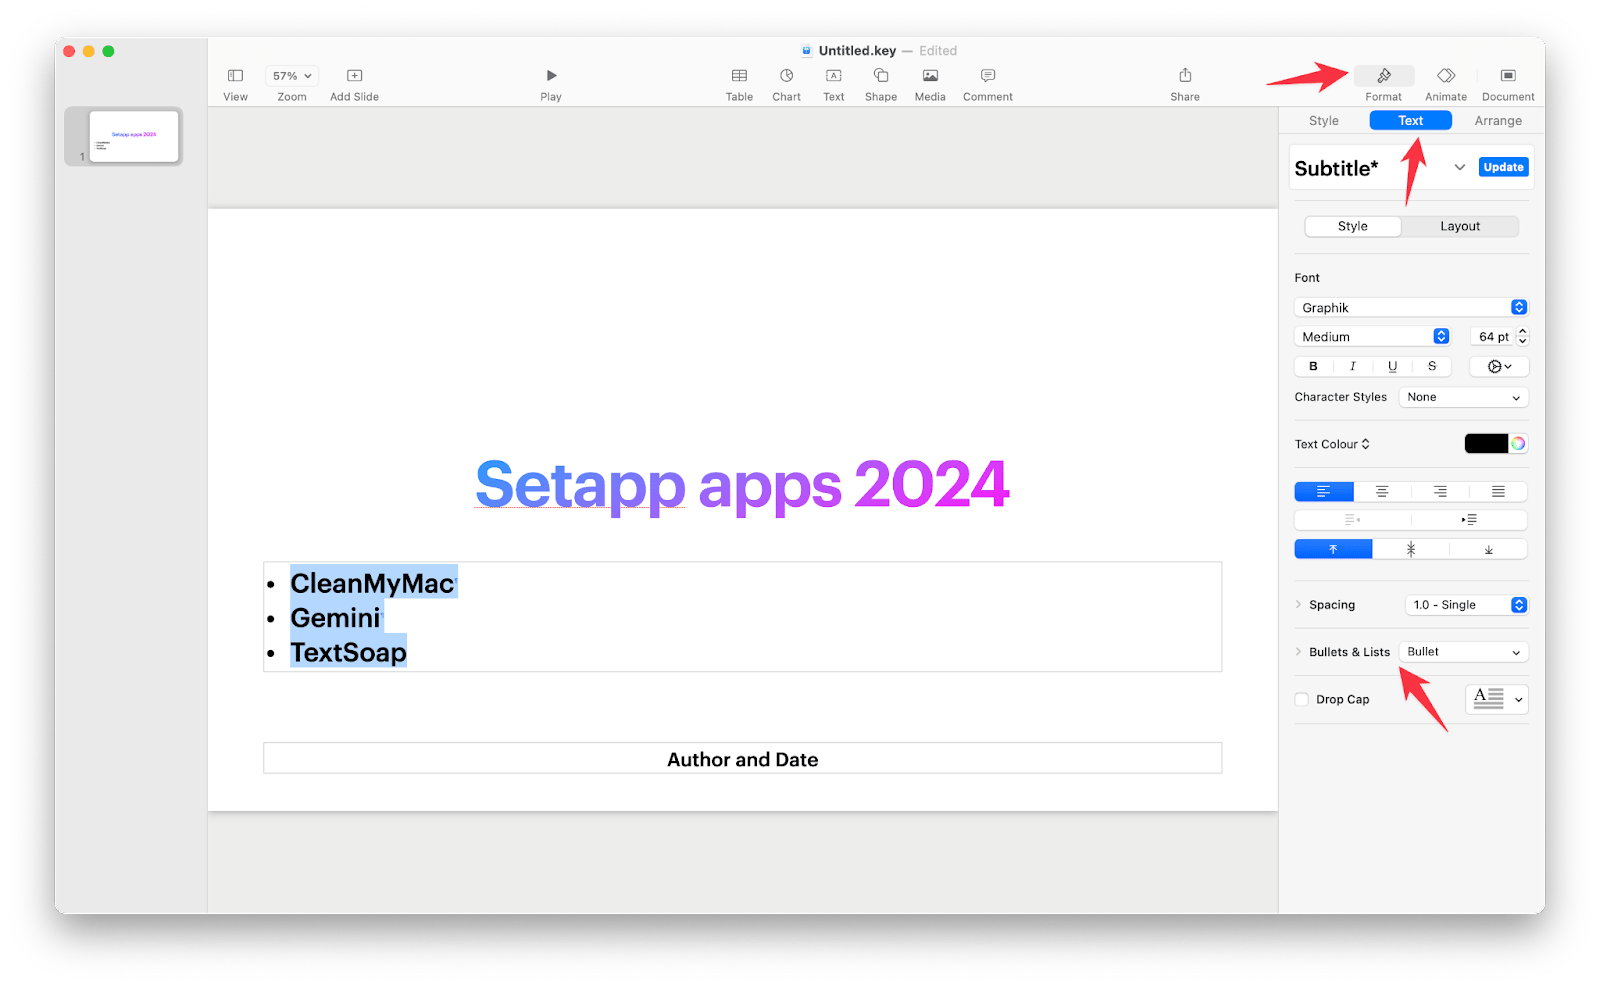
Here's how to make a dot on keyboard on a Mac in Keynote:
- Select the text to format in bulleted form.
- Click the Text tab at the top of the sidebar, and then click the Style button.
- If you don't see a sidebar or it doesn't have a Text tab, click the Format button on the toolbar.
- Next, click the pop-up menu next to Bullets & Lists and select a list style.
- Click the disclosure triangle next to Bullets & Lists to display the list formatting controls.
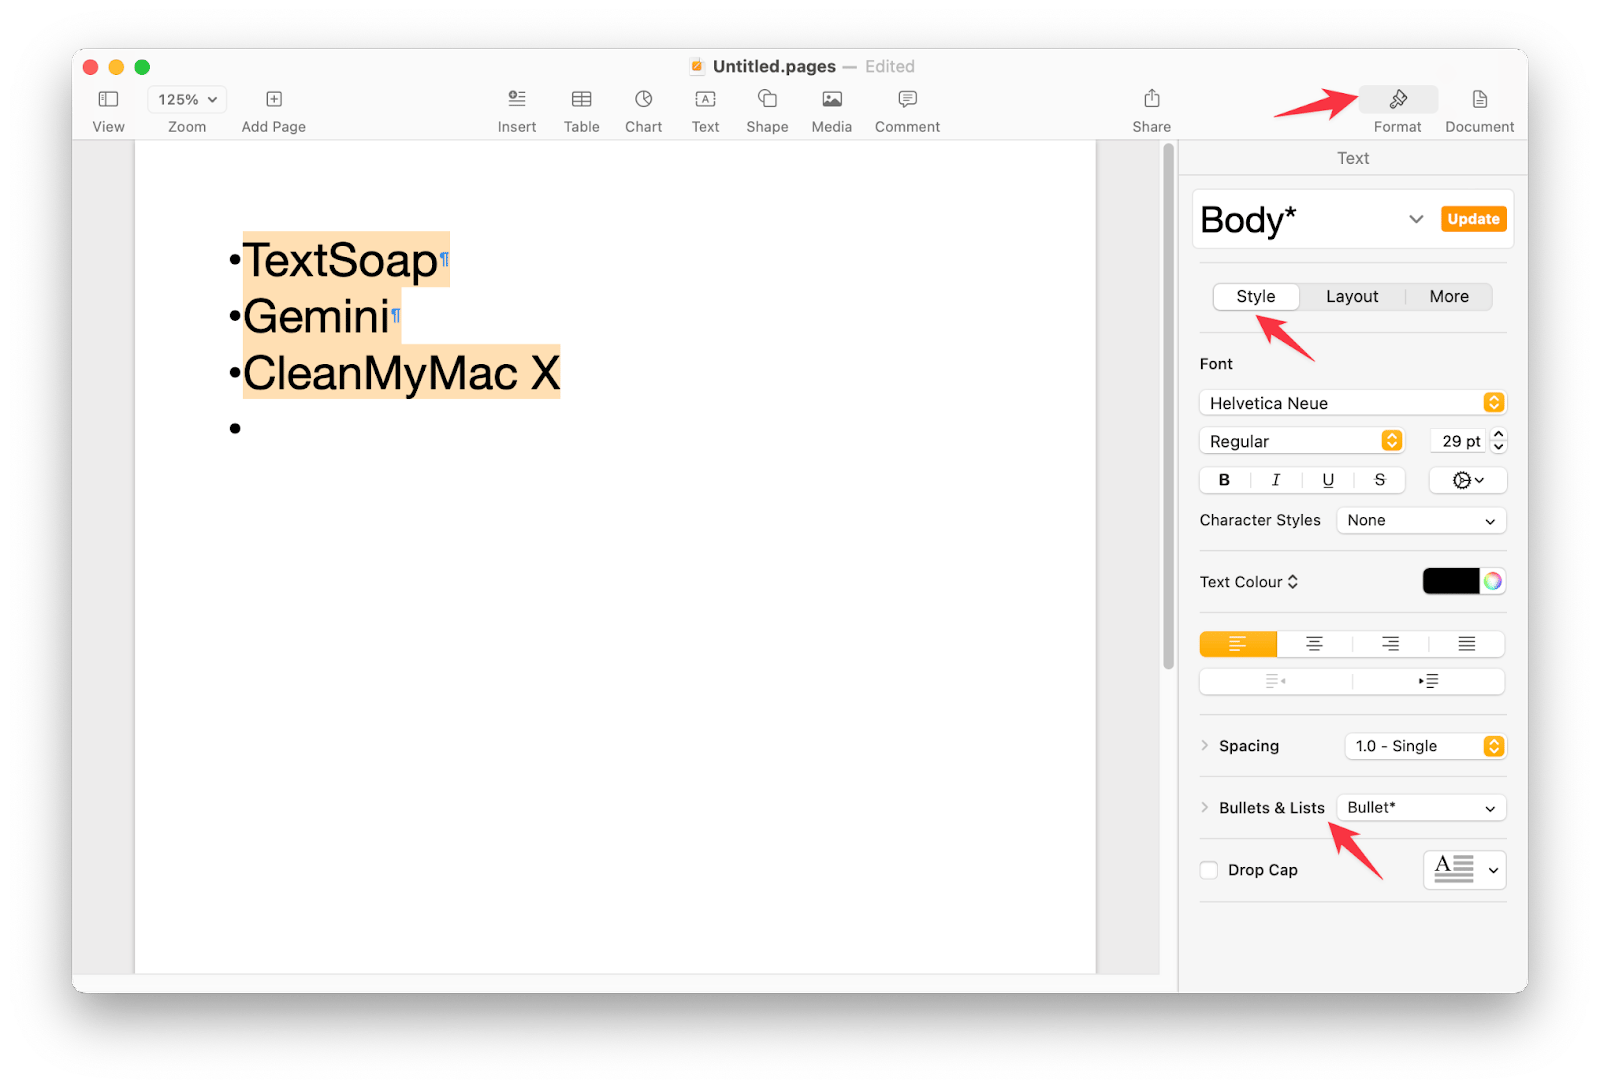
Here's how to make a dot on keyboard on a Mac in Pages:
- Select the text you want to add to the list.
- In the Format sidebar on the right, select Style near the top.
- Click the Bullets & Lists menu near the bottom, and then choose a list style.
How to type a bullet point in iOS
On iOS devices, adding bullets to your text is simple and straightforward. Whether you're taking notes or writing an email, here's how to add bullets with ease:
- Open the app where you want the bullet point. For example, Notes.
- Touch within the text input area to bring up the iOS keyboard.
- Now, press the 123 button located at the bottom left of the keyboard for numbers and symbols.
- Next, tap on the #+= button, again on the bottom left, that houses more symbols.
- Your bullet point symbol (•) is situated approximately in the middle of the second row of symbols.
- Choose it to insert a bullet point.
- After creating your point, pressing the Return button will start a new line with a new bullet point.
Here’s how to back up your iPhone with AnyTrans:
- Install and open AnyTrans on your Mac.
- Connect your iPhone to the computer using a USB cable.
- Click Device Manager in the top left corner.
- Click the Content to Mac button.
Final thoughts on how to type bullet points on a Mac
As you can see, it's not hard to type a bullet point on a keyboard. You just need to know the right bullet point command on your Mac. It's Option + 8. Alternatively, you can try other methods we introduced in this guide. However, if you want to start using your keyboard like a pro, try Keysmith. It's a handy tool that will help you create a shortcut for any action. Keysmith plus other tools mentioned in this article (TextSoap, Ulysses, and AnyTrans) are available on Setapp. Try it to get access to dozens of other handy Mac, iOS, and web tools for almost any task. Free for seven days!
FAQ
How to do bullet points on Mac Notes?
- On your Mac, open Notes and locate the specific area you want to list in bullet points.
- Navigate to the top menu bar and click on the Format option.
- From the drop-down menu that appears, choose Bulleted List.
- The bullet point will appear in your document.
- Start typing your content; every time you hit Enter, a new bullet point will be created.
- Alternatively, you can press Option + 8 keyboard keys at the same time.
How to put space between text and bullet points?
If you're using the Notes app, the app automatically formats bullet points and their spacing, and unfortunately there's no built-in tool to adjust this. However, you can manually add spaces between the bullet and text using the space bar on your keyboard. In Google Docs, you can drag the small blue triangle on the ruler to adjust the space between the bullet and the text.
How to make a bullet point on the Chromebook keyboard?
To type a bullet on a Chromebook, press Ctrl + Shift + U, then type 2022 and press Enter.


