Expert guide on how to empty Trash Bin on Mac
As a writer, I like to keep my Mac nice and tidy. There's nothing worse than it slowing down, especially when I’m racing against a deadline. To avoid that, I make it a point to regularly empty the Trash.
In this article, I’ll guide you through how to manage Trash — from basic steps to advanced tricks to force delete trash on Mac and file recovery.
Empty all of the Trash
Your Mac's Trash can fill up fast with old stuff — unused manuscripts, outdated articles, and forgotten downloads (or, in my case, thousands of screenshots I take for literally everything). Before deleting, I recommend double-checking if there's anything important in Trash you want to restore. If not, proceed to empty it.
Here's how to empty the Trash on MacBook:
- Find the Trash icon on the Dock panel.
- Right-click the Trash icon.
- Choose Empty Trash > Confirm.
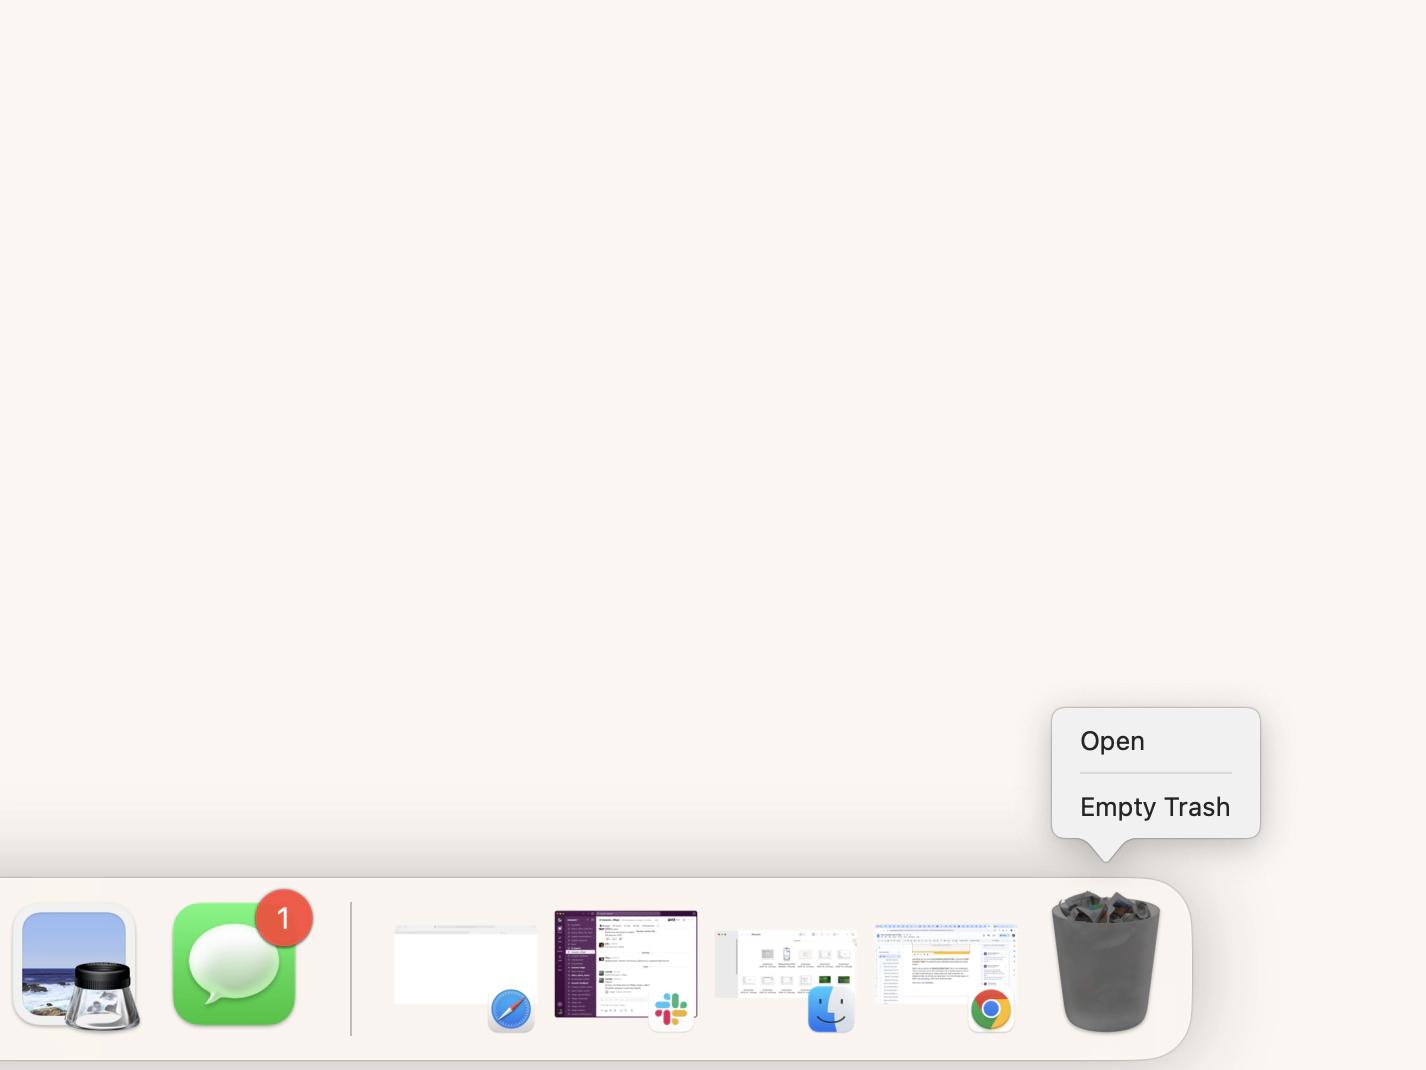
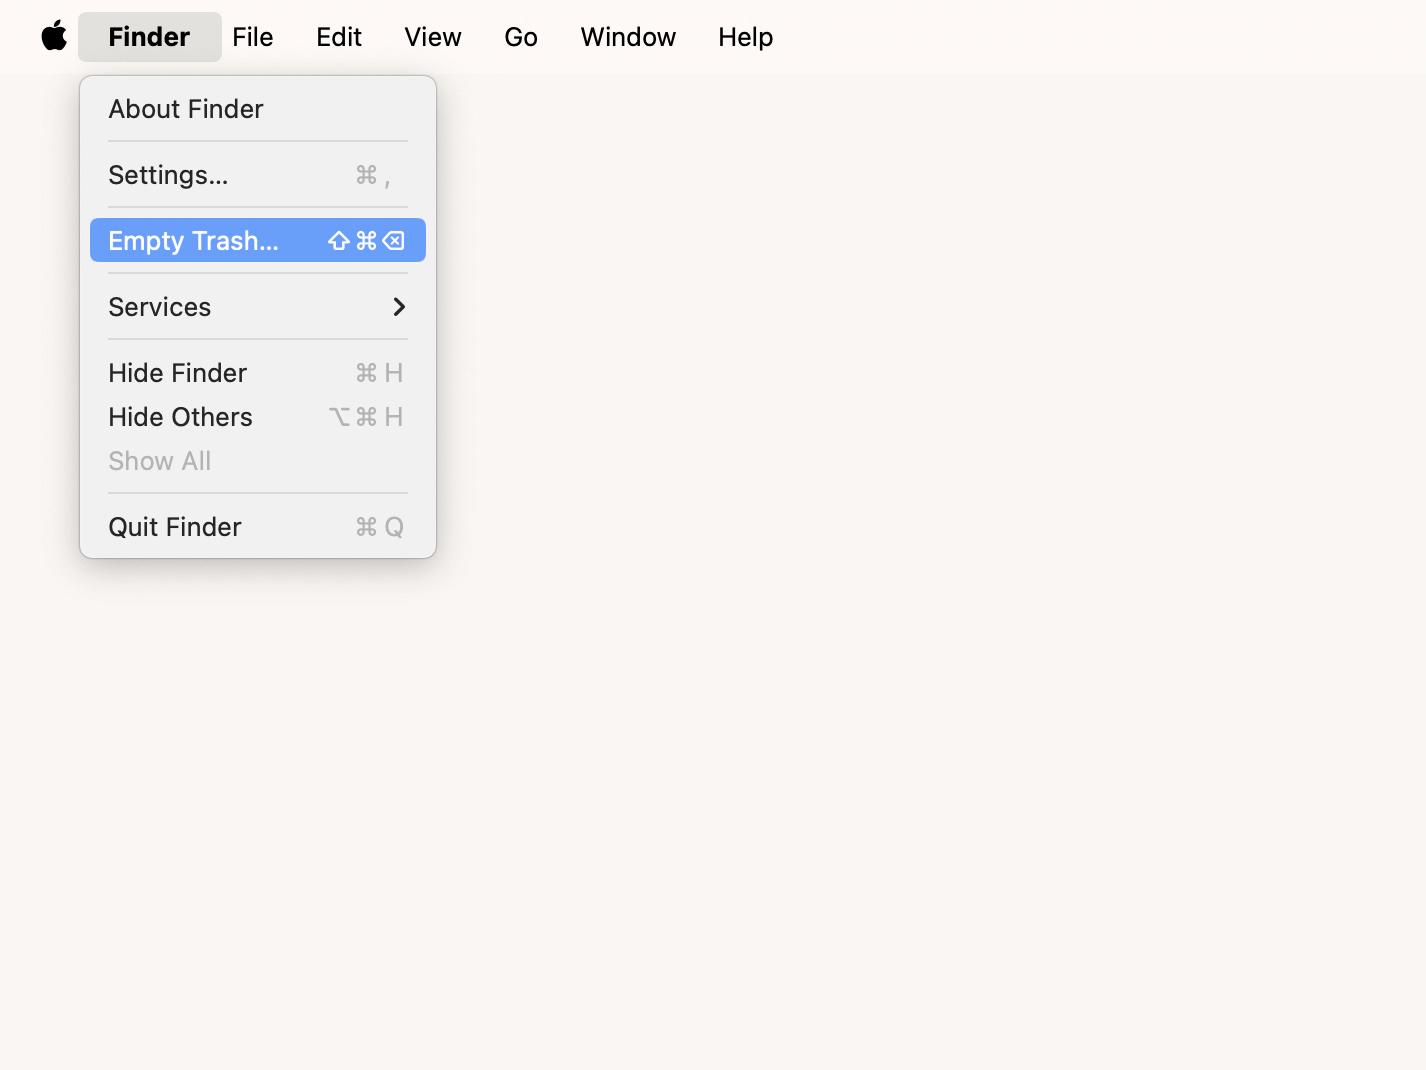
Another way to empty Trash is using Finder:
- Open Finder.
- Click Finder in the menu bar > Empty Trash.
- Confirm.
What if I tell you that you can delete junk without Trash? Like it or not, emptying the Trash is a good start, but it’s often not enough to free up significant space or improve your Mac’s overall performance. Hidden system junk, large unused files, and background clutter can still slow your device down. For a more thorough cleanup, it’s better to use CleanMyMac, which can do all this job quickly.
Here's how to use CleanMyMac to remove junk files:
- Install and open CleanMyMac.
- Click on the Cleanup tab > Scan.
- After a quick scan, you can review all the cluttered junk and decide what to clean. That’s all!
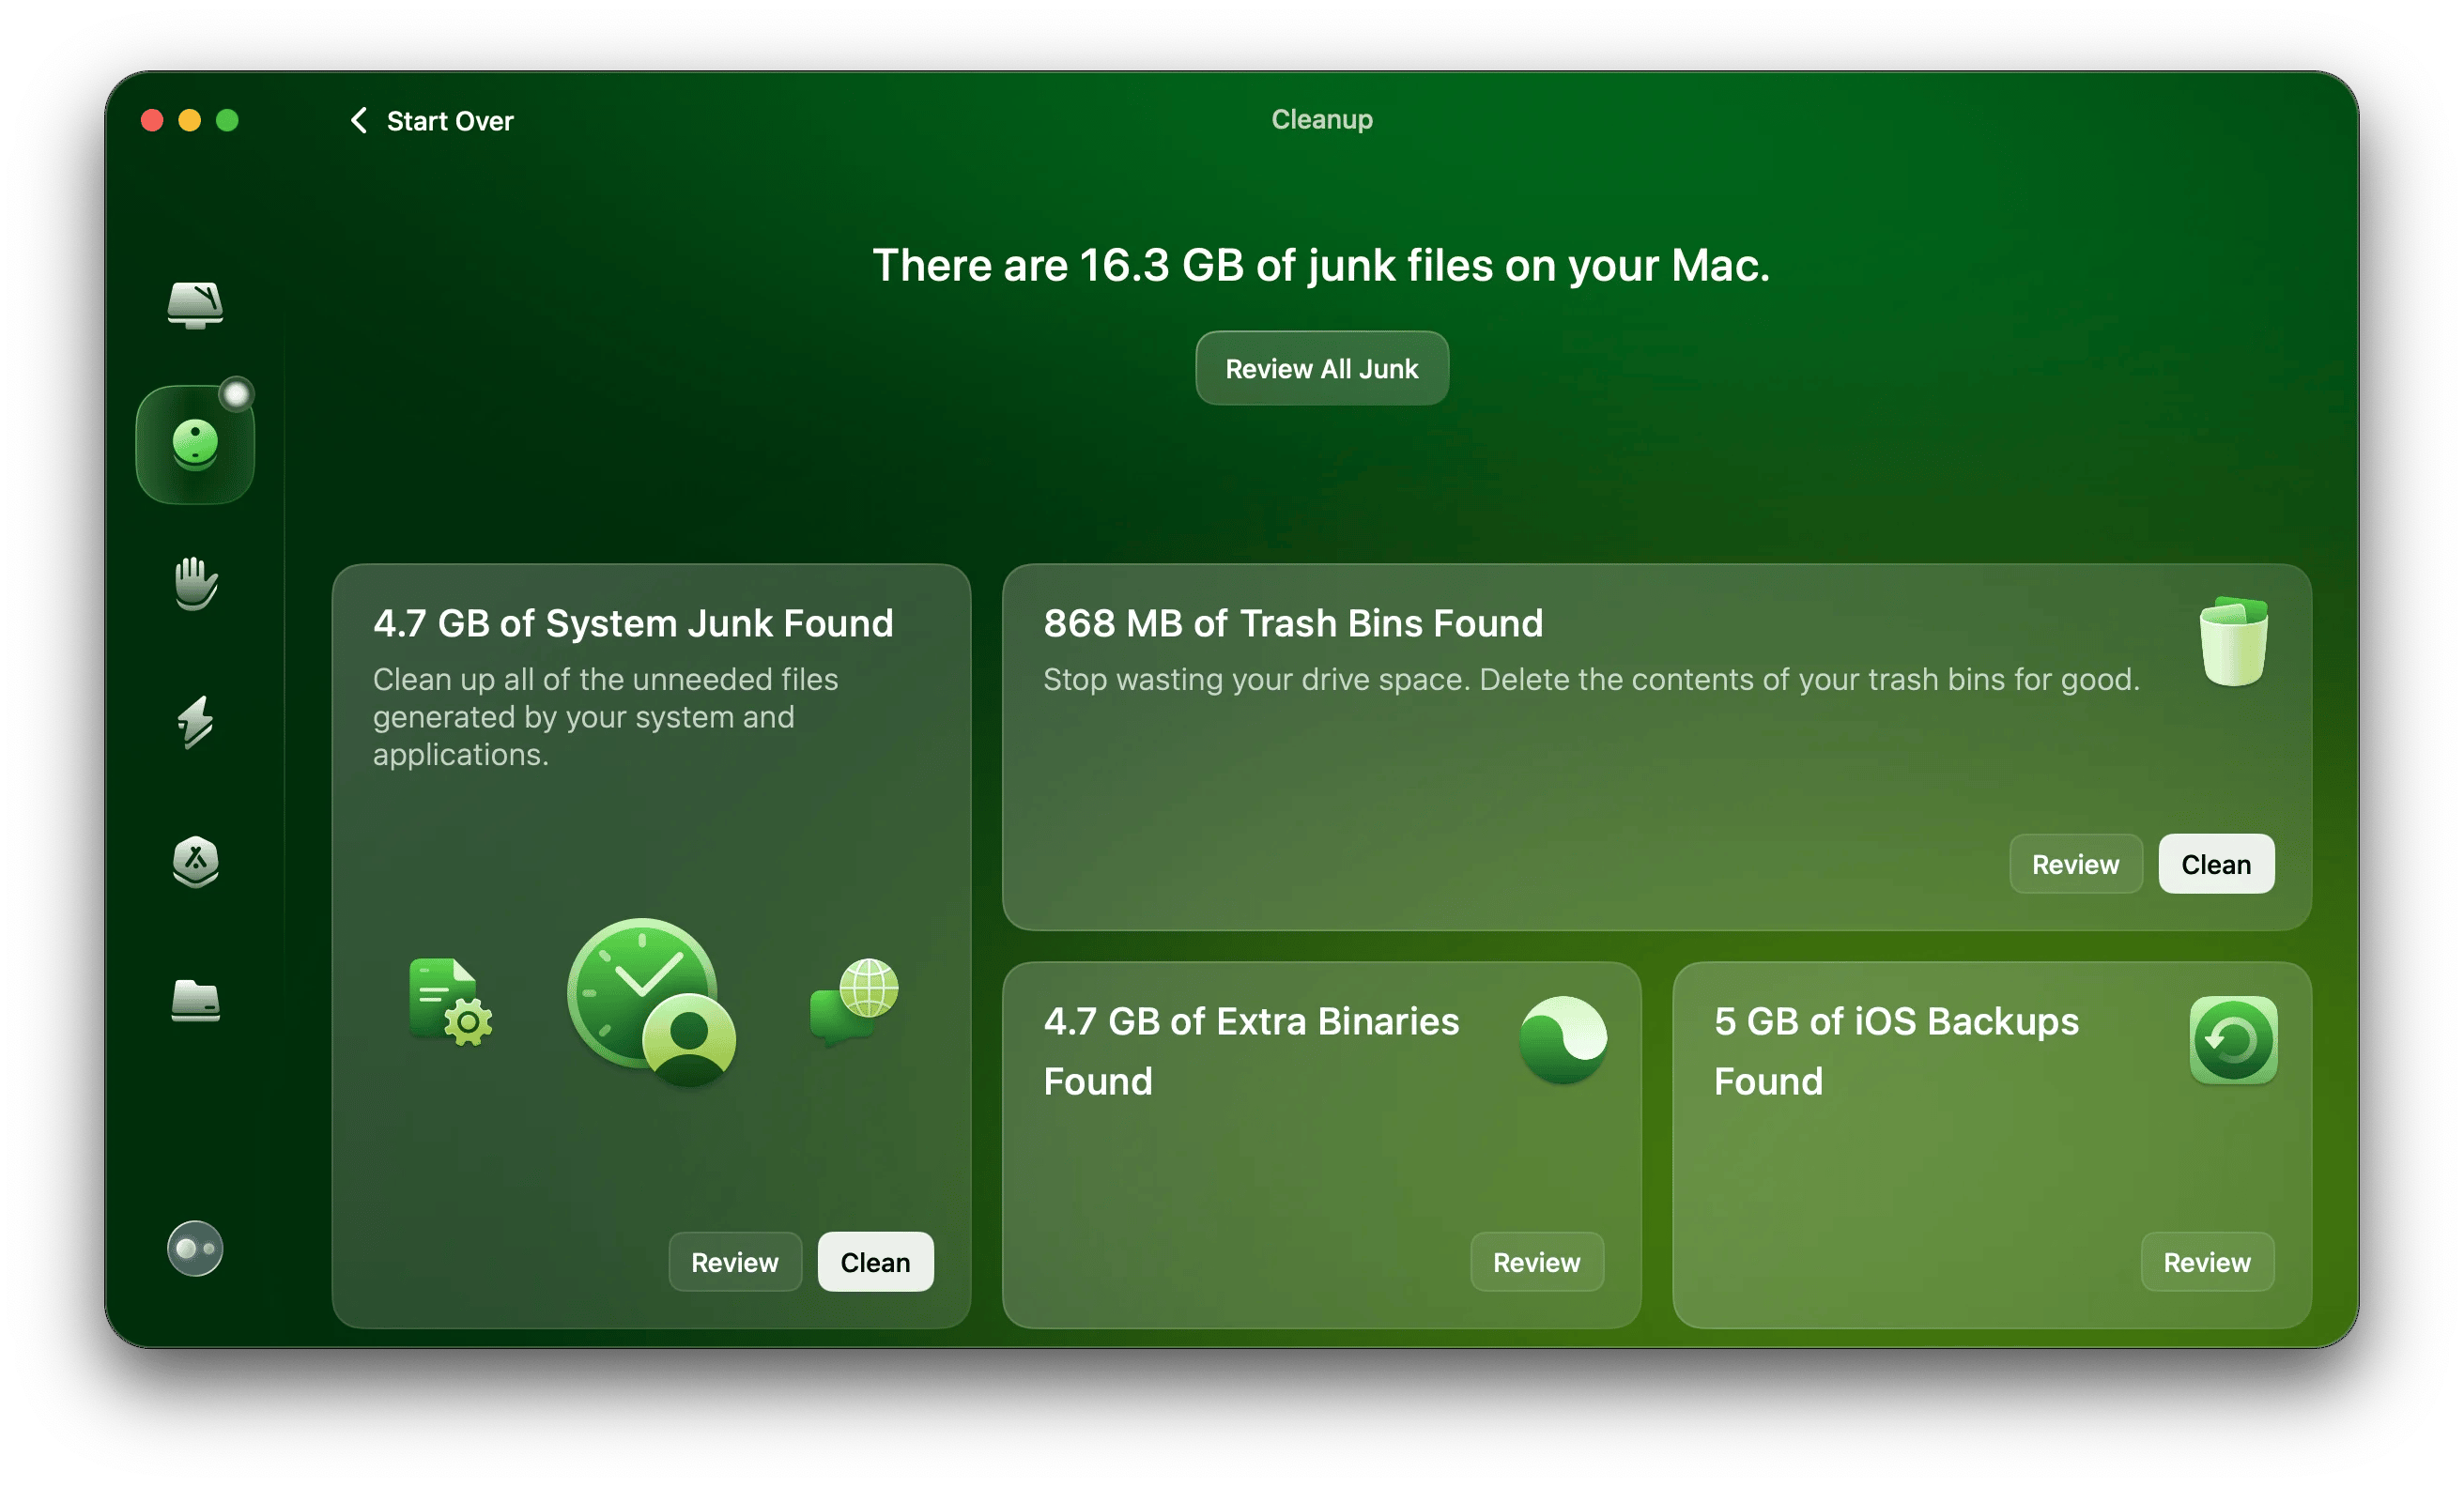
CleanMyMac just found over 16 GB of junk files on my device in under a minute. No surprise my MacBook was lagging so much!
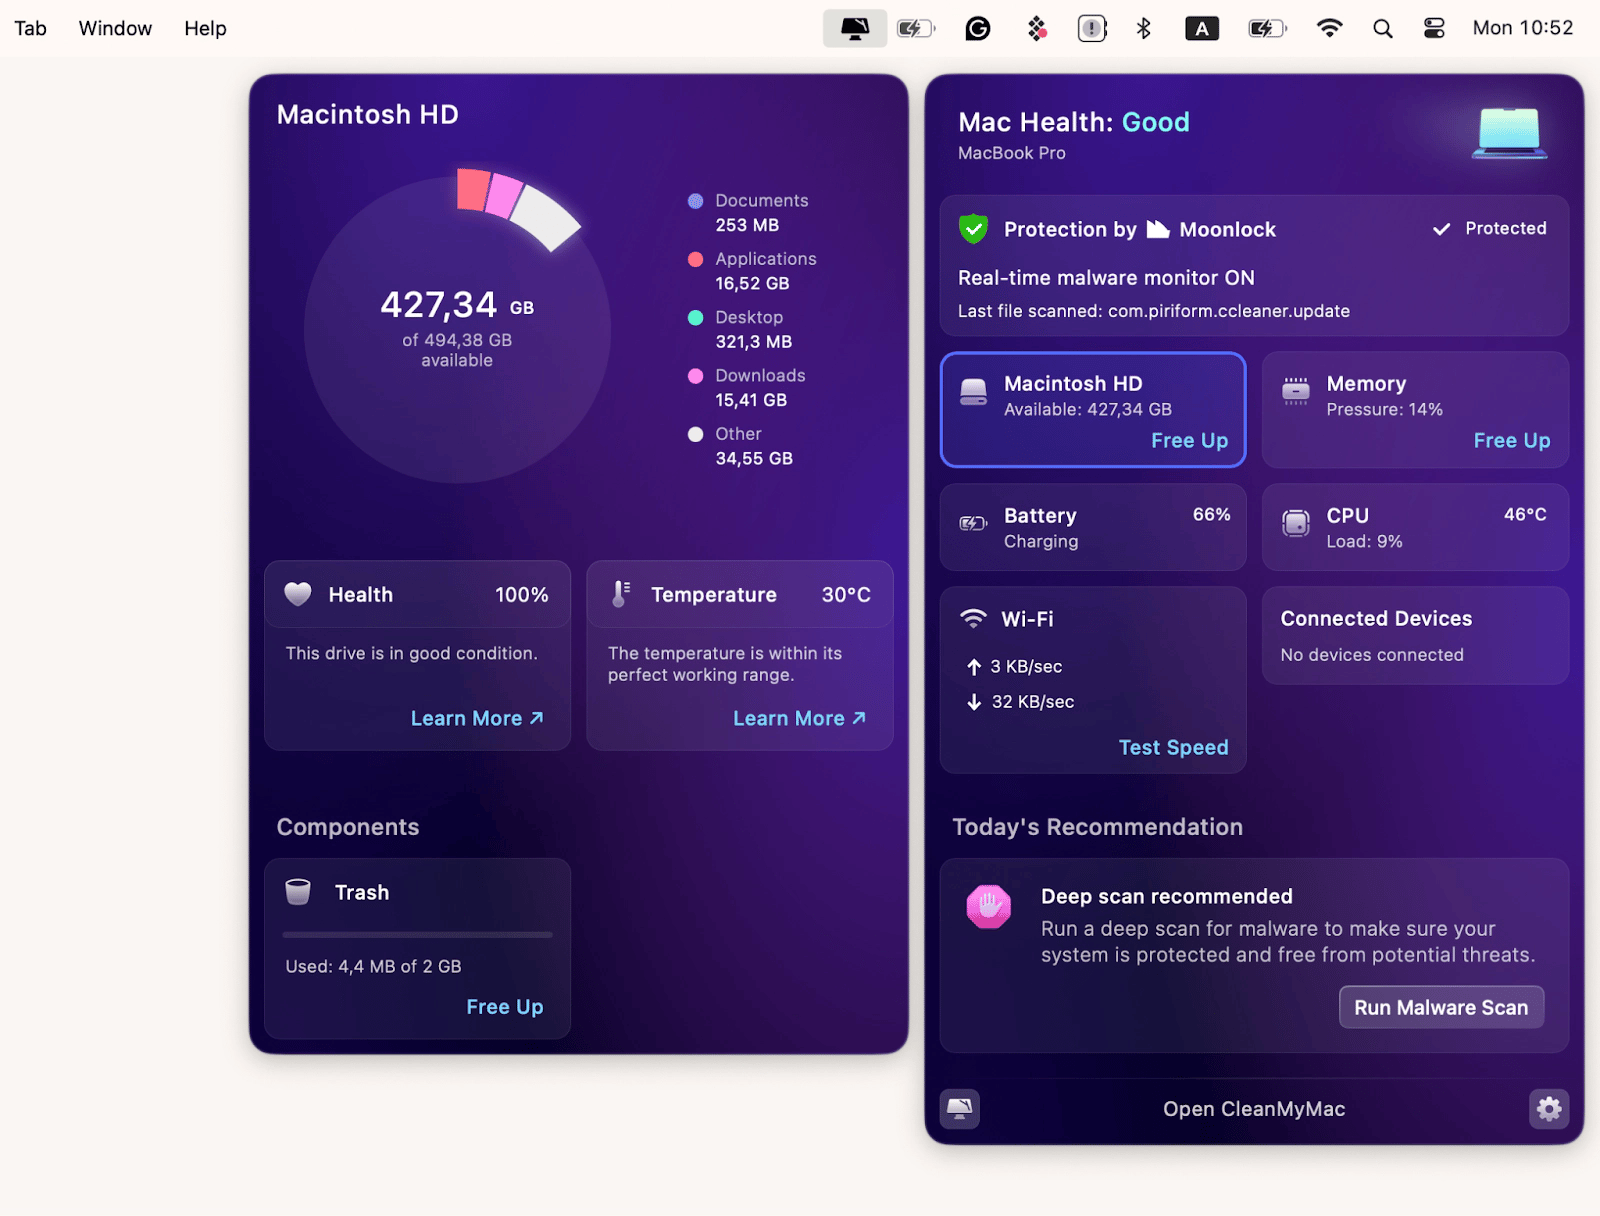
Plus, you can always quickly empty the Trash using the app whenever you need to. Just click the CleanMyMac icon in the menu bar > Macintosh HD > Under Components, locate the Trash > Free up.
Empty one item from the Trash
Sometimes, you just want to delete one file instead of wiping out the whole folder, which would take everything away.
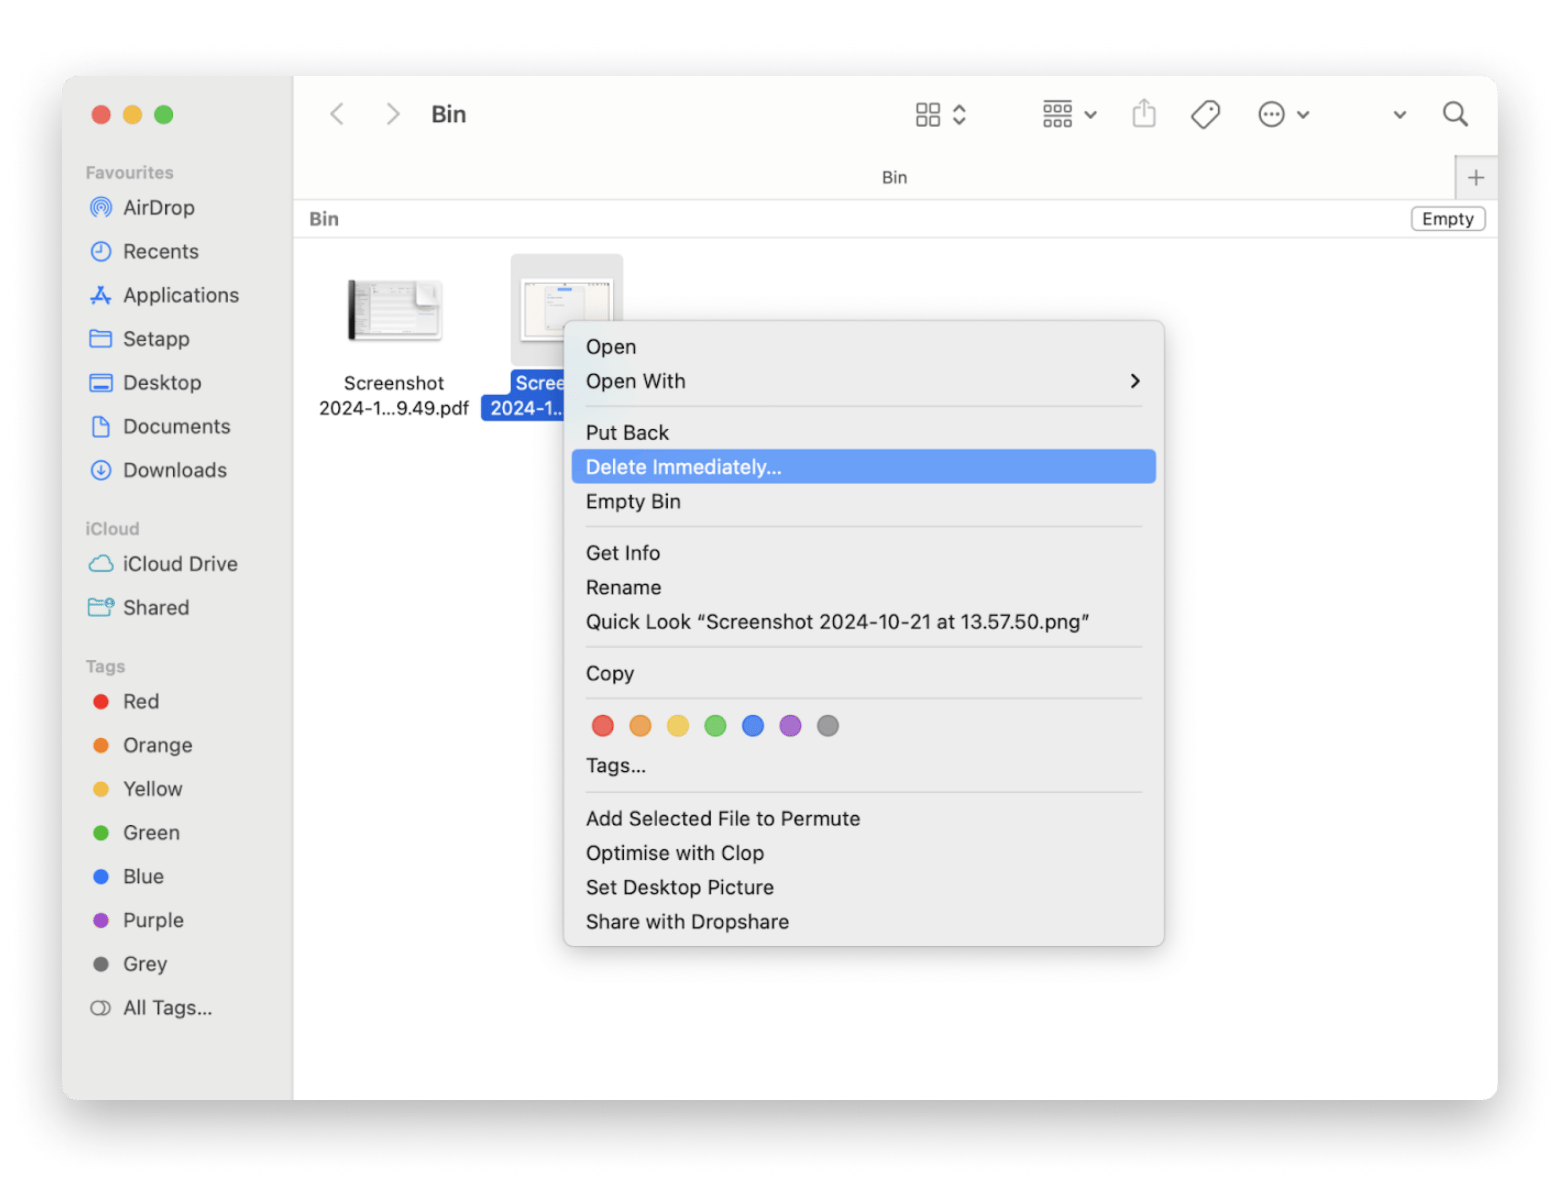
Here’s how to delete one item from Bin:
- Open the Trash from your Dock.
- Find the item you want to delete permanently.
- Right-click on it > Choose Delete immediately.
How to force empty Trash
Sometimes, files just won’t delete from the Trash because they’re still in use. When that happened to me, I had to force the Trash to empty. But before we proceed, you should know that there are more common reasons why your macOS can’t empty Trash:
- Insufficient permissions: Some files may be protected, but deleting them requires administrative privileges. This can happen if the file is owned by a different user or system process.
- Corrupt files: A corrupt file can sometimes get stuck in the Trash, making it impossible to delete normally.
- Locked files: If a file is locked (either manually or by the system), it can’t be deleted from the Trash until it’s unlocked.
- Disk errors: Problems with your hard drive, like bad sectors or disk errors, can prevent files from being deleted.
- External drives or network storage: If the files in the Trash were located on an external drive or network storage that has been disconnected, you might encounter issues when trying to delete them.
If you can’t empty Trash, you can either force delete Trash on your Mac or use Terminal.
Method 1: Force empty via Finder
I love how easy it is to force empty stubborn files that refuse to delete. Simply follow these steps to permanently remove them:
- Open Finder.
- Click Finder in the menu bar, and hover over Empty Trash.
- Hold the Option key and click Empty Trash.
The stubborn files will be permanently removed from your Mac.
Method 2: Force empty via Terminal
If the Finder method doesn’t work, try using Terminal. Let me walk you through that:
- Go to Applications > Utilities > Terminal.
- Type sudo rm -rf ~/.Trash/* and press Return.
- Enter your administrator password if you are prompted.
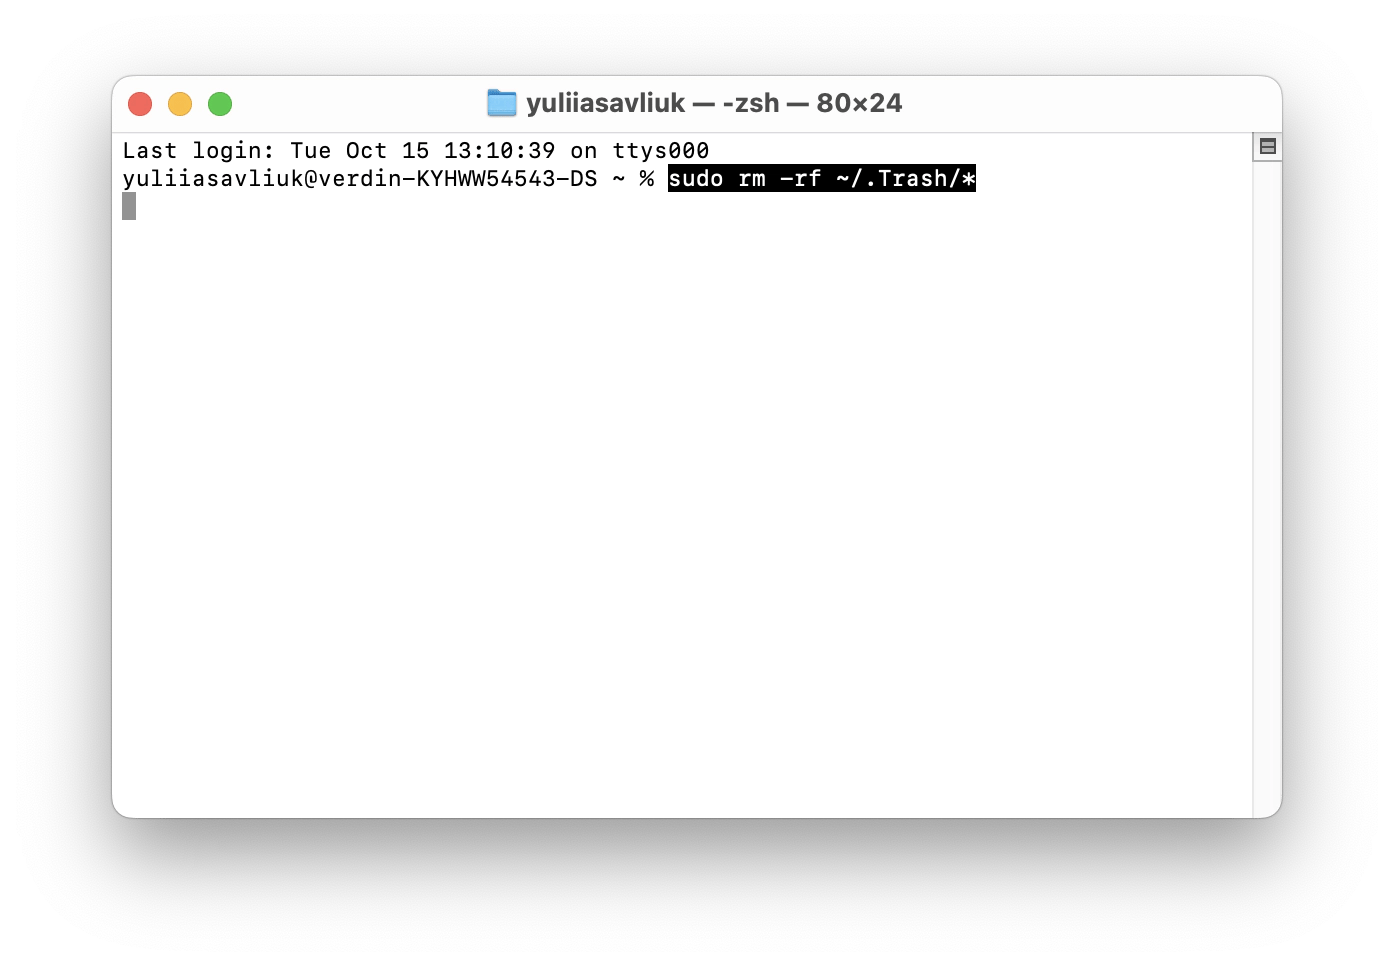
This command clears out everything in the Trash for good, so be careful! Once it’s gone, you can’t get it back. You definitely don’t want to accidentally trash something important, but trust me, it’s happened to me before. But no worries — if you want to know how to recover files, I’ll go over that next.
How to retrieve files from the Trash
A lot of writers I know have accidentally deleted stuff — it happens, even to those who are really good with tech. If you haven’t emptied your Trash yet, you can recover deleted files with a breeze.
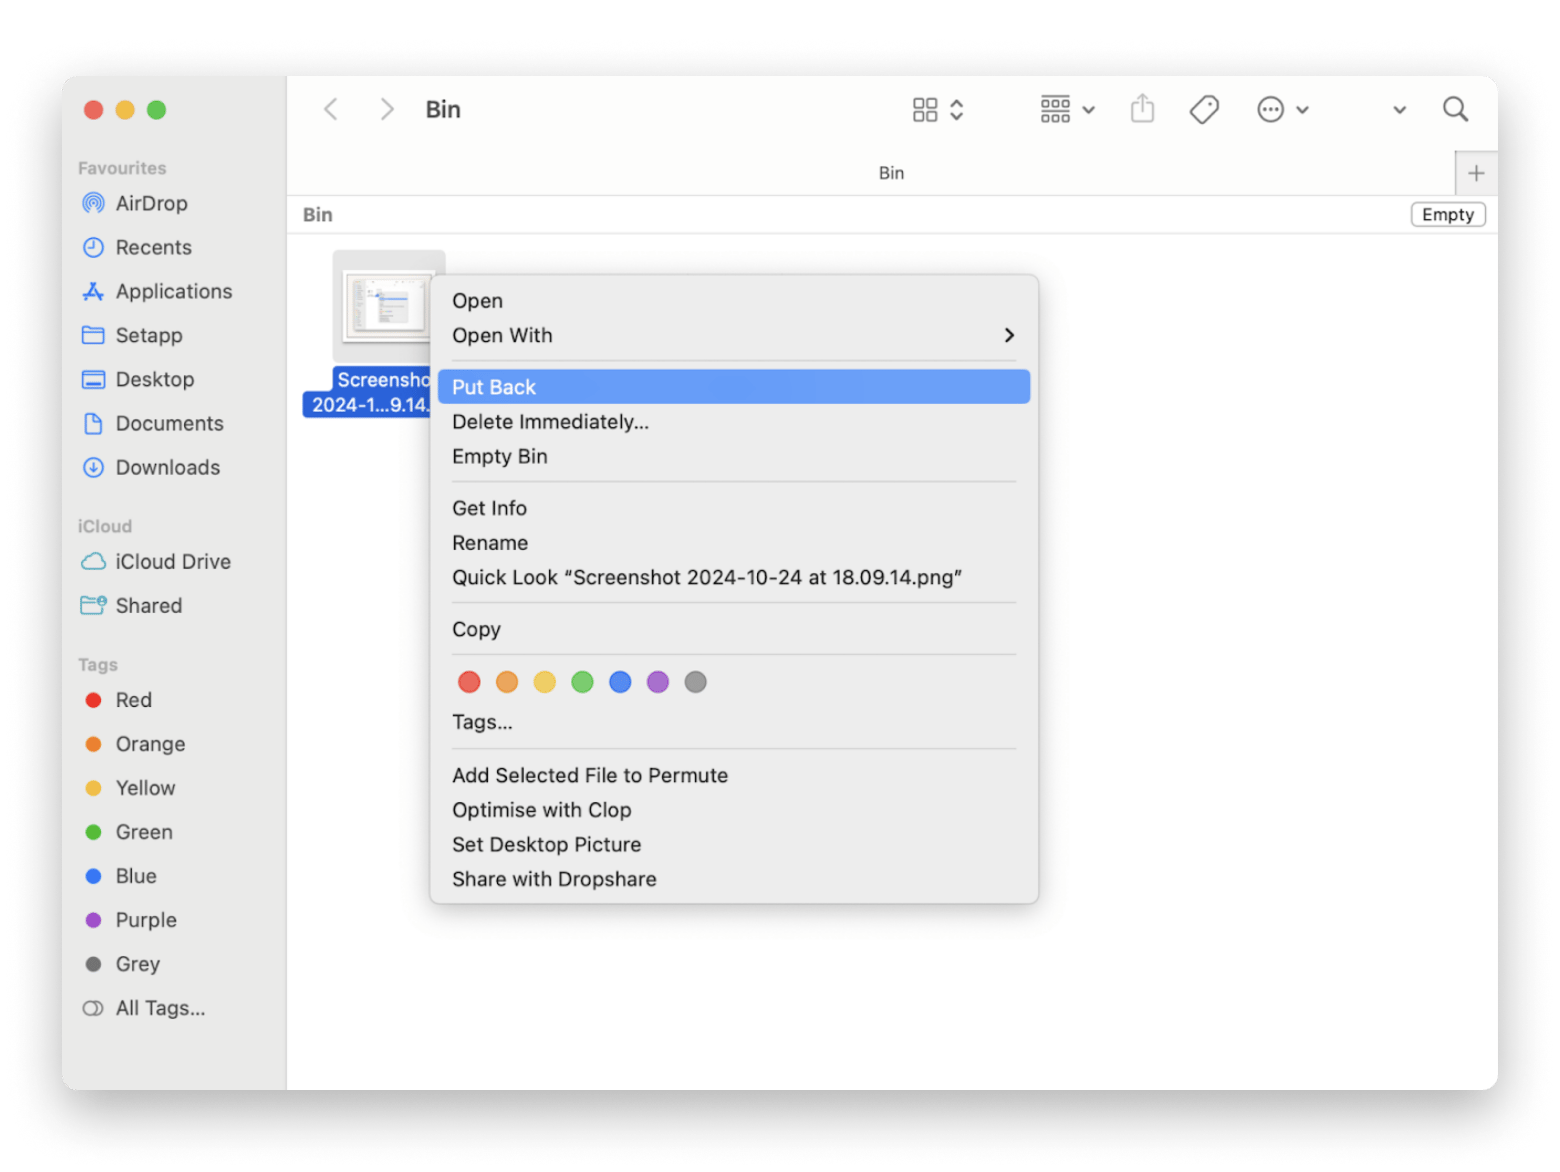
Here’s how to restore files from the Trash Bin:
- Open the Trash.
- Right-click on the file you want to recover.
- Choose Put Back, and the file will be restored to its original location.
How to automatically empty Trash on Mac
If you tend to forget to empty your Trash (trust me, I get it), macOS can automatically clear out files that have been sitting in there for more than 30 days.
Here’s how to set up automatic removal of items from the Trash:
- Open Finder and go to Finder in the menu bar.
- Choose Settings.
- Click on the Advanced tab.
- Select Remove items from the Trash after 30 days.
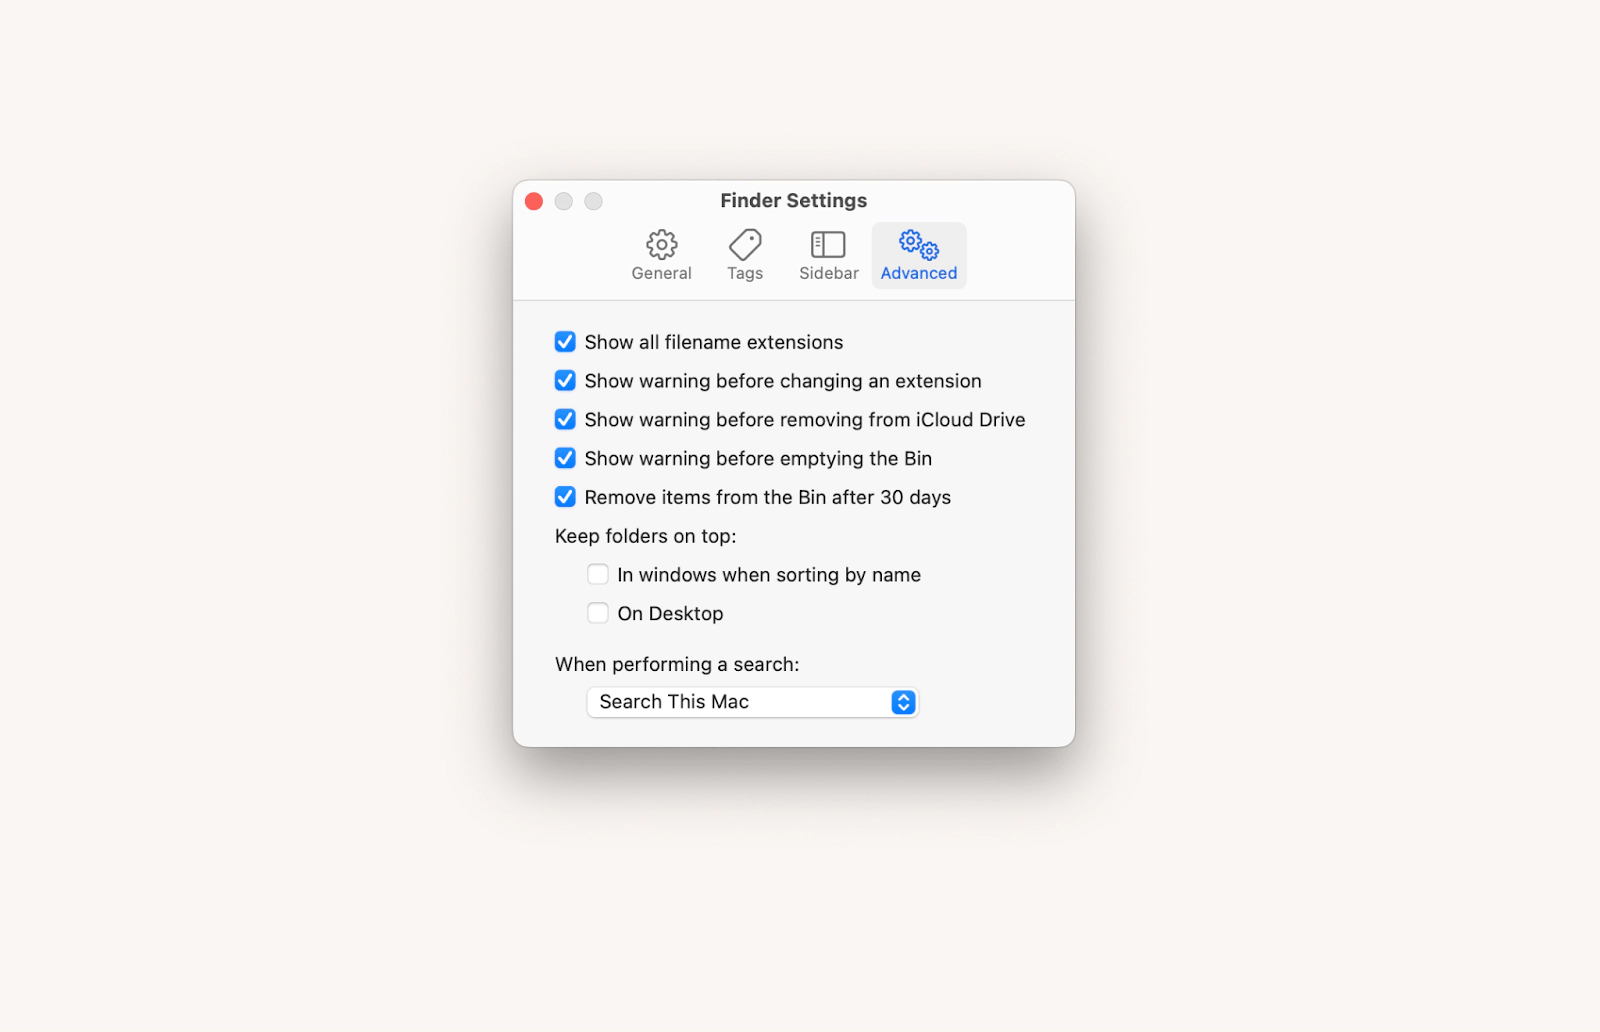
By checking this box, you no longer have to worry about all the piled-up trash. It will be cleared automatically after a month.
How to stop my Mac from automatically deleting Trash
So what if you don’t want your Trash automatically emptied? You need to go back to the Finder’s Settings from the menu bar > Click Advance > Unselect Remove items from the Trash after 30 days.
This will stop macOS from automatically deleting files, leaving you in charge of your destiny.
Delete immediately vs. empty Trash
I often debate whether to delete files immediately or empty the Trash later. When writing, I decide how to manage the many files I accumulate. I know it's best to delete unnecessary files right away to avoid clutter, especially since I rarely review them later.
You should know that:
- Emptying the Trash removes all files at once, accompanied by a confirmation dialog. For sensitive data, using the Secure Empty Trash feature on Mac ensures that files are permanently deleted with no chance of recovery.
- Delete Immediately bypasses the Trash and removes the item instantly. To prevent accidentally losing files forever, you can disable the Delete Immediately option in Finder preferences.
I don't know about you, but I prefer something not deleting forever because, as you know, most tech mistakes are human errors in nature. Especially when I am typing fast and high on caffeine. Half the time, I don't know where my fingers end up on the keyboard.
But if you do end up deleting something important, check out this article on how to recover deleted files on Mac for detailed recovery methods.
Does your Mac know how to empty Trash? It does now
Emptying Trash on Mac is a basic but essential task (if not the most important thing you can do!) By regularly clearing the Trash, I’m able to free up valuable storage, especially if I am designing art for articles and even thumbnails for the YouTube channels that I script.
But to keep your journey smooth, consider using little Mac helper CleanMyMac to declutter your storage from system junk and improve the device’s performance.
You can get both apps and 250+ more on Setapp for a 7-day trial. Setapp is a subscription platform that can help optimize your Mac and boost your digital experience. It’s honestly one of my favorite places to hang out.
FAQs
What is the shortcut to Empty the Trash on Mac?
The shortcut to empty the Trash on a Mac is Shift + Command + Delete. This will initiate the process of emptying the Trash, and you’ll be prompted to confirm your action.
To move a file to the Trash, you can use Command + Delete.
How to show Trash in Finder or Mac desktop?
To access the Trash on your Mac from the Dock, click the Trash icon in your Dock to open it. To access in Finder, click on the Trash icon in the Dock, Finder window will open, displaying the contents of your Trash folder.
After you Delete something, is it really gone?
Not immediately. After you empty the Trash, files are marked for deletion but are not actually erased from your disk right away. You can recover files using trusted tools for data recovery.


