Gmail is beginner-friendly but offers advanced features for experienced users. Signing in, sending emails, and managing your inbox are straightforward. Once you're comfortable, you can use labels, filters, scheduling, and keyboard shortcuts to work faster and stay organized.
Labels and filters automate inbox organization better than manual sorting. Unlike traditional folders, Gmail labels work like tags — one email can belong to multiple categories. Set up filters to automatically apply labels based on sender or subject, so related emails are always grouped together.
Spark Mail brings smarter organization and AI-powered replies to Gmail accounts. It sorts your inbox automatically, integrates with tools like Slack and Trello, and includes an AI assistant that helps draft and refine messages. It's available on Setapp and works with Gmail, Yahoo, and iCloud accounts.
Gmail's recall feature gives you up to 30 seconds to undo a sent email. The default is 5 seconds, but you can extend it to 30 seconds in settings. This safety net is useful for catching typos, missing attachments, or emails sent to the wrong person.
Spark Mail and BusyContacts are both available on Setapp. Try both free for 7 days via Setapp, which includes 260+ Mac, iOS, and web apps. Perfect for managing email and contacts more efficiently.
Gmail dominates the email service provider market, and most of the credit goes to how it makes it easy to manage your communications. It only takes a few steps to send and receive emails, manage your inbox, and customize settings, whether you are using the mobile app or your browser.
One of the best things about the email service is that while it's suitable for beginners, it also offers advanced features for more experienced users.
In this guide, I’ll show you how to use Gmail effectively to reduce that familiar “email overload.” We’ll start with the basics, like signing in, then move on to signatures and customizing settings. I’ll also throw in several helpful Gmail tips and tricks for advanced users.
Need a quick overview?
I want to…
Do this
Sign in to Gmail
Open Gmail.com or the app, enter your email and password, and sign in to your Google account.
Send my first email
Click Compose, add a recipient, write a subject line and message, then click Send.
Organize email smarter on Mac
Use Spark Mail for automatic sorting and AI-assisted replies.
Attach files to an email
Click the paper clip or Google Drive icon, select your file, and send.
Schedule an email for later
Click the arrow next to Send, choose Schedule send, and pick a date and time.
Keep my inbox organized
Create labels and filters to group related emails automatically.
Organize email contacts in one place
Use BusyContacts to manage, edit, and sync all your contacts more easily.
Add a professional signature
Go to Settings > See all settings > Signature and create one.
Block spam or unwanted senders
Open the message, click the options menu, and select Block sender.
Undo a sent email
Enable Undo Send in settings and click Undo right after sending.
When Gmail issues like failed syncing, storage errors, or email client problems persist, the Fix My Mac GPT assistant can provide step-by-step troubleshooting. It helps identify whether the issue is with your Mac's settings, internet connection, or Gmail account configuration.
Getting started with Gmail
Gmail is designed around conversations, so it keeps emails grouped together for easy follow-up and better organization. Getting started with how to use Gmail for beginners is also quite easy, as you’ll have familiar options like inbox, draft, outbox, and spam.
How to sign in to Gmail
You can sign in to Gmail via your smartphone app or your desktop browser.
Go to Gmail.com in a web browser or open the Gmail app on your device.
Click or tap Sign in.
Enter your Google email address and press Next.
Enter your password and press Next.
If you don’t have an account, click Create an account instead of Sign in and provide your details. Gmail guides you through the entire process, and it should only take a few minutes.
You should then secure your account by setting up two-factor authentication (2FA).
Understanding the Gmail inbox layout
Gmail keeps everything simple with a few main categories:
Inbox – This is where you’ll find the emails sent to you. Gmail groups them into Primary, Social, Promotions, and Updates depending on the sender.
Sent – If you send an email, it appears here.
Drafts – These are the emails you’ve typed but have not sent out.
Spam – This one collects the ‘undesirable’ emails sent to you, although Gmail can also misgroup others.
Gmail also offers several useful features, such as a search bar, labels, and message sorting. However, these are more on the side of how to use Gmail effectively, so you don’t need to master everything at once.
How to send an email using Gmail
Learning how to send an email using Gmail will help you quickly feel in control, whether you are new to email entirely or just switching from another service.
Composing and sending an email
Here’s how to send an email using Gmail:
Open the Gmail mobile app or the web app.
Click Compose.
Add a recipient (To)
Write a subject line to summarize the email.
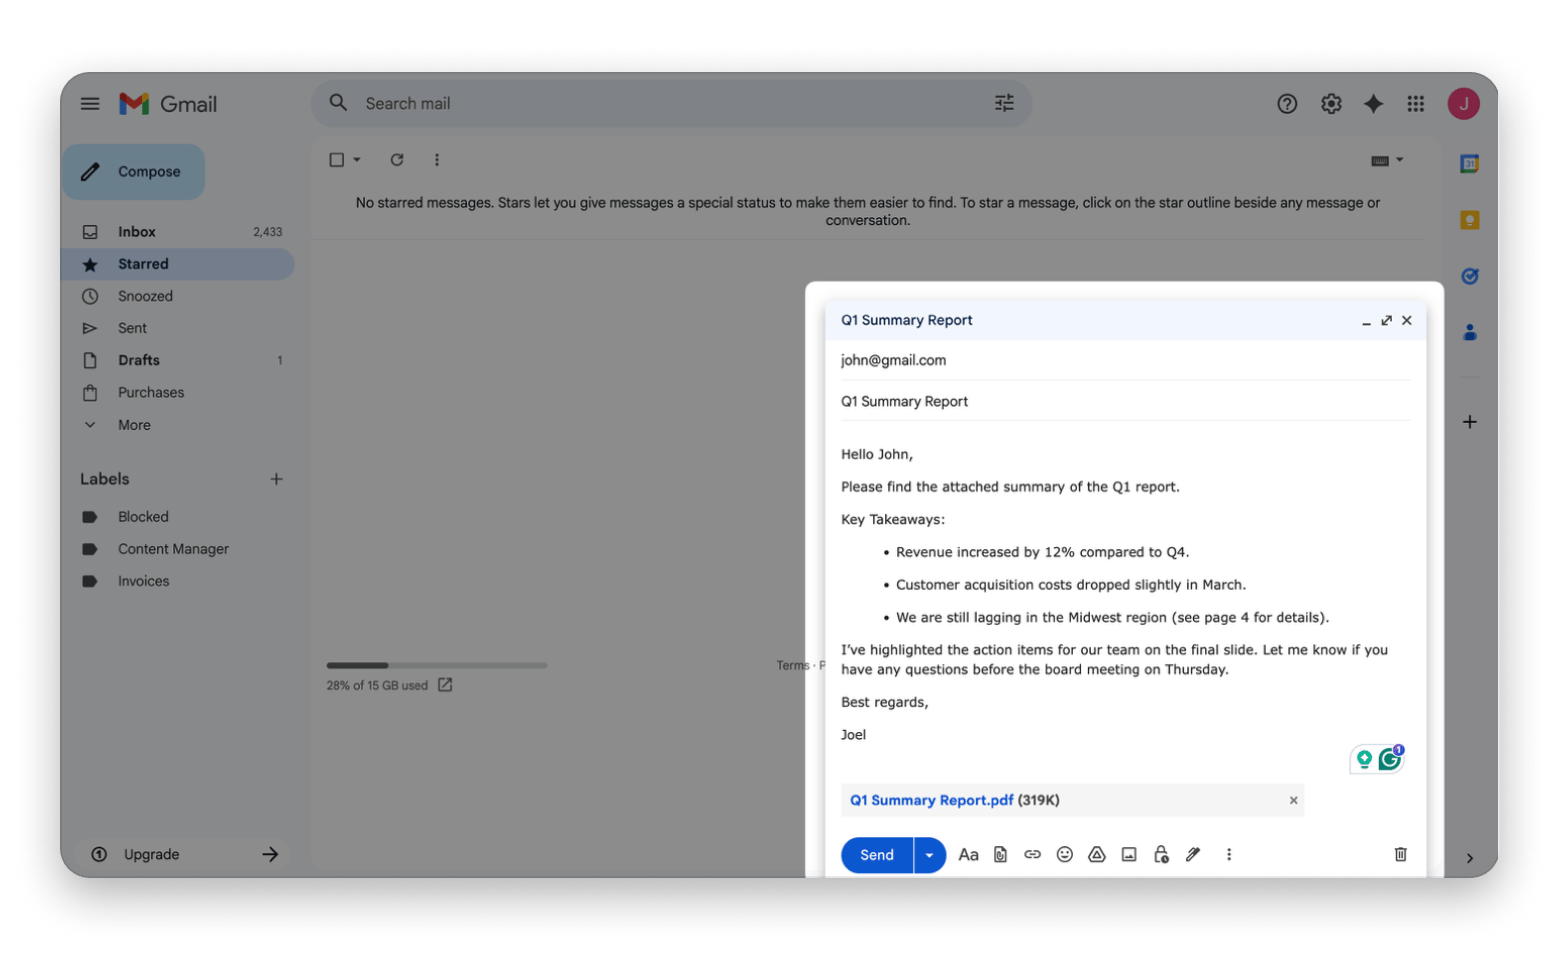
Compose your message.
Attach files (optional) by clicking on the paper clip or Google Drive icons.
Review the recipient(s), subject, message, and attachments.
Click Send.
If you’d like to copy the email to others, you can use the CC (Carbon Copy) option to add extra recipients. There’s also a BCC (Blind Carbon Copy) option if you don’t want to reveal their addresses to others.
Scheduling emails and using attachments
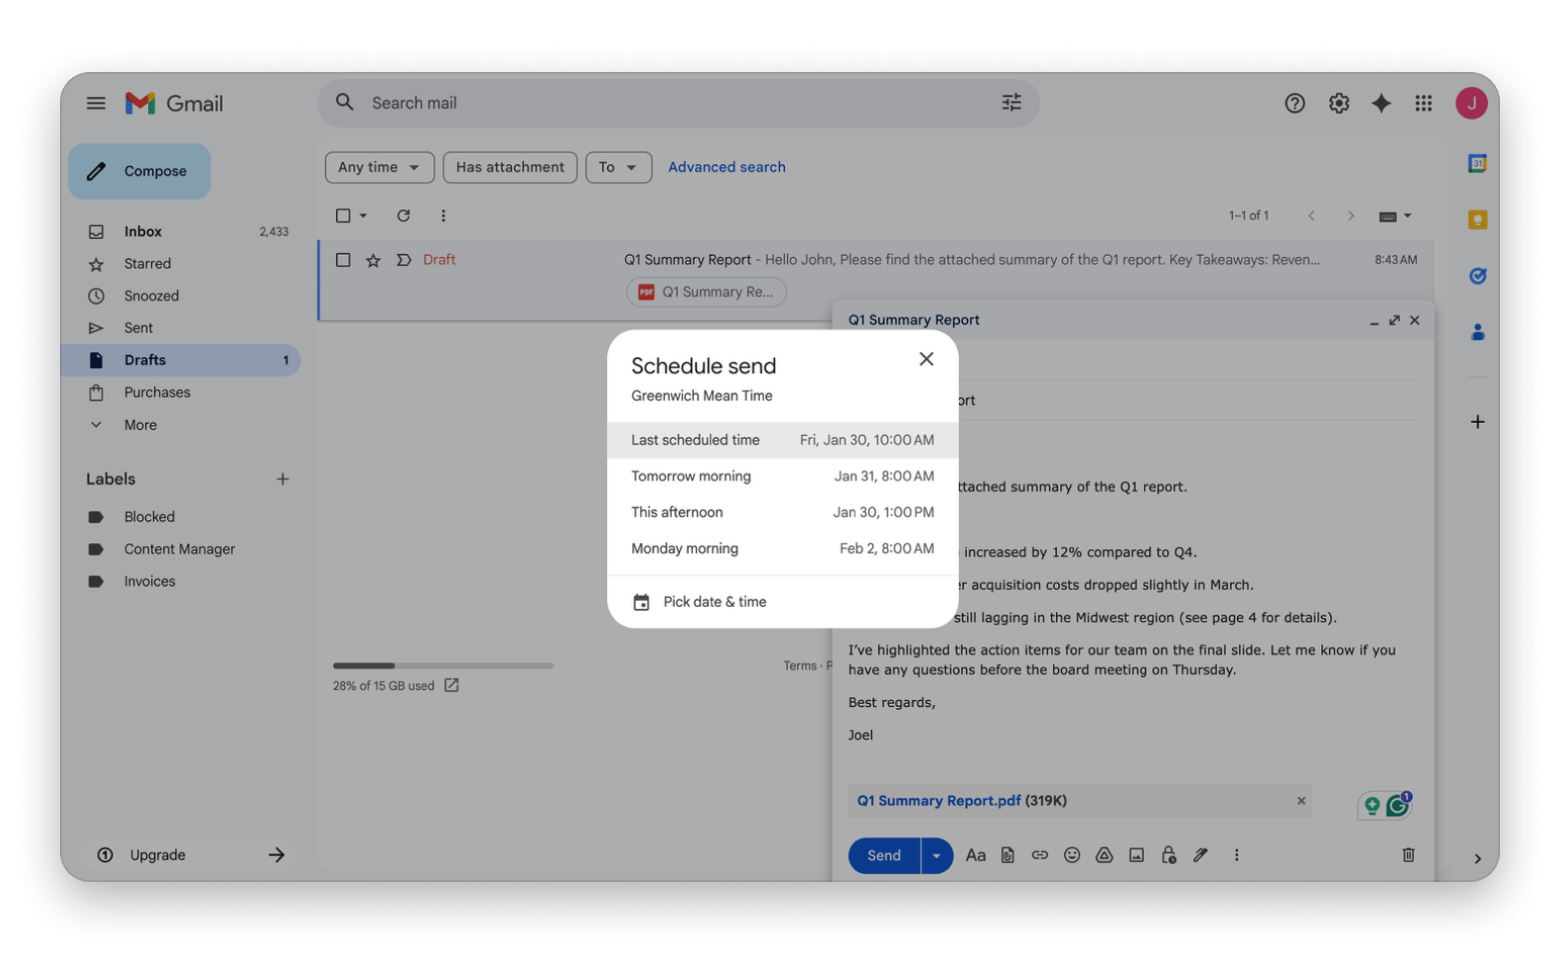
Gmail also lets you schedule a message to be sent later, which can be helpful if you work across time zones or just want to plan ahead.
To use the schedule option:
Click the drop-down arrow next to the Send button
Click or tap Schedule send.
Choose from the suggested options or click Pick date & time.
Click Schedule send.
Gmail will store the email in the Scheduled category, which appears on the leftside panel.
Managing and organizing emails in Gmail
Inboxes can be overwhelming, and I find that keeping them under control helps me feel less stressed and get more done. Gmail offers several tools to help with that, from using labels to mass deletion and a powerful search tool.
Using labels and folders in Gmail
Gmail uses labels instead of traditional folders, but they work more like tags. Whenever you receive an email, you can add it to a particular label or two.
For example, if it’s a ticket booking for a work trip, you can add it to both “Work” and “Travel.” It will be visible when you select the two categories, and it won’t affect the visibility in the primary inbox.
One of my favorite Gmail tips and tricks is automating this process for my frequent inboxes.
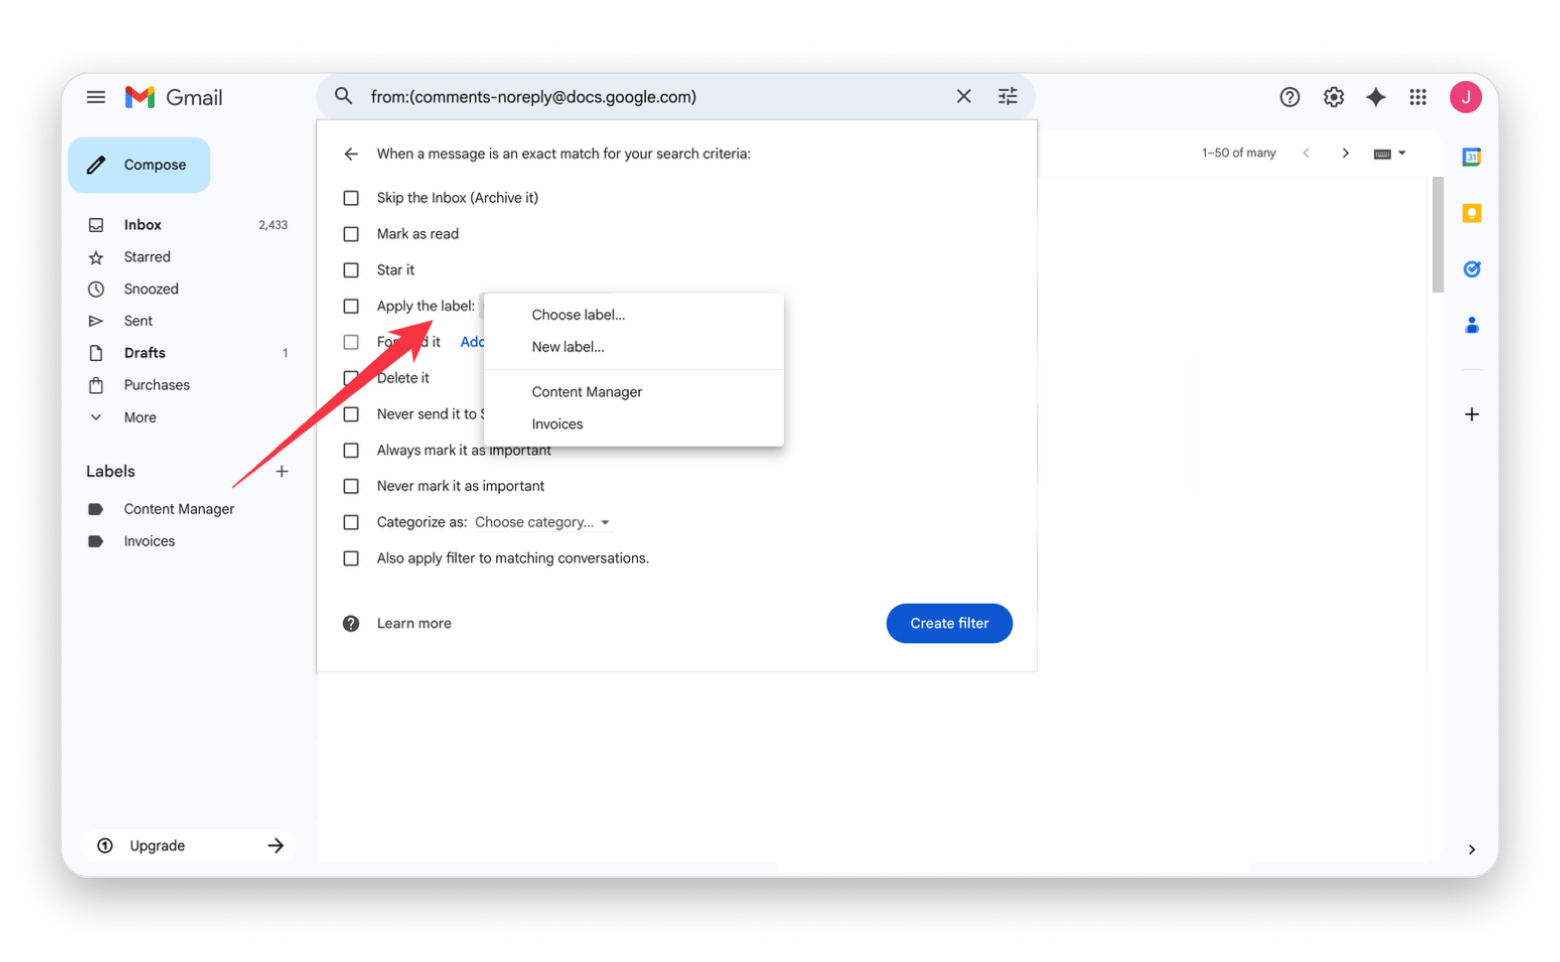
Here’s how to create a label and automate grouping:
Open Gmail on the web.
Click the + icon next to Labels.
Name your label and click Create.
Click the Search options icon in the search bar.
Type the email address in the "From" field.
Click Create filter.
Check Apply the label and choose your label.
Click Create filter.
This will make it easier to find related emails instead of searching for them each time.
Archiving, deleting, and searching emails
Instead of letting the inbox folder look chaotic, you can archive some emails and delete others that you don’t need. This comes in handy when you start getting too many subscription emails or updates, and it’s a good way of ensuring you don’t miss crucial emails.
Gmail makes it easy to archive or delete emails by long-pressing on the app or right-clicking on the web. Note that deleted emails are stored under “Trash” for 30 days before Gmail permanently deletes them. Archived emails are removed from the inbox folder but are still available under “All Mail” on the left panel.
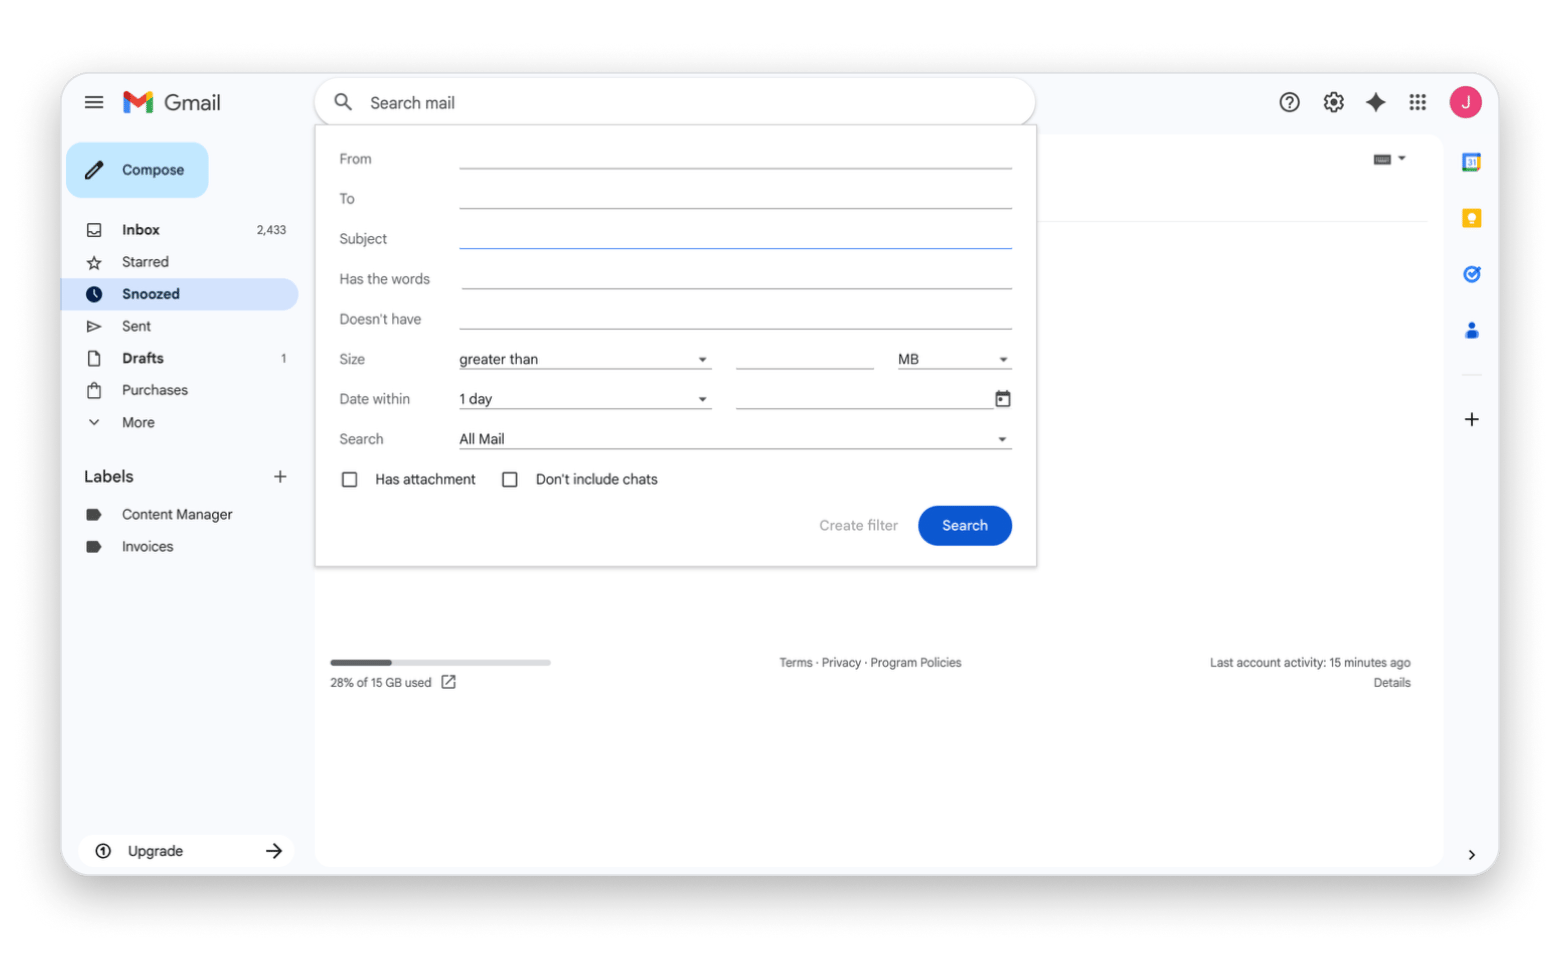
If you simply want to access an older email, you can use Gmail’s search bar. The Search options icon on the right side of the bar offers even more advanced options.
Gmail contacts and email personalization
Gmail automatically remembers people you’ve interacted with, but saving the contact adds a few extra personalization touches and pulls it to your phone.
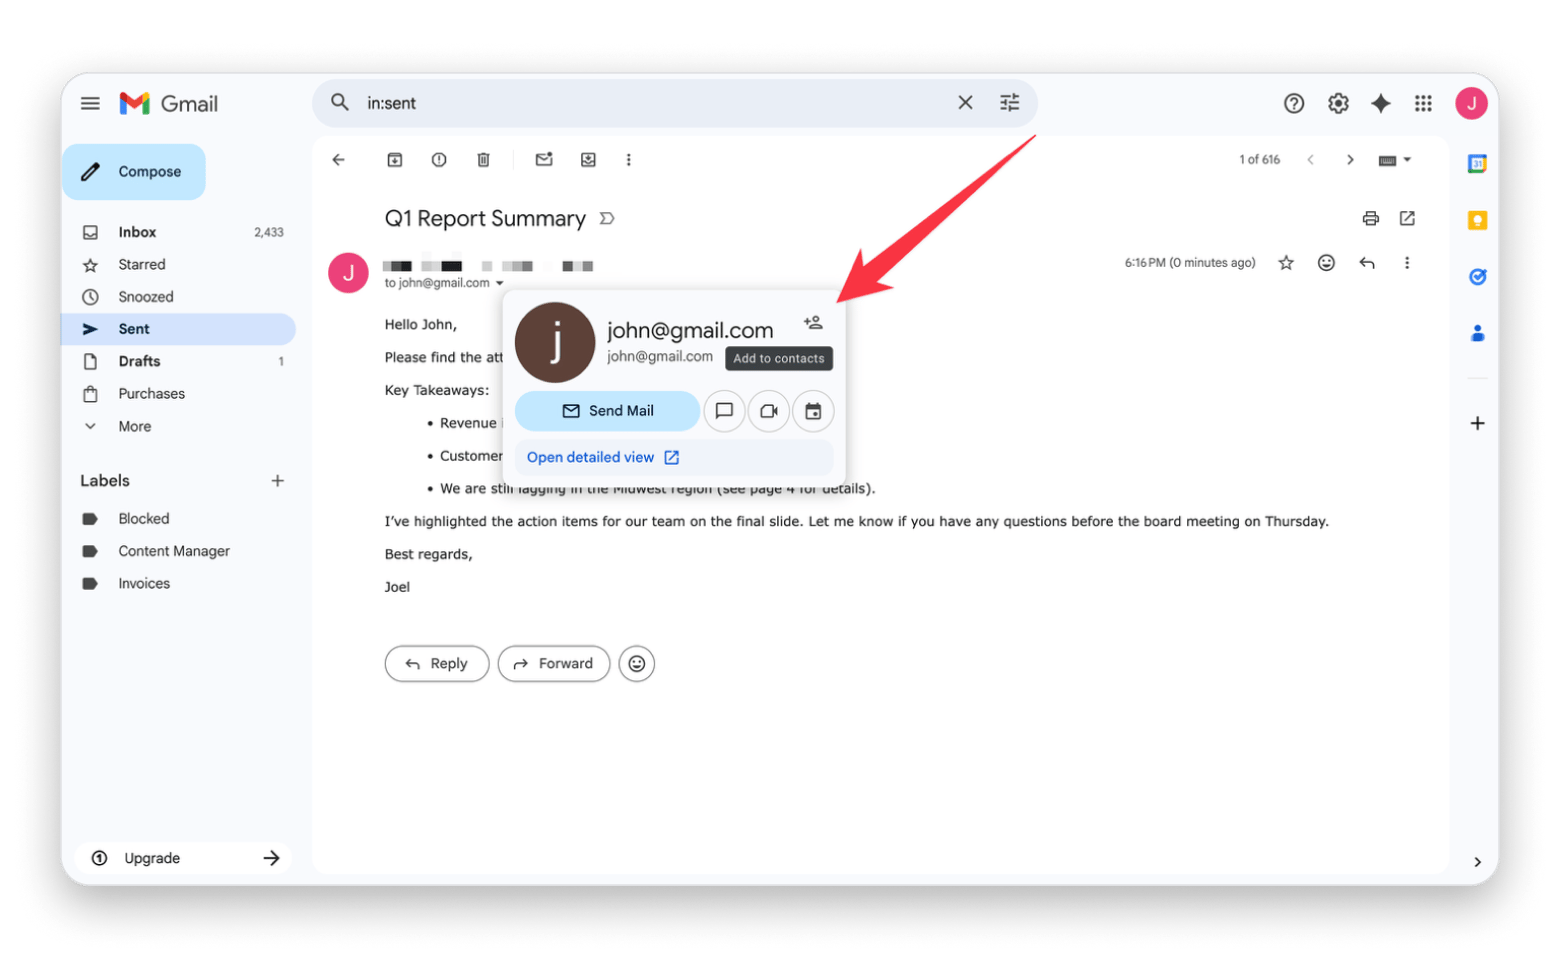
How to add, edit, and manage Gmail contacts
Here’s how to manage contacts in Gmail:
Open Gmail on the web.
Open an email thread.
Hover over the name of the person.
Click Add to contact.
To manage your contacts, you can go to contacts.google.com.
To make it even easier to manage the contacts alongside those on your phone, you can install BusyContacts. I find it to be the perfect contacts management tool as it offers more editing flexibility and advanced filters.
I particularly like that it keeps collecting all other details it knows about a particular person and remembers interactions to make mailing, meetings, and even social media activity seamless.
Adding an email signature in Gmail
Adding an email signature will make you look professional and help avoid repetition when you send or reply to emails.
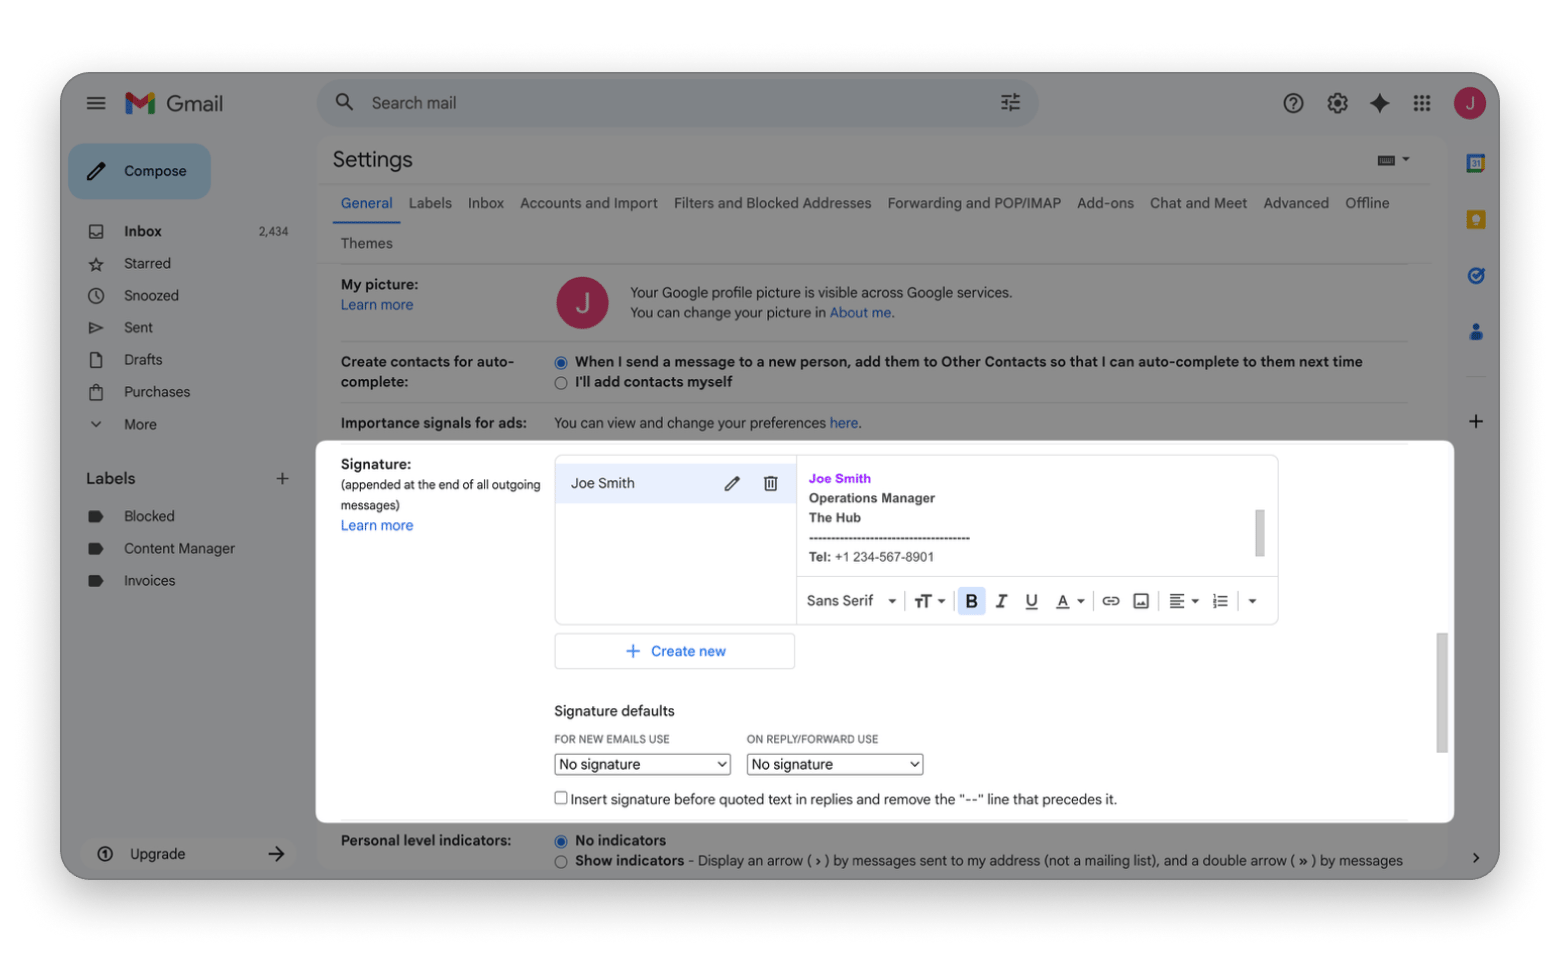
To add a signature in Gmail:
Open Gmail and click the Settings icon.
Click See all settings.
Scroll to the Signature section.
Click Create new and name your signature.
Type your name, role, and contact details.
Choose where the signature should appear under Signature defaults.
Scroll down and click Save Changes.
It will help your emails feel a bit more complete and save you from rewriting the same details over and over again.
Gmail account settings you should know
Once you’ve set up the basics, it’s time to adapt Gmail to how you like to work, something I find to be a crucial part of productivity.
Key Gmail account settings for beginners
Gmail account settings offer users a commendable level of flexibility you can use to determine how messages appear, how conversations are grouped, and even how often Gmail gets your attention.
Some of these include:
Inbox type, such as Default or Priority inbox
Smart suggestions for quick replies
Setting your language
Turning on/off conversational(thread) view
Creating a custom signature
Changing font type, size, and color
Enabling/disabling grammar suggestions and autocorrection
These can be accessed from Settings > See all Settings.
Enabling dark mode and visual preferences
If you already use dark mode in your system and want to match it on Gmail, you can do so from the Gmail account settings.
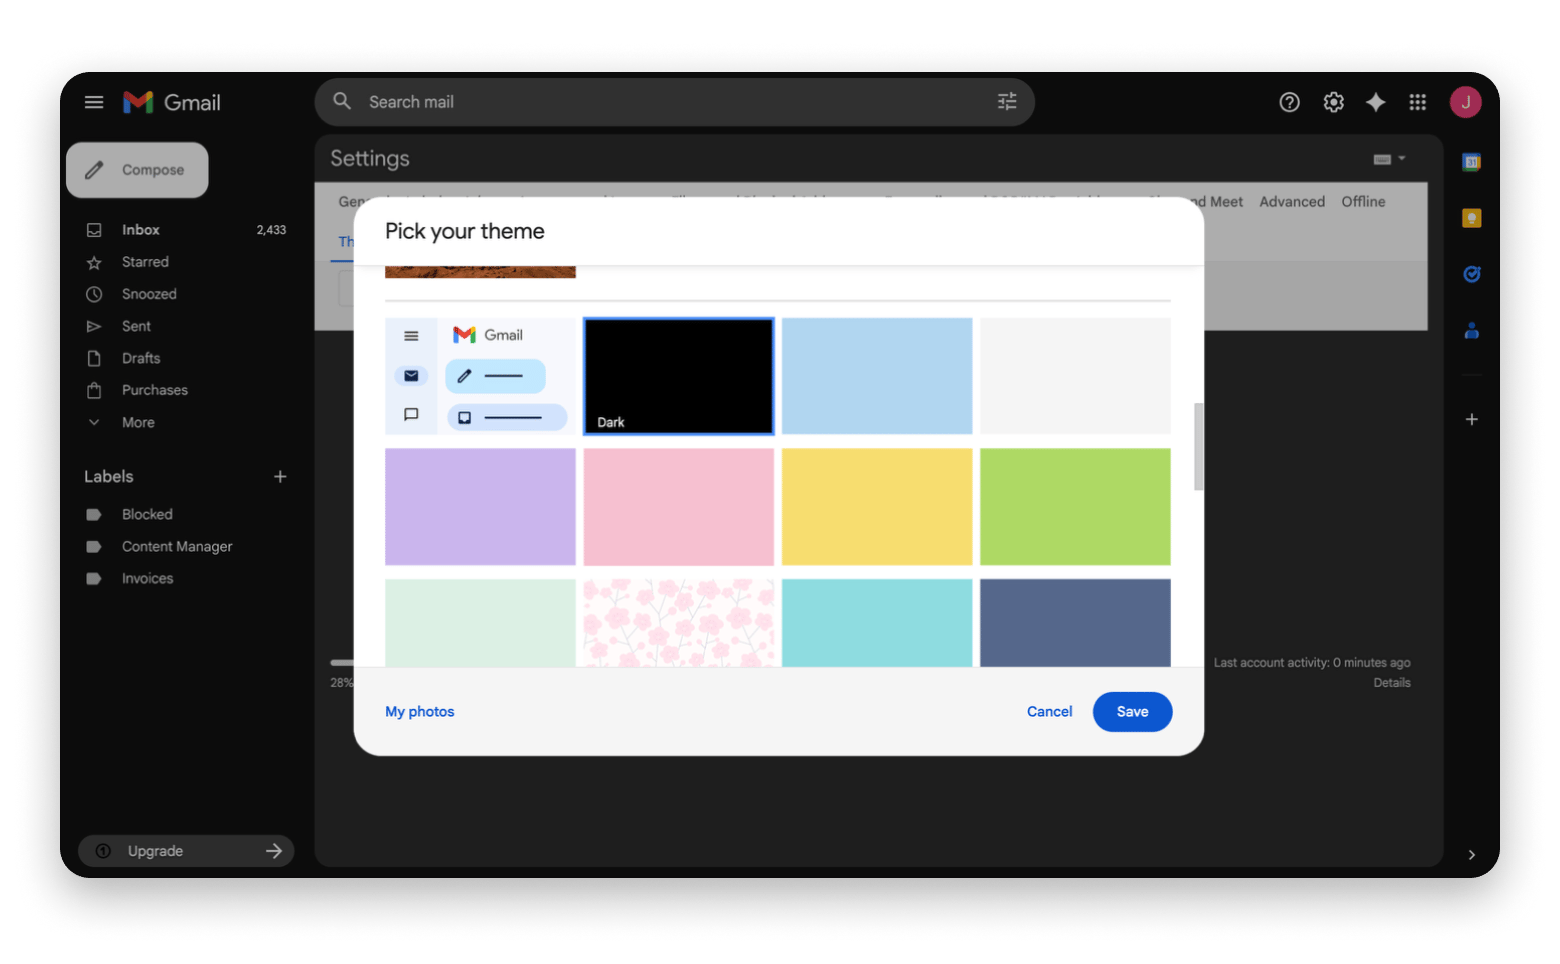
Here’s how to enable dark mode under Gmail account settings:
Open Gmail on your browser.
Click the Settings icon.
Click Themes > Set theme.
Click Dark among the options.
Click Save.
If you tend to use the web app at night, it will make it easier on your eyes.
I’m always looking for ways to save time and increase productivity, so I have a selection of Gmail tips and tricks that help me do more with less.
Using keyboard shortcuts and templates
This is one of the best ways to reduce the amount of time you spend on Gmail. Using shortcuts also makes the entire process feel much smoother. For example, you only need to press “c” to start composing a new email.
Here are the ones I mostly use:
Compose – c
Search mail – /
Reply - r
Reply All – a
Forward – f
Send Ctrl + Enter (Windows) or Cmd + Enter (Mac)
Archive – e
Mark as Read – Shift + i
Note that you’ll need to activate the option before you can use these shortcuts. Go to Settings > See all settings > Keyboard shortcuts on > Save all changes.
Blocking unwanted emails and spam control
If you don’t want to receive an email from a particular sender, you can block them:
Open Gmail
Open an email from that sender.
Click or tap the options icon menu.
Click or tap Block [sender]
Gmail will automatically move all future emails to your Spam folder.
Undo send, recall emails, and email safety
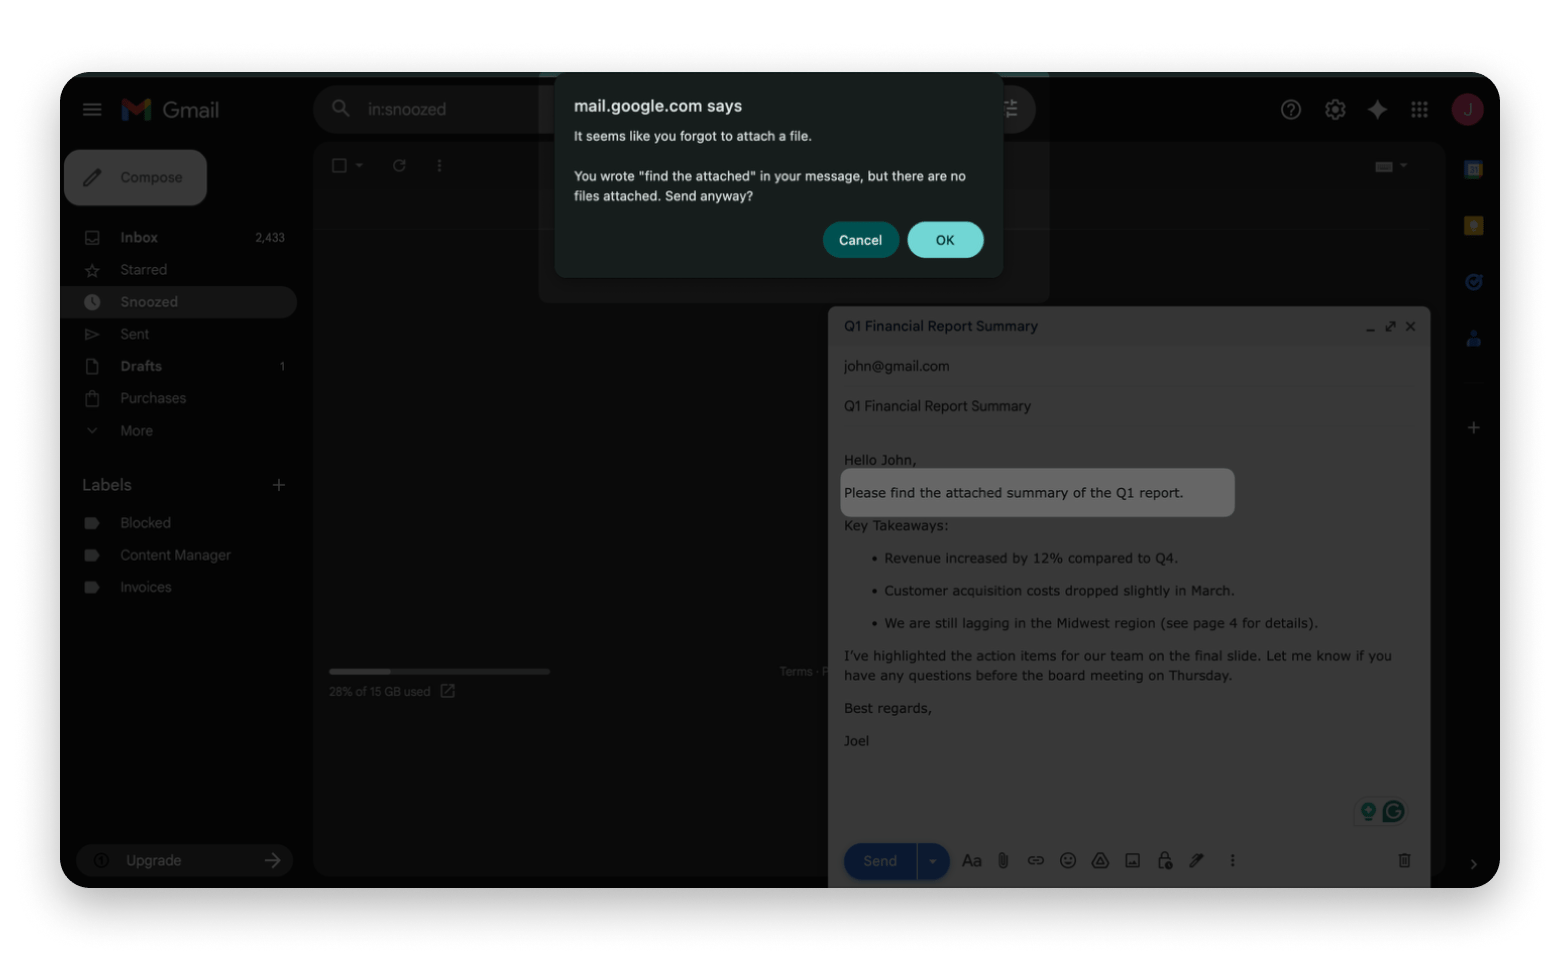
Sometimes, you can notice a typo or a missing attachment just after you’ve sent an email. Gmail offers a few safety features you can use to keep a few things under control, which makes sending emails a bit less risky.
For example, if you mention an attachment but fail to include it, Gmail will let you know before the email is sent.
How to recall or undo a sent email in Gmail
If you realize that you’ve sent an email prematurely, Gmail gives you a recall window before the email actually goes out. It only lasts a few seconds, but you can adjust the timer from the default 5 seconds to up to 30 seconds.
Scroll down to Undo Send and set the cancellation period to 5, 10, 20, or 30 seconds.
Scroll down and click Save Changes.
When you send an email, you’ll see a pop-up that allows you to recall the email.
Gmail alternatives and email best practices on Mac
Gmail works well, but it’s meant to cater to even users who’ve never sent an email before. This means that it can be quite limited, so it’s good to pair it with a dedicated email client like Spark Mail.
It’s my favorite email tool on Mac as it has smart organization features that make the inbox feel a bit calmer and more intentional. It also has a built-in calendar and an AI assistant that makes it much easier to come up with responses and fine-tune your messages.
Besides organization, Spark Mail integrates with other apps like Slack, Trello, Asana, and Evernote to bring your workspace together. It also supports other email service providers besides Gmail, and you can check out the best free email service for Mac if you’d like an alternative.
To learn about the best ways to write an email, check out our guide on how to write a professional email. It focuses more closely on email etiquette, structure, signatures, and best practices.
Common Gmail issues and troubleshooting
It’s inevitable that you’ll come across some everyday Gmail issues that can slow things down. Most of them have simple fixes, so you just need to know where to look.
Missing emails in Gmail – Check All Mail, Spam, and Trash, as they could have been filtered out. Otherwise, use the search bar.
Emails marked as spam by mistake – Open it and mark it as Not spam to improve future filtering.
Sync issues on mobile devices – Check that sync is enabled in the Gmail app settings and confirm that your internet connection is stable.
Gmail storage limits – Check your Google Drive for large files. Otherwise, delete large attachments to free up space.
If it’s a matter of the inbox being all over, just use Spark Mail, as it has better organization features than Gmail.
Final thoughts on how to use Gmail effectively
Learning how to use Gmail effectively is more about understanding the basic features like signing in, inbox layers, email folders, and settings. The service provides several customization options, so take advantage of them to organize your inbox and improve your productivity.
For even better email management, you can use Spark Mail to sign in using your Gmail, Yahoo, or iCloud account. It’s much smarter than Gmail, and it also integrates with other productivity apps like Slack and Trello. If you are trying to manage your email or general contacts, you can use BusyContacts to get advanced features and simplify the process.
Both Spark Mail and BusyContacts are available on Setapp, an all-in-one platform that offers 260+ Mac, iOS, and web apps. You can check out the apps for free, as Setapp offers a 7-day free trial that applies to any and all of its apps.
FAQs
How do beginners start using Gmail?
The easiest way to learn how to use Gmail for beginners is to create an account and sign in through the web or mobile app. Once inside, you can familiarize yourself with the inbox layout, composing an email, and a few basic settings that can help make using the service easier.
How do I send my first email in Gmail?
To send your first email in Gmail:
Open Gmail on the app or web.
Sign in or create an account.
Click Compose.
Add a recipient.
Write a subject line.
Type a body with a greeting, message, sign-off, and a signature.
Click Send.
There are also options to attach a file and schedule the email.
What are the most useful Gmail settings?
Some of the most useful Gmail account settings are email signatures, inbox categories, labels, signatures, and notification controls. It’s good to adjust these early as they’ll help improve your focus and appear professional.
Can I recall an email in Gmail?
Yes, you can recall an email in Gmail as it offers a 5-second “Undo” button after sending an email. You can also adjust the timer to up to 30 seconds. To do this, go to Settings > See all settings > Undo send > timer > Save changes.
How do I organize emails efficiently in Gmail?
You can use Gmail effectively by organizing your inbox using labels, filters, and the search bar. The label can be automated, and you can also adjust several settings to fit your preferences. Alternatively, you can use a smarter email client like Spark Mail as it supports all major email service providers, including Gmail and Yahoo.
Powerful apps live on Setapp
Ditch defaults and discover new gems on one app platform.


_-which-one-is-right-for-you_-1920-646.webp)