PressShift + Command + 5. Choose Record Entire Screen or Record Selected Portion > click Options to enable microphone > click Record. When done, click the stop icon in the menu bar.
Use CleanShot X for cloud sharing. The app records as MP4 or GIF, hides desktop clutter, trims video, and saves to CleanShot cloud with a shareable link.
Sometimes, a chance to show somebody how things are done proves more effective than having to come up with lengthy instructions. This is often true for educators, developers, IT support, YouTubers, online businesses, and teams working from different locations and even different time zones.
Taking a video of your actions as they happen on the screen of your Mac is called screen recording. You can record your entire screen, a selected portion of the screen, or an app window. Here are the quick answers to how to screen record with audio on Mac:
Ways to record screen with audio
Steps to follow
With a specialized third-party app
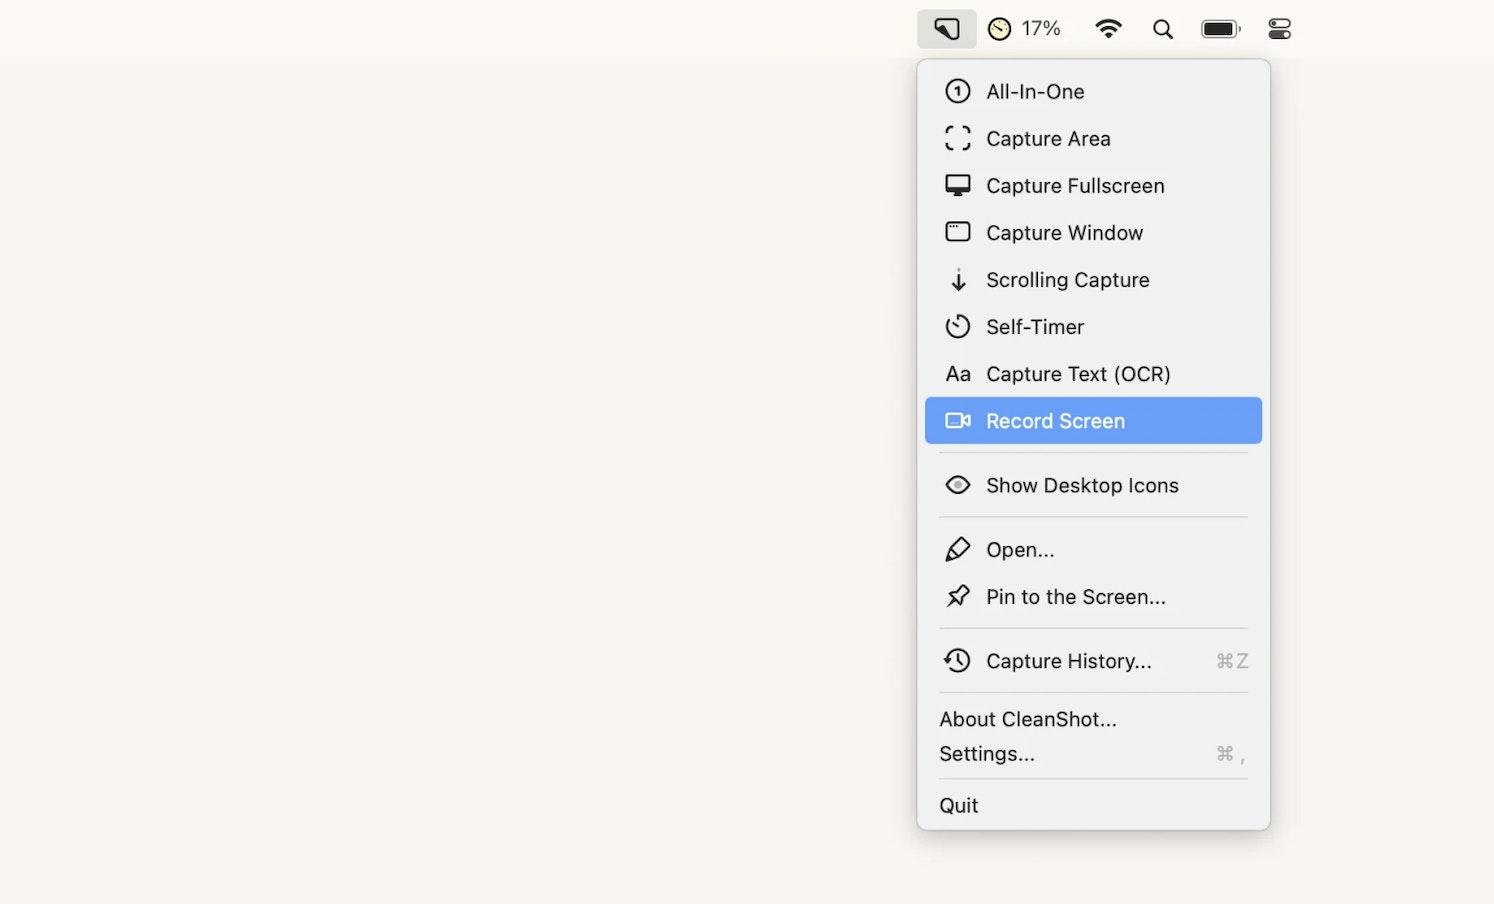
Install and open CleanShot X. Choose Record Screen > Press Space bar > Click the microphone icon to Record MacBook Microphone or other source.
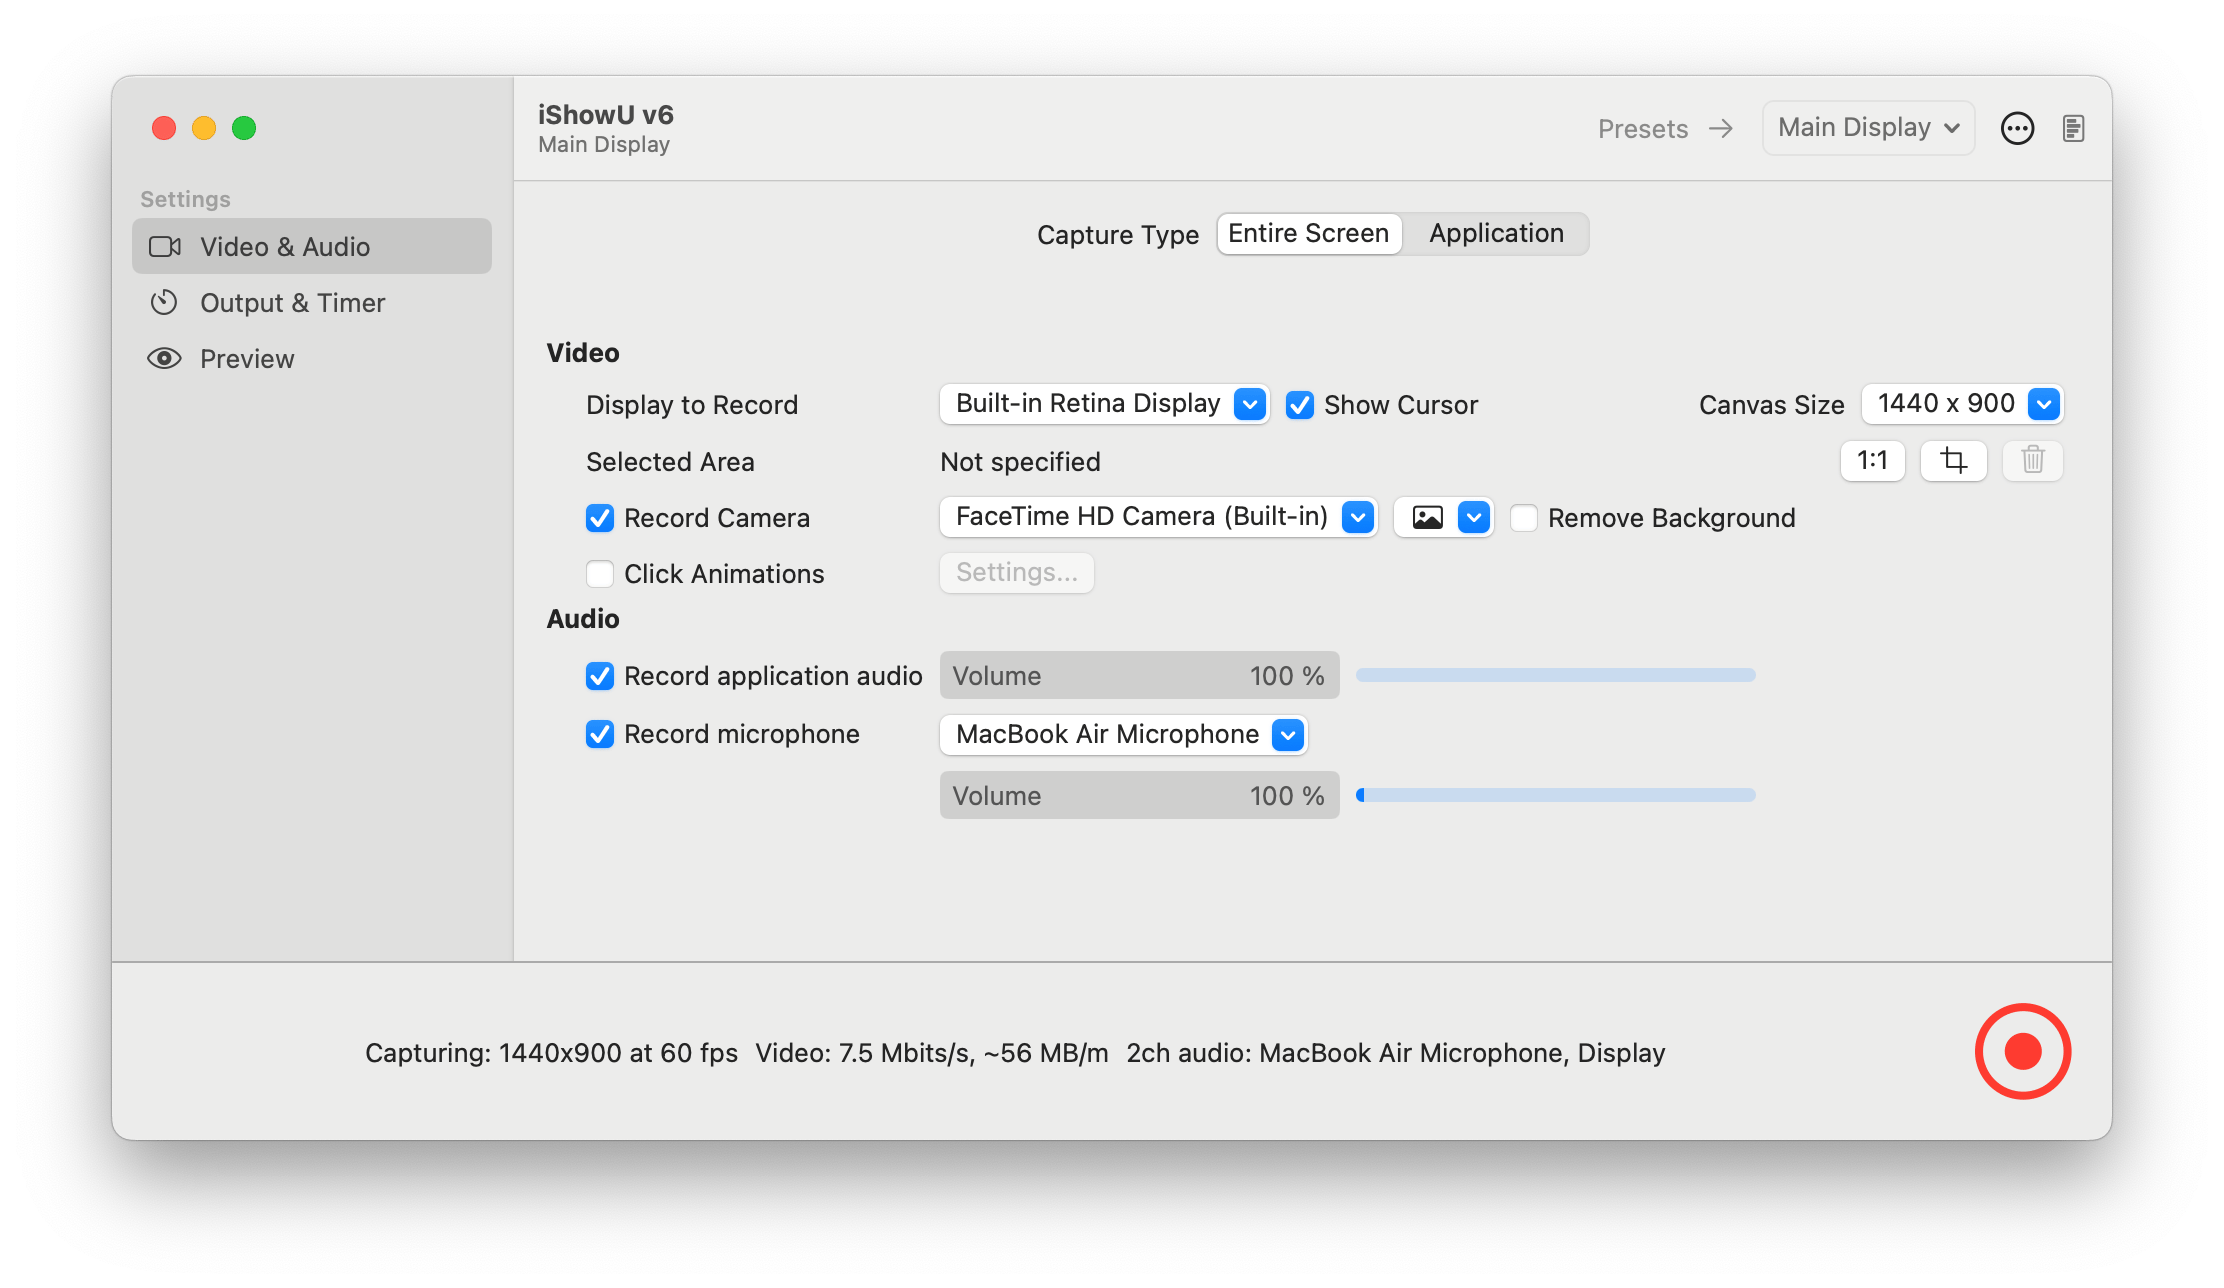
Install and open iShowU. Set recording preferences and press the red circled dot in the bottom right corner of the app to start recording.
With Mac’s webcam
Install and open Capto. Choose the Record option from the toolbar > Select Record Camera > FaceTime HD Camera > Start recording.
Using Mac’s built-in tools
Use QuickTime from the menu bar to record the screen.
With a Mac keyboard shortcut using a microphone
Press Command + Shift + 5 > Click Options to turn on the audio recording > Record.
Don’t want to read the whole article? Just describe your use case to our free custom GPT: How to screen record on Mac, and it will suggest the right solution for your needs in seconds.
How to record audio on Mac in 2026?
Knowing how to screen record on Mac with audio is key when I want to add narration or capture system sound. Here’s how to record audio effectively using different methods.
With Capto you get to not only record your screen with real-time voiceover and webcam feed, but also edit your video and audio tracks, add text or speech bubbles, and share instantly from the app:
Capture a specific app window, a browser, your whole screen, or select an area of any size with any number of windows in it
Hide desktop while recording
Take screenshots
Edit video and images: crop, cut, fade in and fade out for audio
Add annotations
Share to Dropbox, YouTube, Facebook, and all possible shared storages, including FTP/SFTP servers
You can also use iShowU to record your screen. This app is particularly handy for creating product walkthroughs and demos and it can record high quality video with a selfie cam overlay. This allows you to create videos with a “talking head” inserted in them.
iShowU can also replace the background in your selfie video to make it look more polished and professional.
How to record the screen on Mac with the Screenshot toolbar
If you’re wondering, “Can I screen record on my Mac with a native macOS utility?” the answer is — yes. Apple has its own built-in screen recording feature called Screenshot that lets you capture video of whatever’s happening on your screen (with real-time audio, should you choose to).
You can use the Screenshot toolbar for taking both screenshots and video recordings of your screen (for video choose from the last two screen icons with a dot in the lower right corner).
To record with Screenshot:
Press Shift + Command + 5 to open the toolbar
Choose Record Entire Screen or Record Selected Portion (you’ll be able to drag and resize the frame of the screen area you want to be recorded, if you choose this option)
Go to Options and choose microphone settings, decide where you’d like to save your recording to, or set a countdown timer
Click on Record to start the recording
Click on Stop Recording menu bar icon when you’re done
How to record audio in screen recordings
When you think about how to screen record on MacBook, it’s important to also understand how to include sound in your videos.
As we have already discussed, your native Mac screen recorder allows you to capture audio from your Mac’s built-in microphone, but if you’re looking for more advanced capabilities (like creating and editing voiceovers or learning to record your Skype meetings), you can find out more from our dedicated article on how to record your screen on Mac with sound.
How to record your screen on Mac with QuickTime
Another option to record a screen Mac users can try is QuickTime Player. We know this app for playing media files, but it can also be used for recording your screen and sound.
To use QuickTime Player as a Mac screen recorder, simply launch it from Applications and choose New Screen Recording from the File menu. This will open the Screenshot toolbar that lets you configure and start your recording.
The only difference with Screenshot is that with QuickTime Player, once you’re done recording, your file will automatically open inside the app and you can edit it right away.
How to record and share the Mac screen for collaboration
Another great tool for asynchronous screen sharing is CleanShot X. It’s a simple screen recording macOS app that comes with a rich toolkit, allowing you to capture your screen without desktop icons, record as MP4 or GIF, trim video, annotate, and keep your recordings saved on CleanShot’s cloud for free — all a few clicks on the menu bar icon away.
How to screen record on Mac with OBS Studio
Another popular contender for Mac screen recorder of choice is OBS Studio.
OBS Studio is a free open-source app used for both streaming and screen recording by many content creators. It’s known for a variety of advanced features, but can also be easily used by beginners.
Understanding how to screen record on Mac with OBS Studio starts with the basics:
Set up video: Sources ➙ + icon ➙ Display Capture ➙ name the source ➙ OK
Set up audio: OBS Studio is set to capture audio from the built-in microphone on your Mac by default — you can add external audio sources or apps for capturing system sound in Sources
Choose where you want to save your recorded files: Controls ➙ Settings ➙ Output ➙ Recording ➙ Browse ➙ OK
Choose Start Recording under Controls to begin screen recording Mac
Press Stop Recording when you're finished
If you’re also looking for an advanced app to help you edit your recordings, check CamerBag Pro. It’s a powerful photo and video editor that allows for professional adjustments and offers pro-quality preset filters to add style to your creations.
Tips for creating impactful screen recordings on Mac
Being able to clearly get your point across, even if you aren’t in the same room with your audience or colleagues, is very important. Having a video recording to illustrate it is priceless. Learning how to screen record on Mac is, without a doubt, a useful skill, and you can master it in no time with Mac’s built-in Screenshot and QuickTime Player or a more advanced OBS Studio screen recording setup.
If you’d like an effective tool that lets you both record and edit your videos from the same app on Mac, opt for Capto or CleanShot X (if you also like creating GIFs). And, finally, for advanced editing and pro-quality image adjustments, arm yourself with CamerBag Pro to present your ideas with style.
Be sure to try Capto, CleanShot X, CameraBag Pro, and iShowU for free with the 7-day trial of Setapp, a platform of high-performance apps for tasks on Mac and iPhone. Learn how to screen record MacBook and check out more than 250 other options to boost productivity.
FAQ
How to record screen and audio at the same time on Mac
All the above mentioned methods of screen recording Mac users can choose from allow for recording audio from Mac’s built-in mic: you can capture your voice commentary, as well as any sounds playing at the moment (music, app sounds, etc.)
How can I record my screen on Mac with sound but without a mic?
All Macs have an internal microphone built-in, so you don’t have to have an external microphone for capturing sound when screen recording Mac.
Where does screen recording go on a Mac?
The answer differs depending on the app you choose for recording your screen:
Mac’s native Screenshot utility saves recorded files to Desktop (you can choose a different location in Options ➙ Save to)
QuickTime Player automatically opens the video after you hit Stop Recording, and you can then choose where to save your file (File ➙ Save)
OBS Studio lets you locate recordings using the File menu (File ➙ Show Recordings)
Apps like CleanShot X save your files to your free in-app cloud account
What is the recording shortcut on Mac?
Use Shift + Command + 5 to start screen recording Mac.
Get Capto for screen recording
Record any part of the screen and edit video easily.