How to use Private Browsing in Safari on iPhone, iPad, and Mac
- On Mac: Open Safari → right-click Safari icon in Dock → New Private Window.
Alternatively, open Safari → File → New Private Window. When enabled, Safari doesn’t store your browsing history, cookies, or searches on your device. - On iOS: Open Safari → long-press Tabs (two squares) → New Private Tab.
Remember: Safari won’t save local history/searches/cookies in Private mode, but ISPs, network admins, and some sites can still see connection info. - Starting with iOS 17, you can lock Private tabs behind biometric authentication.
Open Settings → Apps → Safari → Privacy & Security → toggle Require Face ID/Touch ID to Unlock Private Browsing. - Private Browsing ≠ full anonymity.
While Safari won’t record your activity locally, your internet provider, employer, or websites can still see your IP address and online behavior. - For stronger privacy, go beyond Safari.
Use ClearVPN to encrypt your connection and mask your IP, AdLock to block pop-ups and ads, and CleanMyMac to remove browsing traces and cookies. Access these and 250+ other curated Mac and iOS apps with Setapp’s free 7-day trial.
Incognito mode is known as Private Browsing in Safari on Apple devices. You may want to use this mode as it gives you the freedom to browse the web privately without your browsing activity being recorded and stored on your device.
With the latest macOS, iOS, and iPadOS, Apple has taken the private browsing experience one step further by letting you lock private Safari tabs with Face ID.
In this article, we'll show you how to enable and disable Safari Private Browsing on Mac and iOS devices.
Quick solutions on how to work with Private Browsing on macOS and iOS
Let's get started with the handy problem-solution table and additional details below.
| Problem / Goal | Steps |
| Enable Private Browsing on Mac | Open Safari → right-click Safari icon in Dock → New Private Window. Or, open Safari → File → New Private Window. |
| Turn off Private Browsing (return to normal) | Close the private window (X). Then Safari → right-click in Dock → New Window. Or File → New Window for older macOS. |
| Enable Private Browsing in iOS | Open Safari → long-press Tabs (two squares) → New Private Tab. |
| Enable Private Browsing on iOS 16 & older | Safari → Tabs → [number] Tabs/Start Page → Private → Done. |
| Turn off Private Browsing | Long-press Tabs → tap [number] Tabs (non-private). Or, Long-press Tabs → Close All [number] Tabs (private) and repeat instructions above. |
| Turn off Private Browsing on iOS 16 & older | Tabs → [number] Tabs/Start Page → select [number] Tabs → Done. |
| Lock Private Browsing with Face/Touch ID (works on iOS 17+) | Open Settings → Apps → Safari → Privacy & Security → toggle Require Face ID/Touch ID to Unlock Private Browsing. |
| Private Browsing not working | Restart Safari (force-quit on iOS/iPadOS; Quit on Mac). If needed, restart device. |
| Want stronger privacy than Private Browsing | Use ClearVPN to encrypt traffic, avoid trackers, and hide IP, especially on public Wi-Fi. |
| Expecting no ads in Private mode | Install an AdLock to block pop-ups/banners. |
| Remove local traces (history, cookies, caches) | Use CleanMyMac → Protection → Scan, select Safari (and others), choose items to remove → Remove. |
| Understand limits of Private Browsing | Remember: Safari won’t save local history/searches/cookies in Private mode, but ISPs, network admins, and some sites can still see connection info. |
How to enable Safari Private Browsing? Step you shouldn't miss
Apple has made accessing Safari Private Browsing on all your devices easy. The steps will slightly differ based on your iOS and macOS versions.
To check which version you're on, go to Settings > General > About > and see the version listed beside iOS Version.
On Mac, go to the Apple menu in the upper right-hand corner of your screen and click on About This Mac. In the window that appears, see what's listed besides macOS.
Now, let's learn how to enable incognito mode in Safari.
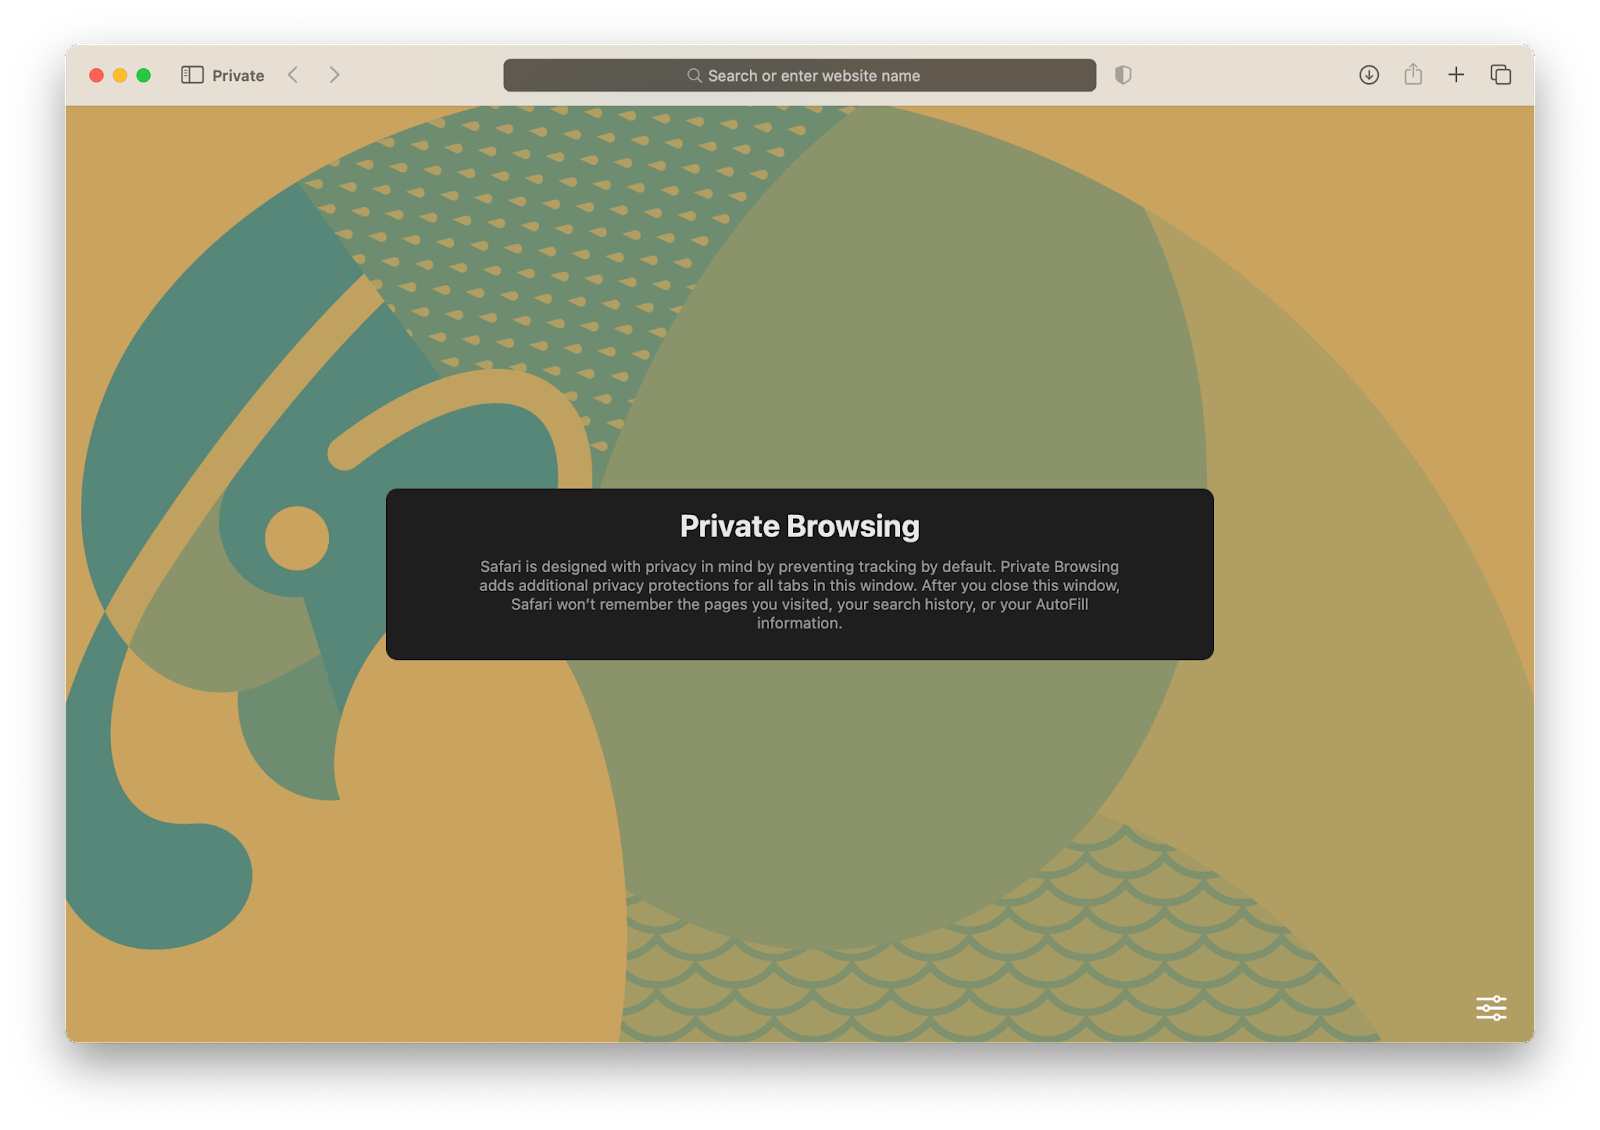
How to enable Private Browsing on macOS Tahoe
One of the easiest ways to access Safari Private Browsing on macOS Tahoe is through the Dock.
- Locate the Safari icon: In the Dock at the bottom of your screen, look for a blue compass-like icon with a white background.
- Open the web browser.
- Right-click on its icon.
- In the menu that opens, click on New Private Window.
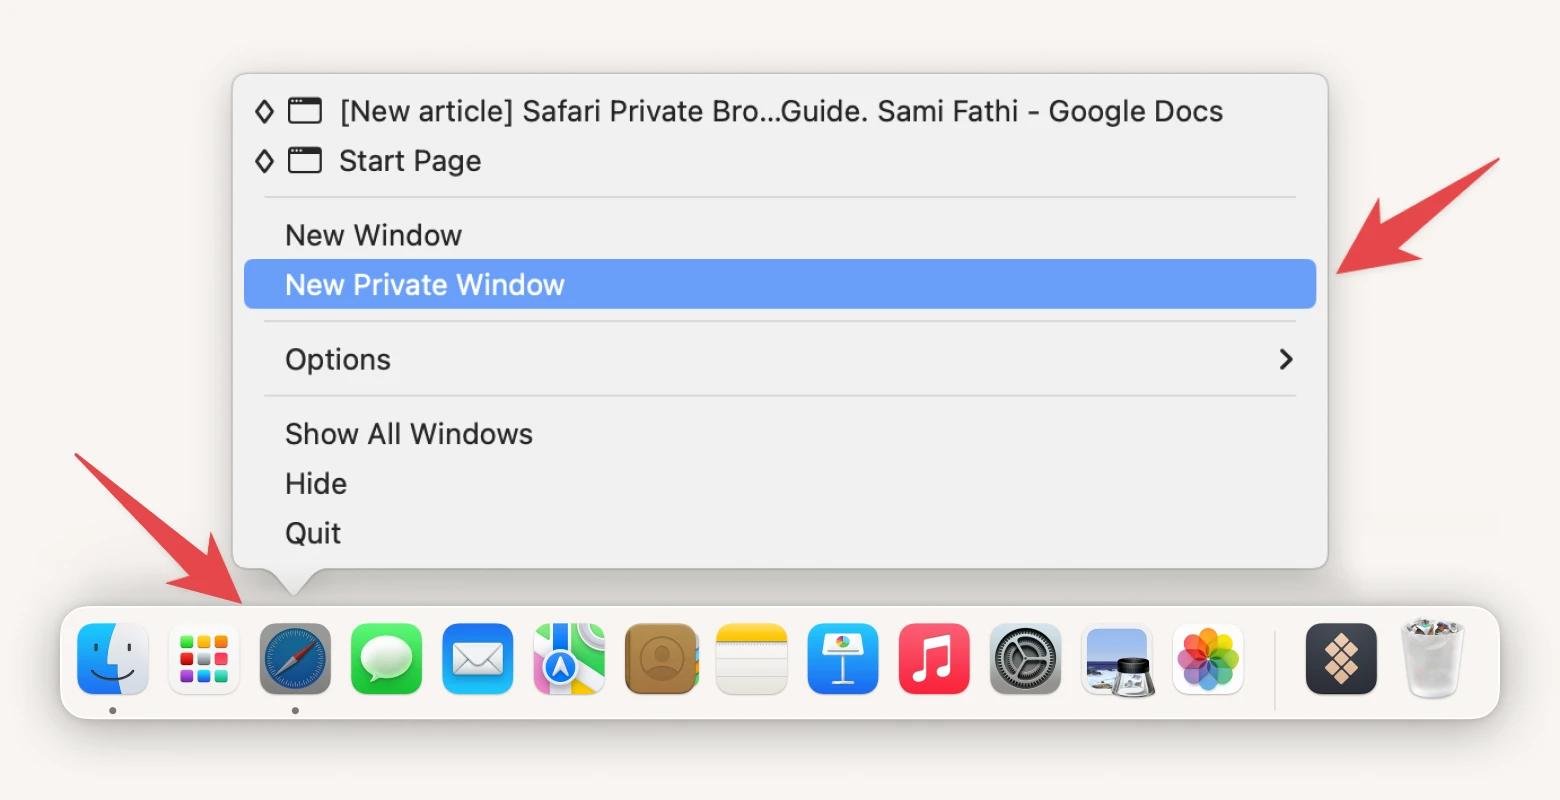
Alternatively, you can go to the File menu in the Mac menu bar with Safari open and click New Private Window. This will open a new Safari window with Private Browsing mode.
How to enable Private Browsing on macOS Ventura
For Macs running macOS Ventura, here's how to access the Safari Private Browsing tab:
- With Safari open, go to the Mac menu bar and click File.
- Click on New Private Window.
How to enable Private Browsing on iOS 18 and iOS 17
If you prefer an iPhone for private browsing, we've got you covered.
Here's how to open incognito tab on Safari on your iPhone running iOS 18:
- Open Safari on your iPhone and open any web page.
- Tap and hold the Tabs button (2 squares icon at the bottom right corner of the screen).
- Tap New Private Tab in the pop-up menu.
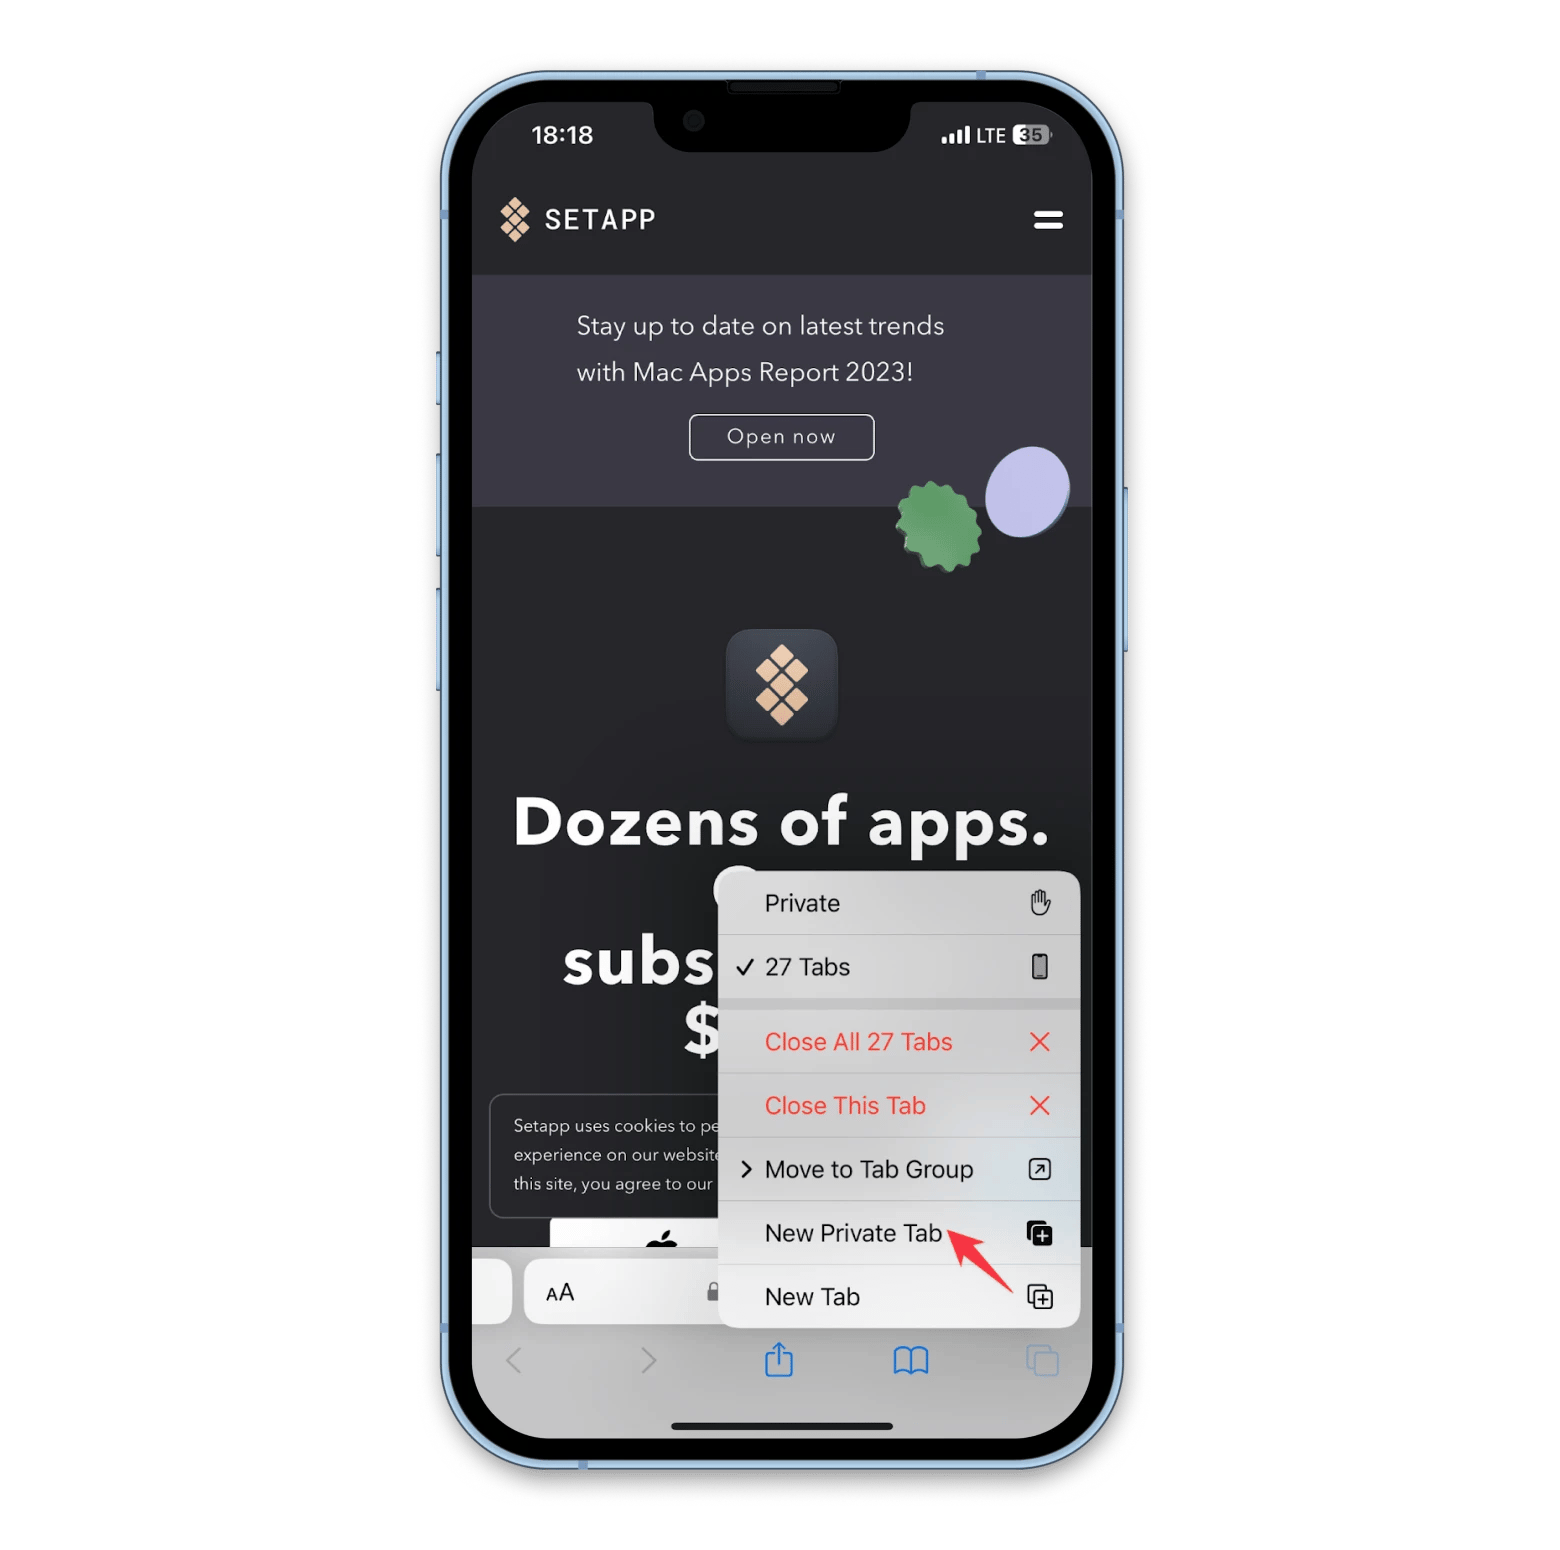
How to enable Private Browsing on iOS 16 and older
For iPhones running iOS 16 and older, follow these steps to access Safari Private Browsing mode:
- Open Safari on your iPhone.
- Tap the Tabs button (2 squares icon at the bottom of the screen).
- Tap [number] Tabs or Start Page to show the Tab Groups list.
- Tap Private, then tap Done.
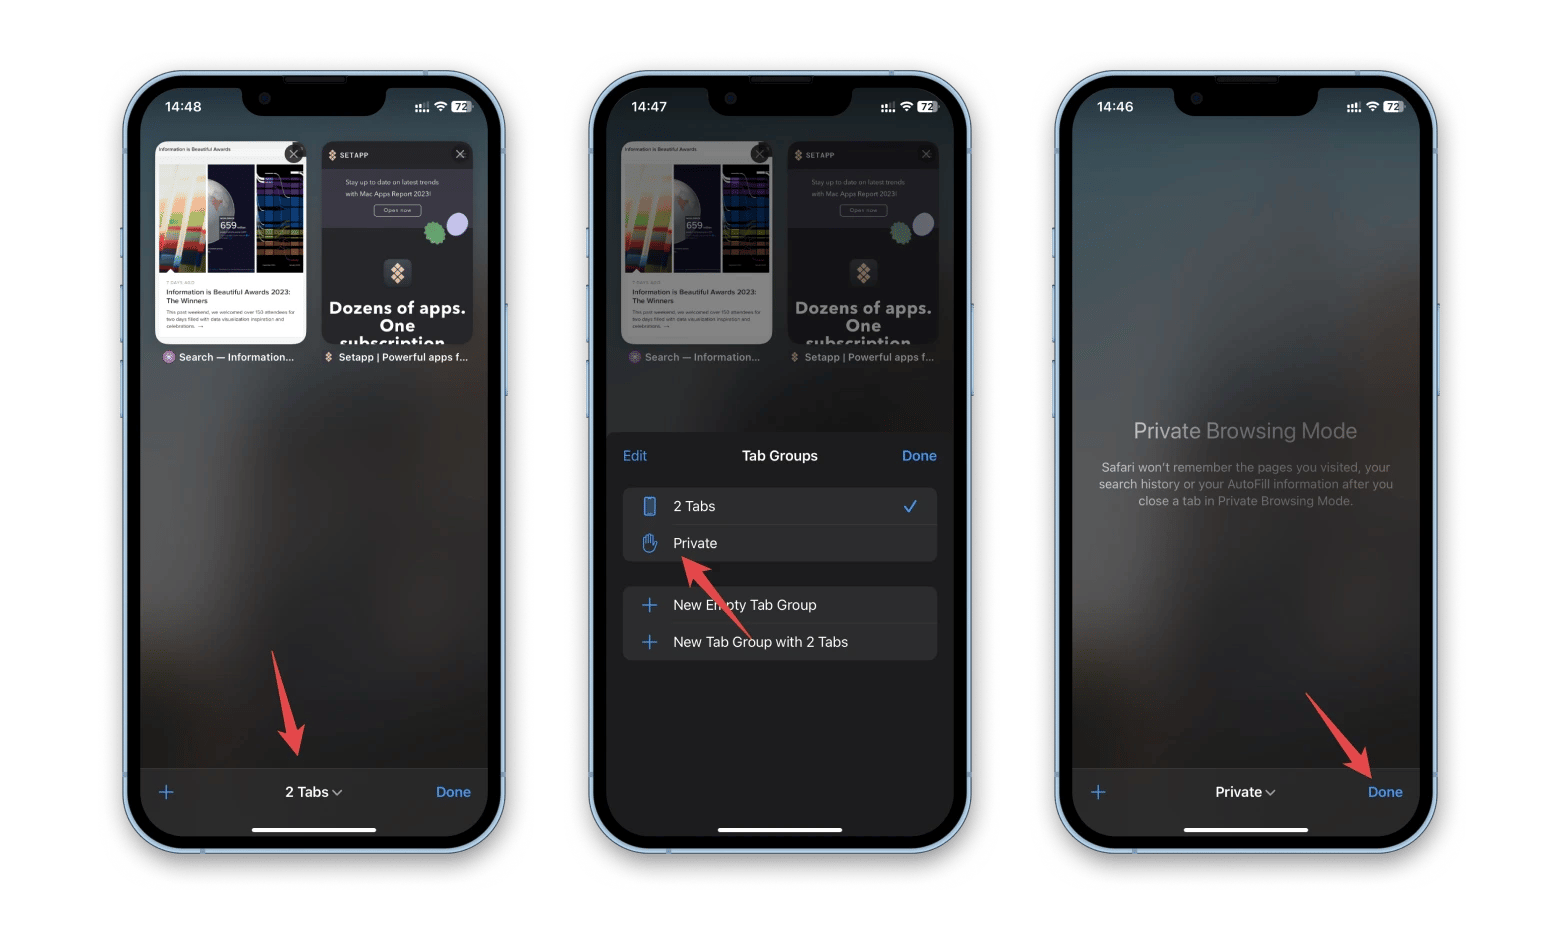
How to lock Safari Private Browsing with Face ID on iPhone
You can add an extra layer of security to your private browsing experience by requiring Face ID or Touch ID to unlock your private tabs. Each time you try to access Private Browsing, your iPhone will ask for authentication before letting you in.
To set it up:
- Open Settings on your iPhone.
- Go to Apps > Safari.
- Scroll down to the Privacy & Security section.
- Turn on Require Face ID / Touch ID to Unlock Private Browsing.
Note: This feature is available only on iOS 17 or later.
Reasons to update your Safari browserBeing up to date is so important that we even included a question about it in our 2024 Scams and Disinformation Survey. When you update Safari on Mac, you get better protection, privacy, and new features, obviously. We asked users: Do you regularly update your software and operating system? Here’s what they said: 55% — always (kudos to you!), 32% — sometimes, 10% — rarely, and 4% said never. Hopefully, that “always” group will keep growing! |
How to turn off Safari Private Browsing mode
Turning off Safari Private Browsing Mode means you'll switch back into normal browsing mode, removing the added features and benefits of Private Browsing. Normal browsing mode, however, ensures your history is synced across all your devices and that all websites work correctly. To turn it off, follow these reverse steps for your respective devices.
macOS Tahoe and Sonoma: How to turn off Safari Private Browsing mode
Follow these steps on macOS Sonoma to revert back to normal browsing mode:
- With your Safari Private Browsing Mode window open, tap the X to close it.
- Locate Safari in your macOS Dock.
- Right-click on it.
- Click New Window.
Alternatively, you can go to the File menu in the Mac menu bar with Safari open and click New Window. This will open a new window with Safari in its normal browsing mode.
macOS Ventura: How to turn off Safari Private Browsing mode
For Macs running macOS Ventura, here's how to close out of Safari Private Browsing Mode and switch back to normal browsing mode:
- With your Safari Private Browsing Mode window open, tap the X to close it.
- With Safari still open, go to the Mac menu bar and click File.
- Click on New Window.
iOS 17: How to turn off Safari Private Browsing mode
To turn off Safari Private Browsing on your iPhone running iOS 17, follow these three simple steps:
- Open Safari on your iPhone.
- Tap and hold the Tabs icon.
- Tap [number] Tabs in the pop-up menu.
You may also exit out of incognito mode in Safari on iOS 17 by completing these steps:
- Open Safari on your iPhone.
- Tap the Tabs button.
- Tap [number] Tabs or Start Page to show the Tab Groups list.
- Tap Private, then tap Done.
iOS 16 and older: How to turn off Safari Private Browsing mode
For iPhones running iOS 16 and older, follow these steps to exit out of Safari Private Browsing mode:
- Open Safari on your iPhone.
- Tap the Tabs button.
- Tap [number] Tabs or Start Page to show the Tab Groups list.
- Tap [number] Tabs, then tap Done.
Is Safari Private Browsing actually private?
While Private Browsing in Safari does provide a certain level of privacy, it is by no means foolproof or impenetrable. It's important to be aware of its shortcomings and the parties who might still be able to track your information even when you're using Safari Private Browsing.
As mentioned, Safari Private Browsing prevents your browser from storing your browsing history, searches, and cookies locally. However, it does not hide your IP address or encrypt your internet traffic.
That means your internet service provider (ISP), network administrators, and certain websites can still track your online activities. In addition, if you're using public Wi-Fi or an unsecured network, third parties may be able to intercept your information. (BTW, you might also want to know how to fix "Your connection is not private" error.)
If you want to keep your browsing sessions private and secure, Safari Private Browsing is not the only option. You can start with virtual private networks (VPNs). The purpose of a VPN is to encrypt your connection to the Internet by routing your data traffic through a secure server in a location of your choice. This hides your IP address and makes it very difficult for anyone to monitor your online activities.
I prefer ClearVPN because it is the most intuitive VPN solution on the market. Not only does it hide my IP address and ensure privacy protection, but it also blocks ads and trackers, and removes banners. Plus, it offers multiple shortcuts that focus on your needs rather than on a server choice.
![]()
Another common misconception about Safari Private Browsing is that it removes ads from websites you visit. This is not true. Instead, Safari Private Browsing makes it harder for ads to track you. To get no ads on the web, apps like AdLock are the perfect solution. It will block annoying, and often malicious, pop-ups, banners, and ads in your browser, so you can avoid viruses and browse the web safely — even on unsecured networks.
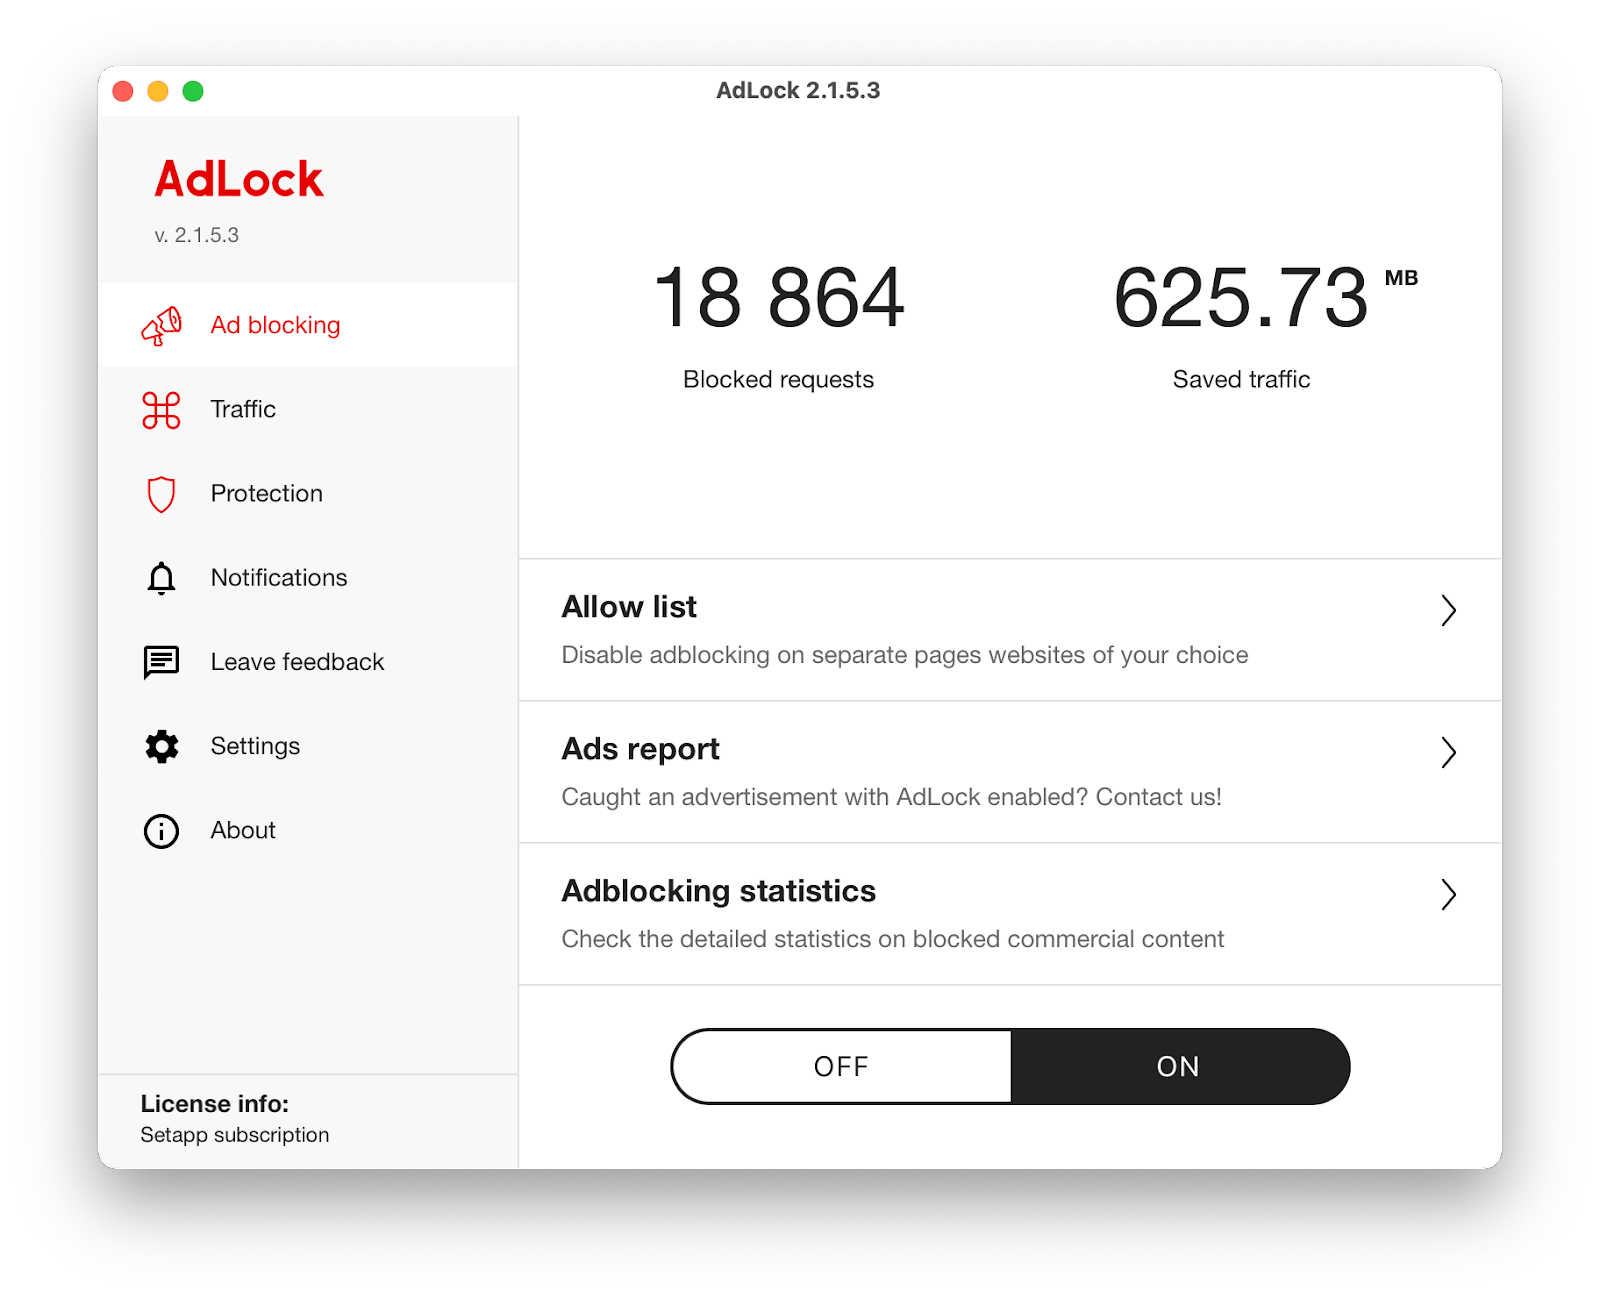
To set up AdLock, all you need to do is turn on web ad blocking (Ad blocking > On). And if you want, you can also enable filtering in selected apps so that ads are blocked in those apps as well (Traffic > Add App > Enable Filtering).
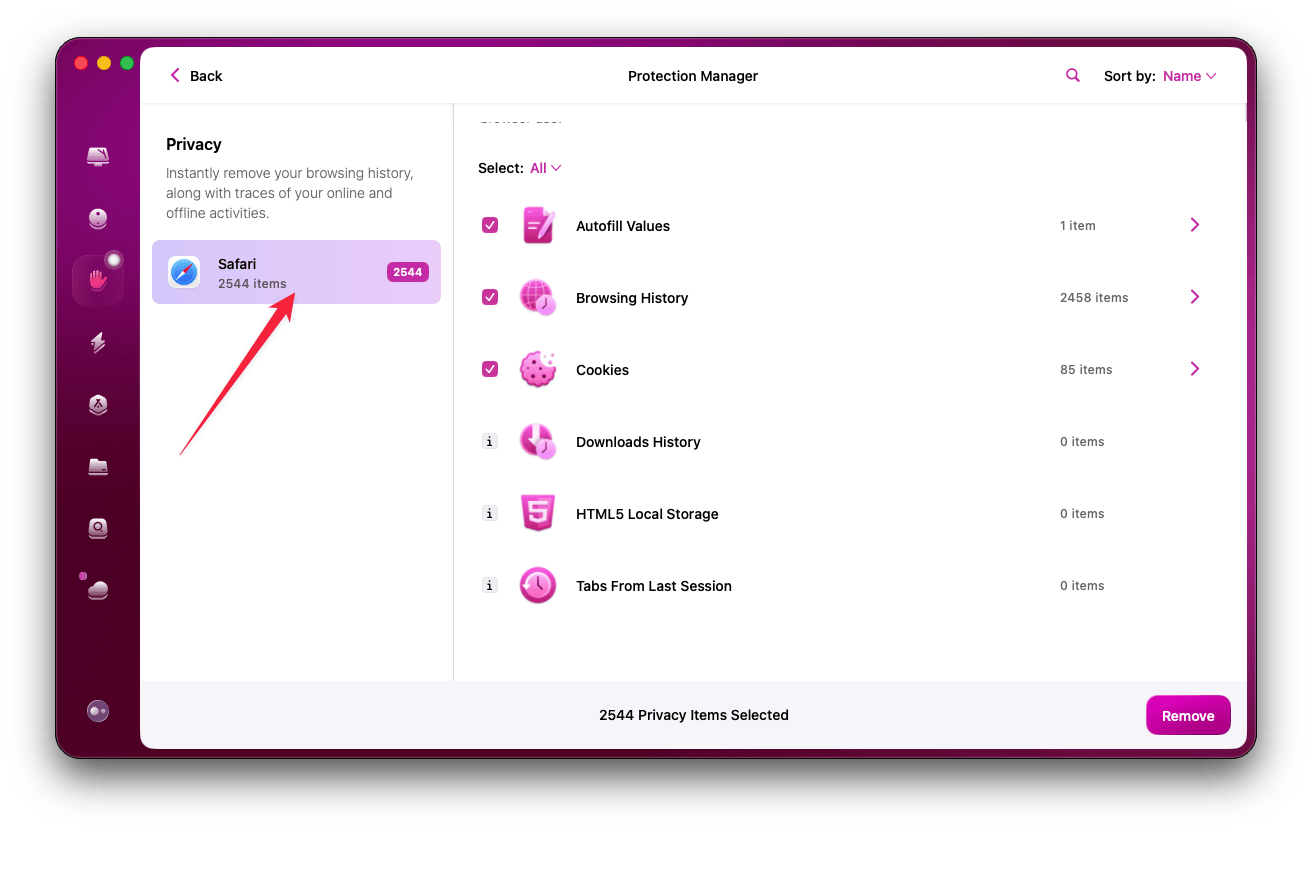
Tip: As you see, going incognito on your Mac isn't the only way to improve your online privacy. There are other things you can do, such as clearing your browsing and download history, deleting cache files, clearing cookies, and getting rid of stored autofill data. Doing all that manually for Safari, Chrome, and Firefox – if you use all three – is time-consuming and not much fun. But you don't have to do it manually.
CleanMyMac's Privacy module can do it all with just a few clicks. It can also clean up your Mac's saved Wi-Fi networks in case you want to reconnect to them in the future. It shows you which public Wi-Fi networks your Mac has saved and divides them into two groups: safe and unsafe. You can then select all the unsafe networks and delete them so your Mac won't automatically connect to them in the future.
How to fix Safari incognito mode not working
Technology is not perfect, so if you encounter a problem with enabling Safari Private Browsing Mode on iPhone, Mac, or iPad, follow these troubleshooting steps:
- Restart the Safari app. On iPhone and iPad, swipe up and hold to enter the multitasking view and swipe Safari out of its background task. Reopen Safari and try entering Safari Private Browsing Mode again. On Mac, right-click on Safari in the Dock and click on Quit.
- Restart your device. Giving your device a complete restart can help fix any weird software glitches. Go to the menu bar on Mac, click the Apple logo, and choose Restart. On the iPhone 6, 7, 8, or SE (2nd or 3rd generation), press the Power button, slide to power off your device, wait 15-20 seconds, and turn it back on. For new iPhones, press and hold the volume up button and the side button until the power-off slider appears.
Great Safari tips and tricks to knowTo be even more protected, check these out: ♦ How to delete your Safari reading list♦ uBlock Origin for Safari (2 alternatives I love) ♦ How to clear history on iPhone and iPad |
How to enable and disable Safari Private mode: everything you need to stay private
Now you know how to open an incognito tab in Safari. That's easy, and you can always do that when you want some privacy. However, while private mode in Safari offers certain privacy benefits, it is not a foolproof solution for securing your information online. It's important to understand its limitations and explore alternatives.
We recommend you get Setapp, from where you can install such handy apps as ClearVPN, AdLock, and CleanMyMac] to take your online privacy even further by disguising your location, blocking ads, and clearing your digital footprint in just one click.
Plus, with Setapp, you get many useful Mac, iOS, and web apps such as Quit All for force quitting apps, App Tamer for reducing CPU usage, TripMode for optimizing network activity, and more. The toolkit is available for a free seven-day trial.
Private searching vs private browsing: Is there a difference?
Private searching often refers to privacy-friendly search engines, such as DuckDuckGo. Private browsing, on the other hand, refers to modes within browsers that keep a user's browsing data, history, and web browsing activity more private and secure compared to normal web browsing.
The internet can be a dangerous place, and Safari private browsing helps ensure that you remain protected as you browse the web. With Safari incognito mode, your search and browsing history won’t be recorded in Safari alongside additional tracking protections. To take your online online security even further, you can use Setapp. Setapp has a catalog of powerful, private, and high-quality apps, including ClearVPN, AdLock, and CleanMyMac.
Unlike traditional apps, which require you to pay with a subscription, Setapp gives you access to 250+ curated apps for a single price. Whether it’s ClearVPN which disguises your location, or AdLock which removes ads from the web, Setapp has what you need to stay private and secure online.
FAQ
Can iPhone Private Browsing mode be tracked?
Yes, due to the nature of how the internet and web browsers work. The administrator of your Wi-Fi network, your internet service provider, and, on occasion, Apple can see information and data about your web browsing regardless of whether you're in incognito mode.
How do I go Incognito on Find My iPhone?
You cannot go incognito on the Find My iPhone app itself, as it's designed to track device locations and doesn't have a private browsing mode. However, if you want to browse privately while using Safari on your iPhone, you can enable Private Browsing (Apple's version of incognito mode) by opening Safari, tapping and holding the Tabs button at the bottom of the screen, then selecting "New Private Tab." This will prevent your browsing history from being saved, though it won't affect Find My iPhone's tracking capabilities.
Can Private Browsing be traced?
Apple, your internet service provider, and the Wi-Fi administrator may be able to see the IP addresses of the domains you visit; however, data on which pages you visited or interacted with remains private in Safari incognito mode.
Can someone see your private search history?
It all depends. While Safari itself doesn't save your browsing history in incognito mode, someone could identify the websites you visited through your computer. Your computer's DNS records could be looked at, revealing the domains you visited. Such information, however, can be erased with the help of CleanMyMac.
To optimize your Mac using CleanMyMac, simply follow these steps:
- Open the app and navigate to the Protection tab.
- Click Scan.
- After the scan is completed, check Safari (and other browsers if you like).
- Go into every browser and specify the exact information you'd like to get rid of
- Click Remove.


